RSS
 

Posts Tagged ‘Photography’

Restaurant Menu Food Photography Using Natural Light

22 Dec

There are many ways to approach food and drink photography, from big budget shoots with food stylists and complicated lighting setups, to low budget natural lighting setups. For a formal restaurant photo shoot, which setup would you choose? I’ve had successes doing both types of photo shoots, but in this particular example, I’ll show you super low budget ways to pull off professional, tasty-looking food photos appropriate for a menu.

restaurant photography tutorial natural lighting

Client Brief

Based in Seattle, this client is an American restaurant going in a new direction with the hiring of a new chef and his decision to revamp the menu into one with distinctive Southern and Creole flavor.  This client reached out in need of 10-20 menu photos for use in their press release announcing the rebranding efforts. I had photographed their interiors previously and knew that the multi-room restaurant and bar was vintage themed with diverse backgrounds, patterns, and lighting schemes throughout the restaurant. Based on the budgeted resources for this shoot, I decided against making it a big production with a food stylist and opted for a low budget approach.

Planned Setup

Initially, I planned a simple lighting setup using a Canon 580 EX-II Speedlite, a shoot-through umbrella, Pocket Wizards, and a compact Manfrotto 5001B Nano light stand. This is my favorite relatively compact and affordable lighting setup for everything from quick portraits to food and drink photography. However, I realized when I got onsite that I was missing a crucial piece of my setup: the flash and umbrella mounting adapter, meaning I had no way of connecting my flash and umbrella to the lighting stand. Oops…time to improvise!

Actual Setup

Since I had photographed the interiors of the venue before and knew that there were two areas that had copious natural lighting: the bar area near the front entrance with huge floor to ceiling windows, and a large room with glass panels for a ceiling. Luckily, it was a typical cloudy day in Seattle, so there was nice diffused natural light flowing through the ceiling, making these two areas the perfect spot for food and drink photography without any flash or external lighting.

In terms of gear, I shot all of these photos with a Canon 6D camera and a 24-70mm f/2.8 lens. I also used the 580 EXII Speedlite on occasion when I needed some fill light.

Composing and Shooting

I photograph a lot of restaurant interiors and as a result I’ve learned that there is a lot of thought and strategy that goes into the design of the space. As a result, I like to find distinct elements of the restaurant to fuse into the food photos that I create. This does two things: 1) it highlights unique features that a designer or architect spent a lot of time working on, and 2) incorporating aspects unique to the restaurant places the dishes in different atmospheres, thus creating more diverse imagery.

Photos at the Bar

Cocktail photography

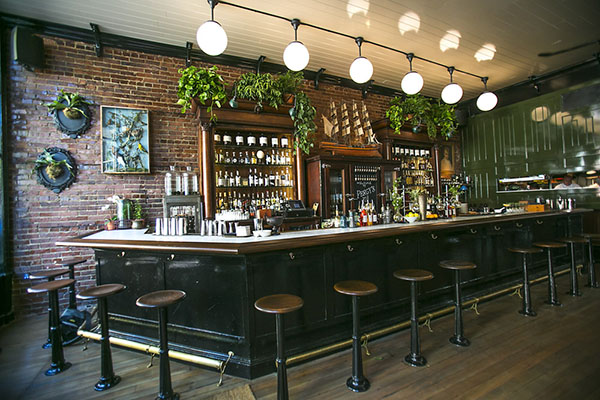
I started off with two appetizer and cocktail dishes, photographing them at the bar that was naturally lit by the huge floor to ceiling window. The white granite bar top was a nice contrast to the warm colors of the food and drinks. I shot this first image at f/4 to keep the main elements of the glass and bowl of nuts mostly in focus. The first few shots looked like they were missing some depth, so on a whim I moved the pairing in front of a bowl of citrus fruits placed at the bar. The color and placement of the fruits ended up being nice complimenting elements, contributing to the image below.

restaurant photography tutorial natural lighting

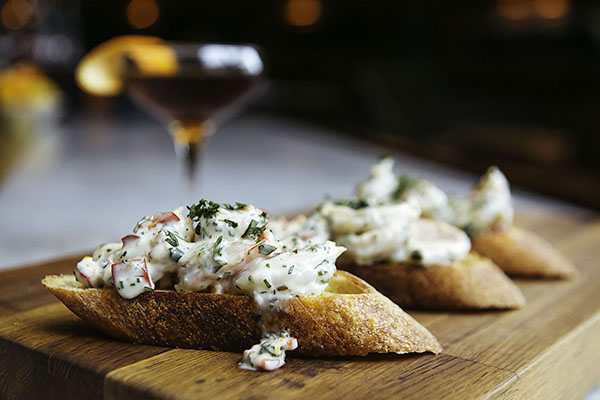
This second dish that was shot at the bar was presented on a super long wooden cutting board. It was actually too long for such a small appetizer, and I solved this problem by zooming in to the image and shooting at f/3.2 to keep the focus on the main element: the chunky shrimp remoulade topping the bread!

remoulade photography

Photos in the Dining Area

Percy's in Ballard, Seattle, WA

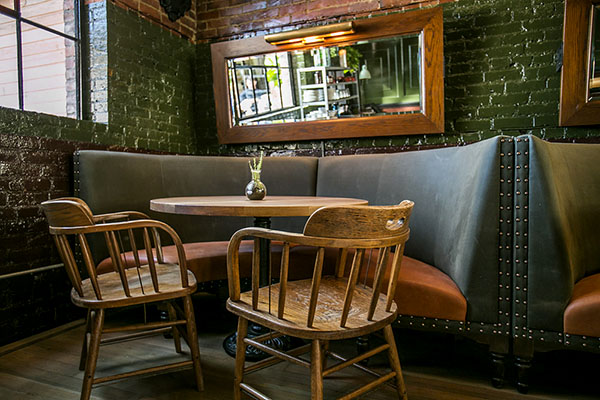
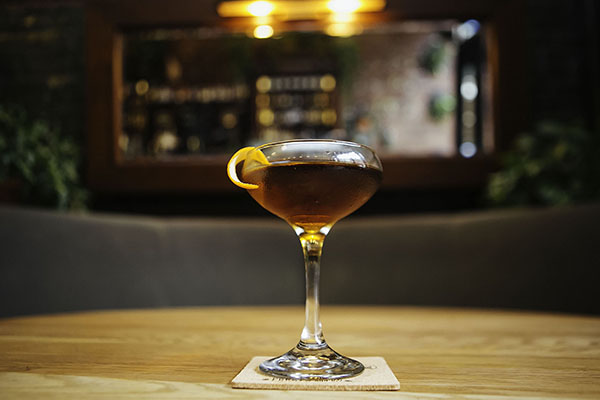
Another intriguing section of the restaurant that offered nice, albeit darker, lighting was the dining area. Featuring an illuminated mirror behind circular booth seats and a light colored wooden table, this was a great space to utilize for cocktail shots. This particular beverage was shot at f/2.8 to keep the glass and its elements in focus and give a nice blur of the mirror background.

FINAL-Cocktail

Photos on the Patio

FINAL-Percys 01

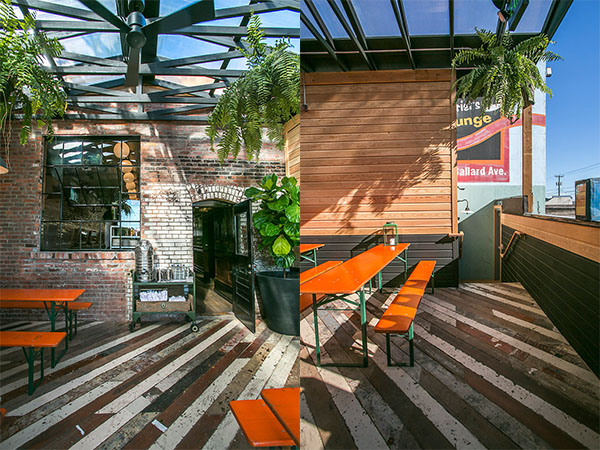
Finally, the bulk of the food and drink photos I shot were taken in the aforementioned covered patio area in the back. As you can see from the images below, the space has a huge glass ceiling, brick walls, long colored picnic tables, and a nicely textured wooden floor panels. All of these elements made for great textures and backgrounds for shooting each dish in a variety of settings.

Final-Kale

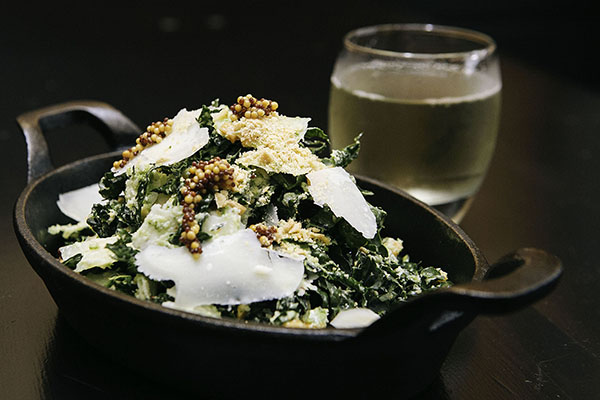
Salads can be a bit tricky to shoot because there can be so many competing elements to focus on. In the case of this kale salad, I chose an aperture of f/5.6 to make sure more parts of the salad were in focus other than the shredded cheese and mustard seeds.

Final-Chicken

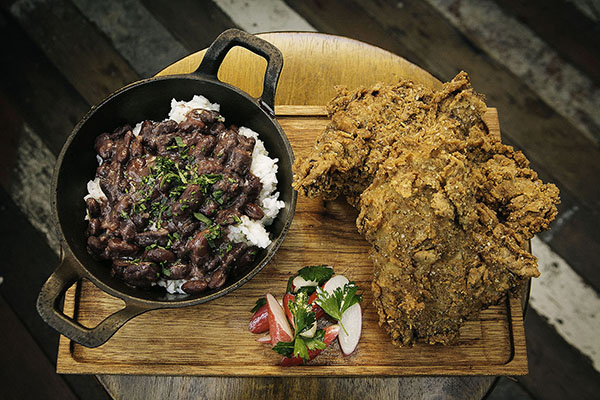
The winning dish of them all was this epic made-from-scratch fried chicken entree with rice and beans. Again, lots of different parts of this dish competing for attention, so I used an aperture of f/8 to make sure the most important parts were clearly in focus.

Wrap Up

Overall, this photo shoot of 10 dishes, each paired with cocktails took me about two hours to photograph. I had a bit of a challenge by forgetting one key piece of my lighting kit, but was able to improvise thanks to copious natural lighting and using my handy 580 EXII Speedlite. All photos received light post-processing treatment and were turned over the next day for the client.

What do you think? Is a lighting kit essential for professional food photography, or is natural lighting the way to go?

googletag.cmd.push(function() {
tablet_slots.push( googletag.defineSlot( “/1005424/_dPSv4_tab-all-article-bottom_(300×250)”, [300, 250], “pb-ad-78623” ).addService( googletag.pubads() ) ); } );

googletag.cmd.push(function() {
mobile_slots.push( googletag.defineSlot( “/1005424/_dPSv4_mob-all-article-bottom_(300×250)”, [300, 250], “pb-ad-78158” ).addService( googletag.pubads() ) ); } );

The post Restaurant Menu Food Photography Using Natural Light by Suzi Pratt appeared first on Digital Photography School.


Digital Photography School

 
Comments Off on Restaurant Menu Food Photography Using Natural Light

Posted in Photography


Starstruck: Adam Woodworth’s nighttime photography

21 Dec

Photographer Adam Woodworth has been taking photos in one way or another for as long as he can remember. Over the past few years one of his many areas of focus has been landscape astrophotography, specifically imagery that captures perfect alignments of the galactic center of our Milky Way Galaxy over haunting New England locations. Take a look at his work and read our Q&A. See gallery

Articles: Digital Photography Review (dpreview.com)

 
Comments Off on Starstruck: Adam Woodworth’s nighttime photography

Posted in Uncategorized


Weekly Photography Challenge – Festive Food

20 Dec

Well it’s that time of the year again. We spend days cooking and preparing for the big feast, then we stuff ourselves and retire to the sofa. Yup it’s holiday time.

Grant Frederiksen

By Grant Frederiksen

Whichever religion or faith you practice, and wherever you live – there is likely some sort of festivities going on this month. I’m spending the holidays in Nicaragua so it will be very different that back home in Canada with my family. I’m sure we’ll have a big meal but it may not be the traditional turkey with all the trimmings – it could look like grilled meat of some kind with rice and beans.

View this set of mouthwatering holiday food photos on dPS.

Your job this go around for the weekly photography challenge is to photograph your festive food.

We have lots of great articles here on dPS to help you out with food photography tips including:

  • 10 Tips to Improve Your Food Photography
  • Using Focus Creatively with Food Photography
  • 5 Tips to Seriously Improve Your Food Photography Techniques
  • 8 Steps to Create Mouth Watering Food Photography
  • 11 Quick Food Photography Tips to Make Mouth Watering Images

Need more examples?

FLORENTIN Marius

By FLORENTIN Marius

Randy OHC

By Randy OHC

FLORENTIN Marius

By FLORENTIN Marius

Guilherme Kardel

By Guilherme Kardel

Orangejon

By orangejon

Sabina\?????? Panayotova\??????????

By Sabina\?????? Panayotova\??????????

Share your festive food images here:

Simply upload your shot into the comment field (look for the little camera icon in the Disqus comments section) and they’ll get embedded for us all to see or if you’d prefer upload them to your favourite photo sharing site and leave the link to them. Show me your best images in this week’s challenge. Sometimes it takes a while for an image to appear so be patient and try not to post the same image twice.

googletag.cmd.push(function() {
tablet_slots.push( googletag.defineSlot( “/1005424/_dPSv4_tab-all-article-bottom_(300×250)”, [300, 250], “pb-ad-78623” ).addService( googletag.pubads() ) ); } );

googletag.cmd.push(function() {
mobile_slots.push( googletag.defineSlot( “/1005424/_dPSv4_mob-all-article-bottom_(300×250)”, [300, 250], “pb-ad-78158” ).addService( googletag.pubads() ) ); } );

The post Weekly Photography Challenge – Festive Food by Darlene Hildebrandt appeared first on Digital Photography School.


Digital Photography School

 
Comments Off on Weekly Photography Challenge – Festive Food

Posted in Photography


Top 10 Photography Resources of 2014 You Should Have

20 Dec

“Photographer” is one of the job titles many people would like to have today. Taking pictures is fun and exciting, especially when you earn money for that. However, to reach the point when photography brings your cash, you obviously need to learn. When it comes to choosing the best educational photography courses, videos and ebooks, it can be overwhelming with Continue Reading

The post Top 10 Photography Resources of 2014 You Should Have appeared first on Photodoto.


Photodoto

 
Comments Off on Top 10 Photography Resources of 2014 You Should Have

Posted in Photography


Get Access to Hundreds of Photography Courses for Just 55 Cents per Day

18 Dec

Todays deal is epic. It gives you access to the teaching of some of the world’s best photography educators for a whole year for just a few cents per day.

What better way to head into 2015!

In a nutshell today’s deal is that we’ll give you access to KelbyOne for a full year for $ 189 – $ 60 off the regular price.

This works out to a be a full year of photography training for just 55 cents per day.

KelbyOne was founded by best selling author, online personality and pro photographer Scott Kelby and it brings together 80 photography instructors who have put together hundreds of photography courses on all manner of topics related to photography.

Their instructors are amazing and include people like Scott Kelby himself, Trey Ratcliff, Corey Barker, Rick Sammon, Mia Mccormick, Joe McNally and many many more.

Screen Shot 2014 12 17 at 3 35 27 pm

And then there are the courses! They’re arranged by categories including photography, photoshop, lightroom, design, video, business and more and cover almost any topic you can think of that relate to photography.

I just had a look over their courses page and stopped counting when I got to 450! That’s over one course per day for the next year!

Screen Shot 2014 12 17 at 3 37 08 pm

Courses are targeted at photographers of all levels (there’s even a special Beginners track). They can be viewed on your computer or other devices and they even have a way to take them offline if you’re going to be on a train, plane or elsewhere without wifi.

Not only that but you’ll get the Photoshop User Magazine and some cool discounts on gear, plug-ins, hardware and more.

Lastly – as a special bonus for dPS readers they giving anyone who signs up today 200 creative presets and actions for Lightroom and Photoshop.

So if you’re hoping 2015 will be a year for you to improve your photography – this is a deal for you. But don’t wait too long – it only lasts 24 hours!

Sign up for KelbyOne here today and set yourself up for a great year of photographic learning.

googletag.cmd.push(function() {
tablet_slots.push( googletag.defineSlot( “/1005424/_dPSv4_tab-all-article-bottom_(300×250)”, [300, 250], “pb-ad-78623” ).addService( googletag.pubads() ) ); } );

googletag.cmd.push(function() {
mobile_slots.push( googletag.defineSlot( “/1005424/_dPSv4_mob-all-article-bottom_(300×250)”, [300, 250], “pb-ad-78158” ).addService( googletag.pubads() ) ); } );

The post Get Access to Hundreds of Photography Courses for Just 55 Cents per Day by Darren Rowse appeared first on Digital Photography School.


Digital Photography School

 
Comments Off on Get Access to Hundreds of Photography Courses for Just 55 Cents per Day

Posted in Photography


Why Manual Exposure is Better for Winter Wildlife Photography?

18 Dec

My winter wildlife photography tours and workshops put us in locations with lots of snow on the ground, which presents a new issue for most people – how to get good exposure without continuously messing around with exposure compensation.

You have to tell the camera to brighten your images by up to two stops of exposure to make whites white, because the meter in your camera wants everything to be a mid-tone gray.

MBP Cranes Exposure Example

For example, here is a photograph of one of our main subjects, the Japanese Red-Crowned Crane (above, left). It’s a predominantly white bird on a snowy white background. For a shot like this if I put the camera in Aperture Priority mode with the aperture set to f/8 for example, the camera would tell me that the shutter speed should be about 1/2000 of a second, which would result in a photo like the under-exposed dark version (above, right).

To avoid under-exposing images like this, one thing you can do is to dial-in +2 stops of exposure compensation in Aperture Priority mode. This would result in a new shutter speed of 1/500 of a second at the same aperture, and a beautifully white image.

There is one fundamental problem with this method though, and this is what most people fail to understand until they’ve missed enough shots for them to take my advice seriously. The moment your subject moves away from their white background, the exposure with +2 stops of exposure compensation is no longer valid.

To prove my point during a recent tour, I switched to Aperture Priority with auto-ISO and photographed this Whooper swan on the snow with +2 stops of exposure compensation dialed in. This gave me a perfectly white bird with perfectly white snow, as we’d expect.

MBP Hokkaido 20140221 0212

Then, just moments later, I photographed a flock of Whooper swans flying into the same location, this time with a darker background, which fooled the camera into increasing my exposure and the result was this totally over-exposed photograph.

MBP Hokkaido 20140221 0217

To avoid this, when photographing wildlife in the snow, the best course of action is to lock your exposure down (using Manual) so that when the opportunity to photograph something with a darker background arises, the exposure doesn’t shift, and the subject and the snow remains perfectly exposed, as in this example.

MBP Hokkaido 20140131 1261

The downside of this method is that you do have to continually check your exposure, especially on a day with patchy cloud for example. Because you’ve locked down your exposure totally, you are responsible for noticing when it gets a bit brighter or darker, and updating your camera settings.

In my experience though, although you sometimes have to tweak the exposure in post-processing, you still return home with many more usable shots, as opposed to the above example with the flock of supernova swans, which is a firm candidate for deletion.

Settings Your Exposure for White

To set my exposure I usually just fill the frame with snow, and adjust the settings in Manual mode, until I see the caret on the camera’s meter indicate that the exposure is now at +2 stops for overcast snow or +1 1/3 stops for brightly lit snow.

MBP Filling the Frame with Snow 640 f8 ISO1001

How you achieve your exposure depends on your subject. Personally, I usually start with the aperture, as that controls depth-of-field, and I want to select that based on how much of the subject or scene I want to be sharp, and how much of it I want to be nice blurry out of focus bokeh.

Then I select the shutter speed, based on my focal length and how much I expect my subject to move. The rule of thumb for the slowest shutter speed you can use without the risk of introducing camera shake, is to use the focal length as the denominator of the fraction in your shutter speed. For example if you are shooting with a 200mm lens, the slowest shutter speed you can safely shoot hand-held is 1/200 of a second.

Of course, image stabilization or vibration reduction in the lens can help you to go slower, but you also have to consider subject movement with wildlife. To freeze a large bird in flight you need at least 1/500 of a second, but ideally 1/1000 or higher if possible.

These are, of course, general guidelines. You may decide to slow down the shutter speed and pan with your subject to use the blur of the wing movement artistically as in this example, but that’s the subject for another article.

MBP Hokkaido 20130207 4320

Once I’ve decided the aperture and shutter speed based on the subject and any artistic decisions I might make, the last setting that I usually change as I lock in on my manual exposure is the ISO. Once the caret reaches +2 on the camera’s meter scale, I make a test shot, and check the histogram.

For a photograph of a field of snow, or a white bird on a white background, most of the data in the histogram should be almost touching the right shoulder of the histogram. This means the image data captured is almost pure white, as it should be. If the data is in the middle of the histogram, the whites will be gray. This is what the camera would do automatically without our help.

MBP White on White Histogram

Also remember to turn on your highlight alert or highlight warnings in your camera’s settings, commonly called “the blinkies”, as these will alert you to any areas of your image that you might be over-exposing. It’s okay to over-expose a few specular highlights, but try not to over-expose large areas of your image, especially on your main subject, or the detail in those areas will be lost, and cannot be recovered on a computer later.

One of the other nice things about photographing birds over snow is that the light from the snow reflects up onto the underside of the birds in flight, as in this example. This means that you really don’t have to worry about where the bird is once you have locked your exposure down in Manual mode.

MBP Hokkaido 20140221 6768

The subject can be on white background, a dark background, or a blue sky, and your exposure will be spot on, leaving you free to concentrate on focusing and composition, instead of frantically trying to adjust your exposure compensation as the action unfolds.

googletag.cmd.push(function() {
tablet_slots.push( googletag.defineSlot( “/1005424/_dPSv4_tab-all-article-bottom_(300×250)”, [300, 250], “pb-ad-78623” ).addService( googletag.pubads() ) ); } );

googletag.cmd.push(function() {
mobile_slots.push( googletag.defineSlot( “/1005424/_dPSv4_mob-all-article-bottom_(300×250)”, [300, 250], “pb-ad-78158” ).addService( googletag.pubads() ) ); } );

The post Why Manual Exposure is Better for Winter Wildlife Photography? by Martin Bailey appeared first on Digital Photography School.


Digital Photography School

 
Comments Off on Why Manual Exposure is Better for Winter Wildlife Photography?

Posted in Photography


Deal 5: Your Guide to Natural Light Photography for $7 (65% off)

17 Dec

On the 5th day of Christmas dPS gave to me… another amazing $ 7 eBook and bundle option!

Yesterday saw our servers pushed to their limit with a $ 7 USD eBook deal so today we’ve decided to roll our best selling eBooks of all time at that sweet price of… $ 7.

That eBook is…

Natural Light: Mastering a Photographer’s Most Powerful Tool by renowned travel photographer Mitchell Kanashkevich.

NewImage

Natural Light is one of the best guides on the market written specifically with beginner to intermediate photographers in mind. Written in easy to understand language, this eBook will certainly help you improve the quality of your photographs… using nature’s free gift to photographers – sunlight!

Today it is yours for just $ 7 – 65% off!

Bundle Mitchell’s 3 Ebooks for $ 19

Want more? Mitchell has written 3 great eBooks for dPS so today if you’d like to explore his full library you can pick up them all for just $ 19 USD.

Mitchell bundle

The bundle includes:

  1. Natural Light: Mastering a Photographers Most Powerful Tool
  2. Transcending Travel: a Guide to Captivating Travel Photography
  3. Captivating Color: A Guide to Dramatic Color Photography
  4. Mitchell’s eBooks are perfect for the beginner just starting out or a more intermediate photographer looking for a refresher. They are beautifully illustrated and full of great practical advice.

    As with all of our eBooks they come with a 60 day money back satisfaction guarantee.

    These 3 eBooks have a RRP of $ 60 but today they’re available for $ 19 (68% off).

    As with all our deals – this one lasts just 24 hours. Grab this one here today.

googletag.cmd.push(function() {
tablet_slots.push( googletag.defineSlot( “/1005424/_dPSv4_tab-all-article-bottom_(300×250)”, [300, 250], “pb-ad-78623” ).addService( googletag.pubads() ) ); } );

googletag.cmd.push(function() {
mobile_slots.push( googletag.defineSlot( “/1005424/_dPSv4_mob-all-article-bottom_(300×250)”, [300, 250], “pb-ad-78158” ).addService( googletag.pubads() ) ); } );

The post Deal 5: Your Guide to Natural Light Photography for $ 7 (65% off) by Darren Rowse appeared first on Digital Photography School.


Digital Photography School

 
Comments Off on Deal 5: Your Guide to Natural Light Photography for $7 (65% off)

Posted in Photography


Architectural Photography Using Layer Masking to Correct Contrast and White Balance

17 Dec
Dps 2

A challenging nighttime scene was overcome with multiple exposures and layer masking.

Blending indoors and outdoors in architectural photography can often create a compelling image. Unfortunately, however, it is often fraught with exposure and white balance issues. These issues are compounded at night, when artificial lights inside buildings coupled with the darkness of the night sky create an especially contrasty image with an unattractive colorcast created by the different light sources. Luckily, with multiple exposures and layer masking in Photoshop, you can create a photo that looks a lot like what you saw with your own eyes.

This method is a little different than HDR, which involves taking three or more photos at different exposures, then using automated software to combine them into one image that captures the range of light in the scene. Here, you’ll be taking three or more photos and blending them manually, since HDR software often creates unpleasant artifacts and odd color blending when used in the type of situations presented in this tutorial. You can always try HDR software first, and if the colors don’t seem to bleed, you can skip down to the later part of the tutorial for dealing with the colorcasts.

Dps 1

An image that required three exposures and had a color cast from the lamps.

Shoot three or more exposures on a tripod

You need to shoot as many photos as it takes to capture the dynamic range (the range from light to dark) in the scene. It is really important to shoot in RAW, to get as much mileage out of each photo as possible. A tripod is also necessary, since you’ll probably be taking these at night, and also because you won’t be using HDR software which aligns the images. You can use auto exposure bracketing to capture three images, but at night, exposures on the high end can often exceed 30 seconds, the longest shutter speed most cameras will let you shoot manually. It’s probably easiest to use manual mode, set your ISO to 100 or 200, stop down your aperture to f/7.1 or f/8 (if it’s really dark out, you can open it up wider), and then take a series of shots at increasingly slower shutter speeds until you’ve captured the range of light in the scene. If you need to go past 30 seconds, go into bulb mode (consult your camera’s manual for how to find it), and use a remote trigger release, holding the shutter open as long as you want. Don’t worry about white balance yet.

Dps 3

Processing one of the RAW files in Lightroom. Here you can see where just processing one RAW file wouldn’t be sufficient.

Process each exposure in Lightroom or Camera Raw, then open as layers in Photoshop

First, you are going to process the photos for exposure only, ignoring white balance. If you don’t have Lightroom, you can do this in Adobe Camera Raw. Since you have multiple exposures, you don’t need to go crazy trying to recover lost highlights (overblown bright spots) and shadows (dark parts that look black), but you want to recover them a little bit to give you more leverage later on in the process. There’s no magical formula for processing here. I usually apply lens profile correction, remove chromatic aberration, and do a little noise reduction before bringing down the highlights a little bit and bringing up the shadows and whites a little bit. Once you’re done processing each exposure, select them all, right click, and select “open as layers in Photoshop. Now you’ve got an image with three or more layers all ready to go, but we’re no quite ready to do the layer masking yet.

Dps 4

Go back and reprocess for white balance

White balance is a setting that keeps the whites in the image white, removing any colorcasts. Different light sources have different white balance settings though, so if you have a photo with two or more different light sources (such as the night sky and an artificial light), no matter how you adjust your settings, you’ll always have a color cast somewhere on your photo. What you’re going to do here is reprocess each photo so that you’ve corrected any colorcasts. If you’re lucky, you’ll have no more than two light sources in the photo. Unfortunately, though, there can often be more.

It’s important to note that you only have to correct for colorcasts that are in properly exposed parts of each photo. For instance, in one of your overexposed photos, don’t worry about the white balance for the overblown highlights. You’ll be discarding that part of the photo later. For one of your underexposed photos, don’t worry about correcting for the shadows, since you’ll also be discarding that. Start with your most properly exposed photo, and correct for any colorcast you see (for instance, the lights inside a building have a yellow cast).

All you have to do to correct the white balance is slide those two sliders (one goes from blue to yellow, and the other goes from green to magenta) until the part of the photo with the colorcast looks normal. When you’re done, open that photo in Photoshop, and make it a layer in the other image you have open. Do this by hitting Ctrl-A on Windows, or Command-A on a Mac to select the photo you just opened, then Ctrl-C or Command-C to copy it. Then click on the image with the three layers, and hit Ctrl-V or Command-V to paste it in as a layer. Repeat the processing until you have corrected all colorcasts in the photo. Then, move on to the other exposures, and correct any color casts there (remember, only the properly exposed parts need to be corrected).

Dps 5

Mask in one layer at a time

Once you’ve finally got every exposure and every colorcast accounted for as separate layers, you’re going to mask them in one by one. I start by making all but the bottom two layers invisible and masking in one layer at a time (by the way, the order of the layers does not matter, but having the most properly exposed image on the bottom will probably make things easier). Do this by clicking the little eye to the left of each layer except the bottom two. Then, with the layer one up from the bottom selected, click the layer mask icon (it’s a rectangle with a dot in the middle, found at the bottom of the layer panel). Make sure the paintbrush icon is selected as well (this can usually be found on the left hand side). You may need to adjust your brush size as you go through.

When painting with black on the layer mask, you will cover up the parts of the layer you don’t want appearing (the improperly exposed or color cast parts of the image are what you want to cover up). When you want to go back and reveal parts because you’ve made a mistake, paint with white on the layer mask. Click X on your keyboard to toggle back and forth between black and white.

When you’ve masked out all the parts of the layer you don’t want shown, select the layer on top of that and make it visible (click the space where the eye used to be). Then create another mask and start masking that layer. Keep revealing layers and masking them in until you’re done. In some cases, one part of the photo may be properly exposed in more than one image. In this case, keep the one that looks better to you. Once you’ve finished this process, save the photo as you would normally. If you think you might come back to this photo later and edit it, make sure to save a copy as a PSD.

Dps 6

Sometimes you get lucky, and the part of the image that’s colorcast has a very strong hue to it. If you have a colorcast that’s almost all one color, you can automate the masking process a bit for that layer. In the top pane, go to Select –> color range, then click somewhere in the colorcast. Look at the preview. You want the part of the image that’s your colorcast to be almost completely white, and the rest to look almost completely black. Adjust the fuzziness slider until this is the case, and then click ok. You actually want to select the inverse of that, so go to Select –> inverse. Now click the layer mask icon, and you’ll have a mask that hopefully masks out the colorcast. If it doesn’t look right, undo it and try it again with a different fuzziness setting. This is not a perfect fix. You will still need to do some fine-tuning, but it really helps move things along quicker.

Dps 7

A simple “select color range” layer mask got rid of most of the colorcast in this photo.

Conclusion

This is just one method of conquering the challenges brought on by nighttime architectural photography. As you start working with photos of this nature, you may find a different method that you prefer. Luckily, many photos only require some of the steps detailed in this tutorial. Sometimes you only need one exposure, but you need to process for colorcasts. Other times, the white balance is even, but you need to mask for exposure. It takes practice to master these intricate masking techniques, so don’t give up if you’re unhappy with your results at first. Start with simpler photos with fewer colorcasts and exposures needed before diving into a really complex one. In time you’ll be creating photos that look as natural as they appeared when you saw them in person.

Dps 8

A single exposure that required layer masking to correct colorcasts.

Have you got any tips for doing architectural photography or using layer masking? Please share in the comments below.

googletag.cmd.push(function() {
tablet_slots.push( googletag.defineSlot( “/1005424/_dPSv4_tab-all-article-bottom_(300×250)”, [300, 250], “pb-ad-78623” ).addService( googletag.pubads() ) ); } );

googletag.cmd.push(function() {
mobile_slots.push( googletag.defineSlot( “/1005424/_dPSv4_mob-all-article-bottom_(300×250)”, [300, 250], “pb-ad-78158” ).addService( googletag.pubads() ) ); } );

The post Architectural Photography Using Layer Masking to Correct Contrast and White Balance by Samantha Decker appeared first on Digital Photography School.


Digital Photography School

 
Comments Off on Architectural Photography Using Layer Masking to Correct Contrast and White Balance

Posted in Photography


The Ultimate Guide to Depth of Field in Photography

15 Dec

Depth of field basically means how much of your picture, from foreground to background is sharp. So there you have it, see you next week, bye, byeeeeee….Oh, are you still here? That wasn’t enough? Ok, so depth of field depends on several things, all centering arount the f stop of your camera, one of a triumvirate of things that allow Continue Reading

The post The Ultimate Guide to Depth of Field in Photography appeared first on Photodoto.


Photodoto

 
Comments Off on The Ultimate Guide to Depth of Field in Photography

Posted in Photography


2 B&W Photography eBooks Worth $30… Yours Today for $7

15 Dec

It is day 2 in our 12 Days of Christmas and if you like $ 7 eBooks (and the popularity of yesterdays deal says you do) you’re going to LOVE this one.

The Deal

It’s our very own Essential Guide to Black and White Photography for just $ 7

Blackandwhitephotographycover

It’s normally $ 20 so that’s a discount of 65%… but that’s not all. We’re going to throw in a bonus eBook ’10 Recipes for Amazing Black And White Photography’ which is worth $ 10!

This eBook from renowned photographer David Nightingale launched earlier in 2014 and got some fantastic reviews.

The Essential Guide to Black and White Photography will walk you through:

  • how to ‘see’ in black and white
  • the best gear to use
  • the special skills and setup needed to shoot
  • how to process your black and white photos to perfection
  • much much more

This eBook has it all covered and has helped thousands of dPS readers to improve their black and white photography.

Here’s the table of contents of the main guide:

NewImage

NewImageThe bonus guide (pictured right) shows you exactly how 10 black and white images were created – a fantastic companion to the main guide to show you how to put the theory into action!

Don’t Miss This Deal

Ready to take the quality of your black and white photography to a whole new level?

Grab this amazing deal in before our 24 offer expires here.

googletag.cmd.push(function() {
tablet_slots.push( googletag.defineSlot( “/1005424/_dPSv4_tab-all-article-bottom_(300×250)”, [300, 250], “pb-ad-78623” ).addService( googletag.pubads() ) ); } );

googletag.cmd.push(function() {
mobile_slots.push( googletag.defineSlot( “/1005424/_dPSv4_mob-all-article-bottom_(300×250)”, [300, 250], “pb-ad-78158” ).addService( googletag.pubads() ) ); } );

The post 2 B&W Photography eBooks Worth $ 30… Yours Today for $ 7 by Darren Rowse appeared first on Digital Photography School.


Digital Photography School

 
Comments Off on 2 B&W Photography eBooks Worth $30… Yours Today for $7

Posted in Photography