RSS
 

Posts Tagged ‘Photography’

How to Use Drones to do Stunning Aerial Photography

22 Dec

DPSLakeSheds

One of the most exciting developments in photography in the last year or two is the drone – high flying cameras that enable you to capture unique viewpoints of common subjects. Recently the cost of getting a camera into the air has dropped dramatically and if you decide to venture down this road I guarantee you won’t be disappointed. Apart from the amazing images you will capture, they are also tremendous fun!

DPSBeetWest

As with most modern technology there is a vast range of drones, or UAVs (unmanned aerial vehicles), on the market. Similar to camera equipment in general, how much you’re prepared to spend will determine the quality of camera on-board, and the flying characteristics of the drone itself. There are low-cost models that will take very basic images, up to the big boys toys that will happily lift your prized DSLR up into the heavens. You can even add your GoPro on to some units that will take advantage of camera gear you may already have. One company has a range of models that has a large percentage of the market – DJI. Their Phantom range of drones are the first choice for many, and though they do make some high end-models, the Phantom 3 series models are the most popular drone in the world, for good reason.

Getting Started

DPSSovHIll

One of the big advertising features of most drones these days is their ease of operation. “Fly Straight Out of the Box” is a common term you’ll see, and in fact it is also very true. Charge the battery, download the app to your smartphone, fire it up, and away you go.

However, it must be mentioned that as easy as these are to fly, common sense and care is a big part of aerial flying. It’s suggested you start with some limitations in place, easily set up on the smartphone app that runs the drone. This is usually along the lines of limiting the maximum height you can fly, and also how far away you can send the drone.

71yjfeMJWwL SL1500

Photo courtesy of DJI

Always start somewhere wide open, such as a local oval or park, and spend time getting a feel of the controls before you even think about pressing the shutter button. Always be aware of your location in relation to what’s around you. As these cameras usually have a wide angle lens (20mm equivalent) and it’s easy to mis-judge your positioning when in close proximity to objects such as trees and buildings, especially if viewing the smartphone screen is your prime.

Rules and Regulations

Most countries have rules to follow, and while they can’t all be mentioned here, usually they are along the lines of these:

  • Drone must always be in Line of Sight (LOS) – that basically means you should always be able to see it
  • Maximum Height 133 metres (400 feet)
  • Never fly over groups of people
  • Respect others privacy
  • No flying anywhere near airports and other no-fly zones as specified in each country

It’s suggested you check with your local air safety authorities for particular details in your area.

DPSBurrumbeet

A few months ago I was flying above my local railway station, looking for the perfect image at dusk, just as the lights came on that illuminate the tower every evening on this historic building. Happily flying for five minutes or so, I looked down to see two local policemen coming over to me. My first reaction in these circumstances is to gauge their reaction to drone flying, and if there are any concerns I bring the machine down immediately. Unfortunately drones have been getting some negative publicity in the press, certainly not helped by the person that crash landed one on the front lawn of the White House in Washington earlier in 2015. Luckily these two policemen were very interested in what I was doing. By showing them exactly on-screen what I was seeing, and explaining the whole procedure and the care I was taking in not flying directly above any people, they left with a very positive attitude.

I think it’s very important to fly with this attitude in mind. And one other thing about flying in public places….you will need to be prepared to become the centre of attention as people are generally quite intrigued by what you doing!

DPSRailStn

Its also tempting to think that aerial imaging is going to be a great new avenue for making some money from your photography. Once again this is another area where the rules vary from country to country, and you should look into the certification you may need in your area to undertake paid aerial work.

DPSWHeip

Amazing Technology

Todays drones have some amazing technology on board that has revolutionized aerial photography:

  • By connecting your smartphone to your handheld remote control unit, you can see on-screen exactly what the drone is viewing. This makes for perfect compositional adjustments.
  • Camera controls are extensive – auto or full manual control, RAW capture, even time-lapse
  • The drone will hover in the one spot with incredible stability, almost like an aerial tripod! You can take your hands off the controls and the drone will stay in that position.
  • Failsafe flight options. With an average 20 minutes flight time per battery charge, the drone can detect when your battery is getting low and will go into RTH mode (automatic return-to-home), ensuring the drone comes back to you! If for some reason the lightbridge connection between the remote control and the machine itself is lost (this can happen when flying behind buildings or trees), once again RTH is activated. Another great use for the RTH feature is when you have lost sight of the drone, which is quite easy to do once it gets some distance away from you, by pressing the RTH button your flying camera will happily return to you before you know it.

DPSGolden

Aerial Photography

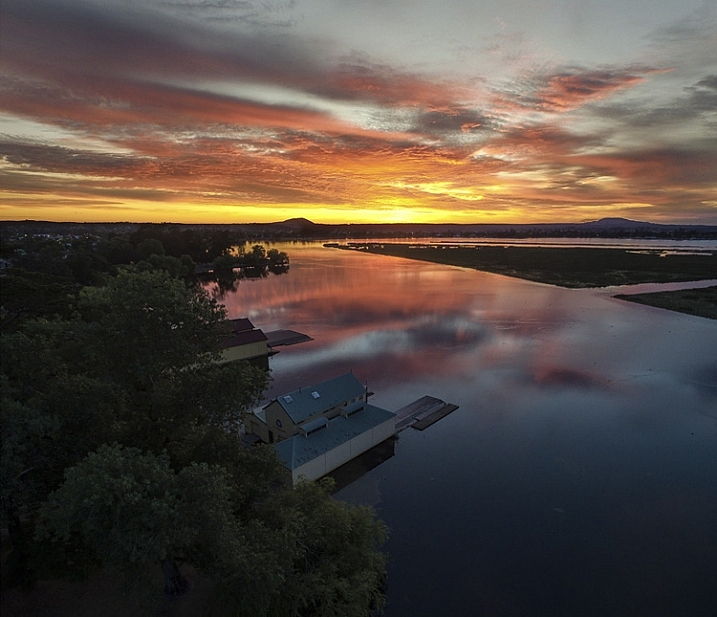
When you first start flying, it’s very exciting to get home, load your images, and marvel at the amazing scenes you have captured. In my first few weeks of flying, everything I took was thrilling. However, I quickly realized that aerial photography is no different to other forms of photography – it’s still all about the light! So rather than just heading out randomly, I once again started to chase the light and conditions, which has always been the strength of my landscape photography.

As a landscape photographer I am always aware of weather conditions and what they might offer. Now even more so, as a drone pilot you will have to also take into account the wind forecasts. Drones are not something you fly in high winds (unless you have to get that amazing once-in-a-lifetime scene in front of you!) and you will find yourself looking for calm weather more than any other condition.

DPSWindfarm

At present the in-built cameras on most drones are nowhere near the quality you are used to with your ground level camera. However, I have found the images I have been able to capture are surprisingly good. Though only 12mps, the fact that you can shoot a RAW file gives you more options to work with later on. The jpg files are also surprisingly good, especially if you have been flying in good light.

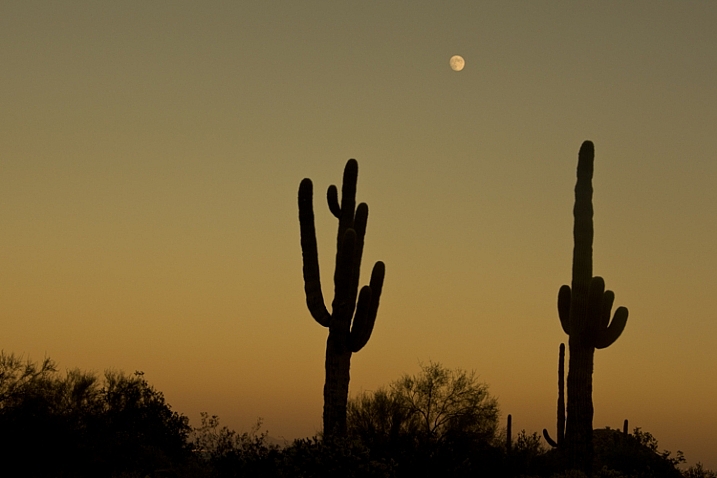
Even when shooting in low light the quality has been amazing for such a small camera unit, and the stability of the camera at 300 feet can be quite astonishing. You can also shoot panorama images just as you would when down at sea level, once again creating something very unique. And why not try a time-lapse from 300 feet?! I have had images printed up to A3 size (roughly 8×10) and you would be hard pressed to tell they were taken with a 12mp camera.

DPSGlengower

I should also mention that most drones these days shoot high quality video, even up to 4K, which produces stunning aerial footage. In fact, at 4K resolution it’s possible to take a high quality frame directly out of the video.
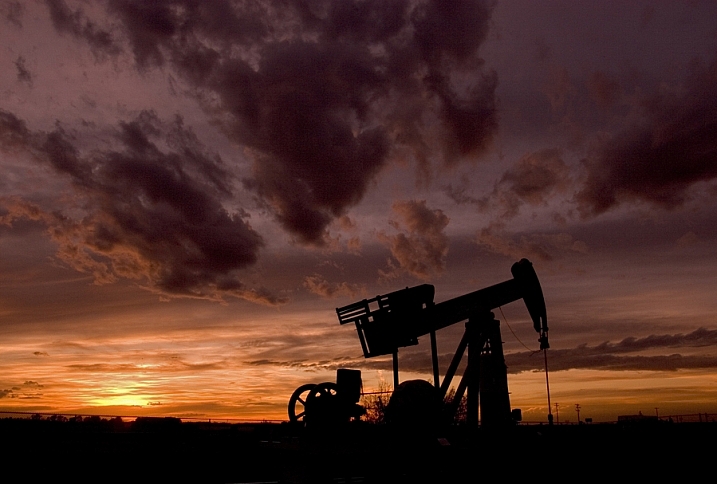
Unique Views

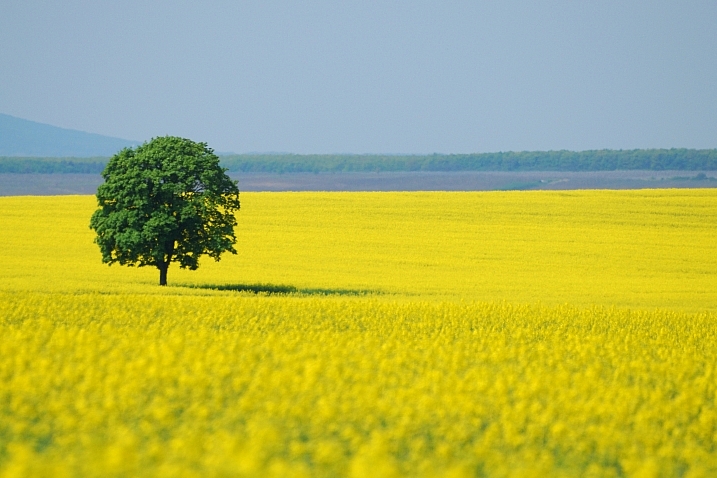
One thing you will love is the amazing patterns you find in the landscape when viewed from above. Drones allow you to get into the area that most planes and helicopters are not allowed to – below 300 feet. Google Maps makes a great starting point for finding locations that look worth visiting.

It certainly beats putting your camera on the end of a ten foot pole (yes, I did that a few years ago).

DPScanola

As a landscape photographer for a number of years now, I can’t recommend highly enough aerial imaging as a unique way to add that extra aspect to your photography. Everyone you share your images with will be amazed and intrigued, and don’t forget how much fun it is. If you ever tire of it, you may like to try herding sheep with your drone – yes, it’s been done!

Have you tried out any drone or aerial photography yourself? Please share your tips and images in the comments below.

googletag.cmd.push(function() {
tablet_slots.push( googletag.defineSlot( “/1005424/_dPSv4_tab-all-article-bottom_(300×250)”, [300, 250], “pb-ad-78623” ).addService( googletag.pubads() ) ); } );

googletag.cmd.push(function() {
mobile_slots.push( googletag.defineSlot( “/1005424/_dPSv4_mob-all-article-bottom_(300×250)”, [300, 250], “pb-ad-78158” ).addService( googletag.pubads() ) ); } );

The post How to Use Drones to do Stunning Aerial Photography by Andrew Thomas appeared first on Digital Photography School.


Digital Photography School

 
Comments Off on How to Use Drones to do Stunning Aerial Photography

Posted in Photography


PIX 2015: C.C. Chapman on using photography to drive change

20 Dec

Writer and photographer C.C. Chapman is a savvy businessman and creative thinker. He is the author of the bestsellers Content Rules and Amazing Things Will Happen, and his work has appeared on the pages of Rolling Stone and The Wall Street Journal. But when you meet C.C. you quickly realize that his real passion is helping other people use their creative abilities to drive positive change in the world. In this presentation from PIX 2015, C.C. shares his thoughts on how to use photography to influence social change, even if it’s only in your own backyard.

Articles: Digital Photography Review (dpreview.com)

 
Comments Off on PIX 2015: C.C. Chapman on using photography to drive change

Posted in Uncategorized


Today Only: 54% OFF Phil Steele’s Event Photography Course

19 Dec

It is day 5 in our 12 Deals of Christmas and today we’ve got a great deal that is perfect for anyone who gets asked to photograph events (birthday parties, concerts, school plays, reunions, weddings etc).

It’s 54% off Phil Steele’s Event Photography Course.

NewImage

We are all Event Photographers

While not all of us see ourselves as ‘event photographers’ most of us are. As Phil says:

“Let’s face it, we are ALL event photographers. Even if you have no desire to shoot professional events for money, if you are the person in your family with a decent camera, then you get called on to shoot the kid’s birthday party, your friend’s concert, the school play, or the family reunion.”

With 25 videos and over 5 hours of training this course teaches you the techniques used by professionals to get great photos—every time—even in the most difficult conditions.

See full details of what Phil covers in his training here.

For the next 24 hours you can pick this practical course for just $ 67 USD – that’s 54% off the normal price of $ 147.

Lastly – as with all our products during this 12 days of deals this one comes with a money back guarantee. If you buy it and are unsatisfied in any way Phil will gladly refund the purchase price with no questions asked.

Become a Great Event Photographer

We are all event photographers – this course will help you to become a great one!

Get full details of Phil Steele’s Event Photography Course.

googletag.cmd.push(function() {
tablet_slots.push( googletag.defineSlot( “/1005424/_dPSv4_tab-all-article-bottom_(300×250)”, [300, 250], “pb-ad-78623” ).addService( googletag.pubads() ) ); } );

googletag.cmd.push(function() {
mobile_slots.push( googletag.defineSlot( “/1005424/_dPSv4_mob-all-article-bottom_(300×250)”, [300, 250], “pb-ad-78158” ).addService( googletag.pubads() ) ); } );

The post Today Only: 54% OFF Phil Steele’s Event Photography Course by Darren Rowse appeared first on Digital Photography School.


Digital Photography School

 
Comments Off on Today Only: 54% OFF Phil Steele’s Event Photography Course

Posted in Photography


104 Brand NEW Hacking Photography Lightroom Presets for $10 [Save 94%]

19 Dec

Ever looked at a stunning image and wondered “why don’t mine look like that”?

Here’s the secret: great photo editing – achievable with this ALL-NEW collection of 104 Lightroom presets from Hacking Photography!

DPS Xmas Bundle Promo

Today’s deal in our 12 Deals of Christmas is deal #7 and it’s our biggest one yet with a whopping 94% off the normal retail price.

This preset collection from Mike Newton at Hacking Photography has never been released before – in fact Mike created it specifically for today’s deal!

Created specially for dPS, this deal includes:

  • The Evolution collection – 54 presets that turn up the volume of color adjustment and creativity (48 color, 6 black and white)
  • The Light Leaks collection – 25 special effects presets that emulate Holga-style, instant film, film burns and toy camera effects
  • The Custom Vignettes collection – 25 presets that add custom vignette styles around your images, in both black or white

Head over to Mike’s site to see lots of before and after examples of these presets

Screen Shot 2015 12 18 at 9 41 30 AM

And with an INCREDIBLE discount of 94% for today, it works out to be just over 10 cents per preset!
To be clear – these presets have never been available in any previous collections – they’re all brand new for you to grab today – but only at this price for 24 hours only!

FAQ: These presets are for use in Lightroom and work on Lightroom 4, Lightroom 5, the standalone Lightroom 6 version (non Creative Cloud), and the Lightroom Creative Cloud version. They come with step by step instructions on how to install them.

googletag.cmd.push(function() {
tablet_slots.push( googletag.defineSlot( “/1005424/_dPSv4_tab-all-article-bottom_(300×250)”, [300, 250], “pb-ad-78623” ).addService( googletag.pubads() ) ); } );

googletag.cmd.push(function() {
mobile_slots.push( googletag.defineSlot( “/1005424/_dPSv4_mob-all-article-bottom_(300×250)”, [300, 250], “pb-ad-78158” ).addService( googletag.pubads() ) ); } );

The post 104 Brand NEW Hacking Photography Lightroom Presets for $ 10 [Save 94%] by Darren Rowse appeared first on Digital Photography School.


Digital Photography School

 
Comments Off on 104 Brand NEW Hacking Photography Lightroom Presets for $10 [Save 94%]

Posted in Photography


Weekly Photography Challenge – Holiday Lights

19 Dec
Tracy Sigler

By Tracy Sigler

Photography of lights at night can be fun. There are many things you do and techniques to enhance photos of lights:

  • Shoot at an aperture of f/11 or smaller to make star points on the light sources
  • Use long exposures to shoot light trails
  • Use a zoom technique to create a unique effect
  • Or just shoot them straight up at night

Weekly Photography Challenge – Holiday Lights

Your job this week is to photograph some lights. If there are no decorations near where you live try some car trails, or street lights. Just try some shooting in the dark, or a new technique you haven’t tried before.

Mike Schaffner

By Mike Schaffner

Chris

By Chris

Powershotpix

By powershotpix

Share your images below:

Simply upload your shot into the comment field (look for the little camera icon in the Disqus comments section) and they’ll get embedded for us all to see or if you’d prefer upload them to your favourite photo sharing site and leave the link to them. Show me your best images in this week’s challenge. Sometimes it takes a while for an image to appear so be patient and try not to post the same image twice.

DAVID MELCHOR DIAZ

By DAVID MELCHOR DIAZ

Counse

By Counse

Olivier Noirhomme

By Olivier Noirhomme

Jeff Krause

By Jeff Krause

Johan Hansson

By Johan Hansson

googletag.cmd.push(function() {
tablet_slots.push( googletag.defineSlot( “/1005424/_dPSv4_tab-all-article-bottom_(300×250)”, [300, 250], “pb-ad-78623” ).addService( googletag.pubads() ) ); } );

googletag.cmd.push(function() {
mobile_slots.push( googletag.defineSlot( “/1005424/_dPSv4_mob-all-article-bottom_(300×250)”, [300, 250], “pb-ad-78158” ).addService( googletag.pubads() ) ); } );

The post Weekly Photography Challenge – Holiday Lights by Darlene Hildebrandt appeared first on Digital Photography School.


Digital Photography School

 
Comments Off on Weekly Photography Challenge – Holiday Lights

Posted in Photography


6 Tips for Capturing Dramatic Skies in your Landscape Photography

17 Dec

Don’t let the land in landscape photography fool you–a great landscape photo relies just as much on the sky. Boring gray skies make for boring landscape photos. But capturing a dramatic sky in camera is trickier than it seems. With the sky lighter than the land, the camera will typically overexpose the sky, turning a brilliant blue into a vague and unexciting gray.

But, with a little fine tuning, it is possible to capture a sky that is the cherry-on-top of a great scene on land. Here are six tips for capturing more dramatic skies in your landscape photography.

Desolation Wildernes Sunset Jkatzphoto

Photo Courtesy Justin Katz Photography.

1 – Time it right

Landscape photography may not require the split second timing that’s necessary for capturing a toddler’s smile, or a wide receiver’s catch, but timing is still a big part of the picture. The sky that’s gray one day, could be bright blue the next. When planning out a landscape photo, consider how the timing will impact the sky.

Watch for weather patterns that add could add interest to a shot, like a storm brewing just on the horizon. Weather plays a big role in the overall mood of the image–if you’re hoping to capture a dark and gloomy shot, head out when the sky is stormy. On the opposite end, if you’re hoping to capture a more relaxed or happy feeling, look for blue skies dotted with clouds.

Yosemite Tunnel View Jkatzphoto

Photo Courtesy Justin Katz Photography.

The time of day matters too. While the middle of the day will produce the most shadows on the land, the sky tends to be the bluest then. Just after sunset and just before sunrise is often a good time to capture wispy clouds and a warmer tint of light. Of course, sunrise and sunset makes for a dramatic sky as well.

2 – Try the wrong white balance

Photography rules are sometimes meant to be broken–sometimes, using the wrong white balance setting creates a more dramatic sky. This is especially true when shooting towards the beginning or end of the day–using a different preset will adjust the color in the sky. Auto, cloudy and shade presets will get you an orange-ish sunset with a light blue sky, with a slight variation between the settings. A florescent setting, on the other hand, will typically turn an orange sunset purple, with a brilliant blue sky. Tungsten offers a similar effect, but with even deeper colors.

Whitebalancepresets

Using Kelvin temperatures to adjust your white balance results in an even greater control over the colors in the sky. Around 5500K will usually capture a sunny sky with an accurate white balance–that is, where things that are white are still white in the picture, or neutral tones. A higher temperature, for example 6500K, will give the land an orange glow but also enhance the colors in a sunset. A cooler temperature, on the other hand (say 3000), will play up the blues and purples. By using the Kelvin scale, you have more options for picking a white balance setting that best captures those colors.

White Balance 16,000 K

Photo © Hillary Grigonis – White Balance edited to 160,000 K in post-processing to add orange

While it’s always best to get the shot right in camera, shooting in RAW allows you even more flexibility when it comes to adjusting the colors in the sky (and the rest of the image, for that matter). If you perhaps overdid it by making the shot too warm or too cool, you can easily adjust it to find the color temperature that fits the image the best. If you have a landscape photo that you already shot in RAW, open it and try different white balance presets, or the temperature slider, to see first hand how shooting with a different white balance would have impacted the shot.

3 – Compose for the sky

When the sky is more dramatic than the land, why not use that when determining your composition? Pay attention to where you place the horizon when you are composing your shot. Using the rule of thirds to imagine the image is dived into threes, place the horizon on one of those horizontal lines. If you are shooting a photo with an average looking sky, try placing the horizon on the upper third of the image, so more of the land is included in the photo. But if the sky is really dramatic, take advantage of that and include more of it in the frame by placing the horizon on the lower third.

Darlene Hildebrandt

By Darlene Hildebrandt – The sky is dramatic so the image was composed to show less ground and more sky by placing the horizon toward the bottom.

Ádám Tomkó

By Ádám Tomkó – as the sky is less dramatic, the horizon placed higher helps minimize the sky.


4 – Use a filter

There are two filters every landscape photographer should have in their camera bag in order to capture more dramatic skies. The first is a graduated neutral density filter. A regular neutral density filter is like putting sunglasses over your lens–it limits the light coming in for bright scenes or long exposures. But a graduated neutral density filter places that darkening effect only on a portion of the image. By placing the dark portion of the filter over the sky, you can properly expose the entire scene. Without the filter, the sky will either be overexposed and bland, or the land will be underexposed and dark. With the filter, you can achieve an exposure that works for both in one shot. The only downside is that graduated neutral density filters don’t work as well with an uneven horizon, like shooting a cityscape. Graduated neutral density filters come in both circular and square formats, but the square is often preferred because you can then place the horizon anywhere in the frame.

A graduated neutral density filter doesn’t work in every scenario–like a very uneven horizon, for example. A polarizing filter doesn’t have as much of an effect on the sky, but it can still be used with uneven horizons. Polarizing filters work by adjusting the reflected light rays coming through your camera lens. Since the sky is blue because of these reflecting rays, turning the front of the polarizing filter will adjust the intensity of the blues in the sky. Since it just affects reflected light rays, it can still be used when mountains or buildings make the horizon uneven. Polarizing filters are also great for enhancing reflections off water or other shiny surfaces too.

Lake Tahoe Sunset Nevada Jkatzphoto

Photo Courtesy Justin Katz Photography.

Experiment with motion blur and long exposures

Long exposures aren’t just for photographing waterfalls. If you use a long enough shutter speed, the clouds will blur too, creating a sky of wispy clouds and a slight feeling of motion. To capture motion blur in the clouds, you’ll need to use a long shutter speed. The best settings will depend a bit on the weather and how much motion blur you’d like, but you can try starting with a two minute exposure and adjust up or down from there.

Kris Williams

By Kris Williams (Exposure info: ISO 200, f/22 for 75 seconds)

If you are shooting during the day, you may not be able to balance out a two minute exposure with a narrow enough aperture or low enough ISO, ending up with a photo that’s way too bright. So how do photographers capture motion blur in the clouds when the photo obviously wasn’t taken at dusk or dawn? A neutral density filter helps block out some of that light so you can use a long exposure during the day (that’s the same thing as the graduated neutral density filter from the last tip, only the entire filter is dark instead of just half).

Image used with permission of Matt Kloskowski

Image used with permission of Matt Kloskowski (10 second exposure)


Use the Camera RAW graduated filter tool

While it’s always best to get the shot right in-camera, there are a few editing tools that can improve the sky in your landscape photos. One of those tools is the graduated filter inside Adobe Camera RAW (works the same in Photoshop and Lightroom). Using the tool, you can click over the sky on the image. Like an actual graduated filter, the effect will only cover that portion of the image and gradually fade away, making it possible to create natural looking edits.

The graduated filter tool can be used to adjust the exposure, creating an effect much like using the actual filter. But, the Camera RAW tool can also adjust brightness, contrast, saturation, clarity, sharpness and color. That opens up a lot of possibilities for applying edits just to the sky for more drama that sometimes can’t be done in-camera.

Original imag

Original image

Graduated filter added in post-processing stage

Graduated filter added in post-processing stage

The sky can make or break a landscape photo. From timing and composition to filters, when you consider the sky as you shoot, you’ll end up with more dramatic, frame-worthy shots.

Do you have any other tips for creating dramatic skies in landscape photography?

googletag.cmd.push(function() {
tablet_slots.push( googletag.defineSlot( “/1005424/_dPSv4_tab-all-article-bottom_(300×250)”, [300, 250], “pb-ad-78623” ).addService( googletag.pubads() ) ); } );

googletag.cmd.push(function() {
mobile_slots.push( googletag.defineSlot( “/1005424/_dPSv4_mob-all-article-bottom_(300×250)”, [300, 250], “pb-ad-78158” ).addService( googletag.pubads() ) ); } );

The post 6 Tips for Capturing Dramatic Skies in your Landscape Photography by Hillary Grigonis appeared first on Digital Photography School.


Digital Photography School

 
Comments Off on 6 Tips for Capturing Dramatic Skies in your Landscape Photography

Posted in Photography


How to Make DIY Reflectors for Tabletop Photography

15 Dec

The use of reflectors in photography is just a way of taking advantage of the existent light, and bounce it to different places in your image. This can be done with virtually any surface that reflects light, like a wall, a mirror, cardboard, styrofoam, aluminum foil, etc.

Dedicated photography reflectors come in many different colors, shapes and sizes. Silver, gold, white, and sometimes mixes of these three colors commonly know as zebra reflectors are the most common colors. There are also 5-in-1 reflectors that include a black surface to absorb light, and a translucent surface to soften light.

What shape?

The shape of the reflector depends on the subject you are trying to photograph. Usually collapsible round reflectors are the most used because they are easier to handle on location, and also easier to fold, but triangular and rectangular reflectors are very popular too.

01

The size of the reflector depends on the area you are trying to illuminate, and when it comes to small subjects like tabletop photography, things get tricky because standard reflectors are usually too big to produce small spots of light. In this article, I will guide you through the steps of building your own customized small reflectors for tabletop photography like the ones above.

Materials

Even though you can use simple paper sheets with some kind of object as a stand to hold it in place, this simple folding technique will for sure give you more control on the way you place your reflectors.

To start you will need some metallic paper sheets. The ones I’m using here can be found in office supply or craft stores, and exist in various sizes and colors. I bought 50×70 centimeters sheets, that are about 20×28 inches, and that allowed me to make a nice set of reflectors of different sizes and shapes.

A useful feature of this type of paper is that the back side is white, so you can use the metallic side or just flip to the white side to have different types of reflections. Beside the obvious silver and gold, you can also buy metallic textured papers for special effects of light reflection.

02

Cutting to size

Now it’s time to cut the paper to size. This depends on the reflector size you want to create; in this case I’m making a 8x13cm (3×5 inch) reflector.

03

Now mark the lines with a ballpoint pen and fold the paper on those lines. You will end up with something like this.

04

To keep the overlapping folds on the back together, I used small magnets. You can use tape, velcro or even re-usable adhesive, but magnets give you more choices of repositioning the angle of the reflector when you are looking for the right spot.

05

Magnets are also very useful if you use a gooseneck or a magic arm to hold the reflector instead of placing it on the table.

06

Positioning the reflectors

Now that we built some nice reflectors it’s time to try them out.

I have used some high end lighting equipment along my career as a professional photographer, but I must say that it always amazes me what is possible to do with the light of a window or a tabletop lamp and a couple of reflectors. The following image is an example.

07

Here is how it was made:

08

Start with Tabletop tungsten lamp with a diffuser as a back light.

09

Now the same tabletop tungsten lamp with a diffuser, plus a reflector on the left side.

10

Now AND another reflector on the right side.

So, there it is, a simple and highly effective setup that is guaranteed to give more control over the way you light your images for tabletop photography.

Give it a try!

googletag.cmd.push(function() {
tablet_slots.push( googletag.defineSlot( “/1005424/_dPSv4_tab-all-article-bottom_(300×250)”, [300, 250], “pb-ad-78623” ).addService( googletag.pubads() ) ); } );

googletag.cmd.push(function() {
mobile_slots.push( googletag.defineSlot( “/1005424/_dPSv4_mob-all-article-bottom_(300×250)”, [300, 250], “pb-ad-78158” ).addService( googletag.pubads() ) ); } );

The post How to Make DIY Reflectors for Tabletop Photography by Ivo Guimaraes appeared first on Digital Photography School.


Digital Photography School

 
Comments Off on How to Make DIY Reflectors for Tabletop Photography

Posted in Photography


13 Tips for Doing Action Photography in Bad Light

15 Dec

Elizabeth-Bars

Sometimes I feel cursed. Like any parent I want to take pictures of my kids doing their activities. However, I have a daughter who is a gymnast. For a photographer, that is a toxic combination of very fast action with generally poor light. But then it gets worse. My other daughter is very involved with her school’s theatre program. That means I’m trying to take pictures of her acting, singing, and dancing in the worst light imaginable.

As a result, I spend a lot of my time trying to photograph action in bad lighting. Having done so for a while now, I have a few tips to pass along, so hopefully this will be easier for you next time you find yourself in a similar a situation – shooting action photography in bad or low light conditions.

#1. Use Manual Mode

Before you even think about shooting, make sure your camera is set up for success. Let’s start with the shooting mode. No matter what mode you normally use, in this context you are going to need a large degree of control over your camera’s settings. Manual mode gives you complete control, so it is generally a good choice. If you are not comfortable using Manual, or if you face changing light conditions, use Aperture Priority.

Hannah1

Shutter speed: 1/320; Aperture: f/2.8; ISO 3200.

You will be using very specific exposure settings that the camera probably wouldn’t choose on its own. We will get to those settings in a moment, but using Manual (or Aperture Priority) will allow you to use them.

#2. Use Fast Glass

Next, you’ll need to decide which lens to use. Use your longest and fastest lens (fast glass) here. The low light environment means that you will want a lens with a wide aperture, that lets in a lot of light. The fact that your subject is likely to be rather far away from you means that you will also need a longer focal length. I personally use a 70-200mm f/2.8 and it works great. I could see even using a longer lens than that.

You may be inclined to use a teleconverter to get some extra reach. If you aren’t familiar with teleconverters, they are extensions that fit between your camera and lens, which increase the magnification of the lens, usually by 1.4 or 2 times. In other contexts, they work great – in a low light environment, however, they don’t. A 1.4x teleconverter costs you 1 stop of light and a 2x teleconverter costs you 2 stops of light. If you start with an f/4 lens, it is now an f/8 lens. That won’t work here. There just isn’t enough light. If you need the extra reach, you are better off taking the picture without it and then cropping it later.

Pub-music

Sometimes a slower shutter speed adds a sense of movement. Shutter speed: 1/10; Aperture: f/4; ISO: 6400.

#3. Shoot Wide Open

Now it is time to prepare the shot. The first exposure setting to make is the aperture. Deciding which aperture to use in this context is easy. Put the aperture at its widest setting, which is the smallest f-number. Doing so lets in the most light. The downside is that you will have a very shallow depth of field. However, in this context that should not matter. You will only want your subject in focus and having some background blur is just fine (sometimes even preferable).

#4. Set a Fast Shutter Speed

Next you will set your shutter speed. The trick here is to make sure you are using a fast enough one. If your subject is not moving, then your minimum shutter speed will be a function of your focal length. The Reciprocal Rule states that your minimum shutter speed for a sharp picture should be the inverse of your focal length. So if you are shooting at 100mm your shutter speed should be 1/100 of a second or faster.

When your subject is moving, things change a bit and you will need to use an even faster shutter speed. I find that 1/200th of a second is a minimum for a moving subject if you want to avoid any blur. Start with that setting, and increase it if you have enough light. Try hard to avoid using a slower shutter speed unless you are trying to add a slight blur to your subject, to show a sense of movement. Otherwise, even if you don’t see any blur when you look at your pictures in the LCD, it might still be there and you will be disappointed when you get back to your computer to find you have a card full of blurry pictures.

Elizabeth-Floor

In this picture, I was able to get away with a shutter speed of only 1/160th of a second because my subject wasn’t moving. . . (Shutter speed: 1/160; Aperture: f/2.8; ISO: 2000)

#5. Set the ISO (High)

The final exposure setting to make is ISO. Since you have already set your aperture and shutter speed, the ISO just is what it is. Set the ISO to whatever level is necessary to achieve a proper exposure.

Don’t be alarmed if you need to use a very high ISO to get a proper exposure. I routinely use ISO 1600 or 3200, and sometimes I even need to put it to ISO 6400. These are ISOs I would never even think about using in most other situations, but they are often necessary here.

. . . but in this photo where my subject was moving, 1/160th of a second wasn't quite fast enough (Shutter speed: 1/160; Aperture: f/2.8; ISO 3200)

. . . but in this photo where my subject was moving, 1/160th of a second wasn’t quite fast enough. Arguably the blur in the legs implies movement, but it isn’t what I was trying to do (Shutter speed: 1/160; Aperture: f/2.8; ISO 3200).

#6 Test Your Exposure Settings Before the Action Begins

Test your exposure settings before the action starts. Since you are indoors, the light is often unchanging. In that case you can tweak the exposure settings and then more or less forget about them while you concentrate on the action. Where there is changing light, you will need to revisit the exposure settings often. In any case, start by making sure they are right, and do a test.

#7. Zoom In

Now let’s concentrate on the taking pictures part. In composing the picture, the first rule is to fill the frame. Zoom in on your subject. Don’t leave a lot of background. The important part of your picture is your subject, and they should dominate the picture.

#8. Wait for Peak Action

(Shutter speed 1/250th of a second; Aperture f/2.8; ISO 6400).

(Shutter speed 1/250th of a second; Aperture f/2.8; ISO 6400).

You may be inclined to machine gun your subject during the action. I know that there are many photographers who do that with great success, but I find it rarely works for me. Instead, anticipate moments of peak of action and prepare for them. When the peak action arrives take 2 – 4 shots very quickly (make sure your camera is in continuous shooting mode) and then recompose. When something else of interest happens, take 2 – 4 more shots, and so on.

Try to anticipate those moments of peak action. When you do so, and you shoot in a quick burst, you are more likely to get the best shots.

#9. Don’t Overlook Breaks in the Action

It may seem odd, but breaks in the action are often great times to shoot. By a break in the action, I mean two things.

The first is a momentary pause during the event. For example, in gymnastics after a difficult move there is typically a momentary pose. The same holds true in singing and dancing, as they hold a pose after finishing a part of a routine. The pose often makes a great shot, plus they aren’t moving so you won’t have as big of a problem with blur.

A break in the action will sometimes provide great shots while allowing you to use a slower shutter speed (Shutter speed: 1/50th of a second; Aperture f/2.8; ISO 3200).

A break in the action will sometimes provide great shots while allowing you to use a slower shutter speed (Shutter speed: 1/50th of a second; Aperture f/2.8; ISO 3200).

The second break in the action I am talking about is an actual break, like the end of a period in sports. There are often warm-up drills going on at that time that lend themselves to great shots. Plus you are typically allowed a bit more latitude in terms of your own movements, and you don’t have to worry about getting in anyone’s way. The best part is that no one will know whether you took the shot during a drill or the real game/match/meet. In fact, after a year or two, you probably won’t remember either!

#10. Nail the Focus

Because you are shooting with your aperture wide open, you will have a very shallow depth of field. That means the focus will be unforgiving and if you miss it there is no leeway.

So what should you focus on? Well, the subject, of course. If your subject is a person, then always focus on the eyes. If the eyes are on different planes, focus on the nearest eye.

This is an area where it pays to be comfortable with your camera’s autofocus modes. Your camera will have a mode designed to focus on stationary points (Canon calls this One-Shot and Nikon and Sony call it AF-S). Your camera will have another autofocus mode designed to track moving subjects, which Canon calls AI Servo and Nikon and Sony call AF-C. In the case of a moving subject, this mode will continuously track your initial focus point and readjust as it moves. Most photographers use this mode in the case of a subject that is moving. I personally almost always use the stationary autofocus, but use whichever one you are comfortable with.

Hannah2

Shutter speed: 1/640; Aperture: f/2.8; ISO 3200.

Another decision you should make to help with your focusing is whether to use back button focus. Normally, your camera focuses when you press your shutter button half way down. You can, however, set your camera to focus when you press a button on the back of the camera instead. I prefer this method because the focus will not automatically reset with each picture, Either way is fine, but back button focus gives you slightly more control over your camera’s focus so you might want to give it a try.

#11. Chimp!

That’s right, I want you to chimp. This refers to the act of looking at your photos on the camera’s LCD screen. Some photographers look down on this practice and referred to it as chimping (supposedly because the people looking at the LCD make “oo oo” noises while looking at their pictures, similar to chimpanzees). I actually think you should look at your LCD in any shooting context, but in this situation it is important to do so. There is just too much that can go wrong, and you need to make sure you are getting the shots. You might have the exposure wrong, your focus might be off, the action might be too fast for your shutter speed, and so on. You do not want to get home and discover you were doing something wrong, that could have been corrected while you were shooting.

#12. Additional Noise Reduction

You will have your own workflow for post-processing your pictures, so I will not dwell on that too much here. There are a few things, however, that are particularly important in this context, that I want to pass along. The first is that you will need to do some noise reduction since you will be using high ISOs for these shots, and you should probably do it in a manner that is a little different than you are used to doing.

Start off by using Lightroom’s noise reduction in the usual manner. Push the Luminance slider under Noise Reduction to the right. There is an equivalent slider in Adobe Camera Raw (ACR), if you use Photoshop or Photoshop Elements. Keep the increase moderate at this point, I find that is usually in the range of 10-15.

After that, reduce the noise in the background further. The background of your picture will usually be blurry because you used a large aperture, so the loss of detail from the additional noise reduction will not hurt anything. In Lightroom, use the Adjustment Brush and push the noise slider to the right, painting in where you want the noise reduction. Photoshop users can do the same thing in ACR or create a new layer with noise reduction, while masking off the subject.

Using Lightroom's Adjustment Brush to Sharpen and Add Noise Reduction

Using Lightroom’s Adjustment Brush to Sharpen and add Noise Reduction – you will need two adjustment brush points added, one for the subject and a second for the background.

Note: you will need to add two adjustment brush points to do this (because you’re making different adjustments to each), one for the subject (to increase Clarity and Sharpness, see below) and a second for the background (to increase Noise Reduction).

#13. Sharpen the Subject

Next, sharpen your photo but, similar to the noise reduction you did above, you should tailor it to this situation. To start off, apply a slight amount of sharpening to the whole image, but not as much as you would usually apply because it will likely also cause an increase in noise.

Then apply sharpening to the subject only. In Lightroom, use the Adjustment Brush again. This time increase the Clarity and Sharpening amounts. Apply the effect only to your subject, while leaving the background alone. In Photoshop you can do the same thing in ACR or create a new layer that you sharpen, and mask off everything but your subject. The extra sharpening will help make your subject stand out a little bit better.

Conclusion

Photographing action in low light is a severe test of your camera equipment and your photography skills. It pays to have fast glass and a camera that performs well in low light. Using the tips in this article, you should be able to set up your camera and make the proper exposure settings. It will take practice to consistently nail the focus. It will take even more practice, and a little bit of luck, to capture the moments of peak action. But when you do, it is priceless.

Do you have any other tips or tricks that you use when shooting action in bad or low light? Please share in the comments below.

googletag.cmd.push(function() {
tablet_slots.push( googletag.defineSlot( “/1005424/_dPSv4_tab-all-article-bottom_(300×250)”, [300, 250], “pb-ad-78623” ).addService( googletag.pubads() ) ); } );

googletag.cmd.push(function() {
mobile_slots.push( googletag.defineSlot( “/1005424/_dPSv4_mob-all-article-bottom_(300×250)”, [300, 250], “pb-ad-78158” ).addService( googletag.pubads() ) ); } );

The post 13 Tips for Doing Action Photography in Bad Light by Jim Hamel appeared first on Digital Photography School.


Digital Photography School

 
Comments Off on 13 Tips for Doing Action Photography in Bad Light

Posted in Photography


Discover the Secrets of Natural Light Photography With This 70% Off Deal

13 Dec

As we announced yesterday – today is Day 1 in our 12 Deals of Christmas dPS – and we’re kicking things off with fantastic deals on or popular Natural Light eBooks.

You can pick either one up for $ 7 (65% off) or grab them both for an even more amazing price of just $ 12 USD (a 70% saving).

PicMonkey Collage

The eBooks are:

  • Natural Light: Mastering a Photographer’s Most Powerful Tool – by travel photographer Mitchell Kanashkevich
  • Life in Natural Light: The Ultimate Guide Guide for Photographers – by family photographer Rachel Devine

These eBooks are normally $ 19.99 – today only either one is $ 7 USD!

Both of these beautifully illustrated and informative eBooks tackle this vitally important topic for photographers from different perspectives but together they make a beautiful little bundle of learning for just $ 12 (70% off).

Taking beautiful photos using nothing but the light around you can often seem as difficult as using the Jedi Mind Trick to get the people in your lens to sit still. But these two books will help you see your photography in… well…. a whole new light.

We could go on about these eBooks all day but this deal only lasts 24 hours so head to our 12 Days of Christmas Page and grab yours before this deal is over.

googletag.cmd.push(function() {
tablet_slots.push( googletag.defineSlot( “/1005424/_dPSv4_tab-all-article-bottom_(300×250)”, [300, 250], “pb-ad-78623” ).addService( googletag.pubads() ) ); } );

googletag.cmd.push(function() {
mobile_slots.push( googletag.defineSlot( “/1005424/_dPSv4_mob-all-article-bottom_(300×250)”, [300, 250], “pb-ad-78158” ).addService( googletag.pubads() ) ); } );

The post Discover the Secrets of Natural Light Photography With This 70% Off Deal by Darren Rowse appeared first on Digital Photography School.


Digital Photography School

 
Comments Off on Discover the Secrets of Natural Light Photography With This 70% Off Deal

Posted in Photography


dPS 12 Days of Christmas: Save up to 94% on Some Great Photography Training

13 Dec

It’s that time of year where we at dPS kick off our annual 12 days of Christmas campaign!

12 deals christmas dps

This is the sixth time we’ve run this and this year we’ve got our biggest deals yet!

Here’s how it works.

Every day between now and Christmas we have put together a fantastic deal on some photography training products. We’ll set them live on this page (the first one goes up tomorrow).

In the coming 12 days you’ll see some of our own dPS eBooks at discounts we’ve never offered before as well as some deals from other photography sites that we’ve negotiated on your behalf.

Deals this year are as high as 94% off!

Each deal only lasts for 24 hours so you’ll need to be quick!

Get Notified of Each Deal

To get notified of each deal as soon as it goes live simply subscribe via email here:


(function($ ) {window.fnames = new Array(); window.ftypes = new Array();fnames[0]=’EMAIL’;ftypes[0]=’email’;fnames[1]=’FNAME’;ftypes[1]=’text’;fnames[2]=’LNAME’;ftypes[2]=’text’;}(jQuery));var $ mcj = jQuery.noConflict(true);
Don’t worry we keep your email completely private and you can unsubscribe at any point if you find the deals are too many!

We’ll also be updating the deals here on the blog and on our Facebook page.

Our first deal goes out to those who are subscribed in the next 24 hours so keep an eye on your inbox and don’t forget you only get 24 hours to grab each one!

googletag.cmd.push(function() {
tablet_slots.push( googletag.defineSlot( “/1005424/_dPSv4_tab-all-article-bottom_(300×250)”, [300, 250], “pb-ad-78623” ).addService( googletag.pubads() ) ); } );

googletag.cmd.push(function() {
mobile_slots.push( googletag.defineSlot( “/1005424/_dPSv4_mob-all-article-bottom_(300×250)”, [300, 250], “pb-ad-78158” ).addService( googletag.pubads() ) ); } );

The post dPS 12 Days of Christmas: Save up to 94% on Some Great Photography Training by Darren Rowse appeared first on Digital Photography School.


Digital Photography School

 
Comments Off on dPS 12 Days of Christmas: Save up to 94% on Some Great Photography Training

Posted in Photography