RSS
 

Posts Tagged ‘Photography’

How to Use Colored Gels for Creative Off-Camera Flash Photography

17 Apr

Diving into off-camera flash photography opens up a world of exciting, new and creative possibilities. Besides giving you the option to shape and control the light in your image with a flash unit, you can also use colored gels to modify the color of your scene to add either a subtle creative touch or a more dramatic impact.

off-camera flash using a blue colored gel

A man playing electric guitar lit creatively by an off-camera flash colored blue.

This guide will help you to get started using off-camera flash and colored gels to bring your photography to the next level!

What are colored gels and how are they used?

Colored gels (sometimes called color filters or lighting gels) are thin pieces of colored transparent material. They can be fitted over the top of your flash unit to modify the color of the light.

Examples of colored gels that can be used to modify the color of light from off-camera flashes

A small example of the variety of colored gels available.

Often, the reason for using a colored gel is to tone of the flash so that it matches the color (white balance) of the room. For example, a typical camera flash fired in a room lit by tungsten light bulbs will appear much bluer against the orange ambient background light. By covering the flash with a gel that is tinted orange, you can make the flash match the existing lighting conditions so that all sources contribute the same color to your final image.

Attaching the colored gels to your flash

A gel can be attached to a flash in a number of ways. Perhaps the most common method for portable flash units is with a velcro strap that wraps around the flash tube. If you’re in a real pinch, you could even simply use a piece of tape. Just make sure that the gel completely covers the flash so that it completely modifies that color of the light.

Note: Magmod makes a system to do just that – read Suzi Pratt’s overview of Magmod options here.

  • Magmod Basic Kit on Amazon including attachment device and gels – $ 89.95 (are a bit more durable and will last longer than the gels).
  • Honl Photo Speed Strap – $ 10.95
  • Honl gel kits – around $ 19.95
A red colored gel filter covering an off-camera flash unit

A red gel has been attached snugly to the flash unit and will now change the color of the light from the flash to red.

A sideview of a colored gel fitted over a flash unit, attached by a Velcro strap

A view of the Honl Photo Speed Strap, which uses velcro to allows you to quickly and easily attach a color gel to your flash unit.

Gels come in a wide variety of colors and are very inexpensive, which makes it easy to get started experimenting with this fun style of photography. Also, they can continue to be used even if they are scratched or folded. You only need to replace a gel if it has a rip or a small hole.

Once you have your off-camera flash or multiple speedlight units ready, you can begin to get creative!

Using colored gels with a dark background

When getting started, one of the best ways to get a sense of how to use color gels is by taking pictures in a dark room. This gives you full control over the light throughout the scene. Creating a dark background doesn’t have anything to do with putting up black curtains or finding a wall that is painted black – it’s all about controlling where the light spills.

First, you’ll want to find a medium to large sized room. Dim the lights so that you can produce a perfectly black image without flash (available room light only). Place your subject a fair distance away from the far wall. By directing the light from your flash units only towards your subject and away from the wall behind them, you can create a completely black background.

To add just a hint of color, put a color gel only on your secondary flash. The key (main) light provides adequate lighting for the subject, while the secondary flash adds drama, intrigue, and style to the photo.

A man plays guitar with a burst of blue color from the flash behind him

This photo was taken with two flashes – the one in the front hitting him is not tinted with any color, the one behind him is gelled blue. Light from the blue-tinted flash has been allowed to “spill” towards the camera lens, created the colored lens flare effect.

Once you’ve mastered this straight-forward style of shot, you can start to mix and match colors for unexpected and fascinating results.

Getting creative with color

Color plays an incredibly vital role in telling a story or establishing a mood. We are all familiar with typical color associations – yellow represents happiness, red represents anger, blue represents sadness, and so on.

With a variety of color choices at your fingertips, you can craft a precise feeling or mood in your images simply by adding a colored gel over your flash unit.

A portrait of a man taken with a light from a flash that has been tinted blue

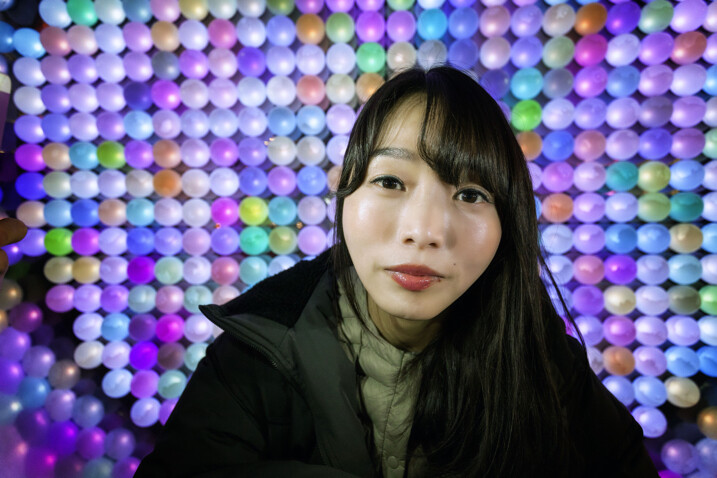
This image was lit by a single flash with a blue colored gel to give it a mood of introspection and melancholy.

It is important to visualize the final image you intend to create, otherwise, your shot can quickly turn into a jumble of mismatched colors.

Remember that you can also color more than just the subject. Firing a colored flash at the background wall can instantly update it, which is perfect for adding some variety to studio-style portrait shots.

An image of a man with a lightsaber, made possible through a red colour placed over an off-camera flash unit

Since lightsabers haven’t been invented yet, an off-camera flash that has been covered with a red color gel provides the distinctive glow for this image. The lightsaber itself was added later in Photoshop.

How understanding color can help you create drama

Once you start playing with color, it helps to have an understanding of how and why certain colors work better together than others.

Colorwheel

You can apply even some basic knowledge from a color wheel to get a sense of how you can create bold and vibrant color pairs. For example, colors directly opposite each other on the color wheel are called complementary colors, as they pair together very well. Knowing this you can mix blue and orange for a dramatic shot. Many Hollywood movies use color theory to help make their footage more vivid.

Or, you can break the rules for more surprising and unexpected results!

A man holding a guitar, lit by light from blue and red colored gels on off-camera flashes

Blue and red create a strong contrast, which adds a feeling of tension and drama to this image.

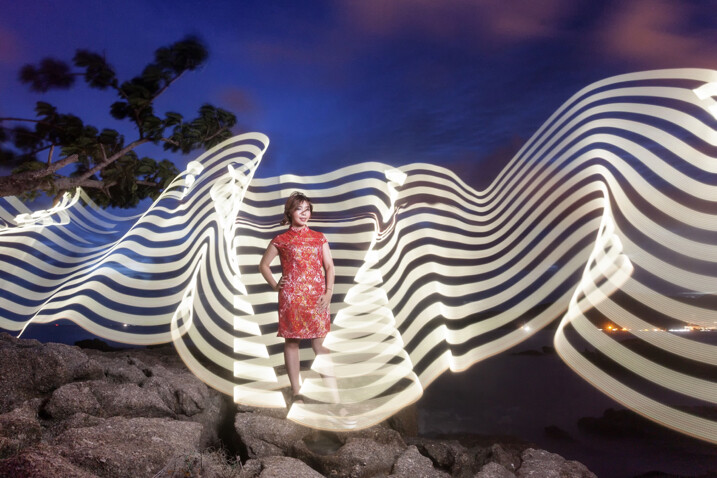
Once you get comfortable with controlling and creating colored light, your creative options are endless. For example, you can use a flash tinted orange to recreate the glow of a sunset. You can also begin mixing and matching with ambient light conditions, which is much trickier but can be very rewarding.

You’ll be surprised how much a thin sheet of colored plastic can transform your photography!

Some important tips to remember

  • Darker color gels, such as deep reds or blues, block a portion of the light that the flash gives off. When working with these colors you will need to increase the amount of flash power compared to when you use flash on its on.
  • If you don’t have a full set of colors, you can layer two colored gels over top of each other. For example, blue and red colored gels can be combined to make purple. Remember that doubling them up will block even more light and require additional flash power.
  • You can use any traditional flash modifiers, such as umbrellas and soft boxes, along with color gels in order to soften or shape the light that is produced.
  • Experiment and play! Even if it seems intimidating or complicated at first, trial and error is a fantastic way to learn a new skill or technique that you can add to your repertoire.

Please share your questions, comments and images shot with colored gels below.

The post How to Use Colored Gels for Creative Off-Camera Flash Photography by Frank Myrland appeared first on Digital Photography School.


Digital Photography School

 
Comments Off on How to Use Colored Gels for Creative Off-Camera Flash Photography

Posted in Photography


7 Ways to Become More Spontaneous with Your Street Photography

16 Apr

As you become more experienced and comfortable doing street photography, you will notice that the way you shoot will begin to change. You will notice more, focus more on what you like, and your work will improve significantly. At this point, it can be important to embrace spontaneity in the way that you shoot.

street photography NYC

So often the first shot of a scene that you take will be the best, for reasons I can’t explain, except that your gut and instinct are something to embrace with this type of photography. The more experienced you become, the more vital they will be.

Here are some tips that have helped me to shoot in a more spontaneous fashion.

1. Choose your camera settings so that you can forget about them

The first step is to figure out your camera settings so that you can forget about them. You don’t want to worry about your camera or changing settings as you’re shooting. When you’re feeling good, it often feels like the camera isn’t there.street photography

If it’s a shady day and the lighting is consistent, then it’s easy to choose your settings and not have to worry about them. But it becomes tough when you are shooting in direct sunlight, where some areas are lit with extreme light and others are in the shadows.

For these situations, what I will do is change my camera to Aperture Priority mode, around f/8, and I will put my ISO up high, to around 1600. I will make sure that when I point my camera at shady areas it will still give me a fast enough shutter speed, like 1/250th of a second, to freeze motion in people. Then, when I point the camera in sunny areas, the shutter speed will be something insane, maybe 1/1000th or more of a second.

Obviously, these settings are not perfect for sunny areas since the ISO is high, but with newer cameras, ISOs of 1600 look beautiful. I prefer to shoot with these settings because it allows me to forget about my settings regardless of what light I walk into. It makes the day much more fun and relaxing, and I can spend more energy looking around.

2. Slow down and shoot quick

street photography NYC

When I work with newer photographers, I often seeing them run from place to place, searching for that elusive spectacular moment, as if the more ground they cover will yield more of those moments. Those moments will occur whether you are moving fast or not. Except when you are moving fast, you’re not focusing on the area that you’re in at the moment. There are interesting photos everywhere, particularly in places that you might have previously disregarded.

The slower you move, the faster you will be able to react when something happens. By increasing your awareness, you will allow yourself to be more spontaneous. You will have more gut feelings to follow. This will allow you to react much quicker when actually capturing the photograph.

3. Spend more time looking with your eyes than the viewfinder

street photography scene

In street photography, your eyes should be the real viewfinder. Focus your energy on looking around. It’s actually hard to do, especially if you are easily distracted or going from place to place. Notice the potential for something to happen with your eyes and get in position, then the viewfinder and camera will follow. But it should almost feel like the camera isn’t there – the hard work is done before you even bring it up to your eye.

4. Figure out how to take good photographs anywhere

street photography - garbage

Stop taking things for granted. The more you think an area will not provide you with a good photograph, the more you should try to get a good one there. Much of the time you’ll get nothing, but you will be surprised how often this works out, and it’s a fantastic way to train your eye.

This will also allow you to create unique and interesting photographs. By shooting in areas where not many others photograph, your good shots will be unexpected. They will stand out.

5. Go with your gut

street photography - crosswalk

We’ve talked a lot about going with your gut already, but what does that really mean? When you’re out there shooting, you’re going to get feelings that moments are about to happen. Most people wait to actually see something happen before they shoot, and often the moment has disappeared by then.

When you feel something good is about to occur, capture the moment in a quick and spontaneous way. Go for it instinctively – use your instincts to your advantage and develop them. While many of these shots will turn out to be nothing, when you hit one at the perfect moment, you will be left with an incredible image that you could not have captured otherwise. Be spontaneous.

6. Don’t worry about perfection

street photography

It is common for newer photographers to worry about cutting people’s feet off, something getting in the way, or the shot being skewed. I have heard so many comments about wishing that a person, group, or object wasn’t in the background or in a certain location. This is, of course, important stuff to consider. But when I hear these comments being made, I detect that the reason they find these things annoying is because they ruin the perfection of the image.

Have you ever shown an image to someone and the first thing they notice is this random background detail that’s barely noticeable? This is part of having too much focus on perfection, and it can drive you crazy. You’re trying to get the most perfect and clean image possible, and that is rarely possible in street photography. You take what is given to you, and an interesting moment is an interesting moment.

Street photography is supposed to feel real, and so many of those imperfections can add to that feeling of it being a spontaneous moment. They can improve an image just as much as they can ruin it. Try to embrace these imperfections when you can as being part of a real and special moment.

7. Don’t be afraid to take weird photographs

street photography - weird

These photographs are for you. You don’t need to take photographs that appeal to everyone, and not everything has to be perfect, grand, and pleasing. Capture photos that are not standard, off in some way, and weird. Focus on what interests you and try to foster that. This is where the voice in your work will begin to shine.

The post 7 Ways to Become More Spontaneous with Your Street Photography by James Maher appeared first on Digital Photography School.


Digital Photography School

 
Comments Off on 7 Ways to Become More Spontaneous with Your Street Photography

Posted in Photography


How to Build a Travel Photography Portfolio

15 Apr

Building a photography portfolio can be a scary proposition, as it forces you to choose images that best represent you as an artist and creator, whilst also demonstrating your technical skill and storytelling ability. Developing a travel photography portfolio is no different.

Travel Photography Portfolio 025

Travel Photography Portfolio 052

However, developing a portfolio is an exercise that has many benefits, both from a personal growth as well as professional perspective.

Unlike many areas of photography, there are some extra considerations for a travel specific portfolio. The main difference with travel photography, as opposed to specializing in weddings, events, or commercial, for example, is that there is a far greater need for you to be flexible in your approach to image making while allowing for the huge variety of subject matter one would normally encounter.

Travel Photography Portfolio 013

Travel Photography Portfolio 017

Start planning your portfolio before you travel

This, of course, comes down to why you want to develop a portfolio of work and who you are aiming to show it to. I have always found this can shift depending on whether I am planning an exhibition, developing a book, building a stock library, showing work to an editor, planning a photography tour and marketing to potential attendees, or simply showing friends and family a new place I have been fortunate enough to visit and photograph. All are valid reasons to develop a travel photography portfolio. If you keep these options in mind before you travel, you are more likely to return with images that can be used across multiple platforms and for different reasons.

The consideration here is you may need to have multiple portfolios depending on to whom and where you are marketing. This is a key factor to consider before traveling as it will shape your approach to image making while on your trip. Having said this, it is also great to stay open to potential opportunities that may present themselves in the future by having covered a subject or place well.

Travel Photography Portfolio 026

Travel Photography Portfolio 022

Travel Photography Portfolio 024

One of the biggest lessons I have learned is to stay completely open to any possibility. This is especially true when visiting destinations that are expensive or difficult to get to, which ultimately means it may be a while before I return, or perhaps not at all. This means that when you are shooting in this situation, make the absolute most of your time. Be open to possible image usage across multiple platforms and for many reasons. This is best done with thorough research for all possible uses of images from the location you are visiting.

What if you aren’t traveling soon?

So how do you start in building your portfolio if you are not planning to travel? Your local area is an excellent place to create content, and for many reasons, some of which I have listed below:

  • You build your skills working in different and changing lighting conditions.
  • Learn how to deal with bad weather while still coming home with images that describe a place well.
  • You learn how to show a destination through images. The goal being to give people who have not been there an understanding of this destination.
  • You are able to visit during different seasons, times, and weather conditions with ease.
  • Research the most common images available for that area. This is handy if your aim is to build a stock library for editorial or commercial use. Then push yourself to photograph this area in a new creative way.
  • You develop your ability to work with local organizations and businesses to help you get the images you need.
  • Build your understanding of the process of storytelling with your images from a destination.
  • You will further your understanding and knowledge of your camera gear and the photographic process before you are looking at an unrepeatable moment. There is nothing worse than a once in a lifetime image opportunity and not having the confidence or ability to capture it well with a camera.

Travel Photography Portfolio 050

Travel Photography Portfolio 056

Now do the same at a destination

Transferring this process to travel destinations is no different. However, the importance of thorough research before you leave is far more critical as you will not know a travel destination as well as your local area. While it is important to have a plan of attack before you land, remain open to opportunities that may arise during your travels.

It is also important to travel to different destinations that have a variety of cultural backgrounds, landscapes, architectural styles, and ultimately photography opportunities. This will further help diversify your images which can then be presented in your travel photography portfolio.

Travel Photography Portfolio 049

Travel Photography Portfolio 039

Travel Photography Portfolio 038

Your first trip

Your initial trip can be considered the most important as it will be your first opportunity to build a library of images. I always recommend making your journey as long as possible, across different destinations, to help you get a wide variety of images.

While traveling I look for eight main areas of subject matter:

  1. Landscape
  2. Portrait
  3. Wildlife
  4. Food
  5. Architecture
  6. Culture
  7. Transport
  8. Local events, festivals and activities

Travel Photography Portfolio 037

Travel Photography Portfolio 044

Travel Photography Portfolio 062

Not every destination will give you the opportunity to photograph all of the above options. However, I have found over the years these will give you the best chance of showing that destination and what it would be like to be there.

If you were to make a list of potential images of your local area or any destination based on the list above, you can easily build a large library that shows it in a comprehensive way. As well, taking into account different demographics of people will further build your portfolio of images to show any destination in a more comprehensive fashion. For example, budget accommodation through to more expensive options.

Travel Photography Portfolio 042

Travel Photography Portfolio 020

Travel Photography Portfolio 021

Diversify

Diversity is also of key importance for your work, especially if you are visiting a location that receives a lot of tourist traffic, all with cameras in hand. Here are some key points to consider to build diversity into your work, regardless of where it will end up.

  • Visit during different times of the day than the norm.
  • If the weather goes bad, keep taking photographs.
  • Use a full range of focal lengths for each subject.
  • Try to shoot from an elevated position as well as crouch down low to help give different perspectives.
  • Be completely proficient in all lighting conditions so you are able to deal with them no matter what scenario.
  • Experiment with filming as well as stills. There is a huge demand for footage and video content.
  • Document the process of traveling.
  • Put people into your photographs, whether it be yourself, your friends and family, or people you meet along the way.
  • Be sure to always photograph the less exciting, day to day elements of travel as well. You never know where these could be used in the future.

Travel Photography Portfolio 019

Travel Photography Portfolio 059

Travel Photography Portfolio 027

Hone your skills

It is important to have developed your ability before you go traveling to not feel a lack of confidence should a fantastic photographic opportunity arise. Practice, practice and more practice is critical for any area of photography. However, the extra cost and competitiveness of the travel photography industry mean you need to be highly proficient before you go traveling in order to make the most of the opportunities that will arise.

Travel is far from cheap and easy. Your time away should best be used creating content. So again, it is important to feel confident in your gear and process before you go to maximize this time away. While there are cheaper destinations to visit, it is still a resource hungry activity. Learning how to shoot efficiently when opportunities arise means you will further add to your diversity of images as well as your versatility and ability for future opportunities.

Travel Photography Portfolio 055

Travel Photography Portfolio 046

Travel Photography Portfolio 047

Culling

Once home, the process of selecting images can begin. Again, look for a variety of images and subject matter that best show your ability, both technical and artistic. Try to avoid images that look similar or show the same subject more than once. Pick only your strongest work and focus your selection based on use. Images for an art instillation are going to be very different to images for stock of local transport or architecture. Having someone review your work with fresh eyes is also an option to consider.

Printing your images, even at smaller sizes can be a great way to finalize a selection of work. It allows you to interact with the images differently as well as being able to view them under different lighting sources to ensure your edits are the best possible. You are able to lay the images out offline to see how well they work as a series or collection, something that is very difficult to do on a computer screen.

Travel Photography Portfolio 030

Travel Photography Portfolio 036

Travel Photography Portfolio 058

Conclusion

Remember, the more you get outside taking images, the more you can develop an understanding and skill level in working in all weather and lighting situations as well as working with people from different places and cultures. Practice, practice, practice.

Travel Photography Portfolio 053 Travel Photography Portfolio 060

Travel Photography Portfolio 063

Travel Photography Portfolio 051

Travel Photography Portfolio 029

The post How to Build a Travel Photography Portfolio by Damian Caniglia appeared first on Digital Photography School.


Digital Photography School

 
Comments Off on How to Build a Travel Photography Portfolio

Posted in Photography


Blue Earth Alliance: Collaboration is key for photography that makes a difference

14 Apr

Blue Earth Alliance: Collaboration is key for photography that makes a difference

Natalie Fobes on assignment in Russia for National Geographic. Fobes is an award-winning photographer who founded the nonprofit Blue Earth Alliance in order to work with photographers to share their stories.

“You don’t have to travel overseas to make a difference with your photography. Your world starts outside your front door,” says Natalie Fobes, a Seattle-based photographer with a resume many photographers dream of. Assignments for major magazines including National Geographic, dozens of awards as well as being a finalist for a Pulitzer, a photography instructor with courses on Lynda.com, and now a successful wedding and commercial photography business in Seattle, Washington where she lives with her family.

It all might sound a little intimidating, but spend just a few minutes in conversation with Fobes and you’ll come to understand not only her passion for the power of photography, but how much she wants to help other photographers succeed.

Almost 22 years ago Fobes formed the non-profit Blue Earth Alliance, along with fellow photographer Phil Borges and attorney Malcolm Edwards, who provided legal guidance. The philosophy behind Blue Earth Alliance is simple – photography and filmmaking can lead to positive change.

DPReview had the opportunity to talk with Fobes about Blue Earth Alliance, the impact of photography and the mission of Blue Earth Alliance.

Blue Earth Alliance: Collaboration is key for photography that makes a difference

The opportunity to share her photographs and the difficulty in finding funding lead Fobes to collaborate and begin Blue Earth Alliance. Photo by Natalie Fobes.

Blue Earth Alliance was formed almost 22 years ago to help photographers. Why did you feel it was needed?

I had just had a book published, had spent 10 years traveling the Pacific Rim and was doing well and I was approached to put together a traveling exhibit. It was expensive to put on the exhibit and hard to find sponsors. I was told if I had been a 501(c)(3) sponsors could help, and I learned other photographers were having similar problems. We saw the media landscape was changing and it was going to get harder to do long documentary projects.

I think the underlying philosophy of Blue Earth Alliance is we feel an individual can make a difference in this world. There are so many things that need attention:  the environment, disappearing cultures, social issues or a local situation. These are all things that matter in our lives, no matter if you live in a small town or in New York City or Seattle. By raising awareness of these issues, you can make a difference; you can make a change. It’s a very high level look, but I think that no matter who you are — whether you’re a professional photographer or advanced amateur — you recognize the power of photography.

Blue Earth Alliance: Collaboration is key for photography that makes a difference

Photojournalist Tom Reese spotlights the devastation of toxic waste in his project, “Choosing Hope: Reclaiming The Duwamish River.” Photo by Tom Reese.

Can you explain how Blue Earth Alliance works with photographers who become sponsored?

First, I need to be very clear:  Blue Earth does not provide direct funding or grants. That is a common misconception about Blue Earth. The biggest service Blue Earth provides is fiscal sponsorship. This is a huge asset to individual photographers and filmmakers since when we accept a project for sponsorship we extend our 501(c)(3) status to it. The photographer/filmmaker can then apply for grants from organizations and foundations that only donate to a 501(c)(3). After 21 years, we have a great reputation with funders for sponsoring worthwhile projects. Blue Earth provides a vetted seal of approval for donors.

Sometimes photographers and filmmakers just need encouragement for their projects. More than one photographer has mentioned that when Blue Earth selected their project for sponsorship, it encouraged and inspired them to continue their work.

Blue Earth Alliance: Collaboration is key for photography that makes a difference

Daniel Beltra’s project has documented conservation around the planet. He has shot on all seven continents, many of his photographs are shot from the air. Photo by Daniel Beltra.

Blue Earth Alliance has sponsored more than 134 photography and filmmaking projects over the last two decades. Can you reflect on a few that have had an impact?

We have had had many, but a couple that stand out. These projects can start the conversation, even raise the visibility of some of these issues. One was a really long term project by the late Gary Braasch. He came on board in the late 90’s, early 2000 and was talking about global warming before it became popular. It was important work in that it elevated the conversation because of his photography and his dedication.

Another is Subhankar Banerjee and his story about the Arctic National Wildlife Refuge and how important it was to keep that area pristine. He had worked at Boeing and had no professional photography experience. He came to us and wanted to do this project and applied for sponsorship.

He spent a couple of years in the Arctic and showed how beautiful it was even when some senators were calling it a frozen wasteland. The Preserve is one of the last pristine areas of that particular environment and there was a lot of discussion about oil, a lot of senators wanted to open it out to oil exploration. He also contracted with a number of museums including the Smithsonian to exhibit his work from this project. In one of the Senate debates about drilling in the refuge Senator Boxer held up his book.

Blue Earth Alliance: Collaboration is key for photography that makes a difference

Katherine Jack’s project with Blue Earth Alliance is documenting life in the Palawan Sea, in the Philippines and how changes to our marine ecosystem is affecting the life of the Palawan residents.

What are the steps a photographer would need to take to get support from Blue Earth Alliance? What are the criteria that makes a project worthwhile?

Blue Earth accepts project proposals twice a year: January 20 and July 20. The submission requirements can be found on our website. In a proposal we look for a clear description of the project, a unique viewpoint or topic and clarity around how the project fits within the Blue Earth mission. Having a project with a 501c3 status does not mean that money magically appears. Finding funding can be difficult, and it takes time to thoughtfully research funders and write grants.

When we review our project proposals one of the first things I look at their budget to see if they know what they are doing financially.

We have a responsibility to make sure funds are used as they should be. One of the first things I look for is are the photographers paying themselves, through a stipend. We are too important not to pay ourselves.

Blue Earth wants our project photographer/filmmakers to succeed, and we scrutinize all proposals in order in ensure that likelihood.

Blue Earth Alliance: Collaboration is key for photography that makes a difference

Greg Constantine’s decade-long project, Nowhere People, focuses on the plight of people forced from their homes, without citizenship and looks at the challenges of their daily lives and their future. Photo by Greg Constantine.

What advice do you have to photographers who are looking for a way to use their photography to make a difference?

Photographers and filmmakers should try to form coalitions with other like-minded people and organizations. I believe in the strength of an individual. But I believe in the power that comes when individuals come together for a common goal.

Photographers and filmmakers also need to realize that one grant will seldom fund their entire project. They should apply for many: large, small and in-between. For my first long-term project I used my savings, a grant and assignments to fund it.

It’s imperative to create a coalition of funders. Funders like to see support from other organizations when considering an application. They see it as a third-party endorsement of the photographer/filmmaker and the project. It’s true that success leads to success.

Photographers and filmmakers often forget, or are afraid of, including friends and family in their fundraising efforts. People are often more likely to give a donation to someone they know. Crowd-sourcing websites make fundraising campaigns much easier than in the past.

If a photographer doesn’t believe they can make a difference then they won’t.

Blue Earth Alliance: Collaboration is key for photography that makes a difference

Natalie Fobe’s captured the extensive damage of the Exxon Valdez oil spill in Prince William Sound while on a three month assignment for National Geographic. Photo by Natalie Fobes.

Your photography has included extensive work around the Pacific Salmon, wildlife and landscapes. What are you most proud of?

I think probably the work that may have had the most impact on society was the Exxon Valdez oil spill in. That was also the hardest story I photographed because of the difficulty of the working conditions and getting access. And the chaos, the chaos of the spill and the emotional impact of the destruction of the environment. The horrible pain that the animals and birds suffered and the people too.

This happened in a beautiful pristine area that was home and sustenance for the native Alaskans but also the commercial fishermen and townspeople who lived there.

Blue Earth Alliance: Collaboration is key for photography that makes a difference

Annie Musselman’s first project with Blue Earth Alliance focused on the delicate balance of human impact on wild animals. Her project Wolf Haven documents animals in sanctuaries. Photo by Annie Musselman.

What does the future hold for Blue Earth Alliance?

We are an organization with a passionate and dedicated board that donates thousands of hours each year to our mission.

We hold an annual conference “Collaborations for Cause.” This will be held in May 5-6, 2017, in Seattle. The goal of Collaborations for Cause is to put non-profits, educators, communications professionals and visual storytellers in the same room for education, inspiration and networking. Presentations and interviews of our past speakers can be viewed at photowings.org.

Our conference supports our mission to form a coalition of non-profits and visual storytellers. We hope that our photographers’ projects educate the public about important issues. Simply: we want our projects to change the world for the better.

Blue Earth Alliance: Collaboration is key for photography that makes a difference

Photographer Tim Matsui’s project focused on human trafficking and lead to the film, ‘Leaving the Life’ as well as working with King County Government in Washington State to create policy around human trafficking. Photo by Tim Matsui.

DPReview also spoke with Tim Matsui, a photographer who has worked on two projects in conjunction with Blue Earth Alliance. He explains how the organization helped him to make a difference with his photography.

I first went to Blue Earth because I was ‘just a photographer’ and unable to apply to many foundation grants or other funding opportunities. I was doing grassroots fundraisers, silent auctions, even burger-beer events with local businesses willing to support my work with their proceeds. Old school.

Leaving the Life is my second project with Blue Earth. My first one, over a decade ago, used documentary multimedia—when slide projectors and dissolve units were still a thing—to create dialog about the lasting effects of sexual violence on individuals and communities.

Being accepted at that time was not only validating of the social justice work I felt compelled to do, but it opened the door to foundation grants and private donations; something I knew very little about.

The learning curve was steep, but I was no longer ‘just a photographer.’ I was in the company of others who were much more accomplished than myself. I had access to their knowledge and this helped me understand how I could increase the impact and reach of my work.

Years later, when I realized Leaving the Life and The Long Night could create impact, I reapplied to Blue Earth. This allowed me to receive a grant from The Fledgling Fund. That grant lead to the policy work I’ve done with King County government.

In fact, it was a screening of The Long Night at Collaborations for Cause where I met a King County employee who became instrumental in my work with King County. Without her, I doubt that two-year journey would have come to fruition.

Blue Earth continues to support my work as I’m now looking for investors for a follow up film to The Long Night— these are people who see their return on investment not as financial renumeration, but policy change. And through Blue Earth I’ve had the opportunity to share what I’ve learned about using film to support social and policy change. Blue Earth is grassroots, created and run by photojournalists, and helping stories have impact is woven into the fabric of the organization. That matters to me.


Blue Earth Alliance’s Collaborations for Cause takes place May 5th and 6th in Seattle. You can find the speaker schedule and registration information online at blueearth.org.

Articles: Digital Photography Review (dpreview.com)

 
Comments Off on Blue Earth Alliance: Collaboration is key for photography that makes a difference

Posted in Uncategorized


The Macallan Masters of Photography Series whisky kit comes with a signed Steven Klein print

14 Apr

Scottish distillery The Macallan has launched its latest ‘Masters of Photography Series’ whisky kit, this one featuring a signed print from photographer Steven Klein. This is the 6th installment in The Macallan’s photography series, with each previous installment having featured signed prints from a different photographer. This time around, 1,000 bottles of this whisky will be sold, ten of them within a bundle with an exclusive signed print.

Of the 1,000 whisky bottles made available for sale, 100 will be slated for the US market, and they will come with a $ 2,995 USD price tag. Pricing and availability in other countries is unclear at this time, though The Macallan encourages interested buyers to email it directly for more info. Joining the photos is a video (above) touching on the ‘Time Captured’ theme of this whisky kit.

The bundle itself, in addition to featuring a signed print, will include a bottle of The Macallan limited edition whisky, custom barware tools, and a horse’s head bottle stopper, all contained within a black case.

Via: PRNewswire

Articles: Digital Photography Review (dpreview.com)

 
Comments Off on The Macallan Masters of Photography Series whisky kit comes with a signed Steven Klein print

Posted in Uncategorized


2017 Pulitzer Prize winners for photography announced

11 Apr

The winners of the 2017 Pulitzer Prize for photography have been announced, which illustrate violence in two locations on opposite sides of the world.

The award for breaking news photography went to freelancer Daniel Berehulak, whose work published in The New York Times showed the violence in the Philippines during a government crackdown on drug dealers and users.

The other finalists include the AP Photography Staff and freelancer Jonathan Bachman.


The Chicago Tribune’s E. Jason Wambsgans won the award for feature photography. His photos document the story of a 10-year-old boy and his mother as they try to recover from the child’s shooting in Chicago.

The other contenders in this category were Katie Falkenberg of the LA Times and Jake May of The Flint Journal.

Each prize winner receives a $ 15,000 prize as well as the famous Pulitzer medal.

Via: The Pulitzer Prizes

Articles: Digital Photography Review (dpreview.com)

 
Comments Off on 2017 Pulitzer Prize winners for photography announced

Posted in Uncategorized


Adobe Research tackles selfie photography with new AI-powered tech

07 Apr

Adobe Research, the company’s research and development division, has released a look at a new technology that tweaks selfies to improve how they look. The technology, which is presented in a new Adobe video, is designed to improve mobile portrait photography by enabling users to adjust the photo’s perspective, depth of field, and more.

Adobe describes its new technology as ‘the potential future of selfie photography,’ demonstrating how it can be used to replicate a more flattering focal distance, adjust the position of the subject’s head within the image, adjust the depth of field using automatic portrait masking and apply styles found in other portraits, such as images found in a Google Image search.

This technology is powered by Adobe Sensei, an artificial intelligence and deep-learning framework the company introduced at Adobe MAX 2016 last November. The selfie technology isn’t available to consumers at this time, but instead serves to highlight Adobe’s latest developments and to introduce photographers to the kind of tools they may have access to in the future.

Articles: Digital Photography Review (dpreview.com)

 
Comments Off on Adobe Research tackles selfie photography with new AI-powered tech

Posted in Uncategorized


How to Create a Potluck Photography Party

07 Apr

It’s always great to meet up with friends, and as photographers, it’s great to meet with fellow photographers. A lot of people’s photography style is to go it alone, which can be good for many things. But, even if you like to photograph alone there are times when meeting other photographers, and bouncing ideas off them will help you. Those meetings are often in the form of photo walks, where most people photograph by themselves. A progression of this type of photography meet up is the potluck photography party.

As you probably know potluck parties are about food. This is such a great idea that we photographers should also use it too. So what does a photography potluck party look like? It’s all about collaborating as a team, and trying everyone’s stuff!

How to Create a Potluck Photography Party

It’s great to collaborate with others and work on photos together. Here two cell phones are used as light sources.

What is a potluck photography party?

The idea of a potluck party is you bring different food dishes to a party, so how can this be applied to photography? Well if you substitute food dishes for photographic equipment then you have the basis of how this idea works. The equipment each participant can bring with them is as follows.

  1. A camera body: This can be a DSLR, a point and shoot camera, or a Smartphone.
  2. A camera lens: This is applicable to those bringing a camera body with interchangeable lenses. Bring just one lens with you to the photography potluck party.
  3. Additional equipment: You can bring one other piece of equipment with you. This can be anything from a tripod, to an additional lens, or even a glass ball.
How to Create a Potluck Photography Party

The gear used in a potluck photography party.

The above parameters form part of a creative exercise, one where the equipment you have is deliberately constrained. In order to realize more complex photography ideas, collaboration and sharing of equipment will be necessary. If the group size is around five, hope at least one person brings a tripod, but not everyone.

If you like to take portraits then equipment for off-camera flash would be great, and working in a team allows the stronger photographers to help those learning this type of photography. The equipment could be as simple as an umbrella that could be used as a prop with a model, or an interesting way of framing a photo. The last variable is where you really should look to push that creative potential, another good piece of additional equipment is the Smartphone!

How to Create a Potluck Photography Party

This photo shows how the flashlight from Smartphones can be used to light the face in a portrait.

Will you go blind?

No, we’re not talking about blind dates here, but equipment. Will you organize your event so that nobody knows what the others will bring? This is the purest form of a potluck photography party, but sometimes you need to engineer what everyone brings a little. Think of those potluck parties where everyone brought cheesecake, that would be awesome but didn’t you want a salad as well?

Letting other people know what you’ll bring can give you a much more balanced set of equipment, and with that comes more creative photos. So the type of potluck photography party you decide to have is important. There are three main types to choose from, they are:

  1. Blind: In this type of party, nobody knows what others will bring, so results will vary. This is the purest form of a potluck party, you will have to use the tools given to you and come up with the best results.
  2. Early bird: In this type of event, you share with other people what you’ll bring through social media or e-mail. This means those people deciding what equipment to bring later can choose based on what other people say they’ll be bringing.
  3. Listed: This form of potluck is highly engineered as you list the items people can bring. In this case, a list is posted on your event page or e-mail invitation. Once people can see the list they can choose which item they’ll bring, and once taken nobody else can bring that same thing. This list may only apply to item #3, the additional equipment.
How to Create a Potluck Photography Party

In this photo, the phone is used to create a second image, with the Smartphone being used creatively.

Make an event on social media

The best way to share your potluck photography party is through social media, with Facebook the best placed to deliver on this. Creating an event on Facebook is a straightforward task. To grow the potluck photography community, and share the results of your party, joining this Facebook group is encouraged. In addition to the resource of this article, you’d be welcome to use this document to explain the concept to other people.

Why not create some country, or city-specific, potluck photography party groups, and host your events through these groups? Instagram is also a great platform to promote your event. Create a new account just for the potluck party photos.

How to Create a Potluck Photography Party

You don’t have to collaborate, some photos don’t need it. In this photo, simple composition and moment of capture were used.

Sharing your equipment

The collaborative nature of this type of event means you’ll be sharing equipment with others. You’re not likely to share your camera body, but other equipment can be shared. If you have a camera body that’s compatible with other people’s lenses, why not see if you can try them out? This way you can increase the pool of lenses available for your shot.

Tripods, Smartphones, and off-camera strobes can be used by almost everyone, regardless of the camera. Take care with speedlights, these are specific to the camera brand they’re designed for and may damage other cameras. Using other people’s expensive equipment does carry some risk, so asking people to sign an agreement to replace damaged items is an option to consider.

How to Create a Potluck Photography Party

Some photographers carry so much gear, it looks like they’re checking in for a flight! Potluck photography parties aim to reduce how much each person carries, but by pooling gear, you still get to experiment.

The potluck photography party group

The idea with the party is that each person has a chance to create their own concept for a photo. In turn, you allow each photographer time to use the available equipment to make their concept happen.

You will need to split larger groups into several smaller groups of around five to seven people. The most sensible way to divide is by camera brand, this will make it easier for people to share lenses. If you have a large group finish the day with something social, where everyone can mix together.

How to Create a Potluck Photography Party

This is the group for a potluck photography party.

Share your potluck photography party experience!

The types of photos that can come out of these events can be conceptual or spontaneous. As with all meetups like this, it’s great to share the results with everyone after you have had an event. This will give you feedback on what you did and will give other people fresh ideas about how they could do something new.

If you go out and try a potluck photography party be sure to come back here and post your work, or a link to your Facebook event page. Those posting to Instagram can use #potluckphotographyparty and #PPP to share on that platform. So now all you have to do is go out and party!

How to Create a Potluck Photography Party

In this photo, no extra gear was needed, but collaborating with one of the other photographers who would model for the shot.

How to Create a Potluck Photography Party

In this photo, a Jinbei 600 flash unit, a pixelstick for the light painting, and a tripod for long exposure were used fro the items that were brought for the party.

How to Create a Potluck Photography Party

The most important thing about parties is to keep it fun and spontaneous!

The post How to Create a Potluck Photography Party by Simon Bond appeared first on Digital Photography School.


Digital Photography School

 
Comments Off on How to Create a Potluck Photography Party

Posted in Photography


10 Reasons Why Photography is a Great Hobby

06 Apr

People start doing photography (versus taking snaps or selfies) for many reasons. It might be a major life event coming up – new baby, wedding, special birthday – or that overseas trip saved up for over many years. It might be that the capabilities of your phone frustrate you enough to want to get real about photography. However it happens, suddenly you find yourself with an empty bank account and some form of camera gear that you now need to figure out how and where and maybe even, why to use it.

10 Reasons Why You Should Get Real About Your Photography

10 Reasons why photography is a great hobby

  1. Recording events and capturing memories
  2. Have fun
  3. Learning is good for the brain
  4. Health and fitness
  5. Creativity
  6. Travel
  7. Meet new people
  8. Join a photographic community
  9. Develop a personal style
  10. It’s all about the light

#1 Recording events and memories

Photography allows you to create images of events, times, and places. To both record what happened and allow you to share them with friends and family, either in digital format or more permanently with prints or photo books. By being able to capture a special moment in time, you carry the memory of that event forward with you, allowing you to share it and remember it with those that were there. Those memories become part of your history, perhaps family lore, not just stories passed down through the generations – but images as well. As the popular idiom says, “A picture is worth a thousand words”.

10 Reasons Why You Should Get Real About Your Photography

Memorable moment capturing the rare NZ Falcon

#2 Have fun

So much fun can be had with a camera. You could be out with the family at the beach or a picnic, local sports games, randomly roaming your city streets photographing strangers without them noticing, stalking wildlife, hiking up a mountain for a stunning view, or standing under the stars at 2 a.m. watching the Milky Way slowly move across the heavens. So many opportunities to do new, interesting, and fun things with your camera that you likely may not have otherwise done.

All sorts of things become interesting when they can provide you with material for photographic adventures. Cultural festivals, parades, sports events, a wander along the beach, exploring parts of your city previously undiscovered, architectural details on buildings, intricate details of flowers, people watching, difficulties of photographing wildlife, meeting people who have different interests and hobbies – just for a few ideas. Most people are willing to share their passion with you if you take some time to talk to them. There are endless opportunities for photographic inspiration – even the contents of your fridge or pantry can be fascinating when viewed through a macro lens. All you need to do is make an effort to look.

10 Reasons Why You Should Get Real About Your Photography

Hanging out with the zombies at a Zombie Run event.

#3 Learning a new skill is good for your brain

Research has shown that learning a new skill helps the brain and improves memory, and the more difficult the skill, the more improvement you get. Coupled with exercise, these two things are considered important for long-term brain health and neuroplasticity. Studies show that slower learning over time helps build strong new linkages within the brain.

New knowledge will accumulate over time, as you keep putting effort into learning a new skill. Given that photography has so many elements, the science of light, the technology of the camera and the creative artistic side, there is a lot to learn. So whatever your age, now is the perfect time to start learning photography.

10 Reasons Why You Should Get Real About Your Photography

#4 Health and fitness

Getting out of the house, walking about, or even hiking is often a side-effect of getting into photography. If you are into landscapes then you have to go to where the landscape scenes are, and that often means some form of exercise. Once you have enough camera gear – likely a body, some lenses, and a tripod – it can weigh a reasonable amount and you will need a bag of some kind to carry it comfortably if you are traveling any reasonable distance.

Some people prefer a more gentle form of exercise – for health or mobility reasons. Others may prefer multi-day hikes into stunning mountain scenery. Mountain biking, horseback riding, kayaking and similar sports are often popular modes of transport to get you to a new landscape and allow for photography along the way.

Camera gear is heavy, so it’s important to be aware of any health or safety concerns. Carrying heavy cameras on straps around your neck for a long time can be quite painful. People with disabilities or limited mobility might prefer a lighter weight option and there are many available these days. Although one of the downsides of digital photography, especially if you shoot RAW, is the amount of time you can spend in front of your computer, processing the images, so that needs to be considered into your fitness regime as well.

10 Reasons Why You Should Get Real About Your Photography

#5 Creativity

In her book, “Big Magic: Creative Living Beyond Fear”, Elizabeth Gilbert writes a great deal about creativity and inspiration. She says it is good for us as individuals, and that the world is a better place for having art in it. That feeling when you finally get the awesome sunrise photo or the perfect candid, maybe the aurora or a meteor shower, or whatever your passion is, that feeling when you finally get the image, makes it all worthwhile.

Being creative is something we don’t tend to allow ourselves to do as adults. Photography is a very acceptable form of creativity that allows endless flexibility in how you adapt it to your own personal style. That style can grow as you learn more and start to experiment with different things.  Creativity is fun and it provides a necessary balance against the stressful demands of the modern lifestyle.

10 Reasons Why You Should Get Real About Your Photography


#6 Travel

Traveling to different parts of your own city or country, and if you are lucky enough to afford it, other parts of the world is a likely outcome of taking up photography. There is so much interesting stuff to photograph in other places including landscapes, wildlife, architecture, and people from other cultures.  Travel broadens the mind and exposes you to new concepts and ideas and is an excellent learning opportunity, provides so much creative

Travel broadens the mind and exposes you to new concepts and ideas and is an excellent learning opportunity. It provides so much creative variety and possibilities for personal growth. Taking the opportunity to travel, even just a couple of hours drive or bus ride away, can provide entirely new situations and vistas. Be brave and venture forth.

10 Reasons Why You Should Get Real About Your Photography

#7 Meet new people

Meeting interesting new people in your travel and adventures is often an unintended side effect. Asking the locals for advice on how to find the way to a certain viewpoint may lead to them showing you the way. Chance encounters with people curious as to what you might be photographing can lead to directions to other points of interest. Maybe you organize a meetup with local photo enthusiasts in your area and you make a new friend, a new adventure buddy. A random chat in a cafe might lead to a new client.

If you are friendly and courteous with your camera, many people are often happy to pose. In some cultures, it may be appropriate to thank them with a small cash payment, so research that in advance. Engaging with other people, even with the barriers of language, means you make more of a connection, and the resulting images may be much more powerful and emotional. While keeping personal safety in mind, be brave and say hello.

10 Reasons Why You Should Get Real About Your Photography

#8 Join a photographic community

Being part of the photography community can be very supportive. Sharing your passion with other people around the world, who speak your language, understand your challenges, and have had similar experiences can very helpful. Online forums can be good places to find those secret local waterfall spots, where certain rare birds might be nesting or come to feed. People may be willing to offer assistance with problems, critique on your images, and it’s just generally a welcoming place to hang out and chat about your hobby.

Join our dPS community on Facebook!

10 Reasons Why You Should Get Real About Your Photography

Photographer in their natural state at a PhotoWalk

#9 Develop a personal style

There are many different types and styles of photography. Some people prefer to label things, put them into boxes and tell you that you have to fit within their preconceived ideas. Rubbish! One of the great joys of photography is its ability to be adapted to every individual’s desires, needs, or preferred style. There is space for all different approaches within photography from the classic landscape, nature, wildlife, street, portrait, sports styles to all the different variations in between.

Whatever your passion is, you can explore it via photography in whatever creative way you want. When starting out it pays to have an understanding of the basic guidelines for composition, but don’t let them limit you to always stay inside them. Challenge them, break them, and see what happens. It might work, it might not, but either way, it will be a learning experience.

10 Reasons Why You Should Get Real About Your Photography

#10 It’s all about the light

Whatever light you have at any given moment is the light you need to work with. Modification of the light might be required – it may need filtering, shaping or diffusing. You might need special gear to adapt to certain light conditions, e.g. astrophotography has certain types of lenses that are recommended, fast glass is recommended for situations where light levels will be poor – sports events inside gyms, music and stage events, churches for weddings, etc.

10 Reasons Why You Should Get Real About Your Photography

Too much light can also be a problem with harsh shadows and blown out highlights. Differential light where you have patches of bright light and shadow within the area you are working, which makes it difficult to get a good exposure. Learning to use a flash or another artificial light source has its own challenges as well as added costs in buying the hardware required.

Learning to work with the light available and knowing how to adapt to it to get the best image possible is one of the biggest challenges photographers face. Light has color, depth, dimensionality, texture, tone, shadow, and behaves in certain ways, dependent on some fundamental rules of physics. One day there will be a moment when you finally “see” the way a photographer does when you see how light falls, how light and shadow are interdependent, and how you can use them to add depth and drama to your images.

10 Reasons Why You Should Get Real About Your Photography

Summary

Photography adds so much value to our lives, by recording special events, people, or places, as well as helping us learn and grow as people. It allows you to share your life and experiences in more meaningful ways via images, either online or printed and given as gifts. Or perhaps you might be quietly puttering away in your home studio, perfecting the art of the macro lens.

10 Reasons Why You Should Get Real About Your Photography

Photography is a hobby that offers so many possibilities for creative expression, technical expertise, and sheer variety of ways to capture an image. Age is not a barrier to learning a new hobby and you can start with the camera on your phone if that’s what you have available. Start getting real now!

The post 10 Reasons Why Photography is a Great Hobby by Stacey Hill appeared first on Digital Photography School.


Digital Photography School

 
Comments Off on 10 Reasons Why Photography is a Great Hobby

Posted in Photography


What learning photography and roller derby have in common

02 Apr

Sure, there are obvious differences between picking up a camera and playing a full contact sport on roller skates. Though you’re probably less likely to break your wrist taking pictures, the guiding principles of learning any new skill apply to photography just as much as roller derby. Trust me, I’ve started at the very bottom in both disciplines – I have literally been there and gotten the t-shirt. So many t-shirts.

As I head for the golden pastures where retired derby skaters go, I’ve done a lot of reflecting on the journey. Whether you’re fresh meat (that’s a real derby thing) or just a newbie photographer figuring out what PASM means, I think these basic principles apply.

You will be really, really bad for a while

When you’re new at skating, just staying upright is hard. You can see me demonstrating this point above at one of my earlier scrimmages.

Photo by Robert T. Bakie

With very few exceptions, everybody starts off bad. Like, really bad. In roller derby you’re a hot mess for a while until you learn how to move with eight wheels strapped to your feet. While it might be less obvious to a casual observer, starting out in photography is kind of similar. Until you get the basic principles in hand, there’s really no way around messing up a lot of shots. Don’t let it get you down.

Practice makes perfect, or at least better

By all means, read up on the fundamentals. Study the work of your heroes. But there’s no substitute for getting out there and getting dirty. As a beginning photographer, the more challenging situations you try to photograph, the more you’ll learn what does and doesn’t work. It’s the same in roller derby – you just need to log a lot of hours on the rink.

You’ll probably think you’re better than you are for a while

This is a photo of a telephone pole I took in 2009. It is Not Good. I thought it was something really special at the time.

The Dunning-Kruger effect – a surge of self-confidence that causes beginners to think they’re better than they are – is just as real in derby as it is in photography. Once you start seeing your skills improve, you’ll lack the frame of reference to know how truly bad you still are. And usually, someone or something will bring you back down to earth pretty quickly (refer to the photo at the top of the page for a diagram of what that can look like). That’s okay, it’s just another reason why the next tidbit is so important.

Seeking out feedback will help you see what you can’t

As humans we’re not great at spotting our own weaknesses, so seeking out someone more experienced in your field for some critique is invaluable. Listen and push yourself out of your comfort zone. Roll with people who are better than you are (you know, physically roll, or just go on a photo walk). Pay attention to what they do, but don’t stress out if you can’t quite keep up yet. You will eventually.

Once you master the basics, you’ll find your style

I’m still working on it but at least I’ve graduated from telephone poles.

We aren’t all an Ansel Adams, and we certainly can’t all be a Missile America. Some skaters, like yours truly, are wiry, bony types who look more at home at a Scrabble tournament than on the track. When you have good command of basic skills, you’ll start to see where your strengths are.

Similarly, with the nuts and bolts of exposure under your belt, a beginning photographer can start playing with different styles and subject matter. Pay attention to what you find you’re drawn to and build on your strengths.

Setting realistic goals will help you keep growing

Without goals, you’re just going in circles – aside from the literal circles that you roll in when you play derby. For best results, make your goals specific, realistic and achievable (you know, SMART) and find someone who can help keep you accountable for working toward them. Assign yourself a photo project and set deadlines for yourself, rather than sit at home worrying that you’re not shooting enough.

Don’t give in to Gear Addiction Syndrome

Gear Addiction Syndrome is real and it’s not just a problem for photographers. Many derby skaters can hold in-depth conversations about their preferences in knee pads and the secret sauce that is their wheel setup. Skating requires a certain level of gear smarts, but just as it is in photography, you can get too carried away making adjustments, particularly when you’re starting out.

In either case, experiment, find what feels like a good fit, and then embrace getting the most you can out of your kit before you start trying to upgrade everything in your (skate or photo) bag.

It will all start clicking and that’s when the fun really starts

This is what it feels like when things finally go right. There’s just a lot of actual blood, sweat and tears leading up to that moment.

Photo by Danny Ngan

The absolute best moments I’ve experienced playing roller derby and taking photos have been when instinct kicked in and I stopped thinking. I’ll turn a corner and see the best shot of my day materialize right in front of me, and I’ll have the right lens and the right settings to capture it. Or I’ll suddenly put a skill I’ve practiced for hours to use in a game.

Nothing beats that moment. Savor it.

Articles: Digital Photography Review (dpreview.com)

 
Comments Off on What learning photography and roller derby have in common

Posted in Uncategorized