RSS
 

Posts Tagged ‘Photographing’

10 Macro Tips for Photographing Insects

02 Aug

Photographing insects is a matter of good timing, patience and suitable equipment. Dismiss any one of these key factors and your photos won’t be satisfactory. If you’re fascinated by butterflies, spiders, dragonflies and any other bug in its minuscule environment, these macro tips will give you some techniques and approaches to achieve the perfect shot. Photo credit Pixabay.com   What Continue Reading

The post 10 Macro Tips for Photographing Insects appeared first on Photodoto.


Photodoto

 
Comments Off on 10 Macro Tips for Photographing Insects

Posted in Photography


12 Tips for Practicing Good Camera Etiquette When Photographing Events

07 Jul

It’s easy to get excited about having a good camera you can take with you to various events and activities. Being able to record the event in images to print or share is exciting and sometimes a nice thing to do for the people holding the event. But do you follow good camera etiquette? And what does that even entail? Let’s have a look.

camera etiquette - concert photograph

Low light situation with bright coloured stage lights made this shot difficult. I wanted to capture the colours of the lights, so I chose not to use my flash.

People attending the event may appreciate being on the other side of your lens. Some people are uncomfortable when faced with big professional looking cameras. Other people just want you to sit down and stop blocking the view for everyone behind you.

It can be a challenge to balance your desire to capture those special moments against a level of intrusiveness into the occasion. What are your options? What should you consider in advance?

camera etiquette - 2 ladies dancing

#1 – Is it appropriate?

Some religious ceremonies may not be the place to take a camera along. Photographing other people’s children is now something to be done with caution for a variety of security reasons. Are you blocking the view of other participants? Are you being a distraction? Have you just blinded everyone with your flash?

Were you asked to bring your camera along to the event and shoot? Have you got permission or approval to be shooting? These days it can be assumed that images will be shared online, not everyone may want to have their images shared, or to be tagged or identified in some way.

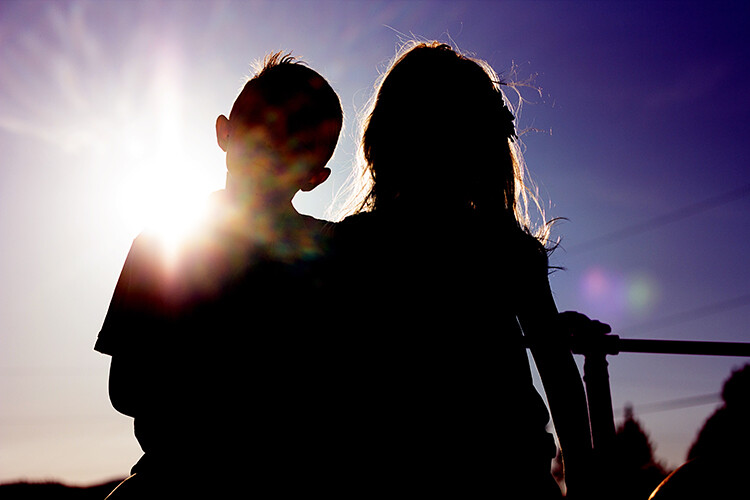
You can share relevant images of an event without showing the faces of attendees

#2 – Use discretion in your approach

So you rock up with a big DSLR body, big long lens, and your camera is clicking away audibly over the hushed sounds in a church. People are looking at you over their shoulder, others are grumbling about you being in their way. Maybe your flash just scared the birthday boy and he is now crying and scared? Sound familiar?

Being there with your camera doesn’t give you the right to impose or interfere with the event. Even a professional wedding photographer is there to be discrete, to capture the images without being the focus of the event. So standing up in the audience, blocking the view behind you isn’t okay. Distracting the performers or people involved with the loud shutter sound is not okay. Getting in the way of people to get the perfect shot is not the point of the event from everyone else’s point of view. They probably paid to be there too.

If you can’t get into the front row easily, if you feel you have to use your flash in a dark venue, if you are getting in the way of attendees or other people, then learn to identify a better time and place to be shooting. Enjoy the event instead and put the camera away.

good camera etiquette

Flash was used in this instance with the permission of the dancer, who was performing for our camera club. I specifically wanted to throw the background into darkness so the bright colours of her outfit glowed.

#3 – Get permission

Have you checked that cameras and photography will even be allowed at the event? Plenty of concerts, plays and similar events specifically ban photography. Sometimes they will announce it on stage before the curtain rises. Some venues specifically ban professional looking equipment, so are you prepared to have yours confiscated at the gate?

Depending on the country you live in, people have rights over how images of them are used. So they have the right to deny you the ability to take shots of them, especially at a private or family event. Not only should you ask for permission to shoot in advance, you should also clarify about what will happen to the images. Will you be sharing them online? Are people okay with that? Do you have model releases for images you might want to use commercially or in competitions?

good camera etiquette

This steampunk lady and her partner not only agreed to pose, they also signed model releases for me.

Are you shooting architecture? Have you checked what approvals may be required? Many buildings that you may assume have public access are actually privately owned. Some do have limitations on photography, especially if it’s a busy space and you want to set up a tripod in the middle of it. It is easy to think you have the right to shoot anywhere you want, but to avoid an uncomfortable situation with a security guard or police, do your homework in advance.

good camera etiquette

A day out shooting airsoft was lots of fun – I was taken along by one of the organizers who made sure I followed all the safety protocols.

#4 – Flash is rarely a good idea

Many events are held in quite dark spaces like; concerts, plays, musical events, sports, dancing, etc. Everyone in the audience is sitting in the dark, watching the action happen under the stage lights. Imagine how annoying it must be for someone to stand near the edge of the stage and light up the place with a camera flash repeatedly. Imagine how annoying and distracting (and potentially dangerous) it must be for the performers to have the flash bombarding them.

If you are in a low light situation where you cannot obtain good images with the gear you have, then put it away. If you need to do a lot of low light work, you may want to consider investing in a body with good ISO performance and a fast prime lens. But otherwise, don’t be the jerk with the camera spoiling it for everyone else by having your own fireworks show while you are trying to shoot.

good camera etiquette

Shooting an indoor swing dance event using a 50mm f/1.4 prime lens to maximize the use of available light and reduce the need to use flash allowed for more intimate images, as the dancers didn’t notice I was there most of the time.

#5 – Avoid conflict

Are you at a wedding or other event where a professional shooter has been engaged? Did you go up to them, introduce yourself, mention you had a camera and ask if it was alright with them if you grabbed a few frames for your own personal records? Did you gracefully put your camera away when they said no, that they didn’t appreciate an amateur getting in the way? Do you respect the wishes of the people organizing the event and allow the professional to do their job?

Did you avoid conflict with someone being paid to do their job, or did you cause a scene or aggravate them with your attitude? Were you professional?

If someone asked you not to take photos of them, did you agree? If someone asked you not to post images of them online, did you shrug and do it anyway? Did you consider your right to shoot and post more important than that of the people whose images you are using to promote yourself?

Are you covered legally if something bad happens as a result of your photography interference?

good camera etiquette.

This lady walked into my shot and is saying oops!

#6 – Participate and be present

How many times do you get asked along to a family event or social occasion? A few?  People are generally pleased to see you and chat and catch up about things. What happens when you bring your camera out? Are people then avoiding you? Do the invites stop coming?

Ask yourself an important question at any event you are tempted to take your camera along to – especially if it involves family or friends. What is more important – the people you are with and the event you are celebrating or is it your camera and photography?

Sometimes it is more appropriate for you to leave the camera behind, to actually be present and participate in the moment. To talk to and connect with people without the barrier of a camera lens between you.

Pick your occasions, your sister may be delighted by your offer to shoot your niece’s first school play outing (but the school or the other parents may not be). Or you could sit in the audience and enjoy the special moment for what it is.

good camera etiquette

Don’t forget to enjoy the barbecue!

#7 – Personal security

Walking the streets, or being in a big crowd with expensive camera gear hanging off your shoulder can be a dangerous exercise. Camera gear is obvious, people see you using it, and the big flashy stuff is usually worth a reasonable amount. Are you paying attention to your personal security and that of your gear? Do you want to be out alone at night in the city getting the gritty street shots?

Traveling to other countries is exciting, but they have different laws and situations. Have you studied in advance to make sure you are not causing any offences? Do you walk around with big branded straps on your camera and on your bags? Are you a walking advertisement for expensive camera gear just waiting to be grabbed when you leave it on a chair in a restaurant? Dress to blend in when you can.

camera etiquette

#8 – Don’t waste people’s time

Is your camera all set up and good to go for the lighting conditions you might encounter? Or are you standing there fiddling with the buttons while your subjects stand there awkwardly, wondering what’s going on?

good camera etiquette

Be ready to capture the best and most genuine smiles.

#9 – Engage your subject

This may well depend on the circumstances, but an image of someone looking at the camera and sharing some emotion makes for a far more powerful image, than a furtive capture from the sidelines. Take the time to say hello, introduce yourself, and explain why you are taking pictures.

Ask their name, if they are okay with you photographing them. Talk a bit about the event, get them interacting with you. Be sincere, everyone has an interesting story to tell, if only you take the time to listen. A few minutes is all it takes but the difference in the quality of the images will be huge. Plus it’s polite to treat people like people, and not just objects for your photography amusement.

good camera etiquette

I spent an afternoon with these lovely ladies at a Zombie Run and we had lots of time to get to know each other. So they were happy to spend some time lurching towards my camera when I proposed the idea.

#10 – Don’t compete for attention

If there are several photographers at an event clamouring for attention, you will get different people looking in different directions within the same image. The end result is not as nice as it can be, and can matter for things like group wedding shots. So wait your turn to get in front of the subject, don’t try to shoot at the same time as someone else (especially a hired pro doing their job!), and potentially ruin both your images.

good camera etiquette

I have the attention of two of the three guys, the one on the right is looking at another shooter next to me.

#11 – Take no for an answer

Some people hate having their photo taken, regardless of the situation or approach. There are many reasons for people not to want to be in front of your camera, so be respectful of their wishes. If they ask you to delete any images they are in from your memory card, then do it. If asked not to post images of people online, don’t. Your rights as a photographer are not more important than those of the your subjects.

good camera etiquette

#12 – Act professional even if you aren’t a pro

Lots of photographers hope to make money out of their hobby and interacting with customers is a key part of the business. Even if you are new and learning, be professional and courteous. Eventually when you are taking paying customers, you will have developed good habits and hopefully a good reputation as well. It will pay off. Have a business card with some contact information to assure people you aren’t a creep with a camera, but a genuine photographer. Who knows, it might also generate some new business for you.

good camera etiquette - dance troupe

This troupe performed at an event I was at and while I was taking some portraits in the lobby they saw me and asked me to photograph them. As I was happy to do that, then they asked if I could get a shot of this guy doing a high kick. The lighting was terrible and my camera wasn’t really up to it, but I agreed, took a few shots, and emailed the best ones to them the next day.

Conclusion

Remember that when you turn up at an event with your camera, it isn’t about you and your photography. It’s about recording the event in a way that doesn’t interfere with it, or disturb the other people or patrons attending. Respect people’s wishes and privacy, ask permission, follow good camera etiquette and everyone will be a lot happier about the situation. Don’t be a jerk, no one appreciates that.

The post 12 Tips for Practicing Good Camera Etiquette When Photographing Events by Stacey Hill appeared first on Digital Photography School.


Digital Photography School

 
Comments Off on 12 Tips for Practicing Good Camera Etiquette When Photographing Events

Posted in Photography


6 Great Reasons for Photographing New Destinations or Locations

02 Jul

It’s always good to go chasing that greener grass on the other side. Sure, you could stay home, but how much more fun it is to explore! There are obvious ways you can learn and grow by photographing locally, but equally, there are a lot of good reasons to throw off that comfort blanket and go for something new, new destinations.

To differing degrees we all have a drive and desire to see the unknown, below are the reasons this desire will enhance your photography. Take time to read this and factor them in when you plan your next trip away to photograph some new destinations.

6 Great Reasons for Photographing New Destinations or Locations

This photograph was taken at the Yeeping festival, this was the first time I’d visited this event. It was a real challenge shooting in low light.

#1 – Photographing new destinations provides a burst of creativity

Going somewhere new is a great way to kick-start your creativity, or perhaps build on an existing project that you’re already doing. That something new can inspire you into a new project, you could turn them into a set for a gallery. There are any number of themes you could try out from architecture, food, or people.

  • Try photographing the people in your new locale, a project like Humans of New York can be adapted to wherever you are now.
  • Combine existing image with a whole new set on a similar theme. Have you photographed churches in the UK? The style will be very different in other parts of Europe, and even more so if you find a church in Asia.
  • Get into some street photography by searching out a local market.
6 Great Reasons for Photographing New Destinations or Locations

This is a church on the Indonesian island of Sumatra. Prior to visiting this are I didn’t realize how many churches there would be. The design is very different to all other churches I have seen before.

#2 – It’s a test of your photography skills

Going somewhere new is a great test of your photography skills. How can you apply what you’ve learned at home to the new destination? If your eye has become sharpened through practicing at home, it will show when you travel somewhere new.

The point about a new location is it will seek out your weakness, you’re not familiar with the new place so you need to be familiar with your camera. Are you ready for the low light photos at a night festival that you will be photographing? You have one chance to get it right, are you ready for that?

Take the time to find out settings of similar photos to those you plan to take and practice in similar conditions before the event. Then when you arrive to photograph in a new destination you can test those skills, and gauge your level.

6 Great Reasons for Photographing New Destinations or Locations

Working with low light street scenes was a lot of fun, and different to the style of photos I usually take.

#3 – Getting the hero photo

There are places that you may travel to for specific photos that are unique and amazing. You simply can’t replicate the big city feel of Tokyo, Shanghai or Dubai when it comes to cityscapes. Equally, going to Angkor Wat in Cambodia or Bagan in Myanmar is light years ahead of visiting a small temple in your local town.

When you travel to these places, the aim is to get the big booming landscape, the photo you’ll hang on your wall or is the opening two-page spread to a magazine article. So what do you need to do to get those photos?

6 Great Reasons for Photographing New Destinations or Locations

  • Do your research. To photograph a new destination you need to google the place you’re visiting. Even better, visit photography sharing sites like 500px and Flickr to look at the best photos from the place you intend to visit.
  • Add you own unique spin. You may choose to use the same angle you’ve seen from other photographers, but if you can find your own unique style of photography it will stand out more.
  • Make sure it’s big! Detail photos won’t cut it, you need a wide-angle lens that captures the whole scene. This often means accessing a high vantage point to capture a big photo.
6 Great Reasons for Photographing New Destinations or Locations

I went to Dubai to photograph a new destination. There are plenty of hero photos to be found in this new mega city.

#4 – Escape the comfort blanket

Going somewhere new means you won’t have a nice comfortable fall-back photo to take, the one you know how to frame. This will force you to think about what you want to portray with your image, and in turn, it will help you grow as a photographer.

If you’re going from a busy city to the great outdoors or vice versa, then you will need to train your eye for that new environment to get the most out of it. Perhaps you don’t do street photography, but the night market is so vibrant you need to document it.

6 Great Reasons for Photographing New Destinations or Locations

This photo was taken on my first trip to India. India is certainly a country that doesn’t allow you to keep a comfort blanket!

#5 – The best location for your photography style

The chances are you know the style of photography you like best. You practice this style a lot in your home neighborhood. Unless you’re lucky, chances are there is a better location to take those photos. We are all looking to take photos that get a “wow” reaction, going to a wow location is a good way to achieve that.

Once again, decide which is your strongest photography style, and then visit the best place for that type of photo.

6 Great Reasons for Photographing New Destinations or Locations

  • Cityscapes. The bigger the better here so visiting cities like New York, Hong Kong, or London are your best bets. There are many new cities that are growing, Shenzhen near Hong Kong is said to have some amazing architecture.
  • Culture. Visiting places during their festival works well for this. The Yeeping lantern release in Thailand is a photographers dream. Many people aspire to visit India during Holi, or Venice during Carnival.
  • Nature. There are reasons that places like Iceland draw so many tourists, the nature is wild. If you enjoy photographing nature there isn’t a better place to go.

Now there are many places not mentioned in the above lists. The point is getting these photos means you need to travel there.

6 Great Reasons for Photographing New Destinations or Locations

On my first trip to Myanmar I tried photographing from a hot air balloon for the first time. This is one of the results.

#6 – Plan to be there when it’s unique!

Planning ahead is advised in all forms of photographic endeavor. The chances are you know when is the best time to photograph your local area. But to photograph a new destination at its best, research is needed.

Is this place best photographed in the morning or the evening? Which is the best season to visit? Are there flowers that bloom, or will there be snow on the mountain? The best photo opportunities can come during a festival, so when will that be? You can really improve the odds of getting great photos by being in a place at the right time.

6 Great Reasons for Photographing New Destinations or Locations

The Sydney opera house is one of the most well known buildings in the world. You sometimes need to go to places like this to get stand out photos.

You need to take a vacation!

Do you need an excuse to go on vacation? Of course, you do, and to photograph a new destination is as good an excuse as any!

We’d love to hear about your experiences of visiting somewhere new, so please share in the comments below. What type of photography do you enjoy, and where is your dream destination to practice that? Has a trip abroad ever kick started a project for you? How about going to a new place this weekend? It doesn’t have to be far from your area. Getting out with the camera and exploring is a great feeling, so let’s see your results!

6 Great Reasons for Photographing New Destinations or Locations

You’ll never find that pot of gold at the end of the rainbow, you might get a good photo of the rainbow though.

The post 6 Great Reasons for Photographing New Destinations or Locations by Simon Bond appeared first on Digital Photography School.


Digital Photography School

 
Comments Off on 6 Great Reasons for Photographing New Destinations or Locations

Posted in Photography


Tips from a pro: photographing fireworks with John Cornicello

30 Jun

Photographing fireworks with John Cornicello

Seattle-based photographer John Cornicello specializes in portraits, but has been photographing fireworks for years. He’s presented a class on it for CreativeLive, and with the Fourth of July weekend upon us, we figured we’d take a look at some of the major takeaways from Cornicello’s class.

For the nitty gritty details, check out Cornicello’s blog post on the subject here. All images and content used with permission.

Location

Once the show starts, you’re not likely to spend much time running around for different vantage points, although this of course depends on the length of said show. If possible, scout in advance, and look for clean views without power lines or trees in the way.

Scouting in advance is particularly advisable because it’s harder to spot these distractions in the darkness, and if you’re not careful, you can have black silhouettes intruding in your otherwise perfect image.

Looking for establishing landmarks can give your photos a little more context, to “establish a setting and help tell a story,” Cornicello says.

Stability

Most obviously, a tripod is the best tool for the job here. If you don’t have one and can’t get one in time, other options – outdoor furniture, fenceposts, the roof of your car – can all work in a pinch, but you won’t have the flexibility a tripod offers.*

If you must use those other options, keep in mind you can adjust the height angle of your camera with whatever props you can find to wedge underneath it; a wallet and cell phone combination can be all you need to get your lens up to the correct height.

If you have the means, a remote trigger can help keep the camera from moving at all from a press of the shutter button. Lastly, since you’ll be focusing near infinity and likely not moving much, it’s best to stabilize your focus by locking it in manual focus if your camera allows that.


* It’s true that many cameras have extremely effective built-in image stabilizers these days, but few of them are up to multi-second shutter speeds, regardless of whether you’re zoomed out or in. The possible exception may be Olympus’ newer interchangeable lens models, but you’re still likely to get more keepers by stabilizing your camera externally.

Exposure

Now this is one that Cornicello says people tend to overthink. As he says, ‘Fireworks are bright!’ You don’t necessarily need to raise your ISO to astronomical levels or have a fast lens to get good results. So let’s switch into ‘Manual’ mode and get everything dialed in.

Keep your ISO around 100 or 200 and stop down the lens – F8 is a good starting point, though Cornicello notes that displays have been getting brighter, so F11 or F16 may be necessary. Start with a 1/2-second or 1-second shutter speed time, and adjust your shutter speed from there as necessary depending on how many bursts you want to capture in a single image.

Also, it’s okay to chimp here to check that your settings are working as intended – just don’t get too carried away and miss the whole show.

And please, if your camera has a built-in flash, make sure it’s disabled. “The flash won’t help with the fireworks… but it will tend to annoy the people around you,” Cornicello says.

Gear

You’ll need a camera of some sort; having a full-frame DSLR or high-end mirrorless camera is obviously great, but even an app offering manual control of your smartphone camera will get you some usable images.

Zoom lenses are great for fireworks, as they let you change up your framing without having to leave your carefully scouted location. And since we’re stopping down, even a kit lens with a basic interchangeable lens camera or fixed-lens camera will work fine.

Cornicello points out that a zoom lens not only allows you to zoom to change your composition between shots, but you can also experiment with zooming during your exposure; you can also play with the manual focus during your exposure to mix things up further. We’ve touched on this earlier, but if your camera or lens features in-camera stabilization, it’s best to shut it off as they are mostly meant for handheld applications.

A few other goodies to have on hand? Cornicello recommends a small flashlight to help you change settings in the failing light, as well as extra batteries and a large memory card. Earplugs are, of course, down to personal taste and requirements.

The wrap

Photographing fireworks can be a fun way to turn a social outing you were already planning for into a photo outing with relative ease. If you’re new to photography, or just got your first interchangeable lens camera or a pocket camera with manual controls, it’s a great way to experiment and become more comfortable with exposure settings.

Head on over to John Cornicello’s blog for, in particular, more details on exposure and useful gear to have for the occasion.

And of course, we mustn’t forget the most important piece of advice Cornicello has to offer: Have fun!

Do you have any other tips or tricks you use when photographing fireworks? Have some images of your own you’d like to share? Let us know in the comments!

Articles: Digital Photography Review (dpreview.com)

 
Comments Off on Tips from a pro: photographing fireworks with John Cornicello

Posted in Uncategorized


Tips for Finding Potential in the Obsolete – Photographing Trash

27 Jun

Most people like photographing the new and the fresh – a bright flower, a laughing child, a dawning day, the beginning of an era. Yet beginnings are but a small and rare part of the human experience. The persistent passage of time leaves us with ever growing piles of both literal and figurative garbage; maybe that’s why we seek out the new, for a glimpse of something different.

Finding Potential in the Obsolete - Photographing Trash

Sometimes we have no choice but to dwell in the past. Why not take the chance to explore it? There is something to be found and shared in that which is already past its due date – items that have been thrown away or left behind. Let’s open up this world of opportunity I like to call Trash Photography and see if we can find something of value!

The Left Behind

You may have heard of Urbex, or urban exploration photography, where the photographer visits and captures abandoned urban places. The photos often have a haunted feeling. The same atmosphere can be achieved on a smaller scale as well, all you need is something that seems to have been abandoned.

Tips for Finding Potential in the Obsolete - Photographing Trash

I found this old, rusty pair of scissors hanging on an old shelf at a friend’s cottage.

It doesn’t have to be something eerie. It can also be something out of place, something intriguing or different; a scene that gives a sense of a time gone by.

Tips for Finding Potential in the Obsolete - Photographing Trash

Old fuse insulators found in storage at my grandparents’ place.

Found Treasure

Trash and treasure might not be synonyms in your vocabulary, but for a photographer, they can be! Many things are thrown away because they don’t serve their original purpose anymore. That doesn’t mean that the object is useless – all it takes is a bit of inspiration and a creative mind.

Tips for Finding Potential in the Obsolete - Photographing Trash Tips for Finding Potential in the Obsolete - Photographing Trash

I found an abandoned LCD TV in the recycling room and decided to borrow it for a project. The screen was indeed broken but not completely. With the addition of some intentional camera movement I managed to create something quite abstract.

But treasure doesn’t have to be shiny. It can also be a fascinating pattern or a revelation.

Tips for Finding Potential in the Obsolete - Photographing Trash

An alien skull or an old hair clip?

Contrasts

If you’re attempting to make an interesting photograph, capturing some kind of contrast usually works surprisingly well. When focusing on garbage or trash, the most obvious thing to contrast it with would be something new.

Tips for Finding Potential in the Obsolete - Photographing Trash

Apart from the contrast between old and new in this picture, there are also contrasts between organic and metallic, and a rusty color versus the green of the leaves.

You can also create contrast by challenging expectations.

Tips for Finding Potential in the Obsolete - Photographing Trash

This broken laundry machine standing outside in the rain, surrounded by laundry, offers another kind of contrast.

Which brings us to the last topic . . .

The Story

Telling a story with just a picture is hard, but it’s a challenge worth taking on. In terms of trash, it can be a story about human nature, environmental issues, the passage of time, there really are no limits.

Tips for Finding Potential in the Obsolete - Photographing Trash

The pile of discarded water bottles with a beautiful waterfall in the back might seem significant – what does it tell you?

Try it out and see what stories you might be able to tell!

Tips for Finding Potential in the Obsolete - Photographing Trash

The abandoned fishing net begs the question of why it was abandoned. Was it lost? Thrown away? Might it pose a threat to someone or something?

Conclusion

What do you think, is there any point in photographing trash, or does this just seem like a waste of time? I would love to hear your ideas and see your creations from Trash Photography in the comments below.

The post Tips for Finding Potential in the Obsolete – Photographing Trash by Hannele Luhtasela-el Showk appeared first on Digital Photography School.


Digital Photography School

 
Comments Off on Tips for Finding Potential in the Obsolete – Photographing Trash

Posted in Photography


NASA spacecraft struck by meteoroid while photographing the Moon

03 Jun
The collision of a meteoroid with the Lunar Reconnaissance Orbiter’s Narrow Angle Camera resulted in this wavy image.

NASA/Goddard Space Flight Center/Arizona State University

A camera on NASA’s Lunar Reconnaissance Orbiter survived a direct hit from a meteoroid no larger than the pin of a head that was traveling at incredibly high speeds. Despite its small size, tiny meteoroids can inflict significant damage on space equipment, especially instruments as delicate as a camera.

According to NASA project scientist Mark Robinson, ‘In this case, (the camera) did not dodge a speeding, but rather survived a speeding bullet.’

The incident actually occurred in late 2014, but was not made public until recently. The Lunar Reconnaissance Orbiter has been mapping the moon’s poles ever since its launch in 2009. And its cameras – manufactured by a small company called Malin – are known for being particularly tough. In fact, Malin cameras are also used on the Mars Curiosity rover.

Articles: Digital Photography Review (dpreview.com)

 
Comments Off on NASA spacecraft struck by meteoroid while photographing the Moon

Posted in Uncategorized


Comparing a 50mm Versus 85mm Lens for Photographing People

12 May

As a writer for Digital Photography School, one of the most frequently asked questions I receive from beginner and intermediate photographers is, “If I have to choose just ONE lens to buy right now, which one should I choose?” We’ve previously discussed the differences between a 24mm lens and a 50mm lens for photographing people, and in that same vein, it’s time for another lens showdown!

lens photographing people

In this article, we’ll be discussing the differences between an 85mm and a 50mm lens for photographing people. Once again, I’ll walk you through several sets of similar images taken with each lens so that you can easily see the differences between the two. Hopefully, you can walk away with a better understanding of which lens might be the best upgrade for you.

To keep things consistent, all images in this article were taken with a Canon 60D, and either the Canon 50mm f/1.8 lens or the Canon 85mm f/1.8 lens. The Canon 60D is an APS-C sensor (cropped sensor) camera, so in order to determine the functioning focal length of these lenses on this camera, multiply the lens focal length by 1.6 (multiply by 1.5 if you use Nikon). So on a cropped sensor camera, the 50mm lens functions roughly as an 80mm lens, and the 50mm lens functions as a 136mm lens.

1. Differences in Depth of Field

lens photographing people

This image was taken with Canon 85mm lens at f/1.8.

One of the biggest differences between the 85mm lens and the 50mm lens is the distance that you’ll need to stand from your subject. With the 85mm lens, the minimum focusing distance is 2.8 ft, and with the 50mm lens, the minimum focusing distance is 1.15 ft.

This means that in general, you will be standing further away from your subject with the 85mm lens, than you will with the 50mm. In turn, this decreases the depth of field, which means that images shot with the 85mm lens tend to have much blurrier bokeh than images shot with the 50mm lens, even when using the same aperture.

lens photographing people

This image was taken with a Canon 50mm at f/1.8.

You can see the difference clearly in the cherry blossoms in the background of the two images above, both of which were shot at f/1.8. The cherry blossoms are fairly well blurred in both images, but the shape of the blossoms is more defined in the image taken with the 50mm lens, and the blossoms are significantly more blurred and creamy in the image that with the 85mm lens.

Of course, everyone has a different preference when it comes to bokeh. Some prefer the more uniform creaminess that the 85mm lens offers, while other photographers prefer to have a little more definition in the background.

lens photographing people

Left: 85mm lens | Right: 50mm lens.

You may even find that you prefer different approaches in different applications! For example, I usually favor the more uniform bokeh of the 85mm lens. However, when I’m photographing in the grass, I prefer the bit of texture which the 50mm lens provides (see the examples above).

This is purely a matter of preference, so start making mental notes about which type of images you tend to prefer when you look at other photographers’ work. If you find that you are always drawn to the creamier texture, then the 85mm lens may be a better fit for you. If you prefer a bit more texture in the background, you may want to consider the 50mm lens instead.

2. Differences in Framing

lens photographing people

This image was taken with 50mm lens.

In addition, spend some time thinking about the content of your backdrops. Using an 85mm lens will result in an image that is more closely framed on your subject. On the other hand, shooting with the 50mm lens will result in an image that includes more of the background (though not nearly as much as shooting with the Canon 24mm lens).

Do you happily hike up to the top of a mountain for a photo session? You might want to consider the 50mm lens in order to more fully capture the trees and vistas in the background behind your portrait subject(s).

lens photographing people

This image was taken in exactly the same place as the previous one, only using the 85mm lens instead of the 50mm.

On the other hand, do you often find yourself trying to disguise the background in your images? Do you shoot on location with backgrounds that are sometimes out of your control and/or unpredictable?  In that case, you may want to consider the 85mm lens.

When you combine the decreased depth of field of the 85mm lens with the closer framing of your subject, the 85mm lens is stellar at creating beautiful portrait images at almost any location.

3. Differences in Shooting Distance

lens photographing people

This image was taken with 50mm lens.

Remember when I said that when you’re using an 85mm lens you’ll be standing further away from your subject than you would be using a 50mm lens? Here’s another reason why that’s important to know, I almost never use my 85mm lens inside our home.

Our house is just over 1,000 square feet, and depending on the room, sometimes I physically cannot back up far enough to use my 85mm lens. Aside from official photography business, it’s important to me to be able to capture little day to day moments of our family, and so having a fast lens that I can use indoors is a must-have for me.

As much as I love my 85mm lens, it just isn’t a great fit for that purpose given the size of our home. Your mileage may vary.

Lens photographing people

This image was taken with 85mm lens.

On the other hand, when we’re outdoors I often prefer my 85mm lens. In that situation, standing further away from my subjects is a good thing. I can let my kids play and have fun without being all up in their business. Having a bit more space between them and the camera means that they’re able to relax more easily, which in turn leads to more genuine expressions and candid smiles.

Conclusion

As you can see, both of these lenses are great for capturing portrait-style images of people – I personally keep both in my camera bag and use them with near equal frequency.

That said, if you’re only able to purchase one lens right now, both lenses have situations in which they outshine the other, so it’s important for you to think realistically about your preferences and the way you’ll use a portrait lens most often in order to get the most bang for your buck!

If you have one of these lenses – which do you use the most for people photography?

The post Comparing a 50mm Versus 85mm Lens for Photographing People by Meredith Clark appeared first on Digital Photography School.


Digital Photography School

 
Comments Off on Comparing a 50mm Versus 85mm Lens for Photographing People

Posted in Photography


3 Lighting Setups for Photographing Headshots

28 Apr

I do a lot of corporate and actors headshots around Washington, DC and I wanted to share some of the simple but effective lighting setups that I use over and over, which you can easily copy and use yourself.

lighting for headshots

The One Light Wonder

My standard setup consists of a large soft light source to the left or right of the subject, a reflector under the face, and another reflector opposite the main light source. I shoot hundreds of headshots per year using this simple setup. I use a Paul C. Buff Einstein unit with a large octabox in my studio, but you could easily put together something similar with a cheap speedlight, an umbrella, and a couple of $ 20 reflectors.

You can see this setup in the photo below, with my poor wife Karen standing in as a subject. She was just coming downstairs to make some tea, and got ambushed!

headshots lighting

Reflectors and adjustments

Once my subject is in place, I do some tweaking. First I will adjust the light source so it is slightly above their eye level. For most people, I think it looks best to have the light coming from above to cast subtle shadows under the chin, accentuating the jaw and helping to hide any double chin.

Then I will adjust the reflector underneath their face and bring it up to about their mid-chest level. This reflector helps fill in shadows on the face and provides a really nice extra catch light in the eyes. Some folks will use another (powered) light source down here, but I find the reflector to be much simpler to set up, and it also has the virtue of being idiot proof.

For example, if you have another light instead of a reflector below the subject, and you accidentally overpower it (so it is more powerful than the main light), you have created some horrible Frankenstein lighting! It is physically impossible to do this with a reflector, which can save from you from costly mistakes.

headshots lightingYou can see the side reflector in my studio in this photo (it’s just to Karen’s left).

Finally we have the reflector opposite the light source. For this one, I will often use a black-sided panel to create a darker shadow on that side of the face. This effect can be very dramatic, and has added benefit of slimming the face. The downside is that if your subject is very wrinkly, you’re not filling those wrinkles with light from that side. So it doesn’t work for everyone.

Here’s an example where of a headshot where I used this effect to create a nice dramatic edge:

headshots lighting

Some additional tweaks

With this simple setup, it’s very easy to make tweaks and see what works best with a particular person’s face. Often I will leave the basic setup in place with the black reflector, but a few examples where I might make changes are:

  1. The subject has a double chin, so I really want to define the jaw. In this case, I may raise the light up extra high to cast more shadow under the chin (make sure you don’t go too high and lose your catchlights), and/or lower or remove the under reflector.

headshots lighting

  1. The subject has long dark hair. In this case, the dark reflector is not necessary because we already have a dark edge there from the hair. So in this case I would go with a white reflector on the side or bring in a hair light from behind (more on that in the next section)

In the photo below, you can see a lot of detail in her hair on the shadow side. That’s because I brought my big white reflector in close.

headshots lighting

  1. Subject has deep set eyes. We want to fire more light into those sockets or our poor subject will end up looking like a serial killer or a cave man! In this case, I might lower the main/soft light so it is right at eye level.

Two Lights

You could run a whole business just using the one light system, but if you’re anything like me you get bored and like to try new things. So let’s bring in a second light.

The second light for me is usually a “kicker” (also called a rim or accent light) coming from behind and opposite the main light. I use this to accentuate the jaw, especially in men, or hair in women. It’s especially nice to create a little highlight on darker hair.

In the photo below, I needed a way to separate this young man from the dark background. My kicker light did the trick!

Headshots lighting

In my studio, I use a strip softbox for this purpose, but you could also use a bare head with a grid or even an old speedlight with a paper towel roll taped to it to make a simple snoot. The important thing is that you want to control the light so it doesn’t spray into your lens and create flare or lack of contrast.

You can see my kicker light in this setup shot with Karen.

headshots

Three and Four Lights

I use lights three and four to create a clean white background. You can either use one light fired at the background from just behind the subject, or two lights off to either side.

The white background is my favorite look these days for a lot of reasons. I think it looks super bright, modern and happy, and really pops on LinkedIn and other online profiles. It is also a great way to go for companies because it is easy to replicate and get a consistent look from shoot to shoot (for example, when photographing a new employee months after the initial shoot, or replicating the same look with shoots done across the country by different photographers).

headshots lighting setups

headshots lighting setups

headshots lighting setups

headshots lighting setups

Whether you use one or two lights for the background depends on your budget and the space where you are working. Two lights can give you a larger more even spread of light, whereas with one light you might have some fall off around the edges that you need to clean up in post-production. So I usually stick to two lights unless I’m on location somewhere and space is tight.

Conclusion

So I hope you all found this article helpful and you can use the lighting setups for your headshot. I look forward to your comments and questions!

The post 3 Lighting Setups for Photographing Headshots by Dennis Drenner appeared first on Digital Photography School.


Digital Photography School

 
Comments Off on 3 Lighting Setups for Photographing Headshots

Posted in Photography


5 Tips for Photographing Street Portraits

16 Apr

Isn’t it always the way that the most daunting things in life are usually the most rewarding? It takes a certain amount of backbone to shoot street portraits. Whether it’s walking up to a total stranger and asking their permission, or taking a more candid, reportage style approach, many photographers get put off through lack of confidence.

It’s a great shame because there is no more fascinating photographic subject than people.

Street portraits Thailand

If you follow the Humans of New York project, you’ll know that every single person has a story to tell; sometimes uplifting, often heartbreaking, occasionally hilarious. The very best street portraits give us a glimpse at those stories in a single frame.

If you’ve always wanted to give it a go but have yet to summon up the courage, hopefully, the following tips will give you all the motivation you need.

The approach

The first time you approach a potential subject is going to be the hardest. It can sometimes feel like an insurmountable hurdle. But try and think about it from your potential subject’s point of view. He or she is going about their daily routine, possibly doing the same thing they have been for years and finding it all a little boring. Then, out of nowhere, someone has judged them interesting enough to want to take their picture. Chances are, you’ve just made that person’s day. At the very least, you’ve given them an anecdote to tell their friends.

He or she is going about their daily routine, possibly doing the same thing they have been for years and finding it all a little boring. Then, out of nowhere, someone has judged them interesting enough to want to take their picture. Chances are, you’ve just made that person’s day. At the very least, you’ve given them an anecdote to tell their friends.

street portraits photography China

Different methods

So, what’s the best way to approach someone? Different photographer’s stand by different techniques. Some just come straight out and ask if they can take a picture. Others want to try and make a connection first in a more roundabout way, striking up a conversation or asking questions.

One psychological technique favored by many salesmen is to first ask for a small, unrelated favor, such as directions or whether they have the correct time. Studies have shown that once someone has done you one favor, they’re much more likely to say yes to another, bigger one. Don’t ask me why—people are complex!

In any approach, confidence is obviously vital, but enthusiasm is just as important. Enthusiasm is contagious. Be genuinely interested, listen carefully to what they’re saying and be respectful. Also, if you can make them laugh, or at least smile, you’ll find all their barriers will start to lower.

The environment

Street portraits market London

Where you find your subject (i.e. their environment) can sometimes tell you as much about them as what they look like.

Finding an impeccably groomed city trader striding around the financial district is to be expected. But finding him in a crowded flea market hints at a story. If the environment adds to the portrait, include as much of it as you need to enhance the photograph.

If you want your portrait to be all about the person, if they have an interesting face or you want to highlight the way they dress, try and find a background that won’t distract from them. A busy background can confuse the eye and take away from the impact you’re trying to make. If you need to, open up your aperture to throw the background out of focus and bring attention back to where it should be.

Street portraits photography East Timor

The eyes have it

The most important part of your portrait will always be the eyes. The eyes tell us everything; how the person is feeling, what they’re thinking, if they’re happy or anxious, and even if they would rather you stopped taking their picture.

street portraits photography China

Eye contact

Eye contact is incredibly powerful in real life. If you’re talking to someone and they maintain a natural, unwavering eye contact, there’s something primeval that makes you trust them and creates a connection. It’s the same with a portrait. You need that eye contact to make a successful shot.

If you photograph a subject who’s not looking directly back at you, the natural instinct is to follow their gaze to see what they’re looking at. You can sometimes use this to your advantage to draw the viewer’s eye towards an element of the picture you want them to focus on. For example, in this shot of a man carrying baskets full of rabbits, the eye line of the two children always brings us back to the cages.

street portraits candid photography China

On a technical note; as I’m sure you’ve noticed, people tend to blink. Try to take a quick burst of shots of your subject to ensure you capture at least some with their eyes open. Autofocus systems can also tend to hunt around, and taking more shots increases your chances of grabbing a pin sharp image.

The candid street portrait

If you’re looking for a way to ease yourself into this genre, shooting candid street portraits holds some definite advantages. You do away with the whole nail-biting business of asking permission and perhaps suffering a rejection. You capture people as they really are rather than the front they put up when a camera’s pointed at them.

But that’s not to say candid street photography is easy. If anything, it’s more difficult (or, at least, a different kind of difficult) and can be just as nerve-wracking.

street photography portrait candid Jerez

Your timing has to be split second in order to capture the spontaneous moments that occur all around you. You need to know your equipment inside out in order to be able to frame a great composition and adjust settings as needed quickly.

Capturing great candid street pictures takes a great deal of practice and a lot of luck. Whatever your personal feelings are on the ethics of taking someone’s photo without permission, there are people who really don’t appreciate it.

It would be very unlikely you’d get into any serious trouble, but it’s worth using your street smarts and common sense. As a personal rule of thumb, if a certain person looks too mean for me to even consider asking permission to photograph them, there’s no way I’d try and sneak a shot.

The technicalities

Whatever type of street portraits you’re taking, the one thing you don’t usually have on your side is time. With candid shots, you’re constantly reacting to the world as it unfolds in front of you at its usual breakneck pace, and with the more posed approach, you’re still cutting into someone’s, probably busy, day.

You need to be able to work quickly, without fussing over settings or lens changes or tripping over bags. Keep your equipment as simple as possible—a single camera body and a zoom lens that covers all eventualities. I put a lot of trust in my Canon 24-70mm f/2.8L. It might not have the widest aperture in the world, but I’m happy to trade that for the versatility.

I generally shoot in Aperture Priority as well. So I only really need to think about the depth of field I want in a shot and let the camera’s far superior brain work out the rest of the details for me.

street portrait photography China

One area where you do need to stock up is memory cards. Make sure you have plenty of storage space with you, you’ll be taking a lot of images—especially if you’re heading out for a day of sneaky candid shooting. Throw in a couple of freshly charged batteries as well, just in case.

Conclusion

Like every area of photography, shooting street portraits has challenges all of its own. By far the most difficult thing to overcome is finding the courage to approach your subjects.

The good news is, if you’ve always felt too intimidated to attempt this genre of photography, you’re in esteemed company. Legendary names such as Diane Arbus and Elliott Erwitt have said they’ve used their cameras as both a kind of license to take photos and to act as a barrier between them and their subject. There’s still something mysterious about a camera that intrigues people—even more so these days when most photos are taken on phones.

street portrait photography candid Jerez

All it takes is a little daring, a projected air of confidence, and you can capture some unique moments and great street portraits.

The post 5 Tips for Photographing Street Portraits by Andy Callan appeared first on Digital Photography School.


Digital Photography School

 
Comments Off on 5 Tips for Photographing Street Portraits

Posted in Photography


5 Non-Portrait Ideas For Photographing Kids

15 Apr

When it comes to photographing kids, we spend a lot of time discussing how to capture images of them smiling naturally and looking at the camera. Of course, every parent wants that sort of image of their child or children, and learning how to cultivate those genuine reactions is an important skill for any photographer to have.

photographing kids

That said, full-face portraits are just one small type of people photography. When it comes to photographing kids in particular, if you only capture that style of image, you’re missing out on a whole lot! Here are five things not to miss when it comes to photographing your children!

1. Little Details

photographing kids - details

Fingers. Toes. Eyelashes. When it comes to photographing kids, don’t forget to capture the little details! Years later, a photo of dirty feet will bring to memory hours spent playing in the backyard. Mismatched fingernails will remind parents of the “I’ll do it myself!” years of budding independence. These aren’t (typically) the photos that make it onto Christmas cards or Facebook profile images, but they are images that parents will be thankful for down the road.

photographing kids - details

2. Silhouettes

photographing kids

It’s amazing how much body language can convey in a photo, and that’s never more evident than in the case of a silhouette. I love capturing silhouettes of kids because they highlight body language and details in a different way than a full-face portrait does.

In a standard portrait, the wisps of hair take a backseat to adorable toothless smiles. I love a good toothless grin, but I want to remember the cowlicks and hair wisps as well. I want to remember the way that the kiddos sat on top of a fence so close to each other that not a single ray of light was able to sneak through.

photographing kids - silhouette

Don’t forget to try silhouettes from a number of different facial views. Try them with the kid facing away from your camera. Try them with the kiddo facing the camera head-on. Definitely, try them in profile! Again, it draws attention to the little details like the shape of their nose and their facial features.

3. Their Little Quirks

photographing kids - quirks

This category is one instance where you’ll be at a huge advantage if you’re photographing your own children (or close relatives) because you know your kids best.

You know the silly way they sit on their feet while they’re eating. You know the way they press their hands into their face while they’re making up a “once upon a time” story. Only you know the goofy faces that they make and you also know the way that one kiddo always tries to photo-bomb the other. You already know the funny little quirks that your own kids have, so make sure to photograph them!

Take it from me, you won’t remember them as well as you think you will, and someday you’ll be grateful for the reminder.

photographing kids

4. Sleeping

photographing kids

This is a category of images that is easy to forget about, but I really try to make an effort to occasionally photograph my kids while they’re sleeping. The other day, my first grader fell asleep unexpectedly. She has the tendency to act older than she really is in a lot of different ways, so my expectations for her tend to be pretty high.

I grabbed my camera and snapped a few photos because I was struck by how young she looked while she was sleeping. Nearly every time that I make the concerted effort to photograph my kids while they’re sleeping, I find myself thankful for the reminder that even though they may act older than their ages, the truth is that they’re still little.

5. Different Angles and Facial Views

photographing kids

As I look through the many, many photographs that I’ve taken of my children, there are very few images that are shot from unusual angles and different facial views. Anytime I find an image that’s shot in silhouette, I’m always pleasantly surprised! There aren’t many of them, but I’m always pleased to come across them because they capture a different sort of expression than full-face images. In my experience, kids aren’t typically photographed in profile very often, and I think it’s such an important aspect in capturing their personalities!

Similarly, I always try to get down to their level when I’m photographing kids. That’s usually a good thing, but on occasion, it’s nice to have an image that’s shot from above, below, or other non-traditional angles. Make an intentional effort to photograph your children from a variety of different perspectives – you won’t regret it!

Over to you

Please share your tips for photography kids below as well as your images. I’d love to see them.

The post 5 Non-Portrait Ideas For Photographing Kids by Meredith Clark appeared first on Digital Photography School.


Digital Photography School

 
Comments Off on 5 Non-Portrait Ideas For Photographing Kids

Posted in Photography