RSS
 

Posts Tagged ‘Photographing’

Let Them Run Around: Photographing Children

16 Jan

The girl in this photo was like the Energizer bunny- she wouldn't sit still! This photo was taken as part of a family portrait session. The posed shots were challenging because three young children didn't want to sit still. Once we allowed her to play in the surf a little, we got much better shots of her.

I am often asked by people, “What can I do to get my children to sit for a photo?” Children can be among the most compelling of subjects to photograph, and as a professional, one of the most profitable.  But children have this odd tendency to want to move around, and not sit still.  This can at times be frustrating when looking for that perfect portrait.  To combat this, as a photographer, a change in mindset is in order. Rather than trying to force the child to sit still, try allowing the children to move around.  Let them get involved in exploring their surroundings. No, you won’t get the traditional portrait of the subject sitting in front of the camera, but you may just get something better, more natural, and more fitting with the child’s personality.

Children can sometimes be the hardest subjects to photograph because they become self conscious in front of the camera.  The worst thing I’ve ever heard a parent say to a child when being photographed is something along the lines of “Let’s see a REAL smile!”  Parents think they are helping but saying such things makes the child wonder what’s wrong with the smile they just gave, and the next one will invariably be worse.  By putting children in their own element, allowing them to explore, to play, you elicit a more natural response that shows their true personalities.

This shot was taken in the child's own home. She was shy around the camera and wouldn't sit still for me. By allowing her to roam around, talk to me, get to know me, she let her guard down, and I was able to get some candid shots of her.

One of the ways to encourage children to be themselves is to put them in a setting that they’ll want to explore. A studio setting, while great for the photographer, can be a nightmare for children.  The lighting, the stands, the backgrounds are at times intimidating and at others distracting.  If a child is going to be distracted, have them be distracted by something that will make a great picture. Often, when I am approached by people to photograph their children, I’ll suggest a setting like a beach, a park, or even their own bedroom. These types of settings put them at ease. Once they are at ease, a variety of shots, including the traditional portrait, can be captured.

Another tack to take would be to schedule the session to specifically be a play session.  In the winter, with snow on the ground, a hillside with sleds can be an ideal setting for capturing children.  Bring a couple of sleds and let them have fun! Build a snowman! Have a snowball fight! In the summer, at the beach, playing in the water and in the sand provides a wonderful glimpse into children’s personalities. A pool will work just as well. Any park setting with a jungle gym is a great starting point for a children’s session. Let them climb, let them swing, let them get dirty.

Get the kids out and let them play!  Just be sure you are ready with the camera when they do.

In the winter, a snow-covered hillside can be the perfect setting for a children's session.


Post originally from: Digital Photography Tips.

Check out our more Photography Tips at Photography Tips for Beginners, Portrait Photography Tips and Wedding Photography Tips.

Let Them Run Around: Photographing Children


Digital Photography School

 
Comments Off on Let Them Run Around: Photographing Children

Posted in Photography


Photographing People – D5100 – Nikon

01 Jan

Nikon School presents DVD Fast, Fun & Easy Great Digital SLR Pictures & Movies 7 D5100 – Nikon
Video Rating: 4 / 5


Digital Photography – Photographing Outdoor Sports Part 2 Shutter Priority

19 Dec

blog.jaredpolin.com Here in part 2 I go into detail on using Shutter Priority for shooting sports outdoors. What is it, what are the benefits of using it and how it works. Make sure you watch the very end for a sneak peek of shooting better hockey pictures. Shot with the NIKON D3S


Photographing the Moon with a DSLR and a Telescope

04 Dec

See my lunar eclipse photos at: www.flickr.com Scopetronix is no longer in business, so maybe try www.telescopeadapters.com. I don’t know them, but they seem to sell the same kinds of adapters for about the same price.

This video produced for us by the excellent Gavin Hoey shows how to use a 3 light setup in a coventional 3 point lighting setup he also shows how to light a white background. Although this is for video lighting this would still apply to still photography and these lights are strong enough for portrait photography. Enjoy Got to product www.smick.co.uk
Video Rating: 4 / 5

 
Comments Off on Photographing the Moon with a DSLR and a Telescope

Posted in Photography Videos


Photographing Crowds at Concerts

22 Nov

The Maine (Explored #104)

It’s not just the band on stage that make for interesting subjects at concerts; the crowd can lend itself for painting a vivid picture of the event too. However the trouble with concerts is the lack of available light, so here are a few suggestions to make the best out of the situation to help you capture the throng of revellers.

N*E*R*D 8

Push the ISO

Concerts are typically shrouded in darkness with intermittent lighting, but because of their busy nature they are no place for a tripod, so you’ll have little choice but to ramp up the ISO.  Before you attend the concert take a series of shots of the same low-light scene at different ISOs, you’ll then be able to gauge at what point noise becomes too distracting. Then when you attend the concert be sure not to go too far above this sensitivity. For the best results, team your camera with a fast lens to capture the action at a wider aperture.

Underoath @ Koko, London 2010

Forget the Flash

Although the crowd’s attention will probably be focused on the stage, it’s best not to use a flash otherwise you could give away your intention of capturing candids of the audience which will affect the results achieved, but you may also temporary blind someone stood in close proximity. Instead use the stage’s lighting for illumination and ambience. You can even achieve some striking silhouette shots in this way, particularly if coloured lights are being used. Simply use spot metering, reading from the stage to throw the audience into darkness, shoot towards the stage, catching revellers with their hands stretched high in celebration.

Do You Realize?

Use what’s Available

Pay attention to the lighting choreography and use your knowledge of the band’s music to judge when the crowd will be illuminated. It may take a few verses to notice a pattern emerging between the lighting and music, so expose when your subjects are well lit, de-press to focus on the burst of light and fire at the next opportunity. If the beams of light are short-lived or your camera has a noticeable shutter lag pre-empt the opportunity by firing a second or so before the light falls on the crowd.

Parkpop 2009 - The girls in the crowd

If all else fails…

If after the concert you feel you pushed the ISO too high to get sharp shots and returned home to find your frames riddled with noise, then run it through a noise reduction program like Noise Ninja or even try getting creative by converting it to black and white for film-inspired feel.

Skrillex, Rialto Theater, Tucson AZ

Post originally from: Digital Photography Tips.

Check out our more Photography Tips at Photography Tips for Beginners, Portrait Photography Tips and Wedding Photography Tips.

Photographing Crowds at Concerts


Digital Photography School

 
Comments Off on Photographing Crowds at Concerts

Posted in Photography


Photographing a Bottle: A lighting Lesson

17 Nov

By Jay P. Morgan. This video is part three in a three part series about soft boxes. In this video we use soft boxes to light the Rocket Fizz Bottle. There are a lot of ways to light a bottle but we chose to show yo how to accomplish it using soft boxes as part of our series. This finished bottle was then com-posited into the image of our talent. By going to our Facebook page you can see the lighting buildup. I posted the images there that show the lighting step by step. www.facebook.com Keep on click’n! Jay P. Morgan theslantedlens.com www.facebook.com www.kesslercrane.com henselusa.com
Video Rating: 4 / 5

 
Comments Off on Photographing a Bottle: A lighting Lesson

Posted in Photography Videos


Catching The Action: Photographing Youth Sports

05 Nov

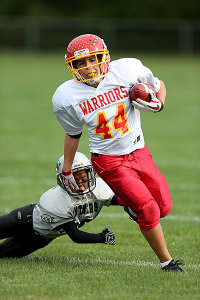
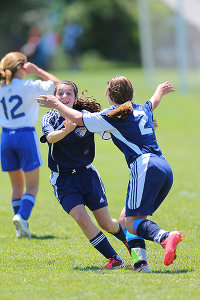
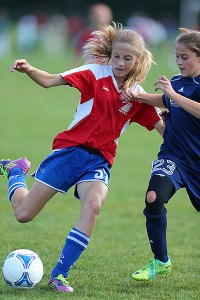
The action is almost always more dramatic when it is coming towards the photographer.

 One of the most popular subjects people photograph is their children.  Everyone is always showing off photos of their little ones.  And when those little ones grow bigger, we photograph their activities. One of the more challenging children’s activities to photograph is youth sports.

With a few exceptions, sports tend to take place on large fields, where a photographer will have limited ability to get close to his subject. Couple that fact with a lack of control over lighting, and sports of any level can be a challenge to photograph.

The biggest issue most beginners seem to have with sports is stopping action.  Motion blur, caused by using too slow a shutter speed, frustrates many new sports photographers.  The bottom line here is very simple: a minimum shutter speed of 1/500 is needed to freeze action.  The longer the lens, the faster the shutter speed needs to be.  So while 1/500 is the minimum, if your focal length is 600mm, you will need a shutter speed of at least 1/640. Faster is better.

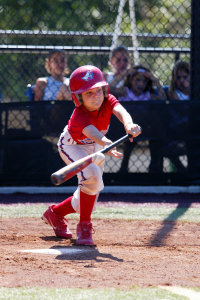
Using a faster shutter speed ensures stopping the motion of the ball as it hits the bat.

The next issue to contend with is the backgrounds.  Youth sporting events take place in parks, at schools, or in other places where the background is less than pleasing.  It could be a parking lot, a building, or you may just have  a lot of spectators in the background that can cause your subject to get lost in the mess. Photographers have two options here.  The first is to move to an area where the backgrounds are cleaner.  Since that may not be an option, the second becomes much more important.  Shoot your images at the widest aperture possible with the lens you are using.

Pro sports photographers typically use wide aperture lenses with apertures of f/2.8 and f/4 for a variety of reasons.  One reason is because they allow  more light into the camera, thus allowing for faster shutter speeds. The second reason is that a wide aperture creates a shallow depth of field- meaning while your subject will be sharp, the background will be nicely blurred, eliminating distractions.

Lens choice is another important part of the equation when shooting sports.  Not everyone will have access to a 400mm f/2.8 lens, but great sports shots can be captured with a variety of lenses- not just the big telephotos.  A 70-300mm zoom lens, which is typically one of the more popular telephoto lenses available, makes a great choice for shooting you sports.  While not as fast as a lens with an f/2.8 aperture, as long as the light is good enough to get a fast shutter speed, these lenses do just fine.  The 300mm focal length will get you enough reach to get closer to the action, but remember to stay disciplined.  Let the action come to you. Shooting across the field will simply result in lots of pictures where the athletes don’t fill the frame, and the dramatic impact is greatly diminished.  For on-field action, typically a lens with a focal length of at least 300mm will be needed. Most pros use anything from 300mm f/2.8 up to a 600mm f/4.

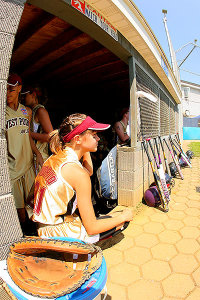
A wide angle lens is useful for situations where you want to show the complete context of where the athlete is. In this case, a fisheye lens shows the entire dugout as well as the player sitting on the steps.

Most people don’t think of wide angle lenses as good sports lenses, but there are several times where a wide angle can be the perfect lens.  Generally, wide angles work well when the photographer can be close to the athletes, be it for a team huddle on the sidelines, a post-game handshake, or a portrait taken on the bench with spectators in the background.   For those who can get access and don’t mind putting their gear at risk, a soccer or hockey “net cam” is a great use for a wide angle lens.  When pros do this they use a protective housing for the camera. It is NOT recommended that a photographer mount their camera in a goal without being protected.  The effort can be worth it.  Some of the most dramatic soccer and hockey photos come from cameras mounted in the goal with a wide angle lens.

When shooting action on the field, working with the available light becomes incredibly important.  Most of these outdoor games take place in midday sun, which is often harsh.  Add in helmets, hats, or other headgear which can cast shadows over faces, and you’ve got a lighting nightmare. With sports such as football or baseball, with hats and helmets on the athletes,  use of exposure compensation can be helpful in opening up the shadows on faces.  A setting of +1/3 or +2/3 is a good starting point.  For later afternoon or early morning games, shooting backlit can add a bit of drama to the lighting, with the sunlight creating a nice rim light on the athletes.  Exposure compensation can help open up the shadows again to maintain detail in the faces.

For indoor sports, the use of flash can be problematic.  Always be sure the use of flash is permitted, first and foremost.  In many sports, such as gymnastics, use of flash is strictly forbidden.  If the available light allows, it’s best to try to shoot without flash. This is where today’s extreme high ISOs and the outstanding noise performance of today’s DSLR’s is especially handy. Photographers often find themselves in school gyms with ISOs set to 3200, 6400, or higher.  Fast lenses with apertures of f/2.8 or larger are also useful in these situations. The same rule for stopping action applies, using a shutter speed of at least 1/500 or faster.


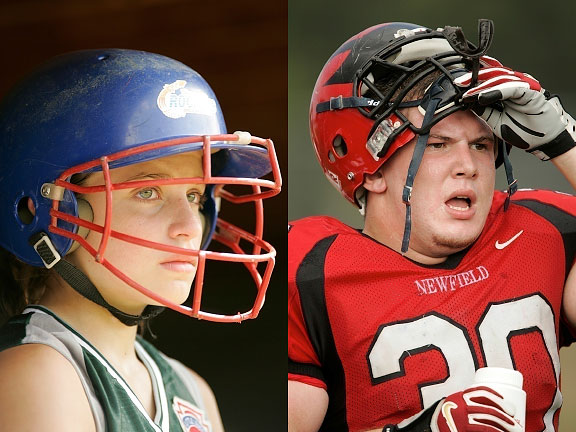
Sideline portraits can sometimes be more impactful that the action on the field. Don't be afraid to turn away from the action and photograph the intensity on the sidelines.

Athletes tend to move quickly, so you’ll want to make sure your autofocus is set to Servo or Continuous (dependent on what brand of camera you use). This allows the camera to refocus as the athlete moves towards or away from the camera.  Setting the drive to continuous will also allow the camera to take multiple photos by holding down the shutter button, ensuring that peak action is captured.

Today’s cameras offer a variety of AF arrays, from 9 or 11 AF points on entry level models, all the way up to 61 AF points on high end models.  Generally speaking, it is easiest to select one AF point and keep it on your subject, though some cameras are especially good at using all available AF points to track a moving subject. Photographers should experiment and practice to find which settings work best for them.

Sports offer a variety of photo opportunities aside from the action on the field.  The sidelines are great for shots of players interacting with each other, coaches instructing players, and sideline portraits.  With all the ups and downs of competition, the emotion on the sidelines makes a great subject all by itself.  Don’t be afraid to turn away from the action during the moments to catch the emotion in the bench area.

Jubilation shots can be some of the most rewarding and sought after shots. It takes discipline to remember to continue shooting even after the play has ended.

In addition, the pomp and circumstance that goes with many youth sporting events also make for great photo ops.  Watch for the halftime performances of cheerleaders and bands at various school sports.  The more devoted “fans” in the stands also make for great opportunities.

Telephoto lenses with wide apertures blur the background nicely, eliminating anything unsightly or distracting in the background.

Knowing where to stand is one of the most important parts of sports photography.  Each sport is different and the games have their own flow of action.  Photographers want to be where the action is going, not where it has been.  Each sport generally offers a ton of options as far as where a photographer can stand.

Personal knowledge of the sport, as well as the teams being photographed is especially helpful.  Photographic knowledge is only half of the battle when shooting sports.  When a photographer knows a team’s tendencies, and even individual athlete’s tendencies, he can anticipate the play, as well as reactions and get something special from it.   Shooting the same team repeatedly makes this easier.  The added bonus is that the team also gets to know the photographer, making them more comfortable and willing to be open in front of the camera, in much the same way people open up to their friends.


Post originally from: Digital Photography Tips.

Check out our more Photography Tips at Photography Tips for Beginners, Portrait Photography Tips and Wedding Photography Tips.

Catching The Action: Photographing Youth Sports


Digital Photography School

 
Comments Off on Catching The Action: Photographing Youth Sports

Posted in Photography


6 Tips on Photographing Lightning During the Day

27 Oct

A Guest Post by Deidra Wilson.

Deidra Wilson Photographer Las Vegas DPS

Perhaps you’ve begun to master photographing lightning at night, but you’ve noticed that there are tons of great storms during the day that produce some pretty great lightning strikes, too. How do you transfer your knowledge over and capture some of those images to add to your collection?

1. Find a Safe Vantage Point

This one should go without saying, but if you’re going to be strapping your gear onto a metal tripod and standing outside in stormy weather for an extended period of time, you should be safe while doing so. You can try being further away from the storm, which will actually give you a better view of any strikes, or you can shoot from a sheltered area. You can even photograph from inside your car if needed.

2. Use a Tripod

When shooting lightning, you’ll be shooting long exposures and shooting handheld simply isn’t an option that will produce a quality image.

3. Close Down your Aperture and Drop your ISO

Both of these techniques will allow you to shoot at longer shutter speeds during the day without blowing out your image. You don’t want to close down to the smallest aperture as you may lose some of your image quality. Say your lens goes from f/2.8 – f/22 – try shooting around f/11 or f/14. Depending on your camera, you can probably safely drop your ISO without degrading image quality.

4. Use a Neutral Density Filter if Needed

If your aperture and ISO combination still isn’t allowing you to shoot long enough for each frame, you can add a neutral density filter to the front of your lens, effectively removing stops from the exposure, depending on what level filter you’re using.

5. Shoot Long Exposures

I usually like to shoot for at least ten seconds when trying to capture lightning strikes. You’ll need to check a sample image to make sure the backgrounds aren’t blown out or underexposed based on your settings.

6. Be Patient

Capturing lightning strikes can be a challenge, but can be incredibly rewarding. Once you dial your settings in, you can also try using a remote and setting the camera to shoot continuously. Then you can sit back and see what you capture over the course of the storm.

For the image above, I used the bed of my pickup truck as a tripod, and the image metadata is as follows:

  • f/18.0
  • ISO 100
  • Shutter speed: 4.0 seconds

Deidra Wilson is a Las Vegas Boudoir Photographer who has a wicked obsession for capturing elusive weather through her lens. You can follow her on Twitter at @deidraphoto

Post originally from: Digital Photography Tips.

Check out our more Photography Tips at Photography Tips for Beginners, Portrait Photography Tips and Wedding Photography Tips.

6 Tips on Photographing Lightning During the Day


Digital Photography School

 
Comments Off on 6 Tips on Photographing Lightning During the Day

Posted in Photography


On Photographing People: Pt. 2

16 Oct

Editor's note: This is part two of Italian photographer Sara Lando's three-part series on photographing people. Part one is here.
__________

By Sara Lando — So you got yourself a willing subject, everything is ready, you’re pumped up and ready to shoot. Your doorbell rings. Woo hoo!

Slowly put down that camera and breath: we don’t fire yet. Now we welcome. Read more »


Strobist

 
Comments Off on On Photographing People: Pt. 2

Posted in Photography


On Photographing People: Pt. 3

16 Oct

Editor's Note: This is the third in a three-part series by Italian photographer Sara Lando on photographing people. The series begins here. I asked her to select some of her favorite images to illustrate this piece.

By Sara Lando — The model is gone, your studio is a mess, you’re tired but still a bit excited about the shooting and can’t wait to see your pictures on your big monitor.

Some might call it a day and go grab a beer. But there’s still a couple of things you might want to do before wrapping it up. Read more »


Strobist

 
Comments Off on On Photographing People: Pt. 3

Posted in Photography