RSS
 

Posts Tagged ‘Photographing’

Travels in China: Photographing the landscapes and people of Guilin and XiaPu

16 Apr

$ (document).ready(function() { SampleGalleryV2({“containerId”:”embeddedSampleGallery_0533137695″,”galleryId”:”0533137695″,”isEmbeddedWidget”:true,”standalone”:false,”selectedImageIndex”:0,”startInCommentsView”:false,”isMobile”:false}) });

A seasoned travel photographer knows that there’s hard work involved in getting the best photos from a trip. So when Ken Koskela arrived in China on a 17-day trip, he wasn’t exactly planning on a relaxing vacation. He rose at 4 AM each day to get himself into position to photograph sunrise over the rivers, rice terraces and mountains of Guilin and XiaPu. Then, spending his afternoons with a guide, he interacted and photographed residents of the villages in the region, and spent evenings capturing sunset.

He operated on an average of four hours of sleep per night, but his hard work paid of in memorable images that capture the beauty of the region and its people. Take a look at a few images here and head to Resource Travel for the full story. Do you sacrifice sleep for great shots when you’re traveling? Let us know in the comments.

Articles: Digital Photography Review (dpreview.com)

 
Comments Off on Travels in China: Photographing the landscapes and people of Guilin and XiaPu

Posted in Uncategorized


Pros and Cons of Photographing Dogs with a Prime Lens

05 Apr

DPS article 6

Dogs, by their very nature, are excitable creatures. Of course, they like nothing more than being outside and running around, chasing sticks, balls, and other dogs. All this can’t be conducive to prime lens photography, right? You want a good zoom lens for a job like this, surely? Well, not me. I love shooting my pet portrait sessions with my trusty Canon f/1.4 50mm prime, and I’m going to go through what I consider to be the advantages of doing so, and how best to overcome the disadvantages.

Pros – or advantages

Prime lenses are as quick as the dogs they’re snapping!

We’ll start with the obvious benefit of shooting with a prime lens – speed. The wider maximum aperture allows for faster shutter speeds, which means that you can freeze your sprinting pooch in action and get pin sharp images as they run (below).

DPS article 9
These two Weimaraners were sprinting full pace towards me. Fortunately my shutter speed was fast enough to freeze their movements in full flight.

Let’s not forget that the light conditions aren’t always going to be favourable. On dull, overcast, days you’ll be thankful for that extra couple of stops, rather than having to boost the ISO and bring noise into the equation.

Bearing this in mind, it’s also important to remember that as you’re widening your aperture to improve your shutter speed, you’re also narrowing your depth of field, so it’s about striking the right balance for the situation.

Image quality and sharpness

Another well-known advantage of shooting with a prime lens is the image quality. Prime lenses are much more simple than zoom lenses in terms of the components that make them, and the mechanisms that operate them. All in all, it’s widely acknowledged that prime lenses consistently offer an extremely high level of image quality.

DPS article 1

Sharper images are going to be a positive thing in any situation, but when you’re editing your images and you can zoom in to see all the details in the fur of your subject, and the glint in their eye, then you will really appreciate that image reliability.

You’re forced to focus on composition

This is an interesting one, and certainly an argument that crops up time and time again when talking about the benefits of prime lenses. If you only use zoom lenses, there can often be a level of complacency that sets in, especially if you’re relatively new to photography.

DPS article 4
caption: If I’d been using a zoom lens on this shoot there’s a good chance I would have zoomed in for a tighter composition, with the subject in the middle of the shot. With that option unavailable to me I was able to think about it, and ended up giving the subject plenty of room on the right to run into, improving the overall composition of this image.

When you’re using a lens with a fixed focal length, you have no choice other than to move around with your subject. You’ll be constantly looking for different angles and opportunities, and eventually you will find yourself in the perfect position, one that you may never have found yourself in, if you weren’t using a prime lens.

Narrow depth of field

If you want to make the pictures of your dogs stand out, then a really tight depth of field is a great way to go about it. A prime lens will allow you to open your aperture to f/1.4 or wider, and really blur out that background, making your subjects pop.

The real benefit of this when you’re taking pictures of dogs is that, unlike human subjects, most of the time you’re not going to get the opportunity to place your dog in position with the ideal background. When you’re photographing dogs, more often than not you’re going to have to work with what you’ve got, and having the ability to blur out background distractions is a huge advantage.

DPS article 3

caption: I was at f/1.4 here, which allowed me to focus on the subjects mouth and nose, while completely throwing everything is the background out of focus.

Cons – or disadvantages

Having subjects that can move faster than you

So you’re out with your dog, and he’s running around at full pace for the best part of an hour. Trying to photograph a subject that is constantly moving around can be very tiring, and when you’re looking at your images and seeing a large percentage that will be unusable, it can be a little discouraging.

Something you need to be prepared for when taking pictures of dogs, is that you’re going to have a higher amount of rejects than usual. Unfortunately, this is the nature of pet photography. However, if you learn to embrace this, then you can get some really rewarding shots. Make sure you set your camera to high speed continuous burst mode, set your focus point over the necessary area on your subject, and fire away. Yes, you’re probably going to throw away 75-80% of them, but the ones you keep are going to be well worth it.

DPS article 8

Difficulty positioning yourself

You may find that one of the most daunting aspects of dog photography is knowing where to position yourself. You don’t have the option to zoom in, so where you are physically positioned is vital to getting the shot.

In order to limit the amount of opportunities you miss, you need to think a couple of steps ahead at all times. Where are your subjects likely to run next? If they’re going to head over there, then where will you need to be to get the best shot? Should you try to get higher than your subject, or should you prepare to get low in order to get down to their level? These are all questions that you should always ask yourself.

DPS article 7

caption: These two Schnauzers were bundles of fun, but they never stopped moving. I constantly had to guess where they would be next. Often you’ll get it wrong, but sometimes you’ll get it right and nail the shot.

If you’re doing a pet portrait session then you could stand relatively close to the owner, ask them to throw a stick or ball (or pretend to). While the dogs are running away, get into position, and be ready for when they inevitably run back towards you.

Remember, your subject is likely to always be moving, so set your focus mode to AI Servo for Canon cameras, or AF-C for Nikon. These focussing modes are designed to continuously adjust focus on moving subjects to ensure that you have the best chance of nailing each shot.

DPS article 5

You end up too far away and have to crop heavily in post-processing

You don’t always need to get a close crop of your subject to end up with a great image. It’s fantastic when you can see their expressions close-up, or the actions of their body and legs as they run, but sometimes a picture of the dog playing in the distance, with a picturesque backdrop of an open field or wooded area, may be the perfect way to portray the scene.

DPS article 10

caption: Not zooming in on this shot allowed me to capture a greater sense of the atmosphere in this winters morning portrait session.

In summary

Hopefully this is enough to persuade anyone with an interest in pet photography to give prime lenses a try. You can pick up a nifty fifty prime for the fraction of the price of a decent zoom lens, and you’ll have real fun getting the most out of it. At the very least, you’re guaranteed an excellent workout!

DPS article 2

Do you photograph dogs or pets? Have you ever tried using a prime lens? Please share your results, thoughts and comments below.

googletag.cmd.push(function() {
tablet_slots.push( googletag.defineSlot( “/1005424/_dPSv4_tab-all-article-bottom_(300×250)”, [300, 250], “pb-ad-78623” ).addService( googletag.pubads() ) ); } );

googletag.cmd.push(function() {
mobile_slots.push( googletag.defineSlot( “/1005424/_dPSv4_mob-all-article-bottom_(300×250)”, [300, 250], “pb-ad-78158” ).addService( googletag.pubads() ) ); } );

The post Pros and Cons of Photographing Dogs with a Prime Lens by Ben Hughes appeared first on Digital Photography School.


Digital Photography School

 
Comments Off on Pros and Cons of Photographing Dogs with a Prime Lens

Posted in Photography


Bird’s eye view: Photographing Cherry Blossoms with the DJI Phantom 4

03 Apr

The cherry blossoms at the University of Washington are a hugely popular attraction every spring in Seattle. Weekends during the peak of the blossom bring in crowds of people to the Quad, all hoping to capture the blooms with everything from professional cameras to tablets and selfie sticks. Rather than trying to avoid the mass of people, photographer and DPR reader Dale Johnson embraced the scene and found a new perspective by shooting from above. Find out how he’s adopted aerial photography and what went into capturing this shot.

By Dale Johnson

Trying to find unique perspectives of familiar places is becoming harder and harder, as everyone and their mother has a camera (mostly built into their phones) and hundreds of thousands of images are uploaded to social media every day. A camera attached to an aerial platform is a fairly new concept, but it’s a category that’s growing rapidly. Adding a drone to my photography kit has provided opportunities to find new ways to see things. In addition to the new perspective, I’m finding that I love to have the element of movement in the scene, which the video and smooth and stable platform allows.

I started experimenting with drone photography last summer with the DJI Phantom 3 Professional. I’m not much of an early adopter, tending to wait until the technology has matured before jumping in. I have been following the development of drones for some time since I bought one of the early remote helicopters several years ago. I tried to learn how to fly it around my living room, though not very well I must say. The Phantom 3 is a joy to fly and incredibly simple to control. I have loved flying it around Seattle. 

Having purchased the new DJI Phantom 4 quadcopter the day it was released, I’d been on the lookout for a place to fly it. The cold, wet, grey days of our Seattle winter have been slowly improving into a beautiful spring and I was eager to get it in the air. I was a student at the University of Washington many years ago, and remember how the ‘quad’, with all its cherry trees, would explode in full bloom each spring. It seemed like the perfect place to fly and get a shot that I had not seen before. 

I first went to the quad just after sunrise on Friday morning to catch the warm light with fewer people around. I was able to get a few decent shots, but the sunlight blew out the highlights a bit and even though I was shooting in Raw, the small sensor on the built in camera didn’t give me the latitude for corrections that my DSLR would. I decided to go back on Saturday afternoon as it was mostly overcast with more even contrast. This time the quad was buzzing. The symmetry of the scene made for an easy composition with the cherry trees framed by the buildings, and the crisscrossing red brick paths added diagonal elements to the image. I also like how all the people give the image a sense of scale and contrast.

A quick word about drones and flying within the city. There are a lot of negative feelings out there about drones and people concerned about privacy issues, or collisions with airplanes. The FAA (in the US) has a new requirement to have drone operators register with the FAA (which I have) and some rules for flying. I followed all the FAA requirements during this flight and found after a quick check with the University of Washington Police that there are no restrictions for flying on campus, except over stadium events.

This new vantage point of the world looking down from above has inspired me all over again to look for unique views on familiar places.

DPReview encourages responsible, legal and safe use of drones. Check local regulations before flying any unmanned aerial vehicle.


Dale Johnson has been taking pictures for over 30 years after receiving a Nikon camera as a graduation present from high school. He now has a day job that has him traveling the world, giving him the opportunity to see and experience people and cultures that he would not otherwise visit (56 countries and counting!). Travel photography has become his new passion. You can see more of Dale’s work at:

500px: https://500px.com/drjhnsn

SmugMug: https://dalejohnson.smugmug.com

Instagram: https://www.instagram.com/dalejohnsonphoto/

Youtube: http://www.youtube.com/c/dalejohnsonphoto

Articles: Digital Photography Review (dpreview.com)

 
Comments Off on Bird’s eye view: Photographing Cherry Blossoms with the DJI Phantom 4

Posted in Uncategorized


10 Tips for Photographing Great Headshots

04 Mar

Photographing a headshot can seem like a daunting prospect. To have one person in front of your camera, looking to you for direction and positivity, is an intense environment. People are generally very critical of themselves in photographs, and feel very nervous. However, there are some simple things that you can do to make it a lot easier for everyone.

Headshot on Black Background 1

Here are 10 tips to help you photograph headshots:

1. Have a pre-session consultation

Before your session make sure you know how the images will be used and what style they would like. This can be on the phone or face to face. Talking to them, will help them relax so much more than email. This will allow you to help them prepare for the session. Make sure they know what to expect, and are as relaxed as possible.

Headshot on White Background 1

Find out about what profession your subject is involved in; a corporate lawyer may well opt for a clean white background look (above), while a more relaxed style of business (yoga instructor) may prefer a more colourful, environmental image (below). Find out in the consultation what they want so you are prepared on the day.

Indoor Headshot

2. Help them to choose the right clothes

Generally speaking, solid, neutral colours, work best for headshots, as you want to avoid anything that distracts away from people’s faces. If it is a formal style you are looking to achieve, make sure that everyone gets the message, and remembers to bring formal work clothes with them. Men often forget their jackets, so for a consistent look, try and have a spare one on hand, even if you need to clip it at the back. If you have time with a person, get them to bring a few items of clothing. Remind them to iron their clothes as well.

Here are some example of good clothing choices:

What to wear

What to wear 2

What to wear 3

3. Create separation from the background

Make sure that your subject doesn’t stand too close to the background. If you are using a studio background (or wall in an office) and you stand someone close to it, you may see shadows on the wall, which makes the images look less professional. For environmental headshots outdoors, I still recommend separation from the background. The bokeh creates a nice nondescript background, especially when shot at a wide aperture. Typically I aim for an aperture of f/4 for environmental and natural light sessions, and f/8 for studio style sessions with lights.

4. Starting the session

Whether you are photographing headshots for a single person, or a whole team, make sure you have a general chat with each person first, to help them relax. This can be just a 10 second, confident handshake, and a “how are you?”. People generally feel very tense about having their photograph taken, and talking about something in their comfort zone (where they live, if they have children or pets, etc) will really help them appear and be more comfortable.

5. Silly Faces!

A great way of helping people to relax in front of the camera, if you don’t have much time with them, is to ask them to pull a funny face for the first frame. Use this as a lighting test for a new person as well. This is great at breaking the ice, and very few refuse to do it. Once they have pulled a daft face, everything else is easy!

Funny faces

Headshot Photography London 0997

6. Lighting and positioning

For business and actors’ headshots, I tend to light quite evenly. There are a few circumstances when the images are low-key, but for the main part, they are evenly lit. A classic beauty lighting setup works well, with one light above, and a second light, or a reflector filling from below.

I ensure the subject is turned with their body 45 degrees away from the camera, and towards the main light source (if your lighting allows for this). Their face should be straight towards the camera. You may need to guide people to look straight down the lens. It’s surprising how many people look off camera, at the flash, or somewhere random.

Headshot setup

Posing example

7. Sit people down

People may be more comfortable sitting down, and by asking them to rest their hands on the tops of their thighs, it gives them something to do with their hands. It also ensures that the subjects all know where they need to be, and they don’t move around too much.

8. It’s all about the little adjustments

What separates a great headshot from an average one, are generally very small changes. These little adjustments can make all the difference. The slight tilt to the head, leaning forward, a gentle but intriguing smile. Don’t be afraid to ask someone to make very specific changes to their expression and position, until you get the image you’re looking for.

Headshot Photography London 1052

9. Keep talking and be positive

When you’re in the midst of taking photographs, make sure that you keep talking to your subject. Reassure them that they’re doing it right, and you’re getting great images. Even if you’re not satisfied with the images when someone turns their head in a certain direction, or how the light is falling on them, never express that to your subject. Silence will kill the atmosphere, so no matter what is happening, just keep chatting and being positive.

10. Shoot tethered

If you have all the necessary equipment, shooting tethered is a fantastic way the get great headshots. When people see a couple of shots on the screen, they can very quickly get an idea of what needs to be changed. The immediate feedback on the screen will help everyone massively.

I hope you find these tips for better head shots helpful. Do you have any others we missed? Please share them, and your headshot photos in the comments below.

googletag.cmd.push(function() {
tablet_slots.push( googletag.defineSlot( “/1005424/_dPSv4_tab-all-article-bottom_(300×250)”, [300, 250], “pb-ad-78623” ).addService( googletag.pubads() ) ); } );

googletag.cmd.push(function() {
mobile_slots.push( googletag.defineSlot( “/1005424/_dPSv4_mob-all-article-bottom_(300×250)”, [300, 250], “pb-ad-78158” ).addService( googletag.pubads() ) ); } );

The post 10 Tips for Photographing Great Headshots by Sean Gannon appeared first on Digital Photography School.


Digital Photography School

 
Comments Off on 10 Tips for Photographing Great Headshots

Posted in Photography


Tips for Minimizing Reflections When Photographing Through Windows

03 Mar

Have you ever wanted to take a photo through a shop window, but couldn’t work out how to cut the reflections? Or been up on an observation deck, trapped behind glass that had so many stray lights shining into the glass, that you couldn’t get a good shot of what was on the other side?

LeanneCole-photography-through-glass-1028

It is hard to take photos through glass and not get lots of unwanted reflections.

Glass can be one of the hardest things to take photos through. It doesn’t seem to matter where you move, you will find more reflections. Then just when you think you have the perfect shot, you put it on the computer only to find that they are still there.

Shop Windows

One of the most commons places to take photos, is through shop windows. But, they are often in well-lit places, and they are tough because you will be getting reflections from all directions. There are ways of minimizing the reflections, and things you can do to help prevent them.

Polarizering Filter

A polarizer filter will help reduce the reflections. It may not remove them all, but it will help you to eliminate many of them. Take the images below, it has all the lights on the outside of the store reflected in the glass, and with a polarizing filter.

LeanneCole-photography-through-glass-1036

The reflections of the lights from outside the shop can be seen on the glass.

LeanneCole-photography-through-glass-1037

The reflections have been removed by the help of the polarizing filter.

A circular polarizing filter was put on the lens, and in order to remove the reflections, it was turned until they just disappeared. Take a look at the image above right, the filter has helped remove many of them.

It doesn’t always work, but it can help reduce reflections. In some cases, you are going to find that reducing them is better than having them ruin your images.

Using a Lens Hood

If you can get your lens right up to the glass of the window so that it sits on it squarely, it can stop any unwanted reflections from getting in front of the lens. However, it means that you can only take photos of what is directly in front of the camera, what do you do if you want to take some at an angle? There is no doubt that once you move it on an angle you will start to see reflections.

You want to be able to create a seal around the end of the lens, and a rubber lens hood can do that. Look at the following photo, you can see one on the lens.

LeanneCole-photography-through-glass-1038

The rubber lens cap is on the lens, and pushed against the window.

The advantage is the flexibility, and how you can move it around and change the angle of your lens. The following two images show one with reflections, and one without. The latter is the one taken using the rubber lens hood.

LeanneCole-photography-through-glass-1034

Reflections on the glass are apparent here.

LeanneCole-photography-through-glass-1035

The rubber lens hood has eliminated the reflections.

They used to be very common and a lot of people would have the rubber hoods for their lenses, but slowly the hard plastic ones have taken over. It is good to see that if you hunt around on the internet, you can still find them. The one used for this demonstration was found on Ebay.

Trams, trains and cars

There are numerous places you could use it, and on a recent trip to the mountains around Lake Tahoe, it would have been great in the tram up Squaw Valley. The glass in the tram had so many reflections it wasn’t worth trying to get any photos. It was the same on the tram that runs from Roosevelt Island to New York.

Trains and other moving vehicles have the same problems with windows and reflections. The rubber lens hood would help you to get an image free of any distracting reflections. However, there is one place in Melbourne where it wouldn’t help at all.

Eureka Skydeck

In Melbourne there is an observation deck that is 88 floors up, Eureka Skydeck, that provides some stunning views of Melbourne. It is a great place to see the city, but a terrible place to take photos.

There is glass all around, and it reflects everything else in it. The one place where you can go outside has mesh across it and for most cameras the holes in it are not big enough to take photos through. At night there are lights on the floor that create their own effects on the windows.

If you go up to the glass to take photos, you will find that if you use the rubber lens hood method won’t work as there are two panes of glass. You might get rid of the reflections off the first pane, but there is not much you can do with the second.

Here are two images, the first was taken during the day and you can see the reflections. The second image was taken at night and you can see all the lights that are there reflected in the glass.

LeanneCole-photography-through-glass-1027

Taken during the day and you can see the reflections.

LeanneCole-photography-through-glass-1030

At night the lights inside reflect everywhere, and you can also get portraits shots, whether you want them or not.

Like everything in photography, there are always ways to get around problems.

To eliminate the reflections, you will need to put your camera on a tripod, or something similar, for the following image a GorillaPod was used. It was placed close to the ground, as you can see in the image. At the Eureka Skydeck they have lights in the floor, so you have to make sure that light isn’t coming from under the camera.

LeanneCole-photography-through-glass-1025

The camera on the gorillapod on the floor.

Set up your image and create a seal around the camera with fabric, you could use a piece of black cloth. It needs to be dark as a lighter colour will reflect as well. For these images a lightweight black jacket was held up against the window, to help prevent the reflections. You want to be able use the fabric or jacket to create a closed-in area around the camera, so you don’t get unwanted views in your image. Look at the following image.

LeanneCole-photography-through-glass-1026

The jacket is placed around the camera to stop reflections.

Of course no system is going to be foolproof, but, if you compare the following two images, you can see that it does make a big difference. The first image was done without any protection, and the jacket was used for the second one.

LeanneCole-photography-through-glass-1033

This image has had nothing done to stop the reflections.

LeanneCole-photography-through-glass-1032

This was taken using the above method with a jacket to block the reflections.

You have to judge each situation as you get to it. While one technique might work in one place, it may not work elsewhere. There is no doubt that glass and windows are one of the hardest objects to photograph through, a bit like photographing a mirror. Take care, and I hope the next time you are taking photos of a shop window, you get some great photos.

googletag.cmd.push(function() {
tablet_slots.push( googletag.defineSlot( “/1005424/_dPSv4_tab-all-article-bottom_(300×250)”, [300, 250], “pb-ad-78623” ).addService( googletag.pubads() ) ); } );

googletag.cmd.push(function() {
mobile_slots.push( googletag.defineSlot( “/1005424/_dPSv4_mob-all-article-bottom_(300×250)”, [300, 250], “pb-ad-78158” ).addService( googletag.pubads() ) ); } );

The post Tips for Minimizing Reflections When Photographing Through Windows by Leanne Cole appeared first on Digital Photography School.


Digital Photography School

 
Comments Off on Tips for Minimizing Reflections When Photographing Through Windows

Posted in Photography


Let there be light: Photographing Yosemite’s elusive ‘Firefall’

27 Feb

$ (document).ready(function() { SampleGalleryV2({“containerId”:”embeddedSampleGallery_8698705739″,”galleryId”:”8698705739″,”isEmbeddedWidget”:true,”standalone”:false,”selectedImageIndex”:0,”startInCommentsView”:false,”isMobile”:false}) });

Once a year, photographers turn their lenses toward Yosemite’s Horsetail Fall and hope for the best. If the conditions are right, the waterfall will be transformed into a spectacle known as ‘Firefall’ as the mid-to-late February sun casts a blazing orange glow on the water – that is, if the water is flowing, and if the horizon isn’t too cloudy. And that’s not to mention the difficulty of nabbing a coveted spot in view of the falls, as well-informed photographers claim their spaces early in the day.

After years of drought, the falls in Yosemite are finally flowing this month and photographers like Taylor Gray have been able to capture the event with a lot of patience and a little luck. It’s quite the effort to put in to get the shot, but the results are truly spectacular. Read Gray’s recounting of capturing the magic moment at the falls over at Resource Travel. You might just want to book a trip to Yosemite this time next year…

Articles: Digital Photography Review (dpreview.com)

 
Comments Off on Let there be light: Photographing Yosemite’s elusive ‘Firefall’

Posted in Uncategorized


Working with what you’ve got: Bambi Cantrell on photographing brides, babies and more

21 Feb
 

Bambi Cantrell is a 30-year veteran of the photography industry specializing in portraiture and wedding photography. In this presentation from PIX 2015, she translates lessons learned over her career into real photographic results, whether her client is a bride, a couple or a young family. As Cantrell’s tastes and photography have evolved over the years, she encourages others to embrace change. ‘Lay a strong foundation on concepts,’ she says. ‘Don’t put blinders on…. You can adapt as you decide to change and get older.’

Keep it simple.
‘Give me a wall, a window and a reflector, and I’m home free,’ says Bambi Cantrell, ‘Don’t feel like you have to have every single tool that’s made to get good pictures.’

Do what you can with what you’ve got.
‘I love tungsten lighting as well,’ Cantrell says. ‘Use existing light sources to create beautiful images. It’s not that the planets line up perfectly for [pro photographers] and not someone else. It’s how can I take the best possible picture with what I’ve got in front of me right now.’

A great expression can be perfection.

‘She’s just laying across the bed in her home, holding her newborn baby,’ Cantrell says. ‘It’s about who you’re photographing. What is this person like?’

Articles: Digital Photography Review (dpreview.com)

 
Comments Off on Working with what you’ve got: Bambi Cantrell on photographing brides, babies and more

Posted in Uncategorized


Tips for Photographing Football (Soccer)

17 Jan

Football (called soccer in some parts of the world) can be a very challenging sport to photograph. The ball is constantly moving quickly around the pitch, which may make it somewhat of a challenge to capture the action if you don’t have the right knowledge on how to do so. This simple guide will point you in the right direction to get more success at your next football match.

football or soccer photography action

Players contest the ball. © Daniel Smith / Getty Images.

First, let’s start off with equipment, because heading to a game with the wrong kit is definitely not going to help you.

Equipment

For best results, an 18-55mm or similar lens will not be sufficient to cover a game of football; the players and the action will be too far away, and you will most likely end up being disappointed with the results. Using a 70-200mm or equivalent is a great starting point, and will be a fantastic range for areas closer to goal. However, if you do have anything longer in your bag that is always helpful; anything up to about 400mm will be perfect. Anything longer than that can get a little too tight on a football field, unless you want to photograph players at the other end.

If you find that you’re current lens isn’t quite long enough, don’t feel like you need to run out and buy a longer one; cropping can always help quite a lot. With newer cameras having such high resolutions now, you won’t find too much of a drop in final image quality. Renting a lens for a day or two is always an option you may want to consider as well.

Also, bringing a small camping stool will be of great comfort to you, and because you will be closer to the ground than standing, it will help you get less of the field in the frame.

Fig 3

Players competing for possession of the ball. © Daniel Smith / Getty Images.

Settings

If you’re comfortable with using Manual mode, the below will be a helpful guide to getting you started. If you’re not too comfortable with Manual mode just yet, using shutter speed priority set to 1/800th, or faster, should do the trick.

Shutter Speed

Football (soccer), as with the majority of sports, is fast paced. To be able to freeze the action you will need to use a fast shutter speed; 1/800th as a minimum, is a great starting point for more advanced players as they tend to move much faster than younger, junior players. If you’re photographing a very young age group match, you may find that 1/500th could be fast enough, however 1/800tj would be a safer option.

Fig 5b

A fast shutter speed was used here. © Daniel Smith / Getty Images.

To add some variety, slower shutter speeds can create some fantastic images when done correctly. Shooting at around the 1/30th mark is a great starting point. If you find that there is too much blur in your images, then speeding the shutter speed up slightly will help. Conversely, if there is not enough blur, you may need to slow the shutter speed down.

Fig 4b

Try using a slower shutter speed to create motion blur showing speed. © Daniel Smith / Getty Images.

Aperture

For single player shots, f/2.8 would be ideal as it will isolate the player nicely. However, if photographing tackles, etc., where there is more than one player, it is best to use f/4 as this will give you a slight increase in depth of field (DoF), without sacrificing too much shutter speed. If your lens cannot got as wide as f/2.8 or f/4, that’s perfectly fine, just use the widest aperture your equipment offers.

ISO

Now that you have your aperture and shutter speed set, use the ISO to fill in for the exposure, or brightness, you want to have. Depending on what shutter speed/aperture combination you have, you may find ISO 400 on a bright day works, or on the other hand, if you’re in a low-light situation such as at dusk, night, or on a heavily overcast day, ISO 800 or higher may be required. Just be careful with how high you go on your particular camera as each model can perform differently at higher ISO’s. This is something that you may need to play around with a bit to explore.

Autofocus

Using the correct autofocus function on your camera will be a key element in ensuring you capture a sharp shot! Because you will be photographing moving subjects, One-Shot AF on Canon, or AF-S on Nikon, is not an appropriate focus mode to use, as it will not continually track the moving subject. In this situation, using AI-Servo on Canon, or AF-C on Nikon, would be the best solution as it will continually track a moving subject, so long as you keep the autofocus engaged. If you’re comfortable with manually selecting AF points, that will further help you control your camera’s focus even more; just select whichever autofocus point you wish your subject to be placed in the frame.

Positions

As with any sport, sitting in the right position will increase your chances of getting the shot. For football (soccer), this is generally around the corners of the pitch or field.

Fig 1

An overview of a soccer pitch with a guide of seating positions. © Daniel Smith / Getty Images.

  • Position 1: Looking down the pitch (field) will give you some great shots of players as they run with the ball toward you. You can also get some great shots of goals here, too. This position is also the most versatile position as you can get a good mix of everything.
  • Position 2: Looking around the pitch (field) is fantastic for shots at goal, as you will generally be able to get the goal shooter, and keeper in the frame. From here, you will also be able to capture players running down the pitch (field), but they will not be as head-on if running down the wings.
  • For some variation, try shooting at position 3, as from there you will be able to get some great panning shots of players with the ball, as they run the length of the pitch. You generally won’t be able to get many great goal shots from here but you may find some great tackle opportunities if they happen around mid-field.

Do not be tempted to run around the pitch following the ball – you will be forever running, and not photographing! It is much better to sit in one location and wait for the action to come to you. You can always move locations, such as at half-time, if you’re wanting to photograph a particular team.

Fig 10

A nice tackle here. A player hslid right under the other for the ball. © Daniel Smith / Getty Images.

What to look for

Here are some things for you to look for at your next game.

Celebrations – This could be of the team that just scored a goal, or after the final whistle, capture the team that won the match.

Fig 6

Teammates celebrate scoring a goal. © Daniel Smith / Getty Images.

Fig 12

A player shows the toll of losing a match. These images are also quite powerful, as the players can often have great expressions.

Action – This will be a major part in the game. Football (soccer) has a lot of tackles, headers, dives, slides, not to mention goals, and goal deflections by the keeper. Staying focused is key to capturing these moments. Also bear in mind, that older players will generally play with a higher intensity than the younger players, so capturing dramatic tackles will happen more often. But be aware that older players also move a lot faster!

Fig 2

Players falls from a push. © Daniel Smith / Getty Images

Fig 7

A player took a shot at goal. Having the goal keeper, and the front goal posts in the frame, clearly illustrates that this is taking place at goal. © Daniel Smith / Getty Images.

Fig 9

Players heading the ball. Getting the ball close to their heads is key with these types of images. If the ball is too far away, it can get lost. Also, the players expressions are generally better when the ball has just hit their head! © Daniel Smith / Getty Images.

The crowd – If the game you’re covering has a lot of supporters, don’t forget to get some shots of them, too, they can add some great atmosphere. Look for emotions on their faces; maybe they’re excited as their team just scored a goal, or they may be very quiet as their team is about to lose. The crowd is a great place for emotions.

Conclusion

Football (soccer) can be a very rewarding sport to photograph. As with any sport, the more you understand about the game, the more you know where to look for action, and will be able to follow it easier. However, if you’re not all that familiar with football (I’m not an expert on it by any meaning of the word) practice makes perfect.

One thing I would suggest is if you are planning on heading down to your local club to photograph a game, as a courtesy ask any match officials or club president if they are okay with you doing so. They will appreciate it, and it will make it easier for future photographers. Happy shooting!

googletag.cmd.push(function() {
tablet_slots.push( googletag.defineSlot( “/1005424/_dPSv4_tab-all-article-bottom_(300×250)”, [300, 250], “pb-ad-78623” ).addService( googletag.pubads() ) ); } );

googletag.cmd.push(function() {
mobile_slots.push( googletag.defineSlot( “/1005424/_dPSv4_mob-all-article-bottom_(300×250)”, [300, 250], “pb-ad-78158” ).addService( googletag.pubads() ) ); } );

The post Tips for Photographing Football (Soccer) by Daniel Smith appeared first on Digital Photography School.


Digital Photography School

 
Comments Off on Tips for Photographing Football (Soccer)

Posted in Photography


A Helpful Checklist to Use Before Photographing Anything

08 Dec

If you are reading this you probably find photography exciting, maybe even so exciting that from time to time you forget changing your camera settings according to the subject you’re shooting. You have probably already missed at least one amazing shot, just because you forgot to change the ISO or shutter speed.

Image2

You are not alone. This happens to both amateurs and professionals, however there are a few simple tricks to avoid ever missing that shot again due to unpreparedness. In this article I’m going to share with you the simple steps I follow before going out to photograph, the steps I have learned the hard way. A helpful checklist to use before photographing anything.

Why do you need a checklist?

Okay, before I start sharing the steps, let’s briefly talk about why you need a checklist. The reason I need a checklist might be different than yours, and it all comes down to your needs. What are you photographing? Are you photographing to make huge prints? Are you capturing a moment that only lasts a brief second?

My main field of photography is landscapes and nature. It is rare that my window of opportunity only lasts for a brief second, meaning that I often have the time to find the best settings. However, if you are more into wildlife photography, travel, or perhaps street photography, your window of opportunity is much shorter, ergo you must be able to quickly take up your camera, and fire off some shots without spending much time fiddling with your settings.

Image7

The feeling of coming back home after an amazing evening, importing your photos, and realizing all the shots are ruined as a result of forgetting to change the settings is a feeling I don’t wish upon anyone. No matter what type of photography you do, quality is the most important.

Point one – Before you leave

Step one takes place before even leaving your home. This might very well be the most important step, and I know for a fact it’s one that many often forget.

Part one of the checklist consists of four basic, yet crucial elements to check:

  • Are your batteries charged?
  • Is your memory card full?
  • Did you clean your equipment?
  • Is all your gear packed?

Are your batteries charged?

You may laugh and think, “Do’h, obviously I won’t go out with empty batteries”. Well, that’s exactly what I thought too until one time when I drove seven hours to the west of Norwa,y where I would spend the weekend in a tent photographing epic landscapes. After one hour of shooting my first battery died, and I realized that all my spare batteries where empty too. Since I was camping I did not bring a charger.

In deep frustration I ended up driving the seven hours back home, as I did not want to spend the weekend in some of the greatest nature of Norway without my camera (Yes, I should have stayed and enjoyed the nature – but my thoughts where not rational at the time). Luckily I managed to pull off one descent shot from that evening, which I did not realize before writing this article!

Image5

I have made a habit to always set my batteries to charge as soon as I get home from photographing, yet I also double check that all batteries are charged when I leave on trips.

Is your memory card full?

Now, leaving home with a full memory card is not as critical as not having any battery time. However it is rather annoying to get the message “Memory card full” after taking 10 pictures. You then have to waste time deleting images one-by-one. Make sure there is enough free space on the card when you head out on your adventures!

Is your equipment clean?

Most of us are guilty of not cleaning our equipment from time to time. It’s more exciting to process your images when you get back home rather than clean your gear, right?

Regardless of what is fun or not, cleaning your equipment needs to be done, especially after photographing in rough conditions or by the sea. I recommend always bringing a microfiber cloth, air blower, and some cleaning spray when you are out, but the more you clean at home, the more time you have to photograph when you’re out.

Personally, in my earlier days I had a couple shots ruined due to forgetting to clean my filters after being out photographing by the ocean.

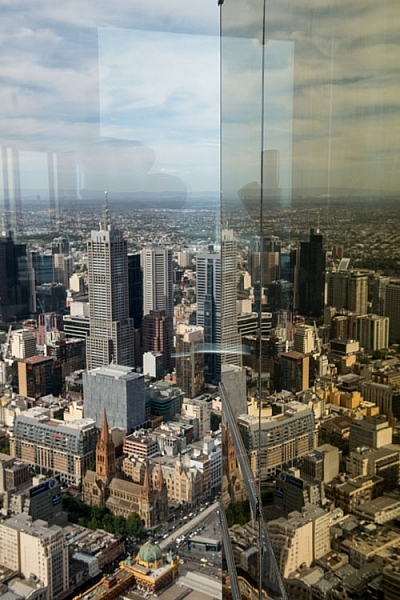
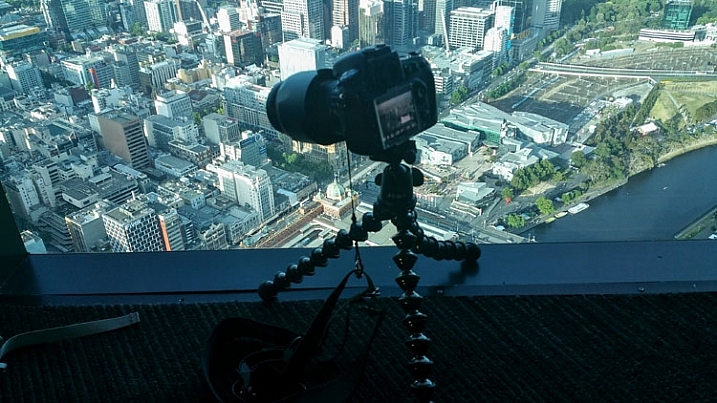
The image below is a typical example of what your files might look like if you forget to clean your lens before shooting. This shot was luckily not ruined, but it took some time removing all dust spots.

Image1 DustSpots 2

Did you pack all your gear?

This is something I have yet to experience myself, probably due to my paranoia of forgetting something. But it’s happened more than once that I have been out with someone who forgot their memory card, remote shutter, or even their camera. So make sure that all of the equipment you need is in your backpack when you exit the door!

Point two – In the field

Now that your batteries are charged, your memory card has available space, your gear is cleaned, and the equipment you need is packed, let’s head out to capture some beautiful images! But don’t get too excited, remember to go through these quick steps first:

Determine the subject you are about to photograph

Before you look into the settings themselves, start by reflecting upon the subject you are going to photograph. Is it a landscape, animal, people, or something else? By spending a few seconds becoming aware of what you are about to photograph, it will be much easier for you to remember to set your settings accordingly. You will then avoid photographing a bird with a narrow aperture when you want to blur the background.

At this stage I would also recommend putting some thought towards what lens you will need most. If you’re photographing birds, you normally need a long zoom, more than the wide angle. Prepare the correct equipment right away, so you avoid having to change lenses while you watch the bird fly away.

Image4 Bird

Check your ISO

If you are a landscape photographer like myself, you want the ISO to be as low as possible in most situations. However, you are also outside photographing sunrise, daytime, sunset and nighttime. These hours often require different settings.

It sucks to photograph a beautiful sunrise, just to come home and realize you forgot to change the ISO from 1600 after photographing the stars last night.

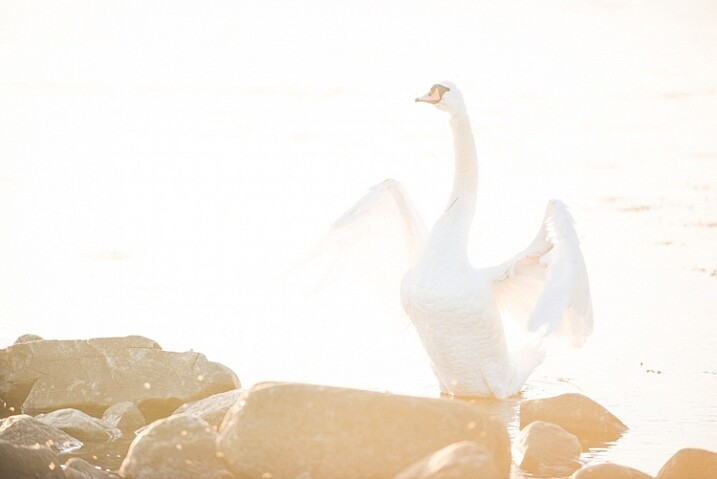
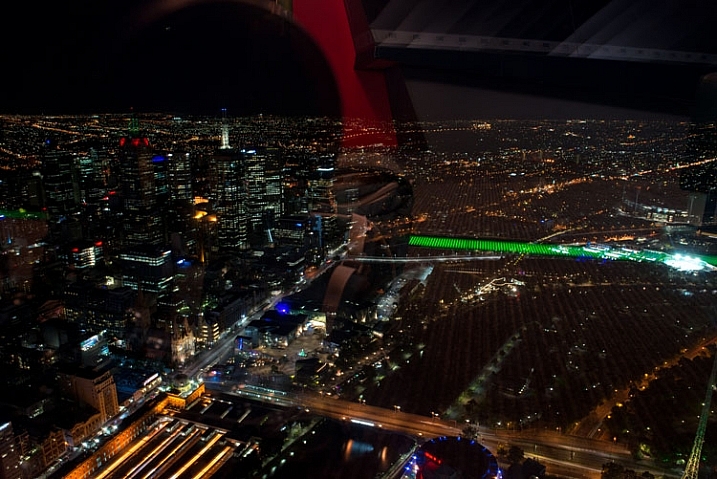
As a default I always check that my ISO is set to 100 when turning my camera on, as this is the setting I use for most of my shots. If you are photographing wildlife you might use 400 as a default to make sure you freeze the moment.The image below is a unfortunate example of one time I forgot to reset my settings from the night before. This resulted in me missing that small moment when the bird spread its wings.

Image4

Check your White Balance

Most of us look at the image preview after firing of a couple shots so we quickly become aware of any visible mistakes we have made, such as not setting the White Balance. Sure, the White Balance is easy to fix in post processing, but I prefer to make the shot as complete as possible in the camera. Quickly check that the White Balance is set to what you normally use (even if it is Auto, Cloudy or any other pre-made setting).

Image3 WhiteBalance 2

Don’t forget the focus!

Have you ever quickly taken up your camera to photograph the bird that just passed you, and later noticed that the image is out of focus because you forgot to change to Autofocus? It’s an easy mistake to make, so before you start photographing, be aware of how you have set the focus.

This also applies for the other way around as well. Say you are about to photograph a long exposure, you set the focus perfectly and slide on the filters. Then, just as you are about to start taking the picture, your autofocus starts going. No, it’s not a disaster, just simply annoying.

Image6

Point three – Back home

At this point your memory card is hopefully filled with amazing images. This is the last step, and it loops right back to point one. Now it’s time to set your batteries to charge, import your photos, and clean your equipment. If you make a routine of doing this after every session, you will avoid making the mistake of heading out unprepared.

That’s it for this checklist, and I hope it helps the next time you are out photographing. These steps don’t take much time to follow, and you don’t need to spend hours in post-processing trying to save a image anymore.

Do you have any “rituals” you do before going out to photograph? Please share in the comments section below.

googletag.cmd.push(function() {
tablet_slots.push( googletag.defineSlot( “/1005424/_dPSv4_tab-all-article-bottom_(300×250)”, [300, 250], “pb-ad-78623” ).addService( googletag.pubads() ) ); } );

googletag.cmd.push(function() {
mobile_slots.push( googletag.defineSlot( “/1005424/_dPSv4_mob-all-article-bottom_(300×250)”, [300, 250], “pb-ad-78158” ).addService( googletag.pubads() ) ); } );

The post A Helpful Checklist to Use Before Photographing Anything by Christian Hoiberg appeared first on Digital Photography School.


Digital Photography School

 
Comments Off on A Helpful Checklist to Use Before Photographing Anything

Posted in Photography


4 Tips for Connecting and Photographing Kids More Naturally

30 Nov

We’ve all seen family photos where everyone is happy, kids are smiling, and the whole brood looks like they are having the time of their lives. Photos like this seem so natural that it’s easy to think they required almost no work at all, when in reality the photographer was likely working like crazy behind the scenes trying to get the perfect pictures.

Shooting photos of adults is one thing, but working with kids brings a whole new set of challenges to the table. Whereas adults generally take directions and respond to requests, kids can be running all over the place, and getting kids to cooperate can be a bit like trying to herd cats. If you have ever had an experience like this, or if you are thinking about getting into family photography, here are four tips for photographing kids that might come in handy.

photographing-kids-girl-purple-dress

These usually help when I’m doing a family photo session, and if you struggle when taking pictures of kids, some of these tips might be just the ticket for that elusive perfect photo.

Get to know the children

Anyone who has spent time doing family photos already knows this rule, but I have seen plenty of photographers fail to get the shots they were aiming for, because they did not do this simple initial step. The first thing I do when taking family pictures is spend a few minutes getting to know the kids. I ask them what their names are, their age or year in school, and have them tell me a little bit about their lives. Ask them specific questions, otherwise you’ll get answers that are too general and unhelpful. “Do you have pets? What are their names? What’s your favorite kind of ice cream? What’s your favorite movie?”

photographing-kids-bridge

By learning a bit about these kids they felt more comfortable working with me and I got much better pictures as a result.

Don’t stop there though. Use these first few minutes as a chance to build a relationship with the kids, and tell them a bit about yourself too, so they see you as a friendly photographer, and not a scary adult with a giant camera lens. One trick to doing this is answering the questions you pose to them after they have had their turn. I like to get a little goofy and set a fun tone for the shoot by giving fake answers that usually make kids laugh. “I’ve got a pet iguana named Mr. Pickles. I like peanut butter and green bean ice cream.” You might feel a bit silly doing this, but it accomplishes two very important things:

  1. It helps establish a relationship and sense of trust between you and the kids, making them much more likely to cooperate during the rest of the session.
  2. It shows the parents that you care about their kids, which can make all the difference between a successful shoot, and a series of awkward moments that will haunt you for weeks.

photographing-kids-two-boys

Have them bring something special

Once you have a foundation built with the little ones, it’s time to actually take some pictures. This can be a little difficult because kids aren’t used to doing things that you usually want them to do when taking photos. You might have a specific pose or composition in mind, but the kids would much rather be running around or climbing trees.

One of my favorite tricks is to have children bring artifacts from their own lives such as books, stuffed animals, or a favorite toy. Not only will it give them something on which to focus their attention during the photo shoot, but it gives you something you can talk about to build a good working relationship for your brief time together. Have them tell you a bit about their stuffed animal, ask if you can read a few pages from the book, or spend a minute playing with their toys together.

It may seem silly to have thousands of dollars of camera gear sitting idle while you and the kids are pretending to play house with stuffed bunnies, but think about the big picture (ha!) here: by doing this you are sowing the seeds for a successful session and impressing the adults at the same time. And that can be worth a lot when they call you for more pictures in the coming years.

photographing-kids-boy-book

This boy’s grandfather told me this was his favorite photo of his grandson, partially because of the book which was a family favorite.

Take some information and twist it

One of my favorite tactics to get kids to smile and laugh, is taking something they already told me when I was getting to know them, and asking about it later on, but with a twist. I purposely get some basic facts incorrect.

If a little girl brought along her favorite toy truck, ask her about her airplane. “It’s not an airplane, it’s a truck!” she will often reply with a huge grin. If a boy told you he is five years old, ask him how he likes being seven. When he corrects you, tell him you’ve always been bad at math so you might keep forgetting.

My favorite trick is to make up my own words. A couple of kids brought their well-worn copy of the children’s classic Green Eggs and Ham, but when I talked with them about it I pronounced it Green Freggs and Fram. These little intentional screw-ups almost always make the kids laugh and smile, and it also gives them a chance to teach you something in return, which kids almost always like doing. Let them correct your mistake and show you how to do it properly, and they will start to feel like they have a true back-and-forth relationship instead of seeing you as just another adult bossing them around. In doing so you will find the kids to be much more cooperative when you really do have instructions for them to follow.

photographing-kids-girl-smiling

Embrace the absurdity

As adults we have all too many inhibitions when it comes to expressing ourselves. We worry about what people will think, how our clothes look, and what everyone around us is doing, and as a result we generally don’t like to make waves, cause a ruckus, or deviate from the norm. Most kids have no such filters, and the results can make for some hectic and stressful photography sessions – if you let it. If you’re the kind of photographer who relishes control and order, perhaps photographing kids is not your particular cup of tea. If you can learn to accept the absurd serendipity of kids, you will not only get some better photos as a result, but you and your clients will have a much better time as a result.

photographing-kids-family-walking

This girl was so bubbly that she rarely stood still, and by embracing her goofiness I got some pictures that her parents were thrilled with.

Rather than telling kids what to do and how to pose, let them just be themselves and capture pictures in the moment. Shots of them playing, goofing around, and jumping on each other might not be what you had in mind initially, but these are the kind of pictures parents, family, and friends often enjoy the most. If your clients do want some specific poses try to get them done first, and then let the kids have fun and loosen up a bit.

photographing-kids-boys-flowerpot

“Mr. Ringsmuth, can we take some photos in a flower pot?” “Sure boys, why not?”

One point to remember is that you’re not just taking pictures but creating and capturing memories. Months down the road when clients show your photos to their friends and family, they will often discuss the photo session itself, and how you treated them and their kids. Even if your photos are stunning, your clients will often sour the moment with a bit of commentary about you as an individual. “Yeah this photo is nice but the guy who took it was such a jerk! He practically yelled at our kids to get them to smile.” You want them to be saying things like “We are so happy with the pictures, and our kids had such a fun time with the photographer. She really connected with them and made them laugh.” Not only are your clients more likely to appreciate their pictures, they will be more willing to book future sessions with you, and sing your praises to their acquaintance,s which will often lead to more customers.

What about you? What are your favorite tips and tricks for taking pictures of little ones? Share your thoughts in the comments below, along with any examples of your favorite kid photos.

googletag.cmd.push(function() {
tablet_slots.push( googletag.defineSlot( “/1005424/_dPSv4_tab-all-article-bottom_(300×250)”, [300, 250], “pb-ad-78623” ).addService( googletag.pubads() ) ); } );

googletag.cmd.push(function() {
mobile_slots.push( googletag.defineSlot( “/1005424/_dPSv4_mob-all-article-bottom_(300×250)”, [300, 250], “pb-ad-78158” ).addService( googletag.pubads() ) ); } );

The post 4 Tips for Connecting and Photographing Kids More Naturally by Simon Ringsmuth appeared first on Digital Photography School.


Digital Photography School

 
Comments Off on 4 Tips for Connecting and Photographing Kids More Naturally

Posted in Photography