RSS
 

Posts Tagged ‘Photographers’

Photographers to Get (Small) Reward for Their Creative Commons Images

19 Jul

dotspin

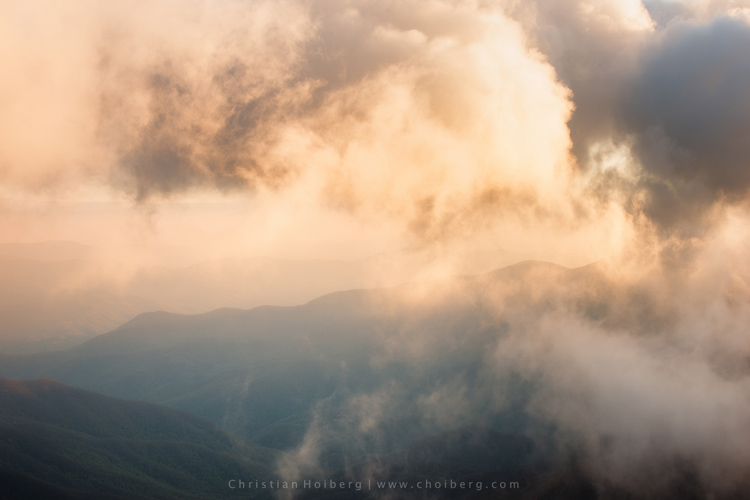
Image courtesy: Dotspin

Someone is benefitting from your Creative Commons-licensed images, and it probably isn’t you. Sure, you might get a little thrill out of knowing that you’re helping a designer with a small budget (or a blogger with no budget) to use an attractive image. And if you’re able to see your pictures in use, the validation can be a fun boost. But that’s a big ‘if’ and it’s pretty much where the benefits end. One new company, though, believes that photographers willing to give away their pictures should receive more for their efforts. Dotspin is trying to line up gifts for photographers who apply Creative Commons licenses to their pictures and give them away on social media sites.

The company has been online since the beginning of May and is still in beta. Its aim, says co-founder Gastón Paladini, is to reward photographers for their contributions to the Internet.

“The idea come from a vision to have a more fair web for all. We think that social media users should be recognized for good content (photos) shared and to be protected in a legal way (copyrights).”

Dotspin is connected to both Instagram and Twitter. Having signed in using an account on either one of those services, Dotspin’s users can take a picture, apply their filters and upload it to their account, tagging the image with the hashtag #dotspin.

The hashtag ensures that the photo is also submitted to Dotspin where, by default, it is licensed as Creative Commons. A settings page, however, allows photographers to change the type of license applied. Rather than selecting one of the various Creative Commons licenses in use, they’re asked whether they’re willing to allow modifications and commercial usage in addition to personal use.

The image will appear in Dotspin’s galleries watermarked with a colored dot, but not before the community has voted on it. Users are presented with two random pictures and asked which they prefer. Images that receive a large number of votes receive “dotcredits,” points which they can redeem for rewards.

At the moment those rewards come from Dotspin, based on “some agreements with Amazon.”

“But we think that soon the suppliers and brands will come to us to offer their products on the Dotspin catalogue,” says Gastón.

Put Your Ads in Front of… Picture-Takers

He may be right.  Instagram currently has more than 100 million users, offering a massive potential market for sellers looking to promote their goods. It’s likely that Dotspin will be able to find some companies who are willing to offer vouchers or freebies in the hope of turning the winners, as well as the site’s users, into future customers.

But the site will face a number of challenges too.

The first is the lack of demographic data. Awarding points that users can redeem means that suppliers can’t target their advertising. They’ll have to settle for offering their products to a demographic made up of roughly of people who like taking pictures. That’s a broad category.

The voting system, too, leaves much to be desired. At the moment, two images are placed against each other at random, forcing users to choose between a picturesque sunset and a mirror-shot selfie, for example. A voting system that pitched two images showing similar topics or that were shot in similar styles against each other might be a more serious way of judging talent.

But a bigger problem is the site’s goal itself. Gastón’s aim to reward people willing to give away their images may be fair and reasonable, but the lack of rewards on offer so far hasn’t stopped people from sharing their pictures. Flickr alone has more than a quarter of a billion photos available under one form of Creative Commons license or another. Donors of those images have made them available with no hope of reward. Gastón wouldn’t say how many photographers have signed up since the site’s beta launch but he did indicate that the numbers are “much more than we thought.”

That could be a good sign but it will be interesting to see whether Dotspin is able to capture a good chunk of the photographers willing to allow people to use their images.

Creative Commons Users Want Tracking for Their Photos, Not Thanks

The most likely outcome is that some photographers currently sharing their images through Instagram and Twitter will sign up to Dotspin and start adding the hashtag. They’ll enjoy the extra feedback provided by the voting system, especially if it’s enhanced. And if the site is able to bring in donors, they might feel a rush if they’re able to win enough credits to pick up a free app download or a discount from a printing service.

But none of those rewards is likely to have an impact on photo-sharing as a whole. They aren’t likely to encourage it and the odd prize isn’t going to come close to rewarding photographers for giving away for free an asset that costs other photographers a great deal to produce.

That’s because when photographers add a Creative Commons license they aren’t doing it for the reward. They’re doing it because they want people to use their images — even the images that few people are ever likely to use. And most of all they want to see their pictures in use.

That would have been a much more powerful reward than goodies redeemable against voted credits. If a platform were produced that highlighted the best of the most recent Creative Commons-licensed images, helped publishers, bloggers and editors to find them, and informed the photographers each time an image was downloaded and told them where it was going to be used, that would be much more rewarding.

And if that service also gave the photographers a share of the page’s revenues, then photographers who applied Creative Commons licenses to their images would really start to feel the benefits.


Photopreneur – Make Money Selling Your Photos

 
Comments Off on Photographers to Get (Small) Reward for Their Creative Commons Images

Posted in Equipment


Photographers Need To Stop Taking Pictures

18 Jul

stop-taking-pictures

Stop taking pictures – OK – I assume that that headline grabbed your attention – and that was what it was designed for.  (I have to say that I’m only half-joking about this – I’ll explain…)   Recently I realized that – that for me as a photographer – one of the most effective and valuable things I could do with my time is NOT taking pictures!  I have to admit it was a bit of a shock when the reality of this started to sink in but now it makes absolute sense to me.


What, you might say – You’re a photographer. What’s going on here?


I’ll explain…  Since you only have a limited amount of time each day you need to prioritise and figure out what actions brings you the “biggest bang for your buck” or the highest lifetime value (you can use the term ROI [Return On Investment] as well).


In our every day we are juggling a lot of roles and I dare to say that most of us are running around “putting out fires” as they flame up instead of working on the really important stuff. The really important stuff are the things that will bring us a lot of value for a limited effort. I’m sure you’ve heard about the 80/20 rule (the Pareto Principle) – this is it!


Photographers – Stop taking pictures #photography #GettingThingsDone
Click To Tweet


Surprisingly taking pictures does NOT bring me the highest life-time value.  Building processes and workflows for my photography brings me the highest lifetime value because once they are in place they run on auto-pilot, automatically.  You spend some time on it but after that the process will just run and run and run…   See what i mean?   Taking pictures gives you some money – but you have to repeat it – over and over again…

productivity-pyramid

And here is the beauty of the whole thing – When you start putting processes and effective workflows in place for your photography you will increase the ROI on your work because the new processes will add  value to what you do – automatically!


IMAGE SOURCE:

Feature image & image 1: courtesy of Per Zennstrom


Fashion Photography Blog

 
Comments Off on Photographers Need To Stop Taking Pictures

Posted in Uncategorized


Concept To Creation: How Professional Photographers Do It

16 Jul

Examples of Concept to Creation from Working Fashion Photographers


Hey FashionPhotographyBlog.com readers.


Thanks for joining us on our “Concept to Creation” series where we walk you through the process of taking an idea into an image. If you were with us last time, we discussed how to turn your inspiration into a concept. Today, we’re going to dive a little further. I’ll help you out with some examples of how working fashion editorial photographers pull their inspiration and translating them into concepts.


Miles Aldridge for Vogue Italia:

Sure, there is a concept in the styling: spring time flowy dresses. There’s continuity between the images because of the bold use of color. But anyone that knows Miles Aldridge’s work knows that’s his style. What ties all these images together? Cats! Without the cats, none of the images would appear to be from the same editorial.

miles-aldridge-vogue-italia-cat-story

miles-aldridge-vogue-italia-cat-story

miles-aldridge-vogue-italia-cat-story

Mert & Marcus for W Magazine:

All the images are shot in the same room. A room that has been flooded. Bingo! There’s your concept.

Mert-&-Marcus-for-W-Magazine

Mert-&-Marcus-for-W-Magazine

Knowing that these guys often pull inspiration from artwork, I wouldn’t be surprised if they were inspired by Pre-Raphaeliate “Ophelia” paintings. I especially wouldn’t be surprised if a big piece of their inspiration came from photographer Gregory Crewdson’s interpretation of these Ophelia images.

ophelia-by-john-everett-millais

Ophelia by John Everett Millais

Ophelia-by-Gregory-Crewdson

Ophelia by Gregory Crewdson


Granted, these examples are more on the extreme end of the spectrum. However, I think it drives the idea across. These images aren’t united because of what the model is wearing. They’re not united because of a dominant color (although, it helps). They’re united because of an idea which brings them together. It takes them out of the real world and brings them into a fantasy land.


This is extremely hard to do on a limited budget. That’s okay! No one is expecting someone with no budget to pull off a shoot like the ones pictured above. Just because you don’t have funds doesn’t mean you cant create a concept on a low/no budget that ties everything together.


Melissa Rodwell for Kurv Magazine:


Not something that would require an extravagant budget like the images pictured above. However, they’re all united in their lighting, clothing, hair, makeup, location and way in which they’re shot. Melissa brings you into this whimsical, etherial world with a simple concept. White.


I know, I know, I’ve said it shouldn’t just be a color that holds your images together. But In these images, it works! Melissa brings you beyond the color white and creates a fantasy world out of it.


melissa-rodwell-kurv-magazinemelissa-rodwell-kurv-magazine

Concept – crucial to binding your images together. You’ll find that any high end magazine only published editorials that has a concept holding the story together.


Hope you all enjoyed the examples of working fashion photographers and their thought processes behind turning inspiration into concepts. Stay tuned because next time, we’ll be discussing the difference between editorial and campaign shoots and how these relate to your shoot concepts.

Until then –


Alana


IMAGE SOURCE:


Feature image: Mert & Marcus for W Magazine

Images 1-3: Miles Aldridge for Vogue Italia

Images 4 & 5: Mert & Marcus for W Magazine

Image 6: John Everett Millais

Image 7: Gregory Crewdson

Images 8-10: Melissa Rodwell for Kurv Magazine


Fashion Photography Blog

 
Comments Off on Concept To Creation: How Professional Photographers Do It

Posted in Uncategorized


Concept To Creation: How Professional Photographers Do It

15 Jul

Examples of Concept to Creation from Working Fashion Photographers


Hey FashionPhotographyBlog.com readers.


Thanks for joining us on our “Concept to Creation” series where we walk you through the process of taking an idea into an image. If you were with us last time, we discussed how to turn your inspiration into a concept. Today, we’re going to dive a little further. I’ll help you out with some examples of how working fashion editorial photographers pull their inspiration and translating them into concepts.


Miles Aldridge for Vogue Italia:

Sure, there is a concept in the styling: spring time flowy dresses. There’s continuity between the images because of the bold use of color. But anyone that knows Miles Aldridge’s work knows that’s his style. What ties all these images together? Cats! Without the cats, none of the images would appear to be from the same editorial.

miles-aldridge-vogue-italia-cat-story

miles-aldridge-vogue-italia-cat-story

miles-aldridge-vogue-italia-cat-story

Mert & Marcus for W Magazine:

All the images are shot in the same room. A room that has been flooded. Bingo! There’s your concept.

Mert-&-Marcus-for-W-Magazine

Mert-&-Marcus-for-W-Magazine

Knowing that these guys often pull inspiration from artwork, I wouldn’t be surprised if they were inspired by Pre-Raphaeliate “Ophelia” paintings. I especially wouldn’t be surprised if a big piece of their inspiration came from photographer Gregory Crewdson’s interpretation of these Ophelia images.

ophelia-by-john-everett-millais

Ophelia by John Everett Millais

Ophelia-by-Gregory-Crewdson

Ophelia by Gregory Crewdson


Granted, these examples are more on the extreme end of the spectrum. However, I think it drives the idea across. These images aren’t united because of what the model is wearing. They’re not united because of a dominant color (although, it helps). They’re united because of an idea which brings them together. It takes them out of the real world and brings them into a fantasy land.


This is extremely hard to do on a limited budget. That’s okay! No one is expecting someone with no budget to pull off a shoot like the ones pictured above. Just because you don’t have funds doesn’t mean you cant create a concept on a low/no budget that ties everything together.


Melissa Rodwell for Kurv Magazine:


Not something that would require an extravagant budget like the images pictured above. However, they’re all united in their lighting, clothing, hair, makeup, location and way in which they’re shot. Melissa brings you into this whimsical, etherial world with a simple concept. White.


I know, I know, I’ve said it shouldn’t just be a color that holds your images together. But In these images, it works! Melissa brings you beyond the color white and creates a fantasy world out of it.


melissa-rodwell-kurv-magazinemelissa-rodwell-kurv-magazine

Concept – crucial to binding your images together. You’ll find that any high end magazine only published editorials that has a concept holding the story together.


Hope you all enjoyed the examples of working fashion photographers and their thought processes behind turning inspiration into concepts. Stay tuned because next time, we’ll be discussing the difference between editorial and campaign shoots and how these relate to your shoot concepts.

Until then –


Alana


IMAGE SOURCE:


Feature image: Mert & Marcus for W Magazine

Images 1-3: Miles Aldridge for Vogue Italia

Images 4 & 5: Mert & Marcus for W Magazine

Image 6: John Everett Millais

Image 7: Gregory Crewdson

Images 8-10: Melissa Rodwell for Kurv Magazine


Fashion Photography Blog

 
Comments Off on Concept To Creation: How Professional Photographers Do It

Posted in Uncategorized


A photographer’s intro to the world of video

13 Jul

It took me a long time to recognize the appeal of video shooting. Even in a job where I have to use a camera’s video features, it was only fairly recently that I moved beyond just taking short clips (essentially stills with a little bit of movement in them) and started to think in terms of using video and editing to tell stories.

Given that most modern cameras offer at least rudimentary video tools, I wanted to share my experiences and perhaps encourage others to start thinking about shooting at 24 or more frames per second.

The good news is that a lot of the things you learn as a photographer are immediately useful as you take your first steps in video shooting. But, as I discovered, at almost every stage I encountered differences and additional factors to consider. Many of which I wished someone had told me when I started…

Stop shaking the camera, you’re making me feel sick

The first thing that became apparent when shooting video for the first time was the need to keep the camera steady. I remember my Dad teaching me how to keep my camera steady and be aware of my breathing when shooting relatively long exposures, but no amount of good breathing technique or bracing the camera against a pillar is enough to give steady video.

Even if your camera is hand-holdable, don’t expect that to mean you’ll shoot it hand-held.

This makes sense, of course: most stills shooting only requires you to hold your camera steady for fractions of a second whereas video lets the viewer see how steady you’ve been for seconds or minutes at a time.

What I’ve learned is that in-camera stabilization can be enough to stop your footage looking unwatchably juddery, but unless you’re aiming for a ‘run-and-gun’ aesthetic, you’ll need to use a tripod or some sort of stabilization rig.

Exposing some limitations

Exposure is another area where the lessons I’d learned from stills photography are useful but incomplete. You still get to control the same variables, but the range of control you have is somewhat restricted. It’s still a question of managing light, but with a greater risk of finding yourself with too much of the stuff.

For me it’s a question of shutter speed, which has a more obvious impact on the appearance of your footage than is usually the case in stills shooting. A fast shutter speed in stills photography will freeze motion, a slow one will allow the subject to blur but there’s often a large range in between these two extremes. In video, there’s a narrower range before the viewer starts to notice the difference.

The 180 degree shutter ‘rule,’ where you use a shutter speed that’s half the duration of each frame (so 1/48th seconds for 24 fps shooting) isn’t an inviolable law, but the further you stray from it, the more jarring or muddled your footage will look. This can be a creative choice, of course, but only counts as such if you’ve consciously made it.

This made me think back to when I was first experimenting with stills photography, and getting a feel for the boundaries set by the longest shutter speed I could hand-hold, the widest aperture I had available and the highest ISO setting I found acceptable. Once I was familiar with these, one of the first purchases I made was a faster lens (that’s right: a 50mm F1.8) to get more light to extend these capabilities.

With stills shooting, one of the first things you buy is a bright lens to get more light, with video it’s an ND filter, to get rid of it.

With video and the further restriction over the fastest shutter speed I’m willing to use, it’s a decent ND filter I need to buy, to reduce the light level to fit your boundaries.

A neutral density (ND) filter allows you to use use wide apertures and the relatively slow shutter speeds that a lot of videographers favor. An adjustable ND filter provides even more flexibility.

A return to JPEGs

Added to these exposure limitations has been another throw-back to my first days as a photographer: having to revert to an 8-bit, compressed shooting format. Having spent some time learning the distinctions between video file formats, the main lesson has been that none of the ones I’m likely to encounter are anything like Raw.

Once you’ve been spoiled by the seemingly endless dynamic range that can fit in a 14-bit Raw file and the ability to set and adjust the white balance at the ending stage, it’s a shock to go back to having to get exposure and white balance perfect when you shoot.

Flat tone curves and Log profiles provide a means of squeezing a bit more useable DR into those 8-bit files, but this can make it even harder to judge correct exposure. I’d highly recommend shooting some test footage and trying to grade it back into something useful, before committing yourself to the flattest tone curve you can find.

Articles: Digital Photography Review (dpreview.com)

 
Comments Off on A photographer’s intro to the world of video

Posted in Uncategorized


7 Last Minute Father’s Day Gifts for Photographers

29 Jun

Father’s Day is just round the corner. If these words made your heart leap in panic, no worries. We have 7 surefire gift ideas for a photography-addicted Dad in your life. Whether it’s a pro photographer or a budding enthusiast you need to greet, there’s a great gift for every kind of photo buff on this list. And the best Continue Reading

The post 7 Last Minute Father’s Day Gifts for Photographers appeared first on Photodoto.


Photodoto

 
Comments Off on 7 Last Minute Father’s Day Gifts for Photographers

Posted in Photography


4 Mistakes Beginning Landscape Photographers Make

23 Jun

Even the most famous photographers started out as beginners. Nobody is a master after day one, and learning is a big part of the process. However, nobody likes to appear as a beginner or an amateur, we all want to create images that looks more professional than just a snapshot.

There are certain mistakes that makes it very obvious that you’re a beginner, and if you want to gain some exposure online, these mistakes might turn people away. Here are four mistakes beginning landscape photographers make and you can can avoid them.

An example of when a spirit level is important to see if the horizon is straight.

An example of when a spirit level is important to see if the horizon is straight.

Mistake #1 – Uneven or crooked horizon

In many photographers’ opinions, there are few things more annoying than viewing landscape images with a uneven or crooked horizon. I see so many images with great potential that are ruined because of this issue. The reason we find this annoying is that the composition is severely weakened with an uneven horizon. Instead of using the composition to lead the eye towards the subject, the horizon will grab your attention and lead the eye straight out of the image.

I know many photographers struggle, or simply forget, to straighten it. This may be because they are so excited to capture the image that they forget to look at it (hi mom!) or because they just don’t know how. Still, straightening the horizon is a huge step towards improving your landscape photography.

Luckily there are a few simple tools to fix this problem, both in the field and in the post-production stage.

In the field: Use a spirit level

If you’ve ever done any sort of construction, this should be a tool you likely know well. But did you know it’s also a highly valued tool amongst photographers?

IMG_7941

It’s becoming more common, even for mid price-range cameras, to have a built-in spirit level. Nikon names it Virtual Horizon, and Canon has the Electronic Level. Personally, I use the Virtual Horizon for all my compositions when the camera is mounted on a tripod (which is 99% of the time). This tool shows you a spirit level on the camera’s LCD screen, so you need to be working in Live View. Note: Keep in mind that using Live View will drain your battery much quicker.

Even though a Virtual Horizon or Electronic Level is becoming more common, there are still many cameras that don’t have this feature, and there are those who prefer the old school method: using a spirit or bubble level on top of the camera. This small and handy tool can be found in most photography stores, and shouldn’t cost more than a few dollars (see photo right).

In post-production: Fix it in Adobe Lightroom

spirit-level-LR
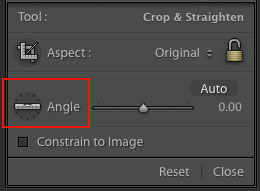
If you weren’t able to get a straight horizon in the field, there’s also a easy method to fix it in post-production.
Adobe Lightroom has a great tool called Straighten. You can find this by going into Develop  > Crop Tool (the keyboard shortcut is R). You then see a spirit level followed by the word Angle (outlined in red on the right).

There are three methods to easily straighten your shot using the crop tool:

  1. Click Auto and see how Lightroom does at straightening the image. It usually does a pretty good job so try that first, you can also undo it if it’s not right and try the other methods.
  2. Select the spirit level and drag a line along the horizon. Adobe Lightroom will then automatically straighten the image according to the data you gave it.
  3. Manually insert amount of straightening you need, or drag the point back and forth until you’re pleased.

Mistake #2 – Being stuck in Automatic Mode

Mode Dial
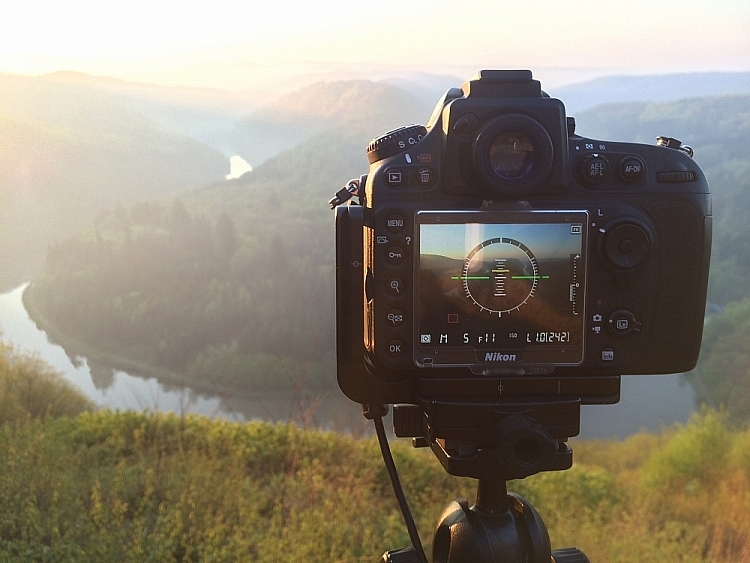
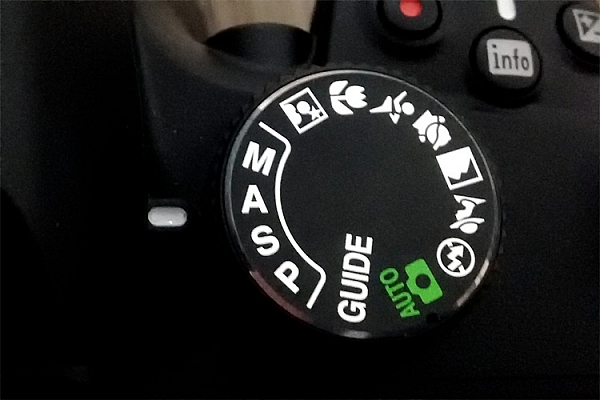
While Automatic Mode may have its benefits for those who just bought their first camera, the sooner you stop using it the better. I always recommend mainly using Manual mode, even though both Shutter Priority and Aperture Priority are acceptable for beginners.

There are several reasons you want learn how to manually control the camera, and understand how the settings work together. Even though the camera does a decent job exposing the image correctly, it doesn’t take the image quality into consideration. In other words, the aperture and ISO will rarely be optimum if you wish to get a sharp result.

I know it may seem scary in the beginning, and I still remember how I tried to understand the basics when I was starting out, but I guarantee you it’s worth the extra effort. When you can use the ideal settings, the final result will be much better.

It would be nearly impossible to get an image like this in Automatic Mode

It would be nearly impossible to get an image like this in Automatic Mode

Mistake #3 – Not using a tripod

Besides the camera itself, a tripod is the most important tool for landscape photography. While some may complain that it’s not practical to travel with, trust me when I say –  there’s an ocean of opportunities when you begin using a tripod.

Not only will your images become noticeably sharper, you will also be able to do certain techniques that aren’t possible without a tripod (such as long exposure photography). Let’s look at some of the advantages of using a tripod for landscape photography:

  • You’re able to achieve longer exposures without getting blurred images.
  • You don’t need to use a high ISO to keep the image sharp. Keep the ISO low and use a longer shutter speed instead.
  • You can carefully make your composition and keep it for many images.
  • Since the camera stays in the same spot you can take multiple images and stack them later (for things like: HDR, time-lapse or techniques to remove people).
  • You’re able to keep the image straight by using Live View, and carefully adjusting the tripod.
  • The amount of motion is reduced so your images become sharper.
Using a tripod makes it possible to have a longer shutter speed

Using a tripod makes it possible to have a longer shutter speed to make images like this.

You don’t need to blow your wallet on the most expensive tripod on the market, but I do recommend getting something that’s more durable than the $ 20 one at the electronics shop. A solid tripod will last for a long time and might save you money in the long run. A sturdy tripod is more flexible to work with, and it’s still gonna do a good job even in windy conditions.

Mistake #4 – Shooting during the daytime

I know I might start some discussion with this point, but good landscape images are not taken during daytime. In landscape photography, light is everything.

You might have heard about the Golden Hour, at times referred to as the Photographer’s Hour. The time around sunrise and sunset is when the sun’s position in the sky is ideal for photography. The low light gives a soft and golden glow to the landscape.

Bird flying through a stormy sunset at Liencres, Cantabria.

Bird flying through a stormy sunset at Liencres, Cantabria.

During midday the light is harsh, and very few images looks good in these conditions. If you want to improve your landscape photography you need to go out and photograph during sunrise and sunset. Daytime is perfect for scouting locations or sleeping.

As always, there’s a few exceptions to the rule:

  • Commercial travel photography: If you’re photographing for tropical hotels and resorts, they do need sunny pictures, as this is what attracts tourists.
  • Cloudy days can be okay for photographing waterfalls.

Read also: 5 Reasons Why Bad Weather Days are the Best Times for Photography and 5 Ways to Create Dramatic Landscape Photos at Midday for other ideas.

Jotunheimen-Cabin-Fog

An example of when shooting during daytime works

Are you guilty of these four landscape photography mistakes? Have you made any other mistakes that had a negative impact on your photographs? Please share your thoughts in the comments below.

googletag.cmd.push(function() {
tablet_slots.push( googletag.defineSlot( “/1005424/_dPSv4_tab-all-article-bottom_(300×250)”, [300, 250], “pb-ad-78623” ).addService( googletag.pubads() ) ); } );

googletag.cmd.push(function() {
mobile_slots.push( googletag.defineSlot( “/1005424/_dPSv4_mob-all-article-bottom_(300×250)”, [300, 250], “pb-ad-78158” ).addService( googletag.pubads() ) ); } );

The post 4 Mistakes Beginning Landscape Photographers Make by Christian Hoiberg appeared first on Digital Photography School.


Digital Photography School

 
Comments Off on 4 Mistakes Beginning Landscape Photographers Make

Posted in Photography


7 Last Minute Father’s Day Gifts for Photographers

16 Jun

Father’s Day is just round the corner. If these words made your heart leap in panic, no worries. We have 7 surefire gift ideas for a photography-addicted Dad in your life. Whether it’s a pro photographer or a budding enthusiast you need to greet, there’s a great gift for every kind of photo buff on this list. And the best Continue Reading

The post 7 Last Minute Father’s Day Gifts for Photographers appeared first on Photodoto.


Photodoto

 
Comments Off on 7 Last Minute Father’s Day Gifts for Photographers

Posted in Photography


8 Fashion Photographers You Should Have On Your Radar

04 Jun

The fashion photography world is enormous, and it’s ever growing.

So how in the world do you find the best of the best? Ask the experts!

Atlas Magazine is an independent print and digital publication geared at the promotion of the next generation of fashion creatives. They receive thousands of submissions a month from photographers globally.

So we asked them, experts that they are, to list the fashion photographers that they’re loving right now.

Take a look at the list. Follow your faves on Instagram. We think you’re going to love them too!

(…)
Read the rest of 8 Fashion Photographers You Should Have On Your Radar (698 words)


© laurel for Photojojo, 2016. |
Permalink |
No comment |
Add to
del.icio.us

Post tags:


Photojojo

 
Comments Off on 8 Fashion Photographers You Should Have On Your Radar

Posted in Equipment


Magnum Graduate Photographers Award 2016 winners announced

24 May

Magnum Photos recently announced the ten winners of its Graduate Photographers Award 2016, providing each graduated photographer with a Magnum photographer mentor, portfolio review and a screening of their work at Somerset House in the UK. The awards were announced in association with RBB Economics.

The Graduate Photographers Award is awarded to photographers who graduated from a ‘lens-based media’ or photography UK degree course some time in the last three years. During the evaluation process, ten experts each nominated ten photographers from which a panel of judges chose the ten finalists. The following photographers were awarded:

  • Nicholas Constant
  • Emma Gruner (NSFW)
  • Tom Heatley
  • Sean Padraic Birnie
  • Sara Sandri 
  • Vincenzo Sassu
  • Charan Singh
  • Erin Solomons
  • Peter Watkins
  • Feiyi Wen

Via: Magnum Photos

Articles: Digital Photography Review (dpreview.com)

 
Comments Off on Magnum Graduate Photographers Award 2016 winners announced

Posted in Uncategorized