Carl Zeiss has announced its annual photo contest for images shot with one of its lenses. Any Zeiss lens is considered valid, from Nokia smartphones through Sony compacts, such as the RX100, to the company’s high-end interchangeable lenses. This year’s theme is ‘The moment that knows no limits’ and first prize is one of the company’s manual focus SLR and rangefinder lenses, with a variety of other Zeiss-branded prizes for runners-up. The contest runs on Flickr until January 15th.
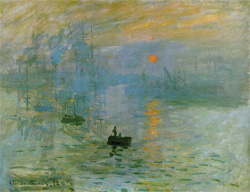
Impressionism is an art movement that began in the 19th century with the works of Monet whose painting "Impression, Sunrise" gave rise to the name of the art movement.
I often think of photography as two different art forms.
There is the traditional style that depicts a literal representation of a scene by showing how it actually appears to the person who is present – the style used in photojournalism and travel images.
Then there is another style when the photographer tries to convey the feeling of a scene, a general impression, or suggestion of a scene.
Lacking in detail these impressionist images emphasize colour over line and are often soft, dreamy, and have a painterly feel.
Think of the impression a scene leaves in your mind when you glance at it quickly and then look away before giving your eyes a chance to focus. Usually it is an impression of colour and shapes and maybe an idea of some things that were in the scene with little detail – just the essence of a subject.
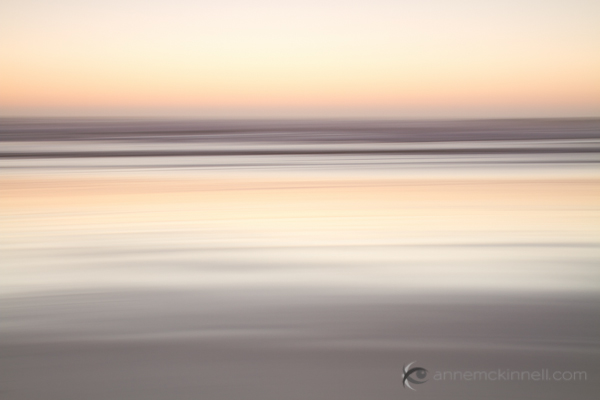
Beach blur using the intentional camera motion technique.
When it comes to creating these dreamy sorts of images where things are out of focus it should be obvious to the viewer that the photographer intended it to be out of focus. If it’s only out of focus a little bit it looks like a mistake.
Try to capture the feeling or mood of the scene rather than a literal representation.
Now, on to the techniques.
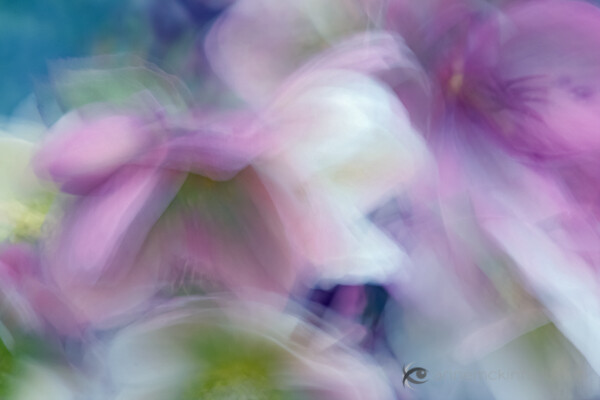
1. Intentional Camera Movement
For this image I moved the camera in a diagonal direction. I also sharpened the image in post-processing which is what gives it the appearance of brush strokes.
This technique works great on landscapes with strong lines such as the horizontal lines in a beach scene (shown above) or the vertical lines in a forest scene but you can do it anywhere.
You will need to experiment quite a bit before you get a result you like but that is all part of the fun. Every frame will turn out differently.
* Start on shutter priority and pick a long shutter speed such as 1/20 to 1/2 a second.
* Point your camera at the middle of the scene and hold the shutter half way down to lock in the exposure.
* Pan in the same direction as any strong lines that exist in the scene.
* Start the panning before you completely press the shutter and continue after the shutter closes. That will make the movement smoother.
* Experiment with shutter speeds.
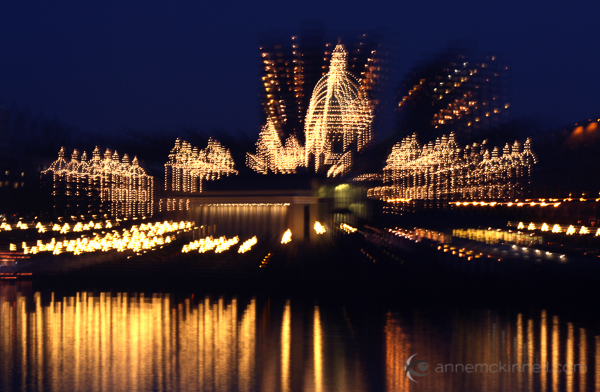
2. Zooming
Similar to the above technique, this one is intentional camera movement too, but instead of panning you zoom your lens in or out during the exposure. I like how this technique looks on city lights.
The Legislature in Victoria, British Columbia using the zoom blur technique.
Set your camera to shutter priority and pick a shutter speed of at least a couple of seconds.
I find it easier to do this technique at night to allow for a really long exposure. If you do it during the day you might need to use a neutral density filter to block out some of the light to allow for the long exposure time.
While the shutter is open slowly zoom the lens. Try to make the zoom as smooth as possible.
You will probably have to try a number of different exposure times and try zooming quickly and slowly for different results.
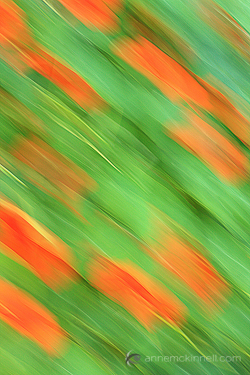
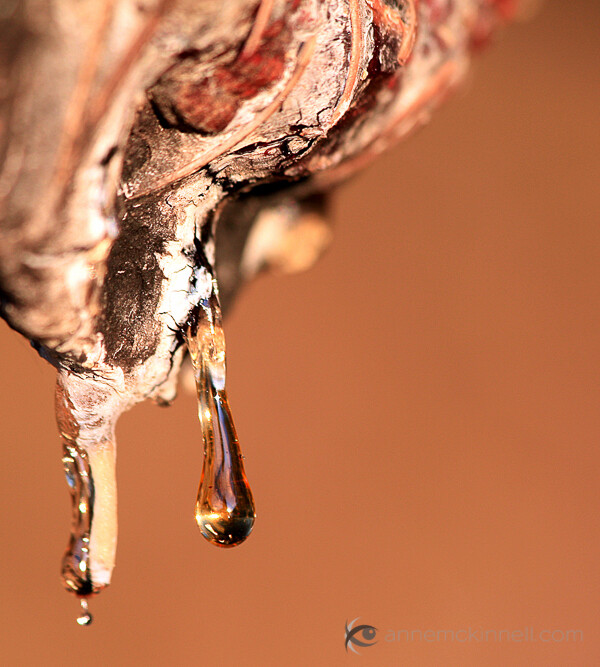
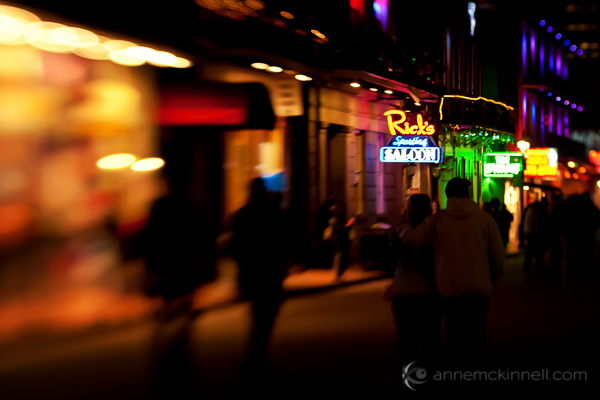
3. Selective Focus
With this technique only a very very small portion of the frame will be in focus. The rest will be extremely soft and painterly. You will need to use a lens that has a very wide aperture opening (f/1.8 or 2.8 for example). It will work best if you move away from your subject and use a telephoto lens to zoom in.
Or you can use a specialty lens like a Lensbaby.
Bourbon Street, New Orleans during Mardi Gras captured with a Lensbaby.
Use the aperture priority setting on your camera and set it for the widest aperture (lowest F stop number).
You might have to focus manually to get the right part of the frame in focus.
This technique tends to works best when you have good colour in the frame.
4. Long Exposures
I always remember the day I made this image because what I really wanted to do that day was the selective focus technique. But when I got to the location it was super windy and there was no way I was going to get anything in focus.
At first I was disappointed until I decided to go with the flow. The flowers blew all over the place while the shutter was open for half a second and I was delighted with the result.
Set your camera to shutter priority and pick a long shutter speed like half a second or longer.
Find a subject that is in motion.
You will probably have to try lots of different shutter speeds before you get one that is just right depending on how quickly your subject is moving. I like it when the result is very abstract yet there is still enough detail to identify the subject.
5. Focus Through
This technique works great with flowers because the petals are semi-transparent and light shines through them. What you want to do is focus on a flower that is a couple of feet away and allow another flower to be extremely close to the end of your lens, so close that it could never be in focus.
Use a telephoto lens.
Find an object that is semi-transparent that you can place in front of the subject which is in focus.
Use manual focus so your camera isn’t confused by the object in the foreground.
The reason I like these techniques is because it gives me a real sense of freedom when there are no rules and I can play around as much as I like.
Even if these sorts of images aren’t your thing, I really encourage you to try it out for a day just for fun, just to release yourself from the obligation of making everything super sharp all the time.
Remember – you are the artist and you can do whatever you want.
I would love to hear about your experience with these techniques! Let me know how it worked out for you in the comments.
Post originally from: Digital Photography Tips.
Check out our more Photography Tips at Photography Tips for Beginners, Portrait Photography Tips and Wedding Photography Tips.
doin what we do!:D song: luniz-five on it watch in 360p idk the quality is messy:[[[ my pictures are hd 1080p Video Rating: 1 / 5
DSLR for video? Yep, they all suck. they are the equivalent of the D60. The first real DSLR, 9 years ago. But they will surpass the RED in a few years. Video Rating: 3 / 5
Comments Off on Downtown Skate Sesh Photo Montage 9/16/11
Winter is coming, and unlike normal people, who rush to get new coats, sweaters and winter tires, geeky guys with photo cameras have some extra things to remember. Winter is, just like all other times of year, is great for photography. Even if it seems that the whole season is a dark eternal night, I think in every country and Continue Reading
The post Get Your Photo Equipment Ready for Winter appeared first on Photodoto.
Last year, we showed you how to one-up those mall elves in the holiday photo game.
This year, we’ll show you how to spin circles around them. Pretty soon those guys are going to be asking *you* for photo tips (and who knows, maybe Santa will hire you as his new photog).
We’re sharing a slew of photo ideas that your family will actually have fun doing! Even the most stoic of teens will crack a smile.
From creative backgrounds to great group photos that take less than 5 minutes to all the holiday lights fun you can imagine, you’re bound to find an idea that’s both creative and a blast.
Those mall elves might have speedy printers, but you have JoJo on your side.
10 Fun & Original Holiday Photo Ideas
p.s. The Super Fantastic Photojojo Lookbook is here. Share with your pals for $ 5 off any order, TODAY ONLY!
1. Multiple Exposures
Because it’s one of the best ways to wow your friends and family with your photo wizadry!
Seriously, though, maybe it’s the way a repeated image mimics the look of snowfall or the way you feel after you eat 10 frosted snowman cookies, but there’s something beautiful, ethereal even, about a multiple exposure.
Some tips: pick a simple subject, like your shiniest ornament, a hand-picked pine cone, a Holly branch or yourself!
Place your subject against a background that’s free of clutter. Check our ideas for fun holiday backgrounds down at #5 (Tinsel! Wrapping paper! Origami snowflakes!) ’cause those work great, too.
To get the same effect as in this photo by Valerie Chiang, you can nab a toy kaleidoscope and hold it in front of your lens. If you’re shooting with an iPhone, the Holga iPhone Lens has a kaleidoscopic filter that’ll do the job.
You can also shoot a multiple exposure photo by snapping the same subject, but moving your camera so that the subject is in a different part of the frame each time you shoot. You can pick however many times you want them to appear.
Get some tips at our Double Exposure Guide or try the (the TIM Holga, which lets you shoot double exposures.
You can also layer your photos in Photoshop or use an app like ImageBlender!
2. Snow Mid-Air!
Since you prefer your snow on the ground or in a sno-cone as opposed to all over you, we found a just as magical snow alternative: COTTON BALLS.
You can make a whimsical snowfall like so:
Plenty of light (flash if necessary).
Quick shutter speed. 1/60th is the slowest you should go. You can also use a higher ISO if you don’t have enough light.
Have your model or a friend throw the cotton into the air.
Snap a bunch of photos in succession, so you catch the cotton snow floating mid-air. Burst-mode is perfect for this!
Confetti or glitter are both another great snow alternative. Here’s a fantab example from Haley Sheffield.
You can even get fancy and turn it into a GIF! Here’s a guide to making a GIF in Photoshop or GIMP. Also, check out our guide to 5 Rad Ways to Play with GIFs.
For phoneographers, try apps like Cinemagram and GIF Shop for iOS or GifBoom for Android.
Pictured: Photojojo Tree Bling!
3. Squish Your Family into an Ornament:
The best part about this idea is that it takes less than 5 minutes!
Grab your family, huddle together as tight as you can (AWWW), and shoot your reflection. You might try shooting from an angle to get your camera out of the shot or simply ‘shop it out.
Now, you’re a Christmas-edition of I Dream of Jeannie, and your cuzzos will be totally impressed!
The photo to the right was shot by Jonathan Arnold on film! Canyoubelieveit? The only Photoshopping he ended up doing was removing the camera from the image. Not bad, eh?
4. Swap Heads
Freak your friends and family out by swapping heads!
They’ll squint until they finally figure out what’s going on. It’s the best!
There are a couple of ways to swap heads. The peeps over at ManBabies specifically swap babies’ heads with dads’ heads. Weird? Yes. LOLMAZING? Yes.
All it takes is a little cut and paste action in Photoshop, GIMP, or any other photo editor. The more precise you are, the more realistic the photo, and the more you’ll trick your friends and family … which is essentially the goal.
You can also simply swap faces, which is what the apps FaceJuggler for iOS and Face Swap for Android do. They detect the faces in a photo, and then switch everyone’s faces onto different bodies.
The result? THIS. Horrifying, hilarious, and endless fun.
5. Get Creative with Backgrounds
You’re so resourceful, you could think of a million and one ways to reinterpret household stuff into rad photo backgrounds. Here’s a list to get you started:
Chalkboard. Use chalkboard paint like Leslie Kerrigan did to the right!
Tinsel. Hang this along a wall for a sparkling background.
Sequins. Just as sparkly, but a little more refined.
Wrapping paper. SO many patterns to choose from.
Paper-craft snowflakes. Make a wall of these!
Foil. Crinkle it to give it texture!
Tree lights. Hang strings of lights vertically to make a wall!
6. Get Ironic
Poking fun at yourself wins because that’s exactly what your family and friends love to do!
Beth’s faux portrait studio Christmas photos bring that ’70s/’80s vibe in the best way possible.
We asked her for tips on how she put this photo together, and she told us she feathered the edges of the photos in Photoshop and combined the two to make one.
Another fantastic resource for studio portrait inspiration: We Have Lasers!!!!
7. Use What You Got, the Christmas Tree Lot
This is a goodie for those of you who don’t have a lot of time to craft a background or pick up extra gear.
Think about using what’s available to you. More likely than not there’s a Christmas tree lot near you with the given that it’s December.
Dress your family up, and wander through the trees for colorful family photos. That’s what Rachel Devine did last year!
Other ideas for locations:
Your neighbor’s yard full of light-up holiday figurines (maybe ask first!).
Your local skating rink.
A snowy grove if you live where it snows.
A fancy hotel lobby! These tend to have just as fancy Christmas trees and decor.
8. Okeh Bokeh
We’d be fools to not take advantage of all the lights that pop up around the holidays!
A classic way to do so is to play with bokeh. Bokeh’s the blurred background you get when you have a shallow depth of field. This looks especially cool when you have lots of tiny lights in your background!
To get the best bokeh possible, aim for a large aperture (which means a low aperture number, like between f/1.4 and f/5.6). A portrait or telephoto lens works best – anything 50mm and up.
Just have your subject stand close to the lens and far away from the background, and BAM, bokeh will be in full effect.
Even cooler, you can make custom-shaped bokeh filters, like Amanda did above. That means the lights in your background can be different shapes — hearts, stars, words, whatevs! If you’re into that idea, you’ll want to check out our DIY Bokeh Kit.
9. Use Holiday Lights as a Light Source
Holiday lights instantly change your photos in these two ways:
Make your photo feel seasonal.
Add a whole new light source, which makes your photo about 10x more interesting.
These two photos (the first by Haley Sheffield) are a couple of ideas for shooting holiday lights both in the daylight and in the dark because, hey, you can do both.
Brad Heaton shot this one inside in a dark room with what looks like some flash on the right to illuminate his subject.
10. Float On
Things get magical around the holidays. So magical, that a baby floating next to a Christmas tree isn’t so far-fetched.
Paul Wallace caught this photo of his kiddo putting a topper on the tree!
Here’s an excellent guide to levitation photos. It may or may not have something to do with digital editing, which means your baby or other floating person will be safe and sound. (No actual levitation required!)
Break Out the ‘Nog, There’s Even More!
When it’s all done and over, chillax with a lens mug full of hot cocoa.
If you’re a spontaneous shooter and always find yourself in low-light, try a Pocket Pod. It stabilizes your camera via your own body weight.
Check out last year’s guide for a bunch more awesome holiday photo ideas!
Stumped on gifts for your fellow photo nerds? Our Lookbook just came out today and it’s FULL of potential photo gifts.
Creepy Santa dot com. Never forget.
Photo credits: 1. Valerie Chiang (Tumblr), 3. Jonathan Arnold, 4. James S. on ManBabies, 5. Leslie Kerrigan, 6. Beth on Flickr, 7. Rachel Devine, 8. Kevin & Amanda & Our Nifty Notebook, 9. Haley Sheffield & Brad Heaton, 10. Paul Wallace
Related posts:
Holiday Photos: The Top 10 Most-Fun-Ever Ideas Rounding up your family for holiday-time photos is a feat…
Photojojo’s Holiday Gift Guide 2012, Part 1! When the turkey is roasted and thanks is given, take…
Photojojo’s Holiday Gift Guide 2012, Part 2! It’s the most wonderful time of the year! Some would…
This six part series explores photography, and demonstrates ways in which you can improve on your skills. This show highlights the best bits from the series. Video Rating: 5 / 5
A New York tabloid newspaper has caused controversy by publishing an image of a man about to be killed by a subway train on its front cover, along with a dramatic headline. The image shows a subway train bearing down on a man who’d been pushed into its path. The paper’s handling of the story has been widely criticized and it raises a range of issues over the actions of all the parties involved. Journalism school The Poynter Institute has an interesting summary, separating the different aspects about a controversy that brings a lot of difficult questions about photojournalism and news reporting. What do you think?
some test shots from the first couple days of having the sigma 70-200 2.8, check out my deviant art page brandonlee88.deviantart.com www.facebook.com www.flickr.com
Comments Off on Sigma 70-200mm 2.8 HSM II Test Photo Photography w/ Nikon D3000
Once again it’s time for another 15 minute photo challenge This time, it’s off to the amazing Peak District in Derbyshire armed only with a Canon 40D and a Canon 24-105L it’s a landscape photographer dream. For more information check out: Web site www.gavtrain.com Blog http Facebook www.facebook.com Video Rating: 4 / 5
Comments Off on 15 Minute Photo Challenge – Peak DIstrict
How to attach a Think Tank Photo Pro Speed Belt V2.0 to a compatible backpack. The Pro Speed Belt allows photographers to carry one or more Modular components on the belt, for rapid access to other gear, while actively shooting. This saves the time consumed by taking off the backpack to retrieve a different lens or accessory. The belt and components can be removed then stored in the backpack for traveling. For more information about the Pro Speed Belt V2.0, Think Tank Photo camera backpacks and other Think Tank Photo products, please click on one of the links below: Pro Speed Belt V2.0: www.thinktankphoto.com Think Tank Photo camera backpacks: www.thinktankphoto.com Modular Set: www.thinktankphoto.com Skin Set: www.thinktankphoto.com Think Tank Photo homepage: www.thinktankphoto.com Video Rating: 5 / 5
artoftheimage.blogspot.com – Continuing with discussing David Hobby’s, the STROBIST, article “Stealing Flash,” and how to protect your digital camera gear and wireless remote lighting while your working in public areas like gyms, arenas, etc., David has a REALLY interesting self-defense plan to fend off would-be thieves and attackers using camera gear. You can check out the original article at David’s website http
Comments Off on Using a Pro Speed Belt with a Compatible Backpack — Think Tank Photo


 Because it’s one of the best ways to wow your friends and family with your photo wizadry!
 The best part about this idea is that it takes less than 5 minutes!
 Freak your friends and family out by swapping heads!
 You’re so resourceful, you could think of a million and one ways to reinterpret household stuff into rad photo backgrounds. Here’s a list to get you started:


 This is a goodie for those of you who don’t have a lot of time to craft a background or pick up extra gear.
  We’d be fools to not take advantage of all the lights that pop up around the holidays!
 Holiday lights instantly change your photos in these two ways:
  Brad Heaton shot this one inside in a dark room with what looks like some flash on the right to illuminate his subject.
 Things get magical around the holidays. So magical, that a baby floating next to a Christmas tree isn’t so far-fetched.

You must be logged in to post a comment.