In his series ‘Time is a Dimension,’ photographer Fong Qi Wei stretches the boundaries of still photography to produce images that convey the passage of time. Rather than using time-lapse, he has created a series of photo collages, each composed of many ‘slices’ taken in a 2 to 4 hour timespan. The resulting images capture the changing colors of sunrise and sunset in a way a single still or video clip can’t match. Click through and take a look at some of his work.
Perspective tricks aren’t just for David Blane and circus folk.
Aside from fun house gimmicks, crafty photographers have discovered ways to turn perspective play into art.
We’ve rounded up seven of these how-dey-do-dat photo projects that will allow you to pull photographic rabbits out of hats (so to speak).
What better way to spend a day as you go upside down, get reflected, and lose yourself in these puzzling photographic adventures.
Create Your Own Photo Illusions
p.s. Our pals at Smugmug (they help make photo websites) had a beautiful redesign and are offering 20% off the 1st year. Just enter code LUVSMUGMUG by 8/30.
p.p.s. We’re hiring! Apply to be our Editorial & Community Lead for the opportunity to re-invent what/how/where Photojojo publishes online.(…) Read the rest of Perspective Play: 7 Photo Projects to Try (999 words)
Last year we shared a behind the scenes video that showed some of what went into shooting this amazing ‘dust’ and ‘dance image’.
Since then photographer Thomas David has shot another great series of dust photos – this series was shot outside and has more of a martial arts/fight theme.
See the full series of images here on Flickr.
And as with last time – here’s a behind the scenes video to show you a little more of how it was taken:
Behind the Scene video for the “Dust and Fight” photoshoot from Tom on Vimeo.
Update: check out this post at The PhoBlographer with a heap more information on how the series was shot.
Post originally from: Digital Photography Tips.
Check out our more Photography Tips at Photography Tips for Beginners, Portrait Photography Tips and Wedding Photography Tips.
Dust and Fight: Behind the Scenes of This Spectacular Photo Series
Please point me in the direction of the photography books.
Thank you.
Love, A photographer in need of a little inspiration.
If dust is settling on your camera and your creative juices need some stirring, the library is a great place to explore photographers and books on photography that’ll light that photo bug inside you. It’s always in there… sometimes it just needs a a little push in the right direction.
Learn some super simple tips on finding the photo books in your library and what to do once you’ve found them.
If you’ve got yourself a free afternoon, strap on your sneakers and head to the library to peruse the photo books and get inspired!
Find Photo Inspiration at the Library
p.s. We’re looking to re-invent what/how/where we publish online, and we’re seeking one amazing Editorial & Community Lead to lead the charge.
GETTING STARTED
Find your local library.
This is a handy website to discover where to locate the library in your hood.
Walk into the library and breath in the musty and awesome smell that is special only to a public library.
Lots of people have been in this institution and many of them have come out of it knowing something they didn’t when they walked in. Or they went in, used the restroom, and left.
But not you! You are going in to be inspired by photography and all of the wonder that comes along with looking at a photograph in print.
What’s great about the library is that you have access to all kinds of photo catalogs that aren’t available online.
You are part of this storied piece of public learning now.
Go forth brave photographer. Inspiration is now shooting out of your fingertips.
DO A LITTLE DIGGING
Thanks to Melvil Dewey and his Dewey Decimal System there is a super simple way to find the photo books in most libraries.
When at the library head straight to the stacks labeled 770.
All nonfiction books have a 3 digit number in front of them that corresponds with their subject matter. The 700 section of the library is The Arts section. All photo books start in the 770 section of the library. Anything with the numbers 770-779 on the binding is a photography book.
If you happen to be in a library that uses the Library of Congress system, then you’ll find the arts in section N.
Once at the photo stacks it’s pretty darn fun to run your hand over the books and see a name or binding that strikes your fancy.
Pull some books off of the shelf and find a cozy place to peruse what you just picked out.
A GOOD PLACE TO START
If you like to have a little more direction when you are searching for books here are some awesome books to look for.
Names of Photographers to Look for at the Library
Wegee (aka Arthur Fellig)
Scandal! Intrigue! Awesome black and white photographs from a man who beat the police to the scene of many a crime!
Lee Friedlander
Magic street photographs, idiosyncratic landscape photos, and bizarrely awesome self-portraits.
Francesca Woodman
Beautiful and sad stories told through images of the artist herself. If you love taking self-portraits, take a look at Ms. Woodman’s poignant images.
Since there are so many amazing photographers out there, here’s a starting list of 100 of the most influential photographers of all time.
Books on Photography
The Photographer’s Eye by John Szarkowski
A formative guide to the visual language of photography.
The Flame of Recognition by Edward Weston
A fascinating glimpse into the life of a photographer who was constantly on the lookout.
The Education of a Photographer edited by Charles T. Traub, Steven Heller, and Adam B. Bell
A great collection of essays about what it means to be a photographer now.
How-to Photo Books
Photography by Barbara London, John Upton, and Jim Stone
This book guides you to be your own photo teacher!
The Art of Photography: An Approach to Personal Expression by Bruce Barnbaum
Barnbaum explains photography in a way that won’t leave you saying “what?!!”
Image Transfer Workshop: Mixed Media Techniques for Successful Transfers by Darlene Olivia McElroy and Sandra Duran Wilson
Learn how to turn your photos into fun mixed media pieces.
Photojojo!: Insanely Great Photo Projects and DIY Ideas by Amit Gupta and Kelly Jensen
Lots of DIY ideas to help you inspire yourself and others with photo projects. From your favorite photo people: us!
Magazines Have Photos, Too!
Books aren’t the only sources for your photo research.
Magazines are full photos, and the amazing thing about the library is that they’re subscribed to basically every magazine ever.
Exploring magazines will introduce you to photography besides the kind you’ll find in the Arts section of the book stacks. You’ll see nature photography, fashion photography, interior design, and portraiture.
Magazines are also a great place to discover emerging photographers. PDN Magazine in particular does a fantastic job of featuring up and coming photogs.
Some more awesome magazines to check out: National Geographic, PDN, Vogue, American Photo, Kinfolk Magazine, Popular Photography, B&W, Wallpaper, Time, Vanity Fair.
TAKE NOTE
Bring a notebook, sketchbook or your phone to the library with you.
While you are joyfully perusing the books you’ve picked off the shelves take notes on photographers, photo tips, or quotes.
Write down words that come to you while looking at photographs. You don’t have to get crazy or put pressure on yourself… free associate as you flip pages. This is all for the joy of photography.
If a photo really grabs your attention write down what you are feeling as you look at the photo. Why did this one photo jump off of the page and into your heart?
Remember how you felt when you looked at the specific image while you are out taking your own beautiful photographs.
When you find you are in need of a little inspirational kick in the pants you can look through your notes and see what inspired you.
YOU CAN TAKE IT WITH YOU
Start an inspiration archive by designating a folder or binder for all things photography.
We feel it important to note that this is a compilation of things you love and is only for personal reference. We don’t believe in stealing artwork or infringing on copyrights.
Once you’ve found something that strikes your fancy make some photocopies of images that you really love and put them in your binder. You can categorize them into sections, like street photography, portraiture, or landscape. Think of it as a Pinterest board, but for your eyes only.
You can also put the notes you have taken in the binder as well.
Organize the images by photographer’s name, subject matter, however you like to look at later and get inspired whenever you are feeling a creative lull.
Related posts:
World Photography Day — Ideas & Inspiration to Celebrate All Things Photo Do you remember the first time you held a camera?…
DIY: Make Crazy Detailed Light Paintings with Photo Light Stencils Extra photos for bloggers: 1, 2, 3 Ever tried painting…
A Healthy Dose of Photo Inspiration — George Lange’s 2006 Photo Flipbook Every so often, we run across photos that make us…
I have become a huge fan of Kickstarter and every so often you find a real gem of a project. Sometime ago I stumbled on to the CTRL+Console app (download link) and loved the idea. If you’re unfamiliar with the project check out CTRL+Console Kickstarter page, but note it is no longer active. In short the app acts as a GUI to a variety of shortcuts in Adobe Premiere Pro, Final Cut Pro, Quicktime and soon for Lightroom.
CTRL+Console – Adobe Premiere Pro Editor
While a lot of Kickstarter projects feel or look like a do it yourself project this one is quite polished. The app was released yesterday on the Apple iTunes store and is now public. It is free to download with the Quicktime console being accessible out of the gate, but you’ll need to purchase/unlock additional editors with in the app. For the app to communicate with the programs on your computer you do need to download a program, but it’s of minimal effort to set up. Overall I think its a great concept and has been extremely well executed. To ground expectations though it did just come out and there are a couple of bugs for Windows users I hear, but they’re being tackled quickly.
One of the nicer touches that was included in the app for those that took part in funding the project was this very nice Thank You page in the app. Much to my surprise I actually found my name listed pretty quickly. A nice touch by Jeff Chow who made the app!
CTRL+Console – Thank You Page, That’s Me
Copyright Jim M. Goldstein, All Rights Reserved
CTRL+Console: One Cool Video & Photo Editing App
The post CTRL+Console: One Cool Video & Photo Editing App appeared first on JMG-Galleries – Landscape, Nature & Travel Photography.
Comments
By: Open Your Creative Eye » CTRL+Console: One Cool Video & Photo Editing App » Page: 1 | Open Your Creative Eye by Open Your Creative Eye » CTRL+Console: One Cool Video & Photo Editing App » Page: 1 | Open Your Creative Eye
Related Stories
CTRL+Console: One Cool Video & Photo Editing App – Enclosure
SmugMug, widely regarded as one of the best internet sites on the web for amateurs and pros alike to share, and especially sell, their photos, unveiled an entirely new SmugMug this morning.
I’ve had early access to the new site redesign and have been playing around with it for the past few weeks — I’m a huge fan.
The new SmugMug brings fresh, updated, design and functionality to the service and is probably the most significant upgrade to the service since it started.
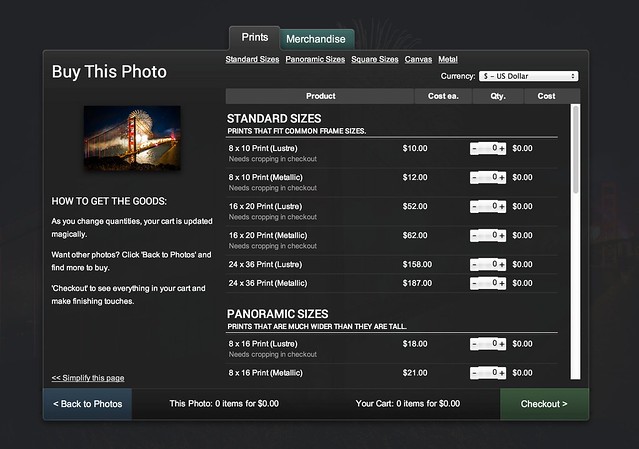
Most significantly, the new SmugMug brings a new line up of beautifully designed templates that allow even the most basic internet user the ability to have a photo commerce site up within minutes.
As much as I enjoyed the old SmugMug as a place to sell my prints, one of the negatives of the old site was that it could be complex and complicated to get a attractive looking interface up. The old SmugMug offered the ultimate in customization, but many photographers are not web design experts and it could be challenging to do it yourself. While you could hire outside pros to customize your site, this added a layer of cost and complication to the equation.
While the new SmugMug still allows advanced users an incredible amount of customization, they also now offer a series of basic templates that are pretty much plug and play. The new templates are stunning right out of the box and you can easily use a new series of tools to do minor edits to add in basic elements that you want to use to present your photos uniquely.
These new templates have been optimized to look good on the three basic interfaces, web, tablet and mobile. They have also added custom links that can be added to your blog, Facebook, Google+ and Twitter as part of any design interface.
In addition to the new design choices, SmugMug also rolled out today a new photo organizer that allows some of the most advanced functionality in photo sharing today.
When Flickr redesigned their site earlier this year, some users were disappointed that Collections lost visibility on the site. The primary way that Flickr manages photos is with sets. Sets can be one dimensional though. Sometimes you need sets of sets. Sometimes you even need sets of sets of sets. The new SmugMug allows seven layers of photo organization.
So if you want to have a page of American photos organized by states you can do that. If you want to be able to drill down into each state and look at the various cities, you can do that too. If you want to drill down even further and look at the various neighborhoods in each of the cities, you can do that.
More control over hierarchy was the number one feature request that SmugMug users had asked for in their user forums.
The new SmugMug organizer also offers lots of ways to bulk edit your photos, allowing you to batch add keywords, delete files, apply custom captions, etc.
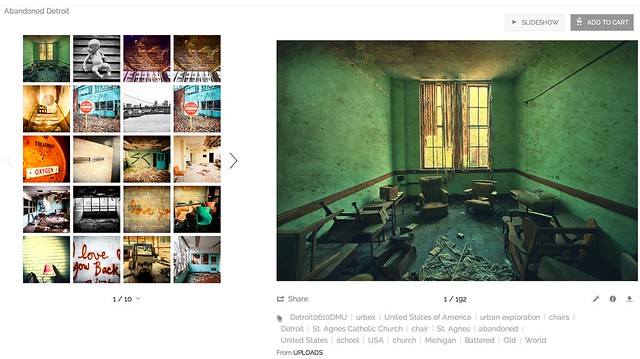
Personally, I do 99% of my metadata work at the file level in Lightroom, but here is where SmugMug offers me one of my favorite features, Smart Galleries. Smart Galleries are not something new with this release, but Smart Galleries allow you to build highly customized automated galleries based on keywords. If I want to build an album of all of my photos of abandoned buildings in Detroit, I can do this simply by building a set that includes any of my photos keyworded with abandoned AND detroit. Now anytime I upload any new photos to the site that have these keywords, they will automatically be added to that album.
One of the problems with redesigning photo sharing sites is it doesn’t matter how good a job you do at it, there will always be naysayers from the “who moved my cheese” crowd who will moan about it. It doesn’t matter how much better you make something, some people just love to complain. Haters gonna hate, gators gonna gate, tators gonna tate, all that stuff. One of the smart things that SmugMug did with this redesign is that they gave control over the new site to the user. If you are already a SmugMug user and *don’t* want to opt into the new site design, you don’t have to.
From SmugMug:
“Unlike many other services, we’re not forcing you to ditch your existing site. You’ll have your very own secret preview mode that contains all your galleries, so that you can personalize it and get familiar with the new features. While it sounds scary, migration simply copies your website contents into a virtual sandbox that only you can see. When you’re ready, YOU unveil your changes and make it public.”
I’m sure that there will *still* be some who complain, even though they get their *choice* over new or old SmugMug, but this should go a long way towards the inevitable backlash that comes with every redesign.
Also, the pricing is staying the same for the service and they are even adding unlimited video uploading to all levels of account with no price increase. At present SmugMug’s pricing remains: Basic: $ 5/month or $ 40/year, Power: $ 8/month or $ 60/year, Portfolio: $ 20/month or $ 150/year, Business: $ 35/month or $ 300/year.
If you are a photographer who has thought about selling your photos on the web, but has held back, now is the time to jump in. With the new SmugMug today, you can easily have a professional looking photo commerce site up and running within minutes. SmugMug offers a generous 85% payout on all sales and gives you a great place to send people to who want to buy your prints.
I’ll be on a special episode of the Trey Ratcliff show tonight where we’ll talk about the new SmugMug — 7pm PST.
There is a live vidcast of the new designs with SmugMug CEO Don MacAskill at 10:30am PST today here.
If you want to check me out on my SmugMug, you can find me here. I’m in the process of adding several thousand new photos to my SmugMug. Feel free to buy a print if you’d like.
More from SmugMug on the new design here.
Two new videos about the new SmugMug here and here.
I have become a huge fan of Kickstarter and every so often you find a real gem of a project. Sometime ago I stumbled on to the CTRL+Console app (download link) and loved the idea. If you’re unfamiliar with the project check out CTRL+Console Kickstarter page, but not it is no longer active. In short the app acts as a GUI to a variety of shortcuts in Adobe Premiere Pro, Final Cut Pro, Quicktime and soon for Lightroom.
CTRL+Console – Adobe Premiere Pro Editor
While a lot of Kickstarter projects feel or look like a do it yourself project this one is quite polished. The app was released yesterday on the Apple iTunes store and is now public. It is free to download with the Quicktime console being accessible out of the gate, but you’ll need to purchase/unlock additional editors with in the app. For the app to communicate with the programs on your computer you do need to download a program, but it’s of minimal effort to set up. Overall I think its a great concept and has been extremely well executed. To ground expectations though it did just come out and there are a couple of bugs for Windows users I hear, but they’re being tackled quickly.
One of the nicer touches that was included in the app for those that took part in funding the project was this very nice Thank You page in the app. Much to my surprise I actually found my name listed pretty quickly. A nice touch by Jeff Chow who made the app!
CTRL+Console – Thank You Page, That’s Me
Copyright Jim M. Goldstein, All Rights Reserved
CTRL+Console: One Cool Video & Photo Editing App
The post CTRL+Console: One Cool Video & Photo Editing App appeared first on JMG-Galleries – Landscape, Nature & Travel Photography.
A good summer photo project doesn’t necessarily require a lot of expensive equipment, just a camera, an idea and and the persistence to see it through. Chances are you’ve already got everything you need to kick off a photo series of your own. At DPReview we’re always looking for new and interesting photos on the web and lately we’ve noticed a lot of inspired projects. Some are more fairly laborious, while others take a simple idea and run with it. Check out these projects and why not get started on your own?
Over the last few years photo blogging has exploded in popularity. Therefore, there is tons of great content all over the web, especially when it comes to fashion blogs, travel blogs, and crowdsourced photo sites. Photo blogs are easy to set up and maintain. Moreover, they make awesome photo galleries for photographers which are put off by the complexity of Continue Reading
The post 44 Inspiring Photo Blogs for Photography Lovers appeared first on Photodoto.
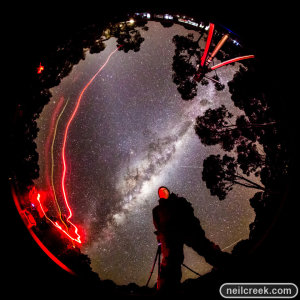
Last weekend one of my photos was selected as a category winner in the national night sky photography competition, the David Malin Awards. The category was “People and Sky”, and Darren asked if I could write a post describing how the photo was created.
I assist friend and colleague Phil Hart with regular night sky photography workshops under the beautiful dark skies of country Victoria (Australia). Knowing my love of fisheye photography, Phil had an idea for a photo to help promote the course: A group photo under the stars by fisheye lens.
I immediately had a vision in my head of the photo and knew it would look cool, so I set myself to working out how to achieve the difficult task of composition and balancing light. Once night fell and we made sure the students were all confident with their new skills and happily taking photos of the night sky, I put my Sigma 8mm f4 circular fisheye on my full-frame Canon 5D MkIII. To achieve this effect you will need a circular fisheye lens and a full-frame camera, or a fisheye lens designed to give a circular image on a cropped sensor. A diagonal fisheye will not capture the whole hemispherical field of view needed to image the whole sky.
Testing the setup and lighting.
From experience shooting the night sky with this lens, I knew that I would be shooting at the widest aperture of f4 and the full 30 seconds shutter speed. Balancing noise and sufficient exposure I chose an ISO of 8000. These settings give me a good exposure of the night sky and particularly the milky way, which would feature in the shot. This is incredibly faint! My main problem was how to light the faces of the students to approximately the same brightness of the Milky Way.
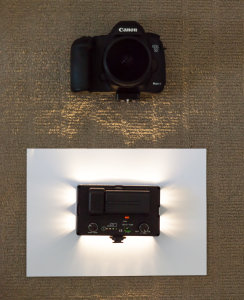
At first I considered using a flash, but even at the lowest setting, even with significant diffusion, the exposure was too difficult to control. The other problem is that I’d need the light to be omnidirectional so that all of the people in the shot would be evenly lit. Ultimately the solution I came up with was to use my LED video light, dialed down to its lowest power setting and laid face down on the ground on a piece of white paper. Only a little bit of light leaked out from around the edges, but it was even and spread out in all directions. Due to the relatively warm white balance of the Milky Way I adjusted the light’s white balance to be warm to match.
A recreation (in my office) of the setup I used. The video light is pointing straight down into the paper.
I took a few test shots to make sure the exposure, focus, white balance and everything else was working just right, and when the galaxy had risen to it’s highest point and was nearly directly overhead we called everyone together. We formed a circle and put our arms over each others’ shoulders to ensure even spacing, and tried to keep where the camera would be in the centre. Linking arms also helped us all to stand as still as possible for the 30 seconds of the exposure. Once we were all ready, I set the camera to 10 second self timer mode and placed it on the ground pointing directly up.
There were a couple of confused comments as people tried to work out how it would look, and jokes about how we all must have looked to anybody watching us from the outside. But once we got a look on the back of the screen, everyone was convinced. This was a truly unique group photo.
Join me on Facebook to learn more and see new photos daily: http://facebook.com/neilcreekphoto.
Post originally from: Digital Photography Tips.
Check out our more Photography Tips at Photography Tips for Beginners, Portrait Photography Tips and Wedding Photography Tips.
How I Took This Award Winning Night Sky Group Photo


 Bring a notebook, sketchbook or your phone to the library with you.
 Start an inspiration archive by designating a folder or binder for all things photography.


You must be logged in to post a comment.