RSS
 

Posts Tagged ‘People’

Architecture for the People: 10 Subversive and Imaginative Designs for China

15 Dec

[ By SA Rogers in Architecture & Cities & Urbanism. ]

pao-shipping-container-pavilion

Putting architecture into the hands of the people in a country where home ownership is typically out of reach, this studio has some incredibly innovative ideas, from modular units that ‘plug in’ to the envelopes of historic buildings to unexpected uses for cheap and plentiful materials. These 10 projects by People’s Architecture Office explore the convenience of prefabrication, multipurpose objects and the brilliance of simplicity while still offering structures that are bright, fresh, airy and comfortable.

Courtyard House

pao-courtyard-house-1

pao-courtyard-house-2

pao-courtyard-house-3

courtyard-house-4

courtyard-house-5

In Beijing, a whole lot of historic architecture has simply been cast aside in favor of newer, cleaner, more spacious suburban housing. Once-vibrant neighborhoods lacking in simple infrastructure like sewer systems are being left behind and neglected, growing more and more dilapidated. PAO has one solution: modern modular units that simply ‘plug in’ to the existing architecture to make it more livable. In the case of ‘Courtyard House,’ the original buildings are used like an envelope for newer structures that can be quickly, cheaply and easy assembled on-site.

Plugin House

pao-plugin-house

pao-plugin-house-2

pao-plugin-house-3

pao-plugin-house-4

pao-plugin-house-5

The firm carried the same concept over to ‘Plugin House,’ which slots onto a tiny, awkwardly shaped plot in a traditional ‘hutong’ alleyway. The prefabricated panels used to create these structures already have insulation, plumbing, windows, doors, wiring, interior and exterior finishes built in, and they snap and lock together with no more than a single hex wrench. People who no prior construction experience can put one of these houses together in 24 hours, and it costs less than $ 10,000.

Plugin Tower

pao-plugin-tower

pao-plugin-tower-2

pao-plugin-tower-3

pao-plugin-tower-4

Plugin Tower is another PAO project that easily fits into existing urban environments, and gets around the difficulty of stable housing in China, where land is held exclusively by the government and building private homes is only affordable to the wealthy. This structure requires no foundation, so it doesn’t need planning approval, and it can be picked up and moved to a new location. The prefabricated steel frame comes in a kit of parts, and the modular living units just plug right in. You can rearrange it however you like and expand it when necessary.

Container Pavilion

pao-pavilion-2

pao-pavilion-3

pao-pavilion-4

pao-pavilion-5

Shipping containers are cheap, easy to procure, highly stackable, customizable and a breeze to transport, so it’s no surprise that PAO has made use of them. This cantilevered pavilion consists of six yellow units overlapping six red units in a perpendicular arrangement, creating shaded areas on the ground and a series of rooftop recreation spaces. The ends of each unit are glazed for views of the city and sightless through the entire building.

Hutong Insert: Beijing Culture and Art Center

pao-beijing-cultural-center

pao-beijing-cultural-center-2

pao-beijing-cultural-center-3

pao-beijing-cultural-center-4

PAO uses its skills in inserting modular units into historic structures in their proposal for the Beijing Culture and Art Center, set within a traditional hutong house. A competition to design the project called for a solution that would renovate the building while retaining as much of its original character as possible; PAO’s proposal makes it easy to add lots of interior space without disturbing much of the outer structure at all.

Next Page – Click Below to Read More:
Architecture For The People 10 Subversive And Imaginative Designs For China

Share on Facebook


[ By SA Rogers in Architecture & Cities & Urbanism. ]

[ WebUrbanist | Archives | Galleries | Privacy | TOS ]


WebUrbanist

 
Comments Off on Architecture for the People: 10 Subversive and Imaginative Designs for China

Posted in Creativity


4 Tips to Help People Photographers Shoot Interior Spaces

18 Oct

As a people photographer, I am not a specialist in photographing still forms like architectural structures and interior spaces. However, because I photograph weddings, I often take photos of interiors and locations as part of the wedding photos I give my clients. This is essentially how I learned to develop an eye for detail, form and structure as part and parcel of my work.

4-tips-photographing-interiors-tutorial_0008

Let me share with you a few tips I have learned that will hopefully get you started in photographing interior spaces and architecture if you are a people photographer.

#1 Use natural light

One of the advantages of still photography is simply that – nothing moves. You can leverage this by playing with your settings, especially the shutter speed. With the camera rested on a tripod or a table, you can play around with very slow shutter speeds to maximize capturing ambient light even in very dark corners, limited light, or night interior photography. If there are lamps and lights that make up the overall ambiance of the room, include them and take advantage of slow shutter speeds and long exposures. You can also keep your ISO low this way and have the bonus of clean noiseless images.

It is important to remember that for interiors, you should aim for balanced lighting. Meaning there are no overly dark shadows or overly bright highlights. You want to see the detail in dark areas but not blow out the light areas altogether. Because we are talking about natural light, think about which times of the day which best feature the interior space. Early morning and late afternoon light are the softest. Overcast days produce soft light. Bright super sunny days produce harsher light especially midday and therefore you may want to take into consideration shadows produced in the interior from harsh outside light. In contrast to photographing people, I would normally use these shadows as an artistic element of the photo. Interior spaces however are different and this may not always be appropriate.

Early morning and late afternoon light are the softest. Overcast days produce soft light. Bright super sunny days produce harsher light, especially midday. Therefore you may want to take into consideration any shadows produced in the interior from harsh outside light. In contrast to photographing people, I would normally use these shadows as an artistic element of the photo. Interior spaces, however, are different and this may not always be appropriate.

4-tips-photographing-interiors-tutorial_0008

#2 Don’t forget your 50mm lens

Not only is the 50mm lens the closest lens that resembles the human eye (when using a full frame camera), it is also the perfect lens to separate some areas and details of the space without going in too close. In a way, it is an excellent “portrait” lens for spaces, whereas my 85mm is my choice of portrait lens for people.

When using wider lenses, I find I have to correct quite a lot of distortion on the edges of the frame. With the 50mm this is hardly an issue. The results are pleasing to the eye and it evokes a very natural look, making you feel like you are within the actual space yourself.

4-tips-photographing-interiors-tutorial_0008

#3 Get the white balance right

This is tricky and the nemesis of many photographers. Most non-photographers are oblivious to white balance. This is especially obvious in weddings where the bride’s dress looks blue and people’s faces register as magenta, yet hardly anyone notices.

When I sold my house a few years back, the real estate agents who boasted of great property photography sent a photographer to my house to take some professional pictures. She arrived with a camera on the tripod and a flash head pointed slightly upwards. The lens used was very wide – I guessed around 10mm or 14mm. It took many days before the photos were up online, when finally I saw them, they were all very blue. My home felt so cold and not homely. One of the reasons for that was the incorrect white balance.

Personally, I prefer a warm feel to all my photos so I tend to edit towards that side. But do be careful that the whites still look white and not yellow or cream. Remember that what often draws people to an image is a feeling or emotion. Your image becomes all the more powerful if it reminds the viewer of a sentiment, experience, or something that resonates with them. White balance is key in helping achieve this kind of engagement with your viewer.

4-tips-photographing-interiors-tutorial_0008

#4 Remember to go close, not just wide

Nowadays, when you browse through interior design catalogues or blogs, you will come across many interior details, arrangements and vignettes that do not show the entire space. Everyone is doing it from high street department stores to high end interior designers. There must be a good reason for it. In order to reinforce engagement and a connection to your audience, details are essential.

Imagine walking into a space, or that you are viewing a house for the first time. Before you walk though the door, you survey the outside look of the property and its surroundings. You do the same as you walk in, surveying the overall scene before your eyes. But when you are inside you get closer and see the details.

You may want to touch and feel the walls, flip some switches on if they work, or sit on the sofa with fluffy scatter cushions. You want to get close, touch and feel things. It is not only a visual connection then, it becomes physical. This is the sense you want to achieve with your images when the viewer is not physically in the space. That is why close up shots and details are important.

4-tips-photographing-interiors-tutorial_0008

Conclusion

With photography, aim to connect with your viewers not only by using visual senses but also with the power of emotion. If you can add a virtual physical touch to this engagement, all the better. When viewers look at your images and say, “I feel like I was actually there.” take that as one of the highest compliments.

I hope you enjoyed this little beginner’s journey into interior photography. Of course there are many more tips like straightening horizons and shooting through doors. If you have any other awesome tips, do share them here in the comments below.

googletag.cmd.push(function() {
tablet_slots.push( googletag.defineSlot( “/1005424/_dPSv4_tab-all-article-bottom_(300×250)”, [300, 250], “pb-ad-78623” ).addService( googletag.pubads() ) ); } );

googletag.cmd.push(function() {
mobile_slots.push( googletag.defineSlot( “/1005424/_dPSv4_mob-all-article-bottom_(300×250)”, [300, 250], “pb-ad-78158” ).addService( googletag.pubads() ) ); } );

The post 4 Tips to Help People Photographers Shoot Interior Spaces by Lily Sawyer appeared first on Digital Photography School.


Digital Photography School

 
Comments Off on 4 Tips to Help People Photographers Shoot Interior Spaces

Posted in Photography


10 Tips to Help You Create Unique Storytelling People Photos

16 Sep

storytelling with photos leadFor most of us, the joy of photography goes beyond taking a great image, to being able to share our pictures and experiences with our friends and family. To do storytelling with images.

How many times have you been traveling and come across someone interesting that you wanted to share with your family? Did asking for permission hold you back? Did you get a photo or series of photos that really tell the story? Were your photographs different and did each add a new perspective?

The following tips will walk you through a real-life example of how I shot a glassblower in his shop and created a series of unique photos to tell his story.

#1 – Get clear on your goals for the shoot

Something attracted you to this person or situation. What peaked your interest? Do you like the subject’s purple hair? Do you love photographing people having fun? Do you want to try to capture the beautiful light on someone’s face? Or perhaps you love dance and would like to capture a dancer in a beautiful portrait?

Here are my thoughts on the glassblower. What I wanted to photograph, what I wanted to do and why I wanted to do it.

Why I wanted to photograph the glassblower:

I have been a Canon user for a long time and Sony lent me one of their new cameras and two lenses (50mm and a 90mm) for a trial run. I had already spent some time playing with the camera by photographing squirrels and I was ready to try something with a little bit more potential.

storytelling with photographs

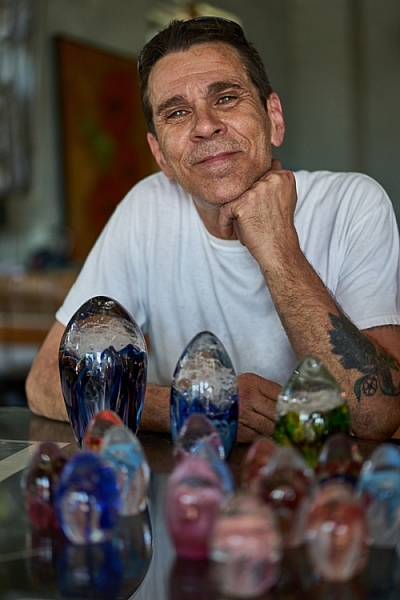
While on vacation in a small beach town, I noticed a small shop run by a local glass blower. He made beautiful glass as well as offered lessons to tourists. I liked the idea of photographing the glass blower for several reasons:

  • He makes beautiful art.
  • The workshop is interesting with a lot of picture possibilities.
  • I could shoot available light in his workshop.
  • He was there all day doing interesting things which means I had a lot of time to shoot.
  • He seemed very proud of his work.
  • He seemed to have an extroverted personality and a sense of showmanship.

What I wanted to do:

I wanted to be able to photograph him as he worked and interacted with others.

My most important goal was to have the opportunity to shoot something pretty simple as I learned to drive this new camera. I liked this situation because I could shoot available light and there was enough action and movement that I could test out the different autofocus settings as well as the creative features of the camera.

I also wanted to be able to shoot, leave to download my images, and come back to the same situation later to tweak my approach. I had found my subject, I just needed to get permission.

storytelling with photos

#2 – Be honest about what you want and don’t be afraid, just ask!

A lot of photographers are shy about asking friends, relatives, and strangers if they can take their photo. Asking is easy if you are honest, sincere, and you know why you want to photograph the person.

The truth is, some people hate to have their photo taken and so be prepared for a no. If someone shies away from the idea, perhaps they require more convincing. Some people actually enjoy being persuaded, so push gently after the first no. There could be a yes hiding behind a little bit of shyness.

And, if you get a no, remember that it’s never personal. Some people are just going to say no. Sometimes the person being asked has no idea why anyone would want to photograph them. They are afraid you are going to make them look dumb and they can’t imagine why anyone would want to take their photograph. That is why step #1 is important.

storytellings with photographs

Before you ask permission, get clear on what you want so you can explain it and overcome any objections. Yes, it’s partly sales, but if you are sincere and enthused and truly want to photograph them, most of the time they will feel flattered and say yes.

How I approached the glassblower

When I approached John to ask him if I could photograph him, I had my camera over my shoulder. I told him his work was beautiful and I’d love to take some photographs. He beamed. He loved the attention.

Note: I didn’t run into the shop taking pictures without permission. I intentionally had my camera, though, so he knew from the start that I was interested in taking photographs. Having your camera on your shoulder, hanging loosely is non-threatening. If he had an aversion to having his picture taken, he would have felt much more relaxed than if I had put a camera in his face. This isn’t paparazzi. It’s about connecting with someone you want to spend some time with.

I told him the truth. That I was in town visiting and I wanted to learn how to use this new camera. I smiled and told him I had already photographed every squirrel in town and was ready to shoot some people. He laughed.

telling stories with photographs

Being able to put people at ease is a great step toward getting a yes. I find it easier to connect with people as a student than a professional. When I approach people as a professional they put up more of a front. When I’m just trying to learn my camera, the pressure is off the subject to do or be anything.

If you are looking for great vacation photos and stories to share with your friends and family, say so. Imagine if a traveler approached you, said you looked amazing and would love to show people back home what people here looked like? You’d be flattered! Of course!

I also explained that I was testing the camera and I might shoot for awhile, go look at pictures, then come back again to shoot some more. Would that be okay? He got excited over the attention and immediately started to share photos another photographer had taken. He loved the idea of being photographed and I had a subject.

#3 – Be considerate

You are shooting in someone else’s home, yard, or business, so be courteous. If a customer comes in, the customer comes first. Always take the back seat. It’s a privilege when someone allows you to take their photo. Remember that and you will always be welcome.

telling stories with photos

#4 – Tell your subject to pretend you aren’t even there

First of all, you will get better pictures and expressions if your subject keeps busy doing what they love. You can watch how they do it and begin to anticipate their next move. Secondly, especially if you are working in a place of business, you don’t want to distract them from their livelihood. If you do, they will grow impatient and suggest the session is over.

I often get close to shoot and then back away for awhile. It relaxes the subject and keeps them off guard. It truly allows them to forget about me and get into their zone.

how to tell stories with photographs

#5 – Really work the situation

Create a variety of shots, with the goal that each shot adds a different element or idea to the story. Walk around, shoot high and low, and use a variety of lenses. Work on cleaning up the background and capturing great expressions. Look for opportunities and unique ways of showing it. Experiment. Have fun. Get creative.
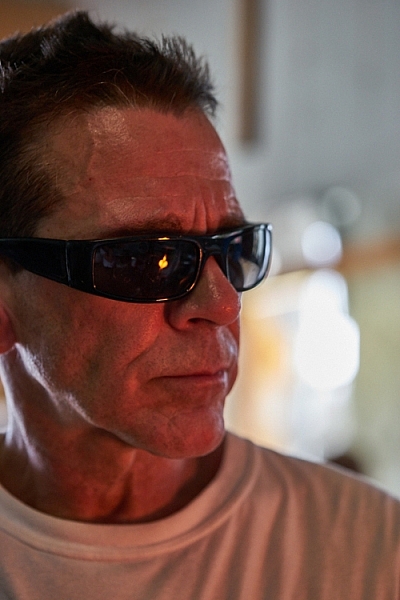
telling stories with photographs

#6 – Shoot portraits

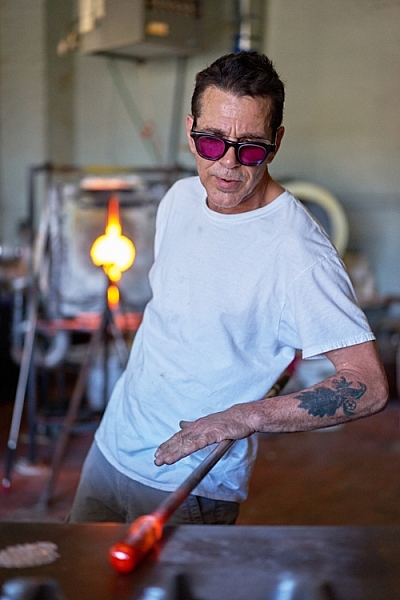
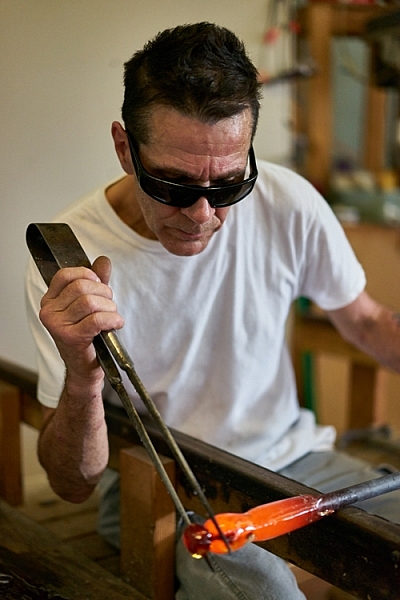
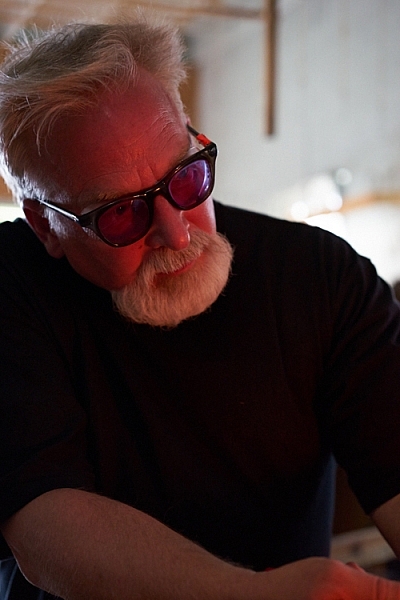
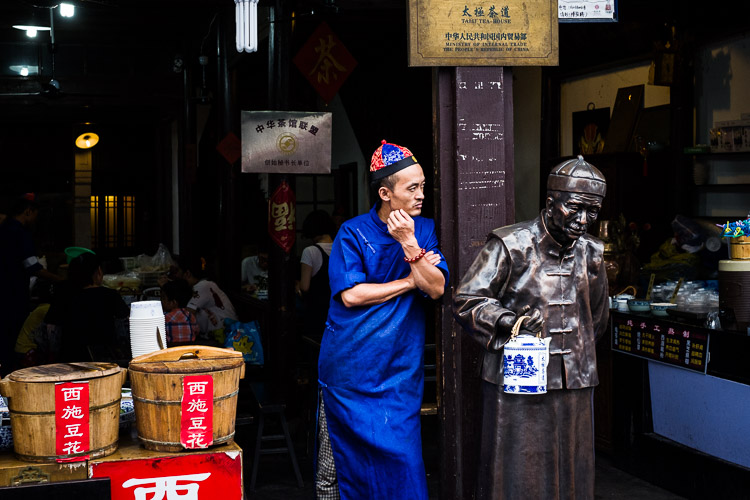
Look for different expressions, light, and angles. Shoot tight and shoot loose. Include the environment in some shots. Work on taking candids as well as photos with the subject looking at the camera. I loved the light on John’s face when he was looking at the fire and how it reflected in his glasses.

telling stories with photographs

Remember, variety is the key. Notice how many different expressions John has in the different photos in this article. Each expression helps to add an element to the story.

telling stories with photographs

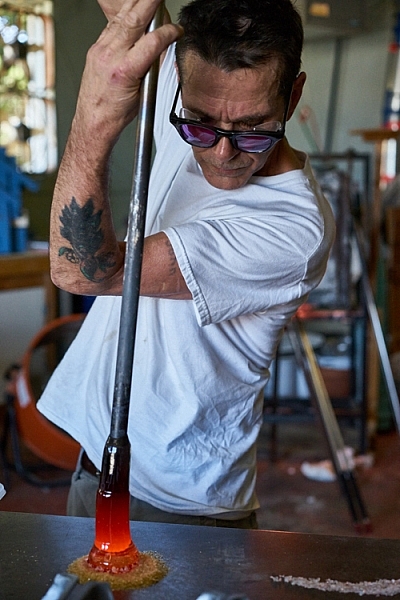
#7 – Shoot action shots

Tell the story of what the person does. Try shooting the same activity in different ways.

telling stories with photos telling stories with photographs

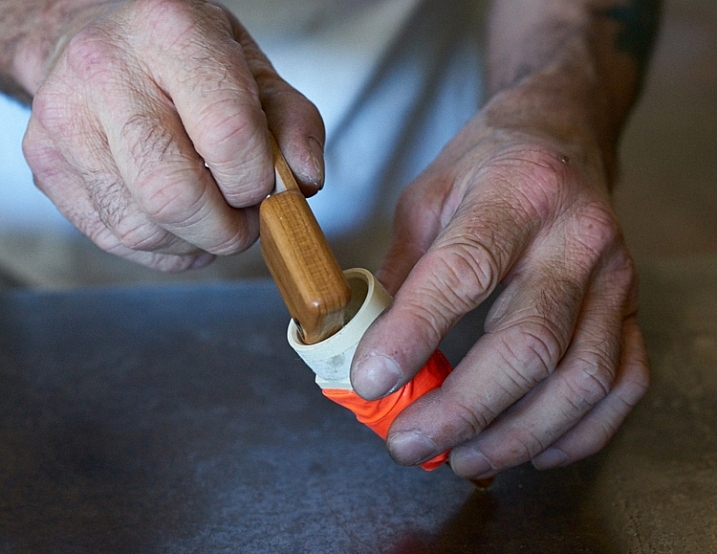
#8 – Shoot close-ups and details

telling stories with photos telling stories with photographs

#9 – Shoot hands

telling stories with photographs

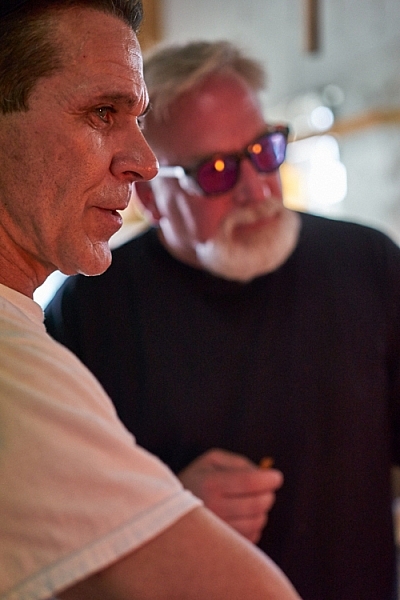
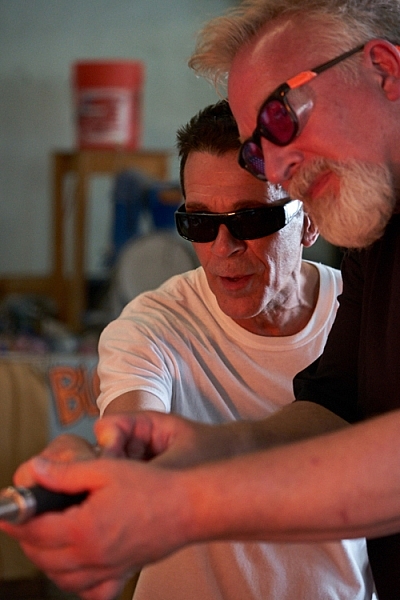
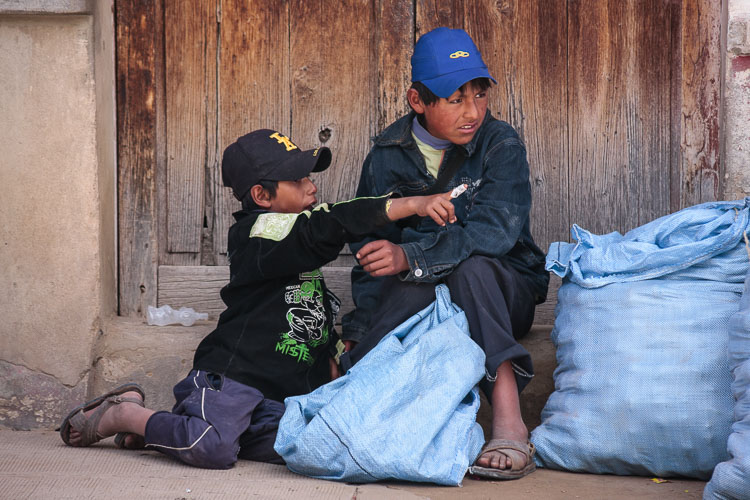
#10 – Photograph relationships

Try to capture the relationship your subject has with other people. In these photos, a tourist stopped by to blow his own piece of glass.

telling stories with photographs telling stories with photos

You now have the tools to approach strangers to ask them if you can spend time with them taking pictures. These rules apply to every situation, whether it’s a musician in the street, your child’s ballet class, or a homeless person. Remember to know your intention and be honest with the subject. Sincerity has opened many, many doors for me.

Once you are inside the door, really work your subject to tell the story. Try different angles and remember to shoot close as well as far away. Shoot portraits, close-up shots, focus on recording what the subject is doing, as well as their relationships.

What story would you love to shoot? Do you know a musician in your neighborhood or a craftsperson? Share your thoughts below, go out and shoot and then share your images in the comments below.

googletag.cmd.push(function() {
tablet_slots.push( googletag.defineSlot( “/1005424/_dPSv4_tab-all-article-bottom_(300×250)”, [300, 250], “pb-ad-78623” ).addService( googletag.pubads() ) ); } );

googletag.cmd.push(function() {
mobile_slots.push( googletag.defineSlot( “/1005424/_dPSv4_mob-all-article-bottom_(300×250)”, [300, 250], “pb-ad-78158” ).addService( googletag.pubads() ) ); } );

The post 10 Tips to Help You Create Unique Storytelling People Photos by Vickie Lewis appeared first on Digital Photography School.


Digital Photography School

 
Comments Off on 10 Tips to Help You Create Unique Storytelling People Photos

Posted in Photography


How to Use Angle of Light in People Photography for Added Punch

12 Sep

This may be something that you have already heard from landscape photographers. It is very important to be aware of the angle of the light (where does the light come from) to be able to get the best of a scene, and the best exposure for your image. Also, when using a polarizing filter, it is more effective when used at a 90 degrees angle to the sun for better blue sky results.

Angle of light – people photography

But when it comes to people photography I couldn’t find a lot mentioning the angle of light online. So here is what I think about it.

Keep the light behind you

When photographing people, it is also very important to be aware of the direction of the light. As I mention when teaching about composition, you should try, as much as possible, to keep the light behind you (or avoid facing the light). If the light remains behind you, the general exposure has more chance of being better, avoiding under and over exposed elements in the image.

JB 4997

Keeping the light behind you ensures a better general exposure through the whole image. Hoi An, Vietnam.

When facing the light, there are two options when it comes to people photography. You can either create a silhouette of your subjects while exposing for the brighter background. Or you can try to find a middle exposure, thus avoiding over exposing your background too much and keeping some details on the subject. This last method works very well in the early morning and late afternoon.

JB 8191
A silhouette created by directly facing the light. Isfahan, Iran.

The third option would be to expose for your subject and completely overexposing your background. I personally do not believe it looks that good though.

JB 6890

Finding a middle exposure between background and subject while facing the light works very well in the early morning and late afternoon. Kandovan, Iran.

Side light is magic

But when you put the light at a 90-degree angle, there is something magic that happens. When the light is softer and more colorful (at sunrise and sunset) it is possible to come up with some type of semi-silhouetted images. The part of your subject exposed to the light will be exposed correctly. The other part will be much darker (still preserving some details). That is going to create a more contrasty image, with a little more punch.

If you take an image which is slightly overexposed, there are no blacks in it and the histogram is slightly shifting to the right. As soon as the exposure goes down, some darker pixels will appear and add contrast to the image, making it instantly more powerful.

This is what a 90 degrees light will do to your subject: shadowing part of it and adding contrast and power to the image.

JB 4802

The light being on the right side, the back of this man is underexposed (in shadow), thus creating more contrast in the image. Hoi An, Vietnam.

For close-up portraits, the angle of the light has some superb effects on skin tones. Mostly when the tones are darker and more keen to reflect the light, this angle will enhance these tones. Because, as mentioned above, a part of your subject (the part which is not directly into the light) will be darker, the brighter parts will be enhanced.

Let’s compare

Here are two images of the same man, taken two minutes apart from each other. As you can see in the first one, the light is more even throughout the picture.

JB 2969

In this second image, there are some much darker areas on the left, adding contrast and punch to the image. The details on the skin tones are also much more interesting.

JB 4933

I hope that gives you some ideas for using the direction or angle of light to add punch to your people photography. Know where the light is coming from and make a conscious choice how to use it to your advantage.

Please share your people photos in the comments below.

googletag.cmd.push(function() {
tablet_slots.push( googletag.defineSlot( “/1005424/_dPSv4_tab-all-article-bottom_(300×250)”, [300, 250], “pb-ad-78623” ).addService( googletag.pubads() ) ); } );

googletag.cmd.push(function() {
mobile_slots.push( googletag.defineSlot( “/1005424/_dPSv4_mob-all-article-bottom_(300×250)”, [300, 250], “pb-ad-78158” ).addService( googletag.pubads() ) ); } );

The post How to Use Angle of Light in People Photography for Added Punch by Etienne Bossot appeared first on Digital Photography School.


Digital Photography School

 
Comments Off on How to Use Angle of Light in People Photography for Added Punch

Posted in Photography


Photographing People: To do Styled Portraits or Not?

25 Aug

When I was a senior in high school, there was one local photographer that nearly everyone went to for their portraits. Part of her process included each person bringing in a bag of clothing to model for her. She would then help select the outfits that would ultimately be worn for the portraits. She also gave specific instructions for hair, makeup, and grooming. Quite often, the photographer hired a makeup artist to be present for the portraits – in effect she was doing styled portraits.

styled portraits two girls

The end result was portraiture that was extremely consistent in style. Even to this day, I can look through my high school yearbook, and pick out exactly whose portraits were taken by that particular photographer. Parents loved her because her output was high-quality, consistent, and you knew exactly what you were getting aesthetically when you booked a session. Essentially, the photographer was offering what has since become known as a “styled session”.

Similar to debating how much (or how little) to post-process images, whether or not to style sessions when photographing people is hotly debated. Let me make one thing very clear – the point of this article is not to take an ultimate stance as to whether or not you should style your own sessions. Rather, this article will discuss circumstances in which it may be beneficial to style sessions, as well as some of the possible disadvantages. Hopefully, this will also start some discussion about what works well for you.

styled portraits newborns

A styled newborn session. I provided the blanket, flowers, and newborn wrap.

Styled Portraits – Definition

In general, a styled session can be defined as being any time the photographer selects the clothing, hair, location/backdrop, and props for a particular session. In other words, the photographer has control and decision making power in all aspects of the session, and controls the end aesthetic look or style of the session.

Pros to Styled Portrait Sessions

  • As the photographer, you have complete control over all the sessions with your name on them.
  • It’s easy to create a signature style or look to your photography.
  • Clients (paid or unpaid) know exactly what to expect when they book a session with you.
styled portraits - A styled child portrait session.

A styled child portrait session. I selected the dress, flower crown, location, and lightly curled her hair.

Circumstances That Lend Well to Styling

In my experience, some types of photography lend themselves to styling more than others. For example, newborn photography is one genre of photography in which the clients often have a desired aesthetic that may be difficult (though not impossible) to capture organically in the client’s home. Many times, newborn photographers have a studio setup with all their blankets, posing bags, and backdrops. If they shoot on location, they often bring blankets, hats, headbands, and various other props to style the sessions to fit their individual style of photography.

styled portraits couples

An image from a styled session with a 1940s theme. I provided the hat, and helped select the makeup and outfits to fit within the theme.

Another instance in which photographers may elect to offer a styled session is when they’re trying to break into a new genre of photography. For example, it’s not uncommon for a photographer looking to break into the wedding business, to hold a styled bridal session in order to create images to use for advertising. The photographer will arrange for various vendors to provide a wedding dress, flowers, a cake, furniture, and other prop items for the purpose of photographing, as if it were an actual wedding. This allows the photographer (and other vendors) a way for their work to be seen via social media and similar venues, before they’ve even booked their first wedding. It’s also a good opportunity to try something new and push yourself in a relatively low-risk scenario.

A third instance in which styling can be appropriate is when you’re trying to create (or recreate) a specific artistic vision. If you’ve been tasked with photographing a 1920s themed engagement session, or one based on a particular book, painting, or movie, then providing a styled session may be the best way to ensure an end product that is consistent with the desired aesthetic.

A senior portrait session that was not styled.

A senior portrait session that was not styled.

Cons to Styling Sessions

On the other hand, going back to the initial example of the senior portrait photographer, the drawback to selecting that one photographer was that the end portraits all looked basically the same, and in some cases, the portraits looked very little like what the person looked like in real life. This anecdote perfectly captures two of the potential drawbacks to offering styled sessions:

  • Sessions can tend to look very similar to one another.
  • Sessions do not always adequately capture the person’s or family’s personality.

Child portrait session that was not styled.

Circumstances That May Not Lend Well to Styling

Although children can be photographed well in any scenario, I prefer not to photograph kids in styled sessions. In my own experience, when I try to style children’s sessions I can become so focused on the outfits, props, and the look of the session, that I can easily overlook capturing the genuine emotion and personality of the child, which is really where my passion lies.

I don’t have this same issue with newborns, engagements, senior portraits, or other types of people photography, but have noticed it particularly when photographing children. As with any genre of photography, there are no absolutes – I’ve seen styled children’s sessions that are unique to each child, and absolutely do capture their personalities, but in my personal practice, I’ve found that my preference is not to style children’s sessions.

style-not-style-8

An newborn photo that was not styled – I used their own blanket, swaddle, and knit rabbit.

When I’m talking with clients prior to a session, if I hear them say the words “candid” or “lifestyle”, it’s a good indicator for me that they probably aren’t interested in a styled session. There’s definitely a range of what people are really asking for when they use those terms in regards of photography, but regardless of where they fall on that particular spectrum, they are probably not looking for images in which every aspect has been carefully curated. This is where knowing your client – whether they’re paid or unpaid – and understanding their needs, is absolutely key to a successful portrait.

Meeting in the Middle

Most often I find that clients really want something in between a styled session and photojournalism. These clients want me to capture the best version of themselves and their lives, which requires a bit of guidance, but not necessarily styling.

They may need some guidance regarding what to wear, but they don’t want or need me to select their outfit for them. They may need me to suggest moving a group of bottles and pacifiers visible on the coffee table during a newborn session, but they don’t need or want me to bring a box of books and succulents to completely stage their home. There’s a balance between the two ends of the spectrum that seems to meet the needs of most of my clients, while also allowing me to have some creative control as the photographer.

styled portraits

For this session, we talked about having each girl wear a white dress and a flower crown, but their moms ultimately selected both the dresses and the crowns. This is an example of “meet in the middle” styling.

Just like any area of photography, there’s a range of beliefs and practices in regards to styling sessions. Some photographers elect to exclusively style sessions, because it gives them the most control over the final image. Other photographers prefer to take more of a photojournalism approach and capture their clients exactly as they show up. Still others land somewhere in the middle.

What about you? Do you offer styled sessions, a photojournalism approach, or are you somewhere in between? What works well for you? Please share your thoughts in the comments below.

googletag.cmd.push(function() {
tablet_slots.push( googletag.defineSlot( “/1005424/_dPSv4_tab-all-article-bottom_(300×250)”, [300, 250], “pb-ad-78623” ).addService( googletag.pubads() ) ); } );

googletag.cmd.push(function() {
mobile_slots.push( googletag.defineSlot( “/1005424/_dPSv4_mob-all-article-bottom_(300×250)”, [300, 250], “pb-ad-78158” ).addService( googletag.pubads() ) ); } );

The post Photographing People: To do Styled Portraits or Not? by Meredith Clark appeared first on Digital Photography School.


Digital Photography School

 
Comments Off on Photographing People: To do Styled Portraits or Not?

Posted in Photography


Microsoft Pix aims to capture better people pictures

28 Jul

Microsoft has released a new camera app that puts its focus on taking better pictures of people. The Pix app is now available for iPhone and iPad, and Microsoft says an Android version is in the works. When active the app is constantly recording and saves 10 frames before and after its shutter button is pressed. A series of algorithms then analyzes the recorded images, evaluating technical quality characteristics, such as sharpness or exposure, but also looking at facial expressions of human subjects.

Based on those characteristics among others, the app then selects three best shots and presents them to the user. The filtered shots are discarded to save space, but not before the image information contained in them is used to enhance the selected shots. For example, the app can brighten app images that have been captured in very dark conditions. 

Additionally, Pix converts a bunch of similar images into a moving Live Image, but only if it thinks the motion in the scene is interesting. The app also integrates Microsoft’s Hyperlapse feature. In addition to recording stabilized time-lapses, in its latest incarnation it also allows you to turn existing images into time-lapses or simply stabilize previously recorded video footage. 

One of the most interesting aspects of Pix is that we can expect the app to get better with time. Anonymized settings data and information on what pictures users delete or favorite is sent back to Microsoft where developers look at the data and fine-tune the app’s algorithms accordingly. Microsoft Pix for iOS can now be downloaded from the Apple App Store.

Articles: Digital Photography Review (dpreview.com)

 
Comments Off on Microsoft Pix aims to capture better people pictures

Posted in Uncategorized


Tips for Taking Candid Portraits of People

28 Jul

Get Andrew’s ebook The Candid Portrait at 43% off, now over at Snapndeals, for a limited time only (August 9, 2016 AUS time).

A candid portrait is often defined as one which you take without the subject being aware that you have done so. The idea is to capture a natural moment, that shows the person’s character or something interesting about them.

A candid portrait

Wedding and portrait photographers often strive to capture candid portraits, so do street photographers. It is the latter form of candid portrait photography that I will concentrate on in this article.

I prefer to take candid portraits when I am travelling, it is rare that I do so at home. There is something about the excitement of travelling and seeing a new place with fresh eyes, that makes me want to take photos that capture life in the streets.

The question is, how do you take photos of other people safely when you are travelling, and how do you create evocative images that capture the spirit of that place? Good photos aren’t taken, they are made by the photographer. The following tips will help you create candid portraits.

All the photos in this article were taken while I was traveling, but you’ll find the principles hold true when you are working close to home as well.

1 – Think about your equipment

Part of the craft of photography is selecting the most appropriate tool for the job. There are two approaches you can take here. One is to use a telephoto lens and take photos from distance. You are unlikely to be spotted by your subject, especially if you are quick, but your photos may also have a lack of involvement in the scene as they are taken from some distance away. Having said that, you can use a telephoto lens to create a cinematic look that pulls the background in closer to the subject, or throw it out of focus.

A candid portrait

I took this photo with a 50-150mm Sigma lens. It’s an enormous lens that I no longer own, but it enabled me to take photos like this from a distance, without being noticed.

The second approach is to use a small camera with a small lens, and get in much closer to the action. The idea here is that the small camera gives you the perception that you are less intimidating, than somebody using a large digital SLR and lens setup. You are much more likely to be able to take photos without being noticed, or to be ignored if you are.

A candid portrait

I used a small 35mm lens on a Fujifilm camera to take this photo. The smaller size of this gear lets me get much closer to people than I ever could with the Sigma 50-150mm lens.

The ideal small camera could be a small digital SLR (such as the Canon EOS 100D), a mirrorless camera (such as the Fujifilm X-T1, my personal favorite), a compact camera (like the Ricoh GR II) or a smartphone.

If you are using an interchangeable lens camera, then a prime lens may be a good choice. Primes are usually smaller than zooms, and the wide apertures come in handy in low light.

2 – Slow down and explore

Become an observer of life. Go somewhere interesting and just watch what happens. Every city and town have their own rhythms. The tide of people ebbs and flows as the hours pass by. Where are the most interesting parts of the city? The most picturesque? Where is life lived on the streets?

What are the unique aspects of that city? A photo of somebody taken in front of a shop could be created almost anywhere, but a photo taken with a well known landmark or typical building in the background (such as the Eiffel Tower in Paris, or the Forbidden City in Beijing) has the potential to be much more evocative.

The key is to relax, take things slowly, and enjoy yourself. A small camera helps because it is easier to carry around all day than a large system.

A candid portrait

This photo could only have been taken in Beijing. The ancient buildings in the background are unique to this city.

3 – Enjoy the process

Don’t put too much pressure on yourself. An empty memory card can be as terrifying for a photographer as a blank piece of paper (or empty computer screen) is for a writer.

One way to get started is to take a photo of anything remotely interesting. It doesn’t really matter what it is, but I find that taking the first photo gets my creativity going and puts me in the right frame of mind to start seeing other images. Remember that you are there to enjoy the day, the sights, and the process of exploration and meeting new people, as well as photography.

4 – Don’t be afraid to talk to people

Talk to people, not necessarily only the people that you want to photograph, but anybody, particularly in shops, markets or working in cafes, who may be open to a conversation. You may have to forget about this option if you don’t speak the language. But don’t let that stop you from using non-verbal communication. Smile, and be open and friendly.

Talking to people lets you get to know the area, and the people who live there. Afterwards, you may be able to ask the person you spoke to if you can take a photo of them, or if there is anywhere that is a good place to take photos. Local people often like to make recommendations, especially if they are proud of their city.

If you can’t speak the language don’t let that put you off even rudimentary attempts at communication. Last year in China, I came across a group of men playing a game of Xiangqi (Chinese chess). I stopped to watch, and held up my camera with a questioning look. One of them nodded to say yes, and I took a few photos before saying thank you and moving on. This is my favorite photo from the set.

A candid portrait

5 – Use a wide-angle lens

The beauty of wide-angle lenses is that you can get in close and photograph somebody, without them even being aware that you are doing so. How? Simply place them at the edge of the frame, or on one of the thirds. The camera will point away from them and they may not even be aware that they are being photographed.

As long as you don’t look at them or make eye contact they will think you are photographing whatever is behind them. This works best when there is something interesting there that a tourist would naturally take a photo of.

A candid portrait

I was taking a photo of the church when I noticed the man was about to walk in front of me. The wide-angle focal length (14mm, APS-C camera) meant that he became part of the photo without realizing it.

6 – Find a rich environment

Sometimes all you have to do is find an interesting location, and observe how the local people behave as they pass through. While in Beijing last year, I became fascinated at the different ways that the local people interacted with the city’s historical buildings. All I had to do was wait, observe, and take photos of interesting moments.

A candid portrait

While visiting Prince Gong’s mansion, a historical building in Beijing, I noticed that people like to walk by these Tibetan style prayer wheels. I stayed there for a while and took photos as people passed by. The incongruous message on the woman’s bag adds a little extra to this photo.

7 – Go when the light is beautiful

Beautiful light is key to creating evocative portraits that capture the spirit and atmosphere of a place. You’ll increase your chances of creating beautiful images exponentially by going out when the light is beautiful. That means getting out at the end of the day during the golden hour. There is also lots of potential during dusk, especially with the mix of artificial and natural light that you find in urban environments.

A candid portrait

The orange light cast by tungsten light bulbs adds atmosphere to this photo taken in Xi’an, China.

Can you think of any other tips for taking candid portraits of people in the street? Please let us know in the comments, I’d like to hear your thoughts.

Get Andrew’s ebook The Candid Portrait at 43% off, now over at Snapndeals, for a limited time only (August 9, 2016 AUS time).

googletag.cmd.push(function() {
tablet_slots.push( googletag.defineSlot( “/1005424/_dPSv4_tab-all-article-bottom_(300×250)”, [300, 250], “pb-ad-78623” ).addService( googletag.pubads() ) ); } );

googletag.cmd.push(function() {
mobile_slots.push( googletag.defineSlot( “/1005424/_dPSv4_mob-all-article-bottom_(300×250)”, [300, 250], “pb-ad-78158” ).addService( googletag.pubads() ) ); } );

The post Tips for Taking Candid Portraits of People by Andrew S. Gibson appeared first on Digital Photography School.


Digital Photography School

 
Comments Off on Tips for Taking Candid Portraits of People

Posted in Photography


21 Fun Images of People Laughing

09 Jul

Laughter is contagious. One person starts doing it and soon others around them follow.

Overduebook

By Overduebook

Capturing real human emotions with a camera can be challenging. Some people are guarded with their emotions, and getting a real smile, let alone a laugh can be difficult.

If you’re a portrait photographer it’s your job to make your clients feel at ease enough to relax and let their real emotions show. If you do candid or street photography it’s about paying attention and capturing just the right moment. Here are some images of people laughing to get you inspire or maybe to put a smile on your face too.

Notice they aren’t all technically perfect, but can you feel the emotion and hear the laughter? Then the image is successful. Yes, animals count too!

Naomii.tumblr.com

By naomii.tumblr.com

Marc Kjerland

By Marc Kjerland

Rosino

By Rosino

*Robert*

By *Robert*

Al-jubey

By al-jubey

Via Tsuji

By Via Tsuji

Gregory Gill

By Gregory Gill

David K

By David K

Rachael

By Rachael

Philippe Put

By Philippe Put

MichelleNMS

By MichelleNMS

Devon D'Ewart

By Devon D’Ewart

Filippey

By Filippey

Peter Kelly

By Peter Kelly

Alon

By Alon

Davina

By Davina

Tommy Wong

By Tommy Wong

Taminator

By taminator

Su-lin

By su-lin

François Reiniche

By François Reiniche

Sadiq Alam

By Sadiq Alam

googletag.cmd.push(function() {
tablet_slots.push( googletag.defineSlot( “/1005424/_dPSv4_tab-all-article-bottom_(300×250)”, [300, 250], “pb-ad-78623” ).addService( googletag.pubads() ) ); } );

googletag.cmd.push(function() {
mobile_slots.push( googletag.defineSlot( “/1005424/_dPSv4_mob-all-article-bottom_(300×250)”, [300, 250], “pb-ad-78158” ).addService( googletag.pubads() ) ); } );

The post 21 Fun Images of People Laughing by Darlene Hildebrandt appeared first on Digital Photography School.


Digital Photography School

 
Comments Off on 21 Fun Images of People Laughing

Posted in Photography


Play-Doh People: Manipulated Portraits Mimic Old School Horror Movies

06 May

[ By Steph in Art & Photography & Video. ]

play doh people main

Lumps of modeling clay in shades that match human flesh are globbed into the hollows of what should be faces in this series of portraits mixing photography with sculpture. Artist José Cardoso gets under the viewer’s skin with visuals that disturb and fascinate, perhaps prompting some to reach up and ensure that their own faces are still intact after checking out the entire collection.

play dough people 4

play dough people 3

play doh people 2

play doh people 10

play doh people 11

play doh people 13

Warped and distorted, with ragged edges, holes from poking fingers and glimpses of bone-like foreign objects embedded within, the Play-Doh takes the place of ordinary features, completely obscuring them or making it seem as if some careless child’s hand has ripped them away. There’s no hint of an attempt at modeling an actual representation of a face – just lumps. (The ones with bits of hair and dirt in the dough are especially cringe-worthy.)

play doh people 5

play doh people 6

play doh people 8

play doh people 7

play doh people 9

The series is deliberately reminiscent of the special effects in old school horror movies, especially those of David Cronenberg, and it’s easy to see that influence here. As scary as they may have been at the time, when we look back at films like Naked Lunch, The Fly, Videodrome and Shivers we can see that they clearly made use of a whole lo to rubber and clay to achieve those gory effects. In comparison, Cardoso’s work is quite restrained, but its subtlety is startlingly effective.

Share on Facebook


[ By Steph in Art & Photography & Video. ]

[ WebUrbanist | Archives | Galleries | Privacy | TOS ]


WebUrbanist

 
Comments Off on Play-Doh People: Manipulated Portraits Mimic Old School Horror Movies

Posted in Creativity


6 Must-Have People Shots to Capture When Photographing Corporate Events

25 Apr

Corporate events may not be every photographer’s dream, but they can certainly be interesting and maybe even fun depending on the assignment. As a freelance event photographer, about half of my shoots are corporate events, and they are among my favorite things to shoot. There’s always lots to learn from the speakers at these events, and they tend to be relatively easy gigs to shoot if you use a pre-planned shot list and know what to look for. This article details the six key people shots that you absolutely must focus on when photographing corporate events.

#1: Posed shots of VIPs

Every corporate event will have its own form of VIPs, and your client will definitely want lots of images of them. Larger events will typically have recognizable local or national celebrities as their designated VIPs, while smaller events may have harder to recognize internal executives as their VIPs. Either way, it’s important to check with your client ahead of time to get a list of their VIPs in attendance, and ideally someone on-site who will help you identify them. Always make sure you understand the perimeters of photographing these VIPs as some, particularly celebrities, can be image-conscious. Whenever possible try to get posed shots of these VIPs with signage in the background that shows proof that they were present at your particular event.

Seattle Corporate Event Photographer

Actor Billy Dee Williams posing at a step-and-repeat.

#2: Posed and action shots of keynote speakers

Corporate events typically include keynote speakers who may or may not be the VIPs described above. Before you start shooting, grab ahold of the event program, and find out who are the keynote speakers. Work with your client to arrange posed shots of the keynote speakers both alone and posed with VIPs. Also, don’t forget to get plenty of shots of the keynote speaker, from a variety of angles, giving his or her speech.

Sattle Corporate Event Photographer

Actor and activist George Takei giving a keynote address.

#3: Candid shots of VIPs and Keynote speakers

In addition to getting posed shots of VIPs and keynote speakers, it’s also important to get candid shots of them interacting with each other, or event attendees. Depending on the nature of the event, these opportunities could include book signings, meet and greets in the green room, or an organized step-and-repeat photo booth. These days, many candid shots of VIPs will include selfies with guests, which can be a challenge to capture, so be prepared for that!

Seattle Corporate Event Photographer

Seattle Seahawks quarterback Russell Wilson posing for a selfie with a fan.

#4: Posed shots of attendees

Depending on the type of event you’re photographing, most attendees will be looking their absolute best and will want photos of themselves. Always be on the lookout for well-dressed and energetic event attendees, and don’t hesitate to approach them to ask for a posed photo. Along these lines, it’s also not unusual to have at least one event attendee who doesn’t want to be photographed. Sometimes, you’ll be made aware of this by your client, and other times the attendee will explicitly tell you themselves. Either way, respect the wishes of the attendees, and definitely do not photograph someone who doesn’t provide consent.

Seattle Corporate Event Photographer

Corporate event party attendees.

#5: Candid shots of attendees interacting

Most corporate events are held for two main reasons: to give keynote speakers chances to educate and address an audience, and to allow for networking among attendees. Always be on the lookout for attendees chatting or interacting with each other, and get their reactions while they are listening to keynote speakers. Ideally, make sure these shots incorporate some form of your client’s branding materials, such as a brochure or sign, to give the photos context.

#6: Full room shots

A final type of corporate event photo that almost every client will request are shots that show off how many attendees were present at an event. This can be tricky depending on the type of venue you are photographing at, and whether or not the event is actually well-attended. Addressing these two challenges can usually be solved in one of two ways:

a) Get a bird’s eye view

Try to get access to a ladder, stool, balcony, or some vantage point within the venue that will let you shoot from overhead and capture wide-angle shots showing a full room. If the room isn’t really that full, try to find angles or special crops that still hint at a room being moderately full. Your client will appreciate the extra effort.

Seattle Corporate Event Photographer

Shooting from up high to show a different vantage point.

b) Get up close and personal

Whenever possible, I always ask my client to make sure that the first several rows of seats or tables at an event are packed with as many people as possible. This way, I can always make an event feel well-attended, even when it’s not. The approach in this case is to avoid wide-angle shots and shoot as close to the stage or from wherever the keynote address is being made, including as many rows or tables of people as possible.

Seattle Corporate Event Photographe

This was actually a well-attended event, but an example of how to shoot up close with attendees in the frame.

In Conclusion

These are just several types of photos to always capture when photographing a corporate event. Above all, it’s important to understand why clients hire corporate event photographers in the first place. Typically, the reasons involve showing visual documentation of special people who were at the event, the fact that the event was well-attended, and the fact that event attendees were engaged and enjoyed themselves. Always keep these overall goals in mind when photographing an event and be sure to snap photos that help you and your client meet these overall objectives.

People photography week

This week on dPS we’re featuring articles all about different kinds of people photography including portrait, event and travel photography. See all the previous ones below, and watch for more people photography articles over the next few days.

  • How to Take Low Key Head-shots
  • How to Do a One Light Portrait Setup and Use it as Your Back-up Plan
  • Travel People Photography – Tips and Pitfalls
  • 8 Tips for Photographing Men
  • 24 Diverse Images That Showcase People Photography
  • Weekly Photography Challenge – People Photography
  • Tips for Getting Yourself to Relax as a Photographer and Have More Successful Portrait Sessions
  • 5 Good Reasons to Add People into Your Landscape Photography

googletag.cmd.push(function() {
tablet_slots.push( googletag.defineSlot( “/1005424/_dPSv4_tab-all-article-bottom_(300×250)”, [300, 250], “pb-ad-78623” ).addService( googletag.pubads() ) ); } );

googletag.cmd.push(function() {
mobile_slots.push( googletag.defineSlot( “/1005424/_dPSv4_mob-all-article-bottom_(300×250)”, [300, 250], “pb-ad-78158” ).addService( googletag.pubads() ) ); } );

The post 6 Must-Have People Shots to Capture When Photographing Corporate Events by Suzi Pratt appeared first on Digital Photography School.


Digital Photography School

 
Comments Off on 6 Must-Have People Shots to Capture When Photographing Corporate Events

Posted in Photography