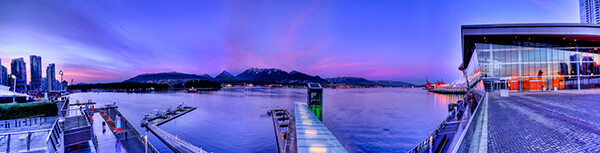
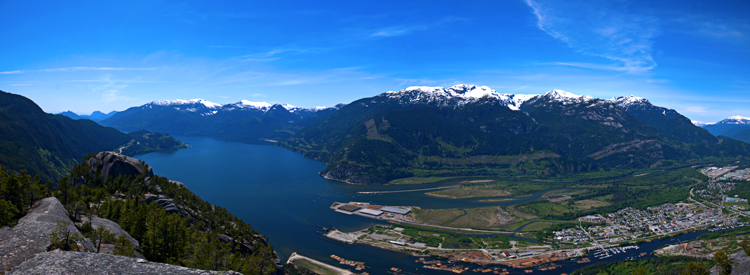
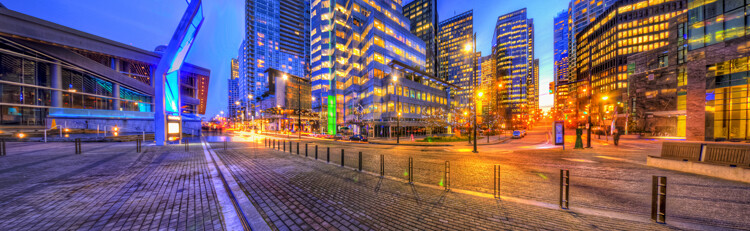
Panoramic HDR image of Coal Harbour – Vancouver, Canada
I am convinced that digital photography has changed so many aspects of photography forever. HDR and photo stitching are just two of those aspects. In the film era you could achieve a lot in the darkroom with blending, dodging and burning, but not to the extent that HDR allows us to achieve now. Photostitching has also allowed us to produce images that were not possible a few years ago. In the days of film, panoramic images were possible, but required a camera made for that purpose, nowadays we can shoot panoramic shots with any digital camera, they can even be shot using an iPhone. So the merging (excuse the pun) of the HDR and Photostitching was inevitable.
This process is a little time consuming and needs to be planned beforehand, but the results can be really spectacular and make your images very dramatic. This article will give you a starting point into exploring the world of bringing HDR and Photostitching together.
What is a panoramic HDR image?
A panoramic HDR is quite simply a series of HDR images that have been stitched together using photo stitching software. It is an image comprised of any number of images, sometimes up to 60, depending on how you plan your shots. Sounds complicated right? It’s really not. If you follow a simple plan, it’s actually pretty easy. It is all in having the correct workflow, so here it is.
The panoramic HDR workflow outlined
The quick process we will be running through is as follows:
- Plan and shoot your HDR and panoramic images
- Edit your HDR images
- Stitch your HDR images together
- Edit the final image in Lightroom or Photoshop
That’s it, simple and we will do it in small steps, so it is easy to follow.
Step 1 – plan and shoot your HDR and panoramic images
HDR Images
I have written Getting Real with HDR – a Step by Step Tutorial for Realistic Looking HDR. Take a look at that if you need a refresher on how to get your HDR images into good shape. Normally, when you shoot an HDR image, you will be using between three and seven images of the same scene to create the HDR. In panoramic HDR shots, you will repeat that HDR shot across the scene for five to seven shots that will capture the panoramic. The key point to remember when shooting a panoramic image is your subject matter. Choose a scene that works in the panoramic format; i.e. a seascape, mountain range, forest or a cityscape from a distance. If you are too far away from your subject, the stitched photo may lack impact, so choose your scene with that in mind.
Panoramic Images
Of course, it’s up to you how many images you want to shoot for your HDR shots. In the example shot at the top of the article, I used three shots per HDR set and used a total of seven images to capture the scene panoramically. Keep in mind that you may want anywhere between three to seven shots per HDR image and use as many images as you need to capture the scene.
Here is a visual breakdown on how this shot worked. I have broken the shots I took into sets. Each set consists of three HDR images. So, Set #1 consists of three HDR images, Set #2 consists of three HDR images. Set 1 and Set 2 overlap by 30%. Set 2 and Set 3 overlap by 30% as well, and so on.
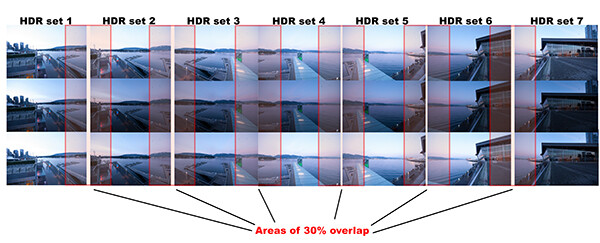
HDR sets and flow for the image of coal harbour. Note the overlaps
What you will notice is that you must take your HDR images and complete the set before moving your camera for the next set. This ensures that you will get the best possible HDR shots, and that they will blend properly. Once you have your HDR shots done on Set #1, move your camera over to frame and shoot Set #2. With panoramic photography, you must overlap your images by at least 30%. It’s not necessary to overlap much more than this, but less than 30% could cause the software to struggle to find linking points in the images. If you have a scene that has lots of detail in it, 30% will be good, if you have a scene that is not very detailed (let’s say a beach scene with sand, water and sky) you may need to overlap more to make sure that the photos can stitch. Continue this process until you have captured your scene in the sets you have decided on.
Some quick tips to remember when you shoot Panoramic HDR images
1. Choose a preset white balance setting that works well for the scene, avoid using auto white balance. If you use auto white balance (AWB), your overall colours in the scene may change as you shoot your panoramic and this could cause some unusual colour shifts in your image
2. Keep your aperture between f/8 and f/11. Once you have chosen your aperture, don’t change it throughout the sets.
3. Use a tripod to make sure that your images are sharp. Also, as you move the camera onto the next set, be sure to overlap by 30%.
4. Be sure not to allow the camera to move up or down as you shoot the images. If it does, the result will be that the images might stitch but the resulting shot will be dropping down or sweeping up and you may not be able to get it right afterwards.
5. The best idea is to use a tripod and keep the focal plane as flat as possible, to avoid distortion, particularly with a wide angle lens.
Step 2 – edit your HDR images
Edit your images by set. Start with Set #1 and take them into an HDR product such as Photomatix Pro. You could used Photoshop too, but my preference is Photomatix Pro. For more details on making your HDR images, take a look at my HDR article to get into the details of the editing process in Photomatix.
Save each set and name them chronologically. I will name my images as follows: SCENENAME – HDR PANO 1, SCENENAME – HDR PANO 2 etc. Once you have taken all your sets through the HDR process and named them in order, the photostitching part is pretty easy.
Step 3 – stitch your HDR images together
For the photostitching part of this process, you can use the photo stitching function in Photoshop or any other photo stitching tool of your choice. I have used Photoshop in the past and it works well, but for more complex stitching I find that Autopano Pro works extremely well. It has been rated as one of the best stitching packages available. I have used it to stitch some pretty crazy panos together and almost anything I have thrown at it, it has been able to process.
Lets look at how this process works in Autopano Pro:
- Open Autopano Pro and on the first screen that you see, click on the second icon from the left to select your images to be stitched
- Navigate to the HDR images that you have processed and select them
- Click on “detect” on the top left hand side of the screen
- Autopano will now scan your images and do a preliminary stitch, this preview stitched image will be displayed on the right hand side of the screen that is open. This process may take a few minutes.
- Once the preview image is displaying, click on the “edit” button (Right hand side of the screen) this will open the image in the Autopano edit screen
- There are a number of options here, below is a high level overview of the most important functions
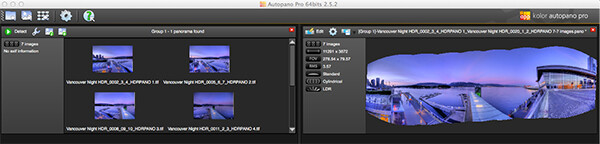
Autopano Pro – images selected for the pano stitch on the left and a preview of the stitched image on the right
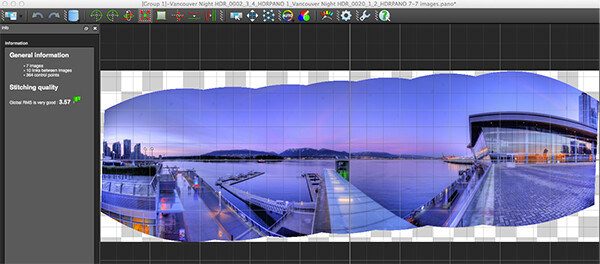
Autopano edit screen with preview of stitched image
Autopano functions on the edit screen:
Autopano has a number of options you can use to render your panoramic image. These projections help with distortion and skewing. Below is an explanation of the most commonly used projections.
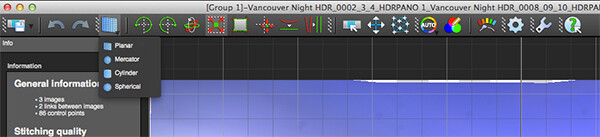
- Spherical – the spherical function allows any panorama to be assembled. It is a commonly used function for building panoramic images.
- Planar or rectilinear projection – this is a good choice if the angle is low, It’s recommended for architectural shots because it is the only mode that does not curve lines that are deemed to be straight lines. Sometimes if the angles are too extreme there may be a loss of sharpness, so be aware of this.
- Cylindrical projection – this projection can be used up to 360° (horizontally).
- Mercator projection – the mercator projection can also be used up to 360° (horizontally). The effect of stretching up and down the image may seem to become distorted.
The key factor in choosing a projection is in how the projection affects your image visually. Does it work for the subject matter? Does the image look correct? Ask yourself these questions as you experiment with the projections.
Once you are happy with your projection and the way the image looks, you can now save the image to a folder on your computer.
Choose the projection that works best for your image
Rendering
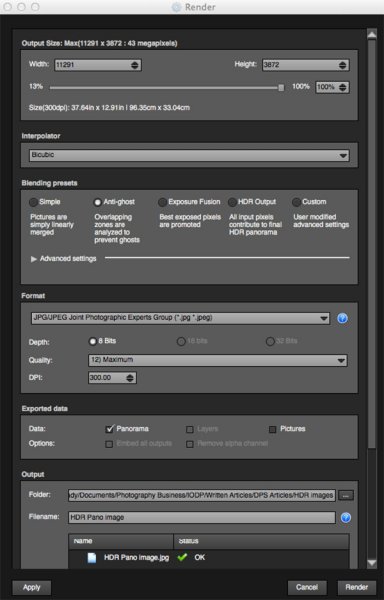
Render screen and options
This is the process of saving your panorama.It is called rendering because the software needs to perform the final stitching and edits to your image. On the rendering screen, you will need to take note of the following:
Interpolator – the interpolator is the method used to assemble the pixels of your panoramic image and will determine the quality and sharpness of your image. There are a few different options here, but the most commonly used options is Bicubic. The other options are useful for advanced stitching.
Blending settings – the purpose of the blending settings is to allow the combining of the overlapped sections of your panoramic to look smooth and seamless. You will notice the following presets:
- Simple – this is fast, but it is possible that defects are seen where the areas overlap
- Anti-ghost – conserve the image’s strong characteristics (stops, lines, curves) when mixing while automatically removing objects that have moved
- Exposure Fusion – to be used if the panorama was created with a bracket shoot. Keeps the best of different exposures.
- HDR output – to be used by users who wish to create a “.hdr” format file in order to create post-production or special effects. Don’t use this on these images as they have already been processed as HDR images.
- Custom – this is enabled when you manually change the parameters and they no longer correspond to a profile.
On the advanced settings, I generally leave that on the default.
Format
This section allows you to determine what the format in which you want your image to be saved. The two formats I use most are TIFF and JPEG. TIFF is an uncompressed file (which means all the information is still in the file, this is great if you are planning to print the image out large) The downside to TIFF is that the files are big. JPEG is a compressed format, that means that some image information has been discarded, the quality will still look the same to the naked eye, but if you print a JPEG image up really big, you may notice some image degradation. Depending on your final output and your space constraints you can choose the format that works best for you. Take the quality up to 12 and set the DPI to 300. This will ensure that you have the best quality image saved.
Output
On this screen, the software needs to know where to save your panoramic and what you want to call it. Choose your destination folder and name the file. Once this is done (it sounds more complicated than it is) click on the render button and the software will begin rendering your image. Depending on the size of the files being stitched, this rendering process can take a few minutes. Once complete, a screen will pop up to let you know that the image is now rendered.
4. Edit the final image in Lightroom or Photoshop
Your image is now stitched together, but the final step in the process is to edit the image in your choice of image editor (Lightroom, Photoshop, Gimp or any other) You will want to follow the basic workflow I outlined in a previous article. Once that is done, you will now have a fantastic Panoramic HDR image. Not too many photographers attempt these images as they take some time to get right, but the results can be spectacular. Give this a try, let me know where you struggled or any insights you had during the process, above all go out and have fun with it!
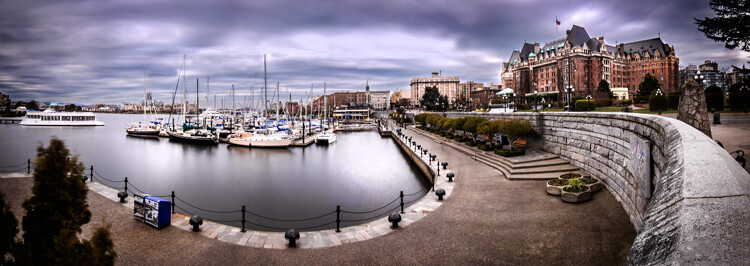
Panoramic HDR image of Coal Harbour – Vancouver BC
The post Step By Step How to Make Panoramic HDR Images by Barry J Brady appeared first on Digital Photography School.

Digital Photography School


You must be logged in to post a comment.