RSS
 

Posts Tagged ‘Panoramic’

Lomography introduces panoramic camera with liquid-filled lens

22 Oct

Off-the-wall photographic company Lomography has introduced a 35mm film camera that shoots 104mm long panoramic images through a lens that we are encouraged to fill with water. The company claims the HydroChrome Sutton’s Panoramic Belair camera is the world’s first 35mm format panoramic camera with a liquid-filled lens. Not surprising you might think, but they had to specify ‘35mm’ as in 1859 pioneering British photographer Thomas Sutton invented a panoramic camera with a water-filled lens that recorded on curved plates.

The camera has a plastic body and a lens that offers the angle of view of a 32mm. There is a chamber in the lens construction that allows users to add a liquid of their choice to create unusual effects. The liquid as such doesn’t form part of the focusing characteristics of the lens so much as operates as a form of filter. Clear water delivers a low saturation washed-out look, while adding weak coffee creates a sepia feel. Lomography recommends colored food dyes, tea and even diluted soy milk!

Images record across the entire width of the 35mm film used in the camera, so the emulsion around sprocket holes is exposed too allowing users to include the holes in their picture or to crop them off. Focus is fixed and the lens has an aperture of F11. Other smaller apertures can be achieved with the use of aperture plates, and shutter speeds are limited to 1/100sec, B(ulb) and T(ime). Cable release and tripod sockets help to keep the camera still during long exposures as well as for multiple exposures, and a hot shoe and a PC socket provide the means for a burst of flash.

Below are a handful of sample images, provided by Lomography:

$ (document).ready(function() { SampleGalleryV2({“containerId”:”embeddedSampleGallery_6711194268″,”galleryId”:”6711194268″,”isEmbeddedWidget”:true,”selectedImageIndex”:0,”isMobile”:false}) });

The Lomography HydroChrome Sutton’s Panoramic Belair Camera is available now and costs $ 79 / £75. For more information see the Lomography website.

Press release:

The Lomography hydroChrome SuTTon’S panoramiC BeLair Camera

GO LOOPy WITH LIQUIDS, WILD FOR THE WETLOOK AND CRAzy WITH COLORS!

  • The world’s first 35 mm format panoramic camera with a liquid- filled lens
  • Unique experimental lens to step up your creativity and craft unexpected liquid effects
  • A fixed-focus lens with extra aperture plates for versatile renderings
  • Undeniably analogue aesthetic with lomo vignetting and perforated edges across panoramic shots
  • A fun introduction to experimental photography suitable for all creative spirits

A CREATIVE NEW CAMERA IS BORN
An inspiring new invention, the HydroChrome Sutton’s Panoramic Belair Camera combines some of Lomography’s best-loved features into one exciting analogue innovation.
The sweeping panoramic perspective of the Belair body meets the thrilling and unpredictable effects of the Sutton Liquid Lens with exposed sprocket holes to boot. Affordable, ingenious and incredibly simple to use with almost no need for settings, this new edition to the Lomography camera family invites creative spirits and first-time photographers alike to dive into an ocean of colorful experimentation.

EXPERIMENTAL, ENCHANTING, LIQUID EFFECTS
The HydroChrome soaks up the scenery and drenches spectacular sprawling shots with special liquid looks. The unique Sutton lens lets you inject liquid into a
circular dial, creating distinctive filters and luscious liquified scenes. With just the simple addition of clear water, you can achieve vintage aesthetics, washed-out tones and radiant blur too – every concoction creates unprecedented, unpredictable effects. Check out the HydroChrome Liquid Guide for inspiration and tips.

UNDENIABLY ANALOGUE AESTHETICS
The HydroChrome makes experimenting easy. As well as a totally unique lens, this camera comes with a further two built-in features to explore – sprocket holes and panoramic exposures. Artistic minds can let their imagination run wild as they craft panoptic shots complete with lo-fi dreamy aesthetics, authentically analogue perforated edges, and extraordinary liquid effects, all on easy-to-use 35 mm film. Creative photographers can also experiment with multiple, long and pinhole exposures as well as four interchangeable aperture plates for versatility in a variety of lighting conditions.

TECHNICAL SPECIFICATIONS

Film Type: Standard 35 mm film
Exposure Area: 104 mm × 35 mm
Lens Angle of View: 32 mm
Aperture: f/11 with f/16, f/22, f/32 & f/168 pinhole aperture plates
Focus: Fixed-Focus Lens
Focus Range: Focus-Free, 1.5 m – Infinity
Shutter Speed: N (1/100), B (Bulb) T-Shutter: Individual T-Shutter Lever
Viewfinder: Sports Viewfinder
Multiple Exposure: Yes
Tripod Socket Thread: Standard Tripod Socket
Flash Sync: PC-Sync Socket & Hot-Shoe
Cable Release Socket: Yes
Price: 79 USD

Articles: Digital Photography Review (dpreview.com)

 
Comments Off on Lomography introduces panoramic camera with liquid-filled lens

Posted in Uncategorized


Apple patent shows its working on panoramic light field capture technology

04 Apr

A newly-published Apple patent, filed back in September 2019, details a light field panorama camera system seemingly intended for use in future iPhone and iPad devices. The technology would enable the average consumer to capture large light field panoramas of a particular scene by moving their device using gestures. The resulting content could be rendered and viewed on the device or using some type of head-mounted display (HMD), including VR headsets.

According to Patently Apple, which first spied the patent, Apple details technology that would build upon its current AR efforts by enabling its consumer devices to capture complex 3D scenes. To do this, the user would need to move their light field-equipped iPhone or iPad in a gesture, such as moving the device in a swooping infinity symbol, to capture light field images of the environment from multiple angles.

A flow-chart provided within the patent filing that shows the process of capturing, processing and viewing the resulting imagery.

A rendering engine would process the individual images into a 3D panorama with six degrees of freedom (6DOF) made possible using the light field technology. As a result, the viewer would have the ability to look above and behind objects, zoom in on areas of the scene and view different angles of the environment. The patent follows Google’s acquisition of light field camera technology company Lytro in 2018.

Unlike conventional cameras, a light field camera system captures both the intensity of the light from a scene and the direction the light rays are traveling in space. The additional data gathered by light field camera systems enable new types of experiences, including the one detailed by Apple.

The patent indicates that Apple’s system may use the sensors in the iPhone and iPad to capture position, motion and other similar metadata alongside the images, the combination of which would contribute to the final light field panorama. The combination of captured images and metadata could then be used to render different views of the same 3D scene, according to the patent, ultimately giving the user six degrees of freedom for exploring the panorama using an HMD like a VR headset.

This would differ substantially from a traditional 360-degree panorama, which is captured from a single point, only allowing the viewer to move their head around within the rendered 3D scene. Light field panoramas will appear more realistic, keeping objects in their correct positions as the user moves around within the scene, which could realistically render from different angles as the user has a look around.

It’s no secret that Apple has been heavily focusing on augmented reality technologies; its most recent iPad Pro model underscores this effort with the inclusion of a LIDAR sensor.

Just a few of the possible movements you could use to capture the scenery using your Apple mobile device.

In its announcement of the 2020 iPad Pro last month, Apple said the new LIDAR sensor ‘delivers cutting-edge depth-sensing capabilities, opening up more pro workflows and supporting pro photo and video apps,’ specifically with augmented reality in mind. The sensor works by measuring the distance of objects that are as far as 5m (16ft) away.

Apple went on to explain:

‘New depth frameworks in iPadOS combine depth points measured by the LiDAR Scanner, data from both cameras and motion sensors, and is enhanced by computer vision algorithms on the A12Z Bionic for a more detailed understanding of a scene. The tight integration of these elements enables a whole new class of AR experiences on iPad Pro.’

The future expansion of these capabilities using light field technology wouldn’t be surprising, particularly in light of ongoing rumors Apple is working on AR/VR gear. With that said, and as with any patent, it is possible we’ll never see this technology make its way into a consumer product. Per usual, Apple has not commented on the patent.

Articles: Digital Photography Review (dpreview.com)

 
Comments Off on Apple patent shows its working on panoramic light field capture technology

Posted in Uncategorized


Make Easy Panoramic Images with Microsoft ICE

18 Jun

The post Make Easy Panoramic Images with Microsoft ICE appeared first on Digital Photography School. It was authored by Rick Ohnsman.

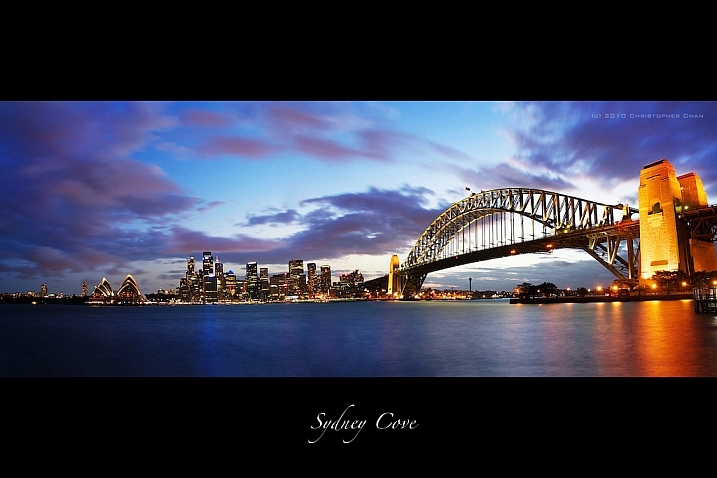
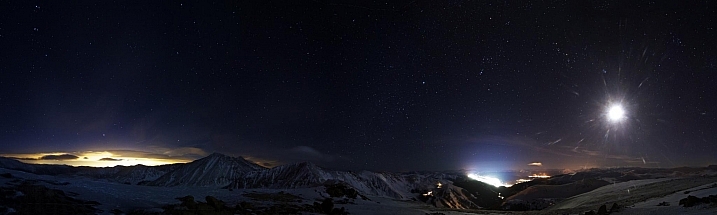
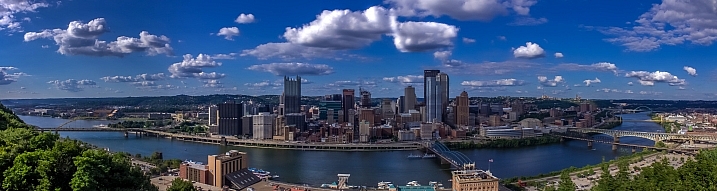
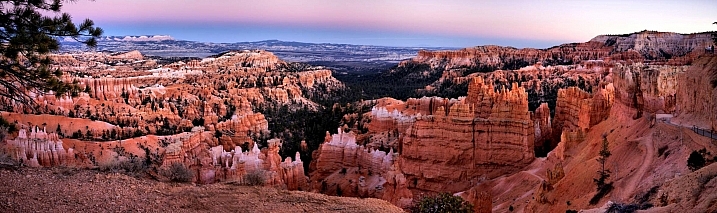
Vista at Dead Horse State Park, Utah. Fourteen images stitched in Microsoft ICE.

You’ve no doubt seen panoramic images and perhaps even know how to make them. Whether using the tools built into programs like Lightroom and Photoshop, or perhaps another dedicated panoramic creation program, or even the sweep-panoramic capability of many cellphone cameras, you’ve used this technique to make images larger than you could make them in a single shot.

In the past, the choice was not as great, and the main stitching programs not as diversified in their capabilities. The programs that did exist to create panoramas were complex, sometimes expensive, and didn’t always work well.

When the first version of Microsoft ICE (Image Composite Editor), a program from the Microsoft Research Division of the software giant came out, it had all the things I sought in software utilities. It was simple, it worked well, and it was free – bingo! Although other options have come along for photo stitching, I still find ICE, (now at version 2.0.3.0), a favorite.

Panorama images are not new nor a product of the digital age. This image was made from Rincon Point in San Francisco in 1851 using multiple photo plates seamed together.

Image stitching – What is it?

When working with panoramic programs you will read the term “image stitching.” It is an apt phrase for the process by which a series of photos are composited together to make a larger image, much like scraps of fabric stitched together to make a quilt. The mark of a good photo-stitching program is how well it can piece the separate images together without showing the “seams.” Check another box for Microsoft ICE – it does that job extremely well.

The Mars Rover uses robotic cameras and panoramic stitching techniques to make high-resolution images.  NASA Photo

Considerations when photographing a panorama

The quality of a finished product is usually dependent on the raw materials that go into it. The same is true of creating a panorama photo. The better your technique in making the individual images, the better your finished panorama will be.  I will not be doing a deep-dive into panorama photography techniques, as that is a whole subject itself, but instead, I’ll list some of those things you’ll want to consider when making your shots.

One real benefit of ICE is that even with less than perfectly created images, it will still do a respectable job in creating a panorama. Of course, with better images, the result will be better too.

Here are some techniques to help you when shooting your images for a panorama:

Camera settings

As you sweep across your scene, making multiple shots, there will be variations in the light. If you leave your camera in an automatic mode, each frame will be slightly different too. ICE has what is called Exposure Blending and uses an advanced algorithm to compensate for this. Thus, it smooths the seams between individual images. However, if you give it better images to work with the result will be better too.

The best practice is to put your camera in full manual mode, find and set an exposure that is a good average for the scene, and lock that in.  Try to pick an aperture for maximum depth of field as well.

The same goes for focus. Find a point where as much of the image will be in focus, (the “hyperfocal distance,” typically a third of the way into the scene), focus there and turn off autofocus.

Lens selection

There is no “just right” lens focal length to use when making panoramic images. The field of view that represented in your stitched image will be dictated by how many photos you make and the sweep of your pan, not the lens focal length.

One might think a wide-angle lens would be a good choice, as fewer shots would be required. But that’s not necessarily true. The best choice is a lens with the least distortion as any lens distortion will be magnified as you stitch images together. Thus, a good, basic 50mm prime lens could be a great choice.

Sometimes, depending on the scene you want to capture, a longer telephoto might work well. Lens quality and minimal distortion trump wide focal lengths here.

A panoramic tripod head allows you to mount the camera so that the lens nodal point is centered over the pivot point of the pan. Thus, minimizing parallax errors.

Nodal point and parallax issues

Wazzat!!?? Yes, you can get complex very quickly and encounter cryptic terms if you want to when making panoramic photos.  Attention to detail results in higher quality panoramas. And, if you decide to pursue this technique, you will want to learn about these things in time.

Very briefly, the nodal point is the spot within a lens where the light rays converge.  Setting up your camera such that the pivot point of your pan is at that spot will produce an image with the least distortion.  This is most important in images where objects in the shot are both close and far in your scene.

Parallax is the difference in the apparent position of an object when viewed along two different lines of sight.

To see a quick example, hold your hand out at arm’s length with your thumb up.  Close one eye and put your thumb over a distant object.  Now close that eye and open the other. You will see your thumb “jump” off the object to a different position.  This is parallax.

When setting up your camera, pivoting around the nodal point will reduce or even eliminate this. And serious panorama photographers will purchase special panorama tripod heads to get this exact spot for any given lens they might use.

Highly serious gigapixel panorama photographers making images with hundreds of composite images might even use motorized computer-controlled heads like the Gigapan to make their shots.

Check out some of the Gigapan images like this made from some 12,000 individual shots. Alternatively, look at this taken from a similar setup on the Mars Rover.

Bringing it back down to Earth, you need not get nearly that sophisticated if you don’t want to.  There are less expensive heads for panoramic photography if you choose to try that and many Youtube videos and instructional articles on setting nodal points.

For starters, you needn’t even worry about all of that to give panoramic photography a try. The beauty of ICE is that even with something as simple as handheld images shot with a cellphone camera, it does a very nice job of assembling a panorama image.

Step-by-Step

Here are some things to do when making your images for use in a panorama:

  • Consider your composition – Good composition is just as important in making a panorama image as any other photo.  If your cellphone supports the sweep panorama feature, you can sometimes make a shot with it to help pre-visualize what you want to do with your DSLR.
  • Level the tripod – You will know your tripod wasn’t level if you get an “arched” looking composite panorama.
  • Mount your camera in a vertical (portrait) orientation – You will get a taller aspect ratio in your final shot and an image less “ribbon-like” when you assemble your panorama.
  • Hand-marker – Shoot a photo of your hand in front of the camera as the first and last in your panorama sequence. This will make it much easier to determine which images belong to a panorama “group.”
  • Camera Settings – Use full manual exposure and focus for the reasons outlined above.
  • Overlap – As you pan making each shot, overlap each image about a third so ICE will more easily find the match points when making the composite.

This is the screen you will see when first opening Microsoft ICE.

Bringing it into ICE

Bringing your images into ICE and letting it assemble your panorama is the easiest part and a big reason to like this program. ICE accepts most Raw photos, .jpg of course, and even layered Photoshop files.  You will need to know this is a Windows-only program and won’t work on your Mac. However, there are plenty of iOS alternatives. One which is also free and well-regarded is Hugin.  I can’t say I have any personal experience with it, however, being a PC guy.

Here’s where you will find the download for ICE. Be sure you get the proper version, 32 or 64-bit for your particular PC. The program will work in Windows 10, 8, 7 or even Vista SP2. There is a lot of good information as well as an interesting overview video on the page.  The installation usually goes quite smoothly.

After you have the program installed, there are various ways to bring your images in for compositing into a panorama:

  • Running ICE as a stand-alone – ICE can be run just fine as a stand-alone program and you can bring your images in from wherever you have them stored. You can do this either by opening ICE and clicking New Panorama from Images or by opening another window in File Explorer and dragging and dropping the images into ICE.
  • Launching ICE from a Folder – Typically, once you install ICE, if you select all the images you want in your pano from a folder and then right-click, you will see an option to Stitch using Image Composite Editor.  Select that, then ICE will launch with your selected images brought in.
  • Using ICE as an External Editor from Lightroom – You can set-up Adobe Lightroom to use ICE as an External Editor.  This is my preferred way as I often do some basic pre-editing to my shots in LR before bringing them into ICE.  Once you have set-up ICE as an External Editor, select all the images in the pano group you will be using. Then, in the Lightroom menu, click Photo -> Edit In -> Microsoft ICE.  You will have the option to Edit a Copy with Lightroom Adjustments.  Pick that, click Edit, and ICE launches with the images ready for compositing.

There are four basic steps in ICE; Import, (the images have been imported here), Stitch, Crop, and Export.

Four basic steps in ICE

1. Import

If you’ve used one of the three methods above, you’re likely already seeing your images in ICE ready for Stitching. If you are running ICE in stand-alone mode and have not already imported your images, you will see three Options across the top of the screen:  New Panorama from Images, New Panorama from Video, and Open Existing Panorama. Choose the first option, navigate in Windows Explorer to where your images are located, select those that make up the panorama group, and click Open.  Remember, ICE opens Raw files, Tif, Jpg, PSD, and perhaps some other image file types.

You will find that in most cases, the default setting for ICE works well. If you are confused about some of the terms and menu options, you can click Next (at the top right of the screen), and ICE proceeds to the next step using the defaults.

If you choose to try some other things, here are a few options:

Rather than use Auto-detect in Camera Motion, you may wish to use Rotating Motion. It will give you more options for adjustment later. I have not found the Planar Motion options to be useful, (and to be honest, don’t really understand them. Such will be the case with ICE for most people – there are options and terms that will take more knowledge of the process. And, while they might have applications, most times will not be necessary.  Keep things simple, and you’ll most often be pleased with the result.)

This is the Stitch step. Ice has composited individual images.  Don’t be overwhelmed by the Projection options. ICE will almost always choose the correct one by default. If you wish to try the others, go ahead and see what you like best.

2. Stitch

Click Next or select option 2 – Stitch from the menu. The screen will show Aligning and then Compositing Images with progress bars as the work is done.  Depending on the size, number, and complexity of your images, this could go quick or could take several minutes.  Once done, your stitched image will appear.

Depending on the camera motion type chosen, you may have another set of options under Projection with terms like Cylindrical, Mercator, and a collection of other types you may not understand. I suggest trying the different options and seeing which makes your panorama look best and the least distorted. You can also zoom into your image with the slider or by using your mouse scroll wheel. Clicking and dragging above or below the panorama will allow you to adjust the shape further. Try various things – whatever helps to make your panorama look best.

3. Crop

Click Next, or Crop to move on. Here you can crop the image to choose what to include in the finished panorama. Usually, you will have some rough edges, depending on how you shot the images and composited them. If you click Auto-Crop, the program will crop to the largest points where it can make a rectangular image. You can also manually drag the sides of the crop.

Auto-Complete works like the content-aware fill in Photoshop and will try to fill in missing pieces in the image. Sometimes, especially with things like the sky, it works amazingly well. Other times with more complex patterns, not so much.

Give it a try and see if you like the result. You can always turn it off if you don’t like it.

The Crop Step. You can crop manually, Auto crop, and use the Auto Complete feature if you like.

Note how the Auto Complete feature has filled in missing parts of the image at top and bottom.

4. Export

Once complete, you will want to save your resulting panorama.

Because you have stitched together what are often high-resolution images to start with, your panorama file can be huge. That’s great if you need to print a wall-sized poster. If you don’t need something that big, consider turning down the Scale by inputting a smaller number. If you know what size (in pixels) you want the finished image to be, you can also enter that number in the Width or Height boxes, and the other will adjust to maintain the aspect ratio.

For example, to print a 12 x 48-inch poster at 300 dpi, you would need an image 3600 x 14,400 pixels.

If your panorama at 100% is over 20,000 pixels wide, that’s overkill and may result in a much larger file than you need.

Or, if you’ll be displaying your panorama on the web where you may only need a file 2400 pixels wide, why make a monster file?

You can also input numbers into the width or height, and the image will adjust the other setting to maintain the aspect ratio. Your use for the panorama will dictate how large you need to output it.

The Export Step. If you were to export this image at 100% scale as a .tif image it would be 19772 x 5833 pixels and be 149MB. For use on the web, you could drop to something like 2400 x 708 (scale just 12.14%) as a .jpg at 75% quality and it would be just 372k. Export your images according to how you will use them.

You also have the option to choose the file format. ICE can output as .jpg, .psd, .tif, .png, or .bmp. Again consider how you plan to use the image. A .tif file will be much larger than a jpg. If you choose jpg, you can also choose the compression level with the Quality settings.

When you’ve made your selections, click Export to Disk and ICE will give you the option of where to save the file. If you came from Lightroom, you will still need to specify the output location. ICE does not automatically put the resulting panorama back into the Lightroom folder where you started.

One option not immediately evident is the ability to save a panorama project. Before exiting the program, look in the top left corner of the screen for the icons there. The last two, which look like disks if hovered, will say Save Panorama and Save Panorama As. These allow you to save your project as an .spj file. This is an ICE file type which can be loaded back in using Open Existing Panorama from the main menu. This could be useful if you intend to make various output sizes or file types from your original images.

32 images shot in two rows to get more of the sky.

ICE does a great job stitching even more complex images.

The final result of the previous multi-row stitch.

Set your camera in continuous mode and shoot, panning with your subject. Bring the images into ICE and stitch as usual. You can get a sequence like this very easily.

Same technique with continuous mode.

The final result.

Nifty tricks – Video, Tiny Planets, VR, and more

There are a few other things ICE will do beyond simply making panoramas.  It is beyond the scope of this article to outline the specific steps to do these things, but I simply wanted to make you aware of them so you can explore further if you like.

This is a 360-degree pano shot as video and imported into ICE. The video will not be as high resolution. 360-degree panos, however, open VR possibilities.

Video Input

First, your input file can, instead of being a group of still photos, be a video file. Video is lower resolution than images taken with most still cameras, but there may be other reasons you want to use it as an input format.  One of those is multi-image action. (See the sample photos). You can do this with multiple images shot as stills or using a video. Capture the action, input the video into ICE, choose the portion of the video you like and then select the action points you want in the finished pano.

Give this a try, and doing it will make the steps clearer.

ICE can also be used to create “tiny planets.”

Virtual Reality

Use ICE to make a 360-degree pano from still images or a video.  Then create an image that can be viewed as an interactive pano and be rotated by the viewer.  Post it to Facebook or view it on a VR device.  There are numerous online tutorials teaching how to do this.  Drone footage can make for an especially interesting VR image.

Conclusion

Microsoft ICE is powerful, can produce high-quality panorama images, and is very easy to use. It also does a good job when accepting the default choices. ICE can use simple images made handheld from a cellphone or hundreds of images on a Gigapan robotic system with a DSLR. There are also fun things like multi-image motion images, tiny planet creation, and virtual reality possibilities.

Oh yeah…and it’s free!  What’s not to like?

Go download it, give it a try, have fun, and share your images with us in the comments below.


panoramic images with Microsoft ICE

The post Make Easy Panoramic Images with Microsoft ICE appeared first on Digital Photography School. It was authored by Rick Ohnsman.


Digital Photography School

 
Comments Off on Make Easy Panoramic Images with Microsoft ICE

Posted in Photography


K-Pan is a 3D-printed panoramic film camera that shoots 6 x 14cm photos

26 Sep

The 3D-printed camera formerly known as the ‘Cycloptic Mustard Monster’ has launched on Kickstarter under the name K-Pan Panoramic Camera. This medium-format analog camera has the same design showcased earlier this year, and assuming the crowdfunding campaign is successful, it’ll be made available to buyers as a DIY kit. Creator Paul Kohlhausen is also offering 10 limited edition pre-assembled camera units.

The K-Pan’s components are printed from SLS nylon, and once assembled, the camera measures 22cm x 9cm / 8.6in x 3.5in and weighs 350g / 12oz (without a lens). Users supply their own 4 x 5 lens and 120 film, of which the camera shoots five 6 x 14cm frames per roll. When assembled according to its default design, the K-Pan’s focus is set to infinity; however, users can change that by inserting spacer brackets as desired.

Kohlhaussen is offering K-Pan in various bundle options with pledges starting at £270 / $ 364 for a standard kit. Shipments to backers are available globally and are anticipated to start in March 2018.

Articles: Digital Photography Review (dpreview.com)

 
Comments Off on K-Pan is a 3D-printed panoramic film camera that shoots 6 x 14cm photos

Posted in Uncategorized


Lastolite unveils two new ‘stone effect’ panoramic backgrounds for portrait photographers

15 Sep

Studio accessories manufacturer Lastolite has introduced a pair of new stone effects to its panoramic background range. Granite and Limestone are the first textured materials to join the range that currently just includes white, black and Chromakey Green plain finishes.

The Lastolite Panoramic Background system consists of a three-part collapsible frame that is self-supporting once erected. Plain or patterned covers stretch over the frame to form a 4×2.3m/13×7.5ft backdrop suitable for shooting groups, and once packed away the kit measures just 100cmx30cmx35cm/39x12x14in.

The new patterns will be available with or without the panoramic frame, and will cost £306 on their own or £600 with the frame (US prices still to be released). For more information see the Manfrotto website.

Press Release

Lastolite by Manfrotto presents new Granite and Limestone panoramic backgrounds to the collection

Lastolite By Manfrotto, the world’s leading manufacturer of backgrounds and lighting control systems has announced the launch of the new Panoramic Background in Granite and Limestone.

The Panoramic Background has quickly become the go to background for busy photographers needing a 4m wide, seamless, crease free, collapsible solution. Built around a three-panel collapsible lightweight aluminium framework, the Panoramic background is completely self-supporting so there is no need for additional stands and crossbars. The Panoramic Background is assembled in a matter of minutes and, once assembled, is simply clipped onto the framework. The stretchable cover fabric ensures a flat, crease free surface at all times. Unlike other large seamless background solutions, the Panoramic collapses down to an impressive 100cm x 30cm x 35cm size, making it very easy to transport. The Panoramic Background is perfect for shooting larger groups, shooting with props or creating the negative space in a photograph that agencies so often request.

The new themed covers now bring textured surfaces to the range and perfectly complement the existing black, white and Chromakey Green solid colour surfaces. There are two new covers available – Granite and Limestone. Granite offers a stone texture effect with a full range of grey tones and a dark vignette around the edges, whilst Limestone is much lighter, offering a subtle range of mid to light greys giving the effect of a Limestone surface.

The Granite and Limestone Panoramic background includes the framework and the cover. For existing Panoramic background users the new covers are also available separately.

Click here to see a video of the new Panoramic Background in action https://vimeo.com/230936776

The Granite and Limestone Panoramic Background has an RRP of £600.
The Granite and Limestone Panoramic Background covers have an RRP of £306.

For more information, please visit www.manfrotto.co.uk/lastolite

Articles: Digital Photography Review (dpreview.com)

 
Comments Off on Lastolite unveils two new ‘stone effect’ panoramic backgrounds for portrait photographers

Posted in Uncategorized


Polaroid launches Eyeball panoramic tripod head

27 Feb

A remote control spinning tripod head that is said to be ideal for shooting panoramas has been launched in the US and UK by Polaroid. The Panorama Eyeball Head fits on a tripod or stands freely on its own feet, and can accommodate DSLRs as well as compacts. The control unit connects with the head via an IR link and manages both the speed and direction of rotation. 

The head is capable of turning a full 360° and the company says that careful gearing ensures the motion is always smooth. There are five speed modes as well as a mode that provides three fixed viewpoints up to 75° apart. 

The head is powered by a built-in rechargeable battery that is said to provide up to five hours of standby time, and which can be recharged via a powered USB port. 

The Polaroid Panorama Eyeball Head costs £44.99/$ 49.99 through Amazon. 


Press release:

RIDGEFIELD PARK, NJ – The versatile Polaroid remote-controlled 360° panorama eyeball head accessory is a compact, portable freestanding mini tripod that can also be placed on a tripod, slider or even selfie stick. Designed for Polaroid cameras, other small popular cameras and SLRs, the Polaroid remote-controlled 360° panorama eyeball head is ideal for creating the perfect panoramic video or picture. IR remote controls offer five speed modes, clockwise and counter clockwise rotation, as well as a triangle mode up to 75°.

Panoramic Shooting Made Plenty Fun

For the contemporary videographer, being able to capture expansive panoramic vistas without any shake or distortion is an absolute must. Thankfully, the Polaroid remote-controlled 360° panorama eyeball head delivers effortless and precisely controlled results. It is compatible with a range of action cameras such as the Polaroid Cube lifestyle action camera line and smaller digital cameras (with ¼” threaded hole). Attachment comes included.

Turns on a Dime – or Quarter

The Polaroid remote-controlled panorama eyeball head rotates your camera in its place, clockwise or counterclockwise, for smooth shooting action. Users can easily control the turning degree from 0 to 360°.

Heeds Your Need for Speed

Using the remote, shooters can also control the exact rotational speed. Press a button to speed up, and press a button to slow down. And thanks to finely calibrated gears, the action always remains perfectly smooth.

Functions Free or Mounted

At the top, a ¼” threaded screw connects to a wide variety of cameras. A padded platform prevents motion-related scratches. At the bottom, a ¼” threaded hole accepts tripod and slider connections for greater application flexibility.

Runs on Built-In Battery

To make this already compact and pocket-sized head as portable as possible, the built-in battery is rechargeable from any USB port or power outlet. A single charge provides five hours of standby and over three hours of non-stop runtime.

The Polaroid remote-controlled 360° panorama eyeball head accessory is available now for $ 49.99.

Articles: Digital Photography Review (dpreview.com)

 
Comments Off on Polaroid launches Eyeball panoramic tripod head

Posted in Uncategorized


26 Elongated Panoramic Vistas

10 Jan

Sometimes using a format other than the standard proportions works better for an image. One of those times is shooting landscapes of sweeping wide vistas.

A great way to do that is to create a panoramic image. Here are a few photos that take advantage of that format to create stunning results.

John Watson

By John Watson

Geert Orye

By Geert Orye

Geert Orye

By Geert Orye

Chris Lofqvist

By Chris Lofqvist

Christopher Chan

By Christopher Chan

Lorenzoclick

By Lorenzoclick

Neil Howard

By Neil Howard

Christos Tsoumplekas

By Christos Tsoumplekas

Zach Dischner

By Zach Dischner

Mariusz Kluzniak

By mariusz kluzniak

Zach Dischner

By Zach Dischner

Jason Mrachina

By Jason Mrachina

Christopher A. Dominic

By Christopher A. Dominic

Always Shooting

By Always Shooting

Mariusz Kluzniak

By mariusz kluzniak

©Mike Photo Art

By ©Mike Photo Art

Massmo Relsig

By Massmo Relsig

Tim Hamilton

By Tim Hamilton

Vadim Kurland

By Vadim Kurland

Davide D'Amico

By Davide D’Amico

Wenjie Qiao

By Wenjie Qiao

Arne Bornheim

By Arne Bornheim

Adrien Sifre

By Adrien Sifre

Chris Toe Pher

By Chris Toe Pher

Kelly DeLay

By Kelly DeLay

Daniel Gillaspia

By Daniel Gillaspia

googletag.cmd.push(function() {
tablet_slots.push( googletag.defineSlot( “/1005424/_dPSv4_tab-all-article-bottom_(300×250)”, [300, 250], “pb-ad-78623” ).addService( googletag.pubads() ) ); } );

googletag.cmd.push(function() {
mobile_slots.push( googletag.defineSlot( “/1005424/_dPSv4_mob-all-article-bottom_(300×250)”, [300, 250], “pb-ad-78158” ).addService( googletag.pubads() ) ); } );

The post 26 Elongated Panoramic Vistas by Darlene Hildebrandt appeared first on Digital Photography School.


Digital Photography School

 
Comments Off on 26 Elongated Panoramic Vistas

Posted in Photography


Weekly Photography Challenge – Panoramic Photos

09 Jan

Panoramic or ultra wide views of scenes are popular and work well for many different subjects.

David Yu

By David Yu

David Yu

By David Yu

Weekly Photography Challenge – Panoramic Photos

If you have never done a panoramic photo now it your chance to try it. The simplest way to create one is to just crop a regular image into one that is really long and narrow. Make sure the subject fits the format and you aren’t cutting off anything important to the composition.

The other, more complex way to make a pano is to shoot a series of images and stitch them together, usually using Photoshop. We have a few articles here on dPS on how to do that if you need some tips:

  • How to do Landscape Panoramic Photography
  • How to Shoot Panoramic Photos
  • Getting Started in Panoramic Photography (beginner)
  • Step By Step How to Make Panoramic HDR Images (advanced)
  • HDR Vertorama Photography – How to Create Mind-bending Images (advanced)
  • Step by Step Using Merge to Panorama in Lightroom (beginner)
Guy Lejeune

By Guy Lejeune

David Kingham

By David Kingham

Stavros Markopoulos

By Stavros Markopoulos

Jeff Wallace

By Jeff Wallace

Vonderauvisuals

By vonderauvisuals

Inefekt69

By inefekt69

Share your images below:

Simply upload your shot into the comment field (look for the little camera icon in the Disqus comments section) and they’ll get embedded for us all to see or if you’d prefer upload them to your favourite photo sharing site and leave the link to them. Show me your best images in this week’s challenge. Sometimes it takes a while for an image to appear so be patient and try not to post the same image twice.

Howard Ignatius

By Howard Ignatius

Chuck Coker

By Chuck Coker

Don Whitaker

By Don Whitaker

Linus W

By Linus W

googletag.cmd.push(function() {
tablet_slots.push( googletag.defineSlot( “/1005424/_dPSv4_tab-all-article-bottom_(300×250)”, [300, 250], “pb-ad-78623” ).addService( googletag.pubads() ) ); } );

googletag.cmd.push(function() {
mobile_slots.push( googletag.defineSlot( “/1005424/_dPSv4_mob-all-article-bottom_(300×250)”, [300, 250], “pb-ad-78158” ).addService( googletag.pubads() ) ); } );

The post Weekly Photography Challenge – Panoramic Photos by Darlene Hildebrandt appeared first on Digital Photography School.


Digital Photography School

 
Comments Off on Weekly Photography Challenge – Panoramic Photos

Posted in Photography


How to do Landscape Panoramic Photography

28 Sep

Have you ever been somewhere with a great view and taken a picture with your widest lens, but wished you had an even wider one that could capture the whole scene?

That is how panoramic photography was born in the 1840s when the pioneer photographers started using Daguerreotype plates pieced together to form very wide-angle scenes.

01


This panoramic image showing San Francisco from Rincon Hill was photographed by Martin Behrmanx in 1851. It is believed that the panorama initially had 11 plates, but the original daguerreotypes no longer exists.

An image showing a field of view greater than that of the human eye, about 160° by 75° or an aspect ratio of 2:1, or larger may be considered panoramic.

Even thou there is specialized equipment for panoramic imaging, we still find ourselves using the same simple techniques of merging images together more than 150 years later, but now using digital cameras and photo merging software to achieve similar results.

This is a simple and beginner’s approach on how to create a panoramic image like this one:

02


This amazing view of The Dom Luís I Bridge in my hometown Oporto, Portugal, was created by merging four vertical images into a high-resolution panorama.

03


Shooting your panorama

To make sure you get good results in you panorama merging, it’s important to use Manual settings in you camera and try to have similar exposure, focus and white balance in all your images.

In this particular case, the images were photographed with a 20mm lens in a full frame camera body at f/16, 1/125th and ISO100. The focus was set to infinity and the white balance was set at 5500K.

It’s also really important to have at least 30% overlapping between images so that the software can have enough pixels to merge and make the blending seamless.

The more rigorous you are during the image exposure step, the more likely you are to have better results in your final image. The use of a tripod and a bubble level are recommended tools, but on a day with good light you might get away with handheld camera images, as long as you try to follow the horizon line or some reference points for the image overlapping.

The number of images you need depends on the field of view you want to cover, but always try to photograph more area than you need so you can crop after the merging process. Portrait or vertical images are usually a better option because they give a better height and therefore higher resolution to the final image.

Stitching your panorama

As for the stitching process, here are the basic beginner steps in Adobe Photoshop, but keep in mind that there is a lot of software options for this kind of editing that can be taken further with vertical, 360º or multi-row stitching which are a lot more complicated.

  1. Open Photoshop
  2. File > Automate > Photomerge
  3. Browse and select the images for the panorama
  4. Click the “Auto” option in the Layout area
  5. Click the “Blend Images Together” option
  6. Click OK to start the stitching process

You will end up with a final stitched image like this:

04


The layer masks are really helpful if you have moving objects, or difficult areas in your image that look weird after stitching and can be edited to enhance the blending.

Now you can flatten the image and just choose the best crop area for your panorama.

So, just add this technique to your bag of tricks and give it a try next time you spot a panoramic view.

googletag.cmd.push(function() {
tablet_slots.push( googletag.defineSlot( “/1005424/_dPSv4_tab-all-article-bottom_(300×250)”, [300, 250], “pb-ad-78623” ).addService( googletag.pubads() ) ); } );

googletag.cmd.push(function() {
mobile_slots.push( googletag.defineSlot( “/1005424/_dPSv4_mob-all-article-bottom_(300×250)”, [300, 250], “pb-ad-78158” ).addService( googletag.pubads() ) ); } );

The post How to do Landscape Panoramic Photography by Ivo Guimaraes appeared first on Digital Photography School.


Digital Photography School

 
Comments Off on How to do Landscape Panoramic Photography

Posted in Photography


World’s highest resolution panoramic photo is stitched from 70,000 images

03 Jun

A team of five photographers has created what they describe as the world’s highest resolution panoramic photograph by stitching 70,000 digital images together to create a 365 gigapixel photograph. Recorded using a Canon EOS 70D with the EF 400mm f/2.8L IS II USM lens on a 2x converter, the picture took 35 hours of shooting over the course of 15 days just to capture. Read more

Articles: Digital Photography Review (dpreview.com)

 
Comments Off on World’s highest resolution panoramic photo is stitched from 70,000 images

Posted in Uncategorized