RSS
 

Posts Tagged ‘Only’

7 Tips to Help When You’re Stuck with Only a Prime Lens

23 Aug

As a photographer you must have flip-flopped back and forth between prime and zoom lenses. “Should I choose a prime today, or a zoom for its advantages?” If you have not done this for a purchase, you must at least have read the numerous articles which weigh the pros and cons of each. But what about when you are stuck with a lens that is not ideal for an event? For the sake of discussion and for this learning opportunity, let’s choose the 50mm prime lens, which is one of the most popular and affordable primes, and is made for every camera body known to man.

Canon-EF-50mm-f1.8-STM-Lens.jpg

If something comes up that is unexpected, that’s a good thing! Not ideal if you don’t have a long enough zoom or wide enough lens, BUT it could be worse. What if you didn’t even have your camera at all? So stay upbeat and realize with some ingenuity you can overcome the confines of being stuck with a prime lens.

As a personal note: This tutorial was inspired by a real event in Guatemala. I had chosen my 50mm for a walk-around lens as it is light, and I wasn’t expecting much as I went out to get a cup of coffee. Well, with a caffeine buzz I climbed a hill, and at the top an ancient Mayan ritual of sacrifice was being conducted for the dead. Maintaining cultural sensitivity I knew that it would be totally inappropriate to get my lens in their face. It was pertinent to maintain my distance for respect.

1. Use shallow depth of field

Prime lenses are known for being sharp, especially when you close down your f-stop. Yet when you are confined, or have limitations about how close you can get, or how agressive you can come across as a photographer, using your lens creatively is important. Thus, you may sacrifice some sharpness, add a little chromatic aberration (CA), etc., but you will also get a different style of shot from a lens that inherently has focal length limitations. Go for bokeh.

001 F1.4 landscape resized from Lightroom (750px)

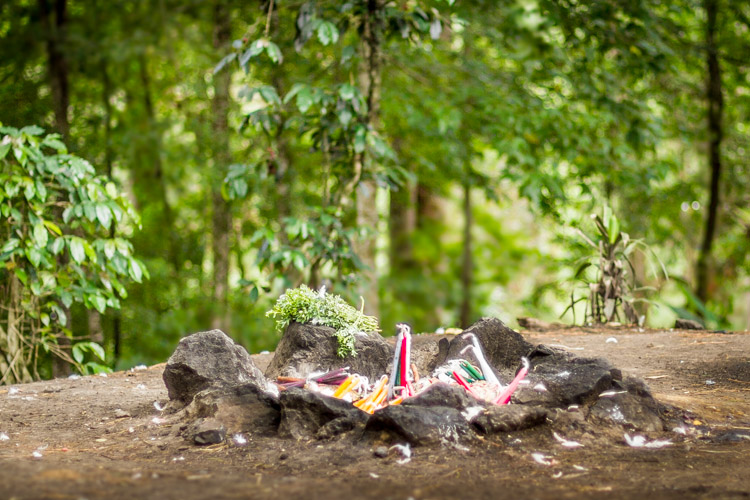
2. Panorama for wider angles

Use panorama techniques to combine images later in post-processing. If you can’t get a wide angle view, make one. Yes the feeling of the final composition will not be exactly the same as a true wide angle, as your foreground and background compression will be greater, but you will be able to give a cinematic effect. Combining images is an easy way to encompass more into your scene when you are limited by your focal length.

006 Panorama resized 1

These two images were combined to show the whole event of the shaman and the fire along with the family members.

3. Shoot with the intention of cropping

Be conscious that cropping is available to you in post-processing. Don’t worry if a hand creeps into your frame, or there is a plastic bottle in the corner. If you consciously shoot for a crop to be performed later you can zoom-in on something specific. This again gives you flexibility and diversity. If you combine this with a shallow depth of field (suggestion number one) you will find that you can achieve a telephoto effect.

003 Crop Before resized

003 Crop After resized

This image was shot for a crop, so cutting off the top of the head is not a problem if you know you will crop in closer in post-processing.

4. B-roll footage

Get photos of activities, reactions, or environmental surroundings which will add to the narrative of the event. If you can’t get any closer, and you have pushed your boundaries of being discreet, then look up, down, and turn around. In film (movies), these are generally called B-roll shots, which helps to transition from one camera angle to another, while also telling the story.

004 B roll resized

The smoke rising up, into the sun, amongst the trees, gives a feeling of the environment around the ceremony.

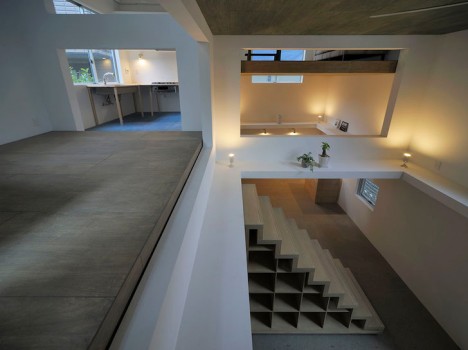
5. Frame your subject with something in the foreground

Use a leaf, a stone or even another person to cut into the frame, which will both highlight your subject, by leading your eye to what you want the viewer to look at, and it will also create layers in the photograph. Layers add a sense of style and depth to your photography. Trying to use different techniques to create different perspective styles will really improve the overall quality of the group of photos you finally decide to keep.

005 Layer resized

The gravestone, then the grandmother, and finally the fire give layers to the photograph.

6. Use both horizontal and vertical photographs

Again this is about creating diversity in a final product. So turn the camera sideways and you definitely have a different style going for you. Some people get stuck in horizontal mode, or in vertical mode. This is a great opportunity to make a change of pace. When your eye sees a photo it follows a pattern, generally starting in the top left corner then moving, left to right (just as you read) looking for areas of light, contrast, lines, color and patterns. A vertical photo will automatically create a different reading experience to the photo. Or why not crop them into a square even?

002 Verical resized

A simple vertical photo changes the pattern during your final composition. Think both horizontally and vertically.

7. Just enjoy the event

See the event not only through your camera, but also with your own eyes. Experience the event, and it will not only give you great memories, but will allow you to feel the mood as well. Understanding the event will give you insight into what out-of-the-box shot may really highlight the event.

Summary

The general idea is to work with what you have, don’t lament what you left at home. If you do, you might just start lugging around simply too much gear to enjoy yourself. Think of how to diversify your perspectives. By confining yourself (in this instance, when confines are placed upon you) there is great opportunity to use your most advantageous feature… your creative brain!

For most people, photography is a hobby turned passion, and enjoying photography should really be priority one. Photography is always a game of tradeoffs, which can be simply exemplified by the basic lesson of the exposure triangle. By gaining one thing you lose another. So begin gaining something even when you are stuck with just a prime lens.

Maybe we could say, you are challenged to be better at what you love!

googletag.cmd.push(function() {
tablet_slots.push( googletag.defineSlot( “/1005424/_dPSv4_tab-all-article-bottom_(300×250)”, [300, 250], “pb-ad-78623” ).addService( googletag.pubads() ) ); } );

googletag.cmd.push(function() {
mobile_slots.push( googletag.defineSlot( “/1005424/_dPSv4_mob-all-article-bottom_(300×250)”, [300, 250], “pb-ad-78158” ).addService( googletag.pubads() ) ); } );

The post 7 Tips to Help When You’re Stuck with Only a Prime Lens by Branson Quenzer appeared first on Digital Photography School.


Digital Photography School

 
Comments Off on 7 Tips to Help When You’re Stuck with Only a Prime Lens

Posted in Photography


All 7 Photography Deals are Back – But only until Friday!

09 Jul

Photography resources

It’s been another huge dPS mid year sale and we hope you’ve enjoyed it as much as we have sharing it with you.

Over 7 days, 7 amazing photography deals were released, 24 hours at a time.

But did you miss a deal you’d love to have?

Well, we’d like to give you one last chance before they’re gone for good (it’s about helping you with your photography, after all).

So until Friday, all 7 deals are back!

  • Deal #1: Living & Loving Landscapes ebooks – $ 10 each
  • Deal #2: 60% OFF Photography Concentrate’s Incredibly Important Composition Skills
  • Deal #3: 100 Hacking Photography Lightroom presets for $ 10!
  • Deal #4: Our Photo Magic ebook – just $ 7
  • Deal #5: 70% OFF Photoshop Artistry: Fine Art Grunge Composition course
  • Deal #6: Jay & Varina Patel’s Focus Collection – 50% OFF
  • Deal #7: Our Portraits ebooks $ 7… or 5 for $ 21!

This is the last time we’ll email you about this sale and we simply can’t extend the deals any further than Friday (they’re just too good).

So act quickly or you’ll miss out!

googletag.cmd.push(function() {
tablet_slots.push( googletag.defineSlot( “/1005424/_dPSv4_tab-all-article-bottom_(300×250)”, [300, 250], “pb-ad-78623” ).addService( googletag.pubads() ) ); } );

googletag.cmd.push(function() {
mobile_slots.push( googletag.defineSlot( “/1005424/_dPSv4_mob-all-article-bottom_(300×250)”, [300, 250], “pb-ad-78158” ).addService( googletag.pubads() ) ); } );

The post All 7 Photography Deals are Back – But only until Friday! by Darren Rowse appeared first on Digital Photography School.


Digital Photography School

 
Comments Off on All 7 Photography Deals are Back – But only until Friday!

Posted in Photography


Become a Composition Master with This Great Guide: 60% Off Today Only

03 Jul

Deal #2 in our massive Mid Year Sale has just gone live – and it’s a goodie!

Iics hero shot discount

Today only you get 60% off Photography Concentrate’s Incredibly Important Composition Skills.

For the next 24 hours and only $ 19.98 (an exclusive dPS price), you’ll get:

  • A comprehensive 225-page ebook — filled with everything you need to know to come away with a deep understanding of composition and the practical know-how to put it to good use
  • 7 bonus videos — looking at examples of theories and techniques and how they influence the look and feel of each photograph, to bring all the concepts covered together
  • A printable pocket field guide — with the most essential composition information laid out, for you to print out, fold up and slip in your camera bag

Check out the video on the Photography Concentrate site to meet Lauren, the author of this tutorial, and learn more about how Incredibly Important Composition Skills will totally transform your photography!

Composition

This deal is an unbelievable amount of value.

Especially because building your composition skills is one of the fastest and most lasting ways to transform the quality of your images.

You see, people view images in predictable ways. And when you discover these patterns, you can use them to your advantage to create photographs that best communicate your desired message.

So are you ready to become a master in composition and gain real skills that you’ll use in every single shot you take?

Head to Photography Concentrate to snap up this amazing deal!

No Risk: Your Satisfaction is Guaranteed

Your satisfaction with this deal is guaranteed. For a full 60 Days, and if you don’t feel like you have stronger composition skills you’ll get 100% of your money back with no questions asked.

googletag.cmd.push(function() {
tablet_slots.push( googletag.defineSlot( “/1005424/_dPSv4_tab-all-article-bottom_(300×250)”, [300, 250], “pb-ad-78623” ).addService( googletag.pubads() ) ); } );

googletag.cmd.push(function() {
mobile_slots.push( googletag.defineSlot( “/1005424/_dPSv4_mob-all-article-bottom_(300×250)”, [300, 250], “pb-ad-78158” ).addService( googletag.pubads() ) ); } );

The post Become a Composition Master with This Great Guide: 60% Off Today Only by Darren Rowse appeared first on Digital Photography School.


Digital Photography School

 
Comments Off on Become a Composition Master with This Great Guide: 60% Off Today Only

Posted in Photography


Like a Ninja: Tokyo Apartment is Only for the Nimble

12 Jun

[ By Delana in Architecture & Houses & Residential. ]

1 ninja house

A tiny 750 square foot apartment is definitely not a lot of space for two people, but this couple was lucky enough to find an exceptionally creative architect. This Tokyo home had a lot of room to grow vertically, so Hiroyuka Shinozaki Architects used floating floors and a series of stairs and ladders to create a spacious living area and studio.

2 open home layout ninja house

3 top floor unfinished space ninja house

The interior of the home is virtually free of walls and even features huge cutout areas in some of the floors. The architects named it House T, but the owners call it a “ninja house.” Their reasoning behind the name? The couple feels that they have to be as nimble as ninjas to navigate the innovative interior.

4 nimble interior ninja house

5 house t tokyo

Large hanging lights and the wide-open space fill the combination home/studio with bright, cozy light. Part of the space is largely unfinished, with plywood floors and very little furniture. It contributes to the austere yet homey feel of the apartment.

6 light filled open floor plan ninja house

7 nimble ninja house tokyo

In addition to the absence of walls, many of the home’s functions and features were built into the walls to maximize available floor space. A decent amount of storage is built into the home’s central set of stairs. While walking along ledges and tiptoeing around holes in the floor might not be for everyone, the pair who live in the apartment say that the unique layout – and the unusual way in which they have to navigate it – has made them healthier.

Share on Facebook


[ By Delana in Architecture & Houses & Residential. ]

[ WebUrbanist | Archives | Galleries | Privacy | TOS ]


WebUrbanist

 
Comments Off on Like a Ninja: Tokyo Apartment is Only for the Nimble

Posted in Creativity


Free Lenses For Everyone!TODAY ONLY

09 Mar

Whoa Nelly, we’re throwing in a free phone lens with every order TODAY ONLY (it’s March 9th 2015)!

Finally, a perfect excuse to pick up that goodie you’ve been eyeing. Perhaps you fancy one o’ these …

Browse a Few of Our Faves Below

Or, Grab a Free Lens Now
(…)
Read the rest of Free Lenses For Everyone!
TODAY ONLY (10 words)


© laurel for Photojojo, 2015. |
Permalink |
No comment |
Add to
TODAY ONLY”>del.icio.us

Post tags:


Photojojo

 
Comments Off on Free Lenses For Everyone!TODAY ONLY

Posted in Equipment


Food Photography – How to Shoot A Beverage With Only Two Lights

30 Jan

The wonderful thing about food photography is that you can easily turn your apartment, home, or garage into a studio. This image was shot for a local ice cream franchise that offers a different spin on the traditional root beer float. The set was constructed on a coffee table with common household items, and was lit with just two lights.

Final image with real ice cream

Final image

You might be thinking that the featured photo does not look like your normal, every-day root beer float, and you would be right. The ice cream pellets in the float were created by flash freezing ice cream mixed with liquid nitrogen.

Because the ice cream was made up of these small pellets, it melted quickly, leaving little time to get the “money shot”. To solve this problem, I created a stand-in cup that was filled with soda and mini marshmallows. This stand-in allowed me to tweak my lights while the ice cream was safely stored in an ice chest filled with dry ice.

Marshmallow stand-in

Marshmallows used as stand-in for ice cream, during set up phase.

Two pieces of white poster board were used to construct the set. One for the floor and one for the background. The background piece was attached to sections of PVC tubing, which were re-purposed from homemade DIY light panel frames. Small one pound dumbbells were placed on top of the PVC frame to secure it and keep it from moving around.

Whenever you photograph beverages, it is important to backlight them in order to show the transparency of the container and/or liquid. That is what makes soda, iced tea and beer ads look so delicious.

For this shot, I decided to achieve the effect by creating a really tiny pseudo-softbox behind the glass of root beer. I started by cutting a rectangular hole in the back of the poster board. Careful attention was taken to insure that the hole was large enough to cover the entire lower portion of the glass, while still being hidden from the camera’s view.

A small off-camera flash fitted with a radio trigger was then placed behind the background. Since the hole and glass were tall and narrow, the strobe was placed on its side, to match.

View from behind background

View of PVC frame and hotshoe flash with radio receiver. Notice how flash is placed on its side, vertically.

Next, a small sheet of frosted stencil paper purchased from a local hobby store was placed in front of the hole, to evenly diffuse the light across the opening. The translucent properties of the paper also created a soft falloff to the background, as if it were being lit from the front instead of the back.

frosted stencil paper

Frosted stencil paper was butted against the background, behind the glass, to evenly diffuse the light shining through the hole in the poster board. The sheet was moved so that the edges, logo and holes were not seen from the camera’s angle of view.

backlit root beer

First backlight test, before marshmallows were added.

Now that the liquid was backlit, we needed to add a light to illuminate the ice cream. To do this, a large piece of diffusion fabric attached to a PVC frame was placed just out of frame, towards camera left. A strobe light was then placed behind the panel. The diffusion fabric created a large source of illumination, which created a very soft transition from the highlights to the shadows.

float without backlight

Light shining through diffusion panel with back light turned off

Finally, an acrylic mirror was attached to a light stand and placed just out of frame, towards camera right. The mirror reflected and bounced some of the light from the large panel back into the shadows.

Before and After of Mirror Fill

Mirror fill: Before and After

setup view

View of entire setup.

The final image was shot using a Canon EF 100mm f/2.8 Macro lens. The camera was set to f/14 at ISO 100.

Final image with real ice cream

Final image using real ice cream.

With a little imagination and ingenuity you too can create professional looking food images on a budget, with minimal equipment. In fact, here are a few cheaper alternatives that could have been used to create the image above:

CFL or LED Light Bulbs

The wonderful thing about still photography is that your subject is “still”. This means you can use regular household bulbs to light your scene if you do not have the money for strobes. All you have to do is lower and adjust the shutter speed of your camera, since the bulbs do not emit as much light as a strobe or off-camera flash. Experiment with different bulb wattages, or try alternating the amount of bulbs to create different lighting ratios. Just make sure you have the bulbs placed behind some source of diffusion. By diffusing the lights, you will create a single large light source; otherwise, you will create multiple shadows and weird reflections from the various sources of light.

White Twin Bed Sheet

A white bed sheet is an inexpensive and great form of diffusion. You can attach it to a PVC frame or stretch it between two light stands using spring clamps. The sheets are also great for portrait work. Need a GIANT softbox? Try a king size sheet!

googletag.cmd.push(function() {
tablet_slots.push( googletag.defineSlot( “/1005424/_dPSv4_tab-all-article-bottom_(300×250)”, [300, 250], “pb-ad-78623” ).addService( googletag.pubads() ) ); } );

googletag.cmd.push(function() {
mobile_slots.push( googletag.defineSlot( “/1005424/_dPSv4_mob-all-article-bottom_(300×250)”, [300, 250], “pb-ad-78158” ).addService( googletag.pubads() ) ); } );

The post Food Photography – How to Shoot A Beverage With Only Two Lights by Joel Dryer appeared first on Digital Photography School.


Digital Photography School

 
Comments Off on Food Photography – How to Shoot A Beverage With Only Two Lights

Posted in Photography


4 Tips for Effective Lighting Using Only One Speedlight

19 Jan

Flashes

If the idea of incorporating flash into your photography work strikes fear in your heart, this is a must read article for you!

The ability to use a portable electronic flash can do wonders for your work by giving you more creative options, and the truth is you don’t need a ton of fancy equipment to begin utilizing flash. In fact, this article is focused purely on the speedlight, the Canon 580 EXII Speedlite to be exact (equivalent to the Nikon SB-900), and how you can get started experimenting with lighting effects using just one speedlight.

Among the smallest, most compact forms of external lighting, speedlights offer consistent, daylight-balanced lighting powered by four AA batteries. They are easy to fully integrate with your DSLR camera, allowing the two units to operate as one. While most speedlights offer manual settings, it is also easy to just leave it on auto (TTL) and let it adjust the light output according to your camera settings. Depending on what kind of camera you own, it might come with its own built-in pop up flash, but a speedlight is still recommended due to its ability to tilt and swivel, giving you more control over where the flash is aimed.

The following examples were photographed using a Canon 5D Mark III and a 580 EXII Speedlite. All included photographs were shot in auto (TTL) setting and received no retouching other than cropping and resizing.

Ambient Light Isn’t Always the Best Light

No Flash

While ambient lighting is often the easiest lighting source to use, it comes with its share of shortcomings. There might be too much or too little ambient lighting, it might be coming from the wrong direction, or it might have a strong color cast. To kick-off this example, let’s see how this Balinese mask photographs using just the ambient light available in the room (see image above). Notice that the colors are dull and the surfaces of the mask are unevenly illuminated. It’s a less than optimal photo, showcasing all of the shortcomings of relying purely on ambient lighting.

If you’re lucky, the ambient light might be able to be moulded using a reflector or simply moving your photo subject. But say you can’t control the ambient light? Here are some tips for using a speedlight in your favor.

Option 1: Shoot with the flash straight on

Straight On

The easiest way to use your speedlight is to aim it directly at your subject. The result is a decently lit subject, similar to the type of photo that a built-in pop up flash would produce. Notice how that colors pop more and the mask is more evenly lit compared to the photo shot in ambient light. However, aiming your flash straight forward can result in some harsh shadows, not to mention cause human photo subjects to be temporarily blinded by light flashing in their faces. It is also very non-directional light making the subject appear flat and lacking dimension.

Option 2: Bounce the flash off the ceiling or wall

Straight UP

Flash bounced straight up off the ceiling

The simplest way to soften the speedlight’s effects is to bounce the flash off of a nearby surface. In this case, the flash is aimed directly up at a white ceiling. When the flash is fired, the light is spread out onto the ceiling and reflected down on the subject. As a result, the front part of the mask from the eyes to the nose are nicely lit, but the mouth, ears, and ornamental headdress are left in the shadows. This is one of the pitfalls of simply bouncing the flash off the ceiling: the image will generally produce shadows on any protruding elements of your subject.

Bounce Off Wall My Left

Bounced of the wall to the left of the camera.

Alternatively, the flash can also be pointed directly at a nearby wall so the light is bounced in another angle. In the above example, the flash was bounced off a white wall to the right of the mask. The result is more dramatic lighting that focuses on one side of the mask, using the shadows to indicate more depth.

Option 3: Use the built-in white bounce card


Straight Up with Whitecard

To solve the problem of shadows produced by bouncing the light off the ceiling, one solution is quite simple. Keep the speedlight pointed at the ceiling, and simply pull up the thin white bounce card that is built into the top of the flash. When the flash is fired, the light not only bounces off the ceiling, but a portion of it is also reflected off the bounce card, as seen in the catchlight of the mask’s eyes.  The resulting image is much more evenly illuminated, all thanks to a thin piece of plastic. However, the eyes do reflect quite a bit of the spilled light from the ceiling.

Option 4: Use a white flash diffuser cap on your speedlight

Flash Cap copy

When it comes to flash modifiers for speedlights alone, there are a ton of options to choose from. One of the most effective modifiers is also incredibly compact and cheap: a translucent white cap or box that fits snugly on your flash. It helps to evenly spread out the light to eliminate harsh shadows. In this case, the diffuser cap was attached to the flash which was pointed directly up at the ceiling. The effect is similar to using the built-in white bounce card in Option 3, but the light is more controlled. The evidence is strongest in the mask’s eyes, which now only have the catch light and not the spilled light bounced from the ceiling.

This is just a very basic introduction to flash photography with a speedlight, intended to simply demonstrate how adding a single external flash can produce dramatically different results. What is your take on flash photography? Do you prefer natural light, speedlights, or strobes?

googletag.cmd.push(function() {
tablet_slots.push( googletag.defineSlot( “/1005424/_dPSv4_tab-all-article-bottom_(300×250)”, [300, 250], “pb-ad-78623” ).addService( googletag.pubads() ) ); } );

googletag.cmd.push(function() {
mobile_slots.push( googletag.defineSlot( “/1005424/_dPSv4_mob-all-article-bottom_(300×250)”, [300, 250], “pb-ad-78158” ).addService( googletag.pubads() ) ); } );

The post 4 Tips for Effective Lighting Using Only One Speedlight by Suzi Pratt appeared first on Digital Photography School.


Digital Photography School

 
Comments Off on 4 Tips for Effective Lighting Using Only One Speedlight

Posted in Photography


Easy Peasy Photoshop Actions – 71 Super Premium Actions for Only $24

18 Dec

You have heard of Inky Deals which is one of the leading deals websites in the design community, with an extended family of more than 300,000 design enthusiasts. They’re the only ones who offer a 200% money back guarantee on every product. This means that if you’re not happy with it, you get your money back and you also get Continue Reading

The post Easy Peasy Photoshop Actions – 71 Super Premium Actions for Only $ 24 appeared first on Photodoto.


Photodoto

 
Comments Off on Easy Peasy Photoshop Actions – 71 Super Premium Actions for Only $24

Posted in Photography


78% Off Ed Verosky’s eBook Bundle (or His New Macro Ebook for just $7): Today Only

13 Dec

As we announced yesterday – today is Day 1 in our 12 Days of Christmas dPS promotion – and we’re kicking things off with a cracker of a deal!

The Deal

Today’s deal has two options:

1. 53% off Ed Verosky’s new Introduction to Close-Up and Macro Photography. Today is is yours for just $ 7.

OR

2. Ed’s entire 9 eBook Bundle with Bonus Mini-Guide for a whopping 78% off the regular price. That’s 9 eBooks on everything from Flash Photography, to Portraiture, to the Basics of DSLR and much more. They’re all yours today for just $ 29 (or just $ 3.20 per eBook).

Shareable day1

Ed Verosky will be no stranger to many dPS readers as we’ve featured his work as a guest author numerous times. See his latest guest post on Macro Photography here.

In previous years of our 12 Days of Christmas his eBooks have been among the most popular we’ve ever featured but as he’s just launched his new Macro Photography eBook we invited him to come back.

Don’t Miss This Deal: It’ll be Gone in Less than 24 Hours

So whether you’ve got all his other eBooks and just need the new one for the crazy low price of $ 7 (normally $ 15) or whether you’re new to Ed’s work and want to pick up his whole bundle of 9 eBooks for just $ 29 (normally $ 135) – todays deal is for you.

Need more information on what’s in todays deals? Check them out here.

But don’t forget – this deal lasts for 24 hours only so grab yours today.

Screen Shot 2014-12-13 at 1.43.52 pm

googletag.cmd.push(function() {
tablet_slots.push( googletag.defineSlot( “/1005424/_dPSv4_tab-all-article-bottom_(300×250)”, [300, 250], “pb-ad-78623” ).addService( googletag.pubads() ) ); } );

googletag.cmd.push(function() {
mobile_slots.push( googletag.defineSlot( “/1005424/_dPSv4_mob-all-article-bottom_(300×250)”, [300, 250], “pb-ad-78158” ).addService( googletag.pubads() ) ); } );

The post 78% Off Ed Verosky’s eBook Bundle (or His New Macro Ebook for just $ 7): Today Only by Darren Rowse appeared first on Digital Photography School.


Digital Photography School

 
Comments Off on 78% Off Ed Verosky’s eBook Bundle (or His New Macro Ebook for just $7): Today Only

Posted in Photography


Inky’s Giga Bundle: $4,816 Worth Premium-Quality Resources for Only $69

11 Sep

Do you remember InkyDeals? We tell you about them every time they have some amazing design and photography deal worth sharing. This time InkyDeals came up with Giga Bundle that includes vector illustrations, t-shirt designs, high-quality textures, Photoshop brushes, video tutorial for creating an old retro-style countdown timer, and 9 responsive premium Bootstrap 3 templates. Awesome Deal For Photographers As Continue Reading

The post Inky’s Giga Bundle: $ 4,816 Worth Premium-Quality Resources for Only $ 69 appeared first on Photodoto.


Photodoto

 
Comments Off on Inky’s Giga Bundle: $4,816 Worth Premium-Quality Resources for Only $69

Posted in Photography