RSS
 

Posts Tagged ‘Next’

Ambassadorship and $24,000 of kit up for grabs in broncolor’s Gen Next contest

21 Jan
Picture by David Sheldrick, one of the winners from last year’s contest

Broncolor is looking for its next generation of young ambassadors and has opened the entry process for this year’s Gen Next contest. The competition is aimed at flash users between the ages of 18 and 30 who inspire the judges and who represent what they see as the next generation of photographers. Winners will receive $ 24,000 worth of broncolor flash equipment and will have their photography promoted for two years through broncolor’s activities around its ambassador program.

The contest has been running for three years already and on each occasion the company has picked five young photographers to promote. Submissions should include three images that involve some use of flash, though the company doesn’t specify that its equipment has to have been used. As ambassadors the winners will be required to actively promote their use of the broncolor equipment that they won, and will be expected to produce posts for the broncolor blog – but they will also get 20% off purchases and free loans for approved projects.

Entry closes on 6th March. For more information see the broncolor Gen Next website.

Press release

The Gen NEXT program from broncolor seeks young photographers with exceptional talent and creative vision to become Gen NEXT Ambassadors.

For a chance to become a Gen NEXT ambassador, share three of your most inspiring images to the official contest website at gennext.broncolor.com. The contest is open to image makers worldwide, between the ages of 18 and 30, looking to push their career to the next level. Entries are accepted between January 16th and March 6th, 2017, with winners announced the following month by April 26th.

Selected winners will be named as Gen NEXT ambassadors and outfitted with $ 24,000 (USD) of broncolor equipment. For the next two years, their work and journey as growing photographers will be featured on the Gen NEXT website. With stunning images, behind-the-scenes content, and insight on the photographer’s artistic decisions, Gen NEXT gives an inside look at the creative growth, while promoting the ambassadors’ work to broncolor’s global audience.

First launched in 2014, Gen NEXT features 15 outstanding young photographers representing a wide range of interests in the world of image making. Through their impressive work, the current Gen NEXT ambassadors have already received considerable worldwide attention and continue to lead the way with inspiring images.

First Generation
Gen NEXT ambassadors from the inaugural 2014 group of five include Benjamin Von Wong (CAN), Dustin Snipes (USA), Jason Jia (CHN), Lara Jade (USA) and Manuel Mittelpunkt (GER).

Second Generation
Gen NEXT’s 2015 group features Anita Anti (UKR), Cristina Otero (ESP), Gonzaga Manso (ESP), Lauri Laukkanen (FIN), and Yulia Gorbachenko (UKR).

Third Generation
The latest group from 2016, adds five more ambassadors; David Sheldrick (UK), Jvdas Berra (MX), Justin Lister (USA), Lara Zankoul (LB), and Natalia Evelyn Bencicova (SK).

To find out who will follow in their footsteps, stay tuned on gennext.broncolor.com and on our social media channels Facebook, Instagram, Twitter & YouTube.

Welcome to the future of photography. Welcome to broncolor Gen NEXT.

Articles: Digital Photography Review (dpreview.com)

 
Comments Off on Ambassadorship and $24,000 of kit up for grabs in broncolor’s Gen Next contest

Posted in Uncategorized


Buying a second lens: what lens should I buy next?

15 Jan

Why do I need another lens?

So you’ve just bought your first interchangeable lens camera? That’s excellent. Whichever camera you’ve bought, it’s likely to be able to support you in taking some great photos. Your camera probably already came with a lens and it’s likely to be totally fine, so why would you need to buy more?

Essentially, the different lenses can extend the kinds of photographs you’re able to take. Different lenses can allow you to take better photographs of different subjects or in different circumstances. It’s all a question of what you want to shoot.

What are the options?

At first glance, looking at additional lenses can be daunting: there are lots of options, their names appear to be written in an obscure code and it’ll quickly become apparent that seemingly small changes in these numbers can equate to a vast difference in price.

An important thing to remember is that you don’t need a ‘complete’ set. So don’t worry about that huge pile of lenses that probably appears on the camera maker’s website or in the back of the sales catalogue; you’re not going to need to buy them all.

You don’t need to collect them all. Most people will only benefit from having a couple of these lenses. The question is: ‘which ones are right for you?’
Image courtesy of Canon

Your specific interests and photographic style will dictate which lenses you need (or, at least, want). And, though there’s always some risk that your photography gets shaped by which lenses you have and haven’t got, there’s nothing that says you need lots of lenses to achieve everything you want to achieve.

The effect of focal length (and aperture) depends on the sensor size you mount it in front of. We’re only going to discuss general classes of lenses in this articles, not specific examples.

The two main properties of a lens are its focal length/s (which defines the view of the world it gives) and the maximum aperture value/s (which defines how much light it can let in). Here’s what different focal lengths look like on a Full Frame camera, shot from the same position:

21mm 24mm 28mm 35mm 50mm 85mm 100mm 200mm

Prime and zoom lenses

Most common lenses, including the ‘kit’ zoom that probably came bundled with your camera are zoom lenses. These have complex mechanisms that allow them to offer a range of focal lengths, meaning they can be zoomed in and out to change the magnification of your subject and what you include or exclude from your image. Zooms are highly flexible.

A zoom lens will list the widest and longest focal lengths it offers (eg 18-55mm), and will also list how wide and bright the aperture can go, first at the widest focal length, then at the longest (eg F3.5-5.6), the lower the number, the more light it can let in.

The alternative to zooms are prime lenses. These only offer a single focal length: the lens can’t been zoomed in or out. Why would anyone want such a restrictive lens? From a practical perspective, it’s easier to design a prime lens with good optical performance and a bright maximum aperture, to let in lots of light, since the design only has to do one thing. And, from a creative perspective, many photographers find a prime lens forces them to consider the composition of their images more carefully.

What’s a telephoto lens?

Although the term has a specific meaning, most people use ‘telephoto’ lens to mean anything longer than about 50mm equivalent. Essentially, anything significantly more ‘zoomed-in’ than looking at the world with the naked eye.

Telephoto lenses with long focal lengths can make your photos seem closer to the action, so they lend themselves particularly well to wildlife and sports photography.

Many camera brands offer a telephoto zoom lens that can be bought as part of a ‘twin lens kit’ when you buy the camera. Like your standard kit zoom, this is likely to be an F3.5-5.6 variable aperture lens. Like your kit zoom, this will be perfectly effective in a lot of situations but won’t necessarily be the sharpest lens or the most effective as the light starts to fall.

A short to moderate telephoto lens can be perfect for portrait shooting.
Photo by Dan Bracaglia

Telephoto lenses can be used for all sorts of things. Short to moderate tele lenses are great for portraiture, allowing you to stand a sensible distance from your subject while including your subjects head or head and shoulders. Longer telephoto lenses can be ideal for various types of sports shooting, and super-long telephotos tend to be specialist lenses for birding.

If your budget will stretch to it, the best quality telephoto zooms tend to be the ‘constant aperture’ models, which maintain the same F-number throughout their zoom range. 

If you find that the long end of your kit zoom doesn’t get you close enough to the action, it’s worth looking into a telephoto lens.

What’s a wide-angle lens?

As you can probably deduce, wide-angle lenses are the opposite of telephotos: they are lenses with short focal length that offers a wider view than you see with the naked eye.

Wide-angle lenses let you capture a wide field-of-view, making them ideal for landscape work or shots that give a dramatic perspective on the world.

These lenses can be used for all sorts of landscape and environmental photography and can lens a dramatic effect to your images. If you often find yourself shooting at the widest setting on your kit zoom and backing away from your subject, you might find a wide-angle lens is a good first choice.

What’s a macro lens?

Macro lenses are specialist lenses that are designed so that they can focus very close-up, enabling high magnification photography. These are especially popular with photographers who want to shoot insects, flowers and other small, fine detail.

Macro lenses allow you to shoot small objects close-up.
Photo: Wenmei Hill

If your kit zoom refuses to focus and your chosen subject always ends up looking tiny in the frame, it might be worth looking more closely at a macro lens.

What about your kit zoom?

A common mistake is to assume that because you already have a zoom that covers the moderate-wide to moderate-tele range, there’s no need to buy a new lens in this range. Actually, the opposite may be true.

Kit zooms let you to go out shooting, the moment you open the camera box but they’re often built to very low cost. This can mean patchy optical performance and slow maximum apertures that can limit your camera’s low light capability and little opportunity to shoot with shallow depth-of-field.

‘Normal’ lens shows approximately the view you see with the naked eye: neither zoomed-in nor zoomed-out. They’re great for capturing the world around you, so you may find it makes sense to buy a sharper or brighter lens that covers the same range as your kit zoom.
Photo by Dan Bracaglia

For many people, the ‘normal’ range covered by the kit lens ends up including the focal lengths that are most often useful, so there’s an argument for buying a better lens to replace or augment your kit zoom. For instance, many companies make relatively inexpensive prime lenses in this region that have a brighter maximum aperture than the kit lens. These can provide a first taste of shallow depth-of-field and are ideal for low light work. 

The prime lens used here gives more ability to blur the background than the zoom lens that comes kitted with most cameras.

Alternatively, companies such as Sigma, Tamron and Tokina make constant F2.8 zooms that are often sharper and more versatile than the lens that came in the box.

Get out there and try it

If you’re worried about whether you’ll find it useful, try renting a copy before you buy. Alternatively, search around for second-hand options (though this often entails doing increased research to ensure no nasty compatibility surprises).

Whichever choice you make, it can take some time to adjust your minds-eye to ‘see’ the photos that your new lens will let you take. Give it some time, keep shooting with it and you’ll find you start to get an almost instinctive feel for a new angle-of-view.

And, even if you change your mind, a good lens will tend to retain a good portion of its value if you look after it, so you can always sell up and try again, if your mood or style changes.

Articles: Digital Photography Review (dpreview.com)

 
Comments Off on Buying a second lens: what lens should I buy next?

Posted in Uncategorized


10 More Photography Tips to Help Take Your Images to the Next Level

12 Jan

A while back I wrote an article that was quite popular: 10 photography tips to take your photography up a level. In this article, I bring you 10 extra tips from all aspects of photography. Enjoy!

10 More Photography Tips to Help Take Your Images to the Next Level

#1 – What’s more than meets the eye?

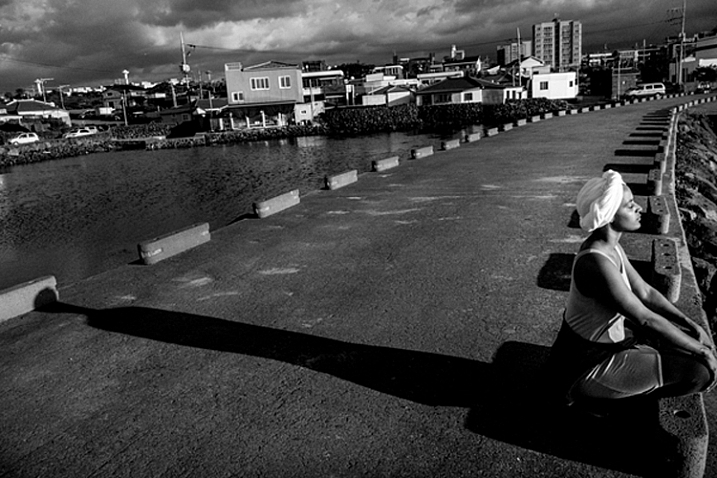
Let me ask you something, what would you do? You meet someone attractive, you are head over heels, and then you start actually talking to them. You then uncover the most superficial person you have ever met. That person is all looks and not much else. You would lose interest, right? Because looks by themselves are good enough to make you interested, but if there is nothing sustaining that interest, you’re gone. This is the same thing in Photography,

This is the same thing in photography. A beautiful composition is nice, but what is in your image that is designed to keep the viewer’s attention? What is it about your image that is more than meets the eye? Is it saying something deeper? Is it making a point? Showing a concept? Add meaning to your images to keep the viewer engaged.

#2 – Know your opportunity

I believe there are only four times when you control the image. The first is at the moment of exposure (when you shoot), the second is in post-processing, the third is in sequencing and editing, and the fourth is while printing. So, when shooting, have these things in mind in order to shoot with clarity.

Example, you shoot an image and it is overexposed (because of the camera’s limitation). But it doesn’t end there as you know that you have another opportunity in the post-processing phase to recover details. Or you shoot something with a nice texture but it doesn’t have the effect you want. It doesn’t end there, you know that you can print and blow it up real big to have the effect you seek. Or you shoot an image that can’t stand by itself. Once again it doesn’t end there, you know you have another similar image that can make a diptych.

The point is that making an image is only the first step. There’s a whole process that comes afterward when you can get the effect you desire. So it’s important to know that what you have in the camera is the starting point and not the end.

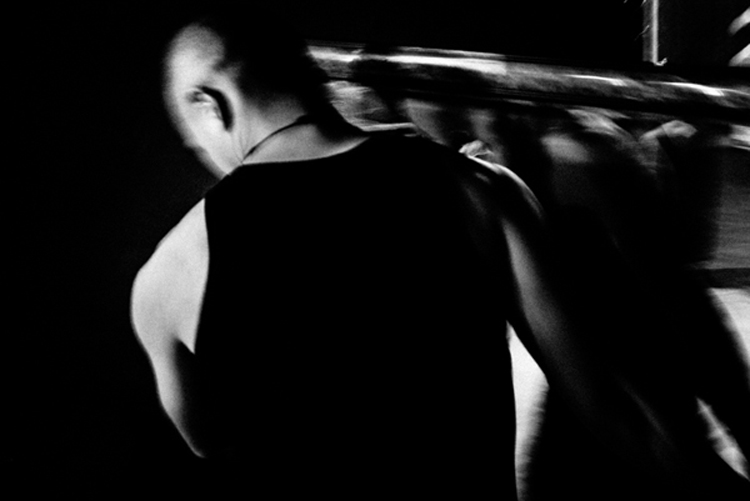
#3 – Pay attention to this detail (after your background)

10 More Photography Tips to Help Take Your Images to the Next Level

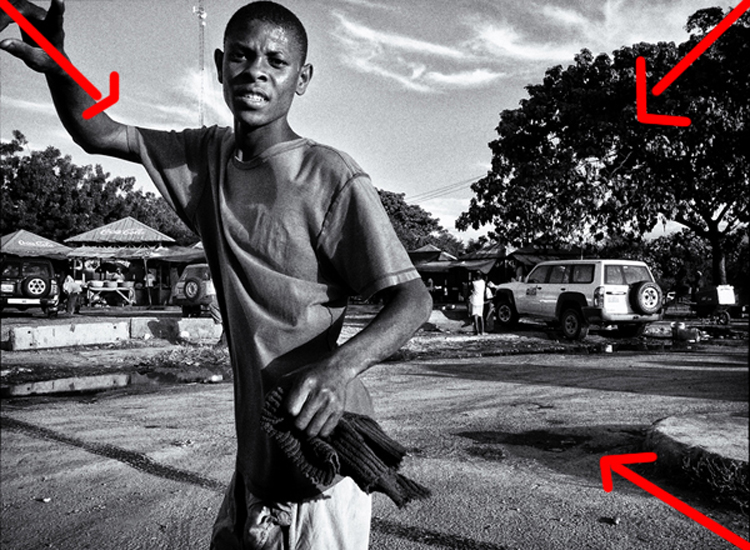
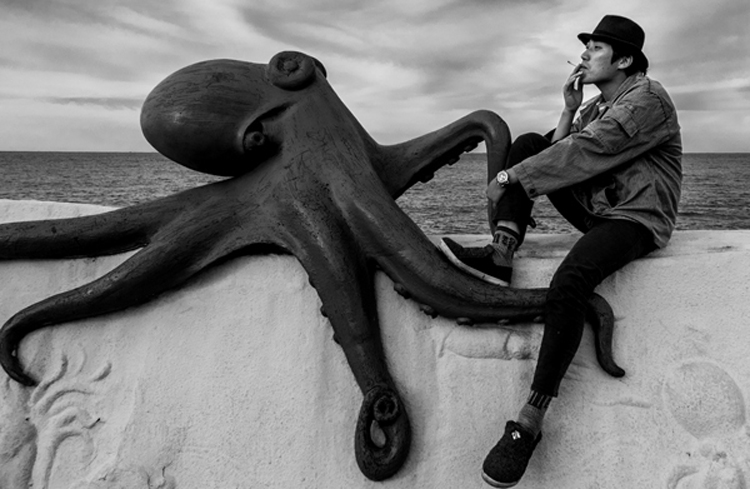
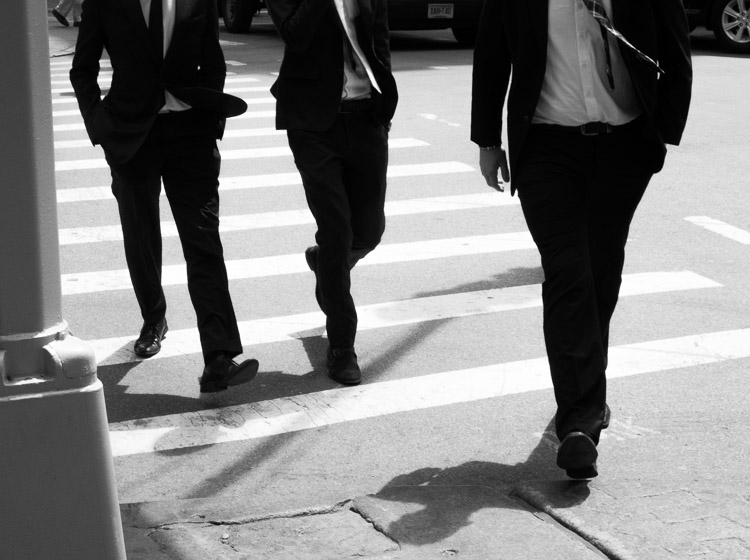
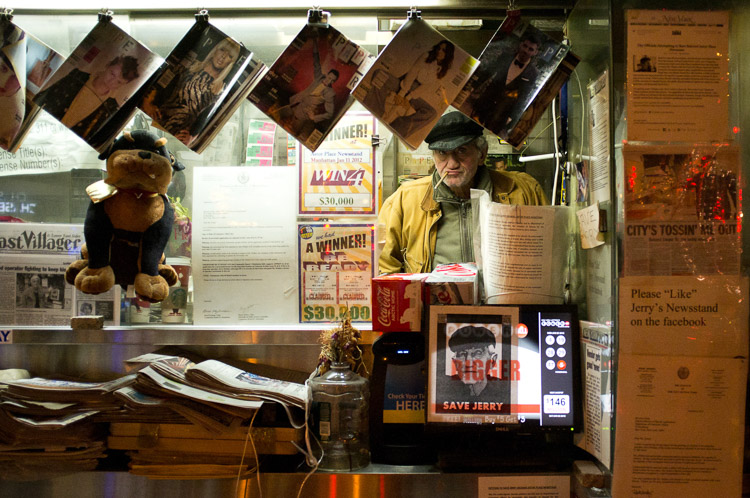
In the first 10 tips article, I suggested that you pay attention to the background first. Now I would like to add another thing to pay attention to before your subject – the corners. You see there is a strong dynamic with the corners, they draw you into the frame, towards the dead center and if you can align some lines there, it’s like surfing a big wave, it just draws your eye even more!

In the image above we have the guy’s hands, the shape of the tree and the shadow on the bottom right corner just pulling you into the image. So, pay attention to your background, watch your corners, and then look at your subject.

#4 – Dennis Rodman-ize it

10 More Photography Tips to Help Take Your Images to the Next Level

Let’s face it, it’s hard to get attention in this ever increasing attention deficit world. Dennis Rodman had been in the NBA for years, but he was receiving few endorsement contracts. He was a good player but didn’t shine enough. Then came the Rodman with the crazy hair and style, even as a kid I knew his name because he simply looked different.

That brings us to photography, you are probably doing something a certain way, so can you Dennis Rodman-ize it? Shoot in a different way that makes your work pop above and beyond what you normally do? For example, landscapes are usually shot with a wide angle, what if you shot landscape abstracts with a telephoto? Or used a special processing technique on your images that gave them a certain look?

#5 – Work on your name

You probably know the wine experiment, where they gave people wine to drink, one was expensive and the other was cheap. Everyone, of course, preferred the expensive wine over the cheap one, even if it was the same wine. Here’s the REAL KICKER, when they scanned the brains of the people who drank the wine, their brain actually made them believe they were drinking expensive wine, and it literally tasted better. Their perception altered their reality.

10 More Photography Tips to Help Take Your Images to the Next Level

With that in mind, work on your images but also on your name or brand. Try to get as much recognition as you can, it will alter people’s perception of your work. I remember a photographer who had decent work, and then that person got famous literally overnight. Let me tell you, even I, knowing all that I know about psychology, now see his work in a better light.

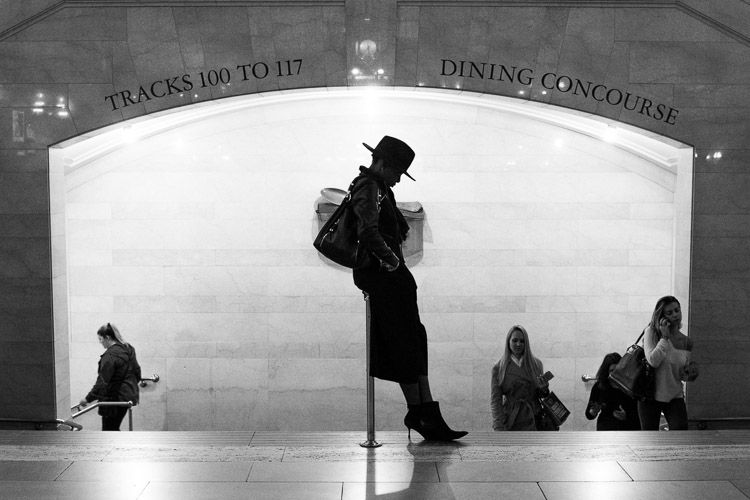
It’s crazy, and probably a bit sad, but that’s just the way it is. The story of Joshua Bell also illustrates this point well. This guy makes $ 1000 per minute playing on a million dollar violin, yet he got a meager $ 32 and a few cents when they had him play anonymously in a metro. Same guy, same skill – different context, different result.

#6 – Get luckier

Let’s not mince words here, luck plays a big role in photography. That Cartier-Bresson shot of the man jumping? That was 100% luck because he couldn’t even see what he was shooting through a hole.

Why is luck such a big deal? Because you DO have to be there at the right moment, and so does your subject, the light, etc. Truth be told, you need the skill and the eye to seize the moment, but if you are not there, the shot won’t be yours.

10 More Photography Tips to Help Take Your Images to the Next Level

So taking into account the luck factor, shoot more often. You’ll get luckier and luckier every time you do. By making more photo opportunities, you’ll be making more images. So if you used to go out once, go out twice, etc.

I mean, who do you think will have a better chance at getting a job? The one that applies for one job, or the one that applies for 10? Skill and creativity are multiplying forces, but it doesn’t matter how skillful you are if you are a couch potato. Sharpen your skills and get out there to get lucky.

#7 – Scramble everything

There was this cool experiment where they gave this guy upside down glasses, so everything was inverted. They wanted to pour him a drink, and he turned the cup upside down (because he believed it was upside down). Imagine the world upside down and how hard it would be to live like that. The kicker? After 10 days he adapted to the upside down vision, and could even ride a bike!

10 More Photography Tips to Help Take Your Images to the Next Level

Sometimes we just get used to how we shoot, we get complacent, that’s normal. So scramble things up. If you normally shoot color, try b/w, if you like portraits try street photography, if you are a film shooter, try digital, etc. It’s like the “Dennis Rodman-ize” tip, but this is more designed to shake you out of complacency rather than to bring attention to your work.

#8 – Revisit your images
10 More Photography Tips to Help Take Your Images to the Next Level

Two photographers can look at the same scene, and yet see two different things. The difference is their knowledge about photography. You probably have some hidden gems in your images that you’ll probably never uncover if you do not revisit your images. You made them, but when you revisit them you do so with new eyes, and you will see them differently.

You will be amazed at what you find. Images that you believed were boring and/or ruined will be seen in a new light. You may ask yourself, “How did I miss that?!? There are quite a few images that I have overlooked, that’s why I have a no-delete policy. Maybe I can’t see what my future self will see or what my future self will be into.

#9 – Let go of preconceptions

10 More Photography Tips to Help Take Your Images to the Next Level

I receive emails daily from photographers around the world. The one thing many seem to struggle with is that they don’t live in a big city. It is understandable, but just because you can’t find the images you have in your mind doesn’t mean they are not there. You just need to let go of your preconceived ideas and be more open to what is in front of you.

Some people tell me they wish they had more money to travel. Evidently, the image in their mind is of travel, but an image doesn’t need to be travel photography to be good, does it? It’s good to have a general idea of what you want, but also to be open to the possibilities.

Some people get hung up on relationship breakups, passing by great, if not better opportunities in front of them. Likewise, seeing what is possible right in front of us allows us to maximize our opportunities as photographers.

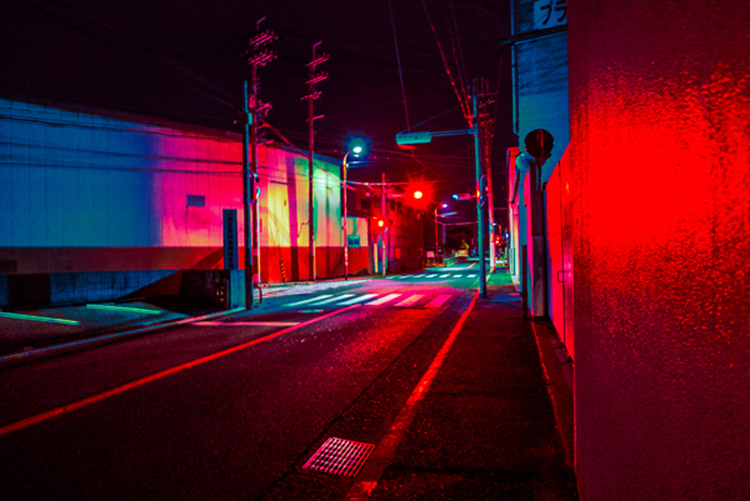
#10 – Remember it’s all plastic

10 More Photography Tips to Help Take Your Images to the Next Level

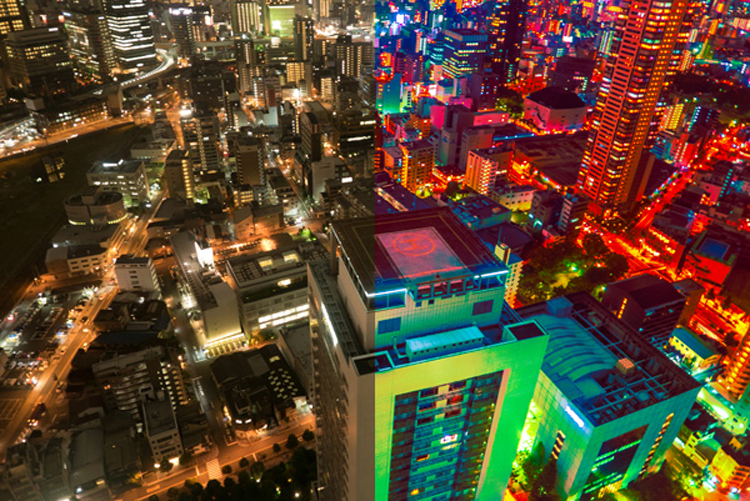
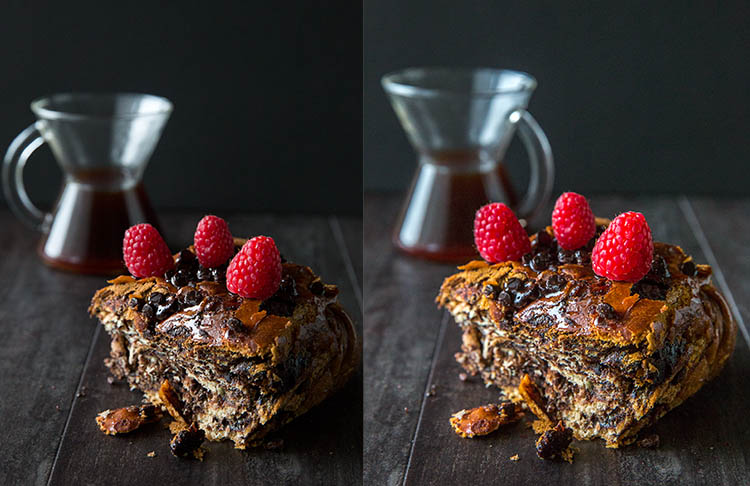
It’s a hard concept to grasp, especially as a beginner, but remember that photography is plastic. Exposure? Plastic. Colors? Plastic. White Balance? Plastic. Sharpness. Who said every image needed to be averagely exposed, with white balance set perfectly by grey card, and super sharp? The first thing I do as a photographer in Lightroom is to clip my blacks. I LOVE clipping my blacks. I never set my white balance with a grey card, I just look at the image and hear what it creatively calls for, then do that.

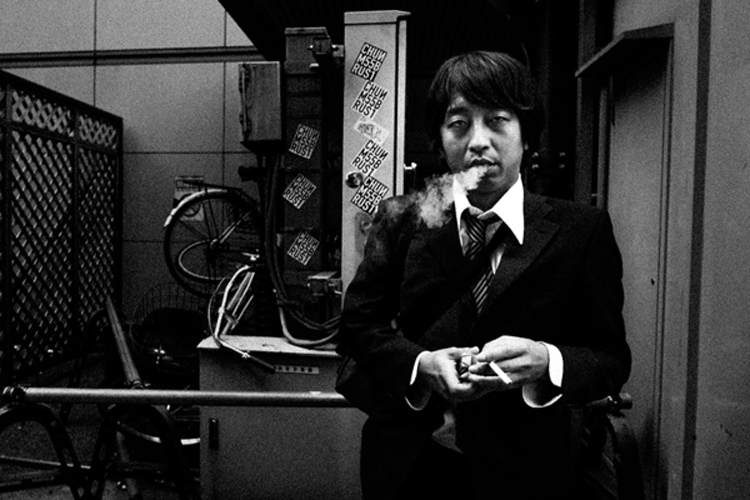
Photo of a bride and groom? Probably needs to be on the warmer side so that the viewer can get some emotional cues from that. Shot these plastic surgeons? I’ll put my white balance on the cool side to reinforce the surgical cleanliness. Whatever you are doing right now, remember all of it is plastic. Who said images needed to be in a square or rectangle? Who said portraits have to contain faces? Who said colors had to be realistic (see above)? Who said paper and canvas was the only printing options…..you get the gist!

Conclusion

There you have it, 10 more photography tips to help you in your photography journey. I hope you resonate with some of them. Be yourself, stay focused and keep on shooting.

10 More Photography Tips to Help Take Your Images to the Next Level

googletag.cmd.push(function() {
tablet_slots.push( googletag.defineSlot( “/1005424/_dPSv4_tab-all-article-bottom_(300×250)”, [300, 250], “pb-ad-78623” ).addService( googletag.pubads() ) ); } );

googletag.cmd.push(function() {
mobile_slots.push( googletag.defineSlot( “/1005424/_dPSv4_mob-all-article-bottom_(300×250)”, [300, 250], “pb-ad-78158” ).addService( googletag.pubads() ) ); } );

The post 10 More Photography Tips to Help Take Your Images to the Next Level by Olivier Duong appeared first on Digital Photography School.


Digital Photography School

 
Comments Off on 10 More Photography Tips to Help Take Your Images to the Next Level

Posted in Photography


Household Items to Bring to Your Next Food Photography Shoot

03 Jan

One of the most common assumptions about food photography is that hardcore food styling techniques must be involved to make dishes more visually appealing. In fact, there are professional food stylists who will employ all sorts of techniques to transform a dish into an inedible, yet highly photo-worthy subject. However, food styling techniques can also be very simple and accessible. Below is a list of common household items that can also help you out on your next food photography shoot.

Tweezers Food Styling Tips for Photography

For Keeping Food Clean

Tweezers

It’s pretty much inevitable that a plate of food will have quite a few moving parts that can easily fall out of place. While the Spot Healing Brush in Photoshop can make crumbs or blemishes disappear in post-production, it’s best to remove those bits and pieces from the dish before your shot is taken. This is where a pair of tweezers comes in. Use them to rearrange food on a plate or reach down into a deep glass or bowl to make adjustments.

Tweezers Food Styling Tips for Photography

These crumbs could have been easily removed with tweezers, or removed in post production.

Cotton balls

Besides being used to soak up pools of excessive liquid that might gather on a dish, cotton balls are also great for propping up food. Stuff one or two behind a piece of food to give it some leverage and height. Since they’re small and absorbent, the cotton balls can easily hide and blend into a dish so it’s not obvious they’re being used.

Q-tips

Serving a similar purpose to tweezers and cotton balls, Q-tips (cotton swabs) are important for small touch ups. Use them dry or dipped into some rubbing alcohol to remove small blemishes from a dish and you’ll save yourself some valuable time in post-production. Which leads me to my next point…

Rubbing alcohol

Throughout a food photography shoot, your props and gear are bound to come into contact with some morsels of food. Bring a small bottle of rubbing alcohol to keep your gear clean, and even consider keeping some hand sanitizer nearby to clean your hands after rearranging plates of food.

Highly absorbent paper towels

If it’s not already obvious, all of the food styling tools listed thus far have to do with cleaning and touching up dishes before they’re photographed. This tool is the last of the cleaning sort and is useful not only for wiping dirty hands after styling, but also for absorbing liquid from juicy meats, iced drinks, or other plates of food that are a touch too wet.

For Keeping Food Fresh

Food Styling Tips for Photography

Using a spray bottle filled with water was essential for keeping the shine on these saucy chicken wings.

One of the biggest challenges for food photographers is to shoot dishes while they still look appetizing and edible. These tools will help restore shine and luster to dishes to imply freshness.

Nonstick cooking spray

Restore a bit of shininess to a dish and help it reflect light better by adding a bit of nonstick cooking spray. Be very careful, however, as a spray that is too strong might dishevel parts of your dish.

Spray bottle filled with water

This serves the same purpose as the nonstick cooking spray, but in a slightly more controllable manner as you can often shift the nozzle of a spray bottle to emit a smaller or larger stream of water.

Eye-dropper

When you need ultimate control over liquid application, it’s best to use an eye-dropper instead of a spray bottle or nonstick cooking spray.

For Applying Creative Touches

After using the above tools to perfect the details of your photo subject, it’s time to focus on two other factors that can take your photo to the next level; light control, and selecting a creative background.

Tin foil (or a large metal baking sheet)

Depending on your preferred camera tools, you may already have a reflector in your food photography kit. If you don’t have a reflector, you can use a sheet of tin foil or a metal baking sheet. If you use tin foil, you have the added bonus of being able to use smaller pieces and mold them.

Food Styling Tips for Photography

On the left: shot without a reflector; on the right: shot with a reflector to the right of the food.

Baking parchment paper

In photography, baking parchment paper can serve a couple of purposes.

First, it can be used as a cheap alternative to a diffuser (light modifier) to soften the light aimed at your subject. Simply tape a sheet of parchment paper to a window where sunlight is shining through. The resulting light will soften considerably, reducing the shadows and glare on your food subject.

Another way to utilize parchment paper is as a photography background or surface. Try plain parchment paper for a white surface, or the brown version for a different color option.

Food Styling Tips for Photography

Parchment paper can add a different texture and color to your photo subject.

Gift wrap

Since we’re on the subject of photography surfaces, gift wrap is another affordable option for shooting food against creative backdrops. Cutting boards, tabletops, and placemats are also popular options, but they can be pricey and take up lots of room to store. Gift wrap, on the other hand, is plentiful with a variety of colors and textures to choose from.

Tweezers Food Styling Tips for Photography

The same dish shot with different backgrounds. White gift wrap paper was used on the left and a wooden table surface on the right.

Over to You

Do you have any simple food styling tips or tricks to share? Let me know in the comments below!

googletag.cmd.push(function() {
tablet_slots.push( googletag.defineSlot( “/1005424/_dPSv4_tab-all-article-bottom_(300×250)”, [300, 250], “pb-ad-78623” ).addService( googletag.pubads() ) ); } );

googletag.cmd.push(function() {
mobile_slots.push( googletag.defineSlot( “/1005424/_dPSv4_mob-all-article-bottom_(300×250)”, [300, 250], “pb-ad-78158” ).addService( googletag.pubads() ) ); } );

The post Household Items to Bring to Your Next Food Photography Shoot by Suzi Pratt appeared first on Digital Photography School.


Digital Photography School

 
Comments Off on Household Items to Bring to Your Next Food Photography Shoot

Posted in Photography


So you got a brand new camera? Here’s what you need next

27 Dec

So you got a camera for Christmas?

If you’re an experienced shooter with more gear than you know what to do with, then this article isn’t for you. But if you just got your first camera, then welcome!

Getting your first camera is an exciting experience, but it can also be a bit overwhelming. This helpful starter guide will answer some of your questions and give you a pretty good idea of what accessories you should buy next to make the most of your new kit.

Cards

Most cameras don’t ship with a memory card, but even if you have one it’s a good idea to get an extra as a backup, or to store more photos. SD cards, which are about the size of a postage stamp, are the most common variety. Some higher end cameras may use CF cards, so verify what type your camera uses. How much space do you need? 16GB or 32GB cards are normally a safe bet, though 64GB might be better if you plan to shoot a lot of video.

Speaking of video…. Video recording generally requires faster cards than shooting still photos. In most cases an SD card with a UHS Class 3 rating should be sufficient, though some newer cards also include a ‘V’ rating for video, such as V30 or V60. Your camera’s manual should tell you what speed you need.

Finally, stick with a reputable company such as SanDisk, Lexar, Kingston, PNY, or Transcend. Every photographer has a had a card fail at some point, and it’s a bit scary, but you can minimize the risk by sticking with companies that have a reputation for producing excellent quality cards.

Batteries

Most cameras only come with one battery and some don’t even come with a wall charger, so we recommend investing in an extra battery or two. USB charging is handy sometimes, but the addition of a spare battery and a wall charger lets you charge two batteries at once. This is a smart purchase if one is available for your camera as an accessory. 

Tripod

You’ll definitely want a tripod if you want to create long exposures, star photography or time-lapses. They’re also great for that family self-portrait in front of the Christmas tree!

Tripods are generally constructed of composite plastic, aluminum, carbon fiber or a combination of those materials. Carbon fiber tripods are the lightest option, but they’re also the most expensive, so an aluminum tripod is an excellent option. 

Tripod legs normally collapse down in two different ways; lever locks and screw locks. Lever locks tend to stay the cleanest and are the easiest to use, so we would recommend sticking with that option. The most common tripod heads (the point where your camera connects to the tripod) are ball-heads, pistol grip and pan-and-tilt heads. Ball-heads are our go-to choice because they allow for a great deal of flexibility with respect to positioning the camera in a number of different orientations.

A tripod we like for all-around use and travel is the MeFoto Classic series. If you want to go super lightweight and flexible, check out Joby’s line of GorillaPods, or read our comparison of tabletop-sized tripods.  

Phone app

Almost every new camera now includes Wi-Fi, so make sure to download the mobile app that works with yours. Mobile apps make it easy to transfer JPEG files to your phone for easy sharing on Facebook, Instagram or your favorite social media outlet. Some apps even allow you to control your camera’s settings and to take photos remotely. Keep in mind that turning on these features could impact your camera’s battery life. Many cameras have a dedicated button to activate Wi-Fi, but if not, your manual will tell you how.

Remote control or cable release

Many modern cameras offer nearly full control wirelessly through a mobile app, but you can also purchase a remote control or cable release to take photos. A remote control gives you a wireless way to snap the shutter and take an image, something that will come in handy for those who love to take selfies, family portraits or photograph events.

A cable release is connected to your camera via a cord. It’s an excellent option if you plan to shoot landscapes or long exposures (like stars) because it gives you the freedom to take your hands off of your camera to reduce the risk of vibration during slow shutter speeds. It will also give you the option to use the camera’s ‘Bulb’ mode which will allow for exposures that are longer than 30 seconds to be taken with ease. 

Card reader

Although most cameras today offer file transfer via Bluetooth, Wi-Fi, or a USB connection to a computer, we still recommend picking up an external card reader. Technology like Wi-Fi is great when you’re just transferring a few photos to your phone, but a card reader is much faster when it comes time to transfer photos of your entire vacation to the computer. Using a card reader will also allow you to keep using your camera while you copy photos.

The majority of card readers on the market offer both CF and SD compatibility in one unit, and you can even find some readers that offer three or even four card format options in one compact unit. Another option is to get a card reader that attaches directly to your tablet or smartphone, making it easy to share pictures with your friends quickly.

Strap

This may sound like a small upgrade, but it can make your shooting experience a lot more comfortable. Most cameras include a basic neck strap, but you can buy straps made from more comfortable materials, such as neoprene or leather, as well as straps that go beyond hanging around your neck, such as shoulder or wrist straps.  

A comfortable camera strap can make all of the difference in the world when you’re carrying around your camera for long periods of time, and gives you the opportunity to customize your kit and make it your own. Peak design and Black Rapid are two companies that make quality, versatile straps, and the Cecilia strap pictured here is a great option for comfort and style.

Camera bag

Need to carry your camera around? You’ll probably want a bag. But don’t just choose any bag; you’ll want one that’s specifically designed to provide padding for cameras and lenses.

Bags come in all shapes and sizes, ranging from backpacks and messenger bags, to bags specifically designed to not look like camera bags. Figure out what type of bag will best meet your needs and go from there. Some of our favorites include, Mindshift, Crumpler, Peak Design, Kelly Moore, Lowepro and Tamrac. 

Maintenance items

The list of accessories that you can buy for your camera is a mile long, but there are a handful of items that will be really useful for maintaining your camera:

  • A blower is great for removing dust particles and for drying your lens in wet or rainy conditions
  • A lens brush can help you to remove fine particulate such as dust from the front of your lens without leaving residue 
  • Microfiber cloths can be a life-saver if you happen to leave a finger print on your lens or viewfinder while you’re out shooting
  • A small bottle of lens cleaner is a great item to have on hand if your lens should happen to get dirty
  • Q-tips can also be useful for cleaning your camera and/or lens should they get dirty

A microphone

Are you planning to use your camera for video in addition to still images? If so, you may want to pick up an accessory microphone. All cameras that shoot video have built-in microphones, but in most cases sound quality is average at best (and likely won’t measure up to the quality of your camera’s video). Models such as the Røde Video Mic GO or the Sennheiser MKE 400 fit into your camera’s flash mount for easy use while shooting.

Editing and organization software

How will you store your photos? You’ll probably want some software on your computer to do things like organize your photos, do some basic editing, or even create fun projects such as collages. The good news is that the built in Photos apps on both Windows and Mac computers can do most of this already. If you want to get a bit more adventurous, consider either Adobe Photoshop Elements or Adobe Lightroom, which provide much more advanced photo editing tools. Don’t feel like you need the full version of Adobe Photoshop, however. It has great name recognition, but you really only need it for very advanced editing.

Another option is to sign up for a cloud storage account, such as Amazon Prime Photos, Google Photos, Apple iCloud or Dropbox. Cloud storage gives you a safe way to store all your photos in one place, accessible from anywhere, and you won’t lose them if your computer crashes. Some services, like Google Photos, also make it very easy to share your photos across social media. 

Articles: Digital Photography Review (dpreview.com)

 
Comments Off on So you got a brand new camera? Here’s what you need next

Posted in Uncategorized


8 Advanced Street Photography Tips to Get You to the Next Level

23 Nov

In photography, teaching and learning can only get you so far. At some point, you will get to a skill level where it’s up to you to put in the time and effort to continue improving. However, dedication and self-learning aside, here are some advanced street photography tips that I think can help you significantly improve your skill level in this area.

Grand Central Woman, NYC

1. Use your eyes instead of the viewfinder

When photographing, it is very common for people to look straight into the viewfinder and forget about the world around them, but this can make street photography tougher. Your vision through the viewfinder is hindered significantly, and that can hurt your ability to capture spontaneous moments. You need to see everything that is happening around you. This will help you to anticipate the special moments that are about to occur in front of your camera.

Your eyes are the real viewfinder, and you will be able to notice much more if you use them. Scan the area and look for subjects that are both near and far. Wait until you notice something with your eyes, then put your viewfinder to your eye to capture the moment. If you start with your head in the viewfinder, by the time the moment happens, your ability to notice it will be a half-second too slow.

2. Embrace spontaneity

Suits, SoHo, NYC

This was one of the early tips that Garry Winogrand received in his photography education that set him on a path to become one of the most renowned photographers of all time. You should certainly spend a lot of time thinking about your work and what you like to shoot, but when you are out there going through the motions, embrace your gut feelings. Instead of worrying about every little detail and thinking about if you are doing a good job or not, put that all aside and have fun.

There is no need to worry about what other people will think. If you feel like there might be a chance for a good photograph, then go for it, no matter how weird the image may be. Don’t let your brain talk you out of it. That gut feeling exists for a reason, so use it to your advantage. If you use your instincts and shoot confidently, that will show in your photographs. They will feel more real and more you. Of course, you will probably take more bad photographs as well, but the good ones will be that much better. Trust your gut.

Keep in mind that some people may take this suggestion too far and machine-gun fire their camera every time they have an inkling that there’s a good photograph. That’s taking this tip too far. Turn off continuous shooting and make sure that you are able to recognize and capture tha moment with a shot or two.

3. Think about how your photos are going to age

Cellphone Fashion Shoot, Soho, NYC.

It is important to think about your work in a historical context. Think about classic photographs and what makes them special. Simple old photographs of window displays and fashions look incredible, but those photographs might have seemed very ordinary back then. If you could go back in time to photograph, what you might see as interesting then would probably be much different than what most photographers were shooting at that time.

What about your life and area is going to be interesting in the future? What is going to change? Are people still going to be staring at their cell phones every second with huge headphones on and completely disconnected from reality? Who knows, maybe?

Try not to take anything for granted, and if you notice yourself disregarding something, then think about why you feel that way. Occasionally, these situations can make the best photographs.

4. Create themes and consistency in your photography

Cellphones, Greene Street, SoHo, New York

The more you shoot, the more you will notice that you are attracted to certain types of photographs. Find these consistencies when you are editing and embrace them. Over time, these ideas can blossom into full-fledged projects and books.

Group these images together into collections, and think about the type of photographs that you would like to add to them. Then the next time you come across a moment that fits into that category, you will be quick to notice and capture it. Each individual photograph is a piece of art, but a collection of photographs is its own work of art. Play with the order of your photographs and the meaning that comes out with different sequences of them.

Consistency does not mean that you can’t photograph different types of subject matter or in both color and black and white. You can be very diverse in how you shoot, and you can change and evolve as you go along, but you can still group these consistencies into projects that fit well together.

5. Repetition

Lower East Side, New York.

The real key to improving your photography is through repetition. It is necessary to photograph frequently to keep your eyes sharp and your hand-eye coordination ready. Your instincts will improve. The more often you do it, the better you will be. Keep the rust away. Even the best photographers need to continually photograph to keep their skills up.

The more you learn to enjoy the act of photographing, the easier it will be to walk out the door to shoot more. Photography shouldn’t be about feeling inspired or uninspired. You do not need to feel inspired to photograph if you enjoy the act of walking. Create a plan for how often you will photograph, just like the gym, and stick to it. Over time, it will become routine and your enjoyment for it will continue to grow.

There is no need to worry about coming back with good photographs. That is going to happen, and you shouldn’t feel sad if you didn’t get anything good in a session. The good photographs will come, but if you feel frustrated too often, then that will affect how you photograph. Just enjoy the process of being out in the world doing something you love. The more you enjoy that, the better you will be.

6. Photograph where you live

Brooklyn Home, NYC.

No matter where you live, whether it’s in the middle of a big city or in a small suburb, use that as a backdrop for a project. That is the area that you frequent the most, and know the best. Go to places that you think would be incredibly boring for photographs and figure out how to get a good photograph there. Don’t take things for granted. Absolutely anything can make a good and beautiful photograph. All it takes is dedication.

7. Emotion and gesture

Jerry Delakas, Astor Place Newsman.

As photographers, our job is to pass on an idea or an emotion to the viewers of our work. How you do that is something for you to figure out. Search for feeling and emotion when you are shooting. Aim to create evocative photographs.

If you are photographing people, it is important to capture them when they are portraying an emotion. This can be shown in a facial expression, what they are doing, or the gesture of their body. Sometimes, you will capture a unique looking person with no emotion or gesture and that will ruin the photograph. Other times, you will capture someone that you did not think would be a good subject, but the emotion shown on their face make the entire photograph. When you photograph people, this emotion is vital to focus on.

8. Zone focusing

Lower East Side, New York City

Zone focusing is the toughest technical skill to learn in street photography, but it is very important to learn. At first, you will screw up a lot of photographs, but over time it becomes a more accurate way of obtaining sharp photographs.

Zone focusing works particularly well in busy areas, but it can be used any time once you get good at it. I tend to zone focus 60% of the time and autofocus the rest. If your subject isn’t moving and you have time to autofocus, it is always good to do that as it will guarantee perfect focus. But the rest of the time zone focusing can be the way to go.

What is zone focusing and how is it done?

This strategy of zone focusing is basically just using manual focus your camera and guessing the distance to subjects. Because of this, you will need a distance meter on either your lens or in your camera. You then want to turn your camera (or lens) to manual focus. Set the focus at a certain distance away from the camera. I prefer 8-10 feet, although I will do a smaller distance if I’m in a really busy area where people are closer together. Next, figure out how far that distance is away from your camera, and now you know that everything at that distance away from you will be sharp.

Zone focusing can be done well at very large apertures, even f/2, but it becomes much more difficult to do well. This focusing strategy works much better with apertures of f/16, f/11, and f/8 and a wide-angle lens such as 35mm. That will ensure there is a large depth of field in your image (make sure to also raise your ISO to achieve this and still keep an adequately fast shutter speed). Thus, there will be a significant area both in front and behind of the spot that you are focused on that will all be in sharp focus. This helps for situations where you miscalculate the distance when the perfect moment happens and it’s not exactly where are focused, and when you have multiple subjects at different distances that you want to be relatively sharp.

This is why it is always good to start off zone focusing in bright sunlight with a wide-angle lens. This will allow you to shoot at f/11 or f/16 so that a lot of your image will be sharp and you will barely have to worry. Set your focus to 8 or 10 feet away and pay attention to your subjects more than your focusing. It is a very freeing feeling, and the extra time you save not having to focus will aid you in catching those spontaneous and instantaneous moments that appear before you.

Conclusion

If you want even more street photography tips, check out: The Ultimate Guide to Street Photography (you can even download it as a PDF).

What things to you practice to up your street photography game? Please share your comments and images in the section below.


If you’d like to learn more about Street Photography, then please check out my ebook The Essentials of Street Photography.

googletag.cmd.push(function() {
tablet_slots.push( googletag.defineSlot( “/1005424/_dPSv4_tab-all-article-bottom_(300×250)”, [300, 250], “pb-ad-78623” ).addService( googletag.pubads() ) ); } );

googletag.cmd.push(function() {
mobile_slots.push( googletag.defineSlot( “/1005424/_dPSv4_mob-all-article-bottom_(300×250)”, [300, 250], “pb-ad-78158” ).addService( googletag.pubads() ) ); } );

The post 8 Advanced Street Photography Tips to Get You to the Next Level by James Maher appeared first on Digital Photography School.


Digital Photography School

 
Comments Off on 8 Advanced Street Photography Tips to Get You to the Next Level

Posted in Photography


Firmware update for Panasonic G85 panning issue expected next week

12 Nov

We recently reviewed the Panasonic Lumix G85, and while it scored a Gold Award, eagle-eyed readers noticed a ‘stickiness’ in panning video clips when mechanical image stabilization was turned on. You can see an example in our video above.

Last week we reached out to Panasonic representatives regarding the issue, and today we received the following official statement:

“Less than a week ago, Panasonic became aware of some reports that the G85’s image stabilization wasn’t delivering the same level of smooth performance that the GX85 is while slow panning in video mode. Panasonic is working to solve the issue with a firmware update as soon as we can. Panasonic appreciates all the valuable feedback and always focuses on meeting or exceeding our customers’ expectations.”

We’re told the update should be available as soon as next week, which is very encouraging. I’d like to personally thank our readers for being so quick to notice the panning problem. It’s because of you this issue was so rapidly addressed by Panasonic.

Articles: Digital Photography Review (dpreview.com)

 
Comments Off on Firmware update for Panasonic G85 panning issue expected next week

Posted in Uncategorized


Next level: iPhone 7 Plus camera review

09 Nov

$ (document).ready(function() { SampleGalleryV2({“containerId”:”embeddedSampleGallery_3203287185″,”galleryId”:”3203287185″,”isEmbeddedWidget”:true,”standalone”:false,”selectedImageIndex”:0,”startInCommentsView”:false,”isMobile”:false}) });

Judging by design, screen size and resolution, the new iPhone 7 Plus is nothing new. While its major specs are nearly identical to the iPhone 6s Plus, it’s in the camera department where a lot of innovation has happened. Next to the standard 28mm equivalent lens there is a second 56mm module to enable optical zooming. Combined with digital zoom, you can drag the zoom slider in the camera app up to a 10x magnification. 

At F1.8 the six-element lens in the wide-angle camera comes with a faster aperture than the 6s Plus and optical image stabilization is on board as well. The 56mm ‘tele’-lens has to make do without stabilization though, and uses a slower F2.8 aperture. A bokeh-simulation mode, similar to what we’ve seen on the HTC One M8 and Huawei P9 before is also made possible by the dual-camera setup. Other new camera features include a quad-LED true-tone flash and flicker-sensor. With iOS 10 and certain third-party camera apps the new iPhone can now finally save Raw files as well.

As you can see, there are a lot of new camera features to explore on the new iPhone 7 Plus and we have done exactly that. Read our full review to see how we got on. 

Key Photographic / Video Specifications

  • Dual 12MP sensors
  • 28/56 mm equivalent focal length
  • F1.8/2.8 aperture
  • On-sensor phase detection
  • Quad-LED flash
  • DNG Raw capture and manual control with 3rd party apps
  • 4K video at 30 fps
  • 720p/240 and 1080p/120fps slow-motion video
  • 7MP front camera with F2.2 aperture and 32mm equivalent focal length

Other Specifications

  • 5.5-inch 1080p IPS screen with taptic feedback
  • Apple A10 Fusion chipset
  • 3GB RAM
  • 32/128/256GB storage
  • 2,900mAh battery
  • Fingerprint reader
  • Stereo speakers

DPReview smartphone reviews are written with the needs of photographers in mind. We focus on camera features, performance, and image quality.

Articles: Digital Photography Review (dpreview.com)

 
Comments Off on Next level: iPhone 7 Plus camera review

Posted in Uncategorized


Huawei Mate 9 comes with next generation Leica dual-cam

04 Nov

Huawei has today launched its latest top-end phablet, the Mate 9. The new device features a large 5.9″ LCD IPS display with 1080p resolution and 1500:1 contrast ratio. In the camera department the Mate 9 comes with a new dual-camera that, like its counterpart in the P9, was co-developed with camera manufacturer Leica.

The new version of the Huawei dual-cam boosts resolution of its monochrome sensor to 20MP (up from 12MP in the P9) with a 12MP color chip. Both lenses feature an F2.2 aperture. There is a new 6-axis optical image stabilization system and a 4-in-1 hybrid AF system that combines, contrast detection, phase detection, laser time-of-flight measurements and depth information. 

As before, image data from both sensors is combined to achieve better image results than conventional cameras. Like on the P9, the dual-camera can also simulate the bokeh of a fast lens on a DSLR, but Huawei says the effect has been improved and is now visible in the live-view image. 

In addition the camera features a new hybrid zoom system, which uses image information from the 20MP monochrome sensor for ‘lossless’ digital zooming of the 12MP standard image output. Huawei says that, thanks to improved compression methods, the camera’s 4K video mode creates smaller file sizes without a loss in image quality. The front camera features an 8MP sensor and F1.9 aperture. 

Android 7.0 and Huawei’s EMUI 5.0 launcher are powered by the in-house Kirin 960 CPU, which, according to Huawei, delivers 180% more performance than the predecessor Kirin 950. Huawei also claims the 4000mAh battery is good for 2.5 days of normal use per charge, or 1.7 days of intensive use. An improved version of Huawei’c quick charging system is on board as well. The Huawei Mate 9 with 4GB RAM, 64GB storage and microSD support will be available in mocha, black, white, gold, space grey and silver and cost €699 in Europe (approximately $ 775). 

Huawei also introduced a limited Porsche Design edition of the Mate 9. This luxury device comes with 6GB of RAM, 256GB of internal memory and features a 5.5″ curved 2K AMOLED display. Other specifications are identical to the standard Mate 9. The Porsche Edition will be sold exclusively through Porsche Design Stores and set you back a hefty €1395 ($ 1545).

Related: Huawei P9 Review

Articles: Digital Photography Review (dpreview.com)

 
Comments Off on Huawei Mate 9 comes with next generation Leica dual-cam

Posted in Uncategorized


Aura is a next generation digital picture frame

04 Oct

Digital picture frames were all the rage around 2006, but since then have pretty much been relegated to the bargain basement. Instead of focusing on innovation, new features and better performance, frame makers decided to compete on price. As a result digital frames have always been regarded a low-quality product and the gadget community quickly lost interest.

The team behind the new Aura frame is planning to change that and make the digital picture frame once again a product that technophiles across the globe are lusting for, with a design that combines a high-quality display with all sorts of digital bells and whistles. The Aura’s screen is pretty much identical to the 2048 x 1536 pixel Retina display in the iPad and the acrylic frame, which is edged in anodized aluminum, will be available in either ivory with rose gold trim or black with charcoal trim. 

Premium finish aside, the Aura frame stands out thanks to its features. There is an accompanying mobile app for syncing manually created albums to the device. Alternatively, the app offers facial recognition and can be set to upload all images that have specific persons in them. There is also a filter that gets rid of blurry images, duplicates and those where subjects have their eyes closed. It even makes sure to only use images that crop well for the frame’s 4:3 format.

Of course you can invite others to contribute to an album as well. In addition the Aura also comes with a set of sensors that can detect if you are in the room in order to make sure you always see a new image when you enter.

The sensors are also used for the gesture control feature which lets you scroll through images from a distance. The Aura frame is not available yet but its makers just secured $ 6M Series A round funding from Spark Capital, so chances are you’ll be able to buy one in the nearer future. The projected retail price is $ 400 and you can register your email to be notified at launch. Watch the video below for a better idea how Aura works.

Articles: Digital Photography Review (dpreview.com)

 
Comments Off on Aura is a next generation digital picture frame

Posted in Uncategorized