RSS
 

Posts Tagged ‘Motion’

Next Version of Adobe Photoshop to Be Branded Photoshop CC, Includes Awesome New Motion Blur Sharpening Tool

07 May

Today Adobe announced a new branding of their flagship Photoshop product to be released later this year, Photoshop CC. The new version will only be available via a monthly subscription to Adobe’s Creative Cloud and will not be sold as a traditional boxed application that consumers can purchase.

Probably the most anticipated new feature in the next iteration of Photoshop is a revolutionary new image sharpening tool that focuses on fixing camera shake issues.

The new tool analyzes images that are out of focus due to the slight movement or motion that takes place while a shutter is open. There are lots of reasons why photographers may find camera shake in their images. Many images shot slower than about 125th of a second are susceptible to camera shake unless you’re on a tripod or have a very steady hand. Telephoto shots, especially can be problematic.

With the new version of Photoshop CC, Adobe uses an algorithm to try and detect which direction the camera was moving that produced the shake. They then try to account for the movement back into the direction of a steady image without camera shake. This new sharpening tool won’t help you with other types of focal blur issues, like lens position, but it does address a fairly common issue dealt with by photographers.

Adobe had previously offered a sneak peak of this new technology in a video that they posted to Youtube. Watch the video and you’ll be impressed.

What makes this interesting to me is that there are a lot of old images that I’ve taken in the past that now will suddenly become salvageable.

This new technology advancement should be yet another reminder to photographers why they should save ALL of their images, even the bad ones that they don’t think they can use. With technology advancements in image processing, I’m finding more and more images that I’d previously dismissed due to problems. Whether previous Adobe noise reduction tech or newer tech like this new sharpening tool, it pays to save all of your images no matter what. Storage is cheap and you never know when you may need that image that you never knew you needed at the time. Even years after you are dead, those images may be important to someone, somewhere for some reason.

While the camera shake feature is the sizzle of the new Photoshop upgrade, there are several other enhancements they have made to the program as well including, smart Sharpen (new technology promising more realistic sharpening without halos or noise) and new upsampling tech (this helps make your photos look better when you make them larger than you processed them).

The biggest news though is Adobe’s moving Photoshop 100% into the Cloud and 100% by subscription. You’ll still be able to purchase Photoshop CS for the time being, but it won’t have the new features available in CC.

Pricing varies by type of customer but starts at $ 49.99 a month per person for individuals. Existing Creative Suite customers, students, and teachers will get a discount to $ 29.99 a month. Creative Cloud has a lot more applications than just Photoshop and also includes Lightroom and a whole suite of other Adobe Creative applications. It also includes integration with Behance, a portfolio site for creatives that Adobe recently purchased.


Thomas Hawk Digital Connection

 
Comments Off on Next Version of Adobe Photoshop to Be Branded Photoshop CC, Includes Awesome New Motion Blur Sharpening Tool

Posted in Photography


10 Pro Motion Control Time-Lapse Tips

19 Apr

As I’ve been documenting landscapes and cityscapes with time-lapse photography the past several years I’ve learned some key lessons, many times the hard way. If you’re new to time-lapse here’s a quick definition from my eBook Photographing the 4th Dimension – Time that discusses slow shutter & video techniques:

Time-lapse videos are produced when hundreds of sequential images are displayed in rapid succession. The line between still photo and video is directly tied to how the human visual system works. Images are retained in our visual memory for roughly one-fifteenth of a second.1 As a result we can differentiate still photos when they’re played to us at a frequency of 10-12 images per second (video lingo being frames per second or fps). Standard video playback frequencies are 24 and 30 frames per second, both of which easily fool our visual system, via the Phi phenomenon, into seeing continuous motion versus still images.

To save you the hardship of enduring the same mistakes I’ve made over the years here are 10 motion control time-lapse tips to get you shooting like a pro including some gear recommendations.

_Q2A4768_full_600c

1. Setup Early
To avoid a last minute rush or worse yet missing fleeting lighting conditions be sure to setup early.  If you’re rushed you’re bound to make careless errors and even put your gear at risk of falling. It pays to take your time, arrive early, carefully setup, review your setup and take a test sequence if time permits. This is a sure fire way to make sure that your actual shoot goes to plan.

jmg-giveaway-HEADERalt
Enter to Win My Ultimate Time-Lapse Photography Setup
Over $ 5000 in prizes – http://bit.ly/WGy7Jw

2. Compose Anticipating Subject Movement
Anticipate the movement of your subject(s). Time-lapse subjects really shine when you take the time to anticipate not only where your camera will move, but where elements in your frame will move during a sequence. Clouds, water, traffic, people, etc. will have a line of movement if you take the time to carefully observe the scene you’re going to photograph you can compose your frame to maximize the impact of this movement. Here again having the necessary time on hand, not rushing, will be advantageous for you to properly evaluate your subject(s).

3. Know Your Move
“The move” is the line of movement your camera will take on a motion control system as your time-lapse sequence runs. As you setup a shot be sure you evaluate the scene and your surroundings to find a move that will highlight your subject best. At the same time be sure that during the sequence your setup won’t be put in harms way during the move either by passing pedestrians, vehicles, losing balance & falling, etc.

_MG_9494-600c4. Variation
Vary the direction of your moves (left to right, right to left, down to up & up to down) and even consider capturing video at a normal 24 or 30 fps. Having a variety of footage will allow you to edit together different sequences with enough variation that your audience won’t find the editing predictable while providing opportunity for smooth transitions between scenes.

5. Know & Read The Weather
As with still photography the most interesting conditions often come about from bad weather (see Make the Best of Bad Weather). Capturing sequences of bad or changing weather can be quite dramatic. To do this the first step is to monitor the weather in the area of your shoot. Time your shot when transitioning weather is most likely to happen. On the flip side since many motion control rigs contain metal, monitoring the weather can also help you say safe by avoiding conditions where lightning might be a possibility.

6. Be Organized Don’t Forget Anything
One best practice I like to follow is to carry the little things that can make or break a shoot. Murphy’s Law always has a way of tripping up a photographer so I like to travel very well prepared even if it costs me in having a heavier bag. Items I carry with me include tools (ex small hex wrench set), extra batteries, extra screws, backup equipment such as an extra camera body & lens, lens clothes, levels, rain covers, filters, etc. There are some very versatile bags out there to help carry these “little” things.  See In Pursuit of the Ideal Time-lapse Camera Bag: Gura Gear Bataflae 32L for the bag I’ve chosen.

7. Choose the Right Equipment & Lenses
Trial and error with gear can be costly both in time and money if you’re not careful. In most instances I shoot with lenses of a focal length ranging from 15mm to 50mm, but for some shots I’ve been known to use a 70-200 or 300mm lens… it all depends on the subject. (see What lens do you use for your Landscape photographs?) When it comes to hardware and software specific to motion control time-lapse my choices are below:

  • Dynamic Perception Motion Control Dolly [win this]
  • eMotimo robotic tripod head (see full eMotimo review with example videos) [win this]
  • Backup Intervelometer(s): Canon TC-80N3 and TriggerTrap
  • Adobe Lightroom
  • Adobe After Effects [win this]
  • BG Render Pro (AfterEffects plugin)
  • For more gear ideas visit my Ultimate Time-Lapse Photography Setup giveaway page

eMotimo & Dynamic Perceptions Examples
http://www.youtube.com/watch?v=1vxQAnfjKrQ
http://www.youtube.com/watch?v=k5HKaplJa_4

8. Don’t Forget Narrative
While it’s great to highlight cool time-lapse sequences always keep in mind how your sequences will piece together to tell a story. Narrative is always important to achieve a deeper connection with your audience. A series of time-lapse sequences without narrative is merely a demo reel.

9. Faster & Higher Capacity CF/SD Cards
When it comes to CF/SD cards faster is always better. As your camera snaps off sequential images you’ll want media that will allow for the fastest write speeds possible. If your CF/SD cards are too slow then your camera’s buffer might fill up and you’ll experience lag in your sequences as your camera tries to empty its cache & write files to your card(s) before taking another photo. Note: A 300X card = 45MB/s write speed. 1X = 150KB/sec Higher capacity cards (ex. 32GB, 64GB and 128GB) will also allow you to capture numerous sequences on the same card.  Use of such cards will also allow you to focus on your subject and less on juggling cards. While some worry use of high capacity cards puts you at greater risk for data loss I’ve yet to experience an issue and chalk this up to regular formatting after downloading images off the card(s).

10. Know Your Time
Don’t lose track of time or mis-calculate sequence times as it can result in the loss of a sequence or keep you tied up for extremely long periods of time. There are now several time-lapse apps for mobile phones to help even the most fatigued photographer get the right sequence calculations. When all else fails once can always revert to the simple use of a calculator

Post originally from: Digital Photography Tips.

Check out our more Photography Tips at Photography Tips for Beginners, Portrait Photography Tips and Wedding Photography Tips.

10 Pro Motion Control Time-Lapse Tips


Digital Photography School

 
Comments Off on 10 Pro Motion Control Time-Lapse Tips

Posted in Photography


Stop Motion Photographer

09 Feb

twitter: @innovateimages instagram: innovateimages facebook: http:www.facebook.com/innovateimageworks website: http:www.innovateimageworks.com clicktotweet.com Who needs a video camera when you’ve got 2335 photos? Follow the adventures of two young photographers as they meet and create memories together. Please show photo-printing-gurus ClickPixx some love. They were amazing to me! (www.clickpixx.com) A huge thanks to Brian Van Wyk (http and Laura-Jane Tresidder for all of their hard work. Behind The Scenes: www.youtube.com www.innovateimageworks.com tags “stop motion photographer”, stop, motion, photographer, davewallace4, dave, wallace, brian van wyk, laura-jane tresidder, canon, nikon, dslr. clickpixx, picture, frame, animation
Video Rating: 4 / 5


Nikon D90 – Orange Stop Motion

06 Feb

First attempt on stop motion.
Video Rating: 5 / 5


Constantinople (Istanbul) in STOP MOTION

20 Jan

STOP MOTION Video, made out of 1282 photos (Nikon D300). Place: Constantinople (Istanbul) Turkey Date: 7 – 11 September 2011
Video Rating: 0 / 5

 
Comments Off on Constantinople (Istanbul) in STOP MOTION

Posted in Nikon Videos


Hitchhiking Stop Motion: 5000 miles, 930 people, 162 secs

15 Jan

www.AdventureSauce.com Want free & uncommon travel tips? 5000 miles, 3000 photos, 930 people, 162 seconds. Benjamin Jenks went after his dream of hitchhiking across the USA and realized not only would he be safe… he would have the time of his life. Watch the Long Version as well! http Like the song? Check Lehtmojoe’s jams here: itunes.apple.com Shot: Nikon d70 with Fisheye lens (10-17mm) Edited: Final Cut Pro X Thanks to everyone who took some time to take a photograph and share in this journey! Special thanks to Zohar Berlyand for being patient as I photographed, Aaron Osborn for inspiring and helping with editing & Angela Lynch for her support and helping with promotion. Are you in the video? Where? Did you see Tom Green? How about the people from History’s tv show, Pawn Stars?
Video Rating: 4 / 5

Daniel Waller caught up with Anton Yelchin, Felicity Jones & Drake Doremus to talk about their latest movie Like Crazy. Amazingly shot on a Cannon 7D Camera this heartwarming story tells of a long distance relationship of Jacob (Yelchin) and Anna Felicity Jones.
Video Rating: 4 / 5


Demonstration of Canon’s 7D Slow Motion Capability. (PLUS camera man gets drenched!!!)

10 Jan

www.KarlTaylorPhotography.Com This time our camera man gets a complete soaking! You are probably well aware that major manufacturers of DSLR cameras (including Nikon & Canon) have had HD video capability as standard in many of their camera models for some time now. Some modern DSLR cameras are even capable of filming at 60 frames per second – Perfect for the slow motion techniques demonstrated in this short video. I hope you enjoy! Karl Learn More HD Video Techniques at www.KarlTaylorPhotography.Com
Video Rating: 4 / 5


How To Create a Motion Blur Effect in Photoshop

06 Jan

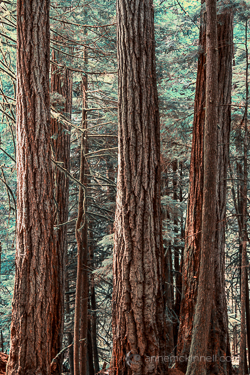
Motion Blur Original

The original image before the motion blur is applied

Motion Blur Filter

For the first technique I am going to start with this rather boring and cluttered image I made in a forest on Vancouver Island, British Columbia, Canada.

Maybe it wouldn’t be so boring if there was anything to show the scale of these enormous trees but it’s pretty hard to get away from cluttered in the dense forest there.

I decided to mimic the effect of in-camera panning by using the motion blur filter in photoshop to blur the image in the same direction as the strong lines of the trees.

Try this technique on your own forest scene or another scene with strong lines by following these steps. I am using Photoshop Elements but you can also do it in Gimp and some other photo editors.

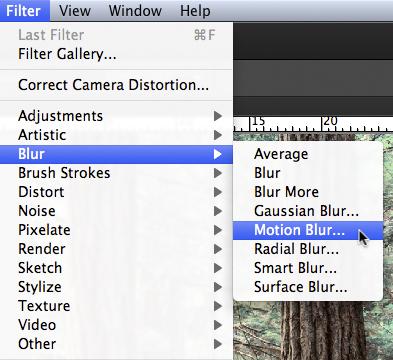
1. Select Filter > Blur > Motion Blur

Photoshop Motion Blur Filter

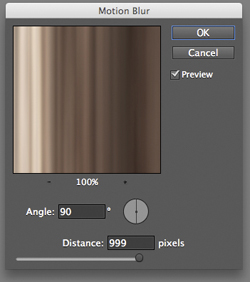
2. Set the direction of the blur to match your image and amount of the blur to your taste. For my image I made the blur vertical and the amount maximum.

If you have a photo editor that supports layers, make a copy of the background layer and apply the filter to the new layer. This will allow you do have some fun in step #4 below.

Photoshop Motion Blur Filter Options

Motion Blur Applied

Image after motion blur is applied


3. Crop the tell-tale edges out of the image.

I find that you can always tell when the blur is done in photoshop, as opposed to in-camera, because the edges of the image don’t blur evenly. Why they don’t blur evenly I don’t know! But they don’t so I always crop the edges out.

See the 100% zoom of a portion of my image below where you will see how the edges of the image don’t look right.

Motion Blur Artifacts

4. To add a little something extra try revealing a part of the original image without the blur.

If you applied the blur to a copy of the background layer as I mentioned in step #2 above you can try this. Either using a layer mask or simply using the eraser tool, remove the blur effect from a portion of the image.

This is the final version:

Motion Blur Revealed

Here is a video I made that shows all the steps I took to make the final image using Photoshop Elements.

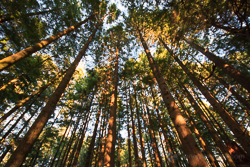
Zoom Blur Original

Original image before zoom blur is applied

Zoom Blur Filter

This technique is very similar to the motion blur effect but with a little bit of a twist.

As you can see the original image has a few problems. The trees are mottled with light and shadow and there are blown out highlights in the sky for a start. But I like the composition of the trees the way the wide-angle lens made them appear to lean in towards the centre of the frame.

I decided to try a zoom blur effect to emphasize the composition and even out some of the colours.

Try this technique on your own image by following these steps:

1. Duplicate the background layer (Layer > Duplicate Layer)

Duplicate Background Layer

2. Rename the layer to “blur” or something else that makes sense to you

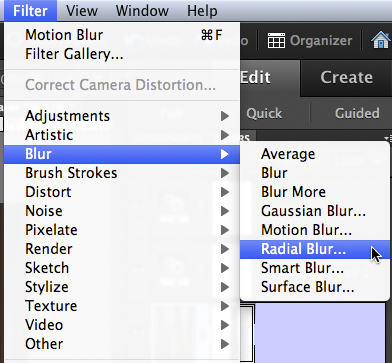
3. In photoshop, select Filter > Blur > Radial Blur

Photoshop Radial Blur Filter

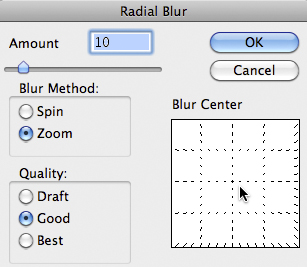
4. Change the option from “spin” to “zoom” and, in the section of the window named “blur center”, drag the centre of the zoom from the middle to the top of the frame to match the composition of the original image

Photoshop Zoom Blur Filter Options

5. Crop out the blown out highlights in the resulting image

Zoom Blur Final

Here is a video I made that shows all the steps I took to make the final image using Photoshop Elements.

Post originally from: Digital Photography Tips.

Check out our more Photography Tips at Photography Tips for Beginners, Portrait Photography Tips and Wedding Photography Tips.

How To Create a Motion Blur Effect in Photoshop


Digital Photography School

 
Comments Off on How To Create a Motion Blur Effect in Photoshop

Posted in Photography


A motion story / Deyan Parouchev / Nikola Mihov

14 Dec

A short movie based on DSLR snap shot pics captured in Paris
Video Rating: 4 / 5


Express (Burlesque Original Motion Picture Soundtrack) (A…

01 Dec

Music video by Christina Aguilera performing Express. (C) 2010 Screen Gems, Inc. Motion Picture Artwork and Photography
Video Rating: 4 / 5

6 hours spent to teach and film. Went by like clockwork thanks to all these amazing dancers. Special shoutout to Shaun Evaristo, Nick DeMoura, Amanda Grind and Megan Curameng for the assistance that day. Also, shoutout to WorldStarHipHop.com for reposting this on their blog: www.worldstarhiphop.com – LB BENIGA.com twitter.com/lylebeniga youtube.com/lbeniga1 REGISTER FOR mL’s theTOUR www.themovementlifestyle.com/tour.php Concept by Lyle Beniga Choreographer Lyle Beniga Director of Photography Nick DeMoura Assistant Director of Photography Shaun Evaristo Editor Thad Reid Assistant to Choreographer Amanda Grind Featured Dancers in order of appearance: Johnny Erasme Devin Jamieson Vinh Nguyen Bam Martin Joesar Alva Mykell Wilson Amanda Grind Mike Fal Ian Eastwood Ellen Kim Jeka Kalotkin Jason Magsuci Marvin Millora JP Goldstein Brent Curtis Lando Wilkins Shaun Evaristo

 
Comments Off on Express (Burlesque Original Motion Picture Soundtrack) (A…

Posted in Photography Videos