RSS
 

Posts Tagged ‘More’

Pinned Down: 10 More Abandoned Bowling Alleys

11 Apr

[ By Steve in Abandoned Places & Architecture. ]

abandoned-bowling-alleys-1a
Abandoned bowling alleys lie scattered across the landscape as if the gods of recreational sports had laid ’em low with a single thunderous strike.

abandoned-bowling-alleys-1c

abandoned-bowling-alleys-1b

Shoeless Hoes? You’ll find neither shoes nor hoes (a type of gardening tool, for the uninformed) at the long-abandoned and unfortunately named Hoe Bowl in Hyde Park, New York. Flickr user Edward Blake (edwardhblake) snapped the stricken state of the once-stylish bowling alley in November of 2014.

abandoned-bowling-alleys-1e

abandoned-bowling-alleys-1f

HoeBowl Family Recreation Centers, founded in 1958 and led by current CEO Diane Hoe, is a chain of bowling alleys centered in New York’s Hudson Valley. The Hyde Park location closed just after the turn of the millennium. In September of 2013, the property was sold to James Rogers, who received approval to build a 76-resident assisted living center at the site. Recent images, however, show no sign of impending demolition. One might say… the Hoe must go on!

Gutter Check

abandoned-bowling-alleys-2a

abandoned-bowling-alleys-2b

Flickr user Corrine Klug checked out the abandoned bowling alley hidden deep within the deserted Scranton Lace Company’s factory in January of 2012. A decade earlier, the company’s vice president infamously told employees, in the middle of a working shift, that the facility was closing “effective immediately.” One presumes the stunned workers dropped everything – bowling balls included (ouch!) – and trudged out the doors, never to return.

Vicious Circle

abandoned-bowling-alleys-5

Remember those funky circular-ball-returns? This one’s funkier than most and the cheese-tastic carpeting only adds to the scene’s essential mustiness. Flickr user b lowe (vittelsandjuice) brings us this abandoned bowling alley still life dating from late 2011.

Next Page – Click Below to Read More:
Pinned Down 10 More Abandoned Bowling Alleys

Share on Facebook


[ By Steve in Abandoned Places & Architecture. ]

[ WebUrbanist | Archives | Galleries | Privacy | TOS ]


WebUrbanist

 
Comments Off on Pinned Down: 10 More Abandoned Bowling Alleys

Posted in Creativity


Macphun updates Tonality with batch processing and Raw support for more cameras

09 Apr

Software manufacturer Macphun has announced an update to its Tonality application that introduces batch processing, free preset packs, as well as Raw support for a wider range of cameras.

The black and white image manipulation package designed for the Mac platform already offers 160 ready-made manipulation and effects settings, but will now offer between one to three extra settings per month, created by a band of professional photographers. The company has four contributing professionals at the moment and will add a new one each month to enlarge the collection of settings users can download for free. Users can, of course, create their own presets using the tools and controls provided and can then share these amoung themselves. Further pre-sets are available to purchase.

The update also brings raw support for owners of Canon PowerShot G1 X Mark II, Fujifilm FinePix HS50 EXR, Leica Q (Typ 116), Leica SL (Typ 601), Leica M Monochrom (Typ 246), Nikon D300S, Panasonic DMC-G7, Sony DSLR-A700, Sony DSC-RX100M3 and Sony DSC-RX10M2 cameras.

The company has also added a link to the 500px image sharing website to smooth the uploading of pictures directly from the program, and has also made it easier to export files to Adobe’s Photoshop and Lightroom applications.

The program is available in three forms, as a standalone application that is priced £15 (though £7.99 until 14th April), as part of the Tonality Complete Kit you get the Pro Version for £48.99, or as part of Creative Kit 2016 with five other Macphun applications for £89.99.

For more information see the Macphun website.

New Tonality updates brings amateur photographers closer to professionals

Ability to add free preset packs created by worldfamous photographers, 500px export integration, batch processing, new cameras support, and special discounts at Mac App Store

Macphun Software, a leading innovative photography app developer with over 30 million users worldwide, have today launched a major update to Tonality, their awardwinning black and white photo editor for Mac.
To celebrate the update, Macphun are offering a 50% discount and a free batch processing in the MAS version of Tonality for one week only (7th14th April) .

What are the key highlights of the update to Tonality?

Preset Packs from WorldFamous Photographers

Tonality users will now have access to a free preset library, created by professional photographers from around the world. To access the library, users simply need to click “Get more presets” from inside the software.

Macphun have enlisted the expertise of professional photographers, including Serge Ramelli, John Batdorff, Dan Hughes, Andy Krucezk and others to create exciting new preset packs exclusive to Tonality, which can be found at macphun.com/tonalitypresets.

Statistics show that since August 2014 (when the software was launched) Tonality users have processed over 7 million images , and applied over 50 million presets to their photos. Current favourite preset packs include Portrait, Architecture, and Dramatic.

500px Support plus 3month FREE membership

Macphun have teamed up with 500px to allow users to easily export images directly from Tonality to the global online photography community. Macphun are also excited to offer a 3month 500px membership for free as a bonus to Tonality.

More cameras supported

RAW file support has been improved and extended so RAW image files can now be opened from a variety of new cameras: Canon PowerShot G1 X Mark II, Fujifilm FinePix HS50EXR 100, LEICA Q (Typ 116), LEICA SL (Typ 601), LEICA M MONOCHROM (Typ 246), NIKON D300S, Panasonic DMCG7, Sony DSLRA700,
Sony DSCRX100M3, Sony DSCRX10M2.

What other new features and improvements can be expected?

Other improvements include ability to export images from Tonality to Aurora HDR, improved Lightroom and Photoshop export, improved language translation quality, and improved stability.

Standard version of Tonality (available on the Mac App Store)
In addition to all the updates listed above, the Mac App Store version of Tonality now includes batch processing as an InApp purchase. The batch processing inapp will be available for free between 7th and 14th April. Batch in Tonality allows users to process, rename and resize dozens of photos at the same time.

What is Tonality?
Tonality is a compelling black and white photo editor. It combines the authenticity of the
monochrome analog era and the cuttingedge colour technologies of the digital age. Reimagine your monochrome image editing with hundreds of presets, layers, unique digital controls, authentic grain and more.

Pricing and Availability:

Tonality is available as a standard version through the Mac App Store, a standalone Pro version direct from https://macphun.com/tonality , or as part of Creative Kit 2016 at macphun.com/creativekit . The standard version of Tonality is available via the Mac App Store at the 50% discount: £7.99 from 7th-14th April: https://itunes.apple.com/gb/app/tonality/id892581529?mt=12

Tonality CK standalone is available direct from https://macphun.com/tonality at £48.99. Creative Kit 2016, featuring Tonality and five other incredible Macphun apps, is available direct from macphun.com/creativekit at £89.99.

Articles: Digital Photography Review (dpreview.com)

 
Comments Off on Macphun updates Tonality with batch processing and Raw support for more cameras

Posted in Uncategorized


Nikon extends service advisory for D750 to include more models

02 Mar

Nikon has announced that the shutter fault in its D750 that it acknowledged in July last year, may be found in cameras from a much wider manufacturing period. Initially it was thought that the issue, in which the shutter occasionally shades part of the image, occurred in cameras produced between October and November 2014. The company has now discovered the same problem in models made from December 2014 to June 2015.

Nikon has promised a free service for all models affected, and an online serial number checker is available for customers to determine whether theirs is one of the models that needs attention.

European customers can check their serial number on the Nikon Europe website, and those in the USA should go to the Nikon USA website. Other region service pages can be found on the Nikon Global website.


Service advisory:

To users of the Nikon D750 digital SLR camera – possible image shading from shutter (update 29/02/2016)

Thank you for choosing Nikon for your photographic needs.

In July of 2015, we announced that the shutter in some Nikon D750 digital SLR cameras manufactured in October and November of 2014 does not function normally, sometimes resulting in shading of a portion of images. Since that time, our examination of the issue has clarified the fact that the same issue may occur with D750 cameras manufactured from December, 2014 through June, 2015.
Therefore, any D750 manufactured from October, 2014 through June, 2015 is eligible for inspection and repair of its shutter.

We sincerely apologize for any inconvenience this issue may have caused.

Identifying affected products
To check whether or not your camera is one of those affected by this issue, click Affected Product Serial Numbers below and enter your D750 serial number as instructed. Your camera’s serial number will be checked against those of applicable products. If your camera is one of those affected, instructions for requesting repairs will be displayed. If your camera is not affected by this issue, rest assured that repairs to your camera are not necessary and you may continue using your camera without concern for this issue.

Resolution
Please contact your nearest Nikon service center if you own a Nikon D750 digital SLR camera to which this issue applies. They will keep your camera, and examine and repair the camera’s shutter free of charge, even if the camera’s warranty has expired.

Requesting service
Please direct inquiries regarding this matter to your nearest  Nikon Service Centre or create a Free Service Returns Request.

We sincerely apologize for any inconvenience this matter may have caused you.

Please be assured that Nikon is continuously working and taking measures to further improve the quality of its products. Once again, thank you for choosing Nikon for your photographic needs.

Articles: Digital Photography Review (dpreview.com)

 
Comments Off on Nikon extends service advisory for D750 to include more models

Posted in Uncategorized


Working with what you’ve got: Bambi Cantrell on photographing brides, babies and more

21 Feb
 

Bambi Cantrell is a 30-year veteran of the photography industry specializing in portraiture and wedding photography. In this presentation from PIX 2015, she translates lessons learned over her career into real photographic results, whether her client is a bride, a couple or a young family. As Cantrell’s tastes and photography have evolved over the years, she encourages others to embrace change. ‘Lay a strong foundation on concepts,’ she says. ‘Don’t put blinders on…. You can adapt as you decide to change and get older.’

Keep it simple.
‘Give me a wall, a window and a reflector, and I’m home free,’ says Bambi Cantrell, ‘Don’t feel like you have to have every single tool that’s made to get good pictures.’

Do what you can with what you’ve got.
‘I love tungsten lighting as well,’ Cantrell says. ‘Use existing light sources to create beautiful images. It’s not that the planets line up perfectly for [pro photographers] and not someone else. It’s how can I take the best possible picture with what I’ve got in front of me right now.’

A great expression can be perfection.

‘She’s just laying across the bed in her home, holding her newborn baby,’ Cantrell says. ‘It’s about who you’re photographing. What is this person like?’

Articles: Digital Photography Review (dpreview.com)

 
Comments Off on Working with what you’ve got: Bambi Cantrell on photographing brides, babies and more

Posted in Uncategorized


4 Tips for More Dramatic Beach Photos

13 Feb

For some of us, the beach is a way of life. Whether it’s barefoot strolls at sunset, surfing in the big waves, or simply relaxing in the sun, the beach can be a magical place that is food for the soul.

Capturing it in a photograph though, can be a completely different story!

Suddenly you notice things that weren’t so apparent before you took your camera out: super bright harsh light, and photos that look boring and that don’t convey the feelings you experienced when you were at the beach.

Bandon Beach, Oregon by Anne McKinnell

These tips will help you make the most of your time photographing at the beach, and ensure you come home with photos that are just as dramatic and memorable as your fun day in the sun.

1. Photograph during the Golden Hour

The middle of the afternoon, when the sun is high in the sky and the light is bright, is a great time for swimming and sunbathing, but not such a great time for photography. Just like other types of landscape photography, beach photography is all about the quality of the light.

At the edges of day, when the sun is low in the sky, you’ll find more gentle golden light that will make your photos glow. Sometimes you can photograph during the day too, but only when there are big puffy clouds in the sky that diffuse the light and create drama. If you have a big bright blue sky, it’s better to enjoy the afternoon swimming and visiting with friends, and save the photography for later.

Ormond Beach, Florida by Anne McKinnell

2. Use a Graduated Neutral Density Filter

Even at the edges of the day, the sky is usually quite a bit brighter than the sand or rocks in the foreground of frame, which makes it difficult for your camera to get a good exposure, without blowing out the highlights and creating dark shadows.

Try to even out the exposure by using a graduated neutral density filter which is kind of like sunglasses for your camera. It’s a piece of plastic or glass that is dark on the top, and light on the bottom, and you use it to darken the just the sky portion of your image.

3. Use foreground elements to create an interesting composition

The beach always looks inviting when we’re just about to step onto the soft sand with our bare feet. But when you photograph it just as you see it, it can end up looking boring.

Try using a foreground element in your composition to add interest to the scene. Is there something unique about your particular beach? Perhaps it has colourful rocks, big boulders, driftwood, or seashells. Try incorporating the unique element into the foreground of your image, to make your photograph more interesting.

Rebecca Spit, British Columbia by Anne McKinnell

You can also use a low angle and get really close to your unique element to emphasize it. If you have big colourful rocks, getting down low, and angling your camera upwards, will make them seem even larger. Whereas if you photograph them from eye level they may not look nearly as dramatic as you remember them being.

Gros Morne National Park, Newfoundland by Anne McKinnell

Look around and see what you can use for leading lines that will guide the eye out to the sunset, or towards an important feature in the frame, like sea stacks, or a house in the distance.

Ross Bay, British Columbia by Anne McKinnell

4. Sunbursts and silhouettes

Try some new techniques to create dramatic images. If you are looking towards the sun, you can create a sunburst by including the sun in your frame and using a small aperture like f/22. It also helps if you can partially hide the sun behind an object.

If you have an interesting foreground element with a strong shape, use it to create a silhouette. To do this, use spot metering and expose for the sky, allowing your foreground element to go completely black.

You can even do the silhouette and sunburst together for even more drama!

Canon Beach, Oregon by Anne McKinnell

Next time you go to the beach remember these tips to help you come home with photos that are just as much fun as you had playing in the surf.

Do you have any other beach photography tips, or some favorite beach photos? Please share in the comments below.

googletag.cmd.push(function() {
tablet_slots.push( googletag.defineSlot( “/1005424/_dPSv4_tab-all-article-bottom_(300×250)”, [300, 250], “pb-ad-78623” ).addService( googletag.pubads() ) ); } );

googletag.cmd.push(function() {
mobile_slots.push( googletag.defineSlot( “/1005424/_dPSv4_mob-all-article-bottom_(300×250)”, [300, 250], “pb-ad-78158” ).addService( googletag.pubads() ) ); } );

The post 4 Tips for More Dramatic Beach Photos by Anne McKinnell appeared first on Digital Photography School.


Digital Photography School

 
Comments Off on 4 Tips for More Dramatic Beach Photos

Posted in Photography


4 Steps to Creating Images With More Meaningful Composition

06 Feb

If you wonder what composition really means, it is basically what elements you choose to put in a photograph, and where you decide to place them in the frame.

Vickie-Lewis-MtHood

When composing a photograph you need to consider several things:

  1. What is the story you are trying to tell? In other words, what do you want the viewer to see or feel when they look at your photograph?
  2. What’s your center of interest or focal point?
  3. What elements will most support that story?
  4. How can you maximize those elements?

Let’s consider each of those points individually.

1- What is the story you are trying to tell?

In other words, what do you want your viewer to know or experience when they see the photograph?

Some ideas if you are photographing your children:

  • You might want the viewers to see how cute they are.
  • You might want the viewers to see how smart they are.
  • You might want the viewers to see how much they love their sibling or new puppy.

Each of those ideas will impact how you choose to compose the picture. In the first example, you might choose to dress your daughter with a pink bow and sit her on her princess bed. If you want to show how smart your child is, you may decide to photograph them winning a spelling bee, or playing with test tubes. Of course, if the story is the new relationship with their puppy, you want to capture that moment of them hugging the puppy, or the puppy licking their face.

Lake-Vickie-Lewis-Photography-for-dps

Here’s another example shooting landscapes. Let’s say you want to take a photograph of a beautiful lake in a park, in the middle of a city. What’s the story you want to tell? What’s the experience you want your reader to have when they see your photo?

Here are some ideas:

  • You can isolate the lake and shoot it in such a way that it looks as though it is in the middle of nowhere.
  • You could shoot the lake with the cityscape in the background to show it as a haven in the middle of a grimy city.
  • You could show the restful, or quiet feeling, of the lake by just focusing on an empty park bench, or the reflection of a tree in the water.

grass by edge of lake Vickie Lewis Photography for dps

In every situation, there are many different stories and compositions. Knowing what the story is, and what you want to say, is the first step in composing a photograph. You can start to see how your intention with the photograph becomes important in composing a photograph.

2 – Choosing a focal point

With that in mind, the next step you want to think about is what is your center of interest or focal point? In other words, what is the one element you want your viewer to see first? What ONE element do you want to stand out?

If you are photographing your children, that’s pretty simple, you want your child to stand out. We’ll talk about some strategies to do that in a minute, but first let’s look at our other examples.

If you see a lake that you are drawn to, first ask yourself the story, then ask yourself what one element can be the subject? Is it a tree or rock in the lake? Is it a house on the lake? Is it the moon rising above the lake? Is it the grass growing on the edge of the lake?

Drop-by-Vickie-Lewis

3 – What elements support the story?

As you view the scene, ask yourself, “What elements support the story I’m telling?” As you look through the viewfinder, move your eye around the outside frame of the photo, then look inside that frame and ask yourself if there is anything in the photo that doesn’t belong there.

For example when you are taking a photograph of your child, you ask yourself if you need the dining room table in the background? Do you need your car in the background? What’s important? What elements add to the subject and which distract?

4 – How can you maximize those elements?

In the next section, we’ll look at examples and talk about ways you can clean up your photographs in two simple ways.

1 Lighthouse snapshopt Vickie Lewis Photography for dps

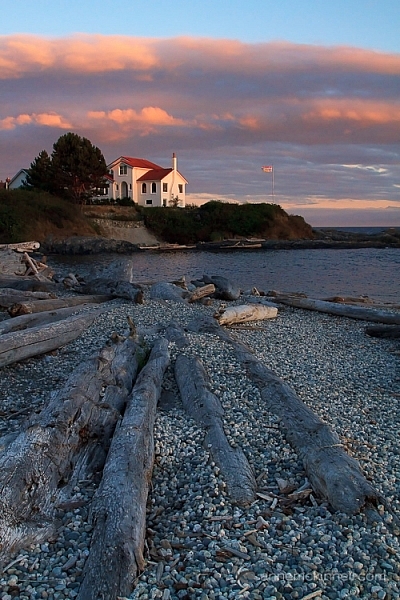
Above is a photo of a lighthouse. It’s a very pretty scene, but it’s filled with elements that don’t really help the composition. There are elements, including a wire overhead and an information stand in the front, that don’t add anything to the feel of the place.

2 Lighthouse Vickie Lewis Photography for dps

This is better. The first shot was taken with a wider angle lens. In this shot, I took a few steps to the right, and zoomed in a little bit. Zooming in not only eliminates some of the foreground, it changes the perspective. Can you see how the image feels more compressed? Also, the wires were not magically Photoshopped out of the picture, I chose to eliminate the top of the tree from the frame.

3 Lighthouse Vickie Lewis Photography for dps

Here’s yet another different perspective. For the shot above, I used an even longer lens, and moved more to the right. The most important element to me, the story, is the lighthouse. The dark tree nicely frames it, and adds perspective. This photo, compared to the first, is much cleaner.

Now, I could have chosen to get closer with the wide angle lens, but the light house would start to lean, and it would have emphasized the power lines.

Different angles can also help clean up backgrounds, so you ask yourself:

  • Would taking a step or two in a different direction get rid of some distractions?
  • Would getting a little bit higher or lower help the composition?
  • Would changing the focal length help with the composition?

1 Foggy Shack vickie lewis for dps

2 Foggy Shack Vickie Lewis for dps

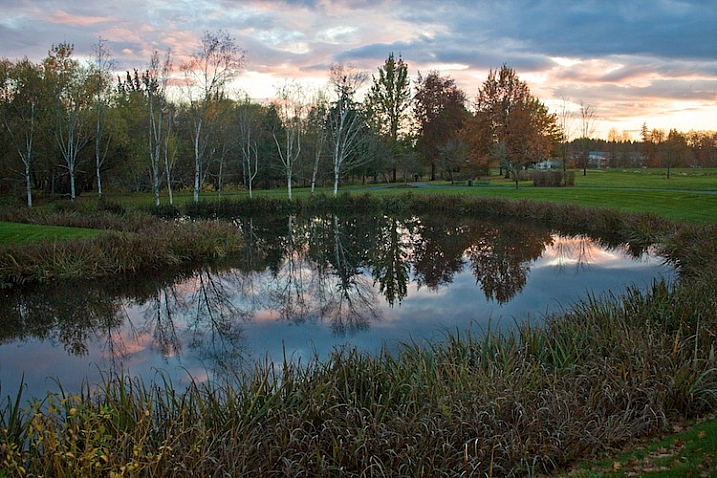
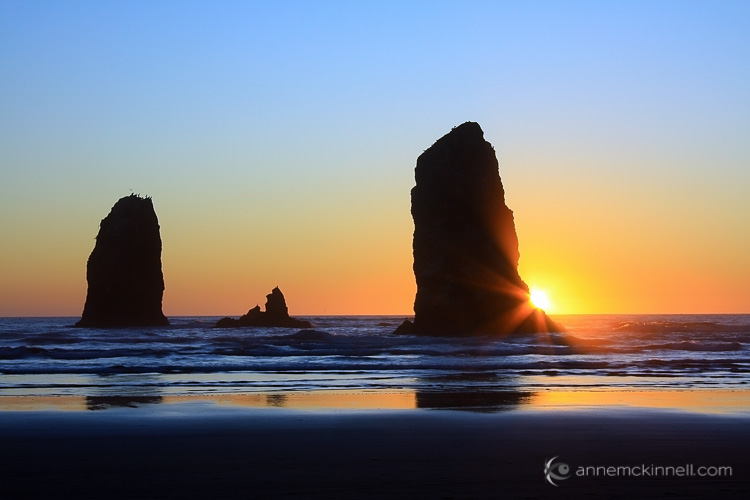
Here’s a great scene of a foggy shack on a lake. It’s next to a very busy highway, so I chose an angle from which you can’t see any cars. In the first example, the emphasis is on the grass. I used a wider lens and looked for a patch of grass for the foreground that made a nice pattern. The grass leads the viewer into the photograph. The shack seems further away.

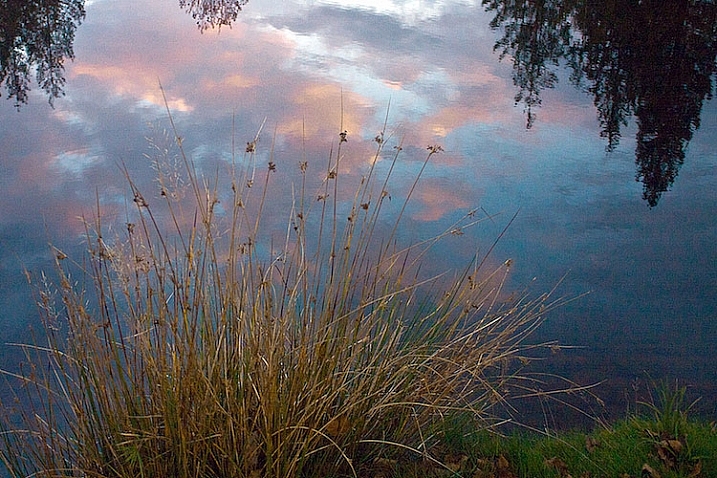
In the second image, I chose to focus just on the reflection and the quietness of the scene. I found an angle from which I could shoot with no grass. My focus changed, the feeling also changed. Which one do you like better?

1 Nehalem River Vickie Lewis for dps

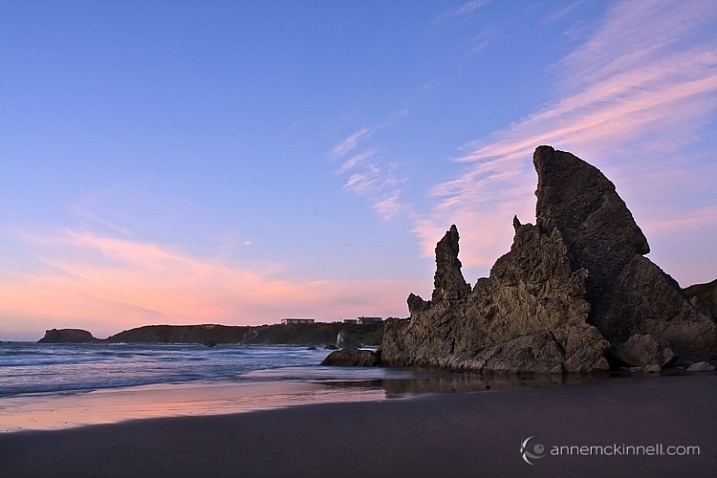
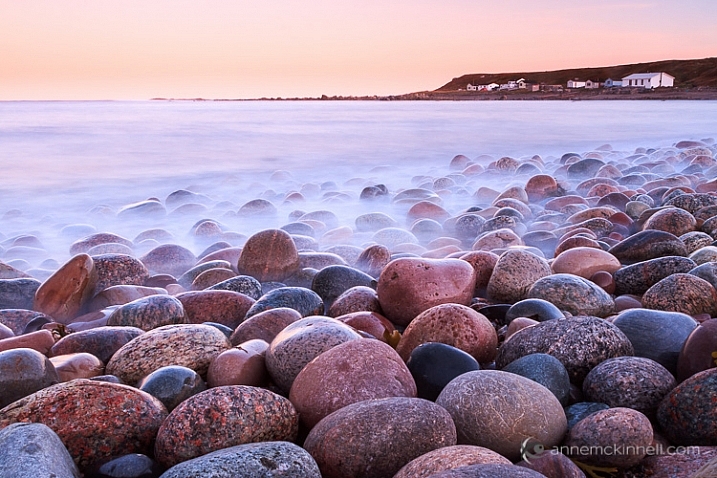
Here’s a beautiful scene with lots of potential. But your eye really has no place to go. There isn’t a strong sense of interest. The story is one of serenity and a great place to go fishing.

2 Nehalem River Vickie Lewis for dps

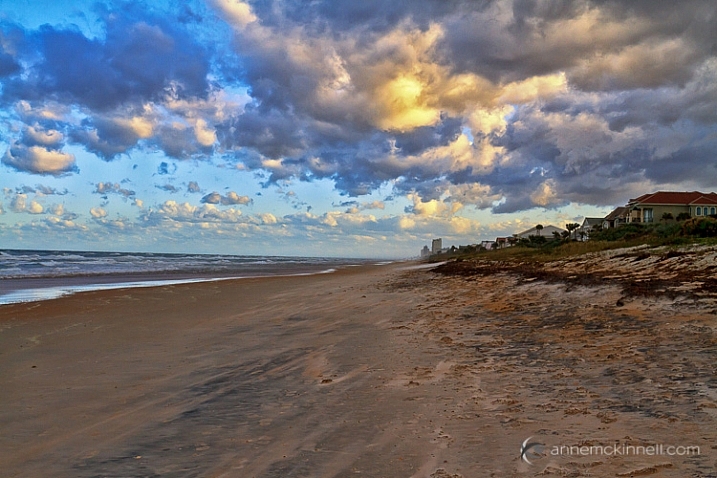
To improve the composition, I waited until some fishermen popped into the right place. In the second photo, can you see how your eye has a place to go? It’s immediately drawn to the fishermen in the red boat.

You can greatly dramatically improve the composition in your photographs by framing a photo and waiting for the right elements to come together.

So now, moving forward with your photography, you have some great ideas to work with:

  • Consider what story you are telling with your photographs.
  • Make sure you have a center of interest.
  • Decide what elements support the story.
  • Maximize the elements by changing position and focal length.

googletag.cmd.push(function() {
tablet_slots.push( googletag.defineSlot( “/1005424/_dPSv4_tab-all-article-bottom_(300×250)”, [300, 250], “pb-ad-78623” ).addService( googletag.pubads() ) ); } );

googletag.cmd.push(function() {
mobile_slots.push( googletag.defineSlot( “/1005424/_dPSv4_mob-all-article-bottom_(300×250)”, [300, 250], “pb-ad-78158” ).addService( googletag.pubads() ) ); } );

The post 4 Steps to Creating Images With More Meaningful Composition by Vickie Lewis appeared first on Digital Photography School.


Digital Photography School

 
Comments Off on 4 Steps to Creating Images With More Meaningful Composition

Posted in Photography


1.4 and More: Canon EF 35mm F1.4L II comparison

21 Jan

Canon is making some big claims about the development put into its 35mm F1.4L II. Its new Blue Spectrum Refractive optical element is claimed to minimize longitudinal chromatic aberration, and a new 9-blade aperture promises smoother bokeh. Initial MTF charts provided by Canon showed improvements in resolution and sharpness over the old 35 F1.4, and the Sigma 35 F1.4 Art as well. Once a copy landed in our hands, we decided to test these claims.

Sharpness

These shots were all focused wide-open in Live View on the bottom of the Space Needle, and shot within a few minutes of each other with the cameras white balance setting on ‘Daylight.’ They were then processed with no exposure corrections or WB corrections in ACR using the ‘Adobe Standard’ camera profile.

$ (document).ready(function() { ImageComparisonWidget({“containerId”:”reviewImageComparisonWidget-63332475″,”widgetId”:296,”initialStateId”:null}) })

When used wide-open, the differences between these three 35mm F1.4 lenses seem fairly significant. The new Canon shows little to no chromatic aberration on the tower of the Space Needle, an area where the other two struggle. It also shows better performance wide-open in the extremes$ (document).ready(function() { $ (“span#imageComparisonLink-1864”).click(function() { ImageComparisonWidgetLink(1864); }); }) of the image$ (document).ready(function() { $ (“span#imageComparisonLink-1865”).click(function() { ImageComparisonWidgetLink(1865); }); }). At F2$ (document).ready(function() { $ (“span#imageComparisonLink-1872”).click(function() { ImageComparisonWidgetLink(1872); }); }) the Sigma starts to catch up in overall IQ towards the center, and the first version of the Canon starts to narrow the gap at F2.8$ (document).ready(function() { $ (“span#imageComparisonLink-1869”).click(function() { ImageComparisonWidgetLink(1869); }); }), although in this specific area it never quite catches up. There are areas where there is a similar amount of sharpness$ (document).ready(function() { $ (“span#imageComparisonLink-1870”).click(function() { ImageComparisonWidgetLink(1870); }); }) behind the Mark I’s aberrations, and there are places where it is far behind$ (document).ready(function() { $ (“span#imageComparisonLink-1873”).click(function() { ImageComparisonWidgetLink(1873); }); }) the Mark II version. These inconsistencies are part of the wonderful world of copy variation, and these lenses are by no means hand-selected examples. Overall, the Canon EF 35mm F1.4 L II does perform a step above the competition.

Copy Variation

After shooting this comparison on the Canon EOS 5DS R, we were concerned with how poorly the EF-mount Sigma 35mm F1.4 performed off-center. While we didn’t have access to more EF-mount versions at the time, we did have a Nikon F-mount Sigma 35mm F1.4 in the office, which we adapted to a Sony a7R II with a Metabones adapter to re-shoot the comparison. While we were at it, we also threw in the Sigma 24-35mm F2 zoom, to see how it stacks up against two of the best 35 primes in the business. We adapted both the EF-mount Canon 35/1.4L II and EF-mount Sigma 24-35mm F2 to the same Sony a7R II via a Metabones Smart Adapter IV for a fair comparison. Result of this comparison are below. Please keep in mind the general caveats surrounding adapters and adapted lenses, especially around compounded mount tolerances affecting off-axis performance (which we see little evidence of). 

$ (document).ready(function() { ImageComparisonWidget({“containerId”:”reviewImageComparisonWidget-51449040″,”widgetId”:300,”initialStateId”:null}) })

Immediately, we see that a better copy of the Sigma 35mm F1.4 Art performs admirably against the new Canon 35L II, at least matching, if not slightly exceeding, center sharpness wide open$ (document).ready(function() { $ (“span#imageComparisonLink-1926”).click(function() { ImageComparisonWidgetLink(1926); }); }) and even at F2$ (document).ready(function() { $ (“span#imageComparisonLink-1927”).click(function() { ImageComparisonWidgetLink(1927); }); }). The story is a little different at the extremes$ (document).ready(function() { $ (“span#imageComparisonLink-1924”).click(function() { ImageComparisonWidgetLink(1924); }); }) of the scene$ (document).ready(function() { $ (“span#imageComparisonLink-1922”).click(function() { ImageComparisonWidgetLink(1922); }); }): although we see a great improvement in this copy of the Sigma 35mm, it still does fall behind the Canon wide-open with a hint more coma at the extremes. At F2.8$ (document).ready(function() { $ (“span#imageComparisonLink-1925”).click(function() { ImageComparisonWidgetLink(1925); }); }) we see the gap between the Sigma 35mm and the Canon 35mm close, while the 24-35 F2 trails slightly behind.

The Canon 35L II continues to perform better with respect to chromatic aberration, though. The extreme variance in performance from copy-to-copy of the Sigma 35mm F1.4 is certainly concerning, and is a good reminder that discerning buyers should test their copy. Interestingly, Roger Cicala has actually found greater copy-to-copy variation with the Sigma 35mm Art in comparison to the Canon 35L II (see Conclusion of this article). This is also a reminder that any internet shootout (save for Roger’s work) is generally prone to only being valid for the copies tested. We hope to circumvent this issue by – in the future – performing these sorts of shootouts with a copy that represents the performance of the average of a population.

Longitudinal CA

Method

Here we look for longitudinal chromatic aberration (CA), which manifests itself as green or magenta fringing behind or in front of the plane of focus. This is particularly an issue with fast primes, and isn’t as easy to remove in post as one would like. Low amounts of longitudinal CA (LoCA) are, therefore, extremely welcome in fast primes that photographers are prone to shoot wide open, and Canon makes some bold claims in this department with the 35L II.

For this test we used our Lens Align tool, which shows green and magenta fringing quite easily in the horizontal black lines around the plane of focus.* The slight differences in lens size, optical center, and focal length meant moving the camera slightly to hold magnification constant. Focus was set wide-open on the center target in LiveView, then locked in place for the sequence.

$ (document).ready(function() { ImageComparisonWidget({“containerId”:”reviewImageComparisonWidget-20031416″,”widgetId”:295,”initialStateId”:null}) })

Results

It looks like the Blue Spectrum Refractive optical element does what Canon developed it for. The 35L II has the best control of LoCA of them all, and is far ahead of the original 35L which, frankly, really didn’t impress in this arena. While the Sigma Art does hold its own, it still falls behind the new Canon, with the magenta fringing even more obvious in our infinity shots of the Space Needle above. And even at F2$ (document).ready(function() { $ (“span#imageComparisonLink-1874”).click(function() { ImageComparisonWidgetLink(1874); }); }) in our Lens Align chart above, the Sigma hasn’t quite caught up to the 35L II. This, combined with the better across-the-frame sharpness, potentially makes the new Canon the better choice for photographers looking to shoot wide-open.**

Bokeh Comparison

While shooting the Longitudinal CA test, we put a net of Christmas lights a few feet behind our Lens Align tool to create beautiful balls of bokeh, giving us a way to visualize differences between the three lenses’ out of focus characteristics. Hover your mouse over any given aperture of any given lens to have the main image switch to a full-frame view of the resulting shot.

Canon 35 F1.4L 1.4 2 2.8 4 5.6 8 11 16
Canon 35 F1.4L II 1.4 2 2.8 4 5.6 8 11 16
Sigma 35 F1.4 Art 1.4 2 2.8 4 5.6 8 11

16

Comparing the new Canon to the old Canon, we can see the effect of the new 9-bladed aperture. Stopped down, the ‘bokeh balls’ have points to them on the older lens, whereas the new lens produces smooth out of focus areas. The odd number of aperture blades also ensures that the new 35 produces brilliant, multi-pointed sunstars.

It’s important to note that all lenses show relatively similar-sized ‘bokeh balls’, suggesting that subject isolation characteristics should be relatively similar between all these lenses. That said, because bokeh and sharpness fall-off is complex, we can’t make sweeping judgements about overall bokeh characteristics at any given plane; simply that, overall, it’s unlikely that there are drastic difference between these lenses in terms of ability to isolate subjects and throw backgrounds out of focus.

All in all, what theses tests show is that the $ 1799 sticker price of the new Canon EF 35mm F1.4 L II does offer some significant advantages over its predecessor, but only a slight advantage over the Sigma that only high-megapixel bodies can really expose the differences in. The biggest advantage it provides is usable wide-open results with nearly no corrections required, which is getting tougher to achieve as resolution goes up. Hats off to Canon for the achievement, but hats off to Sigma for still remaining competitive at a much lower price.


* The rulers on the top and bottom of the chart are NOT part of the tool and are there for framing purposes only. These rulers are not parallel with the focus plane, and should not be used to judge sharpness in any way.

** We should mention that there are limits to the utility of infinity tests focused at the center for prime lenses typically used to shoot wide aperture portraiture. A photographer is likely to focus on non-central human subjects using a non-central AF point, which may yield different sharpness result compared to our centrally-focused infinity shots (especially for lenses demonstrating significant field curvature). In future lens tests using charts, we’re considering providing results from two different focusing methods: centrally focused vs. focused at each measurement point on the chart. The latter may give a better idea of sharpness for non-central, closer-up human subjects.

Articles: Digital Photography Review (dpreview.com)

 
Comments Off on 1.4 and More: Canon EF 35mm F1.4L II comparison

Posted in Uncategorized


How to Use a Gray Card to Get More Accurate Exposures and Color

15 Jan
how-to-use-a-grey-card-1597

High contrast scenes with delicate colors can prove tricky for your camera’s meter and white balance settings.

If you’re familiar with the fundamentals of camera technique, then you know how much of an effect white balance can have on your images. Also, you probably have a basic understanding of how your camera’s meter works, or at least how to react to its output to change your settings appropriately.

Just beyond these basics, there are a few simple techniques that will allow you to fin- tune your white balance, and get more accurate meter readings from your subject. To take advantage of these techniques, you only need to add a single cheap piece of equipment to your camera bag: a gray card.

These humble accessories start at less than $ 10, yet the amount of control they give you over the final image, can be invaluable in tricky situations. For example, they allow you to obtain a good white balance reading from mixed light sources, or get an accurate exposure reading from your camera’s meter in a high contrast scene.

What is a gray card

A grey card is exactly what it says it is. A card that is gray. More specifically, it is middle gray, or 18% gray. This number is important because 18% gray is what your camera’s meter is trying to calculate when it meters to expose for a scene. This means if you put a grey card in front of your subject, and take a meter reading off it, you will get a correct exposure regardless of any tonal contrast in the scene.

Additionally, when used in conjunction with a camera’s custom white balance feature, you can manually set a perfect white balance for everything you photograph. This becomes especially important when you need to faithfully recreate colors in your images, whether that may be for commercial purposes or record shots.

Metering

The more useful of these two techniques is metering. In this case, a gray card is the closest thing you’ll get to a magic bullet that will allow you to get a near perfect exposure, in almost any situation.

Spot metering

To get started, the first thing you’ll want to do is to set your camera to the spot metering mode. While this is not absolutely necessary, the fact that the camera will only be metering from a small section in the centre of the frame will help a lot, especially in circumstances where you cannot fill the entire frame with the gray card. It will also save you a lot of time if you use manual mode.

Metering

With your metering mode changed, all that you have to do now, to take advantage of this technique, is put the gray card in your scene, point the centre of the frame at it, dial in the exposure your meter gives you and then just take the gray card away. Providing that the light doesn’t change, you will now have an accurate exposure for any subsequent shots that you take in this setup.

Taking a meter reading with a grey card.

Taking a meter reading with a gray card.

Hints

There are a few things can do that will make this process easier and more accurate.

First, you should make sure that your subject remains in a similar position relative to the light source, from where you took your gray card reading. For example, if you’re taking headshots outdoors and the sun is lighting your subject from the front; that is one exposure reading. If you turn your subject to the side, or completely around, that will affect your exposure and you will need to take another reading.

The second tip is when you’re taking the exposure reading; fill the frame with the grey card as much as possible. This will help to ensure that your meter is only trying to expose for the card, and not anything around the edges.

White balance

Although the basic white balance settings in cameras can be pretty good, they do tend to struggle at times. For example, tungsten bulbs can vary greatly in color temperature, depending on their quality and power output. This may lead to the basic tungsten setting on your camera failing to give you an accurate representation of colors.

There are two ways to use a gray card to set your white balance. The first is to use it to set your camera’s custom white balance. The second method will allow you to use Lightroom to set a white balance for your images after they have been taken. You can also use Adobe Camera Raw (inside Photoshop) if you don’t have Lightroom.

Shifts in White Balance - Left: Daylight Center: Tungsten Right: Custom

Shifts in White Balance – Left: Daylight – Center: Tungsten – Right: Custom

In-camera custom white balance

The technique described here is for Canon users. If you use Nikon, Sony, or any other brand, you will need to consult your manual for instructions on setting a custom white balance.

  • Step 1:  Take a photo of your grey card, ensuring that it fills the frame entirely. Try to make sure that it is flat in the frame and that it is lit evenly, and in the same way as your subject.
  • Step 2: Open the camera’s menu and find the option labeled “Custom White Balance” (or Custom WB). Press the select button and choose the photo of your gray card. Press select again and you have set your custom white balance. Set the camera’s white balance to use the new custom setting and start taking photos.

how-to-use-a-grey-card-canon

If something in your scene changes, such as the lighting, just repeat the steps above and all of your images should have an accurate white balance.

Post-production custom white balance

how-to-use-a-grey-card-1626

The ColorChecker Passport offers even greater control over white balance, and also has a section for setting a custom white balance in-camera.

For the post-production option, the only thing you need to do with your camera is to take a photo of your gray card in all of the scenes that you’re photographing. It may help with organization if you start off any sequence of photos with the gray card image. This way, you will always know which image to use to take a white balance setting from.

Once you’re on the computer, and have your images loaded into Lightroom, the steps are quite straightforward:

  • Step 1: Select the photo of a gray card that you want to take a white reading, from and enter the develop module.
  • Step 2: Select the eyedropper tool that’s next to the White Balance sliders in the right hand panel, and click anywhere on the image of the grey card. You should now have an accurate white balance setting.

how-to-use-a-grey-card-lightroom-1

  • Step 3: In Lightroom, to copy your settings, press ctrl+shift+c (CMD+C on Mac) and check the White Balance boxes. Leave all of the other boxes unchecked.

how-to-use-a-grey-card-lightroom-2

how-to-use-a-grey-card-lightroom-4

  • Step 4: In Lightroom, select all of the photos you want to correct (using the filmstrip at the bottom) the white balance on and press ctrl+shift+v (Cmd+V on Mac). Now all of photos you took should have a corrected white balance.

how-to-use-a-grey-card-lightroom-3

Summary

All of the techniques outlined here are simple, and not very time consuming, yet the amount of extra control they give you over your camera makes a gray card one of the most cost effective accessories in any camera bag.

Have you used one before? Do you have any other tips to add? Please share that or any questions you have below.

googletag.cmd.push(function() {
tablet_slots.push( googletag.defineSlot( “/1005424/_dPSv4_tab-all-article-bottom_(300×250)”, [300, 250], “pb-ad-78623” ).addService( googletag.pubads() ) ); } );

googletag.cmd.push(function() {
mobile_slots.push( googletag.defineSlot( “/1005424/_dPSv4_mob-all-article-bottom_(300×250)”, [300, 250], “pb-ad-78158” ).addService( googletag.pubads() ) ); } );

The post How to Use a Gray Card to Get More Accurate Exposures and Color by John McIntire appeared first on Digital Photography School.


Digital Photography School

 
Comments Off on How to Use a Gray Card to Get More Accurate Exposures and Color

Posted in Photography


New Year! New Followers! How to Make More Instagram Pals

07 Jan

The empty champagne bottle says it all: 2016 has arrived!

Begin the year by sharing your stellar shots with a wider audience on your fave photo sharing app.

We’re talking, of course, about Instagram! We’ve got tips for making friends and finding new followers ’cause your awesome IG pics deserve to be seen.

Go forth and have a picture-perfect start to 2016!

(…)
Read the rest of New Year! New Followers! How to Make More
Instagram Pals (474 words)


© Taylor for Photojojo, 2016. |
Permalink |
No comment |
Add to
Instagram Pals”>del.icio.us

Post tags:


Photojojo

 
Comments Off on New Year! New Followers! How to Make More Instagram Pals

Posted in Equipment


6 Simple Resolutions for a More Photogenic 2016

04 Jan

It’s a new year, which means a fresh start on some new goals.

If you’re anything like us (and we know you are!) you’re already thinking about making major photography strides in 2016.

So join us in some challenges this year, we promise to keep ’em simple and fun!
(…)
Read the rest of 6 Simple Resolutions for a More Photogenic 2016 (442 words)


© Erin for Photojojo, 2016. |
Permalink |
No comment |
Add to
del.icio.us

Post tags:


Photojojo

 
Comments Off on 6 Simple Resolutions for a More Photogenic 2016

Posted in Equipment