RSS
 

Posts Tagged ‘More’

Streets Illustrated: Colorful Interventions Make the City More Fun

24 Jan

[ By SA Rogers in Art & Street Art & Graffiti. ]

Filling the city with art by literally painting right onto the streets makes it feel like everyone is immersed in an illustration, acting out some kind of larger-than-life story. Formerly bare patches of asphalt and concrete get splashes of color, patterns and imagery that can be humorous, fun or politically pointed. Roadsworth is among the street artists best known for this style, and recently debuted a new piece referencing the refugee crisis.

roadsworth-montreal-mural-festival

“A new record: as of today, the UN has counted 65 million refugees in the world,” he says. “I painted this in recognition of this tragic fact. Walls and Fences are for painting and climbing not for dividing and obstructing.”

In this particular mural, painted onto a street in Montréal, passersby are confronted with massive hands cling to a chain-link fence, effectively forcing them to recognize and think about the subject matter.

roadsworth-gif

roadsworth-ice-cream

roadsworth-bridge-crossing

Other Roadsworth murals are more playful, like a stop-animation squirrel that appears to run down the street when the images are stacked in a GIF, and a crosswalk that has been turned into a rope bridge. A giant pink ice cream cone melts onto the pavement.

roadsworth-octopus

roadsworth-bike-path

roadsworth-singing-river

Prints can be purchased at Roadsworth.com, and you can keep up with the artist’s work on Instagram.

Share on Facebook


[ By SA Rogers in Art & Street Art & Graffiti. ]

[ WebUrbanist | Archives | Galleries | Privacy | TOS ]


WebUrbanist

 
Comments Off on Streets Illustrated: Colorful Interventions Make the City More Fun

Posted in Creativity


Vanguard’s Alta Rise bags expand so you can cram in even more gear

24 Jan

Vanguard’s Alta Rise bag series, which debuted at Photokina, includes three messenger models, two backpack models and one sling bag model. The entire lineup offers what Vanguard calls a ‘+6 size expanding feature’ for increasing or decreasing a bag’s size as needed.

The lineup features the Alta Rise 28 Messenger ($ 109.99), Alta Rise 33 ($ 119.99), Alta Rise 38 ($ 129.99), Alta Rise 43 Sling ($ 99.99), Alta Rise 45 Backpack ($ 129.99), and the Alta Rise 48 Backpack ($ 159.99). The +6 expansion system extends the size of each bag by 6cm via unzipping a single zipper. All six bags can generally fit three to five lenses, a DSLR, and other items including a tablet or, depending on its size, a laptop.

Other universal features include a ‘quick action’ access point, protective padding, and a ‘total coverage rain cover.’ Some other non-universal features include an Air System for comfort in certain bags, accommodation for up to a 15-inch laptop, a discreet ‘Magic Pocket,’ and feet on the bottom to keep the bottom of the bag off the ground.

Via: ThePhoblographer

Articles: Digital Photography Review (dpreview.com)

 
Comments Off on Vanguard’s Alta Rise bags expand so you can cram in even more gear

Posted in Uncategorized


Guerrilla Guidance: DIY Street Signs Make Urban Life More Interesting

21 Jan

[ By SA Rogers in Art & Street Art & Graffiti. ]

guerrilla-street-signs-5

You’re hurrying along the sidewalk on the way to work, running late and not in the greatest mood, when you see a sign in the adjacent field that simply reads “PLEASE WAIT HERE, YOUR FUTURE SELF WILL MEET YOU SHORTLY.” How does that affect your day? Little moments like these can bring some much-needed levity to the world around us, especially in dark times.

marquez-signs-3

guerrilla-street-signs

guerrilla-street-signs-2

Impeccably produced, often enticing you to push a button or take a card, these guerrilla installations look pretty legit until you stop to read what they say. They’re easy to miss, if you’re hustling too quickly and tuning out your surroundings – but if you take a moment to notice them, they might just make you smile.

marquez-signs-1

marquez-signs-2

guerrilla-street-signs-6

guerrilla-street-signs-7

Artist Michael Pederson (aka Miguel Marquez Outside) creates these little interventions and puts them up all over his home city. Sometimes they’re site-specific, referring to things that can be found in the local environment, like a hole in the curb or a sidewalk that ends abruptly.

guerrilla-street-signs-3

guerrilla-street-signs-4

guerrilla-street-signs-8

The personal space cards would actually be pretty handy, and who wouldn’t be tempted by a time travel pay phone? Check out more of Pederson’s work at his tumblr and Instagram.

Share on Facebook


[ By SA Rogers in Art & Street Art & Graffiti. ]

[ WebUrbanist | Archives | Galleries | Privacy | TOS ]


WebUrbanist

 
Comments Off on Guerrilla Guidance: DIY Street Signs Make Urban Life More Interesting

Posted in Creativity


Udee universal backpack includes camera compartment, external USB charging and more

17 Jan

A versatile photography backpack called Udee is seeking funding on Kickstarter, offering a design that’s meant to cover many different circumstances and needs. The backpack boasts 19 features, including a dedicated ‘photography bag,’ an external USB charging port, an integrated LED safety light, integrated earphone port, and more. With 39 days to go, the campaign is looking to hit a $ 20,000 funding goal to bring the backpack to production.

Udee is designed for everything from travel to regular daily use, covering most of the bases anyone could need via a combination of security, convenience and comfort features. As far as comfort is concerned, Udee has a weight reduction design that includes an X-shaped back support element combined with an S-shaped belt, memory sponge material and air permeability.

This is complemented by an anti-theft security feature in the form of a coded lock which, when used with a steel cable, can lock the bag in place and keep thieves out. Convenience is also given a strong focus, and includes quick- access zones, a 3M reflective strip, an earphone port for listening to music through headphones connected to an item inside the bag, and an external USB port for charging a phone using a battery stored within the bag.

Udee’s design allows specific categories of items to be stored separately from others. A photography bag section has cushioned spaces for a camera and lenses, for example, while there’s also a pocket for a laptop, sleeves for notebooks or similar items, small pockets, a glass chamber for breakable items, and even a compartment that can be used as a portable cooler. Overall, the bag has a 25 liter capacity.

Meltpartners, the entity behind Udee, is seeking funding for the bag on Kickstarter, where there’s a stated $ 20,000 funding goal. Backers are offered an early bird Udee basic backpack in exchange for a minimum $ 99 pledge, though other more substantial pledge rewards are also listed.

Via: Kickstarter

Articles: Digital Photography Review (dpreview.com)

 
Comments Off on Udee universal backpack includes camera compartment, external USB charging and more

Posted in Uncategorized


10 More Photography Tips to Help Take Your Images to the Next Level

12 Jan

A while back I wrote an article that was quite popular: 10 photography tips to take your photography up a level. In this article, I bring you 10 extra tips from all aspects of photography. Enjoy!

10 More Photography Tips to Help Take Your Images to the Next Level

#1 – What’s more than meets the eye?

Let me ask you something, what would you do? You meet someone attractive, you are head over heels, and then you start actually talking to them. You then uncover the most superficial person you have ever met. That person is all looks and not much else. You would lose interest, right? Because looks by themselves are good enough to make you interested, but if there is nothing sustaining that interest, you’re gone. This is the same thing in Photography,

This is the same thing in photography. A beautiful composition is nice, but what is in your image that is designed to keep the viewer’s attention? What is it about your image that is more than meets the eye? Is it saying something deeper? Is it making a point? Showing a concept? Add meaning to your images to keep the viewer engaged.

#2 – Know your opportunity

I believe there are only four times when you control the image. The first is at the moment of exposure (when you shoot), the second is in post-processing, the third is in sequencing and editing, and the fourth is while printing. So, when shooting, have these things in mind in order to shoot with clarity.

Example, you shoot an image and it is overexposed (because of the camera’s limitation). But it doesn’t end there as you know that you have another opportunity in the post-processing phase to recover details. Or you shoot something with a nice texture but it doesn’t have the effect you want. It doesn’t end there, you know that you can print and blow it up real big to have the effect you seek. Or you shoot an image that can’t stand by itself. Once again it doesn’t end there, you know you have another similar image that can make a diptych.

The point is that making an image is only the first step. There’s a whole process that comes afterward when you can get the effect you desire. So it’s important to know that what you have in the camera is the starting point and not the end.

#3 – Pay attention to this detail (after your background)

10 More Photography Tips to Help Take Your Images to the Next Level

In the first 10 tips article, I suggested that you pay attention to the background first. Now I would like to add another thing to pay attention to before your subject – the corners. You see there is a strong dynamic with the corners, they draw you into the frame, towards the dead center and if you can align some lines there, it’s like surfing a big wave, it just draws your eye even more!

In the image above we have the guy’s hands, the shape of the tree and the shadow on the bottom right corner just pulling you into the image. So, pay attention to your background, watch your corners, and then look at your subject.

#4 – Dennis Rodman-ize it

10 More Photography Tips to Help Take Your Images to the Next Level

Let’s face it, it’s hard to get attention in this ever increasing attention deficit world. Dennis Rodman had been in the NBA for years, but he was receiving few endorsement contracts. He was a good player but didn’t shine enough. Then came the Rodman with the crazy hair and style, even as a kid I knew his name because he simply looked different.

That brings us to photography, you are probably doing something a certain way, so can you Dennis Rodman-ize it? Shoot in a different way that makes your work pop above and beyond what you normally do? For example, landscapes are usually shot with a wide angle, what if you shot landscape abstracts with a telephoto? Or used a special processing technique on your images that gave them a certain look?

#5 – Work on your name

You probably know the wine experiment, where they gave people wine to drink, one was expensive and the other was cheap. Everyone, of course, preferred the expensive wine over the cheap one, even if it was the same wine. Here’s the REAL KICKER, when they scanned the brains of the people who drank the wine, their brain actually made them believe they were drinking expensive wine, and it literally tasted better. Their perception altered their reality.

10 More Photography Tips to Help Take Your Images to the Next Level

With that in mind, work on your images but also on your name or brand. Try to get as much recognition as you can, it will alter people’s perception of your work. I remember a photographer who had decent work, and then that person got famous literally overnight. Let me tell you, even I, knowing all that I know about psychology, now see his work in a better light.

It’s crazy, and probably a bit sad, but that’s just the way it is. The story of Joshua Bell also illustrates this point well. This guy makes $ 1000 per minute playing on a million dollar violin, yet he got a meager $ 32 and a few cents when they had him play anonymously in a metro. Same guy, same skill – different context, different result.

#6 – Get luckier

Let’s not mince words here, luck plays a big role in photography. That Cartier-Bresson shot of the man jumping? That was 100% luck because he couldn’t even see what he was shooting through a hole.

Why is luck such a big deal? Because you DO have to be there at the right moment, and so does your subject, the light, etc. Truth be told, you need the skill and the eye to seize the moment, but if you are not there, the shot won’t be yours.

10 More Photography Tips to Help Take Your Images to the Next Level

So taking into account the luck factor, shoot more often. You’ll get luckier and luckier every time you do. By making more photo opportunities, you’ll be making more images. So if you used to go out once, go out twice, etc.

I mean, who do you think will have a better chance at getting a job? The one that applies for one job, or the one that applies for 10? Skill and creativity are multiplying forces, but it doesn’t matter how skillful you are if you are a couch potato. Sharpen your skills and get out there to get lucky.

#7 – Scramble everything

There was this cool experiment where they gave this guy upside down glasses, so everything was inverted. They wanted to pour him a drink, and he turned the cup upside down (because he believed it was upside down). Imagine the world upside down and how hard it would be to live like that. The kicker? After 10 days he adapted to the upside down vision, and could even ride a bike!

10 More Photography Tips to Help Take Your Images to the Next Level

Sometimes we just get used to how we shoot, we get complacent, that’s normal. So scramble things up. If you normally shoot color, try b/w, if you like portraits try street photography, if you are a film shooter, try digital, etc. It’s like the “Dennis Rodman-ize” tip, but this is more designed to shake you out of complacency rather than to bring attention to your work.

#8 – Revisit your images
10 More Photography Tips to Help Take Your Images to the Next Level

Two photographers can look at the same scene, and yet see two different things. The difference is their knowledge about photography. You probably have some hidden gems in your images that you’ll probably never uncover if you do not revisit your images. You made them, but when you revisit them you do so with new eyes, and you will see them differently.

You will be amazed at what you find. Images that you believed were boring and/or ruined will be seen in a new light. You may ask yourself, “How did I miss that?!? There are quite a few images that I have overlooked, that’s why I have a no-delete policy. Maybe I can’t see what my future self will see or what my future self will be into.

#9 – Let go of preconceptions

10 More Photography Tips to Help Take Your Images to the Next Level

I receive emails daily from photographers around the world. The one thing many seem to struggle with is that they don’t live in a big city. It is understandable, but just because you can’t find the images you have in your mind doesn’t mean they are not there. You just need to let go of your preconceived ideas and be more open to what is in front of you.

Some people tell me they wish they had more money to travel. Evidently, the image in their mind is of travel, but an image doesn’t need to be travel photography to be good, does it? It’s good to have a general idea of what you want, but also to be open to the possibilities.

Some people get hung up on relationship breakups, passing by great, if not better opportunities in front of them. Likewise, seeing what is possible right in front of us allows us to maximize our opportunities as photographers.

#10 – Remember it’s all plastic

10 More Photography Tips to Help Take Your Images to the Next Level

It’s a hard concept to grasp, especially as a beginner, but remember that photography is plastic. Exposure? Plastic. Colors? Plastic. White Balance? Plastic. Sharpness. Who said every image needed to be averagely exposed, with white balance set perfectly by grey card, and super sharp? The first thing I do as a photographer in Lightroom is to clip my blacks. I LOVE clipping my blacks. I never set my white balance with a grey card, I just look at the image and hear what it creatively calls for, then do that.

Photo of a bride and groom? Probably needs to be on the warmer side so that the viewer can get some emotional cues from that. Shot these plastic surgeons? I’ll put my white balance on the cool side to reinforce the surgical cleanliness. Whatever you are doing right now, remember all of it is plastic. Who said images needed to be in a square or rectangle? Who said portraits have to contain faces? Who said colors had to be realistic (see above)? Who said paper and canvas was the only printing options…..you get the gist!

Conclusion

There you have it, 10 more photography tips to help you in your photography journey. I hope you resonate with some of them. Be yourself, stay focused and keep on shooting.

10 More Photography Tips to Help Take Your Images to the Next Level

googletag.cmd.push(function() {
tablet_slots.push( googletag.defineSlot( “/1005424/_dPSv4_tab-all-article-bottom_(300×250)”, [300, 250], “pb-ad-78623” ).addService( googletag.pubads() ) ); } );

googletag.cmd.push(function() {
mobile_slots.push( googletag.defineSlot( “/1005424/_dPSv4_mob-all-article-bottom_(300×250)”, [300, 250], “pb-ad-78158” ).addService( googletag.pubads() ) ); } );

The post 10 More Photography Tips to Help Take Your Images to the Next Level by Olivier Duong appeared first on Digital Photography School.


Digital Photography School

 
Comments Off on 10 More Photography Tips to Help Take Your Images to the Next Level

Posted in Photography


Tips for How to Think and Use Lightroom More Artistically

04 Jan

Each time I process one of my images I do it in a totally different way. This might sound strange to you. I feel that often articles about image processing are riddled with ideas about formulas and essential steps. But for me, this totally goes against everything I believe about photography.

dps-how-to-be-artistic-lightrrom-9

If you want to make creative images there is no one formula that you can apply to all photographs, or all genres. There are no essential steps that you must follow for every single image.

Why there is no magic formula

To say there is one formula is like saying there is one for making great art, and if we followed it then we’d all be great artists. But that is looking at it from the wrong angle. That’s asking for something outside of you to make you perform well. In fact, the only chance (literally the only) any of us have of taking great photographs, is to allow the most unique parts of ourselves to flow out.

Now, that’s not to say I don’t have some great advice for you. I do! It is, though, based on my philosophy that every image is unique. This is not a paint by numbers experience – so processing must be approached in a fresh, new way every single time.

dps-artistic-lightroom-8-6

Before processing

Like a lot of photos there are a few different ways I could have gone about this. Processing, like the act of taking photos, is a totally subjective experience. That’s most of the fun!

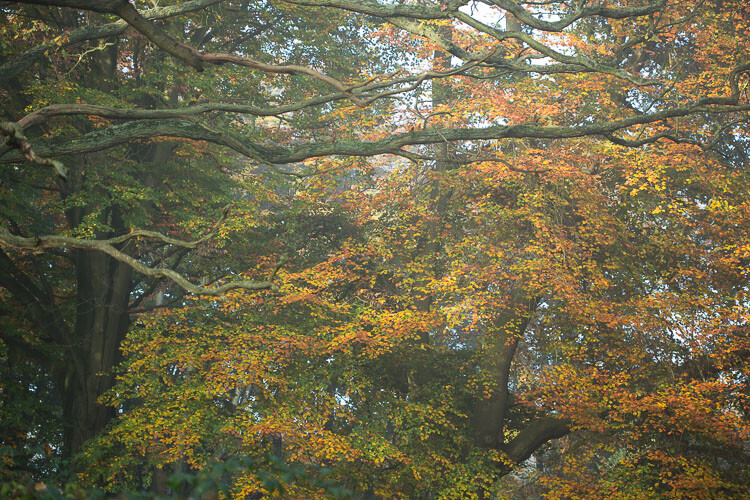
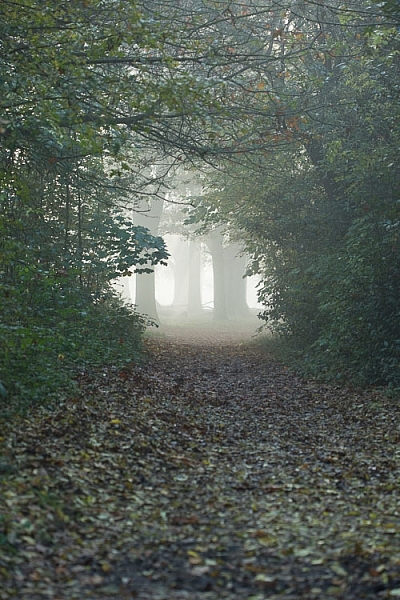
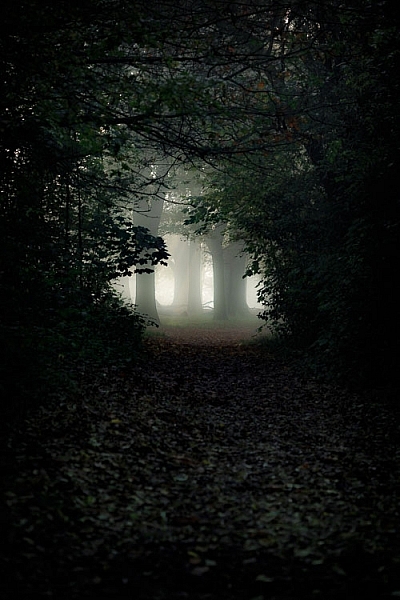
Unlike the other photos I’ve featured in this article, which were all taken on the same beautiful morning in Hampstead Heath in London, in this photo I didn’t want to have that misty fog in the photo. It didn’t work for me with the vibrant colours of the leaves. So instead I enhanced that deep colour and gave the leaves a strong contrast with the dark branches.

To me this is more of a natural look, what you would see when you are out in the woods. I used the HSL module to saturate the colour channels individually with a little Clarity in the basic module. It didn’t really take a big push to make a big change.
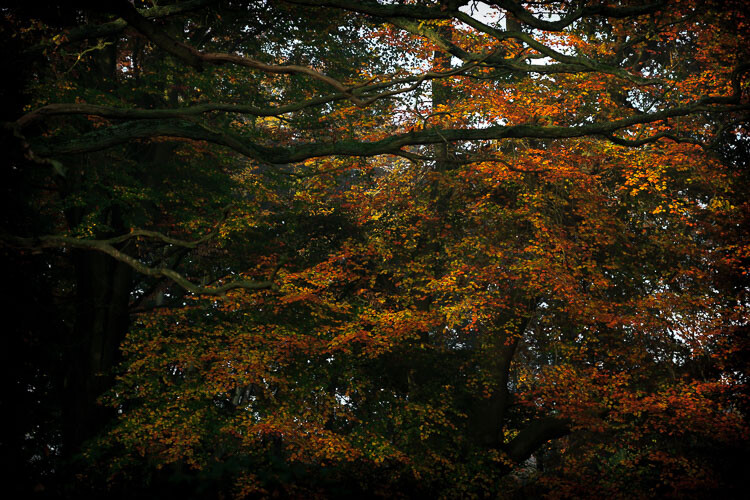
dps-artistic-lightroom-8-5

After processing.

“The reason that art (writing, engaging, and all of it) is valuable is precisely why I can’t tell you how to do it. If there were a map, there’d be no art, because art is the act of navigating without a map.” – Seth Godin

Take a unique approach for each image

You wouldn’t shoot all of your images at the same shutter speed would you? When you are out taking photos, even if you shoot on full auto, you respond to both the subject and the lighting conditions around you. You adjust and work with what is there. That’s the same approach you need to take when processing your images.

I like to think of processing an image like creating a painting. It’s an organic, subjective, unstructured process that finds me going back and forth between the tools, using a little of this, a little of that, until I am able see something that I want.
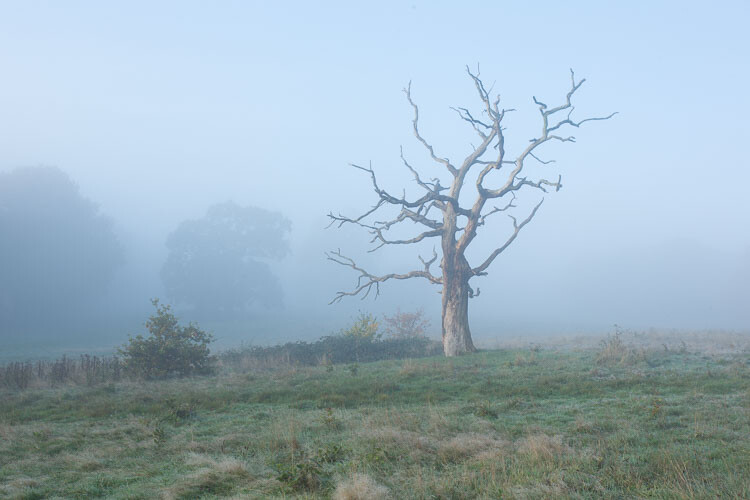
dps-artistic-lightroom-8-2

Before processing.

This image already has all of the elements for a good photo. There is atmospheric light that you can truly feel, and the composition of the bare wild tree on its own is strong. So what I focussed on in the processing was to bring out the colours and enhance the atmosphere ad feeling of cold, bleak and misty. Plus I thought a blue/orange split tone would look cool and topping it off with some grain would make it a have a feel of nostalgia…I’m very nostalgic about trees (childhood thing).

dps-artistic-lightroom-8

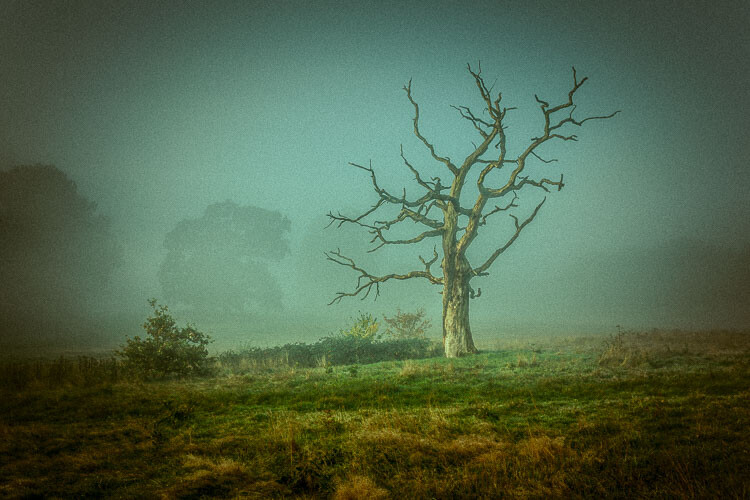
After processing in Lightroom.

“You must forget all your theories, all your ideas before the subject. What part of these is really your own will be expressed in your expression of the emotion awakened in you by the subject.” –  Henri Matisse

How can you apply this to your photography?

My approach might sound a tad unhelpful – I mean if I can’t tell you the formula, the five steps to success, the three keys everyone needs, how can you learn? Well, my approach may take longer to learn, but you will end up with much stronger images. You’ll create images that are powerful, impactful, and unique to you.

Even though Lightroom is about learning a software program, I recommend you do not use it with a technical mindset. Use it with a creative, artistic mindset. Use it as you would a paintbrush, a pen or your camera. Remember we are creating – not solving an algebra problem here!

dps-artistic-lightroom-8-3

Before

dps-artistic-lightroom-8-4

After

What appealed to me here was the slightly mystical feel. It made me think that the path was leading to a circle of fairies. So my Lightroom work reflected that vision, and this is what I created (above right).I wanted a very surreal look. I used split toning in greens and blues, as well as a vignette, and brought out the blacks very intensely using the basic panel. What I ignored was the histogram, which was all squashed up to the right, but that doesn’t matter.

I wanted a very surreal look. I used split toning in greens and blues, as well as a dark edge vignette, and brought out the blacks very intensely using the basic panel. What I ignored was the histogram, which was all squashed up to the right, but that doesn’t matter. Art is always a bit chaotic, right?

Before and after step by step

This is a creative, organic, fun process. Once you’ve gone through all the Lightroom modules (if needed), don’t be afraid to go back and adjust and have a play.

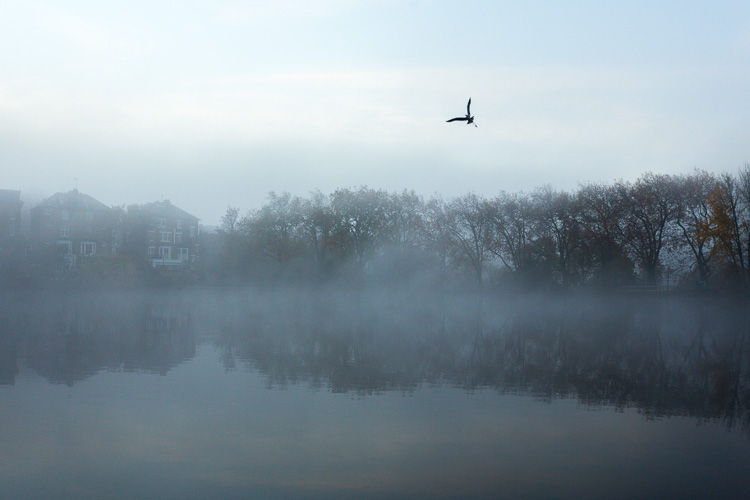
So, I want to take you through the steps of how I processed an image in detail. I hope it sparks a lot of ideas for ways to help you process yours. I am going to take the photo from this, straight out of the camera:

dps-artistic-lightroom-1

Before image, straight out of the camera.

To this:

dps-artistic-lightroom-1-7

Finished image processed in Lightroom.

Connect to the image

Look at the image. What does it make you think of, feel or imagine? What qualities can you sense in the image that you can work with and draw out? The Lightroom tutorials you watch and read will tell you how to use sliders, etc., but they usually don’t tell you when to use them. This process of knowing when to use certain tools comes down to getting really involved in your image, and learning to use the inherent qualities of the photo to guide you.

This may sound obvious, but I think this is an essential step that most people miss. We are often so focused on getting it done, or getting the buttons ready to press, that we leave the artistic part of our mind and jump too quickly into the technical. So respond to the subject, the colors, and the mood of the photo. No blanket presets here, please!
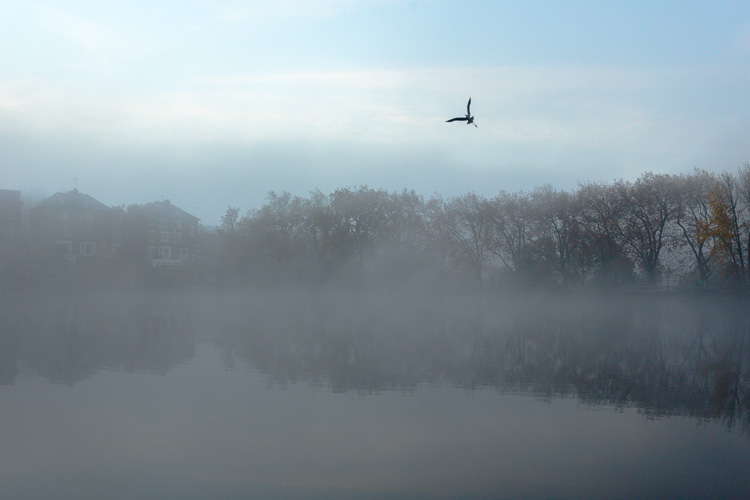
Basic panel first

My next step with this image was with the Basic panel. Most images will start here because you may want to control the tones before starting on the color work. This image was really flat tonally so I wanted to boost the contrast by bringing down the shadows and raising the whites. You get much more specific control when you use the Highlights, Shadows, Whites and Blacks slider then you do with the Contrast slider above them. So here are the settings I applied:

  • Highlights -94
  • Shadows -50
  • Whites +50
  • Blacks -31
  • Saturation +50
  • Exposure -0.20
  • Contrast +19

Those changes produced the following result:

dps-artistic-lightroom-1-2

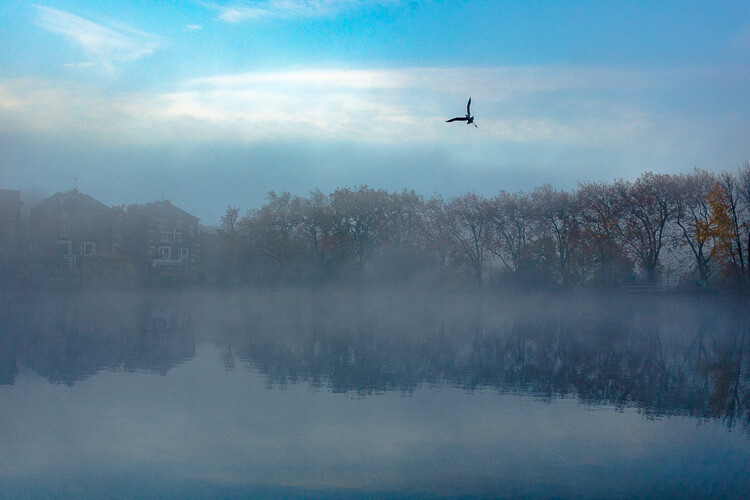
Now I have some good dark tones in the trees and some bright whites in the sky (all contained in the Histogram). Some Saturation gives me a good idea of what color the image would like to be (what direction it leans naturally). In this case, it’s blue.

Apply a Tone Curve

Next I decided to use the Curve panel for a bit more tonal change; bringing up the shadows and bringing down the highlights. Now the sky is richer and the dark areas are less muddy looking.

dps-artistic-lightroom-1-3

Dehaze

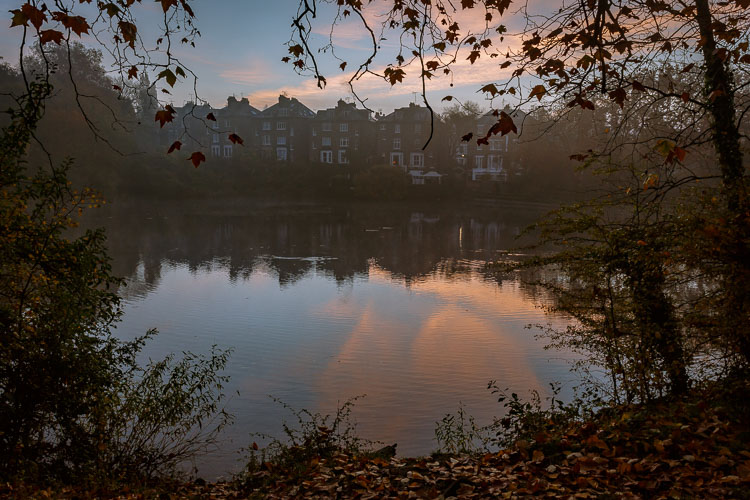
It was a really beautiful morning with the fog and trees, not to mention the fantastic bird (got lucky there!). That said, I was looking at this image and feeling that I wanted to bring out a lot more detail in the water and houses. The fog was great but I was pretty sure I could get more detail without a loss of atmosphere. My answer was Dehaze in the Effects module.

Dehaze is useful for images like this, but can be really super harsh if you are not careful. This image seemed to take a +44 without negative effects, like colour blocking and artefact creation so I left it there (see below).

dps-artistic-lightroom-1-4

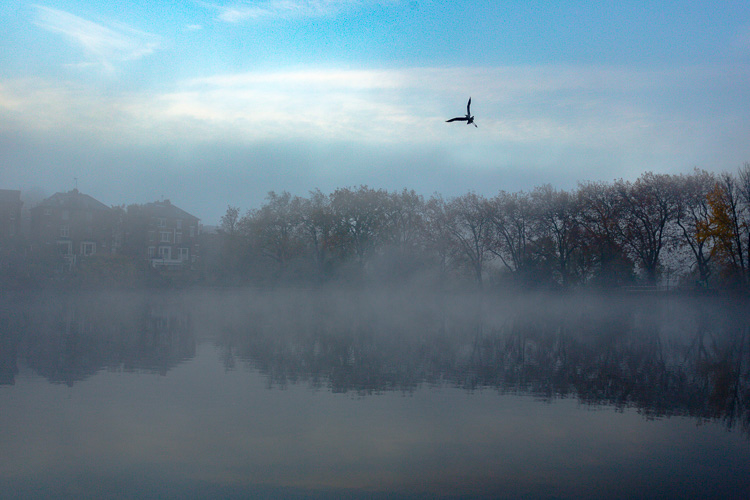
Dehaze does tend to mess around with Saturation, which you can see here. But, eh, I liked it! What I was going for was removing some of the fog on the water and houses and that worked well. It also had the added effect of making the reflection of the trees in the water stand out.

Local adjustments

At this point I usually start to toggle modules on and off to see what happens. I thought the shadows of the trees on the right hand side could use a bit of detail so I made a mask with the brush tool to lighten them a bit. This also brightened up the sky behind the trees and made it all look less muddy. Then, I did the same for the reflection.

dps-artistic-lightroom-1-5

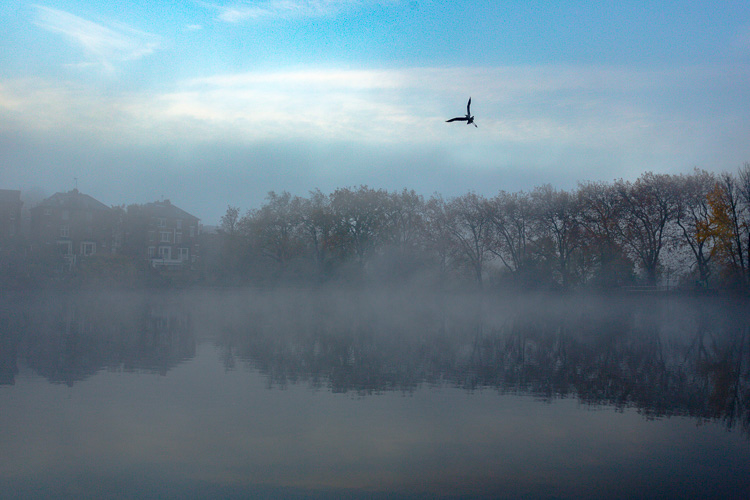
I really liked the fog on the water but I wanted the water to look crisp. So I used a graduated filter over it and put Clarity up to +74 and Exposure at +.60. I also changed the colour to match the blue sky. Now there is a lot more separation between the water and the reflection.

If I like my work up to a point I’ll make a snapshot so I can continue working on the image, but go back to that stage later if necessary. I’m pretty happy with it so far. Now is the time I would start toggling modules on and off again to see what needs adjusting.

dps-artistic-lightroom-1-6

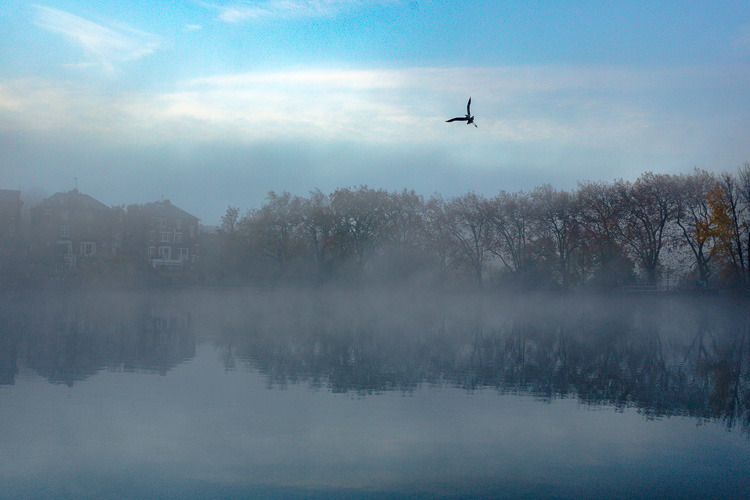
Next, see below, I chose to use HSL (Hue/Saturation/Luminance) panel last just to boost specific colours, in this case the blues. (Not sure why now that I look at it…probably would do it all over again without the blue boost).

I did try lightening the tones in the trees, which look yellow but LR wasn’t having it and said that it was actually blue. Understandable, since there is such a blue cast over everything. The only yellow that could be targeted was that last tree on the far right. I end up with this:

dps-artistic-lightroom-1-7

Conclusion

Now – on the last note, Lightroom is never going to destroy your image or make permanent changes. Therefore you have endless opportunities to play and learn what is possible with this amazing world of processing. Processing is the second half of photography, taking the photo is just the first half. Now I encourage you to:

“Go and make interesting mistakes, make amazing mistakes, make glorious and fantastic mistakes. Break rules. Leave the world more interesting for your being here. Make. Good. Art.” – Neil Gaiman

I’d love to know what you think. Maybe you would have gone about processing this image totally differently? Maybe you like what I did, and maybe you don’t? Let me know, I would love to hear your thoughts.

googletag.cmd.push(function() {
tablet_slots.push( googletag.defineSlot( “/1005424/_dPSv4_tab-all-article-bottom_(300×250)”, [300, 250], “pb-ad-78623” ).addService( googletag.pubads() ) ); } );

googletag.cmd.push(function() {
mobile_slots.push( googletag.defineSlot( “/1005424/_dPSv4_mob-all-article-bottom_(300×250)”, [300, 250], “pb-ad-78158” ).addService( googletag.pubads() ) ); } );

The post Tips for How to Think and Use Lightroom More Artistically by Anthony Epes appeared first on Digital Photography School.


Digital Photography School

 
Comments Off on Tips for How to Think and Use Lightroom More Artistically

Posted in Photography


Kid Stuffed: 10 More Eerie Abandoned Orphanages

28 Nov

[ By Steve in Abandoned Places & Architecture. ]

more-abandoned-orphanages-2a

Little orphans any? Not so much these days thanks to fostering and improved economies, the result being many former orphanages have been left eerily abandoned.

more-abandoned-orphanages-2b

more-abandoned-orphanages-2c

While many orphanages were built from scratch back in the day, others (mainly in the UK) occupied vacant country homes sold by latter-day aristocrats laid low by falling incomes and rising tax rates. Such was the case of the now-abandoned Bramham Children’s Home in West Yorkshire, England.

more-abandoned-orphanages-2e

more-abandoned-orphanages-2d

more-abandoned-orphanages-2f

Dating from 1806, the building was owned by the Ramsden family until 1947 when they sold the rambling pile to the West Riding County Council Children’s Department for the princely sum of £8,000 (roughly $ 10,000 at the time)… about £350,000 ($ 435,000) in today’s money. In its new incarnation as the Bramham Children’s Home, the orphanage only housed 35 children in 1970 cared for by about 16 staff. Not too shabby! By the early 1980s the orphanage had closed yet the building still stands, as photo-documented by Imgur user LeeRielly in August of 2016.

Freinetschool Kasteel De Wip

more-abandoned-orphanages-3b

more-abandoned-orphanages-3a

more-abandoned-orphanages-3c

The Freinetschool Kasteel De Wip, located in Wezemaal, Belgium operated for well over a century: from 1880 through 2008 to be exact. At the time of its closing due to dangerous structural decay, the building housed 54 live-in students divided into 3 preschool classes and 6 primary school classes.

more-abandoned-orphanages-3f

more-abandoned-orphanages-3e

more-abandoned-orphanages-3d

For the past 8-odd years, this exquisite little “castle” has continued to deteriorate with camera-toting explorers such as urbex.nl having to deal with rotten floors, the state of which worsened between visits in 2011 and 2014.

Silverlands

more-abandoned-orphanages-1a

more-abandoned-orphanages-1b

more-abandoned-orphanages-1c

Silverlands, located in Chertsey, Surry, UK can trace its roots back to 1814 when a local brewer invested his prodigious profits in a grand country home. In 1938, The Actor’s Orphanage backed by none other than Noël Coward took over the home but by 1958 the cost of urgent structural repairs had made the orphanage economically non-viable.

more-abandoned-orphanages-1e

more-abandoned-orphanages-1f

more-abandoned-orphanages-1d

In the late 1990s, local governmental authorities floated a proposal to re-establish Silverlands as a live-in clinic for pedophiles. Local residents opposed to the plan mounted a candlelight vigil (presumably they were fresh out of torches and pitchforks) and got the council to change their minds. Photographers Stacey Louise and Tim Barber visited the still-magnificent remains of Silverlands in early 2015, returning with a visual record of its former opulence.

Next Page – Click Below to Read More:
Kid Stuffed 10 More Eerie Abandoned Orphanages

Share on Facebook


[ By Steve in Abandoned Places & Architecture. ]

[ WebUrbanist | Archives | Galleries | Privacy | TOS ]


WebUrbanist

 
Comments Off on Kid Stuffed: 10 More Eerie Abandoned Orphanages

Posted in Creativity


New 2016 Annual dPS Reader Survey – Tell Us More About You

16 Nov

At dPS we value you, our readers, above all else. We want to help you take better pictures.

By doing this survey you will be helping dPS serve you better. By knowing what kinds of things are you struggling with, and the types of articles you want to see we can work toward providing more of what you need to move your photography forward.

We value your time, and you, as our regular reader and always strive to improve – you will help us by completing this form, for which we will be especially grateful.

Click on this link, or the image below to start the survey.

FEAT.-JOHN-SMITH.-CREATIVE-DIRECTOR..png


Thank you for your continued support and being a dPS reader. We wish you all the success on your photography journey.

The dPS Management Team

googletag.cmd.push(function() {
tablet_slots.push( googletag.defineSlot( “/1005424/_dPSv4_tab-all-article-bottom_(300×250)”, [300, 250], “pb-ad-78623” ).addService( googletag.pubads() ) ); } );

googletag.cmd.push(function() {
mobile_slots.push( googletag.defineSlot( “/1005424/_dPSv4_mob-all-article-bottom_(300×250)”, [300, 250], “pb-ad-78158” ).addService( googletag.pubads() ) ); } );

The post New 2016 Annual dPS Reader Survey – Tell Us More About You by Darlene Hildebrandt appeared first on Digital Photography School.


Digital Photography School

 
Comments Off on New 2016 Annual dPS Reader Survey – Tell Us More About You

Posted in Photography


How to Compose Better Images and Make your Images More Extraordinary

28 Oct

When we think about what goes into making a photograph most often our thoughts leap to camera settings like aperture and shutter speed. “What ISO should I use? Should I incorporate more or less of the foreground and is that tree branch really in the way?” We burden ourselves with the technical, while unfortunately overlooking other elements of the shot which potentially mean more to the outcome of the finished image. In this article, I will share a few of my own images and then break down a few key points that you can use to make your own images more consistently extraordinary. I won’t even mention the word exposure…well, maybe just that once.

dsc07896-edit

Don’t worry, this will not be an overly introspective study of the all the “feelings” which we might pour into making a photo. Instead, this is an examination of the how and why we include what we do in our images and it covers some of the thought processes which drive our own creative visions. Once we begin to have a general understanding of how our artistic nature approaches composition the better we can work towards refining our own techniques.

Photo #1: The Brooding

The Brooding

This is one of my personal favorite images. It came about very unexpectedly but it would turn out to be one of the most successful photographs of my career thus far. But why? There must be a reason this image was so well received. So let’s break it down and see what can be learned from the composition.

Use leading lines

This is a photographic methodology that has been mentioned many times. Leading lines are simply guideposts within a frame which lead the attention of the viewer to certain elements and essentially direct their attention within the photo itself. Oddly enough, leading lines can be worked into your composition in many ways and there are no set “rules” for using them. But generally, they originate in the foreground and extend into the frame. That isn’t to say that leading lines can’t be horizontal, diagonal, or anywhere in between.

In the case of this image, the lines of the fence and road move from the foreground to the background thereby creating a sense of depth in the mountains. Meanwhile, the horizontal line of the mountains converges with the vertical lines of the road. This helps to highlight the central element of the photo which is the tree.

The Brooding Notes

Don’t fear the weather

It goes without saying that this photo was made during some less than hospitable weather. An incredibly strong mountain thunderstorm had moved through the valley the night before and the rain had just stopped as I made my way out to shoot. Normally, bad weather deters many photographers from venturing out to make images. This is wrong.

When the weather gets rough it brings with it interesting cloud patterns and awesome light that you wouldn’t encounter on clearer days. Not only do the clouds add a sense of moodiness to the photo but the wet asphalt imparts the feeling of the dankness in the morning air after the storm passed. The yellowish post-storm light works well with the hazy mist in the valley which was hanging low after the rain.

Work with proportions

Whenever you begin mentioning words such as proportions, scale, or ratio as they relate to photography – you lose people’s attention. Usually, because it can seem complicated. Stay with me here! Composing your images based on certain aesthetic ratios and proportions isn’t as difficult as it sounds and I’m about to prove it to you. Ratios don’t have to be exact or perfect in every case but can really add that something extra to your photographs.

Golden Spiral Overlay

The image we have here incorporates what’s called the Golden Spiral or a Fibonacci Spiral to add interest and draw attention to the main elements of the composition. It’s a proportion based on the Fibonacci Sequence and it occurs in nature frequently. In this case, the spiral has been tweaked (flipped horizontally) to guide the viewer, yet again, towards the tree and into the distant mountains. Have a look at this overlay set on top of the flipped photo above and you can see how it lines up.

Pretty cool, huh? Try the Golden Spiral or the simpler Rule of Thirds for yourself to see an immediate boost in your compositions.

Photo #2: Summertime

Summertime

When most people see this photo they either love it, hate it, or say “Adam, your feet are really, really dirty”. It’s true, this was a very impromptu and unorthodox exposure of yours truly as I swayed in my hammock during a hiking trip last summer. Unbelievably, it went on to win First Place Professional in a state magazine a couple months ago. No matter your initial impressions of this image there are still a few important lessons that can be gleaned to help you with your own work.

Find natural framing

This is a close cousin to using leading lines to enhance the viewability of an image. There are many cases when a strong composition makes use of what is referred to as natural framing. This is when a photographer composes certain elements (not always the main subject) in a way so that they are framed by other elements within the shot. Sometimes this framing is obvious, such as when a portrait photographer positions the client in a doorway or when a landscapist places the sunset between two mountain peaks. Other times natural framing is less obvious, as is the case with this image. Look closely.

Summertime Notes

You’ll notice that my beautiful feet occupy the empty space between the hammock at the left and the trees to the right. The empty space created between the structures offers a place for the central subject to really stand out from the rest of the elements of the photo. The lines created by the hammock also help with the overall framing of the image and gives it a very anchored perspective. Speaking of perspective…

Use perspective

This photo was shot using a Rokinon 14mm F/2.8 super wide-angle lens, mounted on a full-frame mirrorless camera. The 14mm focal length bulges the exterior aspects of the frame. This causes the trees to bend in towards the center of the frame. The camera was held relatively close to my feet so that the entire scene seems relatively compressed around them. The overall effect is one of first-hand perspective and allows the viewer feel as if they themselves are swinging in the hammock on a warm summer afternoon…with dirty feet.

dsc07923

Shoot what you want

When I was about to enter this photo into the contest (in which it eventually took first prize from among 2,000 other entries) there were some politely well-worded reservations expressed by some of my friends. Why would anyone want an image of some dirtbag hiker’s feet? Well, when I shot the image I knew it carried the feeling of summer. The earthy remnants of a day’s trek and the welcomed relaxation of a swinging hammock that chases away all worries. I knew the photo fit the theme of the contest which was Summertime. It was an image which I felt was worth entering even though it was slightly unorthodox.

Shoot the images you want to shoot. Hopefully, this is a lesson you already know and have been putting into practice for some time now. If not, now is the perfect time to start.

Photo# 3: The Stars Fell

Falling Stars

On the night this image was made my girlfriend and I had been out chasing the Milky Way through the mountains. There was nothing planned as far as a self-portrait was concerned. This was one of the last photos to be made that night and it came about completely by accident. It is the only exposure I made of us under the stars, which to me makes it even more special, but I digress.

Incorporate the environment

Consider your environment as another subject and use it to enhance the image. This may go without saying when working with landscapes or nature photography, but it can’t be overstated when it comes to portraiture and working with human subjects in general. In the case of this image, the stars wheeling overhead become almost a completely separate subject. Add in the human element and it produces a wonderful duality between man (or woman) and nature.

Here we see a few of the environmental elements which came together in the photo. Some of them may be familiar.

Falling Stars Notes

Open yourself up

Let’s face it, not everything goes to plan. There have likely been many times a shot didn’t pan out, your camera wasn’t set on the ISO you needed, or the light faded before you could click the shutter. Other times everything goes completely to plan. So much goes to plan in fact, that you consider it a job well done and stop thinking creatively.

While it’s great when everything goes right, we shouldn’t stop looking for the next exceptional image. Be open to those great moments that produce great work even if they go beyond what you had set out to do originally.

We were on the verge of packing up and heading back to camp when I had the idea for our spur of the moment self-portrait. I had already produced all the images I wanted to make so we had chalked it up as a success. But as it turns out, the image I never intended to make that night ended up being the best.

dsc08347

Trust your instincts

The reason this photo came about was due to a feeling I had that the image was there before I made the exposure. I was told later that my exact words were, “Want to try something weird?”

Even though it had already been a successful night of shooting the stars I knew there was one more frame to take and that frame should include us. It wasn’t something that was planned but it turned out being one my most cherished images to date.

When shooting any type of image it always pays to go with your gut. More often than not, your instincts will be right. If it feels like a photographic opportunity is presenting itself then it’s usually a good idea to follow your intuition and pursue the idea. Don’t think you have astute instincts? Don’t worry. They will develop and mature as you do as a photographer.

_mg_9049-edit

Conclusion

Remember, strong images are made by more than just perfect camera settings. Begin looking beyond your exposure and aperture to understand how your photos impact you and ultimately the viewer. The methods mentioned above will give you a great start to producing consistently better images time and time again.

googletag.cmd.push(function() {
tablet_slots.push( googletag.defineSlot( “/1005424/_dPSv4_tab-all-article-bottom_(300×250)”, [300, 250], “pb-ad-78623” ).addService( googletag.pubads() ) ); } );

googletag.cmd.push(function() {
mobile_slots.push( googletag.defineSlot( “/1005424/_dPSv4_mob-all-article-bottom_(300×250)”, [300, 250], “pb-ad-78158” ).addService( googletag.pubads() ) ); } );

The post How to Compose Better Images and Make your Images More Extraordinary by Adam Welch appeared first on Digital Photography School.


Digital Photography School

 
Comments Off on How to Compose Better Images and Make your Images More Extraordinary

Posted in Photography


Leica and ONA introduce more luxury bags for the red-dot-obsessed

15 Oct

$ (document).ready(function() { SampleGalleryV2({“containerId”:”embeddedSampleGallery_7420218348″,”galleryId”:”7420218348″,”isEmbeddedWidget”:true,”standalone”:false,”selectedImageIndex”:0,”startInCommentsView”:false,”isMobile”:false}) });

Leica and bag-maker ONA Bags have teamed up again, this time to launch a new premium lineup of exclusive camera bags called the ‘ONA for Leica’ collection. This new lineup is composed of half a dozen camera bags that will be available solely through Leica Camera AG, each of them featuring a red rivet and red lining, as well as space for Leica camera gear and, in some cases, other accessories and personal items as well.

The new collection is composed of ‘The Bowery for Leica’ bag, ‘The Prince Street for Leica,’ ‘The Brixton for Leica,’ ‘The Berlin II for Leica,’ ‘The Camps Bay for Leica,’ and ‘The Roma for Leica.’ Though they all share a similar style, each bag is unique in its offerings, and some are available in multiple versions. There are five versions of ‘The Brixton,’ for example, while some of the others bags — particularly ‘The Camps Bay’ and ‘The Roma’ — are larger and more practical with less design variations. Both waxed Italian leather and waterproof canvas bags are offered in the collection.

ONA’s website currently only lists the The Bowery for Leica bag, which is $ 279. Pricing for the other bags in this collection isn’t clear at this time. Availability is set for November.

PRESS RELEASE

Leica Camera and ONA present an exclusive collection of high-quality, premium camera bags

13 October 2016: Leica Camera has today announced the ‘ONA FOR LEICA’ collection of high quality camera bags.

To celebrate the 100th anniversary of the legendary 35mm camera in 2014, ONA – an American manufacturer of premium camera bags – created ‘The Berlin II’, a bag designed especially for the Leica M-System. As a follow-up to this collaboration, the two companies have once again joined together to present the ‘ONA FOR LEICA’ collection, featuring six distinctive models crafted by ONA. Each piece will be lined in red and will feature a red rivet, as a discreet reference to Leica. The series will be offered exclusively by Leica Camera AG in a range of materials and colour combinations.

The Bowery for Leica: This special edition of ‘The Bowery for Leica’ camera bag represents a mutual commitment to the creation of exceptional products for photographers from both ONA and Leica. The bag is specially designed to provide stylish and practical protection for Leica camera equipment. Two of the five models are crafted from finest quality Italian leather with a lightly waxed finish. The remaining three models are made from a robust and waterproof canvas fabric. With five compartments, it offers enough space for a Leica M-Camera, one to two M-Lenses and various personal possessions or accessories. By detaching the carrying strap, the bag turns into a useful, padded insert for safely stowing camera equipment in a larger bag or case. Its cleverly designed features, variable storage options, compact size and minimalist design make it the perfect universal and modern camera bag.

The Prince Street for Leica: Combining the look of a casual shoulder bag with the practical advantages of a camera bag, ‘The Prince Street for Leica’ offers a unique messenger style. Two models in finest leather and three in robust canvas with real leather trim offer generous capacity for photographic equipment. The two retro-styled clip-buckles ensure that the bag’s valuable contents are safely locked away. Six compartments allow an M-Camera with two to three lenses, an 11-inch laptop or tablet PC and other accessories to be safely and unobtrusively stowed away.

The Brixton for Leica: This sophisticated bag has been designed to be particularly spacious, and is available in five different versions. The ‘Antique Cognac’ and ‘Dark Brown’ models are created from the finest Italian leather, with a wax finish. The water-repellent waxed canvas of the other three bags in the collection keeps cameras and equipment safely protected. All five hand-crafted models offer multiple practical features, numerous outer pockets and compartments and flexible storage space with room for a camera, two to three lenses, small personal items and even a 13-inch laptop computer. The bags are available in water-repellent canvas in the colours ‘Black’, ‘Field Tan’ and ‘Smoke’ (water-repellent canvas) and in real leather in ‘Antique Cognac’ and ‘Dark Truffle’.

The Berlin II for Leica: This exclusive bag is hand-made from finest Italian leather in the colours ‘Black’ or ‘Vintage Bourbon’ and has been specifically designed for the Leica M-System. The premium leather style offers space for one camera, two to three lenses and small accessories, and develops a unique patina during years of use that reflects its truly unique character. Additional storage space inside the bag makes it particularly flexible. Lined in iconic Leica red, four dividers can be used to adapt the space to meet specific needs and can be completely removed, if required. The Berlin II, available in a choice of ‘Black’ or ‘Vintage Bourbon’ leather, offers space for documents in a compartment on the back and features a front pocket with a zip-fastener for storing small personal items.

The Camps Bay for Leica: This stylish, high-capacity rucksack in water-repellent canvas and real leather appliqués is perfect for transporting a wide range of camera equipment, comfortably and flexibly. The space inside can be adapted to meet the needs of the owner’s individual products or to make room for additional accessories. The padded main compartment provides space for the safe storage of one camera with up to seven lenses and a 17-inch laptop computer, while smaller items can be secured away in a pocket with a zip-fastener on the front. Both the straps and the back of this ‘Smoke’ coloured canvas rucksack are padded and covered with breathable fabric, to ensure complete comfort when on the move.

The Roma for Leica: This practical insert with five compartments transforms almost any standard bag into a camera bag. The robust, water-repellent canvas material offers optimum protection for valuable equipment and features real leather grips to make it easier to remove from bags. This cleverly-designed combination of bag and organiser is the ideal solution for photographers looking for a smart way to carry a single camera, one lens and a couple of small accessories.

About ONA

ONA is a purveyor of fine bags and accessories designed for, and inspired by, photographers and creative professionals. Each bag is meticulously hand-crafted from the highest quality materials, conveniently sized, built to last for years, with a particularly attractive, minimalist design. The bags provide durable protection for precious Leica cameras and lenses while reflecting the photographer’s inimitable personal style.

Availability and pricing

The ONA FOR LEICA Collection is scheduled to be available from November 2016 from Leica Stores and Boutiques. Pricing will be confirmed from the date of availability.

Articles: Digital Photography Review (dpreview.com)

 
Comments Off on Leica and ONA introduce more luxury bags for the red-dot-obsessed

Posted in Uncategorized