RSS
 

Posts Tagged ‘Mistakes’

5 Unforgiving Post-Processing Mistakes Every Bird Photographer Must Avoid

03 Nov

Post-processing is one of the most important steps in the image making process. It is in fact one of the most powerful tools to make your vision come true. The camera does not see the way you see your world and it is your responsibility to translate your vision into reality in post-processing.

0 Nature Photography Simplified Bird Photography Post Processing Tips Peacock Portrait Featured Image

You can achieve most artistic results in post-processing that are simply not possible in reality. But, being a bird photographer you do not often get a chance to post-process your bird photographs artistically. Why?

Since the viewer would have seen the bird in reality, it is easier to compare to what is presented in a photograph. Bird photography is generally about showing the bird and its natural beauty not enhancing it artistically to achieve something else!
It is very similar to taking photograph of a person. Do you want to show the person as they are, or do you want to make them look someone else?

Does this mean, you have to just keep it real?

Not necessarily. But any enhancement in post-processing to make a bird or its features look beautiful has to be done with lot more care than if it was a landscape photograph for instance.

Remember that the mistakes will be caught easily!

Below I am listing the five post-processing mistakes that you, as a bird photographer, should avoid because they are unforgiving.
Committing any of these mistakes may ruin your bird photograph, and you definitely do not want to ruin your hours and days of effort in getting that one photograph you love. Do you?

Mistake #1: It’s cropped too tight

There is an ongoing debate about whether to crop or to get everything perfect in field. Though it is desirable to compose in the field, cropping in the post becomes necessary many a times in bird photography because of several factors like:

  • Not enough time to compose the fast action that unfolds in split seconds
  • Not enough focal length to fill the frame
  • Not enough time to compose an image especially in case of birds in flight

If you can improve the composition, then go ahead and crop the image. But too often, I see lot of bird photographers crop it too tight which makes the bird suffocate in the frame and the image look cramped.

1-Nature-Photography-Simplified-Bird-Photography-Post-Processing-Tips-Too-Tight-Crop

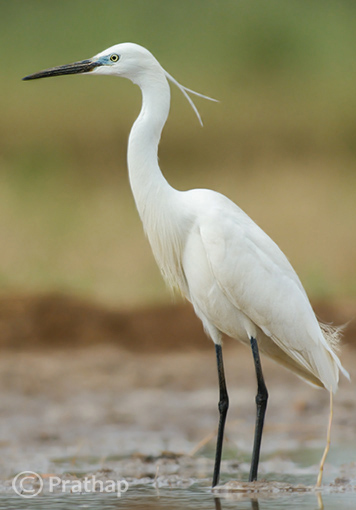
The little Egret in this photograph looks suffocated because there is no breathing space in front to look into, and no space to move which makes it look cramped.

2-Nature-Photography-Simplified-Bird-Photography-Post-Processing-Tips-Little-Egret

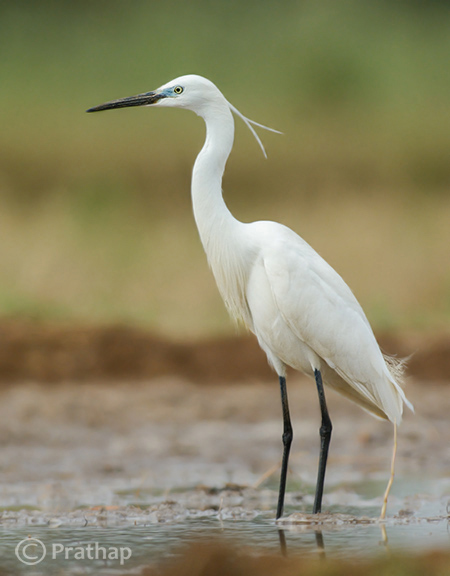
Notice how a little bit more space around the bird gives him room to look into and move. It is more pleasing to our eyes also.

Quick Tip: Use the Rule of Thirds as a guideline.

Mistake #2: It’s unrealistic

The clarity slider in Adobe Lightroom is such a lethal weapon that is hard to replicate even with Adobe Photoshop. It enhances the local contrast in an image, which is one of the most important aspects of processing. Too much local contrast makes an image looks unrealistic as it tends to sharpen.

The soft and smooth feeling of the smallest details in feathers of the bird starts to look very unrealistic.

3 Nature Photography Simplified Bird Photography Post Processing Tips High Local Contrast

Notice how unrealistic the Parakeet looks in the above image. Even the leaves look like plastic.

4 Nature Photography Simplified Bird Photography Post Processing Tips Rose Ringed Parakeet Female

Just enough local contrast (usually Clarity of +20 to +30) will bring out all the details in the bird.

Quick Tip: Instead of using your mouse to pull the Clarity slider, use keyboard arrows and watch the changes as you bump up the clarity. Restrict to the smaller numbers like +10 to +30.

Mistake #3: Everything is overly colorful

Over-saturated images are everywhere!

Birds are definitely colorful subjects and that is the reason we are all attracted to them. But are they so colorful?
Too much saturation looks overcooked. If you try to increase the contrast as a last step in your post-processing workflow (which is usually recommended), then it will also increase the saturation.

Note that Saturation slider increases the overall saturation of the image making everything in the image colorful. Do you really want everything in the image looking colorful? Do you want to emphasize the bird or the background?

5 Nature Photography Simplified Bird Photography Post Processing Tips Over Saturated

Everything in the above photograph of a Red-Wattled Lapwing is colorful. It is way too colorful.

6 Nature Photography Simplified Bird Photography Post Processing Tips Red Wattled Lapwing

In the above photograph I have selectively increased the Saturation only for the bird in Adobe Photoshop.

Quick Tip: Use selective coloring. Saturate only the colors or object that are very important. Use the HSL panel or the adjustment brush to apply the color.

Mistake #4: The bird looks like a wax statue

Have you seen a wax statue of a bird in a shop? You can also see them on the web. Excessive noise reduction will give a plastic or wax statue look to your bird photographs.

While it is important to reduce the noise because most often we have to bump up the ISO to 400 or 800 to freeze the action, it is also important to understand what the Noise Reduction filter does. It The smoothes out the edges, by smoothening out the minute and important details of the image and the bird.

7 Nature Photography Simplified Bird Photography Post Processing Tips Waxing

The above image of a Great Egret has a waxy look because of the excessive noise reduction applied to the entire image. Remember that the water looses texture due to excessive noise reduction giving it an artificial look.

8 Nature Photography Simplified Bird Photography Post Processing Tips Great Egret

By reducing the noise only in the out-of-focus or low detailed or shadow regions of the image, it will help to keep the details intact.

Quick Tip: Reduce the noise only in the smooth areas (like the background) since noise is generally not visible in the high detailed areas (like the bird’s body).

Mistake #5: Too much is bad

Too much is bad in anything that we do. Pushing any post-processing slider too far will yield a bad image. But the most important one that is noticeable with many bird photographs, is that it is over-sharpened. No matter how good your post processing skills are, if you make this one mistake, there is no way out.

Over-sharpening kills a photograph. Period.

It is better to keep it little less sharp than to go too far and be overly sharp.

9 Nature Photography Simplified Bird Photography Post Processing Tips Over Sharpened

The features of the Brahminy Kite are way sharper than what they should be. Also check out the halo around the bird formed due to sharpening on the overall image.

10 Nature Photography Simplified Bird Photography Post Processing Tips Brahminy Kite In Flight

Quick Tip: Apply sharpening only to the bird but not to the background.

Final words

These are some of the major mistakes that should be avoided. Because they are unforgiving and can potentially ruin your best photographs. The best way to avoid these mistakes is to keep a small checklist to see if you have committed any and correct them immediately. With practice, you will easily avoid all of them.

Now, it’s your time to tell me the mistakes that you think should be avoided. What mistakes have you made in post-processing? Feel free to add your opinion on this subject but please make sure it is productive and helpful to all our readers.

The post 5 Unforgiving Post-Processing Mistakes Every Bird Photographer Must Avoid by Prathap DK appeared first on Digital Photography School.


Digital Photography School

 
Comments Off on 5 Unforgiving Post-Processing Mistakes Every Bird Photographer Must Avoid

Posted in Photography


Creative Discovery Through Mistakes

29 Oct

One of the great things about creativity is that it can germinate from a mistake. The trick for photographers is to develop an awareness and eye to see mistakes as creative opportunity so as explore them until they become a crafted photograph. It is very easy to feel that we have to be in control of the creative process from beginning to end and that is not required. Sometimes taking an extended look at a mistake can yield new ideas that would never have come to mind otherwise. Working a scene and trying new angles, settings, focal lengths, etc. is one way to hone your final product through “seeing,” and other times “seeing” happens after the fact when photo editing (see Always Check Your Seconds). The trick to “seeing” after the fact is to not become so absorbed in your initial idea of what you had wanted to accomplish and to be open to new viewpoints and possibilities.

Sometimes mistakes present themselves in an obvious fashion as was the case while I was taking example photos with a new Petzval lens. My aim was to photograph a model and leverage the optics of the lens to capture it’s iconic swirled bokeh in the background. The output as seen below was exactly what I had intended, but in the process a mis-shot was captured and I didn’t notice it’s potential until I was photo editing. Granted the intended shot was perfectly fine; I found the mistake photo fascinating. I instantly saw the opportunity to create something new that I’d never seen before. Inspired I went back out to replicate the optical aberration with a Canon 50mm f/1.0 which lacked the swirled bokeh.

The intended outcome of my shoot.

The accident that sparked an idea

The reshoot of my model with a new lens and similar settings yielded the results I had envisioned (see below). Granted the end results are not for everyone, but given the spooky nature of how my model turned out I thought it made for a great Halloween styled photo set. My mistake yielded a new technique I’m eager to continue to perfect.

Experimental Portrait – The Normal One

Behind the Scenes - Experimental Portraits

Behind the Scenes – Experimental Portraits


Copyright Jim M. Goldstein, All Rights Reserved

Creative Discovery Through Mistakes

The post Creative Discovery Through Mistakes appeared first on JMG-Galleries – Landscape, Nature & Travel Photography.


Related Stories

  • Creative Discovery Through Mistakes – Enclosure
  • Best Photos of 2013 by Jim M. Goldstein
  • Best Photos of 2013 by Jim M. Goldstein – Enclosure
Feed Ads by FeedBlitz
powered by ad choices


JMG-Galleries

 
Comments Off on Creative Discovery Through Mistakes

Posted in Equipment


Avoid These 10 Mistakes That Can Ruin Your Image Quality

08 Jul
Central Park South.

Central Park South.

How many times have you captured an amazing image only to view it on your computer, or as a print, and realize that you screwed something up along the way.

Unfortunately, the only way to stop doing a lot of these easy-to-make mistakes is to have an image ruined by them.  Once you screw up an image you’ll quickly learn not to make the same mistake again.

Here are the most frequent ways I see photographers ruining their images. Avoid these 10 mistakes that can ruin your images

1. Leaving Image Stabilization on when using a tripod

Everyone learns this tip too late. Image stabilizers (in your lens) usually make your images sharper by reducing camera shake. However, when your camera is on a tripod and perfectly still, the motor can actually cause shake! I know a few of you are shaking your head right now as I did when I learned this. If you couldn’t figure out why your tripod images weren’t perfectly sharp, this is usually the reason, although a strong wind or touching the tripod or camera while shooting can do this as well.

2. Not using a fast enough shutter speed

Lego Girl, SoHo.

Lego Girl, SoHo.

Unless you are on a tripod, to achieve a sharp shot your shutter speed needs to be at least 1 over your focal length.  So if you are shooting at 50mm your shutter speed needs to be at least 1/50th of a second (and I like to add a little leeway to that to be safe).  If you are on a cropped sensor, remember that a 50mm lens might be the equivalent of an 80mm or 100mm view, so make sure to adjust for that.

For moving subjects, 1/320th of a second is my ideal speed to freeze motion.  For fast moving objects such as cars or sports, I prefer an even faster shutter speed.

Be especially careful when shooting on Aperture Priority mode or in the auto settings, because it is easy for the camera to set the shutter speed to a setting that will introduce blur into your image without you noticing.  For this reason I frequently like to shoot in Shutter Priority mode.

3.  Not focusing exactly on the most important object, especially when shooting with a large aperture

If you are shooting with a small aperture, such as f/8 and above, you will often have leeway, but especially when shooting with a large aperture (like f/2), you need to make sure that the most important element in the image is the sharpest.  If this is not the case, it might not always be noticeable on the monitor, but it will show up when you make a print.

This is especially important when doing portraiture. Missing the sharpness on the eyes often means ruining the image.

Be especially careful when the element you are focusing on is small, because it will be very easy for the camera to focus on the area behind it instead. This is a mistake that is frequently made by newer photographers. In these tricky situations you need to pay attention to whether the autofocus is picking up the small element.

4. Not raising your ISO up higher when needed

In situations where the light is not strong and you need a fast shutter speed and a large aperture, don’t be afraid to raise your ISO. I see too many people afraid to go above ISO 200.  I use ISOs of 800, 1600 and even 3200 a significant amount. Many digital cameras, especially ones made within the last four years, can handle these ISOs.  Yes it will add noise to your photos, but in many cases you will notice that despite the noise, the technical quality of your images will be better. Noise can look very pleasing, especially on the newer digital cameras.

Mobile Office, Midtown.

Mobile Office, Midtown. ISO 3200

5. Moving while you shoot

This is my biggest pet peeve, by far.  I am normally a very calm person, but when I see this it makes me want to grab the photographer and shake them silly.  I see so many people that take photos without breaking their stride.  Stop your motion every time you take a shot, if even for a second!  Keep your hands still!  It’s not difficult.  Respect every image that you take enough to stop and think about it for a second, and your images will ultimately respect you when they turn out well in print.  Sorry, that is the end of my rant for the day.

6. Over-sharpening

Be careful of over-sharpening your photos. I see this happen all too often. Particularly with high resolution cameras with the right settings, your images often will only need a minimal amount of sharpness. If you overdo the sharpness it will actually have the reverse effect, making your image look fake or as if it was blown up to a larger size.

Couple in Snowstorm, Central Park

Couple in Snowstorm, Central Park

7. Resizing your images after you sharpen them

Sharpening should be the last step after you have sized the image to your final print size. If you sharpen your image and then resize them it will negatively affect the quality of your photo.

8. Not using the correct color space: ProPhoto RGB > Adobe RGB > sRGB

You should always keep your digital photo in the largest colorspace possible. While digital printers cannot yet print all of the colors in ProPhoto RGB, and many printing services prefer you to send them your files in Adobe RGB. When processing my RAW images to Tiff files I always convert them to the ProPhoto colorspace because it is the largest. Why not save your files with the most amount of color information possible?  Many cameras will allow you to set this in the settings.

However, did you know the sRGB is the best colorspace to show your images on the web? Yes, when printing your images it is best to keep them in ProPhoto or Adobe RGB, but when rendering them for viewing over the web, convert them to sRGB.

When you convert an image to a different colorspace, always make sure to do it as a copy of the original image. If you convert a ProPhoto image to sRGB and save it, you will not be able to retrieve that color information if you then convert it back to ProPhoto.

Bow Bridge in Fall, sRGB

Bow Bridge in Fall, sRGB.

Bow Bridge in Fall, Adobe RGB

Bow Bridge in Fall, Adobe RGB. A subtle but noticeable difference.

9. Not using exposure compensation (+/-)

When shooting in overly light or dark situations in Aperture Priority or Shutter Priority mode, the light will fool the camera’s sensor.  For instance, if you photograph in a dark alleyway, your camera’s sensor will try to overly brighten the scene, while if you capture an image with a lot of bright sky or white snow, the camera will try to overly darken the scene.

This is where your exposure compensation comes in.  It is a vital tool for any photographer, especially in tricky lighting situations.

10. Not resetting your camera

Take a look at your camera settings at the beginning of the day and frequently throughout a day of shooting. Some of the most common settings to forget to reset are a high ISO from the night before, your exposure compensation, your white balance setting, and checking your autofocus switch.

Final thoughts

A few final notes that must be mentioned.  With digital images, you can always fix many problems later in post-production. However, there is still no substitute for getting the image perfect in camera.  Processing is necessary in some way for every digital image, but the more extreme, the more you can damage the quality of your images.

It is tough to notice the effects of many of these mistakes when viewing the images on the web or on a monitor, but when you zoom in close to the details or make a print, especially a print of a decent size, these effects with be very noticeable.

The post Avoid These 10 Mistakes That Can Ruin Your Image Quality by James Maher appeared first on Digital Photography School.


Digital Photography School

 
Comments Off on Avoid These 10 Mistakes That Can Ruin Your Image Quality

Posted in Photography


5 Disastrous Mistakes to Avoid When Starting a Photography Business

02 Jul

While starting a photography business, people don’t always understand how to turn their hobby into a full-time job properly. Most newbie photographers make the same mistakes when starting out that they wish to go back and change. Knowing about these mistakes in advance could help you to avoid them. As they say, “wise men learn by other men’s mistakes; fools Continue Reading

The post 5 Disastrous Mistakes to Avoid When Starting a Photography Business appeared first on Photodoto.


Photodoto

 
Comments Off on 5 Disastrous Mistakes to Avoid When Starting a Photography Business

Posted in Photography


5 Not-So-Obvious Mistakes Photographers Make When Starting a Business and How You Can Avoid Them

29 Jun

By plantoo47

When starting your photography business it’s easy to get caught up in how good your portfolio looks, buying new equipment, or how many followers you have on social media. While these tasks are important, you risk overlooking some crucial numbers that will help you to hold yourself accountable and succeed as a result.

Large corporations have whole departments tracking data to help their CEO’s make better business decisions. So why is this completely overlooked in one-person businesses?

In this article you will learn the Five not-so-obvious mistakes photographers make when starting a business. I will also give you some handy tips on how you can avoid these mistakes in the future.

Mistake #1 – Not knowing your income goal

One of the most common mistakes you can make as a freelance photographer is not setting any targets around how much money you want to make. I think we can all agree that it is an amazing feeling to be able to earn enough money to support yourself.

An effective way to grow your income is to first be aware of how much you’re currently earning so that you can figure out how much you want to earn in the future. Have a good solid brainstorming session about the next 12 months and really ask yourself, “How much do I want to realistically earn this year?”

By Simon Cunningham

Making a million dollars a year photographing would be fantastic, but you have to be realistic about your financial goals. You don’t want to set a figure that is so high that you feel discouraged. You also don’t want to set a figure that undervalues your talent. You want to choose a figure that makes you feel a little stretched but is still achievable with some hard work.

A good place to start is to look at how much income you made in the last year, and then add 30% on top of this amount to calculate how much you’d like to make in the next year. For example, if you earned $ 15,000 last year, your goal this year should be $ 19,500 ($ 15,000 x 1.3).

If you don’t have any income records from last year, just choose a figure that you feel comfortable with, and that is attainable.
After you’ve worked out your target income for the year, the next thing to do is calculate your average fee. You can calculate this by dividing your total income by the number of sales (clients) you had over the last year.

So now that we know what your target income and average fee is, we can move on to calculate the number of photo sessions required to reach your target income goal.

By Historias Visuales

Mistake #2 – Not knowing how many photo sessions you need to do

The number of sessions that you need to do in the next 12 months is dependent on your target income and average fee. For example, to make $ 20,000, you will need to do 40 sessions within the next 12 months to reach your income goals. This is calculated by dividing your income goal of $ 20,000 by your average fee, which in this example is $ 500.

Your required number of sessions may feel daunting at first. It’s important to break it down into smaller increments so that you can visualize these amounts so it appears more attainable, so 40 sessions for the year turns into 3.3 sessions per month. This is calculated by dividing 40 sessions by 12 months.

When you’re setting your income goal, think about how much time you want to take off for the year. You need to give yourself leeway for traveling, illness, recovery, planning and so forth. Just because you’re a business owner doesn’t mean you don’t need
to have time off like the rest of the world.

Going back to the example, the number of sessions required is 3.3 per month. Let’s round this down to three sessions to make things cleaner. This means you need to do 0.75 sessions per week.

By Korry Benneth

If you’re not comfortable with the volume, you could tweak your targets. For example, if you were to get more skilled at charging higher fees, we could set your average fee to $ 1000 instead of $ 500. How would this impact your volume? Well $ 20,000 divided by $ 1000 is 20. That’s 20 less photo sessions you have to do for the year, which equals out to just 1.6 sessions per month or only one photo session every couple of weeks.

So the next question is, should you focus on doing more sessions, or should you learn how to effectively increase your fees? The choice is ultimately up to you, but this example illustrates the importance of knowing your numbers so you can make the necessary adjustments in your business that will help you succeed.

Mistake #3 – Not knowing how many inquiries you need

Inquiries are the first point of contact you have with potential clients. Your main goal when you receive an inquiry is to convert it into a booking.

Measuring the number of required inquiries in your photography business can be a little challenging as some of the people that contact you initially don’t end up booking for various reasons. So as a rule of thumb I like to use a 50% conversion rate. This means that to get three bookings for the month, you need to get at least six inquiries.

As you can see, generating inquiries is easily one of the most important steps in the sales process. When it comes down to it, if you want to achieve your goal of $ 20,000, you need to generate six inquiries per month with an average fee of $ 500. Once again, you will only know this if you are aware of the important numbers in your business, which I’m sure, most of your competition is overlooking.

Mistake #4 – Not knowing how many bookings you need

Converting enquires into bookings is another often overlooked part of the photography sales process. Not only do you get the opportunity for income now, it gives you an opportunity to book future business through referrals.

By Ken Teegardin

The number of bookings required in your business should match the number of sessions required. So if you need to do three photo sessions per month, then you also need to book three clients per month.

Obviously the bookings you get today could help get you more sessions in the future. However, I have found that these numbers tend to correct themselves if you focus on getting your target bookings each and every month. So if you’re not doing enough sessions, you have to revisit your bookings and see how you can increase your inquiries.

Mistake #5 – Not having a method of keeping track of your numbers

Hopefully by now you have a better understanding of the relationship between different targets in your photography business. It is clear that more inquiries lead to more bookings, which lead to more sessions, which ultimately leads to more income.

It’s all well and good to be aware of the numbers, but to make significant change in your photography business requires you to hold yourself accountable and ensure that you’re following through on your goals. There are a couple ways you can do this.

One way is to draw a table in your notebook that displays each target for the month. You then record a dash next to the target when you get it done. So if you have a target of three sessions for the month, every time you do a session you draw a dash next to this target. You can also break this down into weeks if that makes it easier for you to update.

By Wendy House

You could also track your numbers by drawing up your targets on a whiteboard in your home office or studio. This is an excellent idea as you’re constantly looking at it.

Another way to do this is to create a spreadsheet. I know a lot of creative professionals cringe when they hear the word “spreadsheet”. However I encourage you to push through your barriers and use a spreadsheet to track your numbers.

The advantage of a spreadsheet is that it does all the work for you. All you have to do is input your progress and the spreadsheet can tell you how you’re doing. I can just hear what you’re saying at the moment. “Michael, this sounds great, but how do I actually create this spreadsheet you’re talking about?” I thought you might ask, so I’ve prepared a spreadsheet for you to download for you to use in your business. I initially created this spreadsheet for my partner’s photography business to track her numbers, and it really helped change her mindset in her business.

Before using my tool she couldn’t tell me what percentage of inquiries were converting into bookings. After she started tracking her numbers, she felt empowered and knew exactly how her business was going at any given time. Sometimes it was a pleasant surprise to know that she smashed her targets, other times she knew that she had to find ways to generate more business.

You don’t have to look at your numbers daily. I recommend updating your numbers at the end of each week. I also suggest that at the end of each month you send your numbers to an accountability partner. Knowing that you have to submit your numbers will only motivate you more. Choose someone you trust and you’re comfortable enough with to share your goals. This could be your spouse, sibling, good friend or business buddy. Sometimes all you need is some encouraging words to keep you focused in your business.

Bonus mistake #6 – Not tracking your expenses

It can be somewhat soothing to plan and think about how much money you’re going to make. Having said that, it’s just as important to understand how you’re spending your income.

Lots of new and even seasoned professional photographers overlook this highly important step. Reducing your costs is another method of making more money so you can spend it on more important things, like a new lens or a holiday.

By Jorge Franganillo

So how can you go about tracking your expenses? Well it’s quite simple, use accounting software. There are many accounting solutions on the market that are both free and paid. Personally, I recommend going with Wave (because it’s free) or Xero (because it’s awesome). Both systems allow you to automatically pull your transactions from your business account bank statement directly into your accounting software. This means you don’t have to spend hours entering your expenses. Pretty cool huh?

Most photographers get overwhelmed when they think of financial management. But investing time in this area will do wonders for your business.

By far the most important feature of accounting software, is the ability to create reports that allow you to see where, and how much, money you are spending in your business. From there you can make necessary adjustments to cut back on your costs.

By M.Kemal

Bringing clarity to your business

The whole purpose of this article is to bring clarity into your business. A lot of photographers like yourself start a business because you want to earn a living doing something that you enjoy. But you soon come to realize that making a living and growing your business is not easy. It can be overwhelming thinking about how you’re going to get through tomorrow’s to-do list while keeping all of your existing clients happy. This overwhelming feeling often leads to “fog brain” and prevents you from having clarity in your business.

Being aware of your numbers will ultimately help you make better decisions. Instead of spending one hour on Facebook today, you could spend that time contacting potential referral partners for your business.

At the end of the day, activities that generate more inquiries are much more important than getting bogged down with emails, packaging, social media, design and other administrative activities, especially when trying to reach higher income targets. Get someone else to do those things so you can focus on what’s important: servicing your clients, doing sessions, finalizing bookings and generating so you can fund the lifestyle that you want and deserve.

For more photography business tips read these articles:

  • The Ultimate Guide to Going Pro as a Photographer
  • How to Calculate Your Cost of Doing Business – And Other Necessary Numbers
  • 5 Things to Consider Before Starting Your Photography Business
  • 30 Things you Should Know to Help you Start a Photography Business

The post 5 Not-So-Obvious Mistakes Photographers Make When Starting a Business and How You Can Avoid Them by Michael Ofei appeared first on Digital Photography School.


Digital Photography School

 
Comments Off on 5 Not-So-Obvious Mistakes Photographers Make When Starting a Business and How You Can Avoid Them

Posted in Photography


5 Most Common Mistakes in Wildlife Photography – and How to Avoid Them

05 Mar

Animals, especially wild ones, make such beautiful subjects that we cannot resist turning our cameras on them to capture images of these majestic creatures in their natural state.

Unlike a landscape, creatures are constantly in motion, and unlike most people, they can be pretty uncooperative when it comes to getting their picture taken. This can make for a lot of botched pictures. Here are a few tips on how to avoid some of the common pitfalls of wildlife photography.

1. A Tiny Subject

Three Brown Pelicans by Anne McKinnell

It’s tough to approach a wild animal – they are easily spooked. Because of this, many wildlife photos have more wilderness than wildlife, with the animal becoming a tiny speck in its environment. This can be effective in some situations, but for the most part you want the animal to be large enough in the frame to see the detail in its eyes. This is where a good telephoto lens can really help you out. Using a long focal length (over 200mm) will allow you to keep your distance while still filling the frame.

2. Blurry Image

Blur comes in many forms. Your entire image could be blurry due to camera shake; a problem which is magnified by the longer focal lengths needed for wildlife photography.

In landscape photography, using a tripod is a good technique to prevent camera shake, but a tripod is not as practical when photographing wildlife. Wildlife photography requires a more active shooting style – you’ll be moving around constantly – so unless you are using a lens that is too big to hold comfortably, forget the tripod. Also, because the animals are always in motion, you’ll need a fast shutter speed anyway. That leads me to the first method to combat camera shake blur: using a very fast shutter speed.

In landscape photography, you normally use a shutter speed that is at least 1/focal length of your lens. But usually that isn’t going to be fast enough when photographing wildlife because the animals are always in motion (even when they appear to be standing still). To avoid disappointment, you’ll need to use a much faster shutter speed to freeze both your own motion and the motion of the animal.

Here is my rule of thumb when photographing wildlife: if the animal appears to be still, use a shutter speed of 1/500th of a second. If the animal is moving, you’ll have to adjust the shutter speed based on how fast they are moving. I suggest a minimum of 1/1,000th of a second, or faster if the animal is moving faster.

Sleeping Steller Sea Lion by Anne McKinnell

Using a lens with image stabilization will also help prevent camera shake blur. A lens with a wide maximum aperture, say f/2.8 or even f/4, will let more light in, allowing you to use a faster shutter speed. Likewise, a camera with low noise at high ISOs will let you turn up the sensitivity. All of these options will enable you to make faster exposures with better results.

Another type of blur is focus blur. This results from your camera being unable to focus, probably because your subject is moving and the AF motor gets confused. Some cameras and lenses have superior auto focus systems to others, but regardless of what you have, you can get the most out of it by setting it to continuous focus mode, usually called AF-C (Nikon) or AI Servo (Canon). This setting will track the subject’s movement in the frame and focus on it more quickly and accurately.

3. The Missed Moment

We’ve all been there. You see the perfect shot, frame it, and hit the shutter. But by the time the camera focuses and the exposure is made, the animal has moved and all you end up with is the second after the perfect shot.

There are two ways to avoid this heartbreak:

Anticipation

This is a skill that can only come with practice and a keen eye. If you can learn to see when the perfect moment is about to happen, rather than when it is happenning, you can hit the shutter right before the peak moment and cause the camera to snap at just the right time.

Orca by Anne McKinnell

Continuous Shooting

When animals are in motion, you’ll get the best chance at a good result by using continuous shooting mode (also called “drive mode” or “burst mode”). With this, you can take several images per second and choose the most successful.

Higher-end DSLRs and mirrorless cameras will have a much faster maximum shooting speed, but no matter which camera you have, there are a few things that will help get the highest continuous shooting rate.

One is a fast memory card – both SD (standard digital) and CF (compact flash) cards have a certain speed that they operate at, and a faster card will make sure that your camera doesn’t get bogged down trying to save the images.

The other is a fully-charged battery – as the juice drains, the camera can become sluggish, so it’s a good idea to keep an extra battery or two in your camera bag. For ultimate performance, you can buy a battery grip that fits on your camera. This holds two batteries at the same time for maximum speed.

4. Where Is Everyone???

Sometimes wild animals can be hard to find, and they’re not always where you want them to be. Before you can photograph them, you have to learn a few things about how to find them.

Know your animals

What types of animals live around you? Before you go out shooting, find out who they are, what they eat, when they sleep, and where they like to relax in between. If you’re photographing birds, research which ones are to be found in your area at which times of year. It’s also important to know how animals might react if, and when, they feel threatened – will they fight, or flee?

American Green Tree Frog by Anne McKinnell

Know the season

Some animals will be much more active at different times of year – particularly during autumn, as they rummage up enough food for winter, and in the spring when some animals come out of hibernation.

Camp out

I don’t mean overnight (unless you’re into that), but it’s often a very effective practice to find a popular area – probably somewhere with a source of water, food, shade or shelter – where animals like to congregate. Set your camera up on a tripod nearby, and disguise yourself among some trees or brush (some photographers go so far as to buy ,or build, a blind to hide their presence).

Be patient

Animals work on their own schedule, so don’t try to fit a shooting session in between other appointments. Great photos take time, and you must allow nature to unfold at its own pace. Many animals are easily frightened, so being quiet, still, and inconspicuous will help put them at ease.

5. Animal Attack!

We don’t call it “wildlife” for nothing – the biggest mistake you can make is accidentally getting mauled. Animals are not adjusted to polite society, and can be pretty rough customers if you catch them at the wrong time, or in the wrong way. They spend most of their waking lives foraging for food, and a spat over a meal can turn ugly, fast. Never get in the way of lunch, unless you want to take its place.

Don’t approach a wild animal directly, and if they see you, avoid looking them in the eye. This is usually a sign of aggression. If you need to get closer, keep low and move in a broad zig-zag pattern to avoid frightening the animal.

Baby Aligator by Anne McKinnell

Be aware of when mating season (or “running season”) is for the type of animal you’ll be photographing. Male mammals are full of testosterone at this time of year, and can be aggressive, violent, and very dangerous. Avoid photographing at these times. Similarly, find out when animals are likely to be giving birth and raising their young. We all know how risky it can be to get in between a mama bear and her cubs.

Whenever you’re dealing with wildlife, always remember that any creature can be dangerous when provoked, and it’s very important to treat animals and their habitat with the utmost care and respect.

For more tips on wildlife photography try these articles:

  • Manipulating Natural Light in Wildlife Photography
  • How Low Can you Go? An Illustration of Camera Angle for Wildlife Photography
  • Making Sharper Wildlife Photographs – [Part 1 of 2]
  • Making Sharper Wildlife Photographs – [Part 2 of 2]

The post 5 Most Common Mistakes in Wildlife Photography – and How to Avoid Them by Anne McKinnell appeared first on Digital Photography School.


Digital Photography School

 
Comments Off on 5 Most Common Mistakes in Wildlife Photography – and How to Avoid Them

Posted in Photography


10 Most Common Mistakes in Landscape Photography – and How to Overcome Them

04 Feb

If you’re serious about landscape photography, it won’t take you very long to realize the fundamental problem of the craft: not every landscape that catches your eye will easily translate into a compelling photograph.

When we experience a place, the smells, sounds, the warmth or chill in the air, and our own emotions combine to give us an overall impression. Our job as photographers is translate that overall impression into a photograph.

Every landscape photo needs to be carefully crafted with the final image in mind.

Devil's Cornfield, Death Valley National Park, California, by Anne McKinnell

There are many problems we run into along the way that can prevent our overall impression of a scene from shining through in the final image. The following are the most common traps to expect, and how you can avoid them.

1. Crooked Horizons

Most landscape photos will feature the horizon – a dead giveaway to the picture’s overall perspective. That means that if the line dividing land and sky is not perfectly straight across, the whole picture looks totally out of whack. There are a few ways to make sure your horizon squares up right:

  • Grid Overlay
    On most DSLRs (and some compact cameras), you can overlay a grid on either your viewfinder, your live view screen, or both. Align your horizon with one of these lines.
  • Electronic Horizon
    Newer, higher-end cameras often have a built-in electronic level. When turned on, it will gauge the camera’s position in space and tell you when it is evenly aligned.
  • Bubble Levels
    Some cameras have a bubble level attached and some tripods will have one as well. If you don’t have one built into your gear, you can purchase one that affixes onto the camera’s hot shoe. Just like a spirit level in construction, this will help you straighten your camera out.
  • Post-Processing
    If all else fails, every major photo editing software will feature a “straighten” tool which allows you to draw a line tracing the horizon. Using this, the program will automatically crop the image on an angle to make sure that the line is perfectly horizontal.

2. Eye-level Perspective

Most people photograph from an eye-level standing position producing photos that look as you would expect to see things if you were there. For a more interesting composition, try climbing on top of something, or getting close to the ground to achieve a different point of view.

3. Empty Skies

Without clouds, birds, or some other interesting feature, empty skies can turn out pretty flat and boring in a photo. Try to compose your picture with something interesting in the sky. If there is nothing interesting to show, raise your horizon line to the top third of the image to minimize how much space the sky occupies in the frame.

Pine Glades Lake, Everglades National Park, Florida, by Anne McKinnell

4. Hand Shake Blur

A blurry photograph loses almost all of its impact. Either use a tripod or use a fast shutter speed combined with image stabilization.

When it comes to landscapes, securing your camera onto a sturdy tripod will always yield better results. Even if you’re using short exposures, a tripod will allow you to compose your shot more precisely and lock its position into place while you shoot.

5. No Focal Point

Skies and mountains are lovely, but a picture can’t be all background. Your photo needs a focal point to hold the viewer’s interest. This can be anything – an interesting tree, a boat, a pier, a log – but no landscape photo is complete without a main subject.

Fisherman at Fort DeSoto, Florida, by Anne McKinnell

6. Cluttered Backgrounds

The opposite also applies – be careful not to focus too much on the subject and forget about how the background comes together. Pay attention to what is behind your main subject. If the background elements don’t add to the composition remove them if possible. Be careful that you have separation between each element, and don’t let them visually blend together (ie. two or more trees merging into a greenish blob). This is especially problematic when the objects are backlit or silhouetted.

7. Poor Lighting

When you rely on the sun to light your shots, you’ll find that some days the weather just doesn’t cooperate. Grey, cloudy days will give you muted, washed-out colours and not much in the way of shadows or contrast. Extremely sunny days might do just the opposite. Carefully consider the lighting conditions on your scene before you decide how to approach it.

  • If the sun is out, position it to one side of the camera to take advantage of the shadows and textures created by sidelight.
  • If the sun is in front of the lens, your scene will be backlit and you can make some dramatic silhouettes.
  • If the sun is behind you photographing the scene will be more difficult because the direct light will make the scene appear flat. Consider changing direction.
  • If there is no sun and the sky is white, use the soft lighting conditions to make close-ups.

Rainbow Rock, Valley of Fire, Nevada, by Anne McKinnell

8. Underexposing

If the sky is overly bright (say, in the middle of the day), it can confuse the camera’s light meter, which will try to compensate by underexposing the rest of the image, resulting in a dark foreground. If this happens, use the exposure compensation to turn up the brightness, but not so much that the sky becomes blown out (turns white).

If you’re having this problem, try re-composing your image to include a darker area of the sky. This type of scene is a good time to use a graduated neutral density filter. These filters are dark on the top and clear on the bottom. You place it in front of your lens to darken the top half of the image and even out the exposure.

9. Hot Spots and Blown Out Highlights

It’s not just the sky that can blow out, though – a hot sun can cause glare on many surfaces. Watch your scene for bright spots caused by reflections or excess sunlight. Most cameras have a “highlight warning” viewing mode on the image preview which will show any pixels that have turned pure white. If you have blown out highlights, use the exposure compensation to reduce the exposure slightly until they are gone.

10. Lack of Dimension

Even though a photo is a two-dimensional image, a strong landscape composition gives the illusion of depth. When you’re setting up your shot, make sure to populate the frame in the foreground, mid-ground, and background.

Lake McDonald, Glacier National Park, Montana, by Anne McKinnell

When you are learning photography it can be hard to critique your own work and understand how to improve. After your next photo shoot, examine your images for these problems so you can avoid them next time. Looking at each of your images with a critical eye and considering how they could be improved will quickly improve your artistic eye and make you a better photographer.

The post 10 Most Common Mistakes in Landscape Photography – and How to Overcome Them by Anne McKinnell appeared first on Digital Photography School.


Digital Photography School

 
Comments Off on 10 Most Common Mistakes in Landscape Photography – and How to Overcome Them

Posted in Photography


Five Photography Business Mistakes to Avoid

29 Nov

A guest article by Steve McConnell

Five photography business mistakes that cost me dearly and how you can avoid them

I’ve been toying with an idea of writing an article, in which I share some ideas on how to start a successful photography business. Every time I think about writing it, I realize that I wouldn’t know what to write. I just don’t think that the entrepreneurial journey for an aspiring photographer can be boiled down to a set of step-by-step tips which can fit neatly into a blog post on photography business mistakes

There are just too many variables (business nuances, possible changes of direction, personal problems, market issues, artistic visions, industry influences, technical developments)  which can be put together in an infinite amount of ways into a business strategy that may lead you to reach your goals.

However, I think that there’s a fairly universal set of potholes which are likely to derail your ambitions as a creative entrepreneur unless you steer the business ship neatly around them. It is with the aim of highlighting these potholes that I decided to write this article. I hope it enables you to put your dream together in your own unique way, while raising some red flags around things that may trip you up.

I think that it is much more useful to highlight some of the pitfalls that exist on this path, hopefully leaving you with the freedom to put your dream together in your own unique way, while raising some red flags around things that may trip you up.

Bit on my background

Let me give you some context. I started my family photography business almost two years ago. In the first year of operation I managed to grow it to a point where it became my part-time job. In this, my second year, I’ve grown it to a point where I’m working at it full-time, my fiancé works in it part-time, and I employ a part-time retoucher to help with editing.

We’re busy. However we’re far from being as stable and sure-footed as I’d like. Every dollar counts and every day a dozen priorities have to be juggled in a way that ensures the worker-bee stuff gets done and the bigger picture (no pun intended) ideas are considered, planned and executed.

photography-business-mistakes-1

What mistakes have I made that you will want to avoid?

Looking back at the business decisions I’ve made, there were some which helped us grow (niche marketing, focus on online channels, partnerships).  There were also some decisions I’ve made, which held us back significantly. These are the ones I’m going to share with you in hopes that you will avoid them on your photography journey.

Mistake #1 – listening to established photographers

This may be a contentious point. Let me qualify my words here – when I say “established pros”, I mean photographers who have been in the game for 10+ years, who were around in the film era and who most likely built their business by selling big prints, renting a studio and advertising in the Yellow Pages while promoting themselves through industry partnerships.

I’ve found it immensely difficult to get advice from these folks that is relevant and works in today’s business world. The few times I have taken on their advice and steered my business in the direction they suggested, I regretted it and had to reverse those decisions.

My take on it is that many established pros suffered a business downturn in the last few years. As a result, many turned to teaching. Thing is, their downturn happened mainly because their businesses were built on principles which expired.  Yet, they’re teaching those exact principles and strategies to the new generation of aspiring photographers.

I’m not saying that all established pros are not worth listening to, of course not. I’m saying that I personally should have used more discretion in evaluating their advice and rejected more of it, instead of trusting them based on the number of years they’ve been in the game.

Mistake #2 – taking too long to learn sales

A few months ago I finally admitted to myself  that I suck at face-to-face sales.

My background is in marketing, which has been helpful in creating branding and business strategies to bring customers to the websites and ensure they have a great experience there, hopefully leading to a sale. But this skill has also become a crutch, because I’ve become reliant on people making their purchase online. If a potential customer called with intent to ask questions (or, God forbid, challenged me on price), I’d collapse.

I decided it was time to get comfortable talking about prices and learn how to articulate my value proposition in a way which catches people’s attention. At the end of the article I’ll share some resources that helped me.

Learning sales was important because it helped me get comfortable with customers on the phone. It changed my perspective on who I am when I answer the phone – I went from being the guy who helpfully provides information about our prices to being the guy who engages potential customers in a dialogue which aims to deliver maximum possible value to them.

photography-business-mistakes-2

Mistake #3 – underestimating the importance of customer service

I started off with the mindset of “I’m an artist. I’m here to create photos. People hire me for my photographs, not for my phone manner or for a card I might send them for Christmas.” I believed that if I focused on producing great photography, that alone would ensure my customers were happy. I did hardly any follow-up before and after the shoots, and I did little else for my customers, except shooting.

I was inspired to change my opinion about on this when I bought a new Apple laptop. It was the smallest detail that flicked the switch for me – a little plastic tab which sits under the laptop and makes lifting it out of the box easy. I’m pretty sure if I bought another brand of computer, I’d have to either jam my fingers between the device and the box to pry it out or flip the whole thing upside down and let gravity do the work.

Not so with Apple. There was a distinct sense of being taken on a journey, even before the Mac was switched on. It made me realize that my customer’s photography journey with me, starts long before a shutter is pressed.

photography business mistakes to avoid

MacBook unboxing

I made it one of business priorities to design, and constantly improve our customers’ experience at every touchpoint with the business. I want people to feel like they’re immersed in a branded experience which begins the moment they arrive at the website and continues long after the photos are delivered. I’m paying attention to things such as:

  • Do they know how to get here?
  • Do they know where to park?
  • Do they get a thank you note?
  • How does the packaging of the USB stick (on which their photos are presented) look?
  • Do I surprise them with some unexpected previews, letting them know that their photos are almost ready?

I want them to feel like everything is being taken care for them and no matter what goes wrong, they don’t have to worry about it. 

Mistake #4 – forgetting about the winter slump

Our business had a nice surge of growth towards the end of last summer, and then it stopped. I’m not saying it just stopped growing. It literally all stopped. I forgot that people might not be as keen to be photographed in windy, chilly months as they are during the summer heat.

Being prepared for the winter slump will help you avoid a scenario in which the bottom falls out of your business and you have to hock camera (and maybe unessential body) parts on E-bay.

photography-business-mistakes-3

Mistake #5 – neglecting my friends

I’ve lived a fairly ascetic existence for the past two years. My focus has been quite single-mindedly on business. I’ve eliminated just about everything from my schedule which was not business related. I’ve hardly been out. I haven’t spent much money at all on clothes or fancy food. Working for weeks without a day off has been the norm.

It was a conscious decision and a necessary one, because I wanted to grow the business quickly. I was hungry for it and I knew that I’m the kind of person who isn’t very good at doing a number of things at once, so I couldn’t afford to be distracted. . This meant cutting ties with most of my catch-up friends (you know, the people you ‘know’, but in reality you really don’t) and not seeing some of my best friends for months and years at a time.

I don’t regret doing it, but I do regret not managing it better. For some people in my life that I do care about, I kind of fell off the radar. I was simply afraid of having a heartfelt conversation with them and telling them that I needed to disappear for a while because there’s something important I had to do.

photography-business-mistakes-4

In conclusion

I’m not entirely comfortable being in a position of dispensing advice because I don’t feel like I’ve fully cracked the code yet. In many ways, I’m living a dream I never thought possible. However, in the context of what’s possible as a creative entrepreneur, I’m still very much a beginner.

However, there are people in this world who have repeatedly created modern, lean businesses which are turning a healthy profit by creating amazing customer experiences. Let me conclude by sharing some resources that I’ve found invaluable:

Here are two resources which have helped me get comfortable on the phone with potential clients and increase my sales dramatically: S. Anthony Iannarino’s The Sales Blog and  Blake Discher’s Webinar On Negotiating.

  • Everything Google – Moz
  • Sales – S. Anthony Iannarino The Sales Blog
  • Strategy – Fred Destin Startup Lifecycle
  • Starting Small – Seth Godin’s Bootstrapper’s Bible
  • Business Models, Lessons From Silicon Valley – Dave McClure 
  • Kick Up The Bum: A Brief Guide To World Domination (and why that’s a good thing)

If you’re a photographer and have already set off on your entrepreneurial journey, I’d love to hear about the challenges you’ve run into.

  • Are you running out of time or money?
  • Are you not sure who your market is?
  • Not sure where to even start?

Those are normal issues to run into and are very much part of the journey. Please share the details in the comments below.

Editor’s note: of course the opinions expressed in this article of those of the author, based on his experience. If you have a differing opinion or addition tips to add please do so in the comments section below.


Steven McConnell is a Sydney-based entrepreneur and photographer. Together with his fiancee, he is behind two startups – Steven & Irene Photography and Arielle Careers. When he is not photographing, his focus is on empowering creatives to make a living by doing what they love. You can catch up with him on Google+.

Post originally from: Digital Photography Tips.

Check out our more Photography Tips at Photography Tips for Beginners, Portrait Photography Tips and Wedding Photography Tips.

Five Photography Business Mistakes to Avoid

The post Five Photography Business Mistakes to Avoid by Guest Contributor appeared first on Digital Photography School.


Digital Photography School

 
Comments Off on Five Photography Business Mistakes to Avoid

Posted in Photography


The 3 Biggest Kid Photography Mistakes

11 Oct

The 3 Biggest Kids Photography Mistakes

A Guest Post by Brent Mail – creator of How to Photograph Kids Naturally Online (currently 50% off at SnapnDeals).

After watching many families at the beach over the school holidays, I noticed that most of the parents, as well as some professional photographers, were making the same 3 HUGE mistakes when they were photographing kids. I could see the parents getting frustrated and it looked like no one was having fun.

I guess I can summarise the 3 mistakes in one sentence. “Hey kids, please sit down over there, look this way and smile!”

Mistake 1: Asking Kids to Sit Still: “Hey kids, please sit…”

The kids are all dressed up for the photo shoot and excited, but don’t quite know what will happen, so they do what comes naturally – they run off and play.

The photographer and parents then try to round up the kids, find a place to photograph them and then ask the kids to sit down and be still and look at the photographer. Ever tried this? It goes against all the natural instincts of the kids – they are super excited and told to sit still. Very difficult to achieve!

Kid photography mistakes 1

Solution – Let the kids run & play

All kids love to run and play. It’s a natural part of being a kid, so why not let them do what comes naturally? Some of the best images I capture are when kids are allowed to run on the beach or at a park. I take this one step further and create games for the kids to play, like racing each other, or getting the parents to chase the kids.

There are 2 things that happen when kids are allowed to run & play:

  • Kids have all this built up energy that needs to be released, and now they get to use it up. It’s fun for them and they become happy, playful kids. This is what you want.
  • Parents and kids get to relax and we capture natural facial expressions, un-posed with no fake smiles.

Kid photography mistakes 2

Tip: Shoot in sports mode – use a fast shutter speed 1/500th sec or 1/1000th sec with AI Servo auto focus (tracking autofocus). When kids are racing towards you, a very fast shutter speed and tracking autofocus will mean that you capture all the action and your subjects are in focus.

Mistake 2: Asking for a Smile – “…look this way and smile!”

Wow, this is a big one. I don’t think I have ever seen a parent not say “smile” to their children when they are being photographed. “Common kids, smile. Give us a big smile!”

Yes, sometimes we get a smile, but it’s normally a fake smile. Who wants images of their children with fake smiles? Not me.

Kid photography mistakes 3

Solution – Be the Clown

Have you ever taken your kids to the circus to see a clown? A really entertaining clown, who gets the kids laughing. Go behind the clown and photograph the kids – those are real smiles!

So you (the photographer) need to become the clown.

How do you do that? When you meet the kids for the first time get down to their level and introduce yourself in a very enthusiastic and loud voice. Set the scene from the start, then, when you are photographing the kids, be loud, be funny, do funny things like roll your eyes, stumble around, dance, or get the kids to scare you! Bring along props to entertain the kids, like a clown nose.

Kid photography mistakes 4

An alternate to being the clown is the have the parents or siblings become the clown. When I’m shooting the close-ups (after the kids have run around and released all that energy) I get the parents to stand behind me and I get them to dance around. This always gets the kids smiling and laughing – seeing dad do “gangnam style” dance is hugely entertaining for the kids. It’s also a lot of fun for the parents.

Mistake 3: Standing Tall

Have you ever had someone stand over you and talk down to you? How do you feel? Inferior, small & insignificant? This is what kids feel like when someone photographs them from high-up. They feel intimidated and it’s not fun for the kids.

Also there is nothing special about the images captured from high-up, they are more like snapshots.

Kid photography mistakes 5

Solution – Get Down Low

When I first get to meet the kids I’m about to photograph, I get down low, and introduce myself. “Hey kids, my name is Brent and we are going to have so much fun today! What is your name?” I connect with the kids in a very enthusiastic voice. From then onwards the kids know that I’m on their side.
When I photograph them, I kneel down to their level, sometime I lay down flat on the ground to get a very different angle of view. Parents love these images, because they have never seen their children from this low angle, and the kids do not feel intimidated so they relax and play along with me.

Kid photography mistakes 6

Summary:

So, next time you go out and photograph kids keep these 3 tips in your mind. The photo shoot will flow and everyone will have much more fun – including you!

  1. Let the kids run and play.
  2. Be the clown and get the kids to laugh naturally.
  3. Get down low to their level.

Hope you enjoyed these kids’ photography tips. If you want to find out more then checkout my “How to Photography Kids – Naturally” course which is currently 50% off at SnapnDeals.

Who is Brent? Brent is an award-winning professional photographer who runs a successful portrait photography studio near the beach in Australia. Brent also teaches photography and has a free mini-course here, as well as
other photography training courses here.

Post originally from: Digital Photography Tips.

Check out our more Photography Tips at Photography Tips for Beginners, Portrait Photography Tips and Wedding Photography Tips.

The 3 Biggest Kid Photography Mistakes

The post The 3 Biggest Kid Photography Mistakes by Guest Contributor appeared first on Digital Photography School.


Digital Photography School

 
Comments Off on The 3 Biggest Kid Photography Mistakes

Posted in Photography


Learning From My Mistakes: 5 Okay Shots That Could Have Been Great

28 May

by Lynsey Peterson.

I am incredibly lucky. It’s taken me a decade, but I have built a portrait photography business that depends solely on word-of-mouth marketing and stays plenty busy that way.

If there was a magic 3 step process for this, I promise I would share it.

I’ve learned a ton along the way: treat your clients like gold, be generous whenever you can, and everyone should blow their nose and empty their pockets before a single picture is taken. Yet……..I still learn every day. Which is odd because every day I am also pretty sure that I couldn’t possibly know more than I know now or be presented with a situation I have yet to encounter. Then again, sometimes my ego and I have trouble fitting thru doorways together.

Mistakesphoto1 1

See that? It’s a house. It’s actually my house – which I am putting on the market soon.

My wonderful realtor who knows I’m a photographer, asked if I wanted to go ahead and take the pictures myself to save time and money instead of bringing in the trained and experienced real estate photographer she usually uses.

Now, I am asking a little more than my hourly rate for this house. In fact, I am asking like a thousand of my hourly rates for this house. 999 of them are going to pay off the note with the bank, but I’m pretty excited about that one I might get back – and I don’t do real estate photography. I’m not even really sure how to go about it if we are being honest. But, hey, I have a fancy camera and an expensive lens and how hard could it be, right?

If you have those fore mentioned things, you are going to be asked at some point to shoot something that you don’t have any interest in shooting. Maybe it’s a house. Maybe it’s food. Maybe it’s dirt in a fetching abstract pattern. And it’s tempting to say yes, because after all…..how hard could it be? The answer is hard. The longer answer is that every time you shoot something subpar, if only because you don’t have the experience, training, and interest in shooting that, you are taking away from the work you do want to shoot. I get it. I really do. Favors for friends, good money in the off-season. But it’s rarely worth it.

The lesson: Stick with what you know. If you don’t have any desire to do it or learn how, don’t take it on.

Mistakesphoto2 1

I love photographing people upside down. It’s unexpected and quirky and different and fun. And, and, and. It’s also complicated and only works when the rest of what the viewer’s eye has to process is simple and easy. If I had stopped for a moment and viewed it without my camera, I would have seen how hard it was to take it. Why is one kid upside down and the other not? Who’s arms are those? How did they get like that? The cuteness of siblings rolling around in grass and beautiful light gets lost trying to understand the whole picture.

The lesson: Simplify.  If it takes you a second to process what is happening, it will take the viewer of the future photograph much more than a second and your concept could be completely lost….no matter how “perfect” the shot itself is.

Mistakesphoto3 1

When a plane went by, causing most everyone in this family to look toward the sky, I though I had hit pay dirt. I quickly envisioned them all looking up in amazement and excited baffle. Instead it only served as an interruption to what we were doing. At the moment I remember thinking I should encourage them to watch the plane. But I was so caught up in the moment passing us by that I didn’t think I had time.

Even if the plane had long passed by the time I conveyed what I meant, I still could have gotten the shot I imagined. But I didn’t say a word about it and therefore didn’t allow them their own moment, which would have produced an amazing shot. Instead I have this: everyone a bit thrown off by the interruption because I didn’t ease the situation.

The lesson: Take your time. No matter how tight the schedule, you always have 30 extra seconds to make a fun situation into a great shot.

Mistakesphoto4 1

Oh this picture. It was such a beautiful shot…………two hours of Photoshop ago. I love MORE. I’m a fan of bigger and better and faster too. When this cutie showed up with this adorable hat,

I got an idea. A crazy/complicated/fun idea.

I. Was. Going. To. Get. This. Shot.

We were going to stay here all day if that’s what it took. And I got a great shot (without the whole day bit luckily). However left to my own devices, I wanted to do everything I could to make it THE shot. What’s post-production, if not to enhance right? I felt it was a Gap Kid’s moment, what with the cute kid and fun hat and all. Deserving of the kind of “enhancement” ready for a catalog cover. Never mind that I don’t shoot fashion, that I rarely shoot commercial, and that for this shot I was being paid to shoot a portrait and nothing more.

The lesson: Less is usually more. There’s a fine line between giving an image a little editing love and turning people into plastic.

Mistakesphoto5

Now I knew going into this shoot that I was photographing a large family and 8 dogs and you’d think that I would have come with my pockets full of dog treats and spent the hour and a half drive there practicing my whistle. But, alas, I did not.

This particular client was a referral who lived really far from me and was willing to pay me a significant travel fee to come to them – and their 8 dogs.

Admittedly my ego got the best of me here. There are hundreds of photographers closer and cheaper. Maybe even some with experience shooting 8 dogs. But they wanted me. And instead of saying, “do I really want to shoot this?”, I happily fed my ego a big serving of “I’m So Wanted” with a side dish of “How Awesome Am I? Answer: Really Awesome”.

Here’s the problem with that: this shot is forever my body of work. Even if I had never shown it to anyone, the client might. And it’s not my greatest work. Yet it may be the only work of mine someone sees.

This isn’t the shot I want to hang my hat on or be known for. I’m not embarrassed about it, but I do get a little bummed about the idea that a viewer may see this and think it’s the best example of my skills.

The lesson: Get over yourself. This shot doesn’t need to be in my body of work, but it is. I could have done more research and come in with better ideas for this 8 dog craziness and by not, the take-away is a shot that could have been so fun and different and interesting and…… isn’t.

Check out more of Lynsey Peterson’s work on her website.

Post originally from: Digital Photography Tips.

Check out our more Photography Tips at Photography Tips for Beginners, Portrait Photography Tips and Wedding Photography Tips.

Learning From My Mistakes: 5 Okay Shots That Could Have Been Great


Digital Photography School

 
Comments Off on Learning From My Mistakes: 5 Okay Shots That Could Have Been Great

Posted in Photography