Easy Peazy HDR in Adobe Lightroom to make realistic HDR images!
HDR photography used to be time consuming, difficult to learn, and required expensive software. Recent new technology now allows anybody, even beginners, to make perfect HDR in less than 5 minutes – while eating a bowl of ice cream. It’s that easy!
Using Adobe Lightroom for HDR
Just wait until you see how awesome this is!
The Perfect HDR Workflow takes place completely within Adobe Lightroom 4 or 5, a very robust, yet inexpensive, state of the art software. There is also an inexpensive plugin you will need. It’s made exclusively for Lightroom by the smart Photomatix people and is the secret sauce which makes this workflow possible and so elegant. It’s called “Merge to 32-bit HDR plugin” and is available for $ 29. They also have a trial version available so you can test it out first. These are the same people who make the world’s leading HDR tone mapping software, Photomatix Pro. So, take comfort, there’s no smoke & mirrors in this HDR workflow and you’ll be working with the best software available today. At the same time, your photography will now blow away 95% of the HDR images which are still being made using the old, harder to learn, HDR tone mapping process.
Notice, you don’t need to own Photoshop or endure the pain & suffering of learning how to use Photoshop to do this method! This, in itself, is huge and a welcome departure from the way HDR photography is typically done.
Advantages of 32-bit HDR Processing
The process I’m going to show you is technically called 32-bit HDR processing. The Perfect HDR Workflow is just my name for the particular workflow I designed with the beginning photographer in mind. My criteria was that total cost be under $ 150 US, which immediately rules out Photoshop in the workflow. Another requirement was that it be so easy that even a beginner can learn to make extraordinary HDR photos in minutes.
The advantages of the 32-bit process are:
- It’s fast
- It’s inexpensive
- It yields realistic looking images
- It’s very easy to learn
HDR doesn’t have to be complicated anymore. In fact, the Perfect HDR Workflow obliterates the complex technical barriers of making outstanding HDR which used to exist. Now, anybody with a digital camera and the desire can play a much bigger game when it comes to HDR photography, can do this!
Are you ready to see how it’s done?
Five Minutes to Perfect HDR
Here we go. Start with the three bracketed RAW images right out of the camera (you can download these for free if you want to follow along):

-2 shot at: ISO 200, F8, 1/1500
|

0 exposure shot at: ISO 200, F8, 1/350
|

+2 exposure shot at: ISO 200, F8, 1/90
|
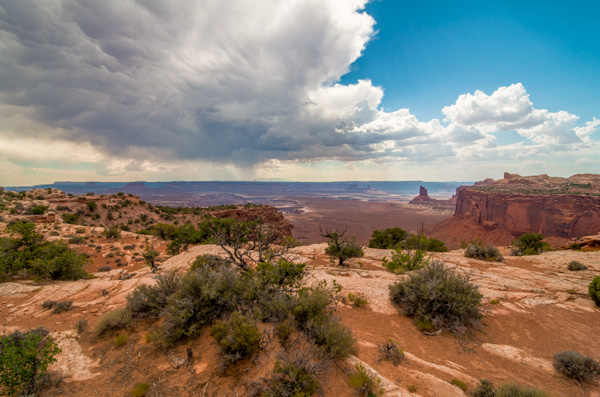
In less than 5 minutes you’ll end up with an HDR photo looking like this:
Start your stopwatch:
The first thing you want to do is create the 32-bit image. With the three RAW files selected in Lightroom, right click and in the dialog box which appears, select “Export>Merge to 32-bit HDR” as shown below.

A new dialog box opens up where you choose your options for merging the RAW files (see image below). Always choose to “Align Images” and then one of the alignment options. If your three photos were taken handheld, select the alignment option “by matching features”. When you shoot on a tripod, you would chose the other option, “by correcting horizontal and vertical shifts”.
If there are moving objects in your scene such as: cars, people, clouds, trees, or anything else – select “Remove ghosts” and the software will usually do a great job of producing a non-blurry merged image, with no ghosts. For this landscape photo, nothing was moving so this option was not selected.
Noise reduction is usually necessary in HDR photography, however, I recommend not using the “Reduce noise” option which the plugin offers up. Instead, you are better off using the noise reduction built into Lightroom. So, leave that unchecked, as well.
Moving down to where you choose how the resulting 32-bit file is saved. I recommend simply combining the file names and adding a suffix like “32-bit HDR” so that, at a glance, you know that is the 32-bit file you want to work with in Lightroom.
The final dialog box selection you want to make is; “Stack with selected photo.” It’s so easy and elegant how this plugin makes your HDR workflow when this is selected. After the 32-bit file is created, the plugin automatically imports it right back into Lightroom and places it neatly next to the original RAW files. This keeps my OCD mind happy. Leave the final two options unselected then click the “Merge” button.
Here’s what the dialog box should look like

In a few seconds, your newly created 32-bit file appears in Lightroom and looks something like this:

Okay, well that’s not too pretty! That’s because this is a 32-bit file which your computer monitor can’t correctly display. But Lightroom 4 or 5 can process it, so let’s do that.
We’ll be working mostly in the Basic panel of the Develop module in Lightroom. The first step is to simply click the “Auto” button which gives you Lightroom’s best guess at the right setting for the image:

It’s already looking much better. But let’s take it a step further!
Adding Your Artistic Touch
Now it’s time to add your personal artistic mark on your photo! At this point, you take over the processing manually to create an HDR image that is most pleasing to you. There are no right or wrong settings. However, my 5 minute process to Perfect HDR does follow some general guidelines so let me show you how this image evolved for me.
Working in the Basic panel, you first will reduce the “Highlights” (slide it left) and increase the “Shadows” (push it to the right) sliders until the image looks best to you. Then you might adjust the “Clarity” to a slight positive value, which adds local contrast between pixels. It makes the HDR photo “pop.” Please be careful not to push clarity too far right. My advice is to keep it below 30, for now anyway. Now let’s jump out of the Basic panel.
For just a couple of quick automatic adjustments, open up the “Lens Correction” panel. I recommend that you always check the box to “Remove chromatic aberration.” Also, you may want to straighten your horizon and/or vertical lines using the “Upright” adjustment tool. Here is what the “Lens correction” panel looks like when you make these simple adjustments:

Now, go back to the Basic panel to finish. Set the white and black points as shown in the video below. The other sliders in the Basic panel can then be fine tuned to your taste and that’s it! Woooo Hooooo, done in less than 5 minutes! You’ve just made your first Perfect HDR photo! Send it to Mom and your friends and be ready to receive their adoration!
Watch The Full Perfect HDR Workflow Video
In the video below, I show the complete processing of this image including how to set the white and black points correctly. It’s easier to show some of the steps in a video, rather than try to describe it all in written form.
Try the Perfect HDR Workflow
If you want to give the Perfect HDR Workflow a try yourself right now, you can download my RAW files of this image for free. Get the free trial download of the merge to 32-bit plugin from the Photomatix website. The plugin you want is the last item on the page. Install the plugin with your copy of Lightroom 4 or 5. Then follow along to get the hang of the Perfect HDR Workflow and find out for yourself how easy this really is! If questions come up, I hang out on Google+ every day and you are welcome to circle & chat with me there or on my blog.
Become an HDR Wizard
Next time, in Easy Peazy HDR in Lightroom Part II, we’ll take this image further using the other panels of the Develop module in Lightroom. I think you’ll be amazed at the power and control you have using Lightroom to process your HDR photos. It’ll be like you’ve evolved into this unstoppable HDR Wizard!
The post Five Minutes to Realistic HDR using Lightroom and a 32-Bit Plugin by Keith Cuddeback appeared first on Digital Photography School.

Digital Photography School


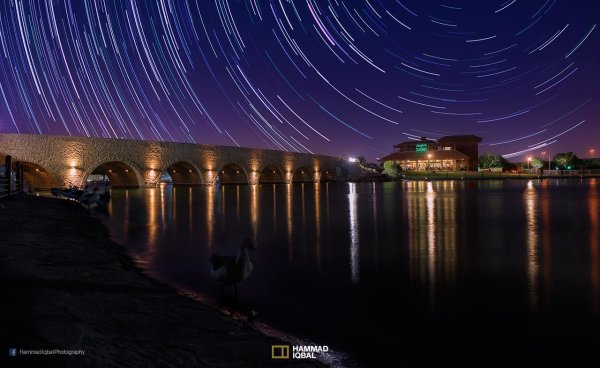
 What are Star Trails?


 There are countless Photography books and classes that explain exposure, yet after reading or attending them, your photos may not have improved because…well, let’s be honest… some of us Right-Brainers aren’t super technical!


You must be logged in to post a comment.