RSS
 

Posts Tagged ‘Minutes’

Floating Tent: Pole-Free Inflatable Structure Pops Up in Minutes

17 Oct

[ By SA Rogers in Design & Products & Packaging. ]

Camping season may be just about over for the casual fair-weather enthusiast, but in any case, here’s a fun piece of gear to add to your Christmas wishlist. Have you ever gone paddle boarding or kayaking, and wished you could just sleep out on the water? Or maybe you’ve fantasized about living in a houseboat, but owning one is a bit impractical. The ‘Shoal Tent’ by SmithFly is like a cheaper, more casual version of heavy-duty floating fishing tents, and it’s way easier to set up.

Noting that 70% of the surface of the Earth is covered in water, the Ohio-based outdoor goods retailer offers an inflatable floating raft with a tent topper that lets you sleep out on the water, and requires no poles to set up. You just use a pump to fill the three raft body air chambers and tent frame with air to make the world “your waterbed.”

Since the tent floor is inflated, your air mattress is built right in, and it features a 6” drop to keep you dry, along with heavy-duty waterproof fabric and sturdy #8 zippers. The top and sides attach with velcro, so you can get in and out easily if you need to (no struggling to position the door just right.)

The tent features an 8’x8’ footprint and can sleep people up to 6’3” tall, with the same standing room height in the center. It packs down to a burrito-roll-style bag and comes with a patch kit and manual foot pump. At 50 pounds, it’s not exactly lightweight, but depending on your plans, it’s probably worth it. It’s currently on pre-order sale at a discount for $ 1274.15, with an MSRP of $ 1499.

Share on Facebook


[ By SA Rogers in Design & Products & Packaging. ]

[ WebUrbanist | Archives | Galleries | Privacy | TOS ]


WebUrbanist

 
Comments Off on Floating Tent: Pole-Free Inflatable Structure Pops Up in Minutes

Posted in Creativity


Flat-Pack Mobile Architecture: This Building Will Self-Construct in 8 Minutes

11 Jul

[ By WebUrbanist in Architecture & Offices & Commercial. ]

Requiring a single tool and very little power, these self-deploying structures are ready for use in minutes, expanding themselves to multiple times their compact travel size.

Based in the United Kingdom, Ten Fold Engineering’s structures can be packed onto ordinary trucks, conforming to road-worthy dimensions for maximum flexibility.

The company boasts myriad possible uses, from medical clinics and mobile hotels to on-demand offices and private retreats — the sale pitch in the video above is a bit blandly corporate, but the mechanics of the thing unfolding are gorgeous.

Their custom pin-jointed linkages help them open and close easily with minimal energy requirements and using just a single (presumably sonic) screwdriver. They are modular and can be customized with various arrangements of floors, doors, windows and dividers — they can even be shipped with furniture inside.

The company is also experimenting with designs for multi-story structures as well as stackable variants, opening up a whole world of possibilities.

Even the designs show an appealing variety of aesthetic possibilities, including dynamic modern looks and spacious expanding ceilings that go a step beyond typical prefab home possibilities.

Thanks to their variable footings, the units can be put up on uneven or sloped ground, stabilizing to sit flat from the perspective of the occupant.

The buildings can go off the grid but also feature optional attachments for solar panels and batteries, presenting an array of potential power possibilities.

At around 700 square feet and $ 130,000 the base models aren’t cheap, but for someone with the urge to roam they make a pretty stylish and comfortable option for a semi-mobile home.

Share on Facebook


[ By WebUrbanist in Architecture & Offices & Commercial. ]

[ WebUrbanist | Archives | Galleries | Privacy | TOS ]


WebUrbanist

 
Comments Off on Flat-Pack Mobile Architecture: This Building Will Self-Construct in 8 Minutes

Posted in Creativity


It Happened to Me: I Made a Photo Book in Less Than 15 Minutes

22 Mar

Scrolling through your camera roll is cool and all, but leafing through the pages of a photo book is just more magical.

We’d make a photo book for every occasion, but who has the time?

Turns out, if you’ve got 15 minutes, you do!

Photojojo-er and all around great gal, Laurel, just got back from a trip to Thailand, and put together a photo book of her adventures in less than 15 minutes.

And, she’s here to tell you just how she did it.
(…)
Read the rest of It Happened to Me: I Made a Photo Book in Less Than 15 Minutes (339 words)


© laurel for Photojojo, 2017. |
Permalink |
No comment |
Add to
del.icio.us

Post tags:


Photojojo

 
Comments Off on It Happened to Me: I Made a Photo Book in Less Than 15 Minutes

Posted in Equipment


Simplified DIY: New Tool-Free IKEA Furniture Snaps Together in Minutes

15 Mar

[ By WebUrbanist in Design & Furniture & Decor. ]

wedge joint

Buying a piece of IKEA furniture is generally a bit of a gamble in terms of potential complexity, but these clever joints are designed to radically simplify and speed up the process across the board.

The so-called “wedge dowel” makes it possible to put together wood products without bolts or screws, hex keys or screwdrivers. The ribbed connector and associated slot lets large objects remain flat-packed for shipping then fit together for long-term durability (without any glue or loss in structural integrity).

furniture set

Historically, some IKEA items have come pre-assembled but at a size that makes them hard to transport. Other smaller items can pack flat but demand a dizzying array of little parts and associated tools. This single joint is letting the company replace dozens of metal fittings for certain sizable items.

stockholm cabinet

The company first started using the dowel system in its Stockholm cabinet series (above) as a test, but now plans to roll it out across its furniture lines, moving next to the Lisabo table. What used to take a half hour can now be connected with these wedge joints in three minutes.

dining set

And it is not just a function of assembly: these joints make it easier to take things apart again, making them particularly useful in a day and age where people move frequently for work and other reasons. Some of their furniture lines are expected to adopt the wedge joint entirely.

Share on Facebook


[ By WebUrbanist in Design & Furniture & Decor. ]

[ WebUrbanist | Archives | Galleries | Privacy | TOS ]


WebUrbanist

 
Comments Off on Simplified DIY: New Tool-Free IKEA Furniture Snaps Together in Minutes

Posted in Creativity


How 10 Minutes a Day with Your Camera Will Help Make You a Better Photographer

08 Jan

How to make sure that the camera is your tool, so taking photos can be your passion.

9990207

Spend 10 minutes with your camera every day

Have you ever found yourself standing in front of an awesome moment trying to decide which camera setting to choose?
Try the following tips for just 10 minutes a day with your camera, and soon enough you will forget it’s even there. The camera will become a natural extension of your eye and hand, and will not be an issue when you see a photo you want to take.

This self-tutoring plan is based on natural human curiosity, and on the fact that muscle memory can do a better job than brain memory in performing manual tasks, such as setting the desired shutter speed. Once you have created a link between your vision, and the finger that turns a dial, or presses a button on your camera, it will stay in that finger’s muscle memory for good. Then, next time you think about that function, it will happen magically by itself.
Here are some examples for 10 minute exercises to do with your camera. Take them as inspiration for making some of your own.

9720526

Explore your camera like a toddler

A toddler is crawling and exploring, seeing new bits and pieces of the world, then stands up and making a new step every day, walking while seeing things from a higher vantage point. You can do the same with your camera if you allow yourself to touch and turn dials, push buttons, or change menu settings without a specific goal. Do that on a daily basis, not in a moment before you need to capture an exciting event. Practice this until you feel safe to take a wrong turn on your camera’s menu, and remember there is always a way back in, by using “Reset Menu”.

DSF9376

One Day, One Button

The secret for fast learning is in keeping it simple. The human brain is really good at learning and performing one process at a time. So if you choose one variable, and focus your attention on it for the whole 10 minutes, it will burn into your brain and stay there.

The place to start is the shutter release button. For 10 minutes, work on different ways to half press it, then fully depress it, and then retrieve your finger tip back to half press. This is better done in front of a mirror, so you can look at your index finger while it’s working. Start at a fast shutter speed and adjust it slower after each shot. When your photos become blurry, try again until the movement of your finger tip is unnoticeable. You’ll start to see that you can shoot hand-held using slower shutter speeds with every minute of practice do you. This will help you discover your lower limit for shooting hand-held.

20100413OT0864 copy

Repeat

Even an experienced professional musician plays repeating scales for few hours a day, before the real work begins. If you repeat your camera’s operation in a simple, yet systematic way, you will feel the difference from day one. Unlike the musician, it will only take you 10 minutes a day to create a change.

For example try standing on a busy street corner following passing cars with your camera (panning), taking some shots with a slow shutter speed. Try to blur the surroundings and keep the car as sharp as possible. For 10 minutes do just that, and explore different ways to hold and move your camera along with the passing car. Shoot at different shutter speeds every time, building your eye-arm-finger connection to work together for the simple task over and over again. Do only that, and nothing else on those 10 minutes.

DSC 5930

Belz Mazzos20120328002

Take your camera everywhere with you

Your body language tell everyone around you about your feelings. The moment you feel uncomfortable, others around you can tell, and then they will feel the same.

SofiaOT4115

The way you are perceived by others, reflects your confidence with your camera. Try taking the camera on your shoulder while going to the supermarket or post office for errands. After about 10 minutes of being out doing daily chores with your camera, you will forget it’s even there, and will project that to others around you. Then you can start taking photos everywhere.

Summary

If you let yourself play with your camera for just 10 minutes a day, you’ll feel different and see the results right from day one. Remember that you learn your camera in order to forget it’s there, so you can focus on your photos.

Do you have any other ideas or tips for using your 10 minutes a day? Please put them in the comments section below.

googletag.cmd.push(function() {
tablet_slots.push( googletag.defineSlot( “/1005424/_dPSv4_tab-all-article-bottom_(300×250)”, [300, 250], “pb-ad-78623” ).addService( googletag.pubads() ) ); } );

googletag.cmd.push(function() {
mobile_slots.push( googletag.defineSlot( “/1005424/_dPSv4_mob-all-article-bottom_(300×250)”, [300, 250], “pb-ad-78158” ).addService( googletag.pubads() ) ); } );

The post How 10 Minutes a Day with Your Camera Will Help Make You a Better Photographer by Ouria Tadmor appeared first on Digital Photography School.


Digital Photography School

 
Comments Off on How 10 Minutes a Day with Your Camera Will Help Make You a Better Photographer

Posted in Photography


How to do Basic Processing on a Portrait in 5 Minutes Using Lightroom

11 Nov

There’s a Triangle of Service that you may have seen before which goes something like this: You have three options available (cheap, quick, quality) but can only choose two. I first saw this on a sign in an automotive shop years ago, but it applies in almost any professional setting where goods and services are produced for consumption, and is especially true in photography.

As a photographer you don’t have unlimited time, but you and your clients expect quality results, and doing so is not always cheap or easy. Fortunately Lightroom makes it simple to do a basic portrait processing job in only a few minutes, which you can then copy and paste to other similar photos, to make your work even faster.

five-minute-lightroom-portrait-processing-headshot

Before I get too deep into this article I want to make clear that the following steps are a process that works for me, but your unique solution might be a bit different. The important lesson is to find a workflow that is easy to replicate and repeat, so you don’t spent all your time doing the same types of edits over and over.

As you work with any editing program – whether it’s Lightroom, Photoshop, Capture One, or even a free tool like Photos or Picasa – it’s a good idea to find an editing style that matches your photography style. I know the look I’m going for when I edit a portrait or headshot, which might be entirely different from what you prefer. Knowing how to achieve my particular style has taken me a while, but now I find that my editing is a lot quicker, because I start each photo with a particular set of steps:

  1. White Balance
  2. Tone
  3. Sharpening
  4. Vignette

These steps are quick, usually get me 90% of the way towards a finished image, and will often result in a finished portrait with no additional editing required. Let’s look at each step one by one:

five-minute-lightroom-portrait-processing-step1-import

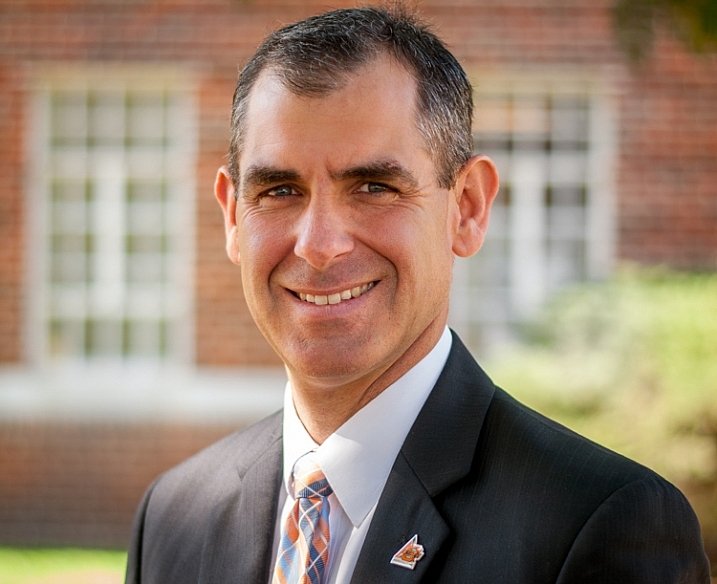
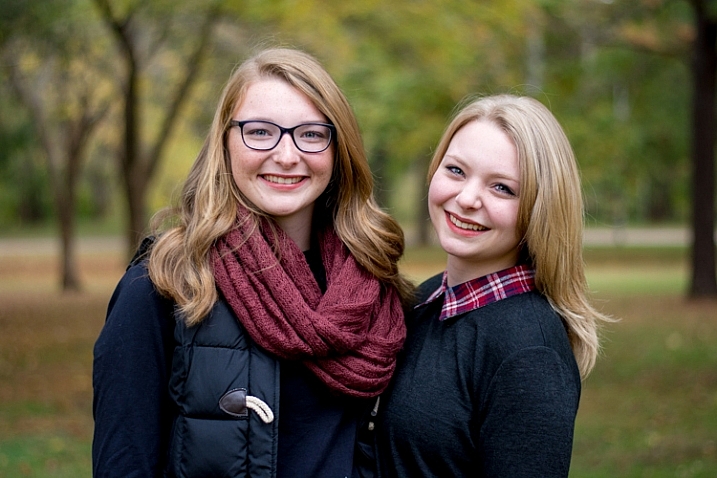
This original is decent but it needs some tweaks before it’s good enough to give to my client.

Step 1: White Balance

One advantage of shooting in the RAW format is that you can calibrate the White Balance of your images afterwards, whereas shooting in JPG leaves you much less leeway to edit not just White Balance, but most other aspects of the photo as well. Of course, one drawback of shooting in RAW is that calibrating the White Balance can take a lot of time, but much of this can be mitigated by using Lightroom’s eyedropper tool (targeted adjustment tool) instead of fiddling with the sliders on your own.

five-minute-lightroom-portrait-processing-white-balance

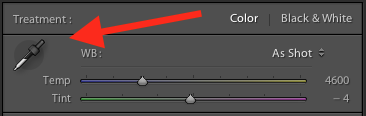
To quickly adjust the White Balance, click the eyedropper icon, then find a part of your image that is neutral in color – think slightly gray instead of pure white. The eyedropper tool might not get you the perfect overall color, but it will quickly get you close to your target, after which you can adjust the Temperature and Tint sliders to your liking.

Another tip to speed things up is to click directly on the Temperature and Tint numbers and use the up/down arrows to adjust their values, or hold down the [shift] key while doing so to make larger incremental changes.

Step 2: Tone

After you get your initial White Balance set, it’s time to make some initial adjustments using the rest of the Basic panel in the Develop module. To get my particular look, I almost always start off with the following values. You can change each one quickly by highlighting the numbers, entering new values, and pressing [Tab] to move to the next set of numbers instantly.

five-minute-lightroom-portrait-processing-basic-panel

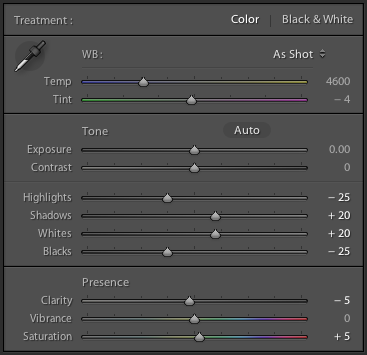
Exposure 0, Contrast 0. I don’t change these values until I make the following adjustments you see below. Because they are global, and affect the entire image, that is not usually what I want to do right away. If the image is still too light or dark after doing the rest of the basic adjustments, I’ll increase or decrease exposure accordingly, but rarely do I need to adjust contrast and you’ll see why in the steps below.

Highlights -25. This helps even out the bright portions of the portrait so any spots that are a little bright are brought down a bit.

Shadows +20. This is a way of brightening just the dark parts of the portrait to bring out a little more color and definition.

Whites +20, Blacks -25. I use these sliders instead of adjusting the contrast because it gives me more granular control over the look and feel of my portraits. I’m essentially making the whites and blacks more pure, which helps give the portrait a richer look overall. Some people skip this step and make adjustments to the Tone Curve, but it’s all a matter of personal preference, though I usually find the white/black adjustments to be quicker.

Clarity -5. Most people bump up the clarity slider which essentially affects edge contrast mostly in the midtones, but I like a slightly more subdued look so I usually start by lowering it a few notches.

Vibrance 0 (zero). This slider mostly affects colors outside the normal range of human skin, so it can be useful if you shoot outdoors and want to make the nature colors pop. I leave it at zero as a general rule, and then adjust later as necessary.

Saturation +5. I usually like a bit more color to start things off, so I start with a small value increase here, and then go up or down as necessary.

I always start with these adjustments, and then tweak as necessary. The whole process only takes a minute and almost always results in an image that is dramatically improved over the initial import.

five-minute-lightroom-portrait-processing-step2-color

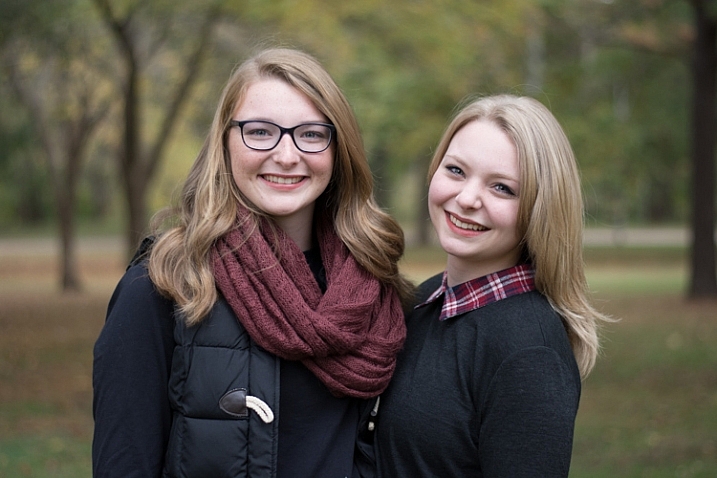
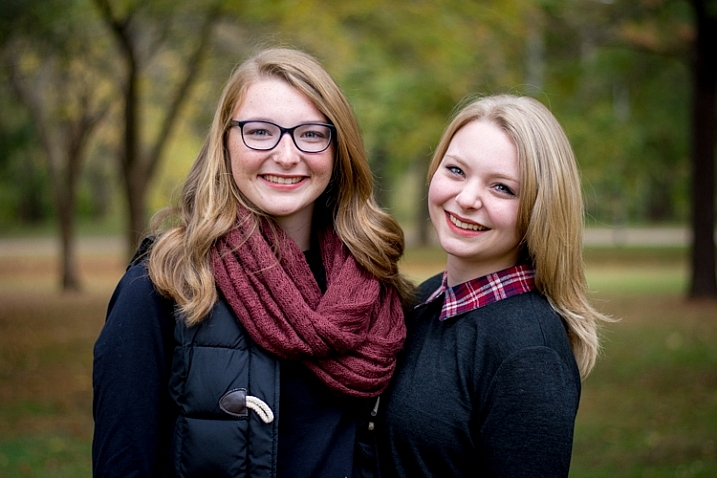
This image is already more vibrant than the initial picture even though most of the adjustments were very basic.

Step 3: Sharpen

After the color and tonal adjustments are finished, I almost always apply some degree of sharpening to the image. With portraits, it’s essential that the eyes be in focus and sharp, so the next thing after Basic adjustments, is to use the Detail panel to get the sharpening you want.

five-minute-lightroom-portrait-processing-step3-sharpen

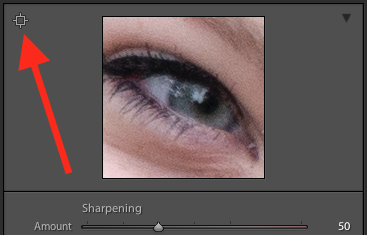
Click the targeting symbol in the top-left corner and then click on your subject’s eye to get a zoomed in view, then adjust your sharpening accordingly. I usually start with a value of 50 and then tweak additional parameters like Radius or Detail if I need to, but this basic adjustment is quick and usually gets me right near where I want.

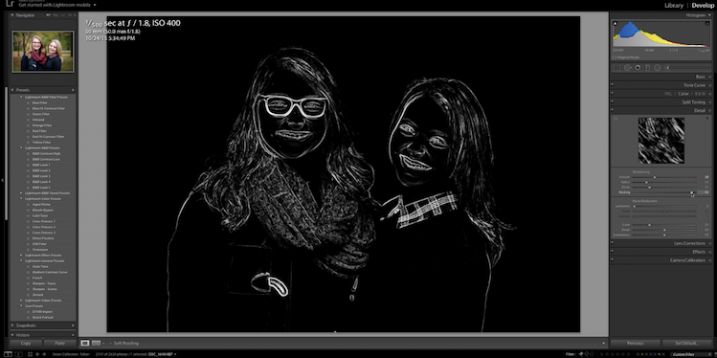
I also apply a mask to the sharpening so it doesn’t apply to areas like faces. This helps keep the eyes sharp without adding unwanted texture to people’s skin. If you hold down the ALT key while you click the Masking slider you will see something like this (below). The white areas are where sharpening will be applied, the black areas will not. Use this to decide how far you want to take the masking on your portrait.

five-minute-lightroom-portrait-processing-step3-sharpen-mask

Step 4: Vignette

This one is a bit controversial – some people like vignettes, and some think they are an abomination unto modern photography, but as I said in the beginning this is all about finding a style and workflow that works for you. I usually add a slight vignette to my portraits, but if that’s not your thing then you can skip this step altogether. It’s not part of everyone’s five-minute workflow but it fits neatly in with mine, which is why I’m including it here. I only use a little bit of highlight priority, dark vignette, and try to keep the effect subtle.

five-minute-lightroom-portrait-processing-step3-vignette

That’s it – finished

Doing these four steps won’t always lead you to a finished portrait, but as the title of this article implies, you can usually get to a very nicely-edited portrait in under five minutes with these simple steps. You might have additional adjustments like adjustment brushes, spot removal, or red-eye corrections to do afterwards, but this will get most of the essentials out of the way.

five-minute-lightroom-portrait-processing-step1-import

Before

five-minute-lightroom-portrait-processing-step3-vignette

After – subtle but you can see the differences

Save your settings as a Preset

One final way to speed things up even more is to create a preset based on your workflow, which you can then apply to all photos on import.

five-minute-lightroom-portrait-processing-new-preset

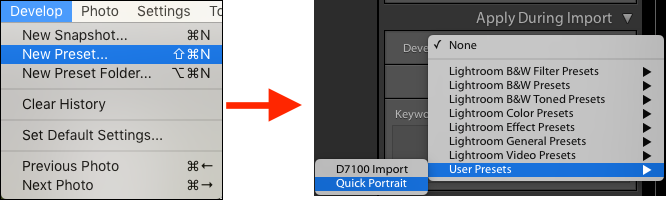
If you take this angle, be sure to err on the side of caution and be a bit more conservative with your edits when creating the preset. You probably won’t want want to apply the same dramatic alterations to every single photo, but if you do find yourself reusing the same workflow over and over it might be worth your time to do an import preset.

Alternatively, you can create a preset and apply it at will after import by right-clicking on any photo in the Develop module, and choosing your preset from the “Develop Presets” shortcut (or find it in the Develop Presets panel on the left side panel of Lightroom).

What quick portrait processing tips work for you? Are there any specific actions you have found that save you a great deal of time? Share your thoughts in the comments below, and any example images of what your finished portraits look like are always welcome.

googletag.cmd.push(function() {
tablet_slots.push( googletag.defineSlot( “/1005424/_dPSv4_tab-all-article-bottom_(300×250)”, [300, 250], “pb-ad-78623” ).addService( googletag.pubads() ) ); } );

googletag.cmd.push(function() {
mobile_slots.push( googletag.defineSlot( “/1005424/_dPSv4_mob-all-article-bottom_(300×250)”, [300, 250], “pb-ad-78158” ).addService( googletag.pubads() ) ); } );

The post How to do Basic Processing on a Portrait in 5 Minutes Using Lightroom by Simon Ringsmuth appeared first on Digital Photography School.


Digital Photography School

 
Comments Off on How to do Basic Processing on a Portrait in 5 Minutes Using Lightroom

Posted in Photography


How to Process a Landscape Photo in 5 Minutes Using Photoshop

07 Sep

2-for-1 special

As part of Landscape Photography Week here on dPS, we’re offering TWO for the price of ONE on our best-selling Living & Loving Landscape Photography ebooks!

Click here to take advantage of this offer.


In this ultra fast video tutorial photographer Joshua Cripps walks your through how to process a landscape photo using Photoshop in under five minutes. He talks really fast and works quickly so if you miss anything just watch the video again (he even says that at the end) or pause it so you can follow along.

How did you make out with your own landscape image, could you do it in five minutes? If it takes you a little longer that’s just fine, especially if you’re just learning Photoshop.

Note: everything he does in the video can also be done in Lightroom using the basic sliders, adjustment brush, and graduated filter.


Here on dPS this is landscape week – here is list of what we’ve covered so far. Watch for a new article (or two) on landscape photography daily for the next couple days.

  • 6 Tips for Better Low-Light Landscape Photography
  • Landscape Photography and the Human Element
  • 5 Ways a Telephoto Lens Can Improve Your Landscape Photography
  • Landscape Photography from the Side of the Road
  • 32 Majestic Landscape Photos to Inspire Your Wanderlust
  • Weekly Photography Challenge – Landscape
  • Landscape Photography – Shooting the Same Location Through the Seasons

googletag.cmd.push(function() {
tablet_slots.push( googletag.defineSlot( “/1005424/_dPSv4_tab-all-article-bottom_(300×250)”, [300, 250], “pb-ad-78623” ).addService( googletag.pubads() ) ); } );

googletag.cmd.push(function() {
mobile_slots.push( googletag.defineSlot( “/1005424/_dPSv4_mob-all-article-bottom_(300×250)”, [300, 250], “pb-ad-78158” ).addService( googletag.pubads() ) ); } );

The post How to Process a Landscape Photo in 5 Minutes Using Photoshop by Darlene Hildebrandt appeared first on Digital Photography School.


Digital Photography School

 
Comments Off on How to Process a Landscape Photo in 5 Minutes Using Photoshop

Posted in Photography


The AP and British Movietone publish more than 1 million minutes of historic footage to YouTube

24 Jul

The Associated Press and British Movietone have announced the addition of more than 1 million minutes of digitized historic footage to YouTube. The AP says that this project represents the largest ever upload of historic news content to YouTube, and will serve as a ‘visual encyclopedia’ for witnessing some of the biggest moments in recent world history. Read more

Articles: Digital Photography Review (dpreview.com)

 
Comments Off on The AP and British Movietone publish more than 1 million minutes of historic footage to YouTube

Posted in Uncategorized


Room in a Box: Portable Tool-Free Bedroom Set in 30 Minutes

26 Jun

[ By WebUrbanist in Design & Furniture & Decor. ]

room boxxx

Containing a room’s worth of essential furniture you can take on the bus or train, this all-in-one-box solution costs just $ 150, is easier to assemble than IKEA equivalents and much lighter too, with wheels as well for added mobility.

room box assembly

room box in a box

While requiring no tools or glue, the would-be catch is that the kit is made of cardboard – however, its makers have delivered on over 40 projects of that same material to date, making them experts at rendering it robust and durable. For those who only need some of the composite pieces: each element can also be converted to other purposes – the bed supports, for instance, can be stacked into shelves or other forms of storage.

room box bed

room box design

The box contains a chair, desk, bin, dresser and bed supports which double as storage, each designed to be load-bearing as well as water-resistant, able to be reused for years by students or other young adults. The entire system can be assembled or deconstructed within a half hour and the pieces weigh around seven pounds each, all making moves between dorm rooms and storage much simpler.

room box shelves

room in a box

From the creators of Room in a Box: “Every piece of furniture can be assembled with no tools or glue by folding and slotting the pieces, and can be taken down and packed back into the box.  When you are done with the furniture it can be recycled or reused in its entirety. This makes for versatile furniture which can be used in many different ways and configurations.  The design of the furniture also includes sliding drawers for storage (with stoppers) which double as handy moving boxes.  “

Share on Facebook


[ By WebUrbanist in Design & Furniture & Decor. ]

[ WebUrbanist | Archives | Galleries | Privacy | TOS ]


WebUrbanist

 
Comments Off on Room in a Box: Portable Tool-Free Bedroom Set in 30 Minutes

Posted in Creativity


Learn How to Setup Studio Lighting in 15 Minutes

29 May

Do you find studio lighting daunting? Understandable. When I got my first set of lights I played with it for half an hour. Intimidated and confused, I shoved it back in the box where it stayed for six months.

Don’t worry though, mastering exposure with studio strobes is easy; in fact it’s probably one of the easiest of the photographic skill sets. By following this tutorial, you can go from no experience with studio lighting, to getting a correct exposure on your first frame, without the aid of expensive and unnecessary light meters. This isn’t a crash course in complicated theories and physics; our goal is to get you using strobes and creating photographs as quickly as possible. You can return to the theories at your convenience. I am a firm believer in the idea that it’s easier to learn the why, when you’ve already figured out the how.

Warpaint john mcintire photography 0754 2

Getting Ready

Before we start, you’ll need to do a few things in preparation:

  1. Setup your studio strobe on its stand, set it to full power and make sure it works.
  2. You should know how to connect your strobe to the camera and make it fire by way of remote trigger, pc sync cable, slaved to your on-camera flash, or by way of an in-camera system. Refer to your manuals if you need help.
  3. Have your strobe’s instruction manual at hand.
  4. Settings: Set your camera to manual mode, your shutter speed to 1/125th of a second, and your ISO to 100. (If you have an older model, or a film camera, then default to 1/60th of a second.)
  5. Have a calculator at hand will make things easier.
  6. Finally, I recommend that you start to think in full stops, which I’ll cover in the next section.

Thinking in Full Stops

Most of our modern cameras are capable of setting the aperture in increments of 1/3 or 1/2 of a stop. This is extremely useful for fine tuning the exposure in most situations; however, for the purpose of this exercise, it is much easier to ignore them for now and concentrate on the full stop values as indicated in the chart below.

Fstops

Finding Your Guide Number

The next step is to flip through your strobe’s manual and find where it lists the Guide Number (also check whether the guide number is listed in feet or meters; this is vital). This magic number is a rather complicated thing and steeped in the brain-wracking Inverse Square Law. As promised, you don’t yet need to know why it works; you only need to know how to use it at this point.

There are two main ways to use the guide number, that will be useful to you. You can choose your aperture based on the desired outcome of your photo and calculate where to put your strobe, or you can place your strobe for a desired lighting effect and calculate the correct aperture.

Calculating Aperture

Some lighting effects require strobes to be in certain positions, and distances from your subject and other strobes. In other circumstances, your strobe might be in a fixed position and it cannot be moved.

In these events, to calculate the aperture for a correct exposure all you have to do is measure the distance between the light source and your subject in feet or meters (whichever your guide number is listed as). Now divide your guide number by that distance. For example a guide number of 66 with a distance of 6 feet between your subject and the light source would result in: 66 divided by 6 for a result of 11. Your answer is your aperture for a correct exposure: f/11.

Most guide numbers never divide so evenly into full stops. For example, if you get a result along the lines of f/9.2, just round it off to the nearest full-stop for the moment and we’ll learn how to fine-tune the exposure shortly.

Calculating Strobe Distance

Conversely, if you know what aperture you want to use, for a creative effect perhaps, simply divide the guide number by your desired aperture. My tendency for studio portraits is f/8, so if you divide our previous example of 66 by 8 (66/8) you get 8.25. To get a correct exposure for this setup, you would just place your light source 8.25 feet away from your subject. It really is that easy.

One caveat: if you have a high powered strobe in a small place, you’re not going to be able to set your camera to something ridiculous like f/64. If your power output is too high, just turn your strobe down to half power and divide the guide number by two.

Fine Tuning Exposure without Changing Your Settings

As you learned, there are instances where you want your aperture to remain constant. You also don’t want to mess with the power settings on your strobe so much that they completely change your guide number and negate your ability to calculate your exposure with ease. Yet subjects move, or you might want to over or underexpose your image for creative effect. The way to do this is simple.

To underexpose or reduce the amount of light falling on your subject, you would move your strobe further away. If your light source is really close to the subject and you move it back about a foot, you will lose 1-2 stops of light (smaller f/number). If your source is farther away from the  subject and you move it back one foot, you will lose less light. This is caused by the Inverse Square Law which states:  In physics, an inverse-square law is any physical law stating that a specified physical quantity or intensity is inversely proportional to the square of the distance from the source of that physical quantity.  (and link to the wiki definition). Just know that closer in you lose more light as you back it away, than if the light is situated farther from the subject to begin.

This is also why I asked you to consider thinking in full stops rather than fractional increments. Moving a strobe or a model one or two feet is much easier to judge on the fly than the four inches (10cm) a third of a stop increment would require.

Notes on Modifiers

The most common modifiers in studio photography will affect the output of the strobe in terms of exposure. You may need to increase or decrease your aperture, or the distance of your light source, depending on which modifier you choose.

Soft boxes and white or translucent umbrellas, which all produce a softer, more diffused light, will decrease the amount of light falling on your subject. To combat this, choose a larger aperture (smaller f/number) or move your light source closer to your subject.

Beauty dishes, silver umbrellas and reflectors, which all produce a harder, more defined light, will increase the amount of light falling on your subject requiring you to choose a smaller aperture (larger f/number) or to move your light source further from your subject.

Modifierexamples john mcintire photography

If you choose to alter your aperture in these situations, feel free to revert to your 1/3 stop increments. A modifier will rarely alter the output of a strobe by a full stop.

You will quickly learn how your modifiers affect the output of your strobes and within a few sessions you should find yourself automatically compensating for them without thinking about it.

Putting it into Practice

I set up a quick portrait session to help demonstrate how to employ these techniques. Gemma graciously volunteered for the task.

The only preparation was the setup of a paper background and fitting the strobe with a beauty dish. After she arrived, I asked Gemma to stand two feet from the background and I placed the light source straight in front of her and as high possible with the beauty dish pointed downward at her face.

All that was required to start shooting was the correct aperture. The Bowens GM400 I used has a guide number of 76. I measured how far away the light source was; which was 7.5 feet. Dividing 76 by 7.5 gives a result 10.133. Because I was using a silver beauty dish, we know that I need to stop down the aperture to get a precise exposure so I set the camera to f/11 and took a test shot. As you can see from the histogram, these simple calculations gave me the correct exposure and it took less than a minute to get there.

Gemmahistogram

In this image you can see that from the first frame to the last, the exposure remained constant leaving me free to concentrate on other aspects of the images.

Gemmacontactsheet

Finally, here you can see the end result.

Gemma john mcintire photography 1692

I hope you’re still with me, and that I’ve convinced you that studio strobes are nothing to be afraid of. With a little practice, the techniques outlined in this article will quickly become second nature, allowing you to concentrate less on the technicalities of exposure, and more on aesthetic variables such as composition and establishing rapport with a client or model. As with most things, the key is practice. Snag a friend, a pet or even a bowl of fruit and run through the whole process again and again, until calculating the correct exposure becomes reflex, and you’ll find yourself spending more time and energy on the creative processes rather than the technical ones.

googletag.cmd.push(function() {
tablet_slots.push( googletag.defineSlot( “/1005424/_dPSv4_tab-all-article-bottom_(300×250)”, [300, 250], “pb-ad-78623” ).addService( googletag.pubads() ) ); } );

googletag.cmd.push(function() {
mobile_slots.push( googletag.defineSlot( “/1005424/_dPSv4_mob-all-article-bottom_(300×250)”, [300, 250], “pb-ad-78158” ).addService( googletag.pubads() ) ); } );

The post Learn How to Setup Studio Lighting in 15 Minutes by John McIntire appeared first on Digital Photography School.


Digital Photography School

 
Comments Off on Learn How to Setup Studio Lighting in 15 Minutes

Posted in Photography