RSS
 

Posts Tagged ‘MIGHT’

10 Signs you Might be a Photo Geek

24 Nov

I’ve watched a few of this guy’s videos and I have to say they’re quite funny. If you can’t laugh at yourself, who can you laugh at?

This video is by DigitalRev TV, hosted by, as he puts it in his YouTube profile, “an asian dude with British accent”. He covers 10 tongue in cheek signs that you might be a photo geek if . . .

So, are you?  I’m pretty sure I am but I’m usually the last one to bring a big camera to social events, or any camera at all. So maybe I’m a recovering one? There is hope!

Have any other signs you’d add to this list? Come clean, are you a Photo Geek too? It’s okay, you’re among friends here.

Cheers,

Darlene-1-250x130

Post originally from: Digital Photography Tips.

Check out our more Photography Tips at Photography Tips for Beginners, Portrait Photography Tips and Wedding Photography Tips.

10 Signs you Might be a Photo Geek

The post 10 Signs you Might be a Photo Geek by Darlene Hildebrandt appeared first on Digital Photography School.


Digital Photography School

 
Comments Off on 10 Signs you Might be a Photo Geek

Posted in Photography


3 Small But Important Lightroom 5 Beta Changes You Might Have Missed

17 Apr

Adobe announced the availability of Lightroom 5 Beta at Adobe Labs today and by all means, go grab a free copy and play. I’ve been using Lightroom since version 1 and have been impressed with every upgrading to the program, gladly plopping down my money for a new version as I have found the enhancements in subsequent revisions well worth the funds. And Lightroom 5 seems to be on the same track, based on my findings while playing with the beta this last week.

Adobe has a number of fine new features in this revision and they are sure not to be missed. They include

  • A Smart Preview feature which mobile photographers will love as it creates a smaller, editable version of their monstrously sized RAW image that is easily portable on a laptop and can be synced when the originals, possibly stored on an external drive or NAS back at home, become available.
  • Radial Gradient which allows for selecting oval or circular shaped areas for specific effects.
  • Upright, which attempts to correct crocked images or fine tune vertical lines. (My experience with this tool has been less than stellar on simple horizon shots at sea. More on this in a minute.)
  • Advanced Healing Brush. This one, I like a lot and it is very helpful. Now your “Spot Removal Tool” can be used as a brush to wipe out items that are not in the shape of a circle. This helps a lot and means I spend even less time in Photoshop CS6.

That’s the obvious stuff that Abode packs into their press kit and you probably have seen those items demonstrated on other sites. What I want to show you are three things I found to be helpful in little, but repetitive ways for how I use Lightroom.

(Click any image for a larger version)

Invert Mask

Shot4Thank you! I’ve been wanting this feature for the longest time to save time. But it’s not quite right.

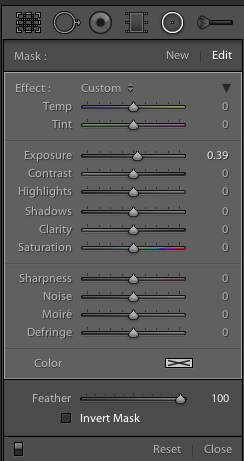
Invert Mask is currently only available with the new Radial Gradient feature. See it at the right? It works well and I’d like to see if appear in the Gradient Tool (especially when creating a new gradient…it would be great to great one just the opposite of the one I am using at the moment) and in the Adjustment Brush.

Here’s a simple rundown of how the tool works.

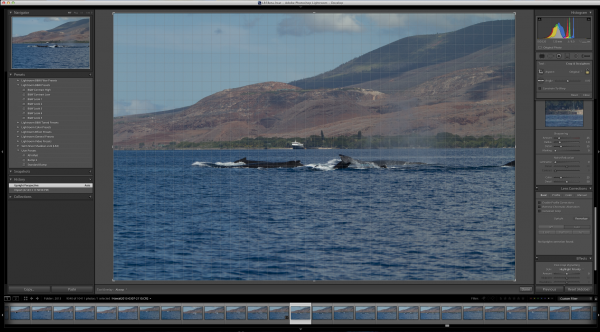
Starting with this image of one of my client’s boats, the Un-Cruise Adventures Safari Explorer off the shore of Maui, Hawaii, I want to see which direction works best: highlight the boat and darken the surrounding seas or slightly darken the boat and bring up the seas, in order to add contrast to the main subject.

Shot1

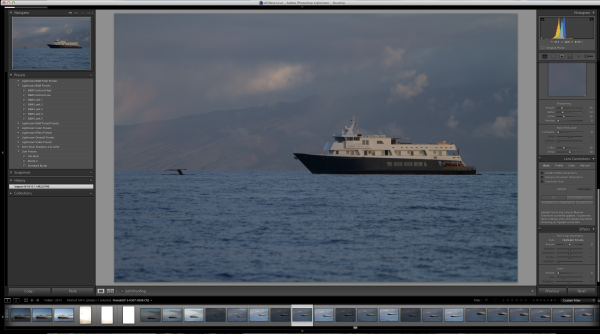
I select the new Radial Gradient tool and draw an oval over the boat (Dear Adobe, please make this tool work like the Ellipse Tool in Photoshop for consistency. Specifically, please allow me to grab a “corner” of the ellipse and drag it down instead of starting with the middle of the ellipse. Consistency would really help. Thanks.).

Shot2

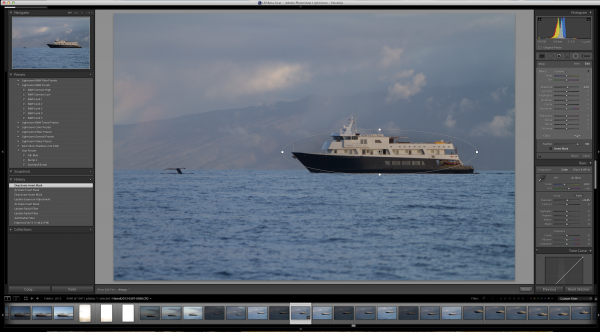
Because I have chosen only to increase the exposure by .39, Lightroom masked the boat and increased the exposure for the rest of the image. But if I want to swap that and mask the entire picture except for the boat, it’s just a simple click of the “Invert Mask” check box.

Shot3

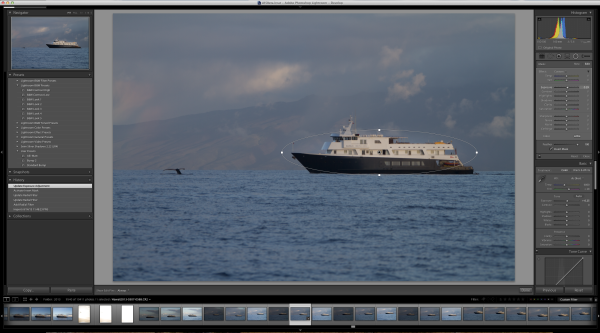
Subtle, but useful to me.

Now please, Adobe, add that ability to the Gradient Tool and to the Adjustment Brush especially.

Visualize Spot Healing

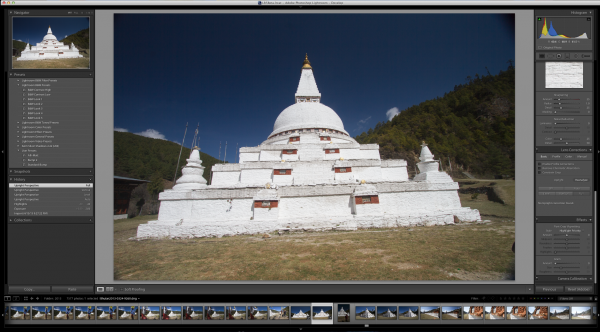
I’d like to think my sensor was perfectly clean before leading a recent tour to Bhutan. As a matter of fact, it was extremely clean before I left. But, as life goes, things don’t stay clean.

Take this image of a masked dancer at the Paro Tsechu.

Viz1

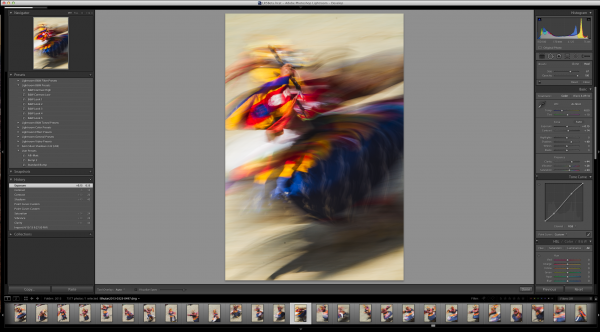
I wanted some blur (obviously) and used a small aperture to achieve a slow shutter speed. In this case, f/25 and 1/6th of a second. Closing down that aperture makes dust on the sensor more obvious, but this image has a lot going on making it hard to find all the dust.

Viz1-2


Viz2


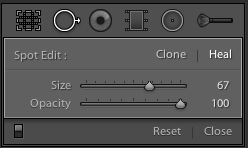
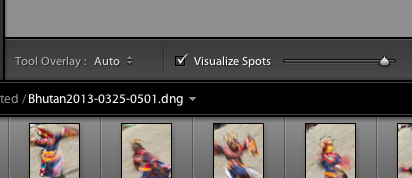
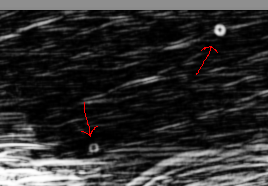
If I click on the “Visualize Spots” check box after clicking the Spot Removal Tool, the slider to the right of it comes alive and I can now more easily see spots. This is a technique used in Photoshop for a while and it works best where edge contrast can be spotted, so in areas without a lot going on.

Viz11

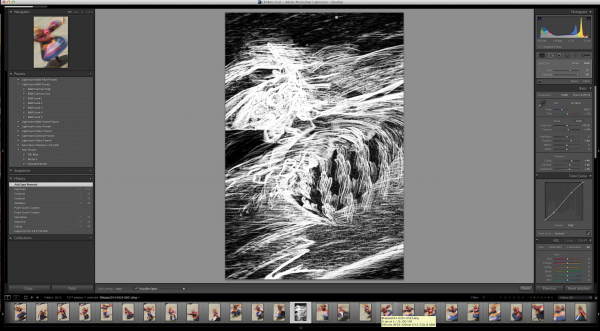
In this image, I found three additional spots, two of which would have been easy to miss without the tool.

Viz4

Remove Chromatic Aberration Check Box

This one is really small, but helpful. With the addition of the “Upright” feature to the Lens Correction panel, Adobe made it easier to get to the Chromatic Aberration removal check box.

Rem1

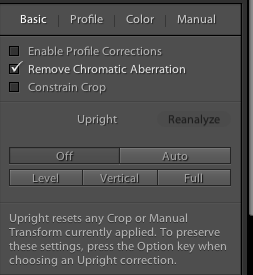
It’s a small thing, but I often use the check box for “Enable Profile Corrections” for my lens and then want to remove chromatic aberration on only select images, but many. The placement of the box here, as well as on the “Color” tab, helps.

Upright Is Not That Functional For Me

Maybe I’m doing something wrong, but I doubt it. This is one of Adobe’s touted JDI (Just Do It) features and it seems to work well on the demos, but not in real life. If it did, it would be cool. I can get the feature to work part of the time, but no where near even 25% of the time reliably.

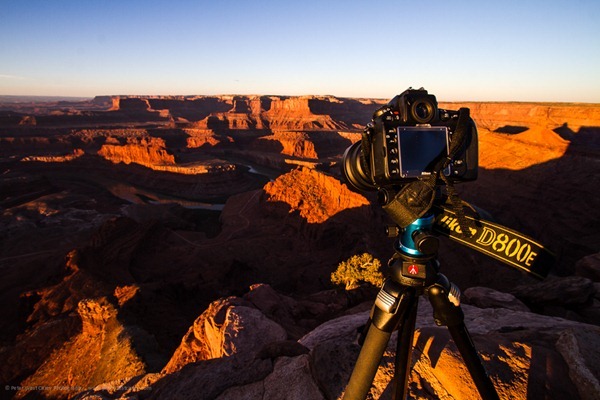
The feature is supposed to level a scene and make diverging or converging vertical lines straight. It can be helpful when it works. But something as simple as a horizon, an obvious one, in this example is not being leveled.  Here’s the initial image out of the camera.

Level1

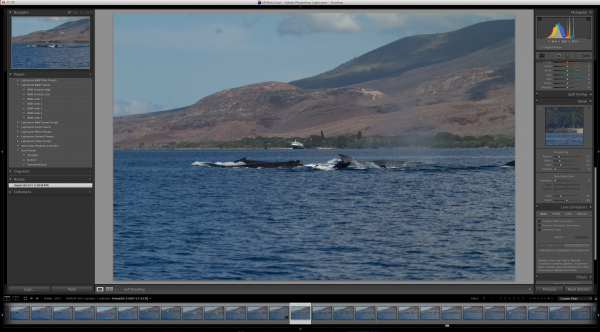
Now to show that the horizon is not level using the Crop Overlay.

Level2

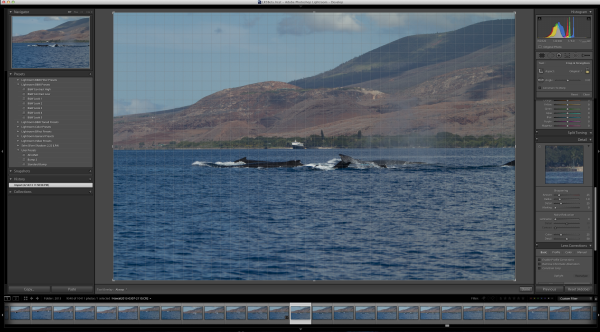
And now using the tool in Auto mode.

Level3

I tried in Level and Full modes to no avail. The program clearly states “No Upright Correction Found”. This is supposed to be a boon for landscape photographers, but even with a clear horizon like this, it failed.

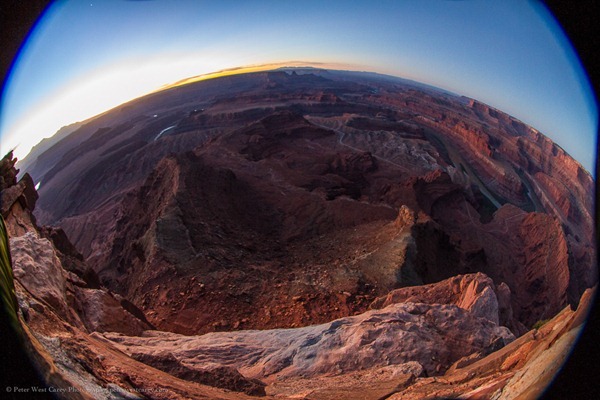
I tried another obvious shot from Bhutan.

Level4

Now how can it say, in all four modes (Auto, Level, Vertical and Full) that no data can be found?

I’m not saying it doesn’t work, I’m saying it’s wonky and not yet reliable.

But this is beta software and that is why they put it out, to find the kinks that mean the most for their users.

Give it a try, Lightroom 5 Beta is quite useful with all the upgrades instituted.


Post originally from: Digital Photography Tips.

Check out our more Photography Tips at Photography Tips for Beginners, Portrait Photography Tips and Wedding Photography Tips.

3 Small But Important Lightroom 5 Beta Changes You Might Have Missed


Digital Photography School

 
Comments Off on 3 Small But Important Lightroom 5 Beta Changes You Might Have Missed

Posted in Photography


Your Photography Website Might Need This

29 Jan

Photocrati has spent many days coming up with very educational and detailed virtual classes. Two are currently available; one on your overall photography website and the other specific to SEO.

SEO is often overlooked or thought to be a waste of time, but Photocrati has made it a point to tell you why it is well worth the time.

Photocrati has recently launched two interactive courses on the Udemy education platform. Here are some details:

udemy_courses

For $ 97, Supercharge Your Photography Website teaches you the fundamentals of getting your photography website going and how to optimize it for your customers and business success.

You will learn about: Hosting, WordPress, Website basics, Plugins, Themes, Layouts, Galleries, Pages, Blogging, Social Media and more.

For $ 49, SEO for Photographers dives into the SEO of your photography website and how you can implement the basic, most crucial SEO techniques into your website.

You will learn about: What and Why, On and Off Site, Meta Tags, Link Building, Local SEO and more.

In the graphic below, you can see how blogging plays a roll in your site’s rankings.

blogging-impact

With Google’s  new Author Rank algorithms, blogging and social media is more important than ever.  To learn more about this, check out the courses and get started today.

  • Supercharge Your Photography Website
  • SEO for Photographers

Thanks and good luck.

dslrBlog

 
Comments Off on Your Photography Website Might Need This

Posted in Photography


Why You Might Want To Consider A Full Frame Fisheye Lens Even If You Have A Crop Sensor Camera

13 Nov

There are few things better in life than having something go wrong that leads to the discovery of something even better.

Such is the case with my plan to test out a Canon 8-15mm fisheye lens courtesy of BorrowLenses.com. My intent with the lens was to take it with me to the wilds of Arches and Canyonlands National Parks in Utah for some crazy, circular images. The problem is I lack a full frame Canon camera, but would be traveling with Michael Riffle, who owns a Canon 5D Mark III. He accepted the challenge to test the lens, being familiar with fisheyes himself.

One thing led to another and we never got around to testing the lens on his camera. Instead, I often found myself using the lens on my Canon 7D, a crop sensor camera. The Canon 8-15mm is intended to fit a full frame sensor and produce, at 8mm, a fully circular image, much like this example from a Sigma 4.5mm on a crop sensor camera.

PeterWestCarey-Nepal2011-1008-9891

What happened instead was a cross between this full circle and a more traditional 15mm on a crop sensor. The 8-15mm lens will show edges of the circle when below 10mm but will otherwise fully cover the sensor from 10mm-15mm. A major difference from a non-fisheye lens, though, is the curving in the image.

For instance, here are two shots, both taken at 10mm. The difference: the first lens is a non-fisheye Canon EF 10-22mm lens and the second is the Canon 8-15mm fisheye.

PeterWestCarey-Utah2012-1021-7193

PeterWestCarey-Utah2012-1021-7187

Both shots are taken from nearly the same perspective (the fisheye is taken from the position of the Nikon D800E in the first image) but the fisheye gives a different feel. I only made slight clarity and level adjustments in the photos and did not crop them, so this is what you can expect at 10mm.

Below 10mm the black edge of the area outside the fisheye is seen. How bad is it? It depends.

At first it annoyed me to have the incomplete image. Neither full fisheye nor filled frame. Like this:

Peter-West-Carey-Utah2012-1021-7155

But then I started finding instances where it worked well. The arches found in these parks lent themselves naturally to the form factor. The more I experimented, the more I enjoyed the effect.

I realize not everyone will like this look. By the time you read this, there might be a dozen notes in the comment section below stating how horrible it is. But this is photography and it is art, so it doesn’t really matter what I like or the commenters like. It matters what you like.

Below are more examples from my short trip. If they intrigue you to give the lens a try, all the better. Some have the corners blacked out and some are zoomed in slightly. Experiment, play, have fun.

(Click on an image for a 1000px version)

The first set of images are from Mesa Arch in Canyonlands NP at sunrise which was packed with 20 or more photographers. The second set is from Delicate Arch in Arches NP at sunrise with absolutely no one else around.

Peter-West-Carey-Utah2012-1022-7348

Peter-West-Carey-Utah2012-1022-7392

Peter-West-Carey-Utah2012-1022-7445

Peter-West-Carey-Utah2012-1022-7451

Peter-West-Carey-Utah2012-1022-7456

Peter-West-Carey-Utah2012-1022-7500

Peter-West-Carey-Utah2012-1023-7955

Peter-West-Carey-Utah2012-1023-7961

Peter-West-Carey-Utah2012-1023-8001

Peter-West-Carey-Utah2012-1023-8010

A special thank you to BorrowLenses.com for giving me the chance to play with the lens.

Post originally from: Digital Photography Tips.

Check out our more Photography Tips at Photography Tips for Beginners, Portrait Photography Tips and Wedding Photography Tips.

Why You Might Want To Consider A Full Frame Fisheye Lens Even If You Have A Crop Sensor Camera


Digital Photography School

 
Comments Off on Why You Might Want To Consider A Full Frame Fisheye Lens Even If You Have A Crop Sensor Camera

Posted in Photography


Nikon SB-900 Speedlight Review: A Look at Nikon’s Flash Flagship and Why You Might Want to Up-Grade

05 Nov

www.artoftheimage.com – Reviewing the Nikon SB-900 Speedlight and looking at the new features and reasons you may want to up-grade.

See how easy it is to pair your iPhone / iPad, Android tablets or any compatible Bluetooth devices to the ZiiSound Wireless Modular Speaker System. Learn more: www.creative.com

 
Comments Off on Nikon SB-900 Speedlight Review: A Look at Nikon’s Flash Flagship and Why You Might Want to Up-Grade

Posted in Nikon Videos


What Mario Kart 3DS MIGHT be like! (3d glasses required for this vid)

25 May

To fix busted 16:9 aspect ratio on 3d videos try changing “yt3d:aspect=16:9” to: yt3d:aspect=15.99:9 Thanks to KingstonHerald for this fix! What Mario Kart 3DS MIGHT be like! This is made using Mario Kart Wii, Nvidia’s 3dvision, FRAPS, and the Dolphin emulator. Enjoy. Mad, mad, mad props to skidau for writing the patch to add stereo support to Dolphin btw. Relevant links below. code.google.com www.fraps.com www.nvidia.com
Video Rating: 5 / 5

? NOTE: This video can be watched in 2D! Go to the 3D button on the bottom of the player and select “Turn off 3D” I fucked up and the end of the video is cut off. It was supposed to be the Queen Araneae boss fight, but I forgot to check my nested sequences. I’ll make another D3 gameplay video soon and do it right. Captured using nVidia’s 3D Vision stereoscopic drivers.
Video Rating: 5 / 5