Some of the wildlife photos you’ve seen may not have been taken ‘in the wild,’ thanks to game farms with captive animals.
Articles: Digital Photography Review (dpreview.com)
Some of the wildlife photos you’ve seen may not have been taken ‘in the wild,’ thanks to game farms with captive animals.
Articles: Digital Photography Review (dpreview.com)
Some of the wildlife photos you’ve seen may not have been taken ‘in the wild,’ thanks to game farms with captive animals.
Articles: Digital Photography Review (dpreview.com)
The Sony a9 is an impressive looking camera. At 20 frames per second, its able to shoot much faster than either of the professional sports cameras from the two big DSLR makers.
The Sony is also smaller and lighter than these cameras (even with a battery grip added, to get nearer to matching their battery endurance), and has autofocus coverage across a much wider region of the frame than a DSLR AF system can offer. On top of this, it’s $ 1500 cheaper than Canon’s EOS-1D X II and $ 2000 less than Nikon’s D5.
And, most importantly, my colleagues who’ve shot with the camera say that the AF performance is within the realms of that offered by the current generation of pro DSLRs.
So, game, set and match, Sony?
 |
| Our initial impressions, as well as the underlying specifications, suggest Sony’s a9 is a highly capable piece of kit. But is that enough for it to elbow its way to the sidelines of the world’s sports pitches? |
Well, not necessarily. For moneyed enthusiasts, the Sony looks like a pretty competitive option. Though, of course, the cost isn’t just about buying the body. If you have to make a switch to a completely new system, the costs extend to every item you need to replace.
However, there are a number of factors that make it more difficult for a working professional to change systems. We spoke to a couple of photojournalists at The Seattle Times about the factors beyond sticker price that might stand in the way of switching (not specifically to Sony but to any other system).
Lenses are one of the biggest factors in deciding whether to swap systems. Not only are lenses every bit as important as cameras themselves when making images but also, especially at the pro and sports end of the market, can easily cost more than a camera body. Often the bulk of the cost of changing systems lies in the need to sell your existing lenses and buy new ones, with the precise cost depending on which lenses you need.
Lens availability is another significant hurdle. Sony has been making strides with its GM lens series but there’s a distinct lack of the long and fast telephoto lenses that sports shooters depend on.
‘Go to any sporting event: the Olympics, the Super Bowl and it comes down to the same basic configurations: short zoom, long zoom, super telephoto. Essentially a 16-35, 70-200 and 400 mm F2.8,’ explains Seattle Times photographer Dean Rutz.
‘What all these companies lack is the super prime telephoto,’ he says: ‘I can’t logically make the switch without a 400mm F2.8 or equivalent. At least a 300mm F2.8. A 70-200 equivalent isn’t sufficient.’
Bettina Hansen, Rutz’s colleague at the Seattle Times agrees: ‘for sports I use a 16-35, 70-200 and one of either the Canon 200-400, 400 F2.8 or 500 F4.’
 |
| Sony has introduced a 100-400mm F4.5-5.6 GM alongside the a9, but that’s not the same as having a 400mm F2.8 available. |
Then, of course, there’s the issue of who owns the lenses. If your employer has spent money on a particular lens system or the rental house with which you have an account and a working relationship only supports certain systems, then this can become a significant barrier to switching.
This is certainly the case for Rutz: ‘my employer provides a generous amount of Canon gear for my work, which is predominantly sports related.’
‘The Times owns everything [I use],’ says Hansen. ‘Changing isn’t totally impossible, though. Our boss did say: “let us know what you want, next time we have to replace gear,” but we tend to replace bodies one year and lenses the next. Those super-telephotos are used on a pool basis, so you can’t necessarily change while everyone’s on another system.’
 |
| Sony has clearly looked at the needs of a range of pros, with the inclusion of features such as an Ethernet connector. ‘That’s how the wires do big events,’ says Hansen: ‘Olympics, World Series, etc – the shooters sit in designated spots and images transmit instantly to editors as they are shot via Ethernet.’ |
The short flange-back distance of the a9 leaves enough room to fit an adapter to allow the mounting of any DSLR lens, but there’ll be a significant change in performance associated with this. Sony only promises 10 frame per second shooting when adapting its own A-mount lenses, and we’re told that both subject tracking (Lock-on AF) and Eye-AF will be unavailable when using non-native mount lenses (this has always been the case even with previous a7 bodies).
‘Performance reportedly will degrade with the adapter,’ says Rutz: ‘I’d need to see the practical application of it before committing.’
As well as bodies and lenses, changing systems incurs a range of associated expenses, Hansen points out.
‘Rain gear is important for sports like football,’ she says: ‘We use Think Tank Hydrophobia rain gear, which isn’t cheap. That’s pretty popular among photojournalists.’
‘The other thing is cards: we’ve invested heavily in Compact Flash,’ she says. ‘That might not seem like much, but we have nine photographers at the moment, so it really adds up. Then there’s cases. We’ve got bags that are designed to perfectly fit a pro level DSLR and everything you need to shoot a football game and get it on a plane. Are we going to have to replace those, too?’
Some of these expenses are likely to be small, but it’s all a question of unknowns.
Professional gear tends to be built pretty tough, but it’s not indestructible. Focus motors fail, lenses get dropped, sensors need cleaning. Working professionals, particularly photojournalists and sports photographers need a good degree of support if anything goes wrong: since neither the news nor a big game will wait for their gear to get fixed.
 |
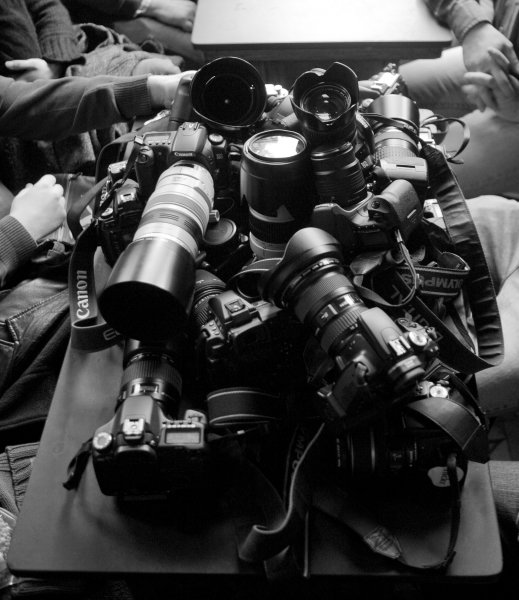
| This is what the competition looks like: Canon Professional Service’s loan stock for the 2016 Rio Olympics. |
As a results, Canon, Nikon and Sony all have ‘Pro’ support schemes that promise a certain level of service, usually including a defined repair period and loan equipment being available in the meantime.
‘CPS is huge to us,’ Hansen stresses: ‘For instance, say I am shooting a Seahawks game, I break a lens, shear it off at the lens mount or it gets stuck on the camera: I can send it in and have a loaner pretty quick. Canon also has a rep in Seattle so we can just go to him if we need something, he’ll often come to the games.’
 |
| Sony’s Pro Support program has been expanded to include more countries, but can it offer the degree of service that pro sports shooters have come to expect? |
Sony has said it’s beefing-up its Pro support system, opening two walk-in support centers and extending coverage to Canada. The program is also available in Australia, Japan, Hong Kong, Germany, Switzerland, Austria and the United Kingdom, though the service level may differ across territories.
This is a key requirement, says Rutz: ‘the challengers need better pro services and outreach, as well as big primes, to be able to push the other companies off their perch.’ One thing in Sony’s favor? If you mostly use the electronic shutter, your mechanical shutter will have a longer life. That’s something, at least.
Then, beyond the practical concerns, there are the personal aspects. Canon and Nikon’s pro cameras have been carefully iterated, generation to generation, so they include the improvements asked for, while also maintaining backwards-compatibility so that users who have spent years with one brand will find the latest model immediately familiar.
Rutz gives just a small example: ‘I think most sports photographers rely on back-button focus to balance framing and frame rate in a rapid-fire sequence. Canon has a big, fat button on the back of their cameras that’s easy to find, on the fly but most other cameras have made that button too flush to be as instinctive. That’s an area that needs to be addressed.’
Interestingly, Hansen highlights exactly the same thing: ‘Back button focus is one of the first things you learn when you’re getting into photojournalism and sports photography.’
Sony has clearly heard about this need and has added a dedicated AF-On button on the a9, so it’ll be interesting how our pros get on with it, once they’ve had a chance to use the camera.
 |
| The Sony a9 has a dedicated AF-On button, but is it pronounced and well-positioned enough to ensure your thumb hits it without having to think? |
That said, if the performance gain is sufficient, most pros will take the time to learn new tricks and work around any oddities. ‘The quirks of these new systems can be mitigated – honestly – if there’s less difference in fundamental performance than what you’re already used to,’ says Rutz.
‘It does take time to get used to these new cameras,’ he says: ‘but most [professionals] I know are geeks and they’re more than willing to play with the assets until they get the swing of it.’
Hansen, having already moved from Nikon to Canon, agrees: ‘If you’re in the field, you’re always experimenting. Learning a new system isn’t so hard. You find the menus that are important to you and you learn those.’
‘Familiarity helps, though,’ Rutz says: ‘At a point photography is reflexive and the camera has to fit into that, versus you having to adapt to the camera.’
Overall, then, there are a series of factors beyond just the cost that contribute to the inertia that acts against working professionals changing systems. As such, being better might not be enough for Sony’s a9 to make a significant dent in the pro sports market.
Articles: Digital Photography Review (dpreview.com)
[ By SA Rogers in Art & Sculpture & Craft. ]

Brutalist architecture is often criticized for seeming cold, impersonal and out of human scale, but the same can’t be said for these structures when they’re miniaturized and ephemeral, destroyed in seconds by the sea. In fact, when they’re crafted out of sand on a beach, outside their usual context, we can appreciate the beauty of their geometry more than ever. Calvin Siebert’s modernist sand castles might just be better than the real thing.
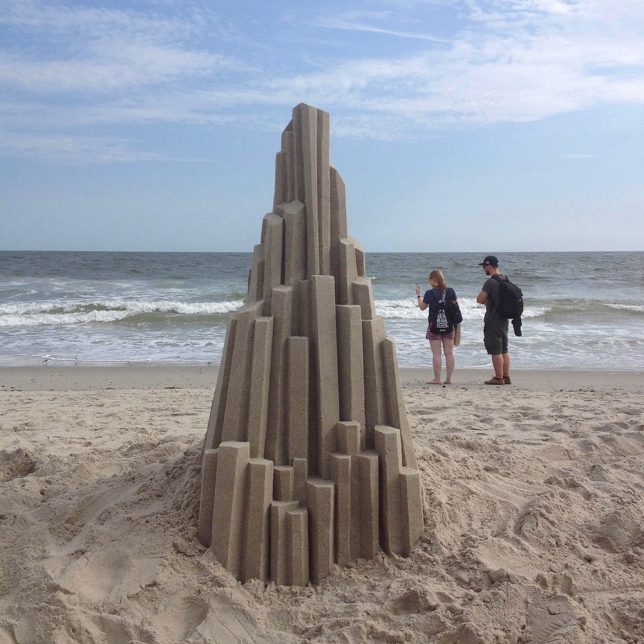

While staying on Rockaway Beach in Queens during the summer, the professional sculptor and self-described ‘box builder’ crafts amazingly complex architectural structures that remain in place just long enough to photograph them, inevitably washing away. You might say that nature is… brutal.


While it’s not hard to imagine seeing some of these designs in the hills of Los Angeles, using sand as a medium enables Siebert to get more creative than the average architect in envisioning fantasy structures that could translate to concrete.


He doesn’t start with sketches, plans or even anything particular in mind, preferring to work intuitively, allowing the forms to take shape. He’s been creating these temporary works of art for the past six years, and has thousands of photos documenting them on his Flickr.


“Building ‘sandcastles’ is a bit of a test,” he says. “Nature will always be against you and time is always running out. Having to think fast and bring it all together in the end is what I like about it… once I begin building and forms take shape I can start to see where things are going and either follow that road or attempt to contradict it with something unexpected.”


“In my mind they are always mash-ups of influences and ideas. I see a castle, a fishing village, a modernist sculpture, a stage set for the oscars all at once. When they are successful they don’t feel contained or finished. They become organic machines that might grow and expand. I am always adding just one more bit and if time allowed I wouldn’t stop.”
![]()


[ By SA Rogers in Art & Sculpture & Craft. ]
[ WebUrbanist | Archives | Galleries | Privacy | TOS ]
There’s a scene in the original Jurassic Park movie, that almost perfectly describes one lesson I have learned when documenting the world around me with my camera. In this scene Dr. Ian Malcolm, a brilliant mathematician who is visiting the prehistoric park, expresses severe reservations about the idea of resurrecting long-extinct species during a conversation with John Hammond, the director of the park. Hammond is gleefully explaining the incredible genetic breakthroughs that his scientists have achieved. “Our scientists have done things which nobody’s ever done before.” Incredulous, Malcolm responds with equal fervor and says, “Your scientists were so preoccupied with whether or not they could, they didn’t stop to think if they should.” The same holds true for camera lenses. Just because you can shoot wide open at f/1.4 or f/1.8, doesn’t mean you should.

When I first got into serious photography work, I was amazed at the power and light-gathering ability of my 50mm f/1.8 lens. It opened up a whole new world of photographic possibilities, that I continue to explore today, and was capable of producing incredible images, even on my humble little Nikon D200. Unfortunately, like the scientists in Jurassic Park, I did not spend years in the trenches learning my trade and honing my skills in order to learn how to truly utilize the power of such wide apertures, and went through a phase where I shot everything wide open because of things like low light photos, depth of field, and of course bokeh. Always with the bokeh. Now it’s important to note that I don’t regret any of those early lessons but I do want to offer youa few simple things I’ve learned over the years, and a couple reasons why you might want to reign things in a bit and not shoot wide open with that fancy prime or ultrafast zoom lens just yet.
I shoot most of my photos with three prime lenses: a 35mm f/1.8, a 50mm f/1.8, and my favorite, an 85mm f/1.8, that I call my supermodel lens. (Seriously, you could just about point that lens at a moldy old scarecrow, and get a portrait worthy of Vogue magazine.) Each of these lenses has its own set of unique advantages and limitations, but as you can probably already tell, the one thing they all have in common is a super wide maximum aperture. Certainly there are plenty of lenses available with even bigger apertures, like the Nikon 58mm f/1.4 or Canon 85mm f/1.2, but when push comes to shove an f/1.8, or even f/2.8 lens, is no slouch either. Wielding one of these ultra-wide beasts can be a bit like riding a tyrannosaurus rex, in that the sheer amount of power at your disposal is kind of insane. But, one advantage of fast primes like this, an ultra-shallow depth of field, can also be somewhat of a curse if not used properly.
I’m not going to lie, it’s a ton of fun to shoot things with your lens wide open but it took me a while to learn, that just like the scientists of Jurassic Park, maybe I should have held back a bit. This portrait of a college student is yet another time in which I had no good reason to shoot wide open, but did anyway, and the result was a photo that simply could not be used. Due to the wide f/1.8 aperture, and my proximity to the subject, it left me with a depth of field consisting of just a few centimeters. Her left eye (on the right side of the photo) is perfectly in focus while the other side of her face is blurry, and the result is a strange-looking picture that I had to discard. Thankfully, I quickly realized my mistake and got some other perfectly usable images by shooting at f/2.8 and f/4. But, this was one of those situations in which I thought it would be super cool to get the way awesome background blur of an f/1.8 aperture, but did not realize how I nearly destroyed the portrait in the process.
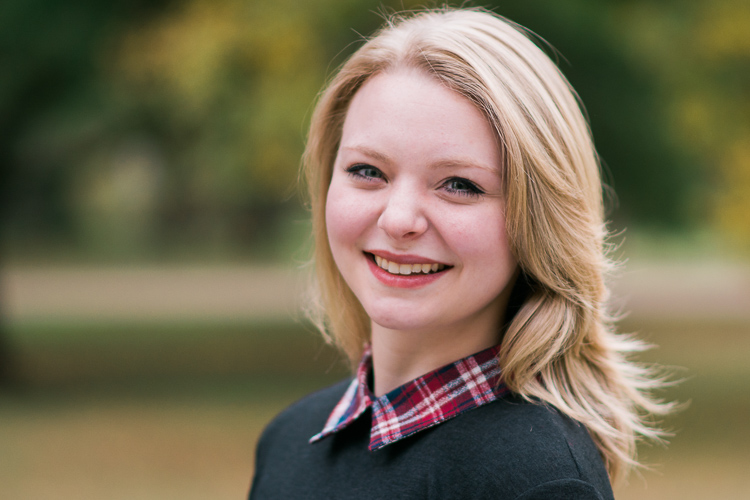
85mm, f/1.8, 1/750 second, ISO 400
Here’s another example from when I first got my 50mm lens, and thought it was so cool to go around shooting all my pictures at f/1.8 – because my warped sense of logic told me that no depth of field could ever be too thin. As a result this picture of some crocuses contains an ugly streak across the center where one flower and a lot of dead grass is in focus while the rest of the image is a blurry mess. Shooting at a smaller aperture would have given me a smooth transition between in-focus and out-of-focus areas and a much more pleasing image overall.
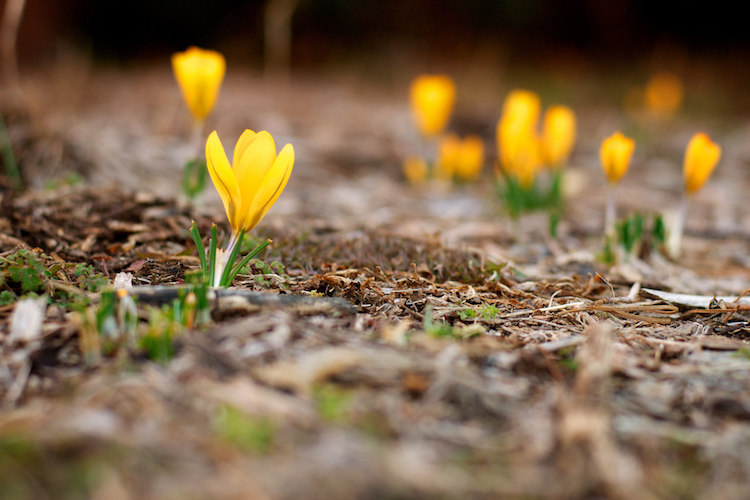
50mm, f/1.8, 1/500 second, ISO 400
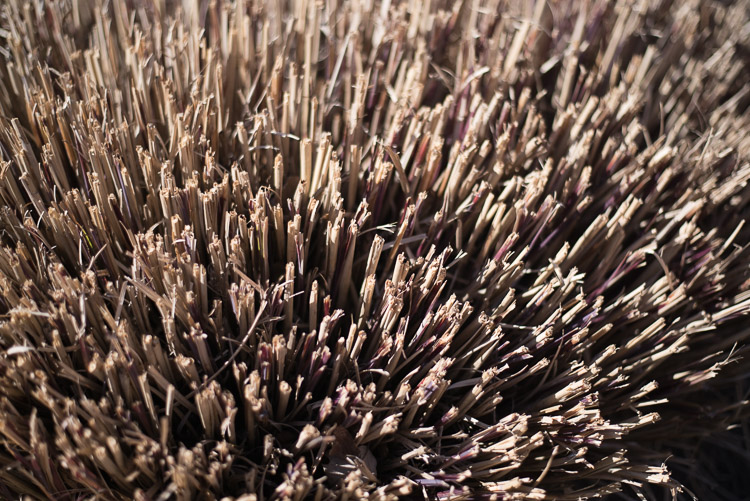
This is a bit subjective, and open to interpretation on the part of both the photographer and the viewer, but over the years I have found that shooting at the widest possible aperture in order to get the most possible bokeh, or background blur, things can go from artistic and interesting, to messy and incomprehensible very quickly. Bokeh is nice and can certainly be used to add an artistic flair to an image, but when overused, it can overpower the subject and ruin the picture. The following photo of a purple flower sticking up from a bed of grass shows this phenomenon in action.
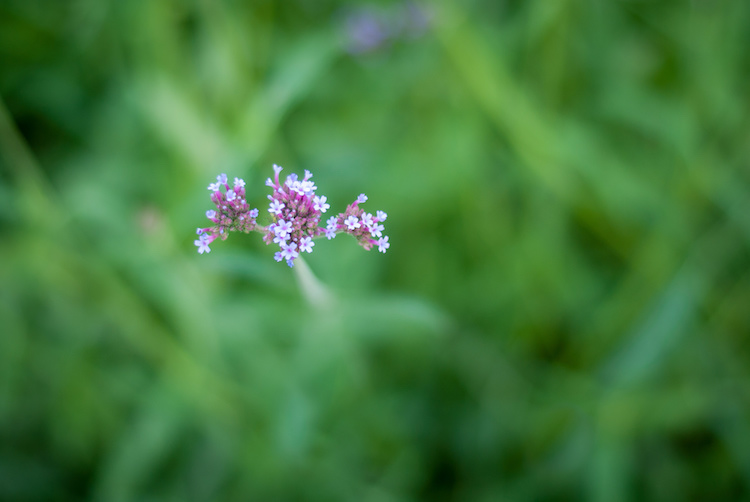
The flowers are so removed from the background it’s almost like they are hovering in midair, and the effect is somewhat disconcerting, and borders on upsetting. Blowing out the background so much has removed any sense of place and context for the subject, and what’s left is a green and purple mess, that is neither artistically interesting, nor aesthetically pleasing.
Before I say too much on this subject perhaps I need to add a bit of a preface. Less expensive lenses can behave strangely when you shoot with them wide open, but more expensive glass is usually much better at this sort of thing. With that disclaimer out of the way, it’s important to understand some of the optical abnormalities such as vignetting, chromatic aberration, and softness, that often show up when your lens is opened up as far as it will go.
Vignetting is when the edges of your image look a bit darker than the rest of the picture, due to how light is manipulated inside your lens before it hits the image sensor inside your camera. It’s not too big of a problem on cameras with smaller sensors like APS-C or micro four thirds models, but it is certainly there, and even more so on full frame cameras.
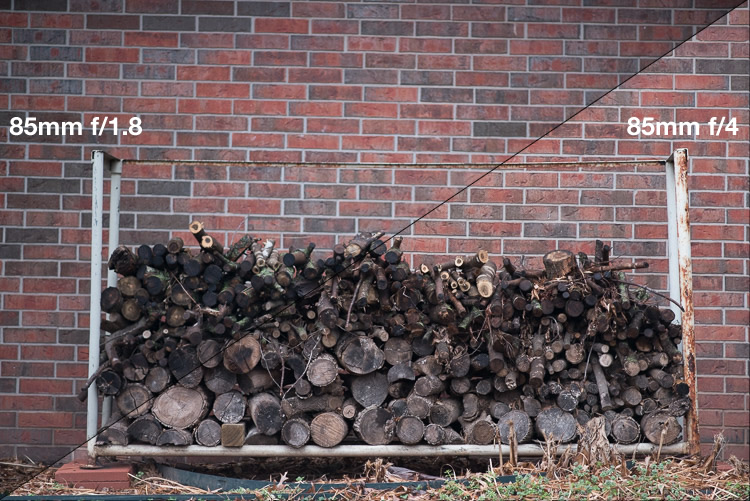
Vignetting can be a major issue when shooting wide open. Notice how the centers of both images are equally exposed but the corners are much darker at f/1.8.
If you shoot in RAW, you can use Lightroom, Photoshop, or other such applications to mitigate most of the effects of vignetting if you want. Of course another solution is to use a smaller aperture, which tends to eliminate most vignetting altogether. Vignetting is not always a dealbreaker, and many photographers, myself included, actually prefer the subtle effects of a well-used vignette. You may find that you fall into this camp, in which case go right ahead and shoot at f/1.8 or f/1.4 to your heart’s content.
The other optical abnormality that often rears its ugly head at wide apertures is chromatic aberration, which might be a much bigger problem if you are not ready for it. This usually manifests itself as purple or green outlines or fringes, around places in your pictures with harsh contrast between dark and light. For example the image below was shot at f/1.8, and upon first glance, looks perfectly usable.
50mm, f/1.8, 1/3000 second, ISO 100. It looks Okay on first inspection, but all is not well up close.
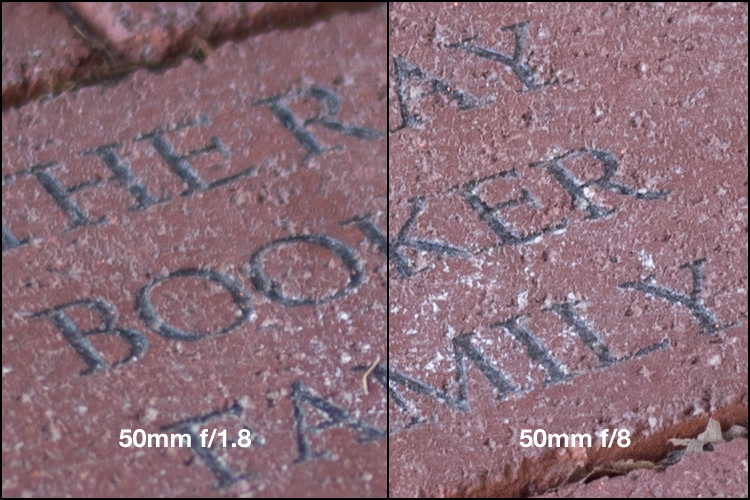
Take a closer look and you will notice a big problem around the edges of most of the dry stalks of grass. Ugly green halos show up all over the place, and this is a direct result of shooting wide open, due to how the incoming light is transformed by the lens on its way to the camera. Here’s a 100% crop of the image next to the exact same picture shot at f/8.
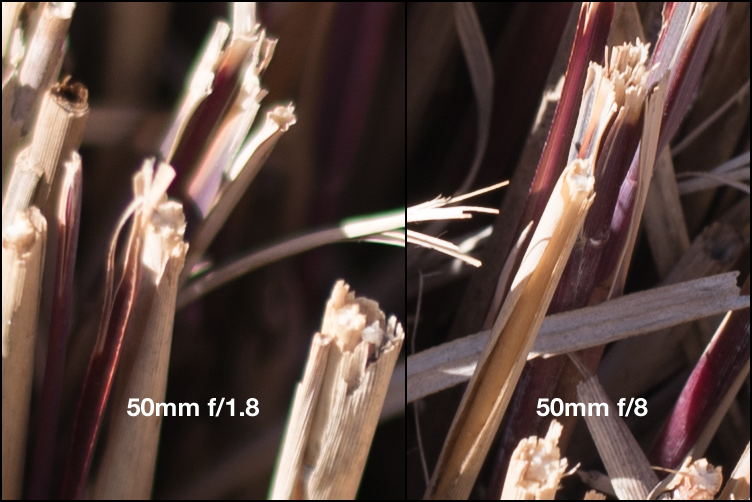
Green outlines abound on the left side while stopping down to f/8 eliminates them entirely.
This optical imperfection can often be mitigated somewhat in Lightroom, by using its: Remove Chromatic Aberration option in the Develop panel. But even then the results are not ideal, and you will often be left with images that still show some green or purple artifacts, or lose a bit of color from other parts of your picture. Rather than mess around with fixing these issues in post-production, I like to just avoid it from the start and shoot at a slightly smaller aperture. It usually fixes the problem, and still leaves me with the same overall composition I would have had with a wider aperture.
The last weird characteristic of most lenses at their widest apertures might not be that big of a problem unless you are painstaking examining your pictures on a per-pixel basis, but it’s something you should know about nonetheless. Almost all lenses are a bit softer when used at their widest apertures, which can result in pictures that are not quite what you want. The picture below was shot at f/1.8 and looks decent upon first glance, but a closer inspection reveals a very different story.
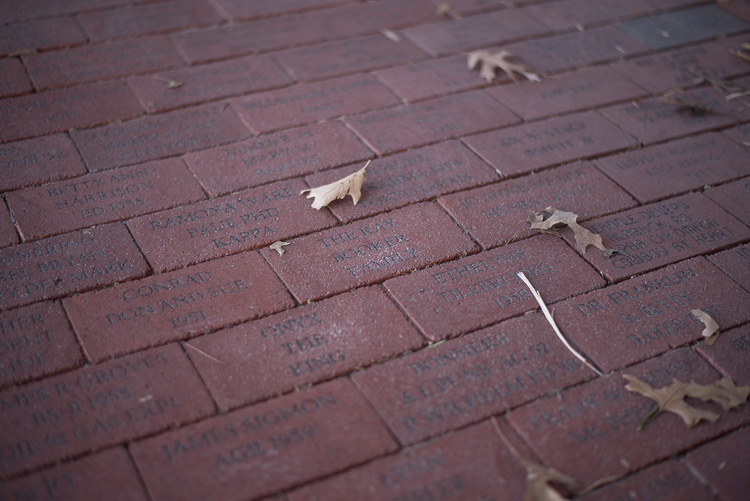
50mm, f/1.8, 1/125 second, ISO 100. Seems decent but once again a closer look reveals a much different story.
Zooming in on the exact center of the image, the point at which I locked focus, shows two very different pictures when this is put next to the very same picture shot at f/8.
Focus was locked precisely on the letter “K” and yet the image on the left, shot at the widest aperture on my lens, is much less sharp.
Once again this sharpness problem can be corrected to some degree in post-production, but my ideal solution is to avoid shooting at f/1.8 unless I specifically need the light-gathering ability, background blur, or other effects that such a wide aperture offers. Photography is all about tradeoffs, and while closing down the aperture on my lens resulted in a picture that was sharper, it also gave me an image that had much wider depth of field, which made the overall composition less pleasing.
The Roman philosopher Marcus Tullius Cicero once said, “Never go to excess, but let moderation be your guide.” This nugget of wisdom is applicable not only to life in general, but also speaks volumes about how to approach photography. I like to treat the widest aperture on my lenses like flooring the gas pedal on my car. It’s fun, but if I went around driving full speed everywhere I went, it would quickly lose its appeal. (Though in my 1998 Toyota sedan I would probably lose a race to a skateboarder, but you get the point.)
Your lenses have wide apertures for a reason and they are meant to be used to get good images, particularly if you are aware of some of the quirks and idiosyncrasies of using them like this. If you like shooting wide open, and don’t mind some of the potential tradeoffs like a bit of vignetting and chromatic aberration, then go for it! However, my own personal rule of thumb is to only use f/1.8 when I really need it, otherwise the creamy backgrounds and bokeh balls start to lose a bit of their luster. When I’m doing a portrait session I keep f/1.8 in my back pocket for when I really need it, otherwise I shoot most pics at f/2.8, f/4, or smaller.
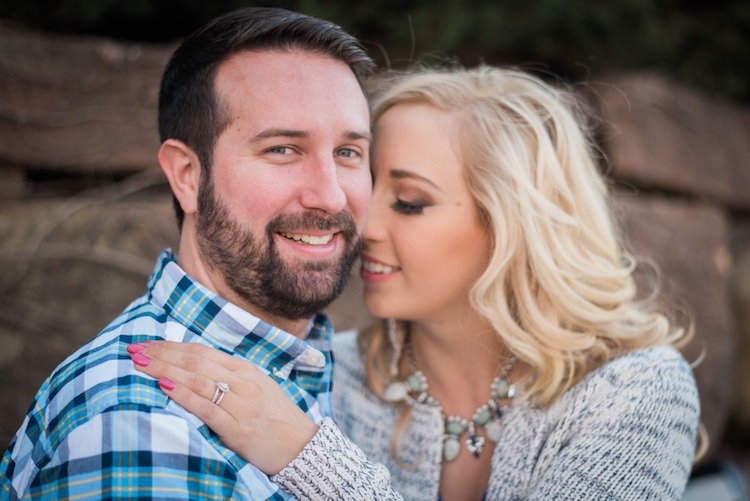
I took most photos of this couple at smaller apertures, which made this one at f/1.8 stand out among the rest.
After hearing this list of reasons to hold back a bit when shooting wide open, I almost feel like I should write a similar article about the benefits of taking photos at the largest aperture possible. I don’t want to give the impression that you should never use your equipment to the fullest of its capabilities, just that there are a few things to know before you go around taking all your pictures at the widest possible aperture your lenses can use. You might end up with a few problems, just like the ill-fated scientists of Jurassic Park, but hopefully yours won’t be quite as lethal, and along the way you could very well manage to take some incredible photos too.
I’d like to know what your thoughts are on all of this, and if you have any favorite shots taken at not-quite-wide apertures, please post them in the comments below!
googletag.cmd.push(function() {
tablet_slots.push( googletag.defineSlot( “/1005424/_dPSv4_tab-all-article-bottom_(300×250)”, [300, 250], “pb-ad-78623” ).addService( googletag.pubads() ) ); } );
googletag.cmd.push(function() {
mobile_slots.push( googletag.defineSlot( “/1005424/_dPSv4_mob-all-article-bottom_(300×250)”, [300, 250], “pb-ad-78158” ).addService( googletag.pubads() ) ); } );
The post Are You Obsessed with Shooting Wide Apertures – Here’s Why You Might Want to Hold Back by Simon Ringsmuth appeared first on Digital Photography School.
If you are serious about your photography business, then you most likely have your own photography website already (if not, you should set one up right away). You are probably really proud of it and consider it the best website under the sun. However, numerous mistakes can be found on almost every photographer’s site. These mistakes could be fatal for your business, since they can easily repel your potential clients. We are talking big agencies, companies and even government organizations, not just regular consumers who want you to be their wedding photographer.
Here’s some good news: these mistakes can be fixed easily once you know what they are based on.
We have recently researched thousands of photographers’ websites when looking for professional vacation photographers for our new project. We were quite surprised by the number of mistakes we had encountered on them. On top of that, several particular mistakes kept constantly repeating!
Some seem obvious, some of them not, but almost every photographer’s website is guilty of at least one or two of these mistakes. So, here comes the checklist of some of the most common photography website mistakes that might save some of your serious assignments:
This is probably the most obvious mistake. However, you would be really surprised how many websites are anonymous. A nickname may be great, it might help you look like a mysterious artist, but it definitely won’t help you to get new inquiries.
Your name is your only brand. You should be proud of it and present it to the public as much as you can. So put your name out there! Visibly! And buy yourself a domain with your name if possible.

Example of good website, be proud of your name: Kristina Kislitsyna
Do you want to run a successful photography business? Then you have to invest in it, at least a little. Start with investing in a decent website. A few hundred bucks and a skilled friend will have the work done in a blink of an eye, you’ll have a nice, basic, yet original website.
However, I implore you, do avoid those cheap template websites with the provider‘s logo all over the place.
Email address is the key. Your client needs to find it quickly and easily. Contact forms might not seem like a bad choice at first, however, they most certainly are. Lots of big clients prefer to contact you via email, because they want to have a copy of the email that they send to you.
If you insist on having a contact form, put your email address next to it and let your client decide. Here’s a secret tip – insert your email address as an image with your email on it so bots cannot find it and you save yourself from getting tons of spam.

Put your email address next to the contact form and let your client decide: Sarah Bel Photography
This one is closely connected to the previous point. Inquiries from agencies, companies, and other projects often end up in the spam box or junk folder. It doesn’t matter which email service you use to communicate with your client, but it is essential to check your spam box every few days. This is the only way to avoid those embarrassing moments when you respond to an important inquiry after several months, and indeed, it is usually too late at that point.
Do I have to add anything else? Hello, it’s 2015! Everyone is listening to Spotify or YouTube while browsing the internet. The last thing people want is to be interrupted by the blasting of your favourite music.
It’s okay if you don’t want to share the pricing on your website, it’s also okay if you want to share it, but you definitely need to decide which way you want to go! If you want to show your prices, do so visibly, clearly, and in a special menu category. If you don’t want to share them, then say so clearly (and add your email address at that point, so that the client can contact you regarding the pricing details right away).
There’s nothing weirder and more suspicious than a small hidden grey link to a PDF pricing guide that cringes at the bottom right corner of an About Me page.

Example of what to do – clear statement about where to find pricing: Vera Pavlova Photography
On photography websites, this is most often caused by high-resolution and uncompressed photos. I know, we are photographers and we are proud of our latest cameras with great dynamic range and stuff. Still, these things are usually not that important for our potential clients. You need your website to be fast! And because of that, you need to compress photos for your website – compress them big time (150-200kb is a good maximum file size for website images, any bigger will slow your site down). Speed is the king in the realm of photography websites.
This one is for photographers from non-English speaking countries. Yes, English is the most important language in the business world nowadays, so you need to have an English version of your website if you want to target the worldwide market. If you don’t have the time, or the resources, to prepare two language versions, then go for an English only site.

Example of a website with two language versions including English: Baru la Photo
Lots of (semi)professional photographers try to target the whole world, thus the only location info that you can find on their website is “available worldwide”. Okay, it’s great to know that you’re willing to travel, but clients are sometimes looking for local know-how. Always specify your location (at least by the city).
Social media is the new place to check testimonials and references to your work. It is crucial for your potential clients to be able to quickly find their way to your profiles on social media. The rule “the more, the better” applies here 100% – Facebook, Twitter, Pinterest and Instagram are necessary. You name the others…

Example of clearly visible links to social media: Austin Sheppard Photography
You put a great amount of energy and time to build up your website. It would be pity to reduce the possibility of attracting potential clients just by making some small mistakes that you can get rid of quite easily. I hope that this article will show some practical examples of such possible changes.
We would also love to hear from you! Are there any other mistakes that you suggest avoiding on photography websites?
googletag.cmd.push(function() {
tablet_slots.push( googletag.defineSlot( “/1005424/_dPSv4_tab-all-article-bottom_(300×250)”, [300, 250], “pb-ad-78623” ).addService( googletag.pubads() ) ); } );
googletag.cmd.push(function() {
mobile_slots.push( googletag.defineSlot( “/1005424/_dPSv4_mob-all-article-bottom_(300×250)”, [300, 250], “pb-ad-78158” ).addService( googletag.pubads() ) ); } );
The post 10 Photography Website Mistakes That Might be Repelling Your Potential Clients by Matej Slezak appeared first on Digital Photography School.
By Ludovic Hirlimann
For all of you camera enthusiasts, lens aficionados and gear fetishists, hearts race and palms sweat when broaching the subject of camera equipment upgrades. Camera companies keep a constant flow of equipment releases coming to quench the insatiable appetite of those who are convinced they need the latest and greatest.
It’s important to keep in mind that just because the new iteration of your camera body or a new lens with an even longer list of acronyms outlining its features is released, it doesn’t instantly make your equipment obsolete.
All you savvy consumers should strive to be honest with yourselves and carefully consider the tangible benefits that you will enjoy from that upgrade. Certainly most of you will legitimately grow out of that point-and-shoot or entry-level DSLR, however, many make the jump too soon before you’re able to fully exploit the capabilities of your equipment.
If you are reading this, you have likely purchased a camera (and possibly additional lenses and other accessories), in which case you are familiar with what could be called the Christmas morning feeling.
For photographers, an upgraded body or a new lens can be an important catalyst to revive waning enthusiasm. Many certainly see this as a thinly veiled excuse for coughing up the cash for some new equipment, but it can provide a needed boost to drag you out of the dreaded photographers-block.
For example, adding a large aperture lens – with an f-stop of f/2.8 or greater – to your stable reveals a whole new perspective, enabling you to further blur out backgrounds and isolate your subject.


Similarly, a telephoto lens will enable you to compose tighter shots from farther away, or experiment with closely cropped shots from a short distance. As focal length increases (and with it the distance to the subject), depth of field decreases and background objects appear closer to the subject opening up new compositional opportunities.

If you are already shooting with a DSLR, depending on the lenses you are using, adding a teleconverter to your bag can be a less expensive option for increasing lens focal length. Teleconverters fit between the lens and camera, and add a certain level of magnification such as 1.5x or 2x. Many lenses are compatible with teleconverters, but not all, so be sure to check with the manufacturer before buying one.

While some photographers can continue to produce compelling images with a basic body and a 50mm lens, many will discover a new realm of possibilities which unfold with the addition of new equipment.
Another way to legitimize an upgrade is if you recognize that your evolution as a photographer is being hindered by your equipment’s limitations.
One advancement which can be gained with a camera or lens upgrade is improved low-light performance. If you find yourself shooting fast-moving kids in your dimly lit house or indoor sporting events, you will quickly discover that shooting at high ISO settings at maximum aperture results in less sharp images riddled with color noise. Color rendition and saturation levels can also suffer greatly in these situations, especially in shadowed areas and with skin tones.
Unfortunately, other than the limited corrections you can make with editing software, an equipment upgrade may be a necessity if you want to get great looking photos in low-light conditions. Point-and-shoot and entry-level DSLR cameras sport better high-ISO performance than just a few years ago, but more advanced models show a drastic improvement in this regard and large aperture lenses can enable you to shoot at lower ISO settings.
In addition to better low-light performance, upgrading your camera body can put a bunch of useful features in your hands such as: a self-cleaning sensor, wireless uploading, increased pixel count, more accurate auto-focusing, faster shooting rates, dual memory-card slots, and more. Be sure to compare your current camera’s specifications with that of a potential upgrade and ask yourself if the added features will have a significant impact on your photography.

Although it doesn’t go in your camera bag, upgrading your editing software can be a game changer for your photographic pursuits. Making the leap from using free editing software, to purchasing and learning Lightroom or Photoshop, can make drastic changes to your final images. These programs open up new avenues for stylizing your images, and countless plugins are available which can enable you to have even more control over the look and feel of your work.
Even if you have the software already, an upgrade in your understanding and ability to use it, can go a long way. Investing time in knowing how to use the software properly, may help boost the quality of your images.

A more utilitarian reason to upgrade equipment is that it is simply reaching the end of its usable life. Camera shutters are rated for a certain number of actuations, at which point the risk of failure and inaccurate shutter speeds increase.
Even the best lenses have many plastic parts, and most modern ones have internal motors with a finite life span. Stiff or stuttering zoom and focus rings, loud or slow focusing and loose lens mounts are a few indications that a repair or replacement is imminent.
This may be a non-issue for many who live by the “if it’s not broken, don’t fix it” philosophy, however, if you use your equipment for paying gigs or to document important events, you may end up regretting a potentially preventable equipment failure.
There are many reasons to make equipment upgrades and most of you will make that leap at some point, but it is important not to set your expectations too high as to what new gear will do for your photographs. Think about your goals and consider which is the most accessible path to take in order to reach them.
By Sergio
I’ll leave you to think about this quote:
“A lot of photographers think that if they buy a better camera they’ll be able to take better photographs. A better camera won’t do a thing for you if you don’t have anything in your head or in your heart.” – Arnold Newman
googletag.cmd.push(function() {
tablet_slots.push( googletag.defineSlot( “/1005424/_dPSv4_tab-all-article-bottom_(300×250)”, [300, 250], “pb-ad-78623” ).addService( googletag.pubads() ) ); } );
googletag.cmd.push(function() {
mobile_slots.push( googletag.defineSlot( “/1005424/_dPSv4_mob-all-article-bottom_(300×250)”, [300, 250], “pb-ad-78158” ).addService( googletag.pubads() ) ); } );
The post 3 Valid Reasons it Might be Time to Upgrade Your Camera Equipment by Jeremie Schatz appeared first on Digital Photography School.
Sony could be working on a phablet targeted at enthusiast photographers, based around its new curved Exmor-RS IMX271SMK sensor unit and an F1.2 lens. According to a post on Chinese forum digi-wo.com the Xperia Z3X’s Android L OS will be powered by a 64bit Qualcomm Snapdragon SoC that is clocked at 2.86 GHz and 4GB of RAM. The screen is rumored to measure 6.14 inches, offering a QHD resolution and will use OLED technology. Read more on connect.dpreview.com
Articles: Digital Photography Review (dpreview.com)
If you have ever shared a photo by email, or posted one online, you might have seen a three or four-letter extension at the end of the file name that looked like “.jpg” or “.jpeg”. Almost every camera – from cell phones to point and shoots to expensive DSLRs takes pictures in this format – with good reason. You can fit thousands of JPG photos on a memory card, and they are generally good quality and easy to view on a computer or mobile device. You don’t need any special software to open a JPG file, and if you do want to edit one, almost any application from iPhoto to Photoshop can do it. However, all DSLRs, and even some point-and-shoot cameras, are able to shoot in another format called RAW which has some incredible benefits for you. Some people swear by the RAW format, others use JPG, and some use both. There is no correct answer in terms of which one is better, instead it’s important to find a solution that works for you. To illustrate why you might want to show in RAW format, here are a few reasons I use it instead of JPG.

Different types of light (such as sunlight, fluorescent bulbs, or a camera flash) affect how colors show up in real life. Our brains are aware of these differences and adjust our perception of the colors accordingly, but your camera doesn’t always know what to do in these various situations. To fix this, it has something called a White Balance setting, which usually contains values like Auto, Daylight, Cloudy, Tungsten, and Flash. Unless you set the White Balance properly, your photos will often have a yellow or blue tint that is not always easy to fix. This is an important limitation of the JPG format, which tosses most of the data it deems unnecessary for a given photo and can make fixing the White Balanc a little tricky. Fortunately, in RAW the White Balance can be easily adjusted to suit the photograph because all the color data is saved.
When you snap a photo in RAW mode, the camera uses one of its White Balance settings as a starting point, but you are free to adjust it however you wish on your computer. Programs such as Lightroom, Photoshop, and Aperture have simple controls for adjusting the White Balance, and even though modern cameras are much better at getting it right on their own I still find myself tweaking the white balance quite often. For example, my camera calculated a White Balance for this photo of a child’s lamp at a value that I thought was far too yellow. Shooting in RAW gives me the flexibility to fix this, and with a few adjustments, I was able to get an image that was much more pleasing to me than the one my camera originally produced.

My camera applied a White Balance setting to the RAW file, but I didn’t really like it.

Using editing software I was able to change the White Balance to a cooler tone that was much more pleasing to my eye.
Shooting in RAW not only gives me the freedom to adjust the colors you see, but also to adjust the colors you don’t see. When a JPG photo is too bright or too dark (i.e. overexposed or underexposed), there is not much that can be done to save it because much of the data that was captured by the image sensor no longer exists. Cameras have all sorts of ways to help us get the right exposure when we take a picture, but sometimes things just don’t work out, and you might find that some of your most precious memories were either too dark or washed out. Since RAW keeps all the data when an image is captured, you have much more leeway in adjusting images after the fact.

The original photo was way too dark to be usable.

RAW allowed me to boost the exposure significantly to create a much better photo.
When I shot this picture of some flowers on a tree, I noticed after I got home that it was far too dark to be usable. If this was a JPG I would have been mostly stuck with the results. But, because I shot in RAW I was able to brighten the dark areas and produce a much better image. In JPG, the data from the dark areas would have been just that, dark. The same can be done for overexposed images too; if a picture is too bright or washed out, it can often be saved if it was shot in RAW.
A third reason I shoot in RAW is that I often like to make adjustments to specific colors in a photo. JPG stores 8 bits of information per color for Red, Green, and Blue–each of the three primary colors of light that make up every pixel in a given photo. Don’t get too caught up in the math here–all you need to know is that those 8 bits (2 to the power of 8, or 2x2x2x2x2x2x2x2) really mean that a JPG stores information for 256 individual shades of each of the primary colors. RAW, on the other hand, stores 4096 or 16384 shades of information per color, depending on whether your camera supports 12 or 14-bit files. These numbers might not mean a lot, but it’s easy to see that either of the latter numbers is far greater than 256. This means that since RAW gives us so much more information to work with, we have a lot more flexibility when editing the colors of our image.
This photo of a family friend (below) turned out fairly well, but I was not happy with a few elements. Her eyes were too dark and and the colors were not as vibrant as I would have preferred. Thankfully, RAW gave me the freedom to edit the picture in order to create an image that was not only more pleasing to look at, but more accurately reflected what I saw when I captured it. This is much more than simply throwing a filter over an existing image; RAW gives you access to the original color data, which allows for far greater control over the finished product.

The original is not bad, but not as good as it could be.

Shooting in RAW meant I had so much color data available that I was able to adjust the colors to create a more pleasing final picture.
Of course shooting in RAW has downsides too, most notably the file size. RAW files can easily take up 10 times as much space on your memory card as JPG files, which seems like a lot of wasted space if you don’t do a lot of editing or post-processing. To be honest, if you are just shooting pictures of a nature hike or your kids in the park, RAW might be overkill. It’s not that JPG files can’t be edited–they certainly can, as anyone who has ever used an Instagram filter will attest. They can be manipulated in Photoshop and other image editing programs as well, and there is enough color information in most JPG files for some editing wiggle room. But RAW gives you much more freedom to work, and even though the file sizes are much greater, the tradeoff is worth it, in my opinion.
You will have to make the decision for yourself, but whatever you decide, try to resist getting drawn into a RAW versus JPG debate–neither format is objectively better. The important thing is that you find a workflow that fits your shooting style and goals. At the end of the day, as long as you are taking pictures you like, that’s all that really matters.

I won a photography contest with this picture…and I shot it in JPG.
You might be just fine with shooting in JPG, and if that suits you, then don’t let me or anyone else tell you different. But if you have ever wanted to experiment with more advanced editing techniques or just coax a little more out of your photos than you might otherwise be used to, RAW might be just the ticket to a whole new world of photography awesomeness.
The post Raw Versus JPG – Why You Might Want to Shoot in RAW Format by Simon Ringsmuth appeared first on Digital Photography School.
You may already know that the ISO setting is used to control your camera’s sensitivity to light. When you use a high ISO setting essentially you are telling your camera to become more receptive to the available light. This is most often used when you are photographing in low light situations in order to maintain a proper exposure. However, there are at least three other reasons you might consider using a high ISO setting when you’re either in a good light situation or on a tripod.
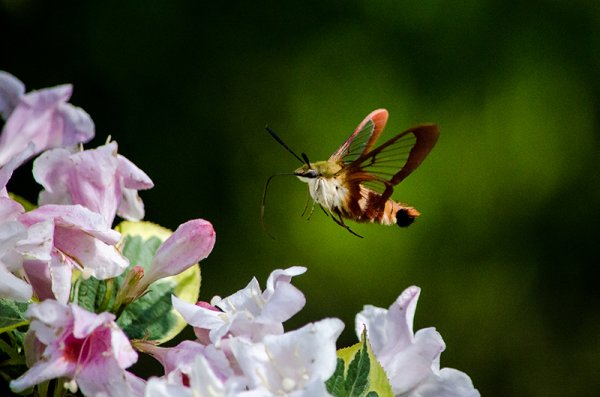
Use a high ISO setting to freeze fast motion – 1/8000th ISO 1,000
The only way to freeze fast motion, like the wings of a hummingbird moth, is to shoot with an extremely fast shutter speed. The above photograph was shot with a shutter speed of 1/8000th of a second in order to freeze the insect’s wings. However, even in the bright mid-afternoon sun, a shutter speed that fast required bumping the ISO setting on the camera to 1,000 to maintain an even exposure.
Below, is an example of why shooting at 1/8000th of a second was necessary. Even at 1/800th of a second the insect’s wings were barely visible. In order to ensure that the motion was frozen it meant that more light was needed in a shorter amount of time and the only way to get this (without a faster lens) is to bump up the ISO on the camera.

ISO 500 1/800th – even at that speed the wings are blurry.
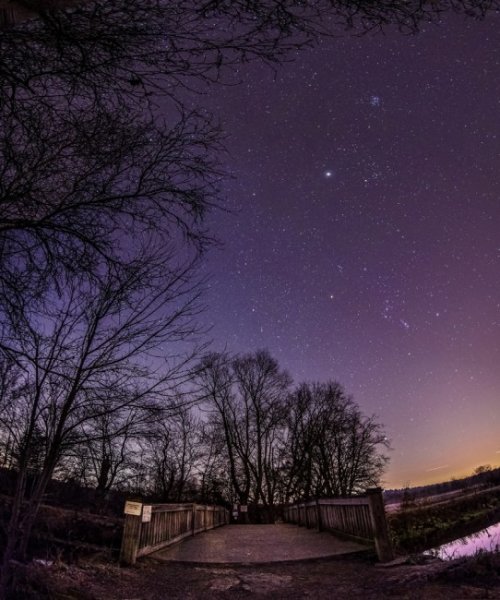
Use high ISO to capture the stars
Many different techniques come into play when you want to photographing the stars, but one of the more important things to remember is to increase that ISO setting. The reason you want to photograph the stars with a higher ISO, even though you’re using a tripod, is that as the earth rotates, the stars move across the sky and you don’t want to capture that movement in your photograph (unless you are doing star trails)
By using an ISO in the 800 to 1,000 rang,e with a fast wide-angle lens, you will be able to capture enough stars to fill the sky. For more on photographing the stars check out: How to Photograph the Stars.
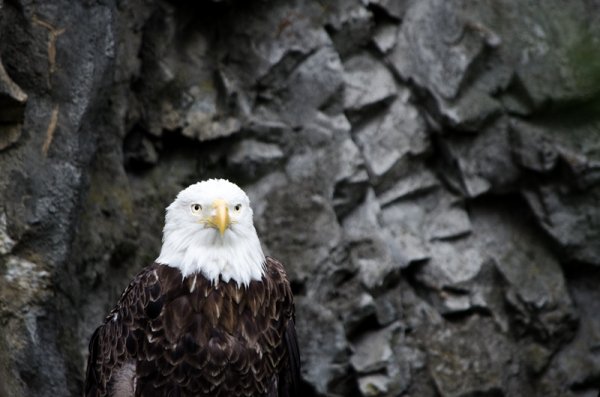
Use high ISO when shooting handheld with a long lens
If you’re shooting handheld with a long lens, you have to remember the shutter speed rule: 1/focal length (35mm equivalent). This rule basically means that if you’re using a 300mm lens on a 1.5x crop factor DSLR then the minimum or slowest shutter speed that you can use is 1/450 (1/300 on full frame).
The bald eagle above was shot at a 450mm equivalent focal length using a shutter speed of 1/500th of second and an ISO of 1,000. Any slower on the shutter speed and you begin to run the risk of introducing camera shake.
Do you ever shoot with an ISO of 800 or higher? What’s the highest you’ve ever shot? Share with us some examples and of course, if you have any other uses for high ISO that you think I’ve forgotten please share those below as well!
The post Three Uses for High ISO you Might Not Know by John Davenport appeared first on Digital Photography School.
You must be logged in to post a comment.