RSS
 

Posts Tagged ‘Mavic’

New video shows off what appears to be DJI’s rumored ‘Mavic Mini’ drone

17 Aug

We’ve already seen purported images and rumored specs of DJI’s impending compact drone. Now, a video posted to YouTube shows off what appears to be the same device detailed in the previously-reported photographs.

Originally posted to TikTok by a user of a closed Facebook group dedicated to DJI drone equipment and subsequently uploaded to YouTube, the 23-second video shows a drone that appears to be the rumored ‘DJI Mavic Mini.’ On the front of the light grey drone is a white DJI logo. The arms of the drone are collapsed in their stored position and appear to have the protective tape still wrapped around them. The front and bottom obstacle avoidance sensors can also be seen in the video as the drone is rotated around.

$ (document).ready(function() { SampleGalleryV2({“containerId”:”embeddedSampleGallery_8389569858″,”galleryId”:”8389569858″,”isEmbeddedWidget”:true,”selectedImageIndex”:0,”isMobile”:false}) });

Interestingly, the area of the drone where the camera/gimbal would normally be installed appears to be missing. As noted by DroneDJ, it’s unknown whether it’s ‘been removed or has not yet been installed on this particular drone.’ The battery door appears identical to the one shown off in the previous images we’ve seen and show the same placement for the USB connector and Micro USB port.

Between our last post and this one, a leaked spec sheet has also been revealed that appears to contradict the initial report that the impending drone will weigh more than 250g. According to the purported spec sheet, the drone will come in at 245g, putting it under the FAA’s weight limit for registration requirements. DroneDJ has shared a follow-up article detailing why this is even more likely be the case considering DJI’s statements at its May 2019 event titled ‘Elevating Safety: Protecting the Skies in the Drone Era.’

Whatever the case is, there’s a lot of smoke hovering around the DJI rumor mill. Now the question is how much longer before the flames are found?

Articles: Digital Photography Review (dpreview.com)

 
Comments Off on New video shows off what appears to be DJI’s rumored ‘Mavic Mini’ drone

Posted in Uncategorized


New photos, specs emerge for DJI’s ‘Mavic Mini’ drone rumored to be released tomorrow

12 Aug

Late last week, DroneDJ obtained images of an unreleased DJI drone that appeared to blur the lines between DJI’s Spark and Mavic drones. Now, DroneDJ has gotten its hands on a number of specs it believes the drone, said to be named the Mavic Mini, could have when it’s officially revealed.

The images, which were first posted (and subsequently deleted) by Twitter user and drone pilot OsitaLV, show a drone that looks like DJI’s Mavic drones, but is small enough that it could also be the successor to the DJI Spark or even the DJI Mavic Air.

However, its arms articulate more in line with what the DJI Mavic Pro and DJI Mavic 2 Pro/Zoom do and its three-axis gimbal appears to be a smaller, less substantial version of that found on the Mavic Air—all details that further blur the lines of where this drone would sit in DJI’s lineup.

$ (document).ready(function() { SampleGalleryV2({“containerId”:”embeddedSampleGallery_8389569858″,”galleryId”:”8389569858″,”isEmbeddedWidget”:true,”selectedImageIndex”:0,”isMobile”:false}) });

According to the new information provided by OsitaLV, the drone will feature a 12-megapixel 4K 1/2.3 CMOS sensor, retail for $ 399 when it launches, weigh 350g (12.35oz) and measure 270mm (10.63in) diagonally when unfolded. This puts it 100g over the FAA’s 250g limit, but still keeps it on the smaller side.

OsitaLV suggests the new drone will make use of the enhanced Wi-Fi technology found in DJI’s Mavic Air and Spark drones, and have object avoidance sensors on the front and bottom of the drone. It’s also reported the drone will use a new, replaceable battery that’s housed inside a compartment that also houses the memory card slot and USB port.

One anomaly, however, is that the images show a Micro USB port on the drone, while DJI’s more recent drones use USB-C. This could simply be because the drone seen in the images was an earlier version sent in for patent and registration purposes, before the jump to USB-C was made.

Rumor has it DJI has an announcement planned for tomorrow, so there’s a chance we’ll see this little machine in its final form.

Articles: Digital Photography Review (dpreview.com)

 
Comments Off on New photos, specs emerge for DJI’s ‘Mavic Mini’ drone rumored to be released tomorrow

Posted in Uncategorized


DJI teases new release for Tuesday, Mavic 2 Pro+ and Zoom+ expected for 2020

11 Aug

DJI recently posted a teaser video to its official YouTube channel announcing a new product release, slated for this Tuesday. While the brief 15-second clip doesn’t reveal much about what’s to be expected for August 13th, DroneDJ was the first to report on the public FCC filing for the DJI OSMO Mobile 3.

An upgrade from the OSMO Mobile 2, released one and a half years ago, the newest phone stabilizer from DJI features an updated folding design on its arm and will be 80 grams lighter than its predecessor. It also comes equipped with Bluetooth Low Energy 5.0, and sturdier, more flexible gimbal motors to support the trend of wider and heavier smartphones. New dimensions of 286x126x98mm make it larger than the OSMO Mobile 2 but it is designed to fold down to almost half its height for convenient transport.

Undoubtedly, consumers are anticipating DJI’s next drone release. It has been almost a year since the original Mavic 2 Pro and Mavic 2 Zoom were introduced to the public. Once again, DroneDJ was first to report on plans for a Mavic 2 Pro+ and Mavic 2 Zoom+ thanks to an attentive reader. A special section of DJI’s website titled ‘EU Declaration of Conformity’ lists both planned drones at the top.

This past May, DJI announced plans to implement both helicopter and airplane sensors in its consumer-grade drones starting January 1, 2020. Known as ADS-B sensors, they will enable drone pilots to detect and avoid nearby aircraft. It would only make sense that DJI would release the Mavic 2 Pro+ and Zoom+ to coincide with this important development. The EU will also implement a common set of drone regulations in June, 2020.

While specs have not been made public, one would at least hope that the foldable, compact drones offer up the ability to capture 4K/60p video like Autel’s competing EVO.

Articles: Digital Photography Review (dpreview.com)

 
Comments Off on DJI teases new release for Tuesday, Mavic 2 Pro+ and Zoom+ expected for 2020

Posted in Uncategorized


Aerial Time Lapse Basics with DJI Mavic Pro 2 Drone Specific Examples

17 Apr

The post Aerial Time Lapse Basics with DJI Mavic Pro 2 Drone Specific Examples appeared first on Digital Photography School. It was authored by Peter West Carey.

Drones can capture images and footage you might have only dreamed of in the past. Now that ability is easily extended to time lapse photography.

I prefer to refer to my drone as a flying camera. While there is certainly some fun to be had in the simple joy of flying around and looking at stuff from high up, I use my drone primarily to create images and footage with an eye toward cinematic appeal. Time lapse imagery can convey a sense of place that still images and videos lack.

The Basics

This post is written based on experience with the latest model DJI Mavic 2 Pro. While manufacturers differ how they handle time-lapse creation, the tips below are meant to introduce you to what’s available. Some tips will be specific for this model but I will also offer more tips for aerial time-lapse creation in general.

Some drone manufacturers will compile the time lapse video for you while others simply record each individual photo, allowing you to compile the video yourself.

It’s important to note that all experimentation and practice should be done in an open space, away from people, buildings, pets and in accordance with all laws and regulations for your location. I practiced over land many, many times before I felt confident using the automatic modes for time lapses over water.

Tips Before Getting Started

Check exposure and anticipate

Changing exposure during a timelapse shoot, be it on land or in the air, is often a tricky endeavor. I suggest, when getting started, to anticipate your lighting situation and not attempt to change exposure during a timelapse shoot if your drone allows it.

It can be difficult to make exposure adjustments depending on your brand of drone (and some don’t allow it at all) – it’s hard enough to safely fly a drone while shooting. Try not to add too much complexity on top of that.

Try different interval timings and drone speed, 2 seconds is a lot different than 10 seconds

The speed of your drone, distance to objects and the length of your interval will have a large impact on your time lapse. There’s a reason DJI limits the speed of the drone in certain modes (explained below) to 4.5MPH. Anything faster than that and the video shows way too much motion to be palatable.

But if you’re flying slow, a 10-second interval might be ideal for helping show the movement of slow-moving clouds or shadows.

Let me show you the difference between a 2-second interval (at 1.6MPH) and a 5-second interval (at 4.5MPH) while a drone circles me.

It’s going to take some experimenting to get it right.

Look at your total time to create 

DPS writer, Ryan Chylinski, explains the importance of shoot length in this helpful post. When flying a drone, it’s even more important to make sure you don’t run out of card space and that you judge the movement of your drone compared to the total time it will take to shoot your time lapse.

Will you cover too much ground? Will your drone still be in line-of-sight (which most countries require as part of drone flying regulations)? What obstacles might your drone encounter when flying that long?

Plan ahead to avoid simple mistakes.

Point one way, film another

Facing one direction while flying another can offer a dynamic look to your video, rather than simply flying straight ahead. You can use a backward facing drone to get a typical pull-back shot or point slightly off of perpendicular for a dolly shot, such as the sunrise below.

Leave yourself time to return home

Do you have enough battery to shoot and return?

This is one of the most important question to ask. Some drones will warn you, but some won’t.

I had a frightening experience when I misjudged distance and return time while shooting a time lapse over water and nearly lost my drone (and polluted the environment). Midway through the flight I aborted the shoot and returned with a safe margin of battery, but I lost the shot.

Work altitude shifts into your scene

Altitude shifts are a like using a typical slider, but on steroids. You’re not limited to the four or 10 feet of a ground-based slider so the changes can be over a much larger distance. You also don’t need to stay moving parallel to the ground the whole time.

Here’s a simple example of a pullback that covered about 1000ft over land/water while steadily climbing 140ft in altitude.

Fly smooth

Using a pre-built, computer-controlled mode, like the ones mentioned below, help ensure smooth flight and operation. If you are controlling your drone manually while shooting a time lapse, ensure that your movements are slow and steady, allowing for your camera to shoot enough photos for a smooth video.

Here’s an example of what happens when I panned down then up too fast while shooting.

Result: Ruined video. Also, to my liking, the pan left and right are too fast.

DJI’s different methods – What do they mean?

DJI fits all of their time lapse modes into a section it calls Hyperlapse. Hyperlapse is just a cool sounding phrase meaning a moving time lapse. The Hyperlapse modes will all shoot and compile the video for you, typically in 1080p and 25 frames per second. You can also choose to save the individual RAW files if you wish to use your own time lapse software.

Safety Note: While the drone uses its side, front, rear, top and bottom sensors to detect objects, it still requires your attention at all times. If it finds an object in its path, it will stop shooting. It is very important to remain in control of the drone and ready to intervene. In Course Lock and Waypoints modes, if you make any adjustment to the controls of the drone, it will exit those modes and stop shooting.

Course lock

Course lock is the mode I use most often and it’s the one I’m going to start with. It allows you to aim the drone in one direction for flight and then either point the camera any way you like, or choose a subject to be tracked.

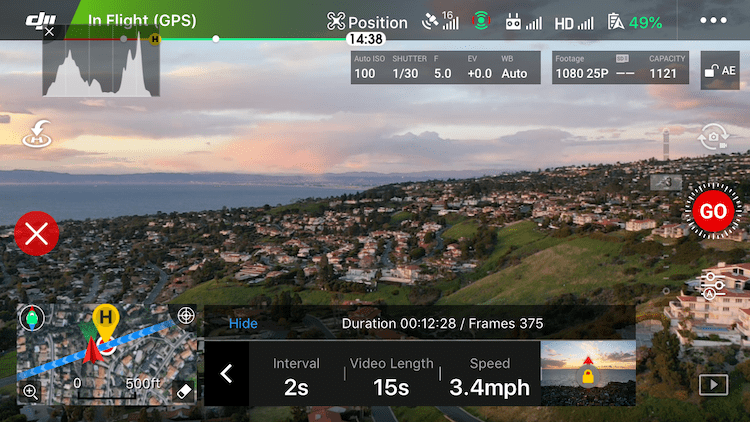
You start by setting course and then the interval, video length and speed. Each item is set by first tapping it and then moving the slider accordingly.

Setting the course is as simple as pointing the drone in the direction you wish to go and tapping the lock icon next to interval, video length and speed. In this case, I pointed the drone directly at the sun. The little image of a lock means my course is locked.

Next, you’ll want to point the drone’s camera in the direction you want to film. Then adjust the shooting settings.

In this example, I left the interval at 2 seconds but then set the video length to 15 seconds.

With that change to video length and interval, the app shows me how many photos it will take and the length of shooting.

After that I set the speed to 3.4MPH.

All that is left is to hit GO and watch the scene unfold! (Notice the course lock section still shows the drone’s intended direction toward the sun.)

Free/Manual

Free Mode is straight forward and gives you the most control. After setting the shooting interval and video length as you would in Course Lock Mode, you are free to fly any which way you please. Up, down, backward, forward, left and right.

But be warned: fast course changes or high speeds will cause your video to be anything less than smooth.

At any time you can press the C1 button (on the underside of the controller) to lock course and speed.

As Free Mode can be used while the drone is on the ground, you can actually use it as a still camera for time lapse.

Circle

As you saw in the videos up top, choosing your speed and interval is important for Circle Mode.

Start by setting the distance from your subject for your drone. Ensure the circle your drone will subscribe in the sky does not encounter any obstacles. If need be, adjust your drone’s height or distance from your subject to achieve the framing you desire.

Next, select Circle Mode from the Hyperlapse options.

Now set your interval, video length and speed as described in the Course Lock Mode. Then select the direction your drone will fly; either clockwise or counterclockwise.

Above these settings, the program will tell you how long the shoot will take and how many frames will be shot. In the example, that will be 5 minutes and 48 seconds to take 175 frames.

Most importantly, choose your subject! You do this by drawing a box on the screen by pressing and dragging until it highlights your subject.

Press GO and your drone will start snapping and moving. When it is finished, you will see a screen as the drone creates (synthesizes in DJI speak) the video.

In the example above, you will notice the path the drone took, which is a very pretty circle (with my initial flight path to get the drone in place mixed in). All Hyperlapse modes require this video synthesizing and the length of time depends on the number of shots. Until video creation is complete, you cannot take any photos or video, but you can fly the drone as normal.

Waypoints

Waypoints Mode is a bit trickier to work than the others, but offers a lot of control and unique results.

After selecting Waypoints Mode you will set your interval and video length as the other modes. You will then set the waypoints your drone will fly. You can set up to five waypoints and a minimum of two.

To do this, fly to the first waypoint, orient your view as you like and press the + symbol in the Hyperlapse tray at the bottom of the screen to lock that waypoint. Continue this method, flying to each waypoint and pressing +.

In this example, I have set two of my five waypoints and will continue adding until all five are set. The map on the left side shows each waypoint with a number and the direction the camera will face.

When you are finished plotting each waypoint, you have the choice to fly the waypoints in order marked or in reverse. If you choose “In Order”, the drone will fly itself to the first waypoint and begin. Otherwise, the drone will begin at the last waypoint selected and fly backwards (but will pay attention to your selected camera orientation for each waypoint).

While the drone flies, you will see the waypoints on the map along with a timer showing how long the drone has been flying and the total time it will fly the route. Next to that is the number of images taken followed by the total images to be shot.

More Examples

Course Lock while facing perpendicular to flight path

Course Lock while flying backward

Course Lock while flying backward with an upward pan for clouds

?

Conclusion

Time Lapse videos from a drone offer a unique and sometimes challenging option. They take planning not only to consider the subject matter and lighting, but also for the safe operation of your drone while it is taking photos.

Each mode offers different options and it’s best to play with them in a safe environment to get the hang of what you can accomplish.

Have fun and post some examples as you try out this technique. I’d love to see them!

The post Aerial Time Lapse Basics with DJI Mavic Pro 2 Drone Specific Examples appeared first on Digital Photography School. It was authored by Peter West Carey.


Digital Photography School

 
Comments Off on Aerial Time Lapse Basics with DJI Mavic Pro 2 Drone Specific Examples

Posted in Photography


Review: DJI Mavic 2 Zoom

14 Apr

The post Review: DJI Mavic 2 Zoom appeared first on Digital Photography School. It was authored by Adam Welch.

Photography is an ever evolving medium. New gear, new technology and new ways of seeing the world make it an extremely exciting time to be a photographer right now.

Over the last year or so I’ve become more and more interested in aerial photography and getting new perspectives for my work. And wouldn’t you know it, DJI just released another brand new tool for aerial photography in August of 2018. So when I had the opportunity to test it out, I didn’t hesitate. I give you…

…wait for it…

…the DJI Mavic 2 Zoom.

dji-mavic-2-zoom-digital-photography-school-adam-welch

Out of the box

Sleek, compact and understated; that’s how I would describe the appearance of the Mavic 2 Zoom. DJI has chosen a color scheme that should be familiar to those who have experienced the previous model upon which they have based the Mavic 2 Zoom upon – the Mavic Pro. The drone itself is dark gray with a silver belly and matching silver accents. You’ll notice that while the overall lines have been maintained, the Mavic 2 Zoom is a completely different animal when compared to its predecessor.

dji-mavic-2-zoom-digital-photography-school-adam-welch

dji-mavic-2-zoom-digital-photography-school-adam-welch

dji-mavic-2-zoom-digital-photography-school-adam-welch

The gimbal cover of the Mavic 2 has also been updated to protect the camera during transport. While easy to remove, I have to admit reattaching the gimbal cover was slightly confusing the first time I attempted it. Luckily, DJI has included a quick diagram to help with this.

dji-mavic-2-zoom-gimbal-digital-photography-school-adam-welch

Who knows, maybe it was just me being clumsy? In any case, once you get the hang of the new gimbal cover, reattaching it becomes essentially like riding a bike.

The Mavic 2 Zoom has incorporated a set of legitimate landing and take-off lights to aid in low-light situations when the bottom-facing obstacle sensors may have difficulty discerning where the ground may be. Speaking of sensors, DJI has enhanced the Mavic 2 Zoom with Omnidirectional Obstacle Sensing technology (more on that later) for side, front and rear obstacle avoidance. These sensors are readily visible throughout the breadth of the aircraft yet somehow the body of the drone doesn’t appear overly cluttered.

dji-mavic-2-zoom-digital-photography-school-adam-welch

The controller for the Mavic 2 Zoom has received a light makeover as well. I was happy to see the addition of the fantastic “stow and go” joysticks present on the Mavic AIR controller to this new iteration of Mavic controllers. When not in use, the joysticks can be packed away beneath the folding wings of the controller.

This makes stashing your controller in your bag much easier and less likely to snag or less ideally, break.

dji-mavic-2-zoom-controller-digital-photography-school-adam-welch

Shown with joysticks attached

Most of the contact surfaces are rubberized, and the controller feels great even when using a larger smartphone like my Samsung S8 Active.

Speaking of phones, an incredibly cool feature of the Mavic 2 Zoom controller is that it charges your phone should your phone’s battery level drop to below 40% during flight. How cool is that?

Thanks for having our backs, DJI.

With that said, you will almost certainly need to remove your phone case (should you have one) to make everything fit within the controller. Of course, you might not have to, but keep that in mind before you fly.

Another feature, albeit possibly not as overtly impressive for some as it was to me, is the addition of an integrated charging cable built right into the included battery charger.

This controller is also identical and interchangeable with the controller for the Mavic 2 Zoom

This enables the user to always have a way to charge their controllers should they misplace or not have another cable to charge the controller.

With the introductions complete, let’s get down to business and see how well the Mavic 2 Zoom performs in the air.

Flight performance

In comparison to the Mavic Pro, it’s safe to say that DJI has improved virtually every area of flight performance in the Mavic 2 Zoom. They have increased the maximum speed and the overall flight time and distance capability. Even though descent/ascent speeds have remained the same as the Mavic Pro (impressive in its own right), it’s easy to see that the Mavic 2 Zoom is very much an upgrade in terms of its ability to fly further faster and with more confidence.

  • Dimensions Folded: 214×91×84 mm (length×width×height)
  • Dimensions Unfolded: 322×242×84 mm (length×width×height) with 354mm at diagonal
  • Weight: 1.99 lbs(905g) with battery and propellers attached
  • Maximum flight time: 31 minutes at constant 15.5 mph(25 kph)
  • Maximum hover time: 29 minutes(no wind)
  • Operating temperatures: 14° F to 104° F(-10°C to 40°C)
  • Maximum speed: 44.7 mph(72 kph) (S-mode)
  • Maximum ascent speed: 5 m/s (S-mode), 4 m/s (P-mode)
  • Maximum descent speed: 3 m/s (S-mode), 3 m/s (P-mode)
  • Maximum altitude: 19,685ft above sea level (6000m)

The Mavic 2 Zoom is about 2g lighter in total weight but all other performance statistics regarding speed, dimensions and flight are precisely the same as the new DJI Mavic 2 Pro drone. In fact, it’s safe to say that the Mavic 2 Zoom and Mavic 2 Pro use the same drone body. The only difference being their respective camera systems.

Don’t believe me?

Here is the Mavic 2 and Mavic 2 Zoom side by side. If you can’t tell, why should I?

dji-mavic-2-zoom-digital-photography-school-adam-welch

In flight, the Mavic 2 Zoom is nimble with great response time. The propellers have been redesigned to make them quieter when compared to the Mavic Pro. Unfortunately, this also means that the propellers are not interchangeable between the two aircraft. So, you won’t be able to buy a set of Mavic 2 props to quiet down your older Mavic. Sorry folks.

Acceleration is quite impressive, with stops being not overly abrupt. Of course, many of these observations depend on how you have the responsiveness of your controller configured. Speaking of that, DJI has placed the three main flight modes for the Mavic 2 Zoom on the right side of the controller. These modes are Tripod (T), Positioning (P) and Sport (S).

dji-mavic-2-zoom-controller-digital-photography-school-adam-welch

When in T-mode, the speed of the drone becomes greatly reduced as well as the acceleration and deceleration making it great for slow and controlled pans. Also, all of the Mavic 2 Zoom’s Omnidirectional Obstacle sensors are enabled.

P-mode could be called the “standard” flight mode. In P-mode, all of the Intelligent Flight modes are available.

Lastly, we have blazing-fast S-mode. In sport mode, all obstacle avoidance is disabled which means you’re entirely on your own. The fun part? The Mavic 2 Zoom can then hit a top speed of nearly 45mph (72.4kph). The Mavic 2 Zoom can also allow the pilot to select from pre-programmed intelligent flight modes which are great for obtaining footage that would otherwise be difficult for the average user.

Intelligent Flight Modes

  • ActiveTrack 2.0(with improved 3D subject tracking) Capable of identifying up to 16 subjects and track 1
  • Cinematic Mode (dampens the drone’s movements for increased stability) Softens the breaking period for increased video smoothness
  • Hyperlapse Moves the drone through out the acquisition of time lapses
  • QuickShots (outlined below)
  • Points Of Interest (POI 2.0) Allows the user to choose a subject and instruct the drone to keep it in frame based on a predetermined altitude and speed while circling
  • Waypoint Navigation The Mavic 2 Zoom will fly to a series of locations chosen on the map
  • Tap-to-Fly Select a map area and the drone will automatically fly to that spot

QuickShot Intelligent Flight Modes

  • Dolly Zoom An interesting cinematic zoom effect…Hitchcock style
  • Asteroid Essentially contorts your scene into spherical illusion
  • Boomerang The drone will fly in an ellipse around the subject and automatically start and stop filming in the same place
  • Rocket The Mavic 2 Zoom will take off vertically with the camera flowing your subject
  • Circle Enables the drone to fly in a circle around the subject at a predetermined altitude and distance
  • Dronie Pre-programmed upward flight with the drone moving backward all the while tracking the subject
  • Helix The drone will upward and away while maintaining view of your subject

Zoom Zoom

If you’re like me, then I figure you’re extremely interested in the camera of the Mavic 2 Zoom. After all, unless you just like flying a drone around the sky (which is fun too), the real reason you’re doing it all is to get awesome aerial photos and videos.

The elephant in the room is, of course, the zoom feature which is the Mavic 2 Zoom’s namesake. It has a 2x optical zoom plus an additional digital zoom capability (which DJI reports being lossless) when shooting video in FHD 1080p. DJI also reports the Mavic 2 Zoom to be capable of producing images with 13-stops of dynamic range. That’s impressive.

Here’s a rundown of the major camera features from the DJI website:

  • Sensor: 12MP 1/2.3″ CMOS
  • Focal Length: 35 mm equivalent of 24-48 mm
  • Maximum Aperture: f/2.8 (24 mm) – f/3.8 (48 mm)
  • Shutter Speed Range: 8–1/8000s
  • ISO Range: 100-3200 for video, 100-1600 (auto) 100-3200 (manual) for photo
  • Internal Memory Storage: 8GB
  • Image Formats: JPEG / DNG (RAW)
  • Video Formats: MP4 / MOV (MPEG-4 AVC/H.264, HEVC/H.265)
  • Video Resolution: 4K: 3840×2160 24/25/30p
    2.7K: 2688×1512 24/25/30/48/50/60p
    FHD: 1920×1080 24/25/30/48/50/60/120p

The camera of the Mavic 2 Zoom also incorporates some flashy new in-camera functionalities. It’s “Super Resolution” feature is incredibly interesting. It is essentially an onboard image stitching tool which can create images with a total resolution of approximately 48MP.

Not only that, but the Mavic 2 Zoom also sports DJI’s new “Hyperlight” mode for increasing image quality during extremely lowlight flights.

Here are a few test images made with the Mavic 2 Zoom.

dji-mavic-2-zoom-digital-photography-school-adam-welch

dji-mavic-2-zoom-digital-photography-school-adam-welch

dji-mavic-2-zoom-digital-photography-school-adam-welch

To give a better understanding of what that 24-48mm focal length actually brings you in terms of zoom capability, here are two frames for comparison. The first shot at 24mm….

dji-mavic-2-zoom-digital-photography-school-adam-welch

24mm at f/2.8

…and the second at 48mm

dji-mavic-2-zoom-digital-photography-school-adam-welch

48mm at f/3.8

Why not two more? Each one is a 1-second exposure which speaks to the stabilization of that 3-axis gimbal.

dji-mavic-2-zoom-digital-photography-school-adam-welch

24mm at f/2.8

Then zooming in to 48mm on that tower the distance.

dji-mavic-2-zoom-digital-photography-school-adam-welch

48mm at f/3.8

I feel it’s worth mentioning that those last two nighttime images were made in a well-known and open area with the drone constantly in site. Be extremely cautious should you operate any aircraft in dark conditions.

Lastly, here is a quick bit of video footage shot using the Mavic 2 Zoom and a few of its features.

Final thoughts on the DJI Mavic 2 Zoom

The ability to zoom with the camera of the Mavic 2 Zoom adds in a new flavor of excitement to an already exciting drone. The aerobatics of the DJI’s latest entry to the Mavic lineup is impressive for any drone. Especially one marketed as a “consumer grade” aircraft.

With a camera capable of all sorts of high-end feats of imagery, it’s hard to draw the line between consumer and professional performance. From the Intelligent Flight features to the increased flight time and speed, refined obstacle avoidance system and compact form factor, the Mavic 2 Zoom is very much a welcome breath of fresh air to the aerial photography and videography community. Not only does it produce excellent still images and video, but the overall experience of operating this little aircraft is an absolutely enjoyable experience.

Have you used the Mavic 2 Zoom yet? Let us know in the comments how you like it and how it compares to any other drones you might have piloted.


review of the DJI Mavic 2 Zoom Drone

The post Review: DJI Mavic 2 Zoom appeared first on Digital Photography School. It was authored by Adam Welch.


Digital Photography School

 
Comments Off on Review: DJI Mavic 2 Zoom

Posted in Photography


Review: DJI Mavic Air

28 Feb

The DJI Mavic Air is a compact, foldable drone and is the smallest member of DJI’s Mavic family of products. It offers high image quality in a travel-friendly size, as well as a solid obstacle avoidance system and powerful automated flight modes. It can shoot 4K/30p video at 100 Mbps, but uses Wi-Fi for connectivity instead of DJI’s more robust Lightbridge or OcuSync signal transmission systems, both of which perform better over long distances.

The Mavic Air is a compelling offering, positioned between the consumer and professional-grade drones that DJI currently offers. When used correctly, it can produce content difficult to distinguish from its professional-grade cousins. If you’re in the market for a drone that delivers features close to the Phantom 4 Pro or Mavic 2 series while keeping size and cost factors in check, the Mavic Air is the perfect aerial companion for you.

Key Features:

  • 1/2.3″ 12 megapixel CMOS sensor
  • 3-axis stabilized gimbal
  • 85 degree FOV (24mm equiv)
  • Lightweight, 430 grams (15 ounces)
  • 21-minute flight time
  • Top speed of 68 km/h (42 mph) in sport mode
  • DNG Raw support
  • 100 Mbps 4K video up to 30 fps
  • Forward and rear-facing APAS obstacle avoidance
  • 8GB of internal storage
  • New intelligent flight modes

The DJI Mavic Air is in some ways an evolution of the DJI Spark, but also borrows liberally from DJI’s Mavic series of drones. The Mavic Air has a smaller footprint than the Spark when the legs are folded and the drone is in travel mode. On top of that, it also includes 4K video (the Spark maxes out at 1080p). The Air also offers DNG Raw stills, longer flight time, D-Cinelike color profile in video, and upgrades the gimbal from two to three axes of stabilization. The use of Wi-Fi for signal transmission matches the Spark, which keeps this small-but-mighty drone beneath the more robust transmission offering of the Mavic and Phantom series.

$ (document).ready(function() { SampleGalleryV2({“containerId”:”embeddedSampleGallery_8624567664″,”galleryId”:”8624567664″,”isEmbeddedWidget”:true,”selectedImageIndex”:0,”isMobile”:false}) });

The Mavic Air has an improved obstacle avoidance system, which protects it from objects in front, behind, and beneath its flight path. Additionally, DJI’s Active Pilot Assistance System, or APAS, also helps the drone avoid obstacles intelligently, by moving around them, instead of just stopping when it encounters them. It has many features that make it suitable for new and experienced drone pilots alike. It’s a near-perfect travel drone for hobbyists and creators of all levels.

The Mavic Air shoots high quality video at resolutions up to 4K/30p, but not without a few compromises. Read the video quality page to learn more. Video by Kjell Redal

How it compares

Learn about new features found on the Mavic Air, and find out how it compares to other DJI models, including the original Mavic Pro/Pro Platinum.

Read more

Aircraft, Camera and Controller

The Mavic Air’s incredible portability may be the best part if its design. We take a closer look at the hardware, and explain a few of the compromises that come with its small size.

Read more

Is it right for you?

We’ll help you figure out whether the Mavic Air is the right drone for you based on how you intend to use it.

Read more

Photography Features and Image Quality

The Mavic Air’s camera is capable of capturing some very high quality images – as long as you’re aware of its limitations.

Read more

Video Features and Quality

The Mavic Air boasts some impressive video capabilities, including high quality 4K/30p capture. Find out how it performs and whether the camera’s small sensor comes with any limitations.

Read more

Conclusion

Our overall impression of the Mavic Air, as well as some alternative models you may want to consider.

Read more


Review Publication History
February 28, 2019 Review published

Articles: Digital Photography Review (dpreview.com)

 
Comments Off on Review: DJI Mavic Air

Posted in Uncategorized


Gear: DJI Mavic Air Drone Review – Better than the Mavic Pro?

09 Dec

The post Gear: DJI Mavic Air Drone Review – Better than the Mavic Pro? appeared first on Digital Photography School. It was authored by Adam Welch.

1 - Gear: DJI Mavic Air Drone Review - Better than the Mavic Pro?

Slowly but surely I’ve begun to set my sights higher when it comes to my photography. Literally. I got my first real taste of aerial photography/videography a few months ago when I used the DJI Mavic Pro drone for the first time. A whole new world opened up with a brilliant “aha” moment when I realized that a bird’s eye perspective can lend itself to an incredible expansion of creative ideas.

So when the good folks at DJI asked me to have a go at their Mavic Air drone…it was difficult to say no.

Being primarily a landscape and wilderness photographer, the super-small size of the Mavic Air made it immediately appealing, as did the fact that the imaging performance was rumored to be on par with that of its larger cousin, the Mavic Pro and Mavic 2 Pro.

Sit back, relax, and let’s have a look at the incredibly capable, incredibly small Mavic Air drone from DJI.

Out of the box

Opening up the package for the DJI Mavic Air Drone proved to be an exercise true to the drone’s namesake. The Air is surprisingly small and most of all, lightweight. I was honestly taken aback at just how minute of a profile the aircraft presented; easily fitting in the palm of my hand.

2 - Gear: DJI Mavic Air Drone Review - Better than the Mavic Pro?

In fact, the AIR isn’t much larger than the provided radio controller.

3 - Gear: DJI Mavic Air Drone Review - Better than the Mavic Pro?

Visually, the drone is beautiful. My test model came in “Alpine White” color but red and black flavors are also available.

4 - Gear: DJI Mavic Air Drone Review - Better than the Mavic Pro?

The Mavic Air is simply a great looking drone in this color scheme. Of course, form should always follow function.

Here’s a list of the key aircraft specifications for the Mavic Air:

  • Folded Dimensions(L×W×H): 6.6″x 3.3″x1.9″(168×83×49mm)
  • UnfoldedmDimensions(L×W×H): 6.6″x 7.2″x 2.5″(168×184×64mm)
  • Flight Vision Senors: Downward, Forward, Backward
  • Controllable Gimbal Range: Tilt: -90° to 0° (default setting),-90° to +17° (extended)

Build quality

Even though the Mavic AIR is admittedly small, the build quality is extremely sturdy. The drone does not feel flimsy at all. Throughout my tests and a couple of crashes (sorry DJI), this little drone sustained little more than a few scrapes and scratches.

5 - Gear: DJI Mavic Air Drone Review - Better than the Mavic Pro?

6 - Gear: DJI Mavic Air Drone Review - Better than the Mavic Pro?

In terms of build quality, the Mavic Air feels less substantial than it’s big brother, the Mavic Pro (and 2 Pro). The overall quality is apparent. I would not worry about the Mavic Air being capable of surviving extended (and turbulent) fly time.

Flight performance and handling

If you’re like me, anything that has a “Sport Mode” function makes you extremely excited. More on that fun little feature in just minute, but first let’s discuss how the Mavic Air handles…well…in the air.

The DJI Mavic Air Drone has a maximum horizontal flight speed of 17.9mph (28.8kph) which is just a tad slower than the DJI’s new Mavic 2 Pro, which clocks a blistering 44.7mph (72kph) and is even more sluggish than the 31mph (50kph) speed of the DJI Spark. These numbers, however, are slightly deceptive as the relatively sloth-like horizontal speeds of the Air are all in “P-Mode”, which could be considered the mode best for general flight.

Where the Mavic Air really earns it’s wings (haha drone humor) is when it’s Sport Mode is engaged. This kicks the Mavic Air’s top horizontal speed up to a hearty 42.5mph (68.4kph). Here’s a quick video of the Mavic Air in Sport Mode. To be honest, the acceleration when in Sport Mode would make the Millennium Falcon a little bit jealous.

I absolutely love the Sport Mode of the Air because it allowed me to use P-Mode for the majority of my flying time to conserve battery life. At the same time, I knew that I could really stomp the gas to fly into or out of trouble extremely quickly.

Overall, the handling of the Air was responsive and accurate during radio control although not as snappy as the Mavic Pro.

Speaking of radio control, I want to take a moment to give the remote control of the Mavic Air a little bit of love. Not only does the controller feel great both with and without my mobile device mounted but it also features removal joysticks. This makes the controller even more packable.

A small feature but one that speaks volumes to the amount of thought DJI put into making the Mavic Air truly user-friendly.

7 - Gear: DJI Mavic Air Drone Review - Better than the Mavic Pro?

8 - Gear: DJI Mavic Air Drone Review - Better than the Mavic Pro?

The ascent speed of 9.84fts (3ms) was actually more comfortable and controllable for my personal tastes when compared to the meteoric 16.4fts (5ms) of the Mavic Pro.

Here are a few more important performance specifications for the Mavic Air:

  • Maximum Descent Speed: 6.56 ft/s / 2 m/s
  • Maximum Wind Resistance: 23.61 mph / 38 km/h
  • Flight Ceiling: 16,404′ / 5000 m
  • Maximum Flight Time: 21 Minutes
  • Maximum Hover Time: 20 Minutes

Camera performance

The proof is in the pudding as they say and the Mavic Air produced some beautiful video and stills with its 12MP camera. Some useful specs of the Mavic Air camera are as follows (provided by DJI):

  • Sensor: 1/2.3” CMOS
  • Lens FOV: 85°
  • 35 mm Format Equivalent: 24 mm
  • Aperture: f/2.8
  • Shooting Range: 0.5m to infinity
  • ISO Range Video: 100 – 3200 (auto),100 – 3200 (manual)
  • Photo ISO Range: 100 – 1600 (auto),100 – 3200 (manual)
  • Shutter Speed Electronic Shutter: 8 – 1/8000s
  • Still Image Size: 4:3(4056×3040),16:9:(4056×2280)
  • Burst shooting: 3/5/7 frames
  • Auto Exposure Bracketing (AEB): 3/5 bracketed frames at 0.7EV Bias


  • Video Resolution 4K Ultra HD: 3840×2160 24/25/30p
  • 2.7K: 2720×1530 24/25/30/48/50/60p
  • FHD: 1920×1080 24/25/30/48/50/60/120p
  • HD: 1280×720 24/25/30/48/50/60/120p
  • Max Video Bitrate 100Mbps
  • Supported File System FAT32
  • Photo Format JPEG/DNG (RAW)
  • Video Format MP4/MOV (H.264/MPEG-4 AVC)

9 - Gear: DJI Mavic Air Drone Review - Better than the Mavic Pro?

10 - Gear: DJI Mavic Air Drone Review - Better than the Mavic Pro?

Here’s a quick video short made using the Mavic Air. Shot in 1080P at 30fps:

Another extremely convenient feature that bears mentioning about the Mavic Air is the inclusion of an 8GB internal “last ditch” memory storage. This bit of built-in memory is an incredibly practical way to ensure that you aren’t completely immobilized by either a forgotten or full memory card. During one of my flights, I managed to fill up my micro SD card, and the 8GB of internal storage really saved the day. Especially if it had been crucial that I finished shooting the scene at the time.

Final thoughts on the DJI Mavic Air

How to best characterize the Mavic Air?

I will admit that before I received the Air I was under the impression that it was going to be a step down from the Mavic Pro I had tested previously.

This is simply not the case.

In fact, I can confidently say that I prefer the Mavic Air to the Mavic Pro based on my testing.

The Mavic Air is extremely compact while still packing in the imaging power of it’s larger cousins. It looks great and can hold its own while in flight.

And that Sport Mode….sheesh.

If you’re looking for an extremely portable yet powerful drone for your aerial photography and videography needs that won’t break the bank, I strongly suggest you have a look at the DJI Mavic Air Drone. It seems great things truly can come in small packages.

Have you used the DJI Mavic Air Drone? If so, share with us your thoughts in the comments below.

The post Gear: DJI Mavic Air Drone Review – Better than the Mavic Pro? appeared first on Digital Photography School. It was authored by Adam Welch.


Digital Photography School

 
Comments Off on Gear: DJI Mavic Air Drone Review – Better than the Mavic Pro?

Posted in Photography


Pro mountain filmmaker Jimmy Chin takes the DJI Mavic 2 Zoom to Greenland

09 Nov

Professional mountain photographer and filmmaker Jimmy Chin has worked on all seven continents, in some of the most remote places on earth. A hugely experienced climber, Chin has had more than his fair share of brushes with disaster in the mountains, where every ounce of weight counts when it comes to getting great shots – and getting down in one piece.

Jimmy Chin’s current film ‘Free Solo’ follows climber Alex Honnold as he became the first person to ever free solo climb Yosemite’s 3,000ft high El Capitan Wall last summer. Only slightly less hazardous was a more recent trip to Greenland for DJI, with professional ski mountaineer Kit Deslauriers.

Over a more than 20-year career, Chin is still inspired by the challenge of “going to new places and exploring mountains in remote places”. For the Greenland trip, alongside his normal DSLR kit Chin brought along DJI’s newest consumer drone, the 4K-capable Mavic 2 Zoom to capture footage of their adventure.

Chin describes the Mavic 2 Zoom as a “multi-tool”, which he used for everything from high production-value shots to scouting locations

The DJI Mavic 2 comes in two versions – the high-end ‘Pro’ with a 1-inch sensor, and the less costly but more flexible ‘Zoom’, which offers an optical zoom lens. Chin describes the Mavic 2 Zoom as a “multi-tool”, which he used in Greenland for everything from high production-value ‘dolly zoom’ and tracking shots to scouting locations and routes. When you’re shooting in the mountains, it might take hours to get up to a certain peak, but with the Mavic 2 Zoom, he could go in search of great-looking locations – and look out for hazards – remotely.

Speaking of remote, in such extreme conditions, gear needs to be reliable, but it also needs to be easy to use. In Chin’s words, “you need equipment that’s intuitive, and which you don’t have to spend a bunch of time figuring out how to make it work” because, as he says, “a lot of your mental bandwidth is taken up by making sure you’re being safe”.

Behind the scenes in Greenland with the DJI Mavic 2

Among Chin’s favorite shots from the trip are the aerial tracking sequences, showing Deslaurier descending down the mountain slopes. In the past, Chin says, “I couldn’t have got those shots in the past without a helicopter. They’re very difficult angles to get when you’re high up in those remote areas. Traditionally, those kinds of shots are expensive, they’re high production-value shots, and being able to create them with a drone I can carry in the top of my pack is incredible”.

As well as its portability, Chin praises the quality of the video that the Mavic 2 Zoom can capture. “You need a camera which offers high quality, because shooting in a location like Greenland, you know it might not be possible to ever go back. Every shot is potentially a once-in-a-lifetime shot”.


This is sponsored content, created by DJI. What does this mean?

Articles: Digital Photography Review (dpreview.com)

 
Comments Off on Pro mountain filmmaker Jimmy Chin takes the DJI Mavic 2 Zoom to Greenland

Posted in Uncategorized


DJI unveils Mavic 2 Enterprise, a commercial-oriented drone with modular accessories

31 Oct

DJI has unveiled the Mavic 2 Enterprise, a modular version of its Mavic 2 Zoom drone designed specifically for businesses, governments, educators and other professionals.

At its core, The Mavic 2 Enterprise is effectively a Mavic 2 Zoom drone with a few tricks up its sleeve. It has the same 4K video capabilities, 2x optical zoom and 3x digital zoom, and 31-minute flight time. But in addition to the standard features, DJI has added a few unique features that will help it perform in more demanding environments.

The battery inside The Mavic 2 Enterprise is “self-heating,” which DJI says will enable it to operate at much cooler temperatures than your run-of-the-mill Mavic 2 Zoom. DJI has also beefed up storage, adding 24GB of storage, three times what the Mavic 2 Zoom offers. There’s also new security features, including a GPS timestamping feature and a new password protection feature that will make users type in a code every time the drone is activated, accesses the onboard storage, or connect with the controller.

To help with various needs such as search and rescue operations and inspections, DJI has also created three add-on accessories: The M2E Spotlight, the M2E Speaker, and the M2E Beacon.

$ (document).ready(function() { SampleGalleryV2({“containerId”:”embeddedSampleGallery_7312418918″,”galleryId”:”7312418918″,”isEmbeddedWidget”:true,”selectedImageIndex”:0,”isMobile”:false}) });

The M2E Spotlight is a 2,400-lumen dual spotlight designed to help “operators in carrying out missions in dark or low-light areas.” The M2E Speaker is a 100-decibel loudspeaker that can have up to ten customized recordings for blaring in emergency situations. The The M2E Beacon is a strobe build with the FAA’s Night Waiver standards in mind, meaning the drone will be visible up to three miles away, be it for other drone operators or pilots of manned aircrafts.

The DJI Mavic 2 Enterprise Universal Edition includes the drone, a remote controller, one battery, all three mountable accessories, and a protector case with flight tools. It’s set to retail for $ 1,999 USD and is available through DJI Enterprise resellers around the world. To find out more information, head on over to DJI’s product page.

There is also an optional “Fly More Kit” that includes two batteries, a battery charging hub, a car charger, a USB connector, a soft case, and two propellers for $ 419 USD.

Articles: Digital Photography Review (dpreview.com)

 
Comments Off on DJI unveils Mavic 2 Enterprise, a commercial-oriented drone with modular accessories

Posted in Uncategorized


Tiffen launches line of filter kits for DJI Mavic, Inspire drones

23 Oct

Tiffen Filters has announced a new collection of drone-specific filter kits for DJI’s latest offerings.

The filters kits are available for the the DJI Mavic 2 Zoom, DJI Mavic 2 Pro, DJI Mavic Air, and DJI Inspire 2 drones, adding to the filters Tiffen already offers for the Phantom series. Tiffen says the filters have “a multilayer and hydrophobic coating” that’s waterproof, resistant to scratches, and “guarantee[s]” ultra-low reflection rates.

“Drone operators will have the opportunity to capture in flight content like never before,” says Tiffen in its press release. “When used in conjunction with the award winning filter technology engineered by Tiffen, the high quality performance of the DJI 4K camera system is taken to the next level, broadening the horizons for content creation.”

The pricing of the filter kits is a bit confusing, so below is a collection of charts detailing the kits available for each drone:

Mavic Air
3 Filter Kit — $ 49.95
6 Filter Kit — $ 99.95
ND4
ND4 — ND4/PL
ND8
ND8 — ND8/PL
ND16
ND16 — ND16/PL
Mavic 2 Zoom
3 Filter Kit — $ 79.95
6 Filter Kit — $ 149.95
ND4
ND4 — ND4/PL
ND8
ND8 — ND8/PL
ND16
ND16 — ND16/PL
Mavic Pro
3 Filter Kit — $ 99.95
6 Filter Kit — $ 179.95
ND4
ND4 — ND4/PL
ND8
ND8 — ND8/PL
ND16
ND16 — ND16/PL
Inspire 2
3 Filter Kit — $ 99.95
6 Filter Kit — $ 199.95
ND4
ND4 — ND4/PL
ND8
ND8 — ND8/PL
ND16
ND16 — ND16/PL

The filters are listed on Tiffen’s website as “coming soon.” Each filter kit will come with a ten-year warranty, meaning these will likely outlast the life of your drone. To find out more, head on over to Tiffen’s Aerial Collection page.

Articles: Digital Photography Review (dpreview.com)

 
Comments Off on Tiffen launches line of filter kits for DJI Mavic, Inspire drones

Posted in Uncategorized