There is a small turn off of Highway 89 in Fruit Heights, it doesn’t lead to anything but a non-descript meadow with patches of trees. I parked my car on […]
Jake Garn Photography
Posts Tagged ‘Magic’
When a shoot turns magic
20
Aug
Mountain Magic: Shooting in the Lofoten Islands
14
Jul
Way up in Norway’s arctic northwest lies a small, yet incredibly beautiful and diverse archipelago, home to some of that country’s most magical landscapes and a truly wonderful winter atmosphere. Photographer Erez Marom shares his experience of shooting in the Lofoten Islands in Arctic Norway, from a traditional fishing village to mountains and ice-covered lakes. Learn more
Articles: Digital Photography Review (dpreview.com)
Paddling Canoe through a Magic Forest
20
May
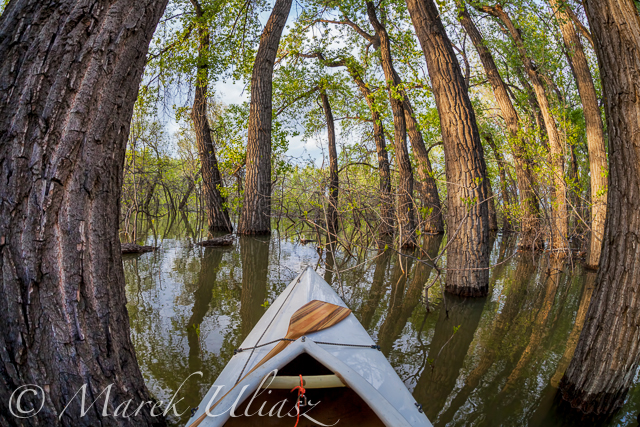
Fish eye lens perspective when paddling through a submerged forest
I love to paddle the Lonetree Reservoir southwest of Loveland during springtime. You can always enjoy a nice view of Rocky Mountains Front Range. It is a great spot to shoot sunsets over mountains. When water is high I like to paddle through submerged trees and bushes. Please keep in mind that the heron rookery is a restricted area during the nesting season, but there are other places where you can paddle into a forest.
Picture featuring Sea Wind canoe in cottonwood forest was shot on May 15m 2014 with Canon 5D Mark II camera and Sigma 15 mm Fisheye lens. I confess … I spent a longer while gliding in a canoe between cottonwood tress and playing with that lens. I was shooting in both landscape and portrait formats.
Which version do you prefer? Horizontal or vertical?

Let’s look at this scene in a vertical format.
Related posts:
– Canoe paddling in fisheye perspective – royalty free pictures.
– Paddling through Forest and Irrigation Ditches
– Fisheye Lens Perspective for Paddling?
– Horizontal or/and Vertical Format in Kayak Photography
Paddling Canoe through a Magic Forest
18
May
Fish eye lens perspective when paddling through a submerged forest
I love to paddle the Lonetree Reservoir southwest of Loveland during springtime. You can always enjoy a nice view of Rocky Mountains Front Range. It is a great spot to shoot sunsets over mountains. When water is high I like to paddle through submerged trees and bushes. Please keep in mind that the heron rookery is a restricted area during the nesting season, but there are other places where you can paddle into a forest.
Picture featuring Sea Wind canoe in cottonwood forest was shot on May 15m 2014 with Canon 5D Mark II camera and Sigma 15 mm Fisheye lens. I confess … I spent a longer while gliding in a canoe between cottonwood tress and playing with that lens. I was shooting in both landscape and portrait formats.
Which version do you prefer? Horizontal or vertical?
Let’s look at this scene in a vertical format.
Related posts:
– Paddling through Forest and Irrigation Ditches
– Fisheye Lens Perspective for Paddling?
– Horizontal or/and Vertical Format in Kayak Photography
Paddling through a Magic Forest
17
May

Fish eye lens perspective when paddling through a submerged forest
I love to paddle the Lonetree Reservoir southwest of Loveland during springtime. You can always enjoy a nice view of Rocky Mountains Front Range. It is a great spot to shoot sunsets over mountains. When water is high I enjoy to paddle through submerged trees and bushes. Please keep in mind that the heron rookery is a restricted area during the nesting season, but there are other places where you can paddle into a forest.
The above picture featuring Sea Wind canoe in cottonwood forest was shot on May 15m 2014 with Canon 5D Mark II camera and Sigma 15 mm Fisheye lens. I confess: I spent a longer while playing with that lens and shooting in both horizontal and vertical.
Related posts:
– Paddling through Forest and Irrigation Ditches
– Fisheye Lens Perspective for Paddling?
The Magic Light of the Golden Hour
29
Apr
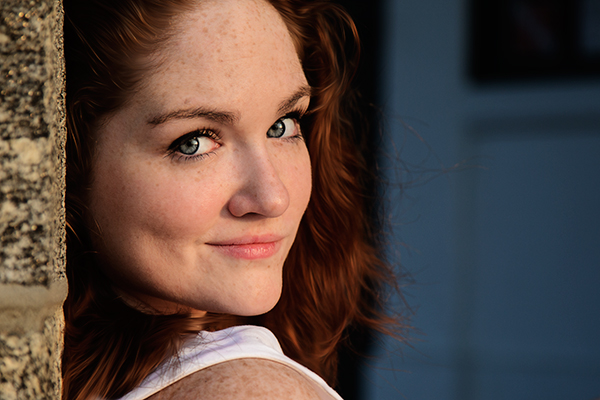
EOS-1D Mark IV with EF 24-105 f/4L IS. 1/500 at f/4, ISO 200.
What is Golden Hour?
My absolute favorite time to photograph anything is a time of day called the Golden Hour. The Golden Hour occurs during the time just before sunset, and just after sunrise. When the sun is lower in the sky, near the horizon, it must travel through more of the atmosphere, reducing the intensity of direct light and thus reducing the contrast in the scene. More blue light is scattered, so sunlight will appear reddish and shadows won’t be as deep as when the sun is higher in the sky. In addition, the lower angle of the sun creates longer shadows, which can add interest to images.

EOS 5D Mark II with EF 24-105 f/4L IS. 1/15 at f/14, ISO 100. The low sun casts a longer shadow, creating foreground interest for this shot.
The Golden Hour does not necessarily last an hour. The closer to the equator you are, the shorter the Golden Hour is. The further from the equator, the longer the golden hour lasts. For instance, in Alaska during the summer, there is a period of several hours of Golden Hour light later in the evening, and during the winter, nearly all daylight hours have a Golden Hour quality to them.

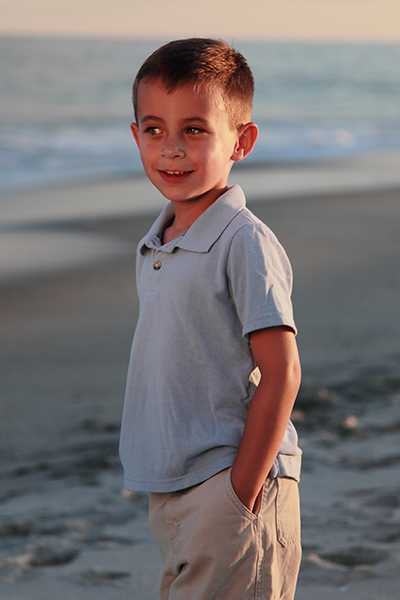
EOS 5D Mark II with EF 24-70 f/2.8L. 1/2500, f/4, ISO 200. The sun was placed over the boy’s shoulder to camera left, and a reflector to camera right.
Golden Hour light is so good, I find it hard to convince myself to photograph at other times. It’s excellent lighting for any subject, but especially lends itself to portraits and landscapes.
Portraits at Golden Hour
For portraits, I use the light in a couple of ways. First, I will position my subject so that the sun is shining on their face directly, as in the image at the top of this article. The light tends to be so soft, I can put down my reflector and just let the shadows fall and create depth. Simply position your subject so the sun is full in their face, and ask them to turn back and forth to watch the way the shadows fall. Move around your subject to watch how the light changes. Shoot from multiple angles. It will end up being like you changed your lighting setup for each shot.
The only portrait angle that will be difficult to shoot at the Golden Hour will be when your subject is completely backlit. In this case, I will use a reflector. Since the light already has a warm temperature, I use the white side of the reflector, or silver if the reflector has no white. I will position my subject so the sun is behind him and over his shoulder, and will position the reflector in front of him on the opposite side. The effect is similar to having two lights, a hair light, and a fill. Again, move around your subject, and have them turn as well, placing the sun at different angles to them. Do the same with the reflector to see the ways you can make the light fall on your subject’s face. The beautiful thing about Golden Hour light is that it comes from such a low angle, you can hold the reflector higher and position it just above your subject’s head, to get those pleasing downward shadows from the nose and other facial features.
Golden Hour for Landscapes
The Golden Hour is also perfect for shooting landscapes. The light creates depth by casting long shadows and defining the character of the landscape. I will often try to put the sun to my side when shooting Golden Hour landscapes. This allows the light to rake across the landscape and create shadows where the surface changes, or create greater detail in grasses, or trees, creating more apparent detail and sharpness than if the light was from the front. This is apparent in the two images below.
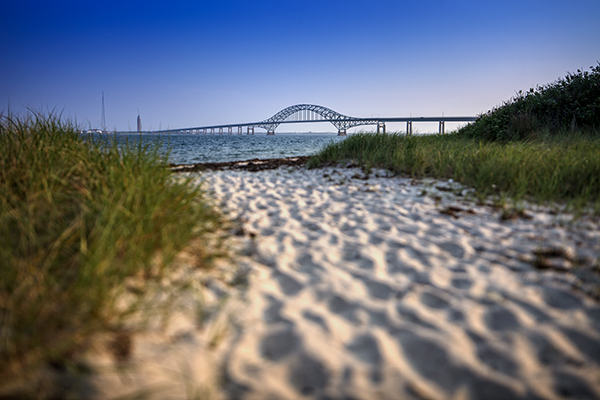
EOS 5D Mark II with TS-E 24mm f/3.5. 1/1250 at f/3.5 ISO 100. The sun coming from camera right creates definition in the sand and dune grass.
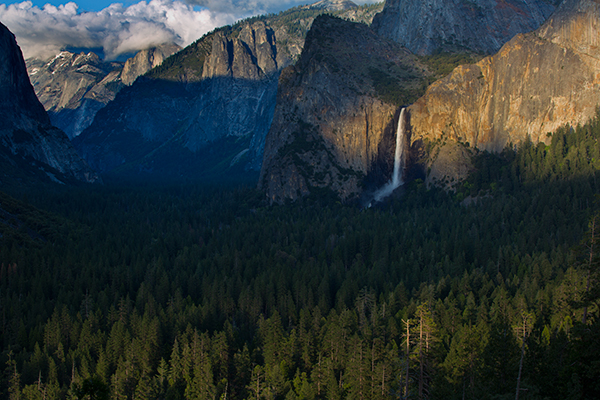
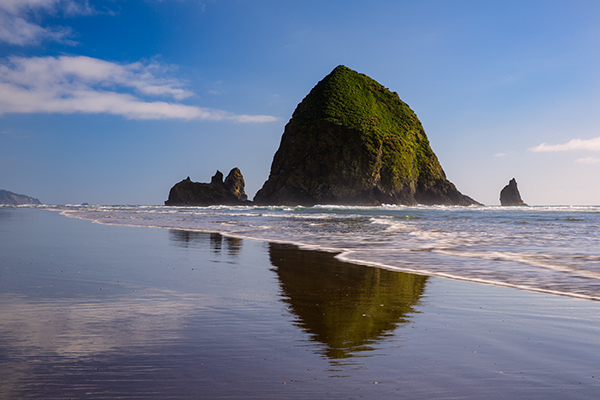
EOS 5D Mark III with EF 70-300 f/4-5.6L IS. 1/13 at f/16, ISO 100. The low angle of the sun and warm golden light creates definition in the foreground trees.
In addition, landscapes shot during the Golden Hour have more color in the sky, especially if there are clouds picking up the warm reddish light. However, shooting directly into the sun, capturing a sunset, creates a very contrasty scene. In cases like that, I use graduated neutral density filters to darken the sky and bring it down so that the foreground and the sky both fall within the dynamic range of the camera, as with the image of the crashing wave and rocks (below). A graduated neutral density filter (ND Grad for short) is half darkened glass, half clear. You can position the filter so the darker area covers the sun and sky, and the clear is over the darker foreground. This helps bring the color back to those sunsets or sunrises, whereas without the filter, the sky would appear washed out and lifeless.
The Golden Hour offers plenty of opportunities for great photos, and the really beautiful thing is that it happens twice a day!
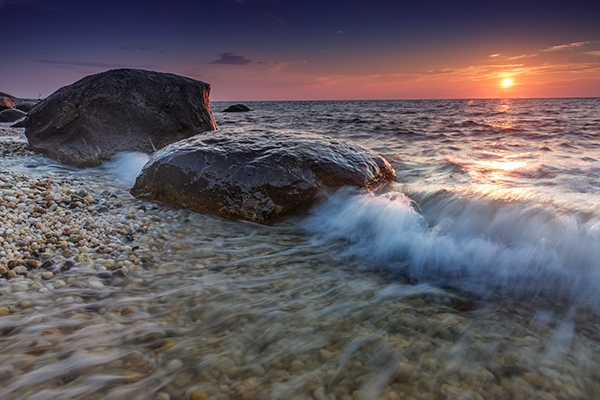
EOS 5D Mark III with EF 24-70 f/2.8L II. 1/6 at f/14, ISO 200. A 4-stop ND grad was used to darken the sky and match the foreground exposure.
EOS 5D Mark III with EF 24-70 f/2.8L II. 1/15 at f/16, ISO 100.
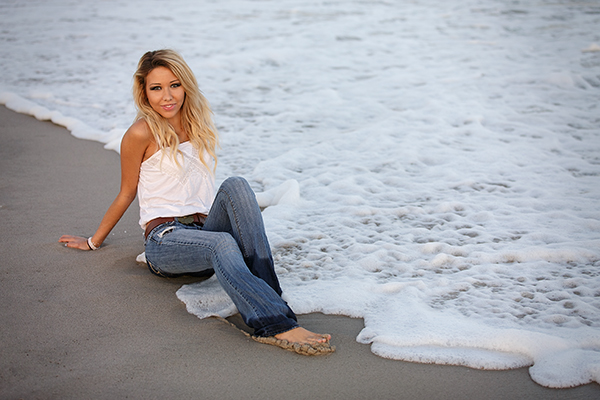
EOS 5D Mark II with EF 24-105 f/4L IS. 1/1000 at f/4, ISO 100. In this case, the sun was positioned more to the side with a reflector bouncing light back into the subject’s face.
EOS 5D Mark III with EF 70-200 f/2.8L IS II. 1/1000 at f/2.8, ISO 100. The soft, warm light of the Golden Hour was perfect for this shot.
More tips on working with light in the Golden Hour:
- The Golden Hour – Perfect Times for Portraits
- Finding and Working with Available Light
- 5 Reasons for Doing Natural Light Portraits
- 10 Reasons to Shoot Portraits During the Golden Hour [Illustrated]
On sale now at SnapnDeals – Golden Hours eBook + Exposure Blending eBook – grab the pair now before the sale is over!
The post The Magic Light of the Golden Hour by Rick Berk appeared first on Digital Photography School.
SLR Magic creates Anamorphot 1,33x – 50 lens adaptor for movie makers
13
Feb

SLR Magic has created the Anamorphot 1,33x – 50, an accessory lens for film makers that compresses the image horizontally by a factor of 1.33x. This allows footage to be shot for 2.35:1 widescreen projection using the standard 16:9 aspect ratio that most cameras record, without having to crop vertically and lose resolution. The lens will be available by March 2014 and cost $ 899.
News: Digital Photography Review (dpreview.com)
Lost your Photo Mojo? Ten Tips to Bring Back the Magic
08
Jan
We all go through creative blocks. Is it such a bad thing? Or, on the contrary, is it a sign that we need to push ourselves, and grow in the process? I think that a loss of passion may be an opportunity to renew and refresh your vision and turn it in a positive experience, instead of staying in a rut and feeling sorry for yourself.
Ten Tips to Get your Photo Mojo Back
1 – Get out of your comfort zone
You may hear this one often, but have you done it yet? I’m not suggesting that you go out and shoot your first wedding, but try something that may seem out of character for you. I consider myself more of an urban photographer than anything else. But I have experimented with other genres, such as B&W flower photography. Did I enjoy it? Sure I did, tremendously! But I also realized that I’m happier shooting street photography. That realization alone gave me a boost to get out and do more of what I love most.

I’m mostly a street photographer but I enjoy trying new genres and techniques. It gets my creative juices flowing!
©Valérie Jardin
2 – Hang out with other photographers
Hanging out with like minded people is like therapy. Admit it, you often experience some frustration when you are on an outing with non-photographers. Being able to enjoy a photo walk without having to justify why you need to take your time to get the shot is priceless. Join a group or start your own. The latter option is a good way to make sure that you will show up for all the photo walks!
3- Start a new project
Before you embark on a long project, make sure you’ll be able to handle the commitment. For example, a 365 project is a great way to grow as a photographer but it can also become a burden and be counterproductive. If you end up quitting after a few weeks, you may end up feeling worse about yourself and photography in general. If you decide to go for the 365, don’t be too hard on yourself. Don’t get to the point where you’ll shoot just about anything to get your pic of the day. Remember, it’s supposed to be fun! You may also consider starting something a little bit more manageable such as a 52-week project, a short term photo essay, a series of portraits of strangers or selfies, etc. Whatever you decide to do, make sure you share with the world! Which leads to the next point…
Some project ideas to help you out
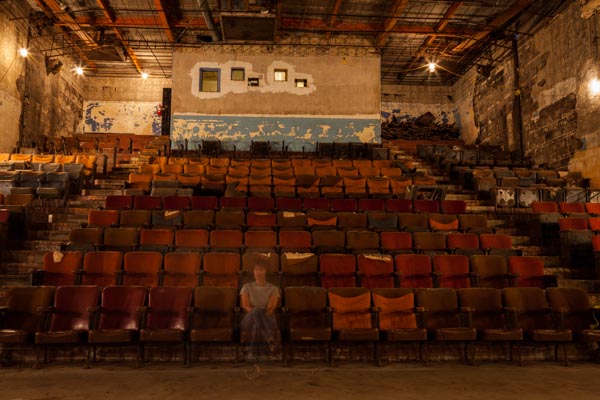
Don’t forget that you are your most readily available subject. Have fun with selfies! Here I played with long exposures and ghost images in an old theater.
©Valérie Jardin
4 – Try a new lens
Rent or borrow something completely different such as a fish eye, a macro lens or a Lensbaby Composer for a few days, see the world differently and embrace the new possibilities.
See a list of the most popular lenses – survey of dPS readers
5 – Share your work, start a blog!
Share your work on social media, or consider starting a photography blog. You don’t need to be a writer to start a photography blog, think of it as a journal in pictures. It’s so much more fun than keeping your images in your hard drive. It will also give you a boost in your confidence and push you to shoot more and better.
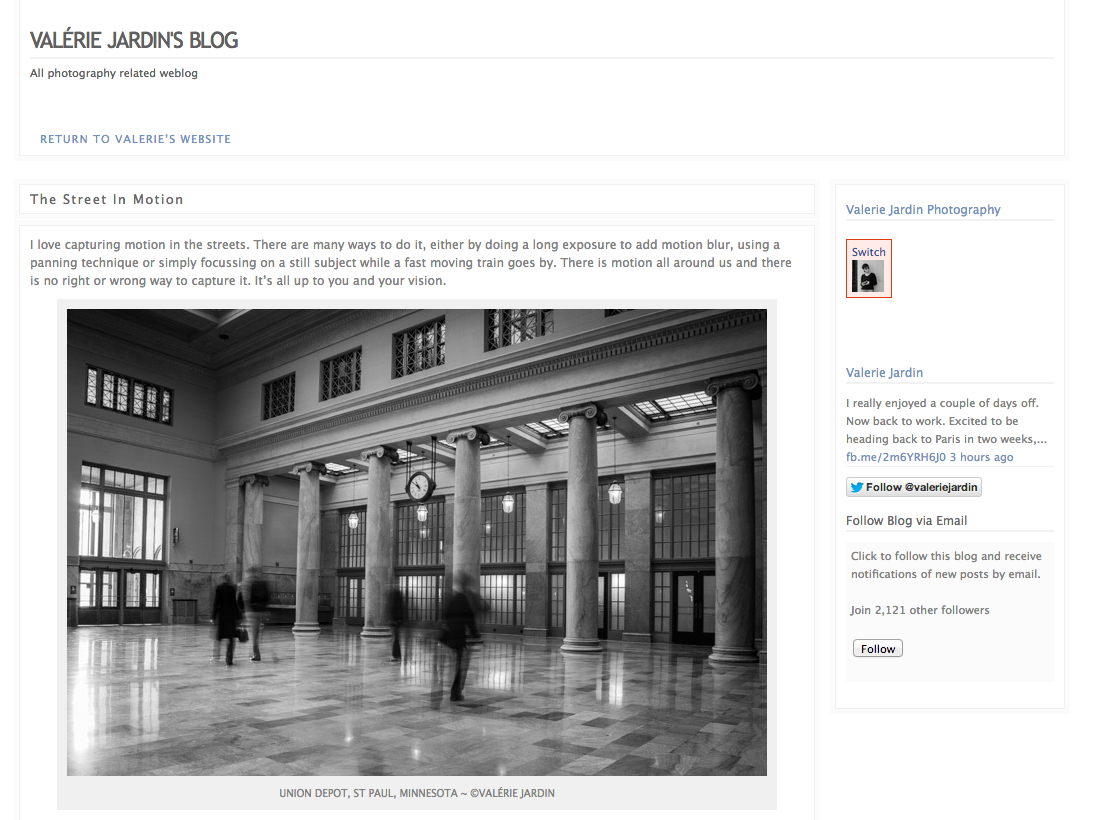
This is my personal blog where I write about projects and things I’m working on outside of my photography business.
You can get a free, or inexpensive blog using resources like:
- Square Space – starts at $ 8/month
- WordPress.com – starts at free
6 – Page through a good photography book
We get inspiration online all the time. Everything we do seems to be online. The Internet is a wonderful thing and we are exposed to the work of so many amazing artists from all over the world and in real time. Sometimes we need to slow down and sit down with a big beautiful book of photographs. Visit a real book store or a library for a change of pace and for renewed inspiration.
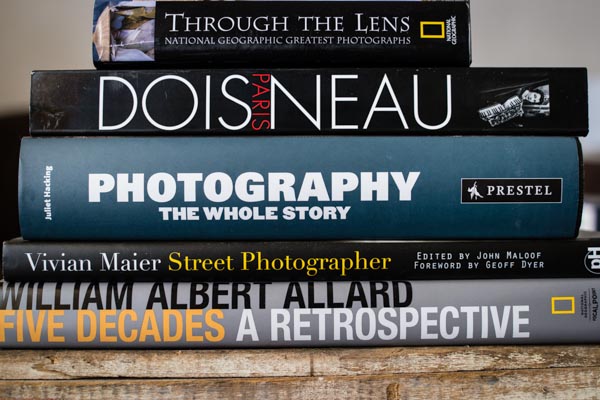
Take the time to page through a real book once in a while.
7 – Visit museums
Photography exhibits are a wonderful way to get some inspiration, but do not neglect looking at art in general. Sculptures, paintings, etc. See the passion that fueled the works of art showcased at your local museum.
8 – Teach a child
Give a camera to a child and go on a photo walk. You’ll be amazed to discover the world from a child’s perspective. Better yet, this could ignite a life-long passion thanks to you!
9 – Write a list of techniques you’ve never tried and give it a shot!
There isn’t a single technique that is not explained in detail online, so you have no excuse for not experimenting with something new. You never know, this light painting thing may just be what you need to feel inspired again, so get to work!
10 – Simply pick up your camera and photograph something in your house
There is no reason to stay in a rut, all you need to do is pick up a camera, any camera. You can even stay home and do it. Pick an ordinary object and make it look extraordinary! This simple step will get the creative juices flowing again.

Just pick up the camera and photograph something, anything, around your house!
©Valérie Jardin
Okay it’s your turn
It’s okay to feel down and uninspired, it’s all part of being an artist. Turn it around and use it as an excuse to push yourself and try something new!
Please take a minute to share your experience dealing with creative block and how you found your muse again.
Books mentioned above and in Valerie’s stack:
- Through the Lens: National Geographic Greatest Photographs (National Geographic Collectors Series)
- Paris
– Robert Doisneu
- Photography: The Whole Story
- Vivian Maier
- William Albert Allard: Five Decades
The post Lost your Photo Mojo? Ten Tips to Bring Back the Magic by Valerie Jardin appeared first on Digital Photography School.
SLR Magic announces 17mm T1.6 lens for Micro Four Thirds
14
Dec

Hong Kong-based lens maker SLR Magic has announced an addition to its family of video-oriented manual focus fast primes for Micro Four Thirds. The 17mm T1.6 offers an angle of view equivalent to 34mm on full frame, and has geared focus and aperture rings. It will be available at the end of December 2013.
News: Digital Photography Review (dpreview.com)
Lightroom Tips for the Develop Module – the Magic Alt Key
08
Dec
Lightroom tips for the Develop module – one feature in Lightroom that isn’t obvious or easy to discover is the visualization feedback which you can get in the Develop module. In many cases when you hold the Alt key, (Option on a Mac) and click (and hold it) on a slider, the screen will change to give you feedback on the adjustment you are making.
This feedback (visualization) take some of the guess work out of how the adjustment you are making is affecting the image. Here are some of the useful visualizations available in the Lightroom Develop module:
Alt and the Exposure, Highlights, Whites, Shadows and Blacks Sliders
When you hold Alt (Option) and drag any of these sliders you will see any areas where whites or blacks are clipped as a result of the adjustment – the color shows which channel is being clipped. When you adjust Shadows and Blacks the white areas of the image aren’t clipped.
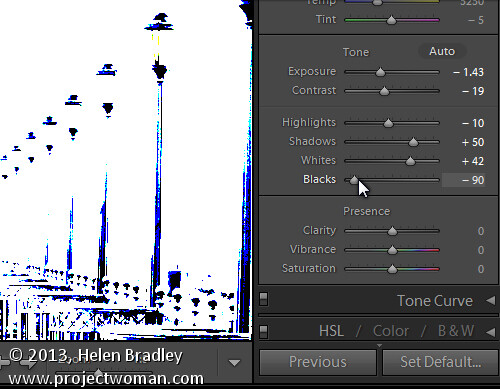
Showing where the blacks are being clipped
When adjusting Exposure, Highlights and Whites – the black areas are not clipped.
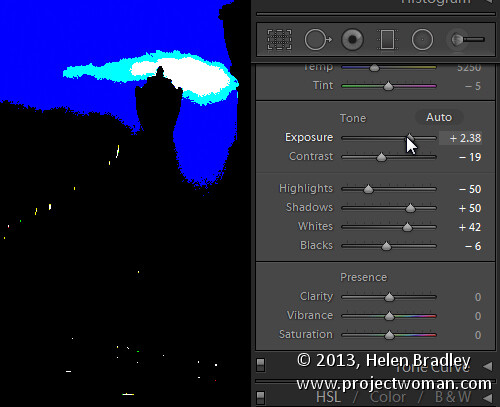
Showing where the highlights are being clipped
Sharpening
When adjusting Sharpening you can preview the result of the sharpening on the image by holding the Alt (Option) key and drag on any slider. Alt (Option) and the Amount slider shows you the sharpening applied to a black and white version of the image – as Lightroom sharpens only the luminance and not color this gives you a better view of the sharpening result.
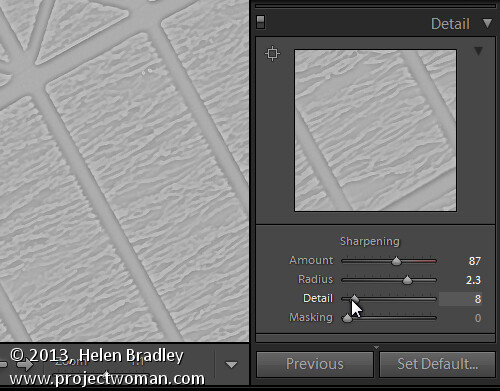
Alt (Option) with the Radius slider shows the halos being applied to the edges in the image to sharpen it.

Showing the radius or amount of sharpening being applied
Alt (Option) and the Detail slider shows the suppression of the halos occurring as you drag on this slider.
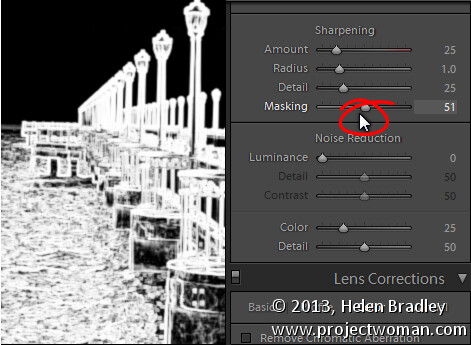
Alt (Option) and the Masking slider shows a black and white mask over the image – the areas which are black are not sharpened and those which are white will be sharpened.
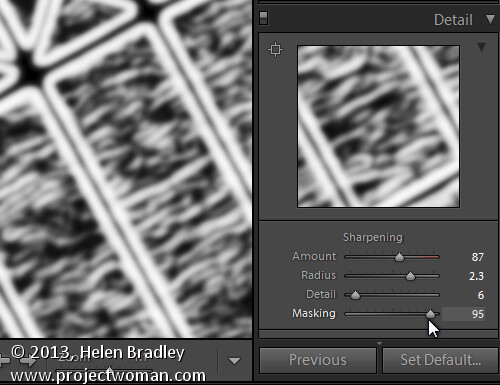
Showing the mask when sharpening – makes it easy to control which areas are sharpened and which are not, very useful for people photos.
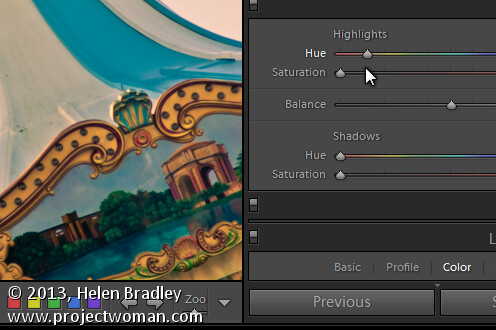
Split toning
Alt (Option) and either of the two Hue sliders shows the currently selected hue in place on the image even if the Saturation slider is set to zero. This lets you see the color you are selecting, at 100% saturation, before you apply it.
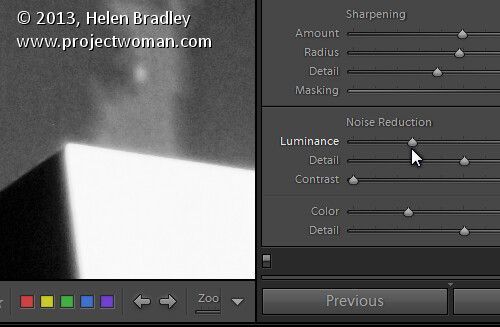
Noise Reduction
Alt (Option) and the Luminance, Detail and Contrast sliders for removing noise converts the image into a black and white image so you can see the effect of the adjustments more clearly.
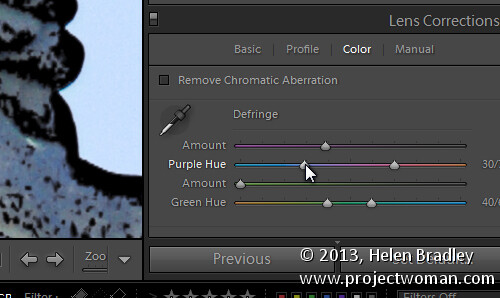
Lens Correction – Color tab
Alt (Option) and the appropriate Amount slider shows the areas in the image affected by fringing. White is not affected and you will see any areas affected by purple or green fringing.

Alt (Option) and the appropriate Hue slider lets you view the range of hues being fixed. Black areas are already being targeted and any remaining purple or green color indicates residual color fringing.
Recognizing the times you can use the Alt (Option) key in the Develop module will help you make adjustments to your images more easily and effectively. I hope you enjoyed these Lightroom tips for the Develop module.
Post originally from: Digital Photography Tips.
Check out our more Photography Tips at Photography Tips for Beginners, Portrait Photography Tips and Wedding Photography Tips.
Lightroom Tips for the Develop Module – the Magic Alt Key
The post Lightroom Tips for the Develop Module – the Magic Alt Key by Helen Bradley appeared first on Digital Photography School.
You must be logged in to post a comment.