RSS
 

Posts Tagged ‘made’

Spread That PJ Love With All New Gifts Made Special by Us!

07 Dec
GG1

Good things come in threes and our third gift guide is no exception. We’ve got four new Photojojo gifts, including an upgrade to an all-time favorite: a better, brighter Pocket Spotlight! Check our tip-top tools for stepping up your phoneography game or that of a present-worthy friend … or three!

(…)
Read the rest of Spread That PJ Love With All New Gifts Made Special by Us! (0 words)


© Erin for Photojojo, 2015. |
Permalink |
No comment |
Add to
del.icio.us

Post tags:


Photojojo

 
Comments Off on Spread That PJ Love With All New Gifts Made Special by Us!

Posted in Equipment


Muji Huts: Affordable Pop-Up Modern Homes Made for Japan

05 Dec

[ By Steph in Architecture & Houses & Residential. ]

muji huts 1

The same Japanese retail chain selling household supplies like space-saving furniture, bed linens and travel toothbrushes will soon sell pop-up houses, too, so you can literally walk out with a kit for an entire, fully-outfitted home in one trip. The Muji Hut, designed by Konstantin Grcic, Jasper Morrison and Naoto Fukasawa for retailer Muji, comes in three variations starting at $ 25K. Each offers just enough space for one or two minimalist residents.

muji huts 2

muji hut 7

The Japanese housing market is a little different from that of the U.S. and other parts of the world in that real estate doesn’t accrue value over time, and demand for preexisting houses is low. Not everybody has the money to knock down an old house and build a new one in its place, however, and lots tend to be tiny.

muji huts 3

muji huts 4

Each designer created their own version of an affordable, no-frills structure that can be assembled in short order, including one made of aluminum, a two-story timber creation and a little cabin clad in cork. Each takes inspiration from kyosho jutaku, the Japanese style of micro homes that aims to squeeze as much function out of tiny footprints as possible.

muji huts 5

muji huts 6

The Muji Huts are envisioned as weekend getaway destinations rather than full-time living spaces, but each contains a generous living room, bathroom and kitchen, and can be heated with a wood stove. The huts can be installed in virtually any location, from tight city lots to the banks of a river, and will be available for purchase in 2017.

Share on Facebook


[ By Steph in Architecture & Houses & Residential. ]

[ WebUrbanist | Archives | Galleries | Privacy | TOS ]


WebUrbanist

 
Comments Off on Muji Huts: Affordable Pop-Up Modern Homes Made for Japan

Posted in Creativity


Luminous Illusions: 14 Interactive Spaces Made of Light

26 Nov

[ By Steph in Art & Installation & Sound. ]

waterlicht main

Step into three-dimensional blueprints made of light, gaze at flickering ghost ships and walk beneath artificial aurora borealis with this stunning set of interactive illuminated installations. Often reacting to physical stimuli like the movement of the wind or the people viewing them, these light art projects blur the lines between what’s real and what’s illusion.

Five-Story Glowing Star in an Unfinished Building
light art glowing star

light art star 2

The concrete shell of a partially completed building in in the Malaysian town of Butterworth is currently occupied by a five-story glowing star by artist and architect Jun Ong. Inspired by glitches, the installation consists of five hundred meters of steel cables and LED strips and is meant to highlight the once-bustling city’s fragmented identity.

Waterlicht: An Artificial Aurora Borealis

light art aurora

waterlicht 2

The sky over Westervoort in the Netherlands is illuminated in swaths of eerie blue, mimicking the natural phenomenon of the ‘northern lights,’ or aurora borealis. Artist Daan Roosegaarde made use of the area’s foggy conditions to reflect beams of blue Led lights to raise awareness about the Dutch waterworks that keep the country from being inundated with water.

Rainbow Tunnels Mimic Movement of Nearby Water

light art rainbow tunnels 1

light art rainbow tunnels 2

Another light-based installation in the Netherlands reminds visitors that without the modern interventions that are in place, the Netherlands would be underwater. These two tunnels linking a newly developed area of Zutphen to the historic city center were transformed by Herman Kuijer, their rainbow hues slowly shifting in time with the movement of nearby water.

Enormous Light & String Installation in Boston
light art string boston

light art string boston 2

Barely visible during the day and illuminated at night, one hundred miles of twine suspended above the city of Boston aims to “visually knit together the fabric of the city with art.” Artist Janet Echelman tied over 500,000 knots to create the 600-foot-wide installation, which undulates irregularly in the wind.

Stellar Caves: 3D Thread Drawings

light art stellar caves

light art stellar caves 2

Artist Julien Salaud coats thread with UV paint so it glows under ultraviolet light, and then weaves it into incredibly intricate three-dimensional drawings that occupy entire architectural spaces. The ‘Stellar Cave’ series creates an enchanting environment filled with silhouettes of animals and constellations for a mystical effect.

Next Page – Click Below to Read More:
Luminous Illusions 14 Interactive Spaces Made Of Light

Share on Facebook


[ By Steph in Art & Installation & Sound. ]

[ WebUrbanist | Archives | Galleries | Privacy | TOS ]


WebUrbanist

 
Comments Off on Luminous Illusions: 14 Interactive Spaces Made of Light

Posted in Creativity


Holdfast Gear’s new Maven Strap is made with bison leather and brass hooks

13 Nov

Holdfast Gear, a maker of high-end leather camera straps, has launched its new Maven Strap. The thin leather strap is designed for smaller cameras and is made from American Bison leather alongside a cream-colored glove leather lining and brass u-hooks. Read more

Articles: Digital Photography Review (dpreview.com)

 
Comments Off on Holdfast Gear’s new Maven Strap is made with bison leather and brass hooks

Posted in Uncategorized


Astrophotography Made Simple

27 Oct

There may not be a more challenging subject matter for photographers than astrophotography. When I first began making photographs, I had an elusive and challenging goal which was to make a photograph of the moon.

Moon

13 years later (has it really been that long?) I think back and smile at how impossible capturing that photograph of the night sky seemed to me at the time. Back then, the idea of making an image that captured the moon or the stars, and even a galaxy, seemed impossible. I assumed the images would require an expensive camera or some kind of magical photo gear. I couldn’t have been more wrong. In reality, you probably have everything you need to get started in astrophotography right now!

Astrophotography is simply a name for the realm of photography which images astronomical objects and the night sky itself. The moon, stars, constellations, galaxies, and even the sun, are all considered astronomical objects. In this article, you’ll learn just how easy it is to make great single exposure photographs of the wonders to be found in the expanses of the night sky.

You will only need some basic photographic gear and a small dose of patience. Complicated image stacking software and astronomically priced lenses and professional cameras not required. Now let’s get started!

Cade's Cove Moon

GEAR

Let’s talk about some of the bare bones gear that you will need in order to make your astro photos.

1 – A camera capable of shooting in full manual mode

You need to be able to control as many variables as possible, so shooting in Manual Mode is essential. Bulb capability is a plus, but not required. Bulb mode means that the exposure begins when you open the shutter and continues until you choose to end it by closing the shutter. Bulb mode is a setting which is now available on even the most budget friendly dSLR’s and mirrorless cameras (even some point and shoots have it).

2 – The fastest (largest aperture) lens you have in your bag

Fast Lens

Wide angle lenses are sometimes viewed as the only focal length to use for astrophotography, but that is most definitely not true. The key to solid astrophotography is to use a lens which can let in the most light. These lenses will be rated with a small f-number and are often prime (fixed focal length). While wide angle lenses will give you a sweeping vista of the sky, don’t count out your medium-telephoto lenses.

3 – A solid tripod

Tripod

You simply cannot escape the fact that a reliably sturdy tripod is the foundation on which all strong astrophotographs are built. Unwanted motion is your enemy. You will need a tripod that can support the weight of your camera and keep it completely motionless. Also, the mount on which the camera physically attaches will play a key role in the outcome of your images. Low quality ball-head mounts can sometimes drift under the weight of your camera during long exposures, so keep that in mind as well when choosing your tripod head.

4 – A microfiber lens cloth

Cloth

You will have your lens tilted upward for many of your shots, so settling dew can become a problem, especially in the summer months. Be sure to pack at least one clean micro-fibre lens cloth to wipe off any moisture which can accumulate on your lens’ front element during long exposures. This is a small piece of gear that can make or break your photo outing.

5 – Optional remote shutter release

Unless you are shooting in Bulb mode, a remote shutter release in not necessary. However, it makes your shooting a little easier, and helps to ensure less camera shake. When not using a remote, set your shutter release on the 2-second timer so that you will not shake the camera by pressing the shutter button.

Camera settings

Now that you know what gear you will need, let’s look at how to go about making your astrophotographs.

Shutter speed

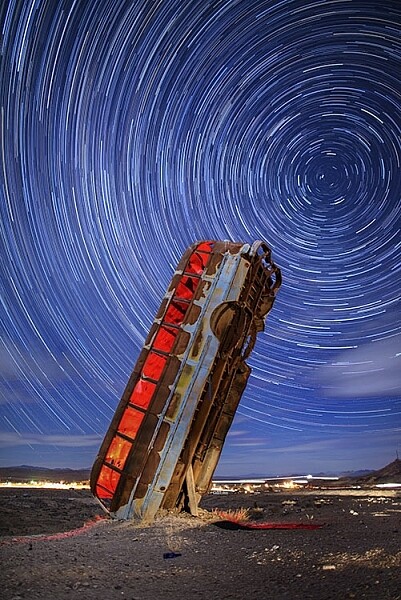
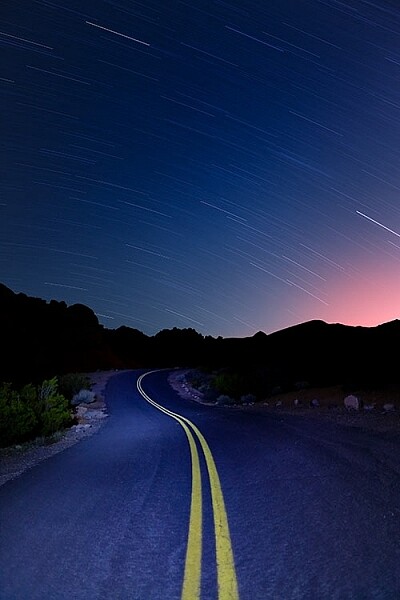
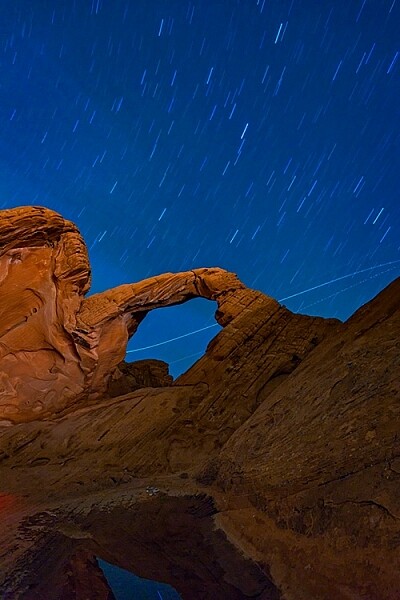
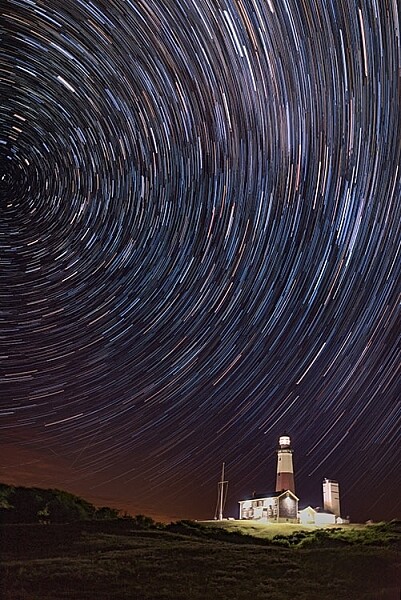
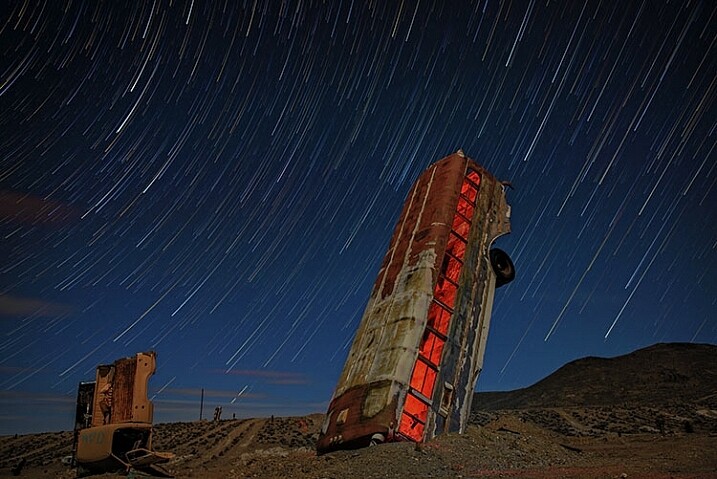
Without a doubt, the biggest question about astrophotography is, “How long should I expose my image?” The answer depends on what kind of photograph are you planning to make. The night sky is dynamic. Everything we see is moving, although it may not appear that way to our eyes. I often relate making photos of the night sky to making photos of water. If you want motion blur (star trails) you will need a longer exposure time. If you want to freeze motion (constellations and galaxies) you will need a shorter exposure time.

Startrail Trees

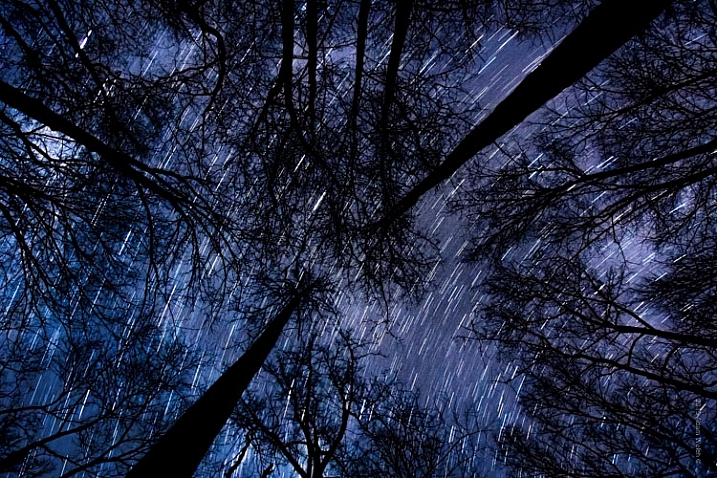
In my experience, the sweet spot for obtaining workable images of stars and the Milky Way without star trails, is around 15-20 seconds depending on the ISO and aperture (more on that shortly) settings. While there are of course no absolute formulas, a good guideline is called the 600 Rule. It is very similar to the reciprocity rule used for avoiding camera shake during hand-held shooting.

The 600 Rule states that to reduce celestial motion blur, the exposure time should be no longer than the equivalent of 600 divided by a given focal length. Meaning that the maximum shutter time in order to reduce star streaking for a 50mm lens would be 12 seconds (600 / 50 = 12), for a 14mm focal length it would be 42 seconds (600 / 14 = 42), and for a 24mm focal length it would be 25 seconds (600/24). This rule is based on full-frame digital image sensors and will keep star trailing less than 8 pixels wide. If you’re shooting an APS-C(cropped sensor) camera, try using 400 instead of 600 in order to obtain similar results.

The important thing to understand about shutter speed as it relates to astrophotography is that, just as in any other type of photography, longer shutter speeds will result with increased motion blur.

Reflection

Aperture

Aperture controls how much light is allowed to enter your camera, and in astrophotography the more light you have to work with, the better your images will be. Shoot your scene at the widest aperture possible. Keep in mind though, that all lenses have ideal apertures, and opening a lens all the way up (largest aperture) often affects overall sharpness. That being said, using a large aperture is almost always desirable, because it allows in the maximum amount of light, which will make your stars brighter and small celestial details more visible.

I shoot the majority of my astrophotography from f/1.8 down to f/3.5 and even f/4. Remember too, that with a wider aperture, precise focusing becomes very important due to the decreased depth of field. Manual focusing is very useful. If your camera has a focus magnification option, use it to zoom in on pinpoint stars or the moon, so that you can obtain the sharpest focus possible. Don’t rely on the infinity focus markings on your lens (they are often not accurate).

ISO settings

Selecting the ISO for your astrophotography is an exercise in compromise. High ISOs are better for shooting in low light conditions, but will also result in more grain and noise in your final photograph. Finding a comfortable medium can be difficult. Shoot with the highest ISO that you feel gives you the least amount of noise, but still allows you to use your desired shutter and aperture settings.

Mother Moon

Most cameras now have high ISO noise reduction built into the their on-board software. I find it is almost always helpful to turn this function off – stay with me here. The reason being, is that image post-processing software today almost always does a better job of reducing noise than does in-camera high ISO noise reduction, which can sometimes reduce contrast and image sharpness. I highly recommend that you experiment with your particular camera and find out what you prefer for your own needs.

Shoot RAW

You may have heard the benefits of shooting in RAW format. In astrophotography, shooting your images in RAW format becomes extremely helpful. The extra information gathered from these larger files will add a huge amount of dynamic range, which will allow you to process the images to a greater degree. Noise reduction will also work more effectively when coupled with the RAW image format.

Tips to make your astrophotography stand out

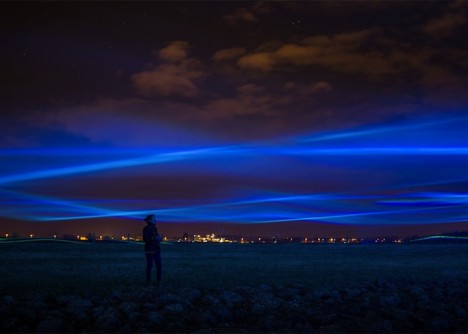
Incorporate external elements within the scene

Milky Way Fire

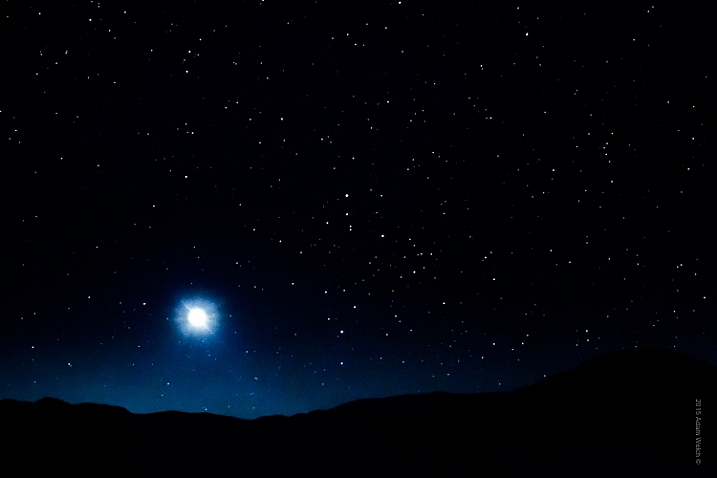
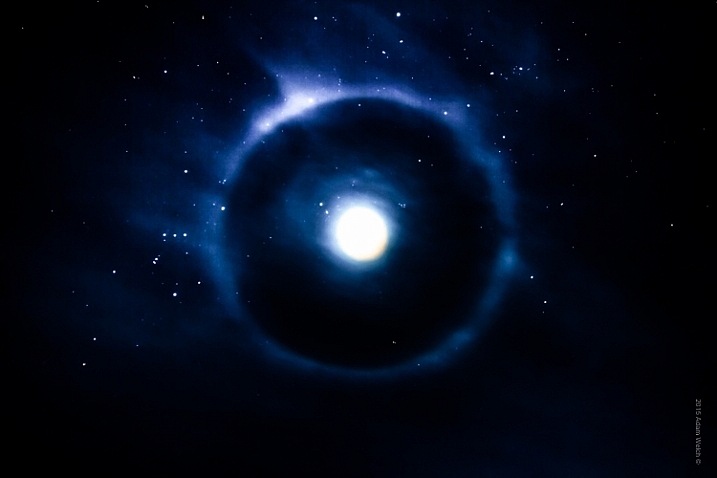
While the objects found in the night sky are incredibly beautiful on their own, adding additional points of interest will often make your astrophotography even stronger. Add reference points such as trees or buildings. Look for a elements that bring harmony within the composition, and flow well with your astrological subject.

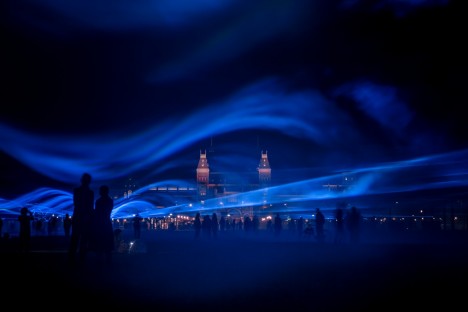
Light pollution can be useful

Boat Trail

While dark skies are certainly ideal for astrophotography, don’t feel that that all external light sources are a bad thing. Sometimes having city lights, or other luminance, interact with your scene can heighten the impact of your composition and add contrast within the image.

Experiment with color

Red Galaxy

Astrophotography loves color. Don’t be afraid to increase, and manipulate saturation and hues in your post-processing workflow. Experimenting with colors will make your photograph a piece of personal art, rather than just a representation. Still, it is advisable not to over process your images so much that you lose detail, and/or make the entire image gaudy and unrealistic (which of course is very subjective). As always, less can sometimes be more.

Astrophotography is challenging, fun, rewarding, and educational. Making images of the heavens is a great way to develop your skills as a photographer, while at the same time producing beautiful images of things that most people may not have noticed before. Today, cameras and imaging software make it easy for us to make great photographs of the night sky. The information you have read here will put you well on the way to producing exciting astrophotos. Shoot for the moon!

googletag.cmd.push(function() {
tablet_slots.push( googletag.defineSlot( “/1005424/_dPSv4_tab-all-article-bottom_(300×250)”, [300, 250], “pb-ad-78623” ).addService( googletag.pubads() ) ); } );

googletag.cmd.push(function() {
mobile_slots.push( googletag.defineSlot( “/1005424/_dPSv4_mob-all-article-bottom_(300×250)”, [300, 250], “pb-ad-78158” ).addService( googletag.pubads() ) ); } );

The post Astrophotography Made Simple by Adam Welch appeared first on Digital Photography School.


Digital Photography School

 
Comments Off on Astrophotography Made Simple

Posted in Photography


Two Methods for Shooting Star Trails Made Easy

23 Oct

As a landscape photographer, it can be easy to find stunning subject matter to photograph during the day. At night, things become more difficult as the sun goes down, but there is still plenty to photograph. With some patience, you can create stunning images featuring the stars as your backdrop, or even your subject.

star trails, night, photography, sky, astrophotography

This image is a composite of 156 separate exposures, merged using StarStax software. Each exposure was ISO 400, f/2.8, 30 seconds. The red glow inside the bus was done by shining a red LED flashlight inside the bus from the other side, during one of the exposures.

Equipment list

Before you get started, you’re going to need a few things:

  • A good sturdy tripod is absolutely essential, I’m using an Induro GTT204M2.
  • A wired remote for your camera is also a necessity. Which model you use will depend on the camera you have.
  • A fully charged battery is a must. The vertical grips that are available for some cameras, allowing you to use two batteries at once for longer life, can also be helpful.
  • A flashlight can come in handy, both for finding your way to the location, and for light painting in the foreground.
  • Finally, a large memory card, or two if your camera has dual slots, will be needed.

#1 – The One-Shot Method

There are two ways to photograph star trails. The first is the old-fashioned way, using a single exposure.

For this method, exposures can range anywhere from several minutes, to several hours. This method was the only way to photograph star trails in the days before digital cameras. When using the single exposure method, your camera needs to be in manual mode, with the shutter speed set to Bulb. Some cameras have a separate mode for Bulb. It is like manual mode, but the shutter stays open for as long as the release button is depressed. A time controller such as the Nikon MC-36A, or Canon TC-80N3 can make things easier by allowing you to lock the shutter button down, or program a set amount of time for the exposure.

ISO should be set to 400. You’ll want to set your aperture somewhere around f/4. The wider the aperture is open, the brighter the star trails will be. If you are photographing in a completely dark setting, with no moonlight, the stars will likely be the brightest object in your scene. Once you’ve set your aperture, you need to decide how long a star trail you want. The longer the exposure, the longer the trails.  The image below was a 30 minute exposure.

This image was created as a single exposure. Exposure time was 30 minutes, ISO 100, f/5.6. The star trails are dimmer due to the smaller aperture, the fact that the moon was still in the sky, and light pollution from the city in the distance, seen as the glow to the right.

This image was created as a single exposure. Exposure time was 30 minutes, ISO 100, f/5.6. The star trails are dimmer due to the smaller aperture, the fact that the moon was still in the sky, and light pollution from the city in the distance, seen as the glow to the right. The street in the foreground was painted with an LED flashlight for several seconds during the exposure.

One thing you need to be concerned with when using a single long exposure is Long Exposure Noise Reduction. If you choose to photograph star trails using a single exposure, the heat generated on the imaging sensor adds noise to the image. Turning on Long Exposure Noise Reduction reduces that noise by using a method known as dark frame subtraction. I previously discussed dark frame subtraction in the article The Night Sky In Landscape Photography. Long Exposure Noise Reduction doubles the length of time needed to make an image. The camera first takes the exposure. In this case, let’s say the exposure is one minute.Long Exposure Noise Reduction then requires another minute to reduce the noise created by the long exposure. That means if you make a star trail exposure for 15 minutes, your camera will be unavailable to take another picture for 30 minutes. You’ll need to make sure you have enough battery to keep the camera powered while it carries out Long Exposure Noise Reduction.

This is a single exposure of 10 minutes, ISO 400, f/5.6.

This is a single exposure of 10 minutes, ISO 400, f/5.6.

In addition to Long Exposure Noise Reduction, another consideration is the length of the exposure itself. There is nothing worse than standing next to your camera while it makes a 30 or 45 minute exposure, and two-thirds of the way through the exposure, a car goes past, shining its headlights across the scene and ruining the exposure. It’s happened to the best of us.

#2 – Merging Multiple Exposures

This is where the second method for photographing star trails comes in. With the advancement of digital imaging, stacking multiple exposures has become possible, and has made creating star trail images easier than ever. By taking a series of drastically shorter exposures, then stacking them in software such as StarStaX, you can increase your flexibility as a photographer, because there are two benefits to this method. The first is that since the exposure are shorter, you can turn off Long Exposure Noise Reduction. The second benefit is that even if a car drives by to ruin the exposure, it’s only one small piece of the sequence, so you can just delete the one frame that was ruined.

StarStaX works by blending a series of images, allowing you to capture the motion of stars in the sky, similar to a single exposure. The one drawback to using software like StarStaX is if clouds are also moving across the sky, it has a tendency to create a stepped shape with them that doesn’t look natural. Better Star Trails Photographs with StarStax is an excellent tutorial for using StarStaX.

Camera settings

To use the stacking method for shooting star trails, set your camera to Manual mode and your camera’s drive to Continuous. Start with your aperture set to f/4. This setting can be adjusted, but the wider the aperture, the brighter the trails. However, be careful to ensure you have enough depth of field, and aren’t overexposing the stars. Shutter speed will be 30 seconds. ISO should be set to 400. Using the time controller or remote for your camera, release the shutter, and use the locking mechanism to keep the shutter button on the remote depressed. With the camera in continuous drive mode, as each exposure ends, another will begin until you stop it. This also minimizes the pause between each exposure, which can cause small breaks in the star trails when the exposures are merged. Alternatively you can use an intervalometer feature if you camera has that, or similar type of remote.

star trails, night, photography, sky, astrophotography

This image is a combination of 121 exposures merged in StarStaX. Each exposure was 15 seconds, ISO 400, f/1.4. To keep the lighthouse from being so bright that it would overpower the star trails, a 3-stop soft-edged graduated neutral density filter was used.

It can be easy to forget the rules of composition when photographing star trails, so don’t get so fixated on the stars that you forget to look at the foreground as well. Chances are your foreground will be shrouded in darkness. A flashlight can come in handy for painting the foreground object with light to make it stand out in the darkness. Colored gels can allow you to get creative with the light painting. When stacking images, you’ll only need to illuminate your foreground for a single frame, as StarStax will use the illuminated exposure for that foreground object.

By the same token, there may be a time where your foreground object is brightly illuminated, as with the lighthouse image above. So I carry a set of graduated neutral density filters, even when shooting at night. For the lighthouse image, I mounted a Vü filters 3-stop soft-edged ND grad on my lens, so that the dark side of the filter was over the bottom half of the frame. This allowed me to keep the lighthouse exposure dim enough to still allow the stars to register in the exposure as well.

This image was created by merging 116 separate exposures in StarStax software in comet mode. Each exposure was 30 seconds, ISO 400 at f/2.8. A red LED flashlight was shone inside the bus for the first exposure.

This image was created by merging 116 separate exposures in StarStax software in comet mode. Each exposure was 30 seconds, ISO 400 at f/2.8. A red LED flashlight was shone inside the bus for the first exposure.

Once you’ve found your foreground, think about the direction you are facing. When facing north, star trails will form concentric circles. When facing away from the north, star trails will simply be slanted lines or arcs in the sky. Both can create interesting and awe-inspiring images.

Now that you know you don’t have to put your camera away when the sun goes down, you need to find some dark sky to get the best results with star trails. The International Dark Sky Association has a great tool on their website to help you find the best places for night sky photography.

Show some of your best star trail images below!

googletag.cmd.push(function() {
tablet_slots.push( googletag.defineSlot( “/1005424/_dPSv4_tab-all-article-bottom_(300×250)”, [300, 250], “pb-ad-78623” ).addService( googletag.pubads() ) ); } );

googletag.cmd.push(function() {
mobile_slots.push( googletag.defineSlot( “/1005424/_dPSv4_mob-all-article-bottom_(300×250)”, [300, 250], “pb-ad-78158” ).addService( googletag.pubads() ) ); } );

The post Two Methods for Shooting Star Trails Made Easy by Rick Berk appeared first on Digital Photography School.


Digital Photography School

 
Comments Off on Two Methods for Shooting Star Trails Made Easy

Posted in Photography


Stacked Ceramics: Shop Floor Made from 25,000 Pieces of Pottery

13 Sep

[ By WebUrbanist in Design & Fixtures & Interiors. ]

ceramic surface side view

A 400-year-old ceramics studio in Japan has completely remodeled their store with a most remarkable addition: a walkable surface constructed from a stack of tens of thousands of scrapped pieces of crockery.

ceramic walkable surface

ceramic stacked tableware discards

Yusuke Seki (photos by Takumi Ota) collected plates, saucers, bowls and cups for this creative endeavor, all to create a display platform for Maruhiro Ceramics in Hasami, Nagasaki.

ceramic steps display level

ceramics on display

To facilitate a more intimate experience, a pair of stairs is placed by the display platform, allowing visitors to walk up and peruse wares, all while enjoying a sense of wonder from the layers of history right beneath their feet.

ceramic platform in use

ceramic wood display cases

Traditionally, flawed ceramics are simply thrown into dedicated landfills, while this rethought application brings pieces of history back up to the surface.

ceramic top detail

ceramic space exxterior

Since the discards are eliminated before the coloring and glazing process, there is an aesthetic consistency to the materials reused in this creative context.

ceramic stairs side

ceramic view outside

Individually fragile, the tableware was turned into modular bricks by being filled with concrete, but their individual shapes and sizes still made this a daunting endeavor to actually deploy. Still, the result is compelling and interactive – not so much of a crackpot idea after all, as it turns out.

Share on Facebook


[ By WebUrbanist in Design & Fixtures & Interiors. ]

[ WebUrbanist | Archives | Galleries | Privacy | TOS ]


WebUrbanist

 
Comments Off on Stacked Ceramics: Shop Floor Made from 25,000 Pieces of Pottery

Posted in Creativity


Art Made Flesh: 35 Sculptures Rendered in Human Skin & Hair

16 Jul

[ By Steph in Art & Sculpture & Craft. ]

flesh art tian

Do these fleshy works of art manipulating human body parts into unnatural shapes make you uncomfortable? That’s probably just what the artist was going for. It’s difficult for us, as humans, to look upon images of our own flesh with emotional detachment, seeing it as we would the meat of other animals, or even as an organic medium for art and architecture. Don’t worry – most of these are not made of actual humans, but rather silicone, polymer clay and wax. Read on for a tent modeled on human intestines, a pillow made of human skin and the world’s grossest pair of stiletto heels.

Jonathan Payne
flesh art payne 4

flesh art payne 3

flesh art payne 2

flesh art payne 1

Jonathan Payne calls these deeply repulsive sculptures ‘FLESHLETTES,’ and that name says a lot. They’re basically lumps of human viscera, teeth, eyes and hair put together into little miniature packages. You probably never wanted to see a nipple with teeth, but here one is, nonetheless.

Andrea Hasler
flesh art tent 1

flesh art hasler 2

flesh art hasler 3

flesh art hasler 4

A tent made of flesh, a giant lump of what looks like human fat serenely overlooking a cliff, and a series of disgusting handbags are among the organic works of Swiss artist Andrea Hasler, who aims to humanize objects with ‘emotional surfaces.’ The tent was modeled upon human intestines and is made of polystyrene and wax as well as leather and real blood.

Felix Deac

flesh art felix deac 1

flesh art felix deac 2

flesh art felix deac 3

Romanian artist Felix Deac creates amorphous blobs of flesh replete with veins, moles, wrinkles and hair. While some might look like deformed human body parts, most are just abstract shapes reminiscent of nightmarish tumors that have taken on a life of their own.

Patricia Piccinini

flesh art piccinini 1

flesh art piccinini 2

flesh art piccinini 3

flesh art piccinini 4

Patricia Piccinini’s work is so shockingly realistic, photographs of it are often passed around the internet as clickbait, with people wondering ‘what the heck am I looking at?’ The controversial Australian artist creates sculptures of fantastical creatures with extremely human-like skin and hair.

Next Page – Click Below to Read More:
Art Made Flesh 35 Sculptures Rendered In Human Skin Hair

Share on Facebook


[ By Steph in Art & Sculpture & Craft. ]

[ WebUrbanist | Archives | Galleries | Privacy | TOS ]


WebUrbanist

 
Comments Off on Art Made Flesh: 35 Sculptures Rendered in Human Skin & Hair

Posted in Creativity


Waffle Walls and Brains Made of Bread: 24 Edible Creations

12 May

[ By Steph in Art & Sculpture & Craft. ]

edible michelangelo 2

Who can take a hamburger, shape it into a Nike Air Max shoe? Clad the walls in waffles and paint with chocolate syrup, too? These artists can, and their edible creations are probably about to make you very hungry.

Michelangelo in Frosting and Sprinkles
edible michelangelo 3

edible michelangelo 1

One of mankind’s most revered artistic achievements, Michelangelo’s ‘The Creation of Adam,’ can be plucked right off the wall and eaten thanks to a recreation by food artist Michelle Wibowo. Half a billion cake sprinkles in 24 colors and 10,000 marshmallows went into the full-scale piece, which took 168 hours to complete for the 450th anniversary of the Italian master’s death.

Nike Air Max Hamburger

edible nike shoe

When 8 creatives were asked to interpret 8 different Nike Sportswear shoes, one in particular went in an entirely unexpected direction. Olle Hemmendorff recreated the Air Max 90 in the form of “the most powerful, most durable and most delicious material known to man: hamburger.” Who can argue with that?

Chocolate Art Supplies

edible chocolate art supplies 2

edible chocolate art supplies 1

Squeeze caramel, raspberry, green tea or brandy fillings out of edible chocolate bottles, or sprinkle the shavings from sharpened chocolate pencils onto your meal. Design firm Nendo created a 12-piece paint set as well as a set of edible chocolate pencils for the Seibu Department Store in Japan.

Super-Sweet Zen Rock Garden

edible zen rock garden 1

edible zen rock garden 2

As if the experience of consuming a box of chocolates isn’t already relaxing enough on its own, designer Tomonori Saito takes it a few steps further with an edible zen rock garden. Draw delicate lines in the sand-like sugar around black sesame and green tea rocks.

Life-Sized Gingerbread House

edible life size gingerbread house 1

edible life size gingerbread house 2

Somewhere at the intersection of Willy Wonka, Santa and Hans Christian Anderson lies this life-sized, almost entirely edible gingerbread house with waffles for walls, candy chandeliers, 144 pounds of chocolate ganache mortar, 660 gallons of marshmallows and 2,500 gingerbread tiles. Architecture firm Alma-nac created the ten-foot-tall house to raise funding for a hospital, and it was devoured by a thousand kids and parents in just three days.

Next Page – Click Below to Read More:
Art You Can Taste 23 Mouthwatering Edible Designs

Share on Facebook


[ By Steph in Art & Sculpture & Craft. ]

[ WebUrbanist | Archives | Galleries | Privacy | TOS ]


WebUrbanist

 
Comments Off on Waffle Walls and Brains Made of Bread: 24 Edible Creations

Posted in Creativity


Pricing and availability for Tokina AT-X 24-70mm F2.8 Pro FX made public

09 May

Pricing and availability for Tokina’s AT-X 24-70mm F2.8 Pro FX lens has appeared on the company’s website. Announced at CP+ earlier this year, the lens will be released in a Nikon mount in June and then for Canon in July. Retail price is listed at ¥150,000 before tax, which is around $ 1250 US (final US pricing is not yet confirmed). Read more

Articles: Digital Photography Review (dpreview.com)

 
Comments Off on Pricing and availability for Tokina AT-X 24-70mm F2.8 Pro FX made public

Posted in Uncategorized