RSS
 

Posts Tagged ‘made’

Urban Carousel: Merry-Go-Round Made of Shopping Cars

21 Dec

[ By WebUrbanist in Art & Installation & Sound. ]

carousel shopping

Subverting the shopping cart, this urban installation is a play on consumer culture and its cyclical nature. Of course, it is also a lot of fun to play with, too.

carousel riders

carousel carts

Set in a public plaza of Ponta Delgada, Açores, Portugal, the piece aims to subconsciously attract people to playfully interact in the unlikely desert of a cobblestone square, all around a lone lamppost no less. Modular and assembled on-site, the installation could conceivably be deployed just about anywhere.

carousel steel

carousel dusk

“By counteracting the freedom of movement that normally characterizes these carts (ironically moving in circles) we are reminded that consumerism does not take us anywhere… or [at best back to our] starting point.” says Nuno Pimenta.

carousel push

carousel lamppost

carousel context

Whether or not the message is clear to the passerby, the function, at least, is self-explanatory. People readily realize they can push the carts, ride in them and go around in a circle just like a miniature park carousel or its classic carnival-ride equivalent.

Share on Facebook


[ By WebUrbanist in Art & Installation & Sound. ]

[ WebUrbanist | Archives | Galleries | Privacy | TOS ]


WebUrbanist

 
Comments Off on Urban Carousel: Merry-Go-Round Made of Shopping Cars

Posted in Creativity


Urban Carousel: Merry-Go-Round Made of Shopping Cars

18 Dec

[ By WebUrbanist in Art & Installation & Sound. ]

carousel shopping

Subverting the shopping cart, this urban installation is a play on consumer culture and its cyclical nature. Of course, it is also a lot of fun to play with, too.

carousel riders

carousel carts

Set in a public plaza of Ponta Delgada, Açores, Portugal, the piece aims to subconsciously attract people to playfully interact in the unlikely desert of a cobblestone square, all around a lone lamppost no less. Modular and assembled on-site, the installation could conceivably be deployed just about anywhere.

carousel steel

carousel dusk

“By counteracting the freedom of movement that normally characterizes these carts (ironically moving in circles) we are reminded that consumerism does not take us anywhere… or [at best back to our] starting point.” says Nuno Pimenta.

carousel push

carousel lamppost

carousel context

Whether or not the message is clear to the passerby, the function, at least, is self-explanatory. People readily realize they can push the carts, ride in them and go around in a circle just like a miniature park carousel or its classic carnival-ride equivalent.

Share on Facebook


[ By WebUrbanist in Art & Installation & Sound. ]

[ WebUrbanist | Archives | Galleries | Privacy | TOS ]


WebUrbanist

 
Comments Off on Urban Carousel: Merry-Go-Round Made of Shopping Cars

Posted in Creativity


Paintless Landscapes: Scenic Art Made of Light & Shadow

13 Dec

[ By WebUrbanist in Art & Installation & Sound. ]

shadow art closeup two

A collection of unlikely (often discarded) objects coupled with a light source can create amazing city scenes, landscapes, portraits and more in the hands of this artist.

shadow art installation

Rashad Alakbarov hails from Azerbaijan and experiments with different materials and setups to turn three-dimensional trash into rich two-dimension displays of all shapes and sizes.

shadow art middle eastern

shadow art detail closeup

shadow art city scene

Some of these, including the top installation featured here, were on display last year at the Fly to Baku Contemporary Art Exhibition at the De Pury Gallery in London, UK.

shadow artist context setup

shadow art portrait sketch

A few pieces contain custom built-to-purpose shapes, like plastic versions of paper airplanes in the top example, while others simply draw on urban junk or everyday objects.

shadow art word wall

shadow art geometric design

There is something playful and informal about his approach. Alakbarov takes inspiration from items at hand to start crafting skylines or other scenes that unfold partly from his imagination, but also in part from the nature of the materials in each case.

Share on Facebook


[ By WebUrbanist in Art & Installation & Sound. ]

[ WebUrbanist | Archives | Galleries | Privacy | TOS ]


WebUrbanist

 
Comments Off on Paintless Landscapes: Scenic Art Made of Light & Shadow

Posted in Creativity


Fantastic Digital Cameras Made for College Students

26 Nov

Most university students will have lots of new adventures to record while in college; but let’s face it, these days, young people want to take excellent photos of their dorm room parties and campus life and appear cool while they’re doing it. A contemporary camera in hand not only helps folks save their college memories, but it also can make Continue Reading

The post Fantastic Digital Cameras Made for College Students appeared first on Photodoto.


Photodoto

 
Comments Off on Fantastic Digital Cameras Made for College Students

Posted in Photography


When Photoshop’s Content-Aware Fill Made My Mouth Drop Open

25 Sep

When Adobe began demonstrating Content-Aware Fill in Photoshop CS5 it generated 2 reactions on average. The first fear about the removal of watermarks identifying the work of photographers and the second was an enthusiastic roar about the creative possibilities. Adobe of course was aiming for the later response.  Since the release of Content-Aware Fill I’ve often used it to fill in gaps when my canvas is rotated to straighten an image, remove objects creeping into the edge of my image, etc. With each subsequent version of Photoshop released Content-Aware Fill has seemingly been able to handle more and more complex scenes.

During a recent edit using Photoshop CC I went back to work on some images with contrails reflected in water where the rocky bottom was still visible. At the time the photo was taken I thought it was ultimately unusable, as I wasn’t about to release an image with reflected contrails. For fun I decided to put Photoshop to the test to see how well it could fill in a complex pattern such as this. I was blown away that it took care of the contrails in a single shot.

Unedited – Zoom View

Content-Aware Fill Employed – Zoom View

If you look closely in the zoomed version of the image, the rocks have an organic pattern while the contrail is completely removed. While I expected that the upper right section of the contrail would be handled easily due to its transition to a nearly pure colored gradient, the random rocky pattern on the left  I figured would be too complex to be addressed cleanly. I was pleasantly surprised when I zoomed in at 100% and 200% to see that all the rocks had continuous edges and didn’t have any obvious signs of being edited. It was at this point my mouth dropped open in amazement.

Unedited  – Full Image 

Content-Aware Fill Employed – Full Image

Sunrise at Two Medicine Lake with Sinopah Mountain reflected in the calm water – Glacier National Park

Adobe’s Original Content-Aware Fill Demo

Copyright Jim M. Goldstein, All Rights Reserved

When Photoshop’s Content-Aware Fill Made My Mouth Drop Open

The post When Photoshop’s Content-Aware Fill Made My Mouth Drop Open appeared first on JMG-Galleries – Landscape, Nature & Travel Photography.


Comments

  • nice content aware is mostly his and miss. often miss for me … by Tor Ivan Boine

Related Stories

  • When Photoshop’s Content-Aware Fill Made My Mouth Drop Open – Enclosure
  • Talking Lightroom & Photography
  • Talking Lightroom & Photography – Enclosure
Feed Ads by FeedBlitz
powered by ad choices


JMG-Galleries

 
Comments Off on When Photoshop’s Content-Aware Fill Made My Mouth Drop Open

Posted in Equipment


Natural Light Portraits: Made In The Shade

30 Aug

One of the easiest ways to start shooting portraits is to use natural light.  There’s no added expense of buying speedlites or strobes, or even continuous lighting. You don’t have to decide where to put the lights, because let’s face it, nature has decided for you.  There are still challenges however, and those challenges must be overcome to successfully pull off a natural light portrait.  One of the biggest challenges is what to do when the natural light just is not pleasing.  Maybe it’s midday sun and the light is too harsh, or maybe it’s later in the day and direct sun is shining right in your subject’s eyes. In my post “Sun Too Harsh? Modify it!”, I discussed ways to use reflectors and scrims to modify natural light to get a more pleasing look.

This image was taken on a bright sunny winter day, with snow on the ground. I didn't have a reflector- the snow helped with that thankfully.  But the sun was too harsh to put her directly in it.  The solution was to go behind one of the nearby buildings and use that softer light to illuminate her face. EOS 5D Mark II, Ef 85mm f/1.2L II. 1/2000 at f/2.2, ISO 160.

This image was taken on a bright sunny winter day, with snow on the ground. I didn’t have a reflector- the snow helped with that thankfully. But the sun was too harsh to put her directly in it. The solution was to go behind one of the nearby buildings and use that softer light to illuminate her face. EOS 5D Mark II, Ef 85mm f/1.2L II. 1/2000 at f/2.2, ISO 160.

But what happens if you don’t have a reflector or a scrim? Well then you have it made in the shade! Find some shade, and you’ll find some soft, indirect lighting that can help you create beautiful portraits.   Look for a large tree with overhanging branches. Or a doorway. Or an overpass of some kind.  Anything that gets you out of direct sun, and into indirect light. It does you no good if there’s no light getting to your subject, but once you find a place with indirect lighting, you’re all set.

Here, the subject was positioned under the overhang of a train station.  Because it was an open overhang, the background is lit brightly, creating more depth. EOS-1D X, EF 85mm f/1.2L II. 1/1000, f/2.8 at ISO 640.

Here, the subject was positioned under the overhang of a train station. Because it was an open overhang, the background is lit brightly, creating more depth. EOS-1D X, EF 85mm f/1.2L II. 1/1000, f/2.8 at ISO 640.

The light will be soft and even- and very pleasing.  The background will likely go a little darker depending on where you found your shade, be it under a tree, where it might be brighter, or in a doorway or behind a building. Look around, see what you can make happen. And just because your subject is facing out towards the light, doesn’t mean you need to be.  Walk around your subject- get that soft light hitting from the side, as well as the front. Just keep your subject positioned so the light is hitting the mask of the face, including the eyes. Just because the light is not pleasing doesn’t mean all is lost. Sometimes, all you need to do is find some shade.

This shot was taken in Central Park in New York City, near Strawberry Fields.  There is a walking path that goes under a large footbridge, creating a tunnel. The day was a typical summer day, bright and hot. The sun was far too harsh. We moved to the opening of the tunnel and I let the light wash in on her face.  I turned her slightly so the light came from the side a bit, creating some shadow on the left side of her face. EOS 5D Mark II, EF 70-200 f/2.8L IS II. ISO 800, 1/250, f/2.8.

This shot was taken in Central Park in New York City, near Strawberry Fields. There is a walking path that goes under a large footbridge, creating a tunnel. The day was a typical summer day, bright and hot. The sun was far too harsh. We moved to the opening of the tunnel and I let the light wash in on her face. I turned her slightly so the light came from the side a bit, creating some shadow on the left side of her face. EOS 5D Mark II, EF 70-200 f/2.8L IS II. ISO 800, 1/250, f/2.8.

Post originally from: Digital Photography Tips.

Check out our more Photography Tips at Photography Tips for Beginners, Portrait Photography Tips and Wedding Photography Tips.

Natural Light Portraits: Made In The Shade


Digital Photography School

 
Comments Off on Natural Light Portraits: Made In The Shade

Posted in Photography


Bone Flowers: Sculptures Made of Rodent Skeletons

09 Aug

[ By Steph in Art & Sculpture & Craft. ]

Bone Flowers Skeleton Sculptures 1

A white sculpture of a dandelion becomes infinitely more interesting the closer you look, as you begin to pick out the tiniest of paws, vertebrae and tufts of fur. Petals are made up of rib cages, stems of spines. Skulls come together to form the base of the flower. Tokyo artist Hideki Tokushige produces these honebana, or bone flowers, in honor of the cycles of nature.

Bone Flowers Honebana

Bone Flowers Skeleton Sculptures 2

Bone Flowers Skeleton Sculptures 4

Tokushige procures (already-dead) carcasses of rodents and keeps them frozen so the flesh can be picked off the skeletons more easily without causing damage to the delicate bones.

Bone Flowers Skeleton Sculptures 5

Once he’s finished completing and photographing the sculptures, Tokushige disassembles them and buries the remains. Using these mice, which are kept in cages throughout their short lives and then frozen to feed to other animals in the least grisly way possible, reflects “a sense of our modern view of nature and life.”

Bone Flowers Skeleton Sculptures 6

Bone Flowers Skeleton Sculptures 7

“Some might think it weird,” says Tokushige of using bones. He states that proximity to bones was normal throughout much of human history, but we’re not as used to seeing them anymore. “Still, someday we all go back to bones and back to soil.” The artist crafts the bones into flowers as a means of paying respects to the dead, our cultural customs and the realities of the life cycle. Flowers are temporary, but bones can last millennia.

Share on Facebook


[ By Steph in Art & Sculpture & Craft. ]

[ WebUrbanist | Archives | Galleries | Privacy | TOS ]


WebUrbanist

 
Comments Off on Bone Flowers: Sculptures Made of Rodent Skeletons

Posted in Creativity


Art of Absence: Brick Street Mural Made of Unpainted Void

24 Jul

[ By WebUrbanist in Art & Street Art & Graffiti. ]

subtractive white brick mural

White wall frames cracked red bricks shaped like rust-colored autumn leaves, all trailing down to a black silhouette of a painter and his bucket – but looks can be deceiving, and this lovely mural was not made in the way you might first guess.

subtractive muralist art detail


It looks deceptively subtractive at first glance, but Spanish street artist Pejac did not chip away at existing paint to create this piece. Instead, he carefully added layers around bricks he wished to shape, almost like a sculpture carving away at a rough block with a careful hand, revealing an object by removal.

subtractive art in context

Thanks to careful site selection, the faux leaves and branches in the mural are visually tied both to surrounding greenery – they also related to the reddish surfaces of other nearby painted and brick structures. Meanwhile, the black figure at the base stands out against the colorful environs.

subtractive street artist illusions

An adept photographer, illustrator and installation artist, Pejac’s other works include cleverly altered street signs and carefully orchestrated urban fantasies, the latter created using paper cutouts attached to windows.

Share on Facebook


[ By WebUrbanist in Art & Street Art & Graffiti. ]

[ WebUrbanist | Archives | Galleries | Privacy | TOS ]


WebUrbanist

 
Comments Off on Art of Absence: Brick Street Mural Made of Unpainted Void

Posted in Creativity


Textures Made Simple

22 Jul

A contribution from Lori Peterson

One of the most intimidating editing for some photographers is integrating textures. Textures can transform the mood and overall effect of an image. It can bring about a change that makes the image go from a nice photograph to a piece of fine art. There are an abundance of textures that can be found on the Internet and yet photographers are sometimes hesitant to use them because they feel overwhelmed or don’t understand that using them can actually be very simple. Once you get used to using textures you can usually decide what tones you want to bring in and how you want to use them.

We are going to do two edits on the same image with the same texture but use two different techniques. Typically I will change the technique I use based on the amount of editing I think the image needs in order to really use the texture. You can use multiple textures and stack them in Photoshop and change their opacity. You can even vary which technique you use on each layer. The fun thing about Photoshop is that if you use layers you can play around with your image. If you don’t like the effect, you simply delete the layer!

We are going to start by opening and image and a texture.

Image 1

Now we will just drag the texture on top of our image.  Size it over your image by using CTRL + T and dragging the corner to make it fit.

Image 2

I typically will change my blending mode to screen or multiply (depending on the image) so that I can see the image underneath.

Image 3a

Now we need to remove the texture off her and her skin. We can do this one of two ways.

First of all we can just add a layer mask and then remove it off of her and her skin using a soft brush.

Image 4

It can be tedious to do it that way because as you get into parts of hair and closer to where her skin meets the texture you will need to make your brush smaller. 

If you prefer, you can remove the texture this way instead:

Once you overlay your texture, go ahead and change the opacity so that you can see underneath the texture. Add your layer mask, you will need that to correct any mistakes or to refine the technique we are about to do.

Make sure that the texture itself is what is highlighted. Select your lasso tool and then go around your subject. It doesn’t have to be perfect, but it will take you a little practice to get the hang of it!

Image 5

Once you have your subject highlighted using the lasso tool, then go up to Filter > Blur > Gaussian Blur.

Image 6

Push the slider all the way over to the right.

Image 7

This will blur the texture on the subject. It doesn’t blur the subject!

Now we need to refine the removal of the texture off our subject, which is much easier now that the texture is blurred.

Click on the layer mask and use your soft brush at a lower opacity to take off the parts of the texture you really want to remove. Since it has been blurred already, it’s not as difficult and tedious to remove.

Image 8

Then you can change your blending modes to fit the look you are trying to get for your image. You can also stack textures and leave the parts that you want or remove the parts you don’t.

Textures can really enhance and change the look of your overall image. They can bring more depth and more color. They can change the mood. They are fun to experiment with and once you learn how to use them fluidly you can really do a lot in Photoshop to change your images.

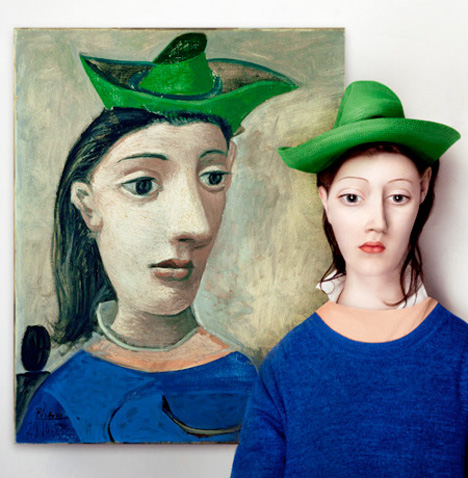
This was my final image using the Tendons texture overlay. 
?
Image 9

Here’s the before and after so you can really see how the image changed. 

Before After Image

Lori Peterson is an award winning photographer based out of the St. Louis Metro Area. Her dynamic work ranges from creative portraits to very unique fine art photography. Lori’s work can be seen at www.loripetersonphotography.com and also on her blog at www.loripetersonphotographyblog.com. You can follow her on Facebook at https://www.facebook.com/LoriPetersonPhotography.

Post originally from: Digital Photography Tips.

Check out our more Photography Tips at Photography Tips for Beginners, Portrait Photography Tips and Wedding Photography Tips.

Textures Made Simple


Digital Photography School

 
Comments Off on Textures Made Simple

Posted in Photography


From Abstract to Actual: Unrealistic Art Models Made Real

20 Jul

[ By Delana in Art & Drawing & Digital. ]

Gelber Narrenhut

Some of the world’s greatest abstract artists have created portraits of humans that, while inspired by the human form, have completely dispensed with any actual human’s natural proportions.

woman in green hat

Hungarian artist Flora Borsi decided to take some of those abstract paintings and digitally create what the models would look like if the paintings were realistic depictions of real humans.

the corn poppy

The results are equal parts entertaining and disturbing. Elongated necks, exaggerated facial features, and impossible proportions make the subjects look vaguely human but not quite what we would expect from actual human models standing next to the portraits they inspired.

bust of woman

The paintings of Modigliani, Picasso, Malevich and more are given the unusual treatment of working backwards to create something new from an already-existing piece of art.

polish woman

Entitled “The Real Life Models,” the project is one that takes you a bit by surprise. Seeing these human forms outside of their respective paintings only highlights how creative and liberal the artists were in painting the original pieces.

american gothic subjects

Borsi did include in her series one real historic photo of models next to the painting they inspired. The older couple who actually posed for Grant Wood’s “American Gothic” are pictured next to their own portrait, looking nearly as sullen as they do in the painting.

Share on Facebook


[ By Delana in Art & Drawing & Digital. ]

[ WebUrbanist | Archives | Galleries | Privacy | TOS ]


WebUrbanist

 
Comments Off on From Abstract to Actual: Unrealistic Art Models Made Real

Posted in Creativity