RSS
 

Posts Tagged ‘Luminar’

How to do Portrait Retouching With Luminar

24 Oct

Macphun’s Luminar is a versatile beast. While a lot is made of processing landscapes and cityscapes, you find it also happens to be a very capable portrait editor. Follow along with this walkthrough to see how I use Luminar to edit a portrait.

Getting Started

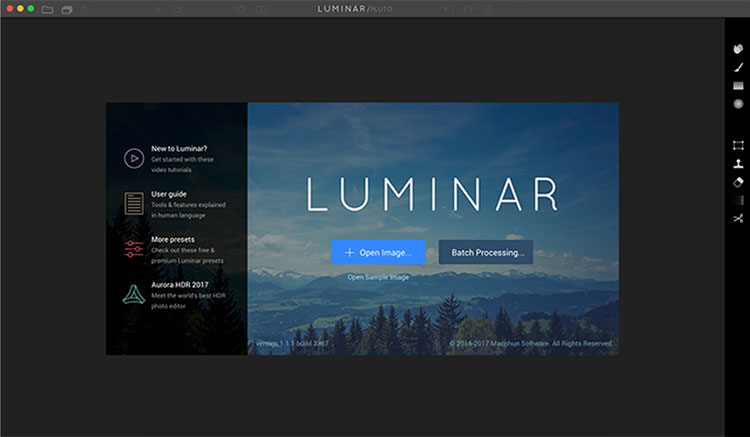
Open your photo in Luminar. As you’ll be using more of a layer based workflow than presets for now, turn off the presets panel by clicking on the second last icon in the upper right of your screen. You’ll get more space and more of the image to work with this way.

How to do Portrait Retouching With Luminar

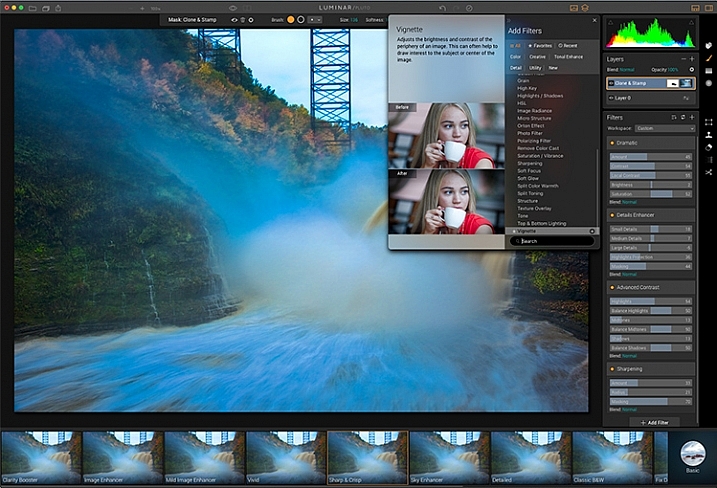
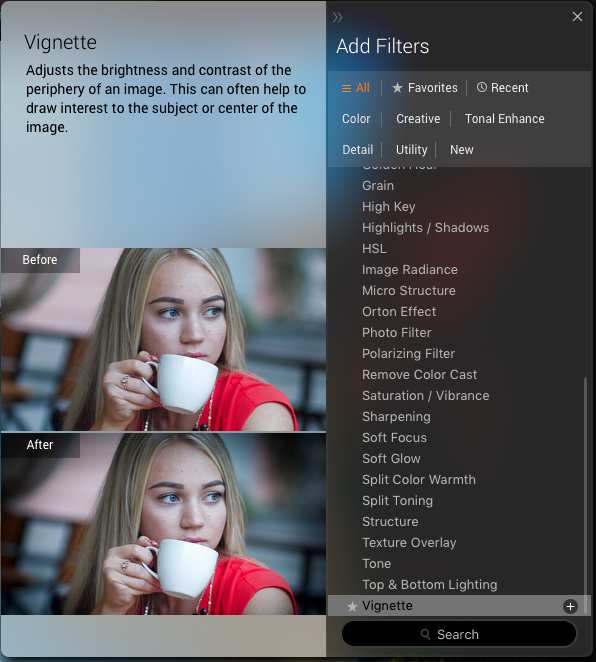
For your first layer (as well as with further layers), you’ll need to click the Add Filter button to add controls. You can have as many filters as you like on one layer.

How to do Portrait Retouching With Luminar

Image Tonal Balance

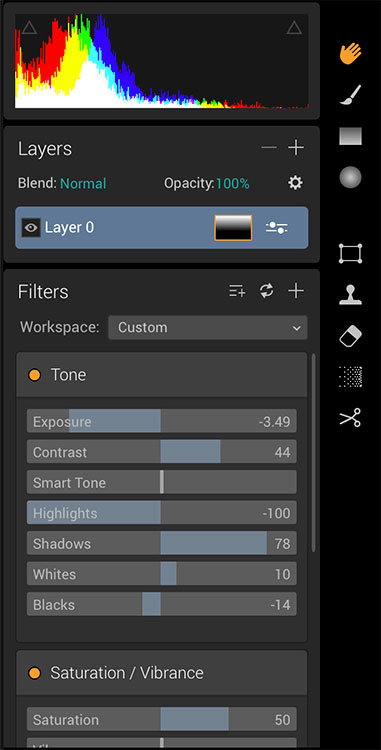
Your first step is to improve the overall tonal balance of your portrait. This one is a little dark, but at the same time, there’s no true black in the photo. If you look at the histogram, there’s a gap at the top (right side) where the wall could be whiter. There’s also a gap at the bottom (left side) where areas like the eye pupil could be darker.

The best filter in Luminar to fix this is Tone. You can select this from the filter list that appears after you click the Add Filter button. You can also just enter the name of a filter in the Search field to find it faster if you know the name of the filter you want.

Notes: As you get comfortable with Luminar’s filters, you’ll probably find yourself using several of the same ones frequently. To make them even easier to find, click on the “star” to the left of the filter name to designate them as “favorites”. Thereafter, choose the Favorites category at the top of the Add Filters panel for speedy access to your most-used filters.

How to do Portrait Retouching With Luminar

For the dark part, you’ll drag Blacks slider down (left) to taste. For the brightness, you should use the Smart Tone slider. This really neat slider allows you to brighten the image while protecting highlights, or darken while protecting the shadows. This is better than Exposure, which will clip highlights and shadows.

The remaining sliders should be adjusted until you feel the photo looks good. You’ll see there’s a small change in Highlights and Shadows here, along with a tiny amount of Whites. The settings will, of course, be different for every image.

How to do Portrait Retouching With Luminar

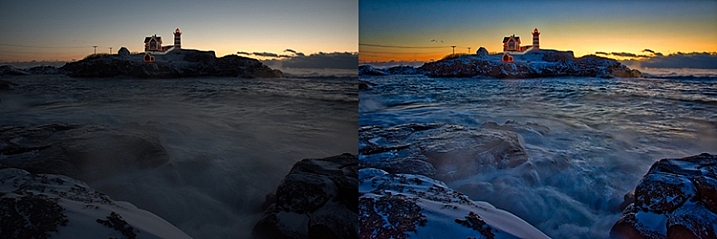
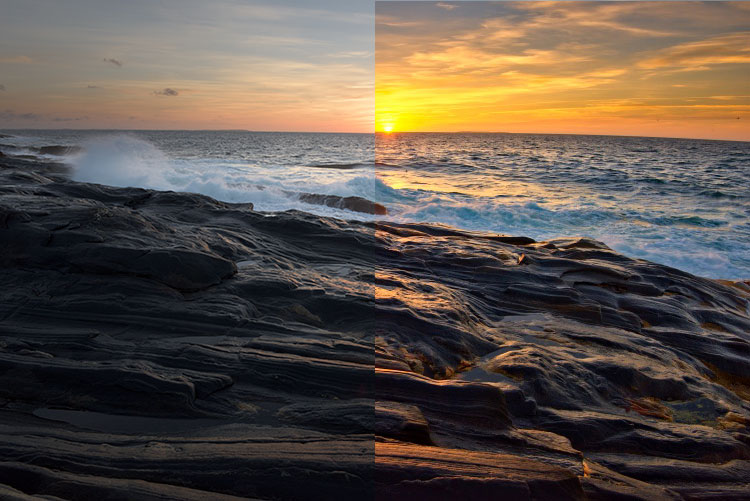
At any stage, you can check your progress by clicking on the eye icon to preview, or click the Before/After view to reveal a slidable Before/After preview.

How to do Portrait Retouching With Luminar

How to preview your edits using the before and after slider.

Removing Blemishes

I know you’re thinking that my subject’s skin is flawless, but in close, there is work to do. You may have more or less to do for your portrait, but the same principles apply. You find the Clone tool on the right panel in Luminar. Clicking it will render a new layer to edit. As this is a rendered layer, it effectively means you’re not working on a raw file anymore, but as you’ve got a good balance of tones to edit, this is fine. You may want to leave this step until later if this bothers you.

How to do Portrait Retouching With Luminar

The Clone tool is on the right-side panel in Luminar.

Once the render is complete you’ll be presented with the cloning screen, asking you to “Click to set the source” (as seen below). The source is the location you’re copying to fix the area you need to work on (which is the destination). To set a different source after this, hold down the Alt/Option button and click where you want the source.

How to do Portrait Retouching With Luminar

Cloning

Next, fix under the eyes by setting your source point to the cheek below. You can quickly change the brush size, using the square bracket keys [ and ]. For adjusting the brush softness (feather) hold the shift key with the square bracket keys. For certain areas, you don’t want to eliminate the destination completely (e.g. you still want some of the lines under the eyes to look natural) so drop the opacity a bit. 50% is a good place start if you’re not sure.

How to do Portrait Retouching With Luminar

To completely wipe over an area, set your opacity to 100%. Set the brush size to just slightly larger than the blemish. Choose an area that matches both the texture and brightness of the area around the blemish as your source point.

How to do Portrait Retouching With Luminar

An old retoucher’s trick is to set a low opacity (like 20%) and then brush over the image slowly, removing blemishes while sampling different areas. This can smooth out texture too much, so just take care while you do it. Click Apply when you’re done.

How to do Portrait Retouching With Luminar

In the case of my example image, there are one or two areas still to fix, but I’ll clean this up at the end of the main retouch, before applying a final finish.

Soft Glow

Next, you’ll need a new layer, as you’ll be masking off the filters you use on this layer. Masking allows you to hide areas you don’t want to be affected by the layer. Click the + sign in the Layers panel and choose Add New Adjustment Layer.

How to do Portrait Retouching With Luminar

Choose Soft Glow from the Filters list for this layer. As you increase the Amount of glow, you’ll notice that it also increases the brightness of the portrait, so use the Brightness slider to reduce it. You can also increase Smoothness to taste. Portraits can also usually benefit from some added Warmth.

How to Edit a Portrait Using Luminar

Masking

You only want the effect on the skin here, so right-click on the layer and choose the Mask>Invert Mask menu. On the top right of the screen, below the Hand tool, you’ll see the Brush tool. Click it. Turn on the Eye icon in the brush controls to see where you’re painting the mask. Just paint the skin and avoid areas of detail like the eyes, eyebrows, nostrils, and mouth.

How to Edit a Portrait Using Luminar

You can paint at 100% opacity because you can decrease the overall layer opacity later if you need to.

How to Edit a Portrait Using Luminar

Eyes

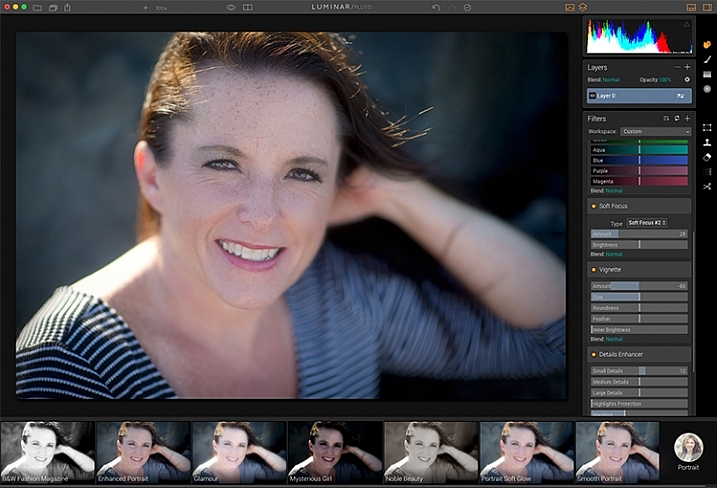
Next, let’s retouch the eyes. Consider renaming layers as you work for ease (as you can see I’ve done below), but it’s not essential. Create a new Adjustment Layer and add the Details Enhancer filter. Boost each of the details sections to taste. I’ve expanded the filter section to make it more visible below (it’s not something you can do in the app).

How to Edit a Portrait Using Luminar

Again, right-click on the layer and choose Mask>Invert Mask. Then use the Brush to paint in the iris only. If the effect is too strong, bring back the opacity of the layer in the Layers panel.

How to Edit a Portrait Using Luminar

Dodge and Burn

While it’s not a preset or filter, you can easily dodge and burn in Luminar. You need to set them up as two adjustment layers and mask them off.

Burning (darken select areas)

For burning, create a new adjustment layer and add Curves as the filter. Grab the middle of the curve and pull it down a little to darken the image. Change the Blend Mode of that layer to Luminosity. This stops the curve from adding saturation as well as contrast. Don’t forget to name the layer so you know which one it is.

How to Edit a Portrait Using Luminar

Next, you need to invert the mask as with other layers: Right-click on your Burn Layer and choose Mask> Invert Mask. The areas that you need to burn are the areas that are darker in the photo naturally or things you want to minimize. Burning helps things recede while dodging will bring them forward.

For faces, areas to burn are around the edge of the forehead, the area below the cheekbone, the neckline, the sides of the nose and the brow bone near the nose. Below shows the active mask with the areas I have burned. You want to paint with a low opacity brush (10% or so) and build up the effect. Keep turning the layer off and on to ensure you don’t overdo it. The effect should be subtle.

How to Edit a Portrait Using Luminar

If you brush in the wrong area, just hold down the Alt/Option key to turn it into the eraser temporarily. You can click the hollow circle to select the eraser tool.

Dodging (lighten select areas)

Dodging is also a new adjustment layer with a Curves filter, go ahead and add that now. But, this time you raise the middle of the curve a little.

How to Edit a Portrait Using Luminar

You can probably guess that you need to invert this mask as well! Great, you’re getting the hang of using Layers in Luminar. For dodging, you need to paint in the areas that you want to come forward. The forehead, above the cheekbone, the chin, and the front of the nose.

How to Edit a Portrait Using Luminar

If you find the effect too subtle still, raise the curve a little more. The combined dodging and burning will give more contour and shape to the face. As the last bit, you can also dodge a small crescent shape into the bottom of the iris. For my image, I’m going to do a little more cleanup with the Clone tool.

How to Edit a Portrait Using Luminar

Finishing the Look

For the final look, consider the elements of the photo and what can enhance it. This portrait is a little too saturated, so on a new adjustment layer add a Saturation/Vibrance filter and lower the Saturation to taste (I used -16 here).

How to Edit a Portrait Using Luminar

Even though you set the Blacks right back at the beginning, fading this image would also look cool. To do this, add a Curves filter to the layer and raise the left point a little. Add a second point to restrict the effect to the darker parts of the photo.

How to Edit a Portrait Using Luminar

The final thing you can do is add the Grain filter. A small Amount will give you a little texture to give a more organic feel to the shot.

How to Edit a Portrait Using Luminar

Saving the Image

Saving the file from the File>Save menu saves a .lmnr file, which is a fully editable file, with all your layers intact. You can even save your history into this file.

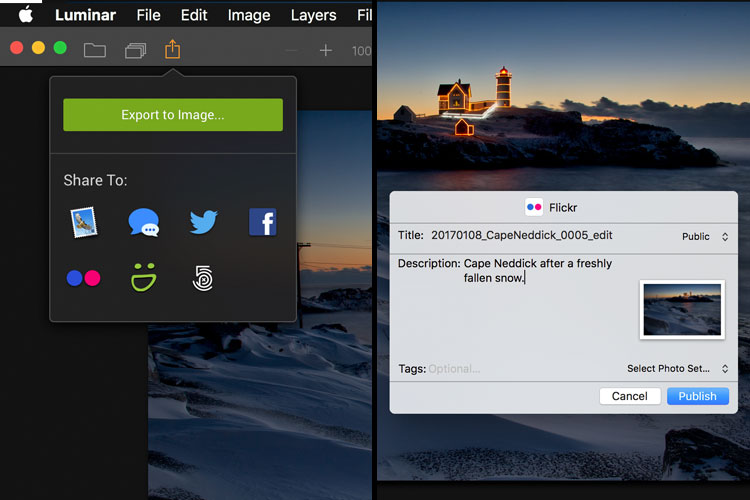
To share the file with others, you have a few options. On the left of the top bar, you’ll see the standard share icon (a box with an upwards arrow). If you click it, you’ll get the available options. Export to Image will create a rendered image, while the icons available allow you to share to Email, Message, Twitter, Facebook, Flickr, Smugmug or 500px.

How to Edit a Portrait Using Luminar

Selecting a service will bring up a dialog for that service.

How to Edit a Portrait Using Luminar

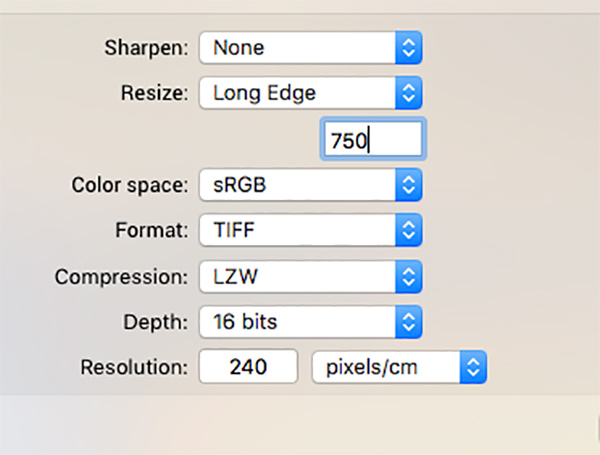
If you choose Export to Image, you get the standard operating system browser dialog. You can choose from JPEG, GIF, JPEG2000, PNG, TIFF, PSD or PDF output. The other options change to reflect this. For web sharing, an sRGB JPEG is the best option.

How to Edit a Portrait Using Luminar

Conclusion

So that’s been a look at a variety of the tools available in Luminar to aid with editing a portrait. You can download a free trial here and give it a go. Feel free to post your results in the comments.

Disclaimer: Macphun is a dPS advertising partner

The post How to do Portrait Retouching With Luminar by Sean McCormack appeared first on Digital Photography School.


Digital Photography School

 
Comments Off on How to do Portrait Retouching With Luminar

Posted in Photography


Speed up Your Workflow with the Accent AI Filter in Luminar and Batch Processing

03 Oct

It’s not uncommon for me to sit down at my computer with a memory card full of images and stare blankly at my ever-growing Lightroom catalog while my mind reels at the thought of editing each and every one of them. Many photographers have experienced this phenomenon and there are certainly some good methods of dealing with it such as using Presets in Lightroom, syncing edits across multiple photos, or even just copying and pasting a series of edits from one image to the next and then tweaking as you go.

Other programs offer similar tools for processing multiple images at once, but the Achilles Heel of this type of workflow is that the edits are often static in nature. You can choose from a predetermined set of values (e.g. Clarity +10, Saturation +5, Highlights -20, etc.) and then apply that to many images at one time. But what if some of your images require subtle changes to those parameters?

Lightroom and just about every image editor I have ever used for batch processing won’t tweak your editing parameters if a picture needs a little extra contrast boost or exposure adjustment. That’s where Luminar is different, and its unique Accent AI filter combined with the program’s built-in batch processing offers a great way for you to significantly speed up your workflow while producing outstanding images for yourself, your clients, or your fans on social media.

How to Speed up Your Workflow Using the Accent AI Filter in Luminar to do Batch Processing

After batch processing with the Accent AI filter in Luminar.

Accent AI Filter in Luminar

The Accent AI filter is new in Luminar Neptune, an update to Luminar that was released this summer. It works by using artificial intelligence to analyze your image and make adjustments depending on where it thinks the picture needs it most. Accent AI isn’t just a predetermined set of adjustments, but a series of tweaks and edits applied dynamically to the image, all controlled by a single slider that lets you control the overall intensity of the filter.

When I edit my images in Lightroom I often start with a custom preset that includes many alterations such as sharpness, highlights, shadows, tone curve, etc., and then adjust those on a per-image basis according to how I want them to be fine-tuned. It’s the latter part of that process which becomes tedious, and it’s precisely where the usefulness of the Accent AI filter really starts to show.

If Luminar thinks that an image might benefit from lowering the highlights, increasing shadow detail, altering the exposure, or any number of other editing parameters then it adjusts all of these at once instead of forcing you to edit individual sliders and change numerical values.

How to Speed up Your Workflow Using the Accent AI Filter in Luminar to do Batch Processing

Original unprocessed image. All I did to edit this into the image you see above was to use the Accent AI filter in Luminar and nothing else.

Applying the Accent AI Filter

Another example of the effectiveness of the Accent AI filter is this image of the Seattle skyline I took from the Sky View Observatory at the top of the Columbia Center Tower. I spent a lot of time using the various sliders in Lightroom to try to get a decent final result. But when opened the same picture in Luminar and used the Accent AI filter, I got a great finished photo in a matter of seconds.

How to Speed up Your Workflow Using the Accent AI Filter in Luminar to do Batch Processing

Original photo. Listen closely and you’ll hear a sad trombone playing in the background.

The first version, processed only using Lightroom. I spent about 10-15 minutes to achieve this in LR.

The Luminar version is so good I like it even better than the results I got from manually tweaking all sorts of sliders in Lightroom, and it literally took less than 10 seconds with the single Accent AI slider.

How to Speed up Your Workflow Using the Accent AI Filter in Luminar to do Batch Processing

Applying the Accent AI filter dramatically improved the image. The only thing I don’t like about this picture are the spots from dust on my lens in the top-left corner. Accent AI is great at many things, but it won’t fix blemishes like that. Luminar does include a powerful Erase tool to fix blemishes if you want to, but of course, it doesn’t work for batch processing.

Accent AI can also be used in combination with other filters in Luminar to enhance your images even more. You can get just the right combination of editing parameters to make your photos shine. I often use the Accent AI Filter as a starting point, usually adjusting the value to between 60 and 80, and then apply other edits as I need them like Vignette, Dehaze, or Soft Focus.

But the real power of Accent AI lies in how it can be used for batch processing wherein it can dramatically speed up and enhance the results of your photo editing workflow.

Creating Presets in Luminar

How to Speed up Your Workflow Using the Accent AI Filter in Luminar to do Batch Processing

Click the Add Preset button (shown here with a red circle around it) to create a new Preset that you can use when Batch Processing several images.

In order to use Accent AI for batch processing you must first create a preset, since you can’t just apply individual filters when going through a batch of images. Your mileage may vary but I’ve found that a good place to start when working with this type of operation is a value of 75. Set that, then click the icon third from the left (circled in red on the screenshot) and give your Preset a name, but make sure it’s descriptive like “Accent AI 75”.

Presets can contain as many filters as you like. I have create several for different types of images including: landscape, close-up, portraits, etc. All of them include the Accent AI filter and a combination of other filters in order to get the right look. The heavy lifting is done with the Accent AI filter, though. So I have a few different presets created with just that one filter set to different values like 60, 80, and 100 so I can quickly apply a single Accent AI adjustment to multiple images at once.

The Accent AI filter shines

Since the Accent AI filter examines each image individually and edits them based on where it thinks they need to be altered, I can generally trust it to give me good results and often don’t even need to use any other adjustments or filters.

Another way to approach batch processing with Accent AI is to open a single image from a collection of similar photos, apply the filter just as much as you want for that specific image, and then save that value as its own unique Preset. Then enter the Batch Processing mode and apply that Preset to all of your images at once.

How to Speed up Your Workflow Using the Accent AI Filter in Luminar to do Batch Processing

The thought of going through and editing each one of these pictures individually really bugs me. I created a preset called Cicada Accent AI 82 for editing these in a batch, which was nothing more than the Accent AI filter set to 82 Percent.

The major difference between using the Accent AI Filter in Luminar and syncing (or copy/pasting) edits in Lightroom is that Accent AI works dynamically to apply adjustments where they are needed. So each picture is edited individually rather than having all the same edits applied to all of them at once. That makes it ideally suited for batch processing in a way that is a step above what Lightroom and other programs have to offer. I’m not all that comfortable with applying a single preset in Lightroom to many pictures at once without then going through and tweaking all of them. But I’ve learned to trust the Accent AI Filter in Luminar and I’m quite pleased with its results.

Batch Processing

Once your preset is created, click the multi-file icon in the top-left of the Luminar interface to enter Batch Processing mode. Here you can set a variety of options such as export location, image format and quality, resizing, renaming, and more.

How to Speed up Your Workflow Using the Accent AI Filter in Luminar to do Batch Processing

In the example above I have loaded the Accent AI 75 Percent preset and ran a batch process on 50 photos of a cicada bug. Luminar processed all of them in about the amount of time it would have taken me to edit a single image in Lightroom.

How to Speed up Your Workflow Using the Accent AI Filter in Luminar to do Batch Processing

A quick caveat

As good as the Accent AI filter is for batch processing, it does have some important limitations that you should be aware of. I have found that it works best for nature, landscape, and architecture photography and generally prefer its results in those types of situations over portraits.

That’s not to say it isn’t useful for portraits, just that I’m a bit overly picky and tend to obsess over small details that even the advanced artificial intelligence in the filter can’t quite match. Also there can be a tendency to apply it a little too much, especially when you first start using it. My advice would be to hold back a bit to a value of 40 or 50, especially when batch processing. Sliding the filter all the way to the right can sometimes result in photos that look a little too over-edited and fake, so it might be best to start small and then find how you like to use it over time.

How to Speed up Your Workflow Using the Accent AI Filter in Luminar to do Batch Processing

Conclusion

Even if you don’t like the idea of trusting a computer to edit your photos for you, I would encourage you to at least give the Accent AI filter inside Luminar a try. Use it in combination with a couple other filters and see how it could save you a great deal of time, especially with batch processing or generating proofs for clients. You might be surprised at how much you like it.

The post Speed up Your Workflow with the Accent AI Filter in Luminar and Batch Processing by Simon Ringsmuth appeared first on Digital Photography School.


Digital Photography School

 
Comments Off on Speed up Your Workflow with the Accent AI Filter in Luminar and Batch Processing

Posted in Photography


3 Ways Luminar May Cure Some of Your Post-Processing Headaches

13 Sep

Lately, I’ve been playing around with Luminar by Macphun. I’ve found that this program reduces the number of my editing headaches. I’ll share a bit of my experience with it, and you can see if it can help solve some of your headaches or challenges as well.

Processing is a chore

I’m the impatient type; I hate sitting down. I spend my life trying to find ways to keep moving and being active. I love to create and build and explore. Sitting down to edit photographs is a true chore. You all know a photographer like me. They spend their time carefully composing, adjusting lighting, and building the image in the camera, so they don’t have to spend hours editing their images.

Let’s be clear I’m not criticizing those who build images using several layers and masks. Some of my favorite photographers are editing masters, and I truly appreciate the skills they use to create their work. It’s incredible. But it’s not me. Editing is a headache for me. I hate it, but I’m too possessive of my work to ever considering outsourcing my post-processing. So anything that reduces the time I spend behind a computer is a bonus for me.

Lately, I’ve been playing around with Luminar by Macphun. I’ve found that this program reduces the number of my editing headaches.

I used the presets in Luminar to help process this image. I’ve been on an abstract kick lately and the blue of this painted wall drew me to photograph all the cracks in the paint.

Luminar is very quick to use. The program works as a stand-alone application, or you can install and use it as a plug-in for Lightroom and Photoshop. I chose to edit using Luminar as the standalone version. So here are three of my editing headaches that Luminar helped reduce.

1) Finding a starting point for processing the image

Often we photographers shoot with a finished look in mind. We know we are going to convert an image to black and white or we want to create a luminous light filled look, and we shoot accordingly. However other times we struggle to picture the finished image. We can’t figure out a starting point for processing the photo. That’s where presets come in.

You can use presets as an idea bank that helps to get the creative juices flowing. The only issue is viewing these presets and finding the right starting point. In Luminar the presets are large, and you can easily scroll through each look using the slider bar. The display of presets is easily accessible at the bottom of the screen. You can click through several different looks and return to the one you like.

3 Ways Macphun's Luminar Cures Some of My Post-Processing Headaches

Here you can see the open screen and all of the presets are displayed at the bottom.

The other bonus to this method is the slider located on each preset. If the look is just a little too strong for your liking, it’s easy to dial it back. You can adjust how strongly each preset affects the image. For someone like me who tends only to make global adjustments to images, these types of features are really useful. I am able to select a preset then gently adjust the image to my liking.

Luminar helps with ideas and possibilities

3 Ways Macphun's Luminar Cures Some of My Post-Processing Headaches

This is the image I created in Lightroom. The color version is more like the picture I had in my head but when I saw the preset in Luminar it sparked some creativity.

The image you see below was pretty much a quick snap on my way out the door. I was in Cuba and waiting for my aunt to get ready before we caught the bus. I had no vision for the shot other than a quick sighting of something interesting. So when I returned home, I struggled with what to do.

I would never have thought of doing a black and white conversion for this image if it were not for one of the presets in Luminar. A headache solved, the program gave me an idea. I used the preset as a base and tweaked the image slightly. In total it took me about five minutes to edit the image.

3 Ways Macphun's Luminar Cures Some of My Post-Processing Headaches

I would never have thought of processing the image in black and white if not for the presets provided by Luminar.

2) Soooo many buttons to manage and remember

For those of us who want to edit images quickly, it’s difficult to remember all those keyboard shortcuts, and it’s time-consuming to keep checking the cheat sheet by our desks.

In Luminar, the interface is very simple, and it’s quick to use with just a few simple buttons. It’s easy to crop, compare, and apply a brush or a gradient to your work. It’s easy to make both global and more isolated adjustments quickly and effectively.

3 Ways Macphun's Luminar Cures Some of My Post-Processing Headaches

As you can see I quickly added a layer to this image. I wanted to use the brush to apply some very specific adjustments just to some areas of the image. Notice the clean interface.

Here you see the simplified interface with some of the options hidden (presets and histogram). It is a workspace called Quick & Awesome which you can select from the pull-down menu.

3) Layers can get complicated and confusing

Managing layers and masks can be confusing in Photoshop and for some of it’s a real headache. In Luminar, the layers are easy to access and utilize.

3 Ways Macphun's Luminar Cures Some of My Post-Processing Headaches

You can add filters to an image by creating another layer or apply them directly to the image. I used the filters and brushed them into the image on separate layers.

Pushing the plus (+) button adds a layer quickly in Luminar. The layers can be used to overlay a second image, like a texture or to apply filters, brushes, etc. It’s easy to apply a preset to an image, globally. Then if you want to apply a preset to just a few areas of an image you can also create another layer and brush the preset onto specific areas of the image.

To illustrate this point, I’ve quickly applied a black and white preset to an image using the brush tool. You can see how quick and easy it is to make very specific adjustments to an image by painting in the preset as a layer mask, similar to tools like Adobe Photoshop. However, Luminar can take things even one step further. Filters themselves can also be applied in the same manner. To do this, simply click on the brush tool, then click on the title bar of a filter (not a layer). When you begin painting in the mask, you’ll see a small mask preview thumbnail appears in the title bar. After creating the mask, adjust the filter sliders as desired to apply the effect to the mask. Once you get the hang of filter masks, you’ll find it’s an extremely efficient way to make selective edits to your photos.

Filters themselves can also be applied in the same manner. To do this, simply click on the brush tool, then click on the title bar of a filter (not a layer). When you begin painting in the mask, you’ll see a small mask preview thumbnail appears in the title bar. After creating the mask, adjust the filter sliders as desired to apply the effect to the mask. Once you get the hang of filter masks, you’ll find it’s an extremely efficient way to make selective edits to your photos.

Managing layers and masks can be confusing in Photoshop and for some of it’s a real headache. In Luminar, the layers are easy to access and utilize.

I really like how the program displays all the masks and layers I’ve created. I found it easy to manage.

In conclusion

For some of us, editing is a chore. It depends on your personality and your style. Post-processing is an essential part of the photographic process, but it doesn’t have to ruin your love of photography.

Many of the features in Luminar help to alleviate those editing headaches from which many of us suffer. The program simplifies complicated processes and allows users to create beautiful images in a fairly short amount of time.

Managing layers and masks can be confusing in Photoshop and for some of it’s a real headache. In Luminar, the layers are easy to access and utilize.

Here’s a finished image I completed using Luminar.

The Mac version of Luminar is available for a free trial or purchase here.. If you’re on a PC, download a free public beta version of Luminar for Windows here.

Disclaimer: Macphun is a dPS advertising partner.

The post 3 Ways Luminar May Cure Some of Your Post-Processing Headaches by Erin Fitzgibbon appeared first on Digital Photography School.


Digital Photography School

 
Comments Off on 3 Ways Luminar May Cure Some of Your Post-Processing Headaches

Posted in Photography


Macphun launches beta of Luminar photo editor for Windows

14 Jul

Mac-software maker Macphun has launched its first product for Windows PCs: a public beta of its award-winning photo editor Luminar. The beta is free of charge and comes with many of the most important features of the Mac version, including the artificial intelligence powered Accent AI Filter, which replaces traditional controls like shadows, highlights, contrast, tone, saturation and exposure with a single slider.

Unfortunately, a number of functions remain under development for the Windows platform, including workspaces, plug-in integration, object removal and noise reduction; however, the public beta will be updated as those features are being integrated and Macphun is envisaging a full cross-platform release in late in 2017.

“We are thrilled to release our first PC product today and give photography enthusiasts around the world the first taste of our best-selling Mac product,” said Kevin La Rue, Vice-President at Macphun. “By test-driving Luminar for Windows, beta testers can help shape our software and make the final release a perfect fit for everyone.”

You can download the free public beta of Luminar for Windows on the Macphun website now.

Press Release

Macphun debuts its first-ever software for the PC, heralding a new era of cross-platform solutions for photographers

San Diego, CA – July 13, 2017 — Macphun, the California-based developer known for delivering award-winning products for Mac, today launched the free public beta of its award-winning photo editor Luminar for Windows. To download the beta, please visit macphun.com/beta.

Luminar is a powerful photo editor designed to tackle anyone’s photography needs, from correcting challenging image problems to artful stylizing. Users can choose between levels of image processing complexity based on their experience, and adapt the workspace controls to their skill level, moving up to more advanced modes as they learn. Luminar works in non-destructive fashion and aims to take “work” from photo editing “workflow” for photographers worldwide.

In April, only 5 months after its launch, Luminar for Mac won the prestigious TIPA award for Best Imaging Software 2017. This all-in-one photo editor is a cutting-edge solution for creating fascinating images without extra hassle. Luminar includes over 300 robust tools that make fixing, editing and perfecting a photo as easy as moving a slider.

“We are thrilled to release our first PC product today and give photography enthusiasts around the world the first taste of our best-selling Mac product,” said Kevin La Rue, Vice-President at Macphun. “By test-driving Luminar for Windows, beta testers can help shape our software and make the final release a perfect fit for everyone,” concluded La Rue.

The public beta is free of charge and already matches some of the most important features of Luminar, such as the newest and most advanced tool developed by Macphun’s Research and Development Lab – the Accent AI Filter, powered by artificial intelligence technology. The filter allows anyone to create stunning images with a single slider, substituting for dozens of traditional controls like shadows, highlights, contrast, tone, saturation, exposure, details and many others.

Admittedly, several features from the Mac version of Luminar remain in development for the Windows platform, among them workspaces, plug-in integration, object removal, noise reduction, and more. As these are completed, the public beta will be updated regularly leading to a full cross-platform release late in 2017.

Key features of the Luminar for Windows public beta:

  • Adaptive user interface – Exactly matching the Mac version, the software adapts to the skill level and preferences of the photographer.
  • One-click presets – Over 50 pre-defined styles for every photography style.
  • Photo Editing Filters – Over 40 custom filters, each with built-in visual tips and a unique set of easy-to-use controls for correcting, enhancing and stylizing images.
  • RAW file conversion – Support for the latest RAW file libraries.
  • Non-destructive workflow – Edit without fear.

Recommended System Requirements – Windows 10, Core i5 2.2 or better, 8GB RAM, 1GB GPU RAM, SSD with 20+GB free space.

Articles: Digital Photography Review (dpreview.com)

 
Comments Off on Macphun launches beta of Luminar photo editor for Windows

Posted in Uncategorized


Macphun introduces Luminar Neptune with Accent AI filter

16 Jun

Software company Macphun has launched an update to its easy-to-use image editor Luminar. The most significant innovation in Luminar Neptune is a new artificial intelligence powered filter. The Accent AI Filter improves images with one simple slider instead of many adjustments and controls, such as shadows, highlights, contrast, tone, saturation and exposure.

The new filter uses artificial intelligence to analyze different areas of an image based on structure, objects, dark and light zones, colors and other parameters. As a user moves the slider across the image, the software automatically detects what areas of the image need improvements and applies them. You can also adjust the intensity of changes, generating a more natural or dramatic look, depending on the desired effect.

“Our mission to make complex photo editing tasks simple and fun led the team at our R&D Lab to explore Artificial Intelligence technology for image enhancement,” said Kevin La Rue, Vice-President at Macphun. “The Accent AI Filter emerged as a ground-breaking way to make perfect images instantly, incorporating the power of dozens of filters into one convenient tool. This is something other photo software is missing; and what’s more important, it’s something that all photographers will greatly benefit from,” concluded La Rue.

There is also a new workspace called Quick & Awesome. It consists of three filters which can create results very quickly: the aforementioned Accent AI Filter, Saturation & Vibrance and Clarity. The latter two allow for fine-tuning of the image after application of the Accent AI filter. Other updates include plug-in integration with Aurora HDR 2017, faster masking/brushing, an improved vignette filter and better memory management.

This latest update of Luminar is currently available for Mac only but Macphun is planning to launch a public beta of Luminar for PC in July. More information and free trials are available on the Macphun website.

Articles: Digital Photography Review (dpreview.com)

 
Comments Off on Macphun introduces Luminar Neptune with Accent AI filter

Posted in Uncategorized


Overview and Impressions of the new Macphun Luminar Software

16 Feb
Macphun Luminar

An image edited using Macphun Luminar image editing software.

At some point, after you pick up your first digital camera, the question of image editing arises. For years, the leader has been Adobe with their package that includes Lightroom and Photoshop. However, lately, other software companies have been dipping their toes in the waters of image editing applications. One of the latest is MacPhun, makers of the Macphun Creative Kit.  Their entry into image editing, available for Mac OS X based computers only, is called Macphun Luminar.

Luminar is a standalone application for nondestructive RAW processing and image editing, but can also be used as a plugin for Lightroom, Photoshop, Aperture, and Apple Photos. The application window and tools available are identical whether it runs as a standalone or as a plugin.

Overview

When opening Luminar, you’ll be presented with a window that gives you two options; Load Image or Batch Processing.

Luminar opening screen

Macphun Luminar workspace

Luminar’s workspace is clean and easy to navigate.

Selecting Batch Processing allows you to drag and drop images, or load them from folders on your computer. You’ll then be prompted to choose certain settings such as a preset to apply (more on the presets later), as well as where you would like the images saved, what type of file to save as, resizing, and file naming. In addition to the opening dialog, Batch Processing is also available from the File menu within the application.

I’m a little disappointed that I can’t see a preview of the preset I’m applying to the batch, but overall, the process is easy to understand and runs pretty efficiently.  I processed a batch of 24 RAW images in just under three minutes on my late 2013 iMac.

The other option you see when starting up Luminar is “Load Image”. This allows you to open a single file and edit it to your liking, and then export it in any number of ways. I kind of wish Luminar had a file browser to allow me to view thumbnails, rather than just the “Load Image” dialog.

Workspaces

Macphun Luminar Portrait Workspace

You can change the workspace according to your subject matter. For instance, selecting Portrait brings up a different set of tools than does Landscape, or Street.

You can customize the application by using one of the workspaces available, which automatically brings up a set of filters appropriate for the subject matter.  The preset workspaces include Black and White, Landscape, Street, and Portrait. You can also create your own workspace based on the filters you find yourself using the most (see above).

Editing window

Macphun Luminar

When selecting Add Filter, this window listing available filters appears, allowing you to select from dozens of filters to apply to your image.

Once you have a file opened, you’ll be presented with the editing screen. The main window will show your image. Across the bottom, you’ll see the Preset Panel. This shows various presets that can be applied to your image. In addition to the default presets, Macphun has a selection of preset packs available for download on their website (some are free, some are for purchase). The presets are separated into various workspaces, including Outdoors, Portrait, Street, Dramatic, Basic, and Travel.

Luminar sliders

On the right side of the screen, you’re presented with the layers panel which shows the different layers you have in your current image. Similar to Photoshop, layers can use different blending modes, and the opacity of each one can be adjusted to give you exactly the look you want. A Transform tool is also available to work with the layers if needed.

Beneath the Layers palette, you’ll find the sliders to adjust the filters currently in use. Each preset uses various filters that can be adjusted using these sliders. You can also create your own look simply by adding the filter or filters of your choice from over 40 available. In addition, each filter has a separate blend mode that can be changed to adjust the look as well.

Macphun Luminar

A RAW image before processing with Luminar on the left, and after on the right.

Toolbars and palettes

On the right edge of the screen sits a toolbar, which houses various tools including Move, Masking Brush, Gradient Mask, Radial Mask, Transform, Clone Stamp, Eraser, Denoise, and Crop.

Any of the panels and palettes within Luminar can be shown or hidden with a click of the mouse, making it easy to customize the workspace to your liking.

Luminar-Export-Dialog

The Luminar Export Dialog

Once you’re done making your edits, Luminar offers an easy interface to share your images to various photo sharing and social media sites, including Facebook, Twitter, 500px, Smugmug, Flickr, Messages, and Mail.

Luminar sharing options.

Macphun Luminar portrait preset

A portrait edited using the Black and White Fashion Magazine preset under the Portrait presets in Luminar.

Pros of Luminar

Macphun’s Luminar, as a standalone application, offers an excellent option for those who don’t want to get involved in a subscription service. Luminar is currently available from Macphun for $ 69, making it an easy way to get started editing RAW photos with a powerful image editor. For those already using Photoshop or Lightroom for their editing, Luminar works as a plugin that provides all of the powerful editing options of the standalone.

Luminar is easy to use, with a multitude of sliders that are pretty self-explanatory and provide for fine control over image effects. In a very short amount of time, you can be editing your RAW files and exporting finished images in a variety of formats, including TIFF, JPEG, PNG, GIF and PSD. If you’re familiar with MacPhun’s interface in the Creative Kit, Luminar will be easy to figure out.

I found the quality of the images edited in Luminar to be excellent, but as in Creative Kit, I thought some of the presets needed to be dialed back a bit for the best results. The variety of effects and options available really lets you customize the look of your images as well. I found some presets to be excellent starting points, but then by adding another filter or two, I was able to get exactly the style I wanted for my image.

Macphun Luminar

An image edited using MacPhun Luminar.

Before/after

Layered files

As of a recent update to the program, there is now the ability to save images as .lmnr files, which will save the layers and work done on an image, so you can come back to it later. A nice feature similar to saving as a layered PSD file. 

Cons of Luminar

As someone who’s used Photoshop for years, I found that some of the tools, such as the clone stamp, worked differently than I expected. This is easily overcome as familiarity with Luminar grows, but it took a little while before I got results I liked.

One other puzzling question is, why isn’t there native support for Macphun’s Creative Kit? MacPhun indicates in their product FAQ that there will be support for plugins eventually, but it would seem to make sense to have that powerful suite of plugins available from Day 1. Once support for plugins is available, Luminar becomes an even better value, in my opinion.

Macphun Luminar

Landscape image edited using Macphun Luminar.

Luminar, while an excellent photo editor and RAW processor, lacks certain tools available in Photoshop, such as the ability to output to CMYK, have multiple print layout options, or add text to an image. While many will never have a need to do any of that, it is a distinction that should be made, especially for those who like to add a watermark to their images being shared online.

Finally, Luminar lacks an asset management component like Lightroom, so for those who like to create catalogs, collections, and add keywords and descriptions to images, you’ll still need to use Lightroom while using Luminar as a plugin.

Macphun Luminar

Edited and exported using Macphun Luminar.

Final Verdict

Macphun Luminar has a simple to understand interface and a lot of great features that make it an excellent RAW processing application. Its flexibility to work as either a standalone application or a plugin for Photoshop, Lightroom, and other photo applications means that Luminar will be easy to integrate into your current workflow. My first thought, however, is that its primary market is people who want a powerful photo editor that is simpler to use than Photoshop, without paying a subscription fee every month.

Luminar offers some excellent editing tools, and with over 50 presets, it’s easy to get started towards the look you want. The interface is easy to understand, with self-explanatory sliders clearly marked to allow you to adjust the effect to your liking. If you’re just getting started with processing RAW files and photo editing in general, Luminar is a great choice.

Luminar is available from Macphun’s website for $ 69, for Apple computers only (currently, supposedly a PC version is coming in the future tbd). Here are a couple more before and after images of what you can do with Luminar. Have you tried it? What are your thoughts?

googletag.cmd.push(function() {
tablet_slots.push( googletag.defineSlot( “/1005424/_dPSv4_tab-all-article-bottom_(300×250)”, [300, 250], “pb-ad-78623” ).addService( googletag.pubads() ) ); } );

googletag.cmd.push(function() {
mobile_slots.push( googletag.defineSlot( “/1005424/_dPSv4_mob-all-article-bottom_(300×250)”, [300, 250], “pb-ad-78158” ).addService( googletag.pubads() ) ); } );

The post Overview and Impressions of the new Macphun Luminar Software by Rick Berk appeared first on Digital Photography School.


Digital Photography School

 
Comments Off on Overview and Impressions of the new Macphun Luminar Software

Posted in Photography


Macphun announces Luminar photo editing app for Mac

20 Oct

Macphun, the company behind Aurora HDR, has announced Luminar, an all-in-one photo editing app for Mac. The photo editor was designed for users of all skill levels, and includes a user interface that can be tailored to each user’s specific needs.

Luminar includes a variety of tools for processing images, including native Raw processing, more than 35 photo filter sets including Photo Filter Emulation and Cross-Processing, presets, layers, brushes and masking, spot healing, noise reduction and ‘personalized darkrooms’ called Workspaces. Macphun also mentions a sky replacement tool to tease some of the other more advanced features the software will offer.

Macphun says it will open Luminar to pre-orders on November 2 with the official launch scheduled for November 17. New customers will pay $ 59, while existing customers will be charged less at $ 49. Those who pre-order the software will receive an exclusive video series dubbed Photography Essentials and Marketing Guide for Photographers by Will Burrad-Lucas.

Via: Macphun Blog

Articles: Digital Photography Review (dpreview.com)

 
Comments Off on Macphun announces Luminar photo editing app for Mac

Posted in Uncategorized