RSS
 

Posts Tagged ‘LOOK’

Video: Leica M10 First Look

19 Jan

The new Leica M10 is an attractive combination of classic styling and modern specifications. Check out our quick video overview for a rundown of some of its key features.

Read our First Impressions Review

Articles: Digital Photography Review (dpreview.com)

 
Comments Off on Video: Leica M10 First Look

Posted in Uncategorized


Take a look at a 380-shot mosaic of Apple’s new campus created with a 100MP Phase One camera

06 Jan

A composite of 380 100MP aerial images has been created of the site of Apple’s new campus by photo mapping and data company SkyIMD. The company usually provides the kit for other aerial photographers to use, but on this occasion wanted to show off the amount of detail that can be captured with a Phase One iXU RS1000 100MP aerial camera. The company used software to create flight paths over the 0.5 square mile construction site and spent just thirty minutes shooting 420 images with the camera attached to a Cessna 172 light aircraft.

When combined to create a single picture of the whole area, the images allow dramatic magnification so that people in the scene can be picked out – even though the plane was flying at 2000ft with a lens just longer than standard for the format.

The Phase One iXU RS1000 industrial camera uses the same CMOS sensor that is used in the IQ3 100 back for the XF 645-style DSLR body, but in this case it is used in a body with no moving parts. The firm used a Rodenstock 90mm lens with the body and once all 420 images were combined and cropped to the equivalent of 380 images, the file measured 4.76GB. SkyIMD used Photoshop’s Photomerge feature to combine the images, but to maintain manageable amounts of data the company divided the images into batches of over 70 covering specific areas of the site. Once the batches were combined those composites were also combined to create the final image, which you can see on the SkyIMD website.

SkyIMD’s Michael Estigoy has provided some detail about how the image was shot and created.

All of the images were captured using our FAA/EASA/ANAC STC certified Aerial Camera Platform. The platform mounts to the strut of a plane (Cessna) and holds the PhaseOne iXU RS1000 90mm camera in a vertical (nadir) position.

During the pre-flight process, we used a software program called Flight Planner from AeroScientific (http://www.aerosci.info/flightplanner/) to create our flight paths, and calculate the frequency of the intervalometer based on the speed, altitude and desired GSD (ground sample distance).

Using the PhaseOne iX Capture Software, we set the exposure and ISO to obtain the best image balance we could. There was some consideration given to capture as much detail as possible – balancing the exposure between not making the shadows too dark and whites/brights too blown out.

We loaded up the flight plan on our iPad – we use an application called Galileo Offline Maps (https://galileo-app.com/) – to depict the flight lines and line up our airplane. Our pilot, who has years of experience flying missions like this, lined up the plane at the speed and altitude we calculated pre-flight, and then flew the lines straight and level. I controlled the camera operation and made sure that the image quality and coverage was being captured successfully.

The parcel required us to fly 7 flight lines to capture the imagery. We flew one grid.
We are planning follow up flights and will fly a double grid pattern on those, or a cross hatch pattern, to capture more images and enable us to create better mosaics and perhaps a 3D model or flyover.

Stitching and imaging process
We typically use photogrammetry software such as those offered by Pix4D and Agisoft. However, this time I elected to try and use Adobe Photoshop to create the Mosaic. I used the Photomerge function.

We had a total of 420 images. We have a high-powered computer (8 core i7, 64GB RAM, m.2 SSD drives, etc., GeForce GTX video card), but 420 is almost impossible to process all at once. I grouped the images into six separate folders, each representing an area of parcel. Each group shared some images with the other groups in order to facilitate matching. After each group, or chunk, of images was merged, I corrected them for distortion and then merged the groups together. After merging, any major flaws were cut out and images were sourced to fill in the holes.

Photoshop used 90% of our installed RAM and approx. 700 GB of scratch disk space on two m.2 SSD drives to complete each group, including the final mosaic.

As mentioned on our site, we did not take any time to massage the resulting mosaic Photoshop produced. I may have adjusted curves, performed some slight sharpening, and that’s about it. There are obvious mis-alignments and distortions in the image. We wanted to share the image rather than spend another week making it perfect.

The final image was cropped to the final size. I had seen the plans Apple submitted to the City of Cupertino and wanted to try and represent that area of view (pages 3 & 4 of this PDF – https://s3.amazonaws.com/apple-campus2-project/Site_Plan1_Submittal7.pdf). The crop was made visually. We eliminated the use of about 40 photos, hence the approx 380 images mentioned on our site.

The image was too large for TIFF or JPG format so it was saved as a Photoshop Large Document (.PSB). In order to support the zooming feature on our web, we used a photoshop plugin from Microsoft:
http://research.microsoft.com/en-us/um/redmond/groups/ivm/HDView/HDPhotoshopPlugin.htm. This created the thousands of tiles for zooming.

I used Openseadragon for the javascript/web enablement for the zoom/interactive viewer:http://openseadragon.github.io/

Articles: Digital Photography Review (dpreview.com)

 
Comments Off on Take a look at a 380-shot mosaic of Apple’s new campus created with a 100MP Phase One camera

Posted in Uncategorized


Take an entertaining look back at the cameras that came before SD cards

13 Dec

Looks like we’re not alone in our love of cameras from the early days of digital photography: YouTuber The 8-Bit Guy has published a thoroughly entertaining look back at cameras that used floppy disks and other memory media that preceded the humble SD card. He revisits the Sony Mavica FD-7, Mavica FD-85, Panasonic SD4090 and the Mavica CD-350. Take a look at the video and see if it sparks any memories of cameras from your past, and then head over to our Throwback Thursday feature on the floppy-disk-using Mavica FD-91.

Articles: Digital Photography Review (dpreview.com)

 
Comments Off on Take an entertaining look back at the cameras that came before SD cards

Posted in Uncategorized


A fresh look at Dorothea Lange’s censored photos of Japanese internment

11 Dec

$ (document).ready(function() { SampleGalleryV2({“containerId”:”embeddedSampleGallery_2013785745″,”galleryId”:”2013785745″,”isEmbeddedWidget”:true,”standalone”:false,”selectedImageIndex”:0,”startInCommentsView”:false,”isMobile”:false}) });

Dorothea Lange’s photos of Japanese interment in America are less well-known than her other Farm Security Administration works like ‘Migrant Mother’ – and there’s a reason for that. The unflinching view of the events captured in her photos landed them in the US National Archive, with many labeled ‘impounded,’ where they sat for decades.

Following the attack on Pearl Harbor, the US government announced the mandatory relocation of people of Japanese ancestry, the majority of which were American citizens, to internment camps. Lange was commissioned to photograph the events, both as people were displaced from homes and business, and later as they reported to assembly centers and were ultimately sent to the camps.

Lange’s photos painted a brutally honest picture of every phase of the internment, and were seemingly met with displeasure from the military as they were quietly impounded and archived. A 2006 book put the censored images front and center for the first time. You can see a few of the images here; Anchor Editions has published some information about the images and is offering prints with half of proceeds going to the ACLU. 

Articles: Digital Photography Review (dpreview.com)

 
Comments Off on A fresh look at Dorothea Lange’s censored photos of Japanese internment

Posted in Uncategorized


A fresh look at Dorthea Lange’s censored photos of Japanese internment

10 Dec

$ (document).ready(function() { SampleGalleryV2({“containerId”:”embeddedSampleGallery_2013785745″,”galleryId”:”2013785745″,”isEmbeddedWidget”:true,”standalone”:false,”selectedImageIndex”:0,”startInCommentsView”:false,”isMobile”:false}) });

Dorothea Lange’s photos of Japanese interment in America are less well-known than her other Farm Security Administration works like ‘Migrant Mother’ – and there’s a reason for that. The unflinching view of the events captured in her photos landed them in the US National Archive, with many labeled ‘impounded,’ where they sat for decades.

Following the attack on Pearl Harbor, the US government announced the mandatory relocation of people of Japanese ancestry, the majority of which were American citizens, to internment camps. Lange was commissioned to photograph the events, both as people were displaced from homes and business, and later as they reported to assembly centers and were ultimately sent to the camps.

Lange’s photos painted a brutally honest picture of every phase of the internment, and were seemingly met with displeasure from the military as they were quietly impounded and archived. A 2006 book put the censored images front and center for the first time. You can see a few of the images here; Anchor Editions has published some information about the images and is offering prints with half of proceeds going to the ACLU. 

Articles: Digital Photography Review (dpreview.com)

 
Comments Off on A fresh look at Dorthea Lange’s censored photos of Japanese internment

Posted in Uncategorized


RNI’s Colibri app gives your digital images a slide-film look

29 Nov

If you think your smartphone photos and other digital images look a little bland straight out of camera, you now have one more app at your disposal to give them more of a film-like appearance. London-based app maker RNI has launched its new Colibri app. Colibri is essentially an image filter app for the iPhone, albeit a slightly special one. The filter algorithms behind the app use machine learning and its makers say Colibri has been fed some of the ‘finest slide film scans’ to create its range of filter options. 

Colobri’s ‘more color, less editing’ tagline indicates that the app is not meant to be an all-purpose editor but instead puts a focus on enhancing the image’s color and tonal properties to simulate a slide-film look. That said, there are cropping and rotation tools available and you can adjust the intensity of your filters, brightness and contrast using a range of sliders.

Of course it’s all a matter of taste, but some the image samples on the RNI website look quite promising. So, if you like this type of effect, Colibri might be well worth its download price of $ 1. If you like this type of film simulation apps but would prefer a little bit more control over the conversion process, you could also have a look at the Filmborn app we reported on recently.  

Articles: Digital Photography Review (dpreview.com)

 
Comments Off on RNI’s Colibri app gives your digital images a slide-film look

Posted in Uncategorized


Chinsekikan: Japanese Museum of Found Stones that Look Like Human Faces

18 Nov

[ By WebUrbanist in Art & Sculpture & Craft. ]

japanes-rock-faces

An unusual collection of found-object art in Chichibu, Japan is home to nearly 2000 rocks that naturally feature what appear to be facial expressions.

japan-rock-faces

japanese-face-stone

A jinmenseki (or: rock with human face) can look like anything from an abstract emoji to a famous figure, including ones in this array that are purported to resemble Donkey Kong, Nemo and Elvis Presley.

japan-elvis-presley-head

japan-face-rocks

japanese-stone-collections

The founder of the museum, Shozo Hayama, passed away after 50 years of collecting and left the space and its collection to his wife Hayama six years ago. The key criteria: nature is the only artist in the mix (no modified rocks allowed).

rock-museum

japanes-faces

japan-evil-face

japan-rock-collector

Some of the rocks are named while others simply set on the shelves, left open to interpretation. Visitors can simply show up but are advised to call ahead since the hours of opening are not entirely consistent or predictable (h/t Spoon & Tamago).

Share on Facebook


[ By WebUrbanist in Art & Sculpture & Craft. ]

[ WebUrbanist | Archives | Galleries | Privacy | TOS ]


WebUrbanist

 
Comments Off on Chinsekikan: Japanese Museum of Found Stones that Look Like Human Faces

Posted in Creativity


5 Steps to Achieve the Look of Black and White Film Using Lightroom

10 Nov

As a hobbyist, amateur, or professional photographer, you may be interested in achieving the look and feel of black and white film without the hassle and investment in equipment and gear. You can edit a digital image using Lightroom with this goal without having your hands smell like rotten eggs (developing chemicals). If you shoot black and white film often, as I do, then you might actually love that smell. If not, then you might want to read on.

Look feel black white film Lightroom01

The feel of black and white film – research first

The objective here is to provide you with a few basic steps to get you started on the path to edit your digital images to look like they were shot on black and white film, without the mess. If you are not familiar with the qualities of film images or have not examined them closely, it would be a good idea to do so. Try to pick up and look closely at some actual prints on photographic paper. You might find these in your grandmother’s attic or your local museum. Photography books or online searches will yield many reprinted or scanned examples as well.

First, consider the subject of style as it relates to film photography. Film photographs generally have a certain nostalgic or vintage look and quality to them that distinguish them from the clarity and realistic look of a well-composed digital image. Film tends to render subjects and scenes in a more abstract manner. Although you can make tack sharp and very realistic looking images using today’s film and gear, that’s not really the role of film photography.

Look feel black white film Lightroom02

If you want clean, shoot digital. Film should look old, slightly out of focus, and definitely grainy. All film has some or a lot of grain and it is basically the equivalent of digital noise. While you may prefer some of your images to look super sharp and smooth, you may also find it pleasing to add a little (or a lot) of grain from time to time.

Film adds an air of mystery

You might want to experiment with this more abstract style or look of film that comes with a distinctive aesthetic. One advantage of presenting this style of image is that the viewer is given the task of filling in the blanks, so to speak. Subjects in your image that are not entirely in focus or even blurry can be representative of anything or anyone. Your image can be more open to interpretation by the viewer as compared to an image that was sharply composed with a subject that is obvious. In other words, you might want to leave some room for mystery in your images. Film photography, or working towards the look and feel of film, can do that for your images.

Look feel black white film Lightroom03

Like digital, film is really just another medium in which we can express ourselves as artists and photographers. I love many things about both film and digital and each has a place in my professional and personal photography life.

5 steps to getting the look and feel of film using Lightroom

If you shoot digital and are looking to achieve the look and feel of film, below are five easy steps using Lightroom.

1. Set your ISO high

ISO should be set to somewhere between 1600 and 6400. Digital noise is the modern day equivalent of the grain in film. The grain or digital noise creates atmosphere and the look or aesthetic that you are trying to emulate.

2. Make an image of something interesting

Look feel black white film Lightroom04

Choose a subject. Framing and composition should be pleasing, and be careful to avoid too many distractions. Emotion is usually a good idea to include if there are people or animals in your photo. Any additional compositional techniques can be applied to the image. The subject could be in focus or blurry. This is completely up to you and your vision.

3. Convert the image to black and white

To convert your image to black and white, press V or use another method for black and white conversion in Lightroom. You can stay in color, but the look and feel of color film is more difficult to achieve and will require some additional steps.

4. Open the Develop module in Lightroom

Look feel black white film Lightroom11In the bottom panel of the Develop module called Effects, make the following adjustments:

  • Using the sliders, set the Post-Crop Vignetting to -10. Older camera lenses tended to impart some vignetting onto the image. This will give the image an authentic older film quality to it. Ansel Adams famously burned (darkened) the edges to all of his prints.
  • Set the Grain Amount slider to 50.
  • Adjust the Grain Size to 50.
  • Set the Grain Roughness to 25.

5. Review your image and make the finishing touches

Adjust the sliders to increase or decrease the three Grain options to achieve your vision for the given image. You can also dial in or out the vignette as well. All images are different and all digital image files will respond differently to these adjustments based on the sharpness and ISO settings.

Look feel black white film Lightroom05

You may want to consider the following questions to evaluate your adjustments at this point. Do these edits help the image? Does it assist in the presentation of the image as more abstract so that it might connect better with the viewer? Did the adjustments achieve the look at feel of film that you were gong for? You can decide on the answers to these questions and make editing decisions as you see fit or recruit a friend to provide a critique.

If you like your results and would like to explore this topic further, there are free online software programs such as Analog Efex Pro that are part of Google’s Nik Collection. Presets are also available that will aid you in this process and even help you to achieve the look and feel of color film. You might want to consider making your own presets and applying them en masse to a given photo shoot or batch of images as well.

Look feel black white film Lightroom06

Below are a few images representing multiple genres that I made with a digital camera then edited to achieve the look I was going for using the settings in the Effects panel above.

Look feel black white film Lightroom07

Look feel black white film Lightroom08

Look feel black white film Lightroom09

Look feel black white film Lightroom10

Do you enjoy shooting film or reproducing the look of it using digital methods? Do you have a favorite way to achieve it? Please share in the comments below.

googletag.cmd.push(function() {
tablet_slots.push( googletag.defineSlot( “/1005424/_dPSv4_tab-all-article-bottom_(300×250)”, [300, 250], “pb-ad-78623” ).addService( googletag.pubads() ) ); } );

googletag.cmd.push(function() {
mobile_slots.push( googletag.defineSlot( “/1005424/_dPSv4_mob-all-article-bottom_(300×250)”, [300, 250], “pb-ad-78158” ).addService( googletag.pubads() ) ); } );

The post 5 Steps to Achieve the Look of Black and White Film Using Lightroom by Jeremy H. Greenberg appeared first on Digital Photography School.


Digital Photography School

 
Comments Off on 5 Steps to Achieve the Look of Black and White Film Using Lightroom

Posted in Photography


What’s In My Bag: A Look at the Camera Gear of a Nature Photographer

27 Oct

Being a landscape or nature photographer is like enjoying ice cream and having unlimited choice in the ice cream shop. There are so many different kinds of images to make, and different ways of making them in the outdoors, that having a wide variety of gear to choose from is important. This article will take you on a little journey through what’s in my bag. From my own camera gear to the different tools that I use to help me photograph the scenes in nature that capture my attention, and turn ordinary life into extraordinary art.

whats-in-my-bag-a-look-at-the-camera-gear-of-a-nature-photographer

sunset reflected in water

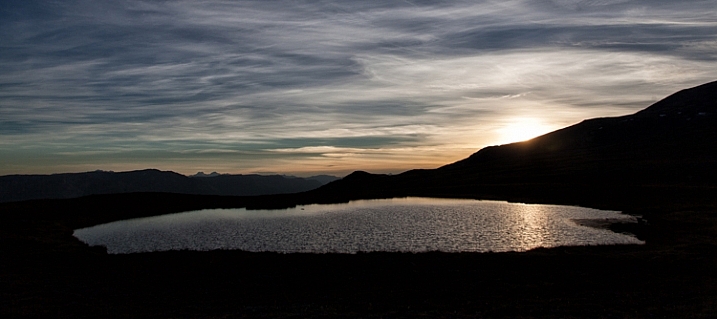
Hudson Bay Mountain Sunset
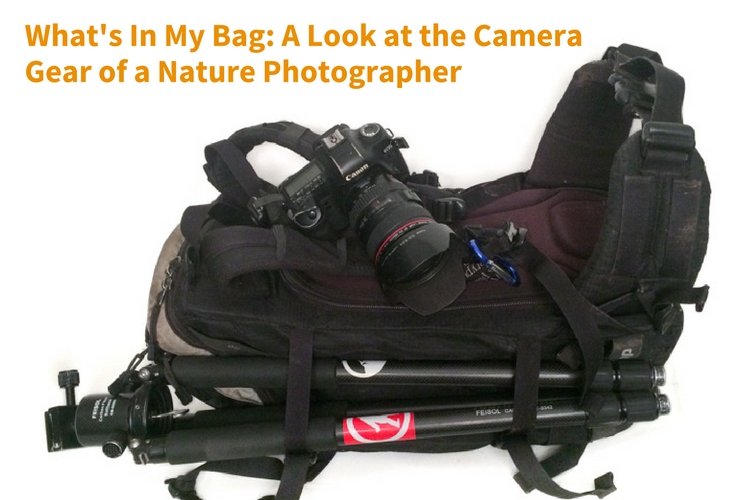
The Backpack

camera-bag-gear-02

The biggest piece of gear I use is the Tilopa backpack from f-stop. It’s a rugged 50L pack that’s well suited for a wide variety of outdoor scenarios. There are all manner of straps and zippered compartments both outside and inside the pack that are useful for attaching and storing both large and small pieces of equipment. There are three things however that have proven to be especially valuable to me:

  1. Rear Panel Access – instead of just having access to the inside from the top, the Tilopa has a zippered section that allows you access to the bag when you lay it on the ground. This is helpful when you have gear at the bottom of the pack and you don’t want to excavate everything on top of it to get access (as you’d have to do when going in from the top as is typical in a lot of other backpacks).
  2. Internal control unit (ICU) – ICU’s come in different sizes and shapes and allow you to organize and protect your camera equipment. My Tilopa allows for a large ICU with space at the top of the pack for a jacket or food depending on my needs. The backpack also has attachment points that you can use to secure your ICU to the inside of the pack. One really nice feature is that the ICU itself can be zippered shut and removed or carried. If you fly a lot and find that your pack is overweight, you can remove the ICU with your valuable gear and take it with you on the plane while checking the rest of the bag.
  3. Padded Hip Belt – to carry some of the weight on my hips.

Backup Camera Bodies

camera-bag-gear-03

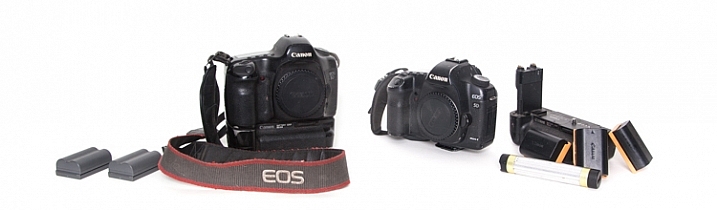
The first digital SLR I owned was the Canon 5D. It was such a huge step up, both in price and quality from its predecessor (a film Canon Rebel). I remember being amazed at how much more of the scene I saw when looking through the viewfinder (thanks to the full-frame sensor). In 2007 I purchased an additional body (Canon 5D Mark II), which meant that I now had a backup. Having two cameras available for use provides a nice sense of security, knowing if one has issues, there won’t be any loss of productivity. The main differences between the two bodies that I appreciate are the live view, greater dynamic range, and higher resolution screen that the 5D MK II provides.

Extra Batteries – Charging Devices

Having spare batteries is especially important when I am out shooting for extended periods of time, or I am photographing winter scenes. I also appreciate having grips for each of my camera bodies that gives me the option of going out with two batteries at a time.

Another situation where a longer battery life is appreciated is when I shoot time-lapse sequences. I can shoot several thousand images at a time and it’s nice to know that I can leave the camera firing away with ample power, and not have to continually come back and check to make sure the battery hasn’t died.

Not only do I have backup camera batteries, but I also had a portable battery charger (Goal Zero Switch 8) for my phone. I say HAD because I used it so much it’s worn out. I am planning on purchasing an upgraded power charger soon. This device can be charged at home by plugging it into a USB port, and then used in the field to recharge a phone (or other devices such as headlamps).

Image Storage

camera-bag-gear-04

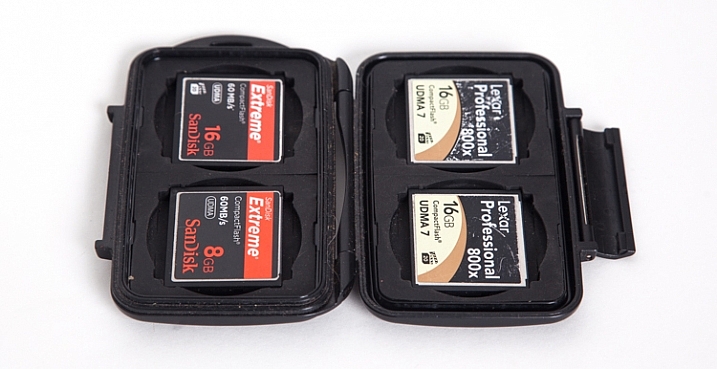
Apart from the Compact Flash (CF) cards in the cameras, I also carry a small (older model) Pelican case with room for 4 CF cards. The majority of my cards are 16GB, but I also carry a 2GB one as an emergency backup in a small pocket in my backpack.

Apart from the flexibility that having multiple cards provides, I sincerely believe in redundancy. You never know when a card might fail, and so to be ready on the occasion that one does, it’s nice to know you can keep shooting. Most of the time I don’t fill the 16GB cards to capacity when I’m out for the day on a photo-adventure. There are occasions however when I’m on a commercial job where having multiple cards is an absolute must.

Lenses

camera-bag-gear-05

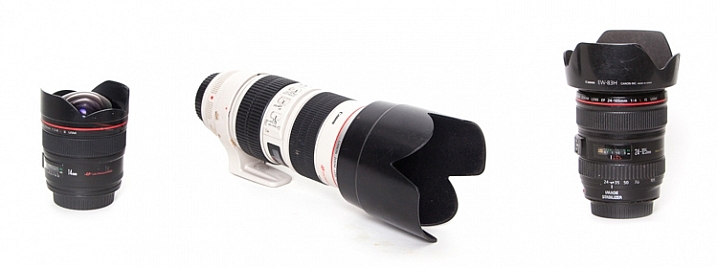
The three lenses I have are all Canon L-series glass.

  • 14mm, f/2.8: This wide-angle prime lens is really useful for capturing wide open vistas. It also comes in handy when you find yourself in tight quarters and don’t have a lot of physical depth between you and your subject. The trick when you’re really close though, is to make sure your main subject is near the center of the frame. Because of the nature of this almost fish-eye lens, objects near the corners of the frame have exaggerated perspectives. It’s almost as if they are unnaturally stretched. (Price it out on Amazon or at B&H)
  • Canon 24-105mm, f/4: This is the lens that I have on my camera the most, primarily because it has the greatest degree of flexibility when it comes to focal length.
  • 70-200mm, f/2.8: Every once and while I go out with the goal of focusing on more detailed aspects of nature, rather than a wide-angle view of a scene. The added focal length as compared to the 24-105mm lens helps me to do that. The large aperture can also provide a nicely blurred background when the need arises.

Tripod

camera-bag-gear-06

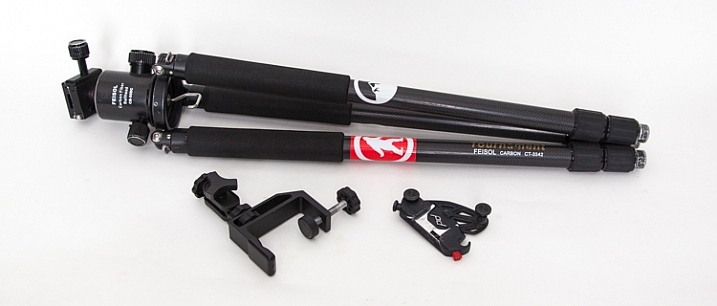
My current tripod is the carbon-fibre Feisol CT-3342 with a Feisol CB-50DC ball head. This allows for flexibility when composing your image and also has the capability to rotate when the camera is locked in place (there are degree markings to help when specific movements are required, for example when doing panoramas). There is a tiny removable hook (which you can hang things from) that screws in underneath the head which is useful when it’s windy and you need that extra measure of stability.

The tripod has 3-section adjustable legs that extend or contract with the simple twist of a rubber ring. One of my favourite features (as I do a lot of winter photography), is the screw-in metal spikes that attach to the bottom of the tripod legs. These come in handy when I’m out on ice, or other slippery situations, to keep the tripod secure during each exposure the camera makes.

I also have a small tripod clamp that comes in handy in situations where using a tripod simply isn’t possible.

A relatively new purchase has been the Capture Pro from Peak Design. This is a device that I attach to the shoulder strap of my backpack and then click my camera (with the appropriate shoe) into it. So the camera is always close at hand when I go out on my adventures. It means every time I want to make a photograph, I can just reach down and release the camera from the clip instead of stopping and getting the camera out of the backpack.

Shutter Release Mechanisms

camera-bag-gear-07

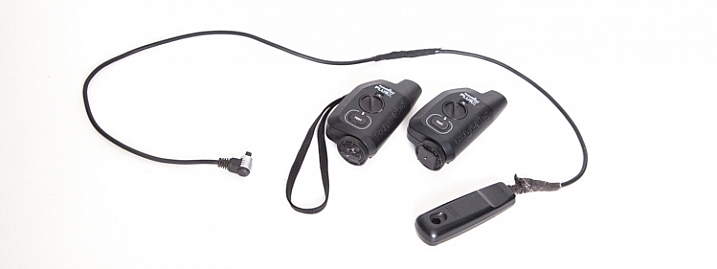
There are two different ways that the shutter on the camera can be activated. First of all, a wired shutter release can be plugged into the side of the camera.

You can accomplish hands-free shutter release wirelessly as well. The Pocket Wizard PlusX transceivers are the ones that I use. One gets attached on your camera’s hot-shoe and plugged into the appropriate port on the side of the camera. Then as long as that device and the second one you can hold in your hand (or even on another camera) are both set to the same channel, when the remote device is triggered, the transceiver on the hot-shoe will fire the camera.

Why remote triggering? It’s very useful in low-light situations where a sharp image is required and hand-holding the camera is not possible. It’s also absolutely essential when doing long exposures.

Promote Control

camera-bag-gear-08

This remote control device can be used for a number of different things, including bulb-ramping and focus stacking. However the most commons things I use it for are my time-lapse sequences and HDR bracketing.

LEE Big Stopper

camera-bag-gear-09

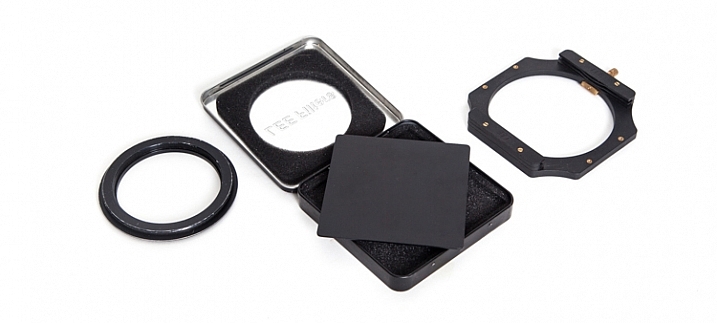
Essentially this is a piece of glass that allows me to make long exposures beyond the normal capabilities of my camera. Practically, it’s a 10-stop neutral density filter that allows me to make a long exposure of a waterfall and turn raging water into silky smoothness. I also use it to capture the motion of clouds in the sky. There is the 4″x4″ piece of glass that slides into a holder, which itself attaches to the camera via a ring that screws into the end of the lens.

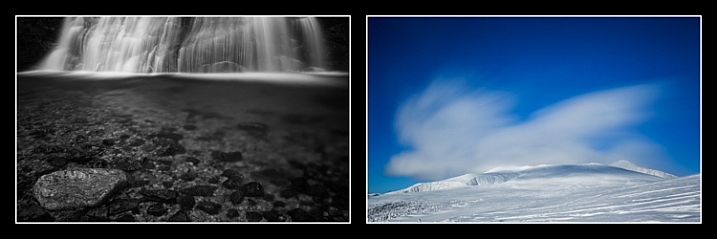
Waterfall: 30 seconds, f/4, 12:36pm
Clouds: 30 seconds, f/14, 12:03pm

Other Equipment

There are a few other pieces of equipment that find their way into my pack every once and a while:

camera-bag-gear-10

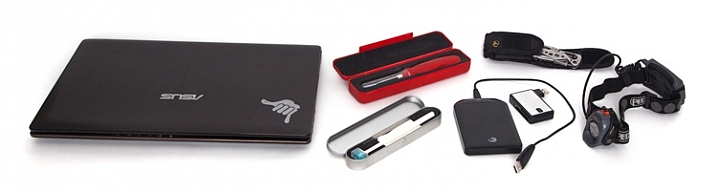
  • Tools for cleaning the camera sensor: I have an older version of the Visible Dust Arctic Butterfly as well as a sensor gel stick.
  • A laptop CF card reader adapter for extended trips where I’m away from my office and need image storage and editing capability.
  • An external hard drive for image backup.
  • Camera battery charging devices
  • Phone for safety
  • Lens cloth
  • Leatherman multi-tool device
  • Headlamp

Final Thoughts on Camera Gear

There you go, a fully-loaded backpack that weighs 35 pounds (15.9 kg). Thankfully not everything comes with me all the time, my back would definitely have something to say about that. With the years I’ve been doing photography, picking and choosing the tools that best suit the goals I have on any given day is what helps me turn ordinary life into extraordinary art.

What tools do you use? Please share in the comments below.

googletag.cmd.push(function() {
tablet_slots.push( googletag.defineSlot( “/1005424/_dPSv4_tab-all-article-bottom_(300×250)”, [300, 250], “pb-ad-78623” ).addService( googletag.pubads() ) ); } );

googletag.cmd.push(function() {
mobile_slots.push( googletag.defineSlot( “/1005424/_dPSv4_mob-all-article-bottom_(300×250)”, [300, 250], “pb-ad-78158” ).addService( googletag.pubads() ) ); } );

The post What’s In My Bag: A Look at the Camera Gear of a Nature Photographer by Curtis Cunningham appeared first on Digital Photography School.


Digital Photography School

 
Comments Off on What’s In My Bag: A Look at the Camera Gear of a Nature Photographer

Posted in Photography


A look at Google Pixel’s sensor reveals potential HDR video tech

14 Oct
Example of a sensor pattern with spatially varying exposure, in which pixels of the same color receive differing amounts of light. (From the Computer Vision Laboratory at Columbia University.)

Steven Zimmerman over at XDA Developers has just published an article with some insights into the Sony IMX378 sensor used in Google’s recently announced Pixel smartphones. Although he covers a number of technologies likely familiar to DPReview readers, such as stacked BSI-CMOS technology and on-sensor phase detect autofocus, there’s an interesting section on Spatially Multiplexed Exposure (SME-HDR) which has the potential to provide improved HDR video capture. It’s an interesting read, and one worth taking a look at if you’re interested in sensor technology.

Articles: Digital Photography Review (dpreview.com)

 
Comments Off on A look at Google Pixel’s sensor reveals potential HDR video tech

Posted in Uncategorized