RSS
 

Posts Tagged ‘Long’

Long Shot 2017 is Saturday, June 10th. Will you be shooting?

08 Jun

Here in Seattle, we are pretty excited when summer arrives. Granted, the warm weather doesn’t actually get here until sometime in mid-July, but that doesn’t stop us from leaving the socks at home and heading out without a raincoat (and then complaining about the inevitable rain and hashtagging all of our Instagram photos with #junuary).

One of the ways we celebrate the coming of summer is with the Photographic Center Northwest’s (PCNW) Long Shot – a global 24-hour photo shoot that is open to anyone, anywhere, with any camera (yes, including your phone). Long Shot isn’t a competition; it’s an opportunity to take a day to focus on photography, share what you capture and see what other photographers are doing. It’s also a way PCNW raises awareness and funds to support its photographic mission.

Photo by Luke Peterson | Long Shot 2016

This year’s Long Shot is on Saturday, June 10th. Between 9AM Pacific on Saturday and 9AM Pacific on Sunday, participating photographers around the world ‘chase the light’. You photograph whatever you want, wherever you are. If you register (there is a $ 20 suggested donation), you can submit up to 5 favorite images from the day and a jury will pick one of your images to include in the annual Long Shot slideshow and pop-up exhibit in Seattle on June 17th. You don’t have to attend the pop-up to participate, and you don’t have to participate to attend the pop-up.

“Ode to 18th Century” by Anna Ream | Long Shot 2016

If you choose not to register, you can still take photographs and share them on social media using the hashtags #longshot2017, #photocenternw and #pcnw. Your images won’t be included in the slideshow or exhibit, but you’ll still be part of a worldwide community of photographers taking part in a fun event.

Take a look at the Long Shot 2016 slideshow to see what last year’s participants photographed. (Note: There are a lot of beards.) What will you photograph this year, if you participate?

Articles: Digital Photography Review (dpreview.com)

 
Comments Off on Long Shot 2017 is Saturday, June 10th. Will you be shooting?

Posted in Uncategorized


How a Short Versus Long Exposure Will Affect Your Landscape Images

29 May

The shutter speed is probably the factor which has the greatest impact on an image. By adjusting the exposure time by only a few stops, you’re able to completely change the appearance of an image. But what exposure time is best for landscape photography? Should you use a  long exposure or should you work with shorter ones? When will adjusting the shutter speed have the greatest impact?

In this article, I’ll share three case studies where I compare how adjusting the shutter speed has impacted the final images. I don’t believe that either is better than the other (in each case) but it’s important that you’re aware of the differences so it becomes easier to convey the story or emotions you desire.

What is a Long Exposure?

I’ve had many discussions with fellow photographers regarding the exact definition of Long Exposure. At first thought, most consider a long exposure to be an image where the clouds are dragged across the sky or moving water looks like silk or ice. However, this is judging solely based on the visual aspect of the image. Is it not still considered a long exposure if you don’t see its effect? Wouldn’t a 20-second exposure be 20 seconds no matter what?

The definition most of my photography friends have agreed upon is that a long exposure begins when you can’t take a sharp image handheld. Normally, this is at about 1/50th of a second with a wide angle lens.

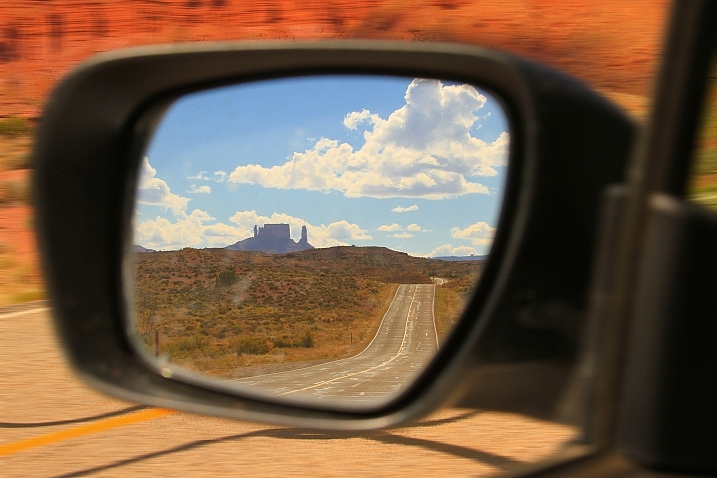
Using a tripod makes it possible to have a longer exposure.

Case Study #1 – Waterfalls

Waterfalls are often ideal to start experimenting with long exposures. Since the water is moving quickly, you don’t need an extremely long exposure just to capture some motion. In fact, you’ll need a very quick shutter speed to avoid capturing any motion at all.

The choice of shutter speed has an extremely high impact on the image. You might not even need a filter to begin capturing the motion of water in your shots. However, I find waterfalls to be tricky to photograph at times because of this. The different shutter speeds have such a big impact that the entire mood (and story you tell) of your image quickly changes. So, consider what you wish to convey.

If it’s a huge waterfall with a lot of power you might want to use a quick shutter speed to capture its raw power and beauty. While a smaller waterfall might be more appealing when you use a slow shutter speed (long exposure). Experimentation is always the key when working with shutter speeds.

waterfall case study

Rjukandefossen, Norway 1/5th of a second shutter speed.

For the image above, I chose to use a shutter speed slow enough to require the use of a tripod but not so long that the water would become completely blurred. The textures in the water help build the overall atmosphere of the image and it compliments the rawness. By keeping some texture in the water, I’ve also strengthened the composition. When a longer shutter speed was used (see below), many of the lines in the foreground were lost and the flow wasn’t as natural anymore.

long exposure waterfall

Rjukandefossen, Norway 20-second exposure.

When lengthening the exposure time to 20-seconds, the image lost a lot of its raw and natural feel, which was what I wanted to convey. Now, the image has an unnatural appearance and even though it’s still visually pleasing, it’s not as interesting anymore.

A long shutter speed wasn’t ideal since the river was flowing so quickly. Had the water been slower, a 20-second exposure might have done a better job. So, when photographing a waterfall make sure that you keep in mind how quickly the water is flowing, as this will have a great impact on your choice of shutter speed.

Had I used a faster shutter speed than on the first image (for example 1/500th) the image would have a different impact yet again. Such a quick shutter speed would freeze most of the water and remove the sense of motion shown in the first image. Instead, there would have been a lot of texture in the water but no movement to compliment it. That would have resulted in a messy and, again, less appealing image.

Case Study #2 – Seascapes

When working with images that have more than one moving element (for example the sky and the water), you’ve got multiple factors to consider when choosing a shutter speed. Not only will the choice of shutter speed determine how the sky appears but it’s also crucial for the appearance of the water. In fact, since the water is what’s moving the quickest, that is where you’ll see the biggest difference (just as with the waterfalls).

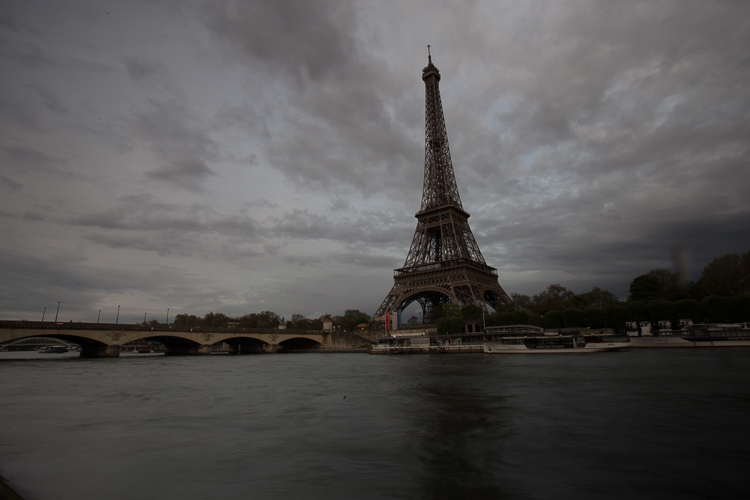
For the image above, I used a shutter speed of 0.6 seconds. In the grand picture of long exposures this is still a relatively short shutter speed, and for some, it doesn’t even qualify as a long exposure. However, despite the shutter speed being only 0.6 seconds, there’s quite a lot of motion in the image. Since the waves were coming in fast the camera was able to register a significant amount of motion within that short time.

Personally, I’m a big fan of exposures between 0.5 seconds to 1.5 seconds when photographing seascapes (especially when using a low perspective like this). The shutter speed is long enough to capture the motion but it’s also fast enough that there’s still a lot of texture in the water. The lines that come as a result of the slow shutter speed do a significant job in improving the composition.

long exposure seascape

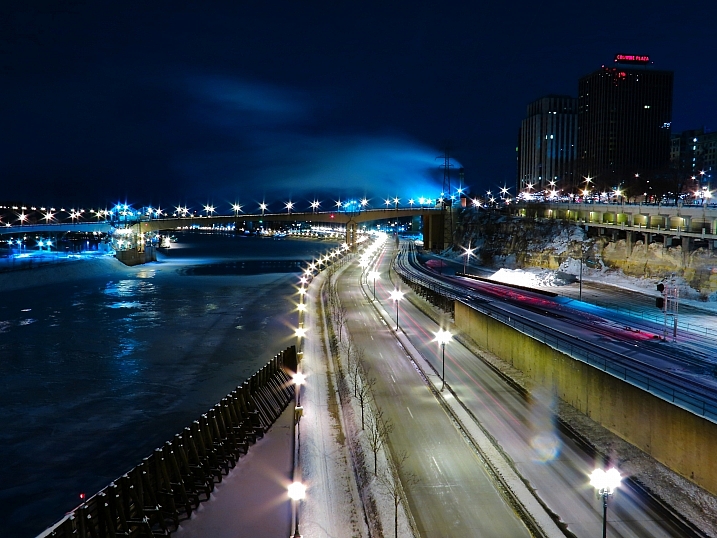
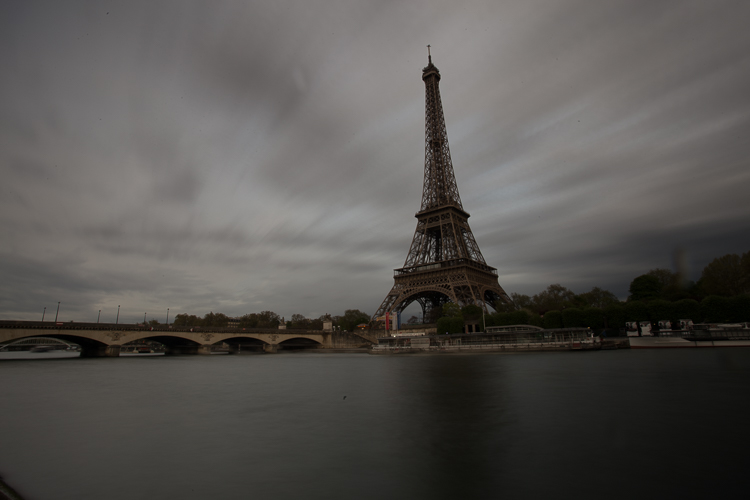
In the second image, I increased the exposure time to 30 seconds, allowing the camera to register motion for a longer period of time. As you can see, the texture that was the previous image is lost and the water has completely changed its appearance. Now it looks more like ice, or some sort of solid state.

However, the clouds are also considerably different than in the first seascape. By using a 30-second exposure the camera has also registered motion in the clouds, resulting in a more dynamic sky. When the clouds are dragged across the sky, such as above, you’ve got an extra factor to consider for your composition. In this scenario, the clouds are moving towards the horizon, creating a series of extra lines that help lead your eye through the image. Often this can be a great advantage.

I don’t believe that one is necessarily better than the other but, again, it’s important to understand how the choice of shutter speed (exposure time) will impact the image. When working with a slow shutter speed you’re introduced to several new factors (such as the helpful leading lines in the sky) and being aware of them will make the process of learning long exposure photography easier.

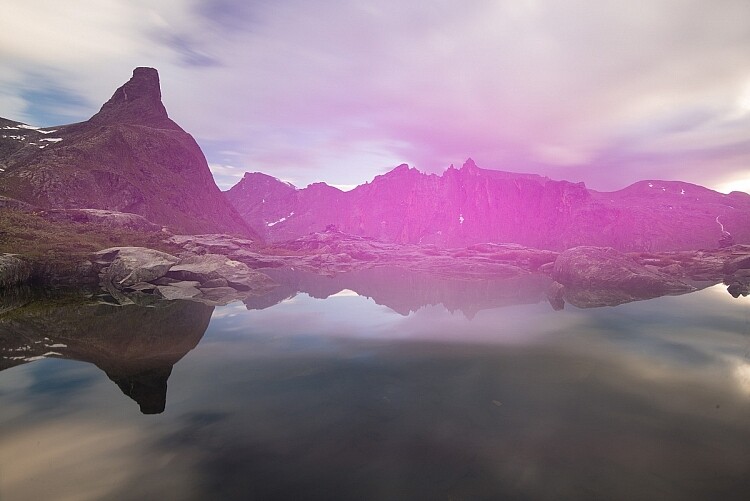
Case Study #3 – Generic Landscape

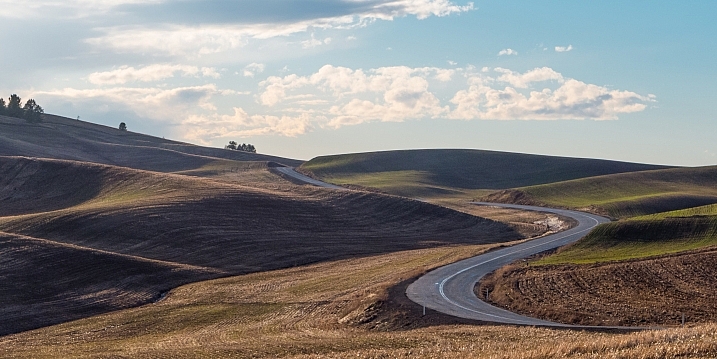
Once you remove the second element of motion, the choice of shutter speed becomes somewhat less crucial. Still, there will be a big difference between a 30-second exposure and a 1-second exposure if you’ve got some movement in the clouds. But the difference between a 0.5 second and 5-second exposure is less significant for a generic landscape and a seascape or waterfall photo.

It’s not uncommon for me to see someone using an ND Filter when photographing a mountain on a cloudless day. This is very common when first using filters, as you want to use them all the time. However, a 2-minute exposure won’t look any different than a 1/100th of a second exposure when there aren’t any moving elements in the image. After all, an ND filter doesn’t create motion, it registers it.

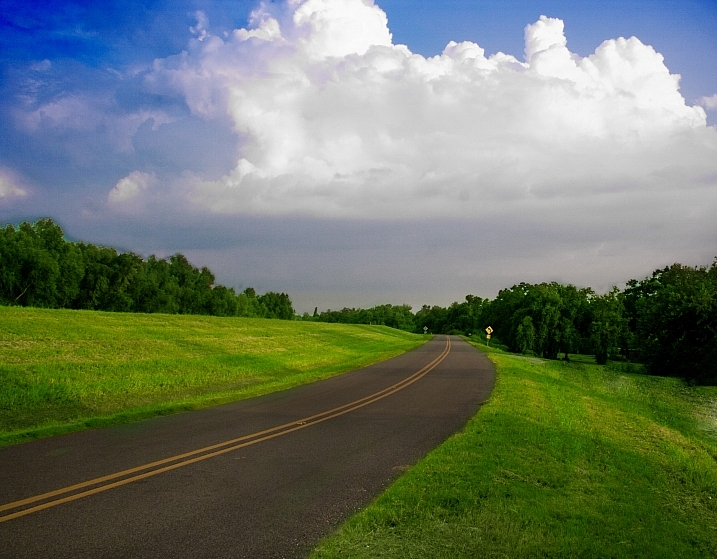
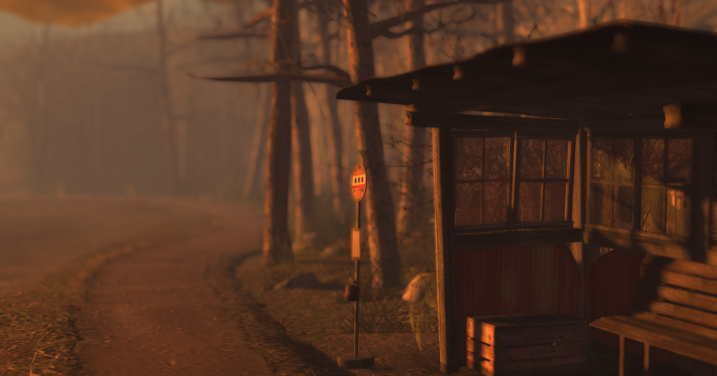
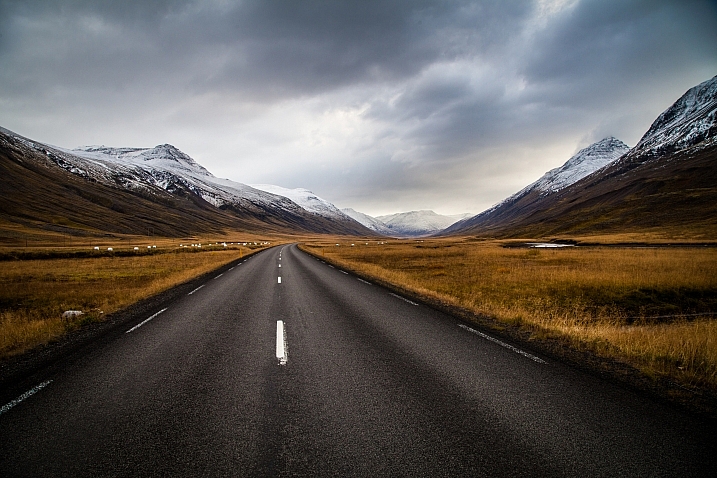
The image above is a typical example of when a long exposure wouldn’t make a big difference. I used a 1/5th second exposure time for this particular image but had I used a 30-second exposure with filters instead, it still would have looked more or less the same. Simply put, it wouldn’t have been beneficial to use a long exposure on this scene.

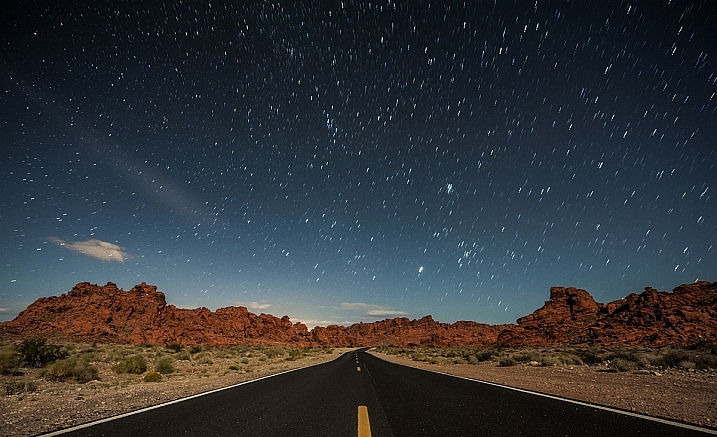
It isn’t until you’ve got at least one moving element that the true power of a long exposure photography appears (remember, this can be something as simple as grass moving in the wind). In the image below, you see the same scene but this time with clouds in the sky. The shutter speed I used for this image was 1/15th of a second, which means that I wasn’t able to capture any motion – yet.

short exposure generic landscape

Once clouds had appeared and there was one element of movement in the frame, a long exposure would have an impact on the image. Since the clouds were moving I was able to capture the motion and, again, create a more dynamic image.

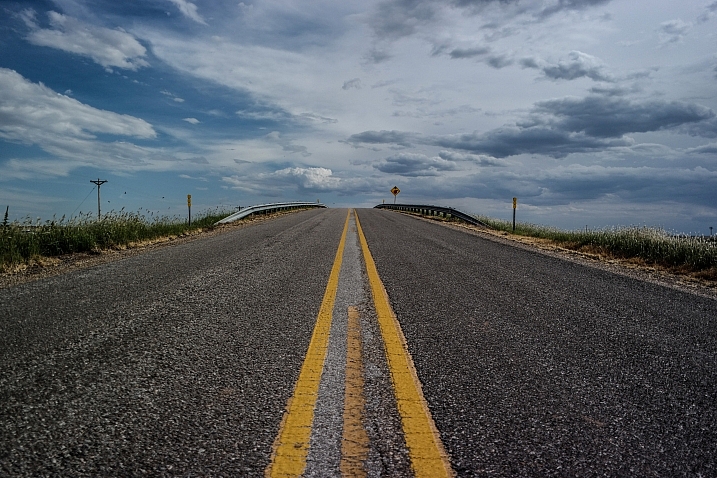
For the image above I increased the exposure time to 30-seconds. By increasing it that much you can clearly see how the sky has changed and how the overall mood of the image has changed along with it. Unfortunately, the clouds were moving sideways. Had the clouds moved towards or away from me, the image would have greatly benefited from a long exposure and taken advantage of the leading lines that would have helped to lead the eyes towards the structure. Since the clouds were moving sideways, the extra leading lines in the image aren’t as helpful, even though they look nice.

Summary and Conclusion

After reading this article I hope you have a better understanding of how the shutter speed will affect an image and when increasing or decreasing it will be beneficial. There’s no “correct” way of doing it, and in the end, which image you prefer depends on what you’re looking for in your image. However, as I’ve mentioned multiple times, it’s extremely important that you understand how a longer or shorter shutter speed will impact the image. By understanding this, you’ll be able to save a lot of time in the field and ultimately create better images.

Remember, a slower shutter speed can affect the appearance of an image when there’s more than one moving element within the frame. A slow shutter speed is not going to make a difference when there are no moving elements.

The post How a Short Versus Long Exposure Will Affect Your Landscape Images by Christian Hoiberg appeared first on Digital Photography School.


Digital Photography School

 
Comments Off on How a Short Versus Long Exposure Will Affect Your Landscape Images

Posted in Photography


2017 Roundup: Consumer Long Zoom Compacts

26 May

Bridge and travel zoom cameras are two of the very few categories of compact cameras to survive the smartphone. Whether it’s a travel zoom, which puts a 25X-30X zoom into your pocket, or a bridge camera which offers even more zoom, phones just can’t compete.

While there are now enthusiast-level long zoom cameras with 1″-type sensors, such as Sony’s Cyber-shot RX10 series and Panasonic FZ1000/FZ2500, there are still plenty of more budget-friendly models, though their smaller sensors don’t offer the image quality or depth-of-field control of the pricier models.

The following cameras are included in our roundup:

  • Canon PowerShot SX60 HS
  • Canon PowerShot SX730 HS
  • Nikon Coolpix P900
  • Panasonic Lumix DC-FZ80/FZ82
  • Panasonic Lumix DMC-FZ300
  • Panasonic Lumix DC-ZS70
  • Sony Cyber-shot HX90V
  • Sony Cyber-shot HX400V

Of those eight cameras, three are pocket-sized and offer 30X-40X zooms. The other five are bridge (SLR-style) cameras with focal lengths ranging from 600mm to an unbelievable 2000mm (35mm-equivalent).

And with that, let’s take a look at some consumer-level travel zoom cameras!

Articles: Digital Photography Review (dpreview.com)

 
Comments Off on 2017 Roundup: Consumer Long Zoom Compacts

Posted in Uncategorized


Essential Equipment for Long Exposure Photography

22 Apr

Normally, I say that equipment is not important, at least not for those just getting started with photography. Until you know how to master the camera, equipment shouldn’t be the main focus. You don’t need to worry about having the best equipment or things you don’t actually need. However, to achieve certain techniques or effects, having the right equipment is essential. Long Exposure Photography is one of these techniques where some additional equipment is needed.

equipment for long exposure photography

Let’s jump straight to it and look at what I consider to be essential equipment for long exposure photography:

Camera with Manual and Bulb Mode

Okay, so this one might be a given. It’s obvious that you’ll need a camera to take an image. However, to be able to use a slow shutter speed (which is what long exposure photography is all about), you need a camera that allows you to manually adjust the ISO, aperture and shutter speed.

Since you are working with different shutter speeds it’s essential that you’re able to adjust these settings yourself, so you can then control the quality of your image. Even though most compact cameras do have this opportunity now, I highly recommend using a DSLR (or mirrorless) camera if you don’t already. It doesn’t have to be anything fancy, an entry level camera will do just fine.

bulb mode

Nikon D800 Bulb Mode

Bulb Mode is another option that it’s beneficial for your camera to have. While it’s not essential, it allows you to take exposures that are longer than 30 seconds. Most DSLR cameras have a maximum shutter speed of 30 seconds so if you want to use an exposure longer than that, you need to be in Bulb Mode. 

With this mode selected (it’s located different places on different cameras), you can expose an image for as long as you want. Basically, as long as you hold the shutter button triggered, the camera continues to take the image. I’ll come back to a neat trick to avoid pushing the button for several seconds or minutes in a bit.

A Tripod

I consider a tripod to be essential for any type of landscape photography but when dealing with slow shutter speeds, it’s hard to work without one. Some of you might comment that you can just lean the camera on a fence or lay it on a rock but that really limits your flexibility and, of course, the stability of your camera.

The reason I always travel with a tripod is because I normally work with images that have a shutter speed just too slow to capture handheld. Plus even if I’m not, I have the option.

This image wouldn’t be possible without a tripod.

You don’t need to spend thousands of dollars on the best tripods available but avoid getting the cheapest aluminum ones from the local electronic shop. Make sure that the tripod you choose is sturdy enough to be used in a river with rushing water, or when the weather is windy.

Exposure times of anywhere between 1/4th of a second to multiple minutes is common with long exposure photography. It goes without saying that you’re not able to get a sharp handheld image when using a shutter speed of 30 seconds. By using a tripod you make it possible to work with such long exposures and capture great, sharp images.

Neutral density filters

I’ve previously explained how to do long exposure photography without filters, so why do I now say they are essential? It’s quite simple – the quality of your images will be much higher.

Before explaining why I consider neutral density filters to be essential for long exposure photography, let’s quickly look at what they are:

  • Neutral density filters are darkened filters that are placed in front of the lens, requiring a slower shutter speed for the same amount of light to reach the sensor.
  • There are two systems available: screw-in and drop-in or square filters.
  • The filters come in different strengths (3-stop, 6-stop, 10-stop, etc.) which describes how much you need to lengthen the exposure time to maintain a well-exposed image.

NiSi 6-Stop ND Filter in front of my Nikkor 14-24mm

There are many filters to choose from on the market and it seems like new brands appear all the time. Personally, I’ve been using LEE Filters, NiSi Filters and B+W. NiSi has become my go-to choice these days as their filters don’t have a visible color cast (which is a common issue with these types of filters). LEE is known for its strong blue color cast and B+W had a very dominant red tone. These are relatively easy to fix in Adobe Lightroom or Camera RAW but I prefer to get as much as possible right in the camera.

Why are ND Filters essential for long exposure photography?

As mentioned, these filters require you to lengthen the exposure time for the same amount of light to reach the camera’s sensor in order to get a well-exposed image. The filters are darkened and their strength dictates how much you need to slow down the shutter speed. Compared to doing this without filters, using an ND filter allows you to use a much longer exposure times while still maintaining optimal quality (the sharpest aperture of your lens).

equipment for long exposure photography

Nikon D800 w/ Nikkor 16-35mm f/4 @ ISO100 – f/11 – 241 seconds.

It wouldn’t have been possible to capture an image with a 241-second shutter speed, without using an ND filter in the conditions present when I took the image above. You might be able to reach such an exposure time at night but not during a sunset. Without a filter, I might have gotten a 1-second exposure, which would look completely different with an overall lower quality. By placing a dark ND filter in front of my lens (the NiSi 10-stop) I was able to use a very long exposure and capture some of the beautiful motion going on in the sky as well as soften the surface of the lake.

Remote shutter

I’ll admit it right away, a remote shutter isn’t essential to achieve a long exposure but it is going to make the process much easier (I feel naked when mine is left behind)!

I’ve previously written an article where I compared using a Delayed Shutter and Remote Shutter, so I won’t go into the details of which is better here. What I will mention, however, is that when doing long exposure photography you often have to work with quickly changing elements (such as rushing waves). In these scenarios, you want to be able to capture the image at the exact moment the moving element is where you want it to be and can’t afford to wait an additional two seconds (for the self-timer to go off).

equipment for long exposure

A remote shutter was used to capture the exact moment the waves went over the rock

The image above represents one of these scenarios. As the tide was rising, the formations of the waves were constantly changing. I knew that I wanted to capture the exact moment the water started running down the left side rock and to be able to do that, I needed a remote shutter. Had I used the built-in delayed shutter (with a delay of two seconds) I would most likely have missed that exact moment, even though I could have tried to predict the moment of impact.

For Bulb Mode

Another benefit of using a remote shutter for long exposure photography is that most of them have a shutter lock function, which is going to save you a lot of hassle when working in Bulb Mode. Rather than manually holding the shutter button (and causing a visible camera shake) for minutes, you can lock up the shutter with a remote release.

remote shutter

Remote Cable Release

You don’t need to purchase the most expensive release out there (they can be surprisingly pricey) just make sure that it’s something that won’t break right away and one that has the opportunity to lock up the shutter. Note: make sure to get one that is compatible with your camera model.

Cardboard to cover the viewfinder

My last recommendation is something that many articles forget to mention. You need something to cover the viewfinder! Many cameras have this as built-in function and have a sort of “curtain” that you can close. But there are still many cameras that don’t have this option. If your camera doesn’t, make sure that you bring a piece of cardboard, or similar, that you can use to block the viewfinder during a long exposure. This is to avoid any unwanted light leaks as you see in the image below.

camera light leak

I forgot to block my viewfinder so my two-minute exposure looked like this.

Conclusion

While there are many other accessories available to make long exposure photography easier, these are the ones I consider to be essential. Do you have any others to add to the list?


The-Ultimate-Guide-to-Long-Exposure-Photography-eBookIf you want to learn more about Long Exposure Photography I’ve shared everything I know in my eBook The Ultimate Guide to Long Exposure Photography. This eBook is for those who are ready to take their images to the next level and expand their creative vision.

The post Essential Equipment for Long Exposure Photography by Christian Hoiberg appeared first on Digital Photography School.


Digital Photography School

 
Comments Off on Essential Equipment for Long Exposure Photography

Posted in Photography


6 Tips for Shooting Long Exposure Night Photographs

16 Feb

In this article I am going to share with you six tips that I have found to produce amazing long exposure night photographs. I have learned the hard way by making every mistake possible and through that finding what really does work.

So here are the 6 tips to make your long exposure photographs at night:

6 Tips for Shooting Long Exposures at Night

Tip #1: Try to avoid using a Neutral Density filter

On this photo (below) I did a 25 second exposure. That is quite a long exposure and to help prevent it from blowing out, I took the photo right at the end of sunset. There was less light, so that I didn’t have to put an ND Filter on.

6 Tips for Shooting Long Exposures at Night

If you put an ND filter on it is going to give you a color cast during long exposures. Yes you can use a polarizer, but avoid Neutral Density filters. Shoot when the sun is going down and keep your camera at a low ISO like 100 or 200. Don’t get me wrong, I love ND filters but not at night.

Tip #2: The best time for long exposures is 25 seconds

I know that’s a bold statement. Not as bold as stating that French food is the best in the world, but still a bold statement. Here is why I recommend this; I’ve found that when I shoot at 25 seconds it makes the water silky and the clouds stretchy and this has a beautiful look that sells well. Obviously it’s also an artistic choice, but as a photographer you likely want people to buy your photos. The best indicator that people like your photos is that they buy them.

Here is an example:

6 Tips for Shooting Long Exposures at Night

First I started with a 6 second exposure.

Now, in taking the photo I exposed the image for the highlights. So when you open up the shadows, bring down the highlights, and boost the exposure a little bit like so:

6 Tips for Shooting Long Exposure Night Photographs

I do have all the details of the photo, but the only problem is that the clouds were not moving and the water is not silky.

6 Tips for Shooting Long Exposure Night Photographs

So I went ahead and put the exposure time to 25 seconds. Now it does seem like the highlights in the photos are a little burnt, but I have found that on city lights it doesn’t really matter that much because it still works great on a print.

To conclude; 25 seconds is the best long exposure, you don’t even need a remote, you just need to put your camera on the 2-second timer and go into manual shooting mode, use a low ISO, and an aperture that is going to work like f/7 or f/8.

If your photo is too bright you can adjust the aperture to f/14 and if it is too dark you can even put your aperture to f/4. Just make sure you check your focus to ensure the background is sharp.

Tip #3: Try different exposures of the same scene

Even though I said that 25 seconds exposure is the best, it’s always good to shoot different exposures because this may be different for your situation. For example, I thought that this first image was my go-to photo.

6 Tips for Shooting Long Exposure Night Photographs

But in the end the one that I am going to retouch and going to send to the gallery is this one.

6 Tips for Shooting Long Exposure Night Photographs

So you already have your camera setup and on a tripod. Go ahead and try 8 seconds, 15 seconds, 25 seconds all without touching the tripod and then when you are evaluating your photos for retouching you will have several options.

Tip #4: Shoot towards the sun

When you are doing a long exposure without an ND filter (so as to avoid the color cast, tip #1), a good thing to do is to shoot toward the sun. When it is behind the horizon line it will always give you a nice sky with lots of color and gradations.

You can see on this photo that the sun is setting on the left.

6 Tips for Shooting Long Exposure Night Photographs

And as I turn the camera more away from the sun and back towards the city you get this view.

6 Tips for Shooting Long Exposure Night Photographs

You can see that we get less and less details in the sky. But if you shoot where the sun sets you will always have great details even after sunset, and it is the right time for these type of photos.

Tip #5: Make sure you have water and the sky in your photo

Those are two important things for a long exposure which help to really elevate your photos into what I like to call miracle photos.

Tip #6: Try to get the clouds coming towards you

You can study meteorological information to get a sense of which direction the clouds are moving and try to position your shot accordingly. There are even a few apps which great for this.

As I said, this is not always easy but I got lucky on this one. The clouds are going to be stretchy and create leading lines and that help make this photo really interesting.

6 Tips for Shooting Long Exposure Night Photographs

I hope this helped you and you will be able to capture beautiful places at the perfect time. Please share your long exposure night photos in the comments below.

** NOTE ** If you’d like to know more about this subject, learn more about my brand new course on night photography here, so you can take stunning night photos too!

googletag.cmd.push(function() {
tablet_slots.push( googletag.defineSlot( “/1005424/_dPSv4_tab-all-article-bottom_(300×250)”, [300, 250], “pb-ad-78623” ).addService( googletag.pubads() ) ); } );

googletag.cmd.push(function() {
mobile_slots.push( googletag.defineSlot( “/1005424/_dPSv4_mob-all-article-bottom_(300×250)”, [300, 250], “pb-ad-78158” ).addService( googletag.pubads() ) ); } );

The post 6 Tips for Shooting Long Exposure Night Photographs by Serge Ramelli appeared first on Digital Photography School.


Digital Photography School

 
Comments Off on 6 Tips for Shooting Long Exposure Night Photographs

Posted in Photography


PABLO is a long exposure and light painting app for the iPhone

17 Sep

Czech photographer Miroslav Tichy once described photography as painting with light. Now there is an app for that, but instead of naming it after Tichy, its makers decided to call it PABLO for Pablo Picasso, who created some of the first notable light art images with photographer Gjon Mili in 1949.

PABLO has been developed for light painting with the iPhone. You can create pictures and video by moving a light source in front of the camera while capturing a long exposure. Alternatively, you can illuminate a subject, shine a point of light directly at the camera, or move the camera itself during exposure.

In the app’s ‘live view’ you can watch as light paintings are created and a community feed lets you see a continuous gallery of light images by PABLO users around the world. Additionally, you can create light paintings by uploading existing video clips. Any lights in the video will freeze to create light trails.  You can find more information in the video below and on the PABLO website. How-to videos are available in the PABLO Youtube channel and if you’d like to try the app yourself you can now install it for free from the App Store. 

Articles: Digital Photography Review (dpreview.com)

 
Comments Off on PABLO is a long exposure and light painting app for the iPhone

Posted in Uncategorized


21 Enjoyable Images of Long and Winding Roads

05 Aug

Using lines and in particular, leading lines, in photography is a popular method of composition to create more interesting and dynamic images.

Roads, pathways, and trails can give you a great opportunity to photograph such leading lines. Let’s look at these images of long and winding roads and see where they lead us:

Thomas Hawk

By Thomas Hawk

Carl Jones

By Carl Jones

Ozzy Delaney

By Ozzy Delaney

Joshuadelaughter

By joshuadelaughter

Anthony Wright

By Anthony Wright

C.C. Chapman

By C.C. Chapman

Dom Crossley

By Dom Crossley

Kylie_Jaxxon

By Kylie_Jaxxon

Terry Chapman

By Terry Chapman

Ed Suominen

By Ed Suominen

Paul Bica

By paul bica

Del Brown

By Del Brown

Cushmok

By cushmok

Diana Robinson

By Diana Robinson

Geee Kay

By Geee Kay

Jon Noel

By Jon Noel

Nrg_crisis

By nrg_crisis

David Menidrey

By David Menidrey

Todd Martin

By Todd Martin

UnShuttered Soul~ Good To Be Busy!

By UnShuttered Soul~ Good to be busy!

Andrés Nieto Porras

By Andrés Nieto Porras

googletag.cmd.push(function() {
tablet_slots.push( googletag.defineSlot( “/1005424/_dPSv4_tab-all-article-bottom_(300×250)”, [300, 250], “pb-ad-78623” ).addService( googletag.pubads() ) ); } );

googletag.cmd.push(function() {
mobile_slots.push( googletag.defineSlot( “/1005424/_dPSv4_mob-all-article-bottom_(300×250)”, [300, 250], “pb-ad-78158” ).addService( googletag.pubads() ) ); } );

The post 21 Enjoyable Images of Long and Winding Roads by Darlene Hildebrandt appeared first on Digital Photography School.


Digital Photography School

 
Comments Off on 21 Enjoyable Images of Long and Winding Roads

Posted in Photography


2 Long Exposure Photography Hacks to Try if You Don’t Have an ND Filter

20 Jun

We all love long exposures, well I personally do. They are a great way to create dynamism, movement, and add depth to your images.

In this tutorial, I’ll show you two long exposure hacks that can be useful if your Neutral Density filters are not dark enough, if it’s too bright outside and you cannot get a long exposure, or if you simply don’t have any ND filters. Dark ND filters can be really expensive, so this is a good alternative.

IMG 8076

Long exposures create this surreal, and yet very pleasing effect to give a WOW factor to your images. Whenever you take a photo at night you will automatically get a long exposure, unless you use a very high ISO. For this tutorial I am talking about long exposures during the daytime, which are a bit more complicated to achieve.

The two hacks involves taking nine different images, and stacking them together. Now before I actually explain them, I will briefly give you the best camera settings and shooting conditions:

Shooting and camera settings

  • You will ultimately get the best results if you shoot on a cloudy day with a lot of wind. Why? Because on a cloudy day you will get clouds, and the wind is going to give them movement, and that’s what you want – movement. On a cloudy day, you will also get the minimal amount of light to be able to extend your shutter time.
  • You absolutely need a tripod, first all of all because your images need to be aligned, and you want your images as sharp as possible. With a shutter speed slower than 1/60th, you will start to get blurry results without a tripod.
  • Use a cable release or a 2-second timer every time you take an image. This again is a great way to avoid camera shake and get sharp results.
  • Focus on your subject and put the lens to manual focus, before you start taking your images. DO NOT refocus between the nine shots you are going to take.
  • Use an ISO of 100. You are on a tripod, so you don’t really need a higher ISO.
  • Use a very small aperture, like f/22. This will cut down the light entering your camera as much as possible and with an ISO of 100, will help slow down the shutter speed.
  • Shoot one or two hours before sunset, then you will also have a minimal amount of light to extend your shutter speed even slower.
  • Use your ND filters if you have some. If your ND filters are very dark (10 stop for example) you won’t need these hacks because you will directly get long exposures. If your filters are not dark enough, I would still recommend using them even if you have a one second exposure.
  • I recommend exposing, and focusing before putting your ND filters on, because after that – well you won’t be able to see clearly.

Hack #1 – multiple exposure mode

The first hack consists of using the multi-exposure mode on your DSLR. If you do not have this mode, don’t worry the second hack works for all cameras. I personally use a Canon 6D, but this multi-exposure mode is mostly available for all sorts of advanced DSLRs.

You will find this mode on your menu, you just need to enable it.

IMAGE1

For the settings:

  • Average for the Multi-expos ctrl option
  • Continuously for Continue Mult-exp setting

You have the choice to pick how many exposures you want to shoot, the maximum will depend on your DSLR. I usually pick nine exposures to get as much movement on the clouds as I want.

This mode will allow you to multiply your shutter speed by the number of exposures you shoot. For example, If you shoot a single image with an exposure of one second, you will get a total exposure of nine seconds if you shoot nine exposures. It works the same if you have an exposure of 15 seconds.

With this mode, the camera will automatically stack the images together and give you one single image with all the cloud movement. This trick also works if you want some nice silky water.

If the clouds are moving really fast, then I recommend waiting around two seconds before you take another shot. The main trick is to not have the clouds at the same position one shot after the other. If the clouds are moving very slowly then I recommend waiting around 10-15 seconds between shots.

This mode will also tell you on your screen, how many images you have left to complete your multi-exposure.

This is an example of a long exposure I got using this method. My aperture was f/22, ISO 100, and I had a shutter speed of one second after using my ND filters. That wasn’t enough to get a long exposure with stretchy clouds, so I decided to use the multi-exposure mode. I took a total of nine shots, and you can see below the before and after using this mode. You can see that it does not only affect the clouds, my water looks nice and silky as well.

IMAGE2

Single image

IMAGE3

Nine shots using multi-exposure in-camera.

IMAGE4

After some retouching, I got this result!

Hack #1 – multiple exposures merged in Photoshop

The second hack consists of doing exactly the same thing but manually. If you are used to shooting time lapses, then this shouldn’t be too complicated to understand.

The multi-exposure mode in-camera gives you automatically, and directly, the long exposure result in one image. For this hack, will shoot nine separate images, one after the other.

You need to use the same camera settings I mentioned above (manual mode, manual focus, tripod, small aperture, ISO 100, release cable or 2-second timer). For the shooting conditions I would also recommend the same thing, and use ND filters if you have some.

You will basically shoot a time lapse of nine images only. Do not forget to have an interval of 10 seconds minimum between each shots. This process can be quite boring. I personally use the magic lantern camera hack that has an intervalometer built inside the camera. I can then pick how long I want my interval to be between each shot, and the camera will automatically take an image every 10 seconds, for example, until I decide to stop.

IMAGE5

You can buy an intervalometer or use the timer on your phone to count your intervals. It’s really up to you.

Here’s an example of nine images I shot one after the other with an interval of 15 seconds between each. You can clearly see that the clouds are moving. For demonstration purposes, I have intentionally underexposed these shots.

IMAGE6

So after you get all your images, import them into Photoshop as layers (from Bridge or Lightroom whatever fits with your workflow).

IMAGE7

Open as Layers in Photoshop after selecting the images in Lightroom.

Then next thing you want to do is to select all the layers, and create a smart object.

IMAGE8

IMAGE9

After that go to Layers -> Smart Objects -> Stacking -> Mean.

IMAGE10

IMAGE11

Photoshop will create a nice long exposure now, combining all the layers.

IMAGE12

Here’s the before and after:

IMAGE13

Before is on the right of a single image – after is on the left.

Conclusion

You don’t need super dark expensive filters to create long exposures. Of course, you will get the best results with them, but this is a pretty cool alternative. Now personally as a 19 year old student, I cannot spend a lot of money on gear, and so far these two hacks have worked perfectly for me.

IMG_7663-Edit

Enjoy the art, and share your hacked long exposure images in the comments below. I’d love to see your results.

googletag.cmd.push(function() {
tablet_slots.push( googletag.defineSlot( “/1005424/_dPSv4_tab-all-article-bottom_(300×250)”, [300, 250], “pb-ad-78623” ).addService( googletag.pubads() ) ); } );

googletag.cmd.push(function() {
mobile_slots.push( googletag.defineSlot( “/1005424/_dPSv4_mob-all-article-bottom_(300×250)”, [300, 250], “pb-ad-78158” ).addService( googletag.pubads() ) ); } );

The post 2 Long Exposure Photography Hacks to Try if You Don’t Have an ND Filter by Yacine Bessekhouad appeared first on Digital Photography School.


Digital Photography School

 
Comments Off on 2 Long Exposure Photography Hacks to Try if You Don’t Have an ND Filter

Posted in Photography


Long Exposure Fire Photography – 5 Tips for Beginners

15 May
tips for long exposure fire photography

ISO 100, f/10, shutter speed 5.0 seconds

A long exposure photo can make flames look soft and feathery, capture spark trails, and be used to create a romantic or cozy mood. The tips in this article will help you get started with long exposure fire photography.

Long exposure fire photography: 5 tips for beginners

Remember to be careful as you practice your fire photography. Fire can be dangerous, and it’s easy to be careless when we’re thinking more about our photography than the fire. Maintaining a safe distance is important for you and your gear.

1. Use a slow shutter speed

To take a long exposure photo, the shutter in your camera needs to be open long enough to blur motion and light. Here are a couple of ways to ensure that the shutter stays open:

  • Shutter Priority: you choose the shutter speed
  • Aperture Priority: the camera chooses the shutter speed

Shutter Priority

Put your camera in Shutter Priority mode, choose your desired shutter speed, and let the camera do the rest.

This will force your camera to let in light for the amount of time you’ve chosen. This means your camera will be choosing your ISO (if it’s set to auto) and your aperture. This will give you varied results depending on how much light is available. Using Shutter Priority in this way can be fun. When you choose a shutter speed of five or six seconds, you can capture interesting flame shapes, and lots of spark trails. The bonfire and torch photos in this article were captured in Shutter Priority mode.

long exposure fire photo

ISO 100, f/11, shutter speed 6.0 seconds

Aperture Priority

You could also put your camera in Aperture Priority, choose a mid-range aperture (f/8 – f/11,) set a low ISO (100 – 200,) and let your camera choose the shutter speed. If you’re shooting at night (when it’s really dark) and the fire is your light source, your camera will choose a slow shutter speed. This should give you a photo with large depth of field, relatively free of grain (noise).

If this causes your shutter to be open for longer than you want, increase the ISO. This will start adding noise, which can be reduced during editing. The card game and match photos in this article were shot using Aperture Priority.

long exposure flame photo

ISO 100, f/11, shutter speed one second

Those are a couple of suggestions to get you started. Long exposure fire photography is all about playing around and having fun. Try lots of different apertures and shutter speeds. If you’re like me, you’ll get excited as you review each shot, and see the interesting shapes you’ve captured.

2. Set your camera on a tripod

When using a long exposure, you’ll want to reduce camera shake which results in blurry photos. Camera shake occurs when the camera moves while the shutter is open. Slow shutter speeds (of more than one second) make it impossible to hand-hold your camera, and still get sharp images. Using a tripod will keep your camera steady.

3. Use a remote shutter release or set the self-timer

Your remote (or the camera’s self-timed shutter release) can also help you cut down on camera shake. When you press the shutter release manually the camera moves a little, this could cause blur in your photo. But when you use a remote shutter release (or set your camera’s self-timer) you don’t have to worry about that. This may seem like a small thing, but it can make a big difference to your image sharpness.

long exposure fire spark trails

Spark trails. ISO 320, f/6.3, shutter speed 6.0 seconds

When capturing match flames the remote works best. It’s super frustrating trying to capture that flame burst while waiting for the camera’s self-timer.

4. Choose your subject

Do you want your main focus to be the fire itself? Or are you trying to capture more of the mood created by the fire? While capturing the mood, it can be tricky to focus on people. It’s not easy to sit still during a long exposure and any movement will create blur in your photo.

The following photos were shot in Aperture Priority mode, with an aperture of f/8. For the first photo, I set the ISO at 100, and my camera chose a shutter speed of 5 seconds. That was too long for my daughter to stay still, so the photo is blurry.

long exposure fire photography tips 3

ISO 200, f/8, shutter speed 5.0 seconds (blurry)

For the second photo, I set the ISO to 400 which cut the shutter speed in half = 2.5 seconds. That was a little easier for her, and the photo is clearer.

long exposure fire photography tips 2

ISO 400, f/8, shutter speed 2.5 seconds

5. Switch to manual focus

Sometimes auto focus doesn’t work well in the dark.

Here’s how to focus on something other than the fire: Shine your flashlight on the subject, and press the shutter release button halfway. When autofocus locks on, turn off the light and switch to manual focus. Without moving or adjusting anything on the camera, take your shot. Your camera will maintain the same focus point – as long as nothing is adjusted.

Note: you could also try back button focus.

Where will you practice?

Do you enjoy a cozy fire at your campsite, or having bonfires at the beach? Do you like candlelit dinners? Or what about backyard marshmallow roasts? All of these would be great places to practice long exposure fire photography.

long exposure bonfire

ISO 160, f/5.6, shutter speed 6.0 seconds

Experimenting with long exposures around a campfire can be a little addictive. I’ll bet the more you practice, the more fun you’ll have.

Don’t forget your flashlight! You’ll need it to see your camera controls, for help with focusing, and to get safely back to your car.

long exposure fire photography tips

ISO 100, f/16, shutter speed 5.0 seconds

Please share your tips and photos by commenting on this article.

googletag.cmd.push(function() {
tablet_slots.push( googletag.defineSlot( “/1005424/_dPSv4_tab-all-article-bottom_(300×250)”, [300, 250], “pb-ad-78623” ).addService( googletag.pubads() ) ); } );

googletag.cmd.push(function() {
mobile_slots.push( googletag.defineSlot( “/1005424/_dPSv4_mob-all-article-bottom_(300×250)”, [300, 250], “pb-ad-78158” ).addService( googletag.pubads() ) ); } );

The post Long Exposure Fire Photography – 5 Tips for Beginners by Dena Haines appeared first on Digital Photography School.


Digital Photography School

 
Comments Off on Long Exposure Fire Photography – 5 Tips for Beginners

Posted in Photography


2016 Roundup: Consumer Long Zoom Compacts

12 May

Bridge and travel zoom cameras are two of the very few categories of compact cameras to survive the smartphone. Whether it’s a travel zoom, which puts a 25X-30X zoom into your pocket, or a bridge camera which offers even more zoom, phones just can’t compete. 

While there are now enthusiast-level long zoom cameras with 1″-type sensors – such as Sony’s Cyber-shot RX10 series – there are still plenty of more budget-friendly models, though their smaller sensors don’t offer the image quality or depth-of-field control of the pricier models. The one product in the group that is a bit more competitive with the enthusiast cameras is the Olympus Stylus 1s, which has a 1/1.7″ sensor, rather than the smaller, and more common (in this class) 1/2.3″.

The following cameras are included in our roundup:

  • Canon PowerShot SX60 HS
  • Canon PowerShot SX710 HS
  • Nikon Coolpix P900
  • Olympus Stylus 1s
  • Panasonic Lumix DMC-FZ300
  • Panasonic Lumix DMC-ZS60
  • Sony Cyber-shot HX90V
  • Sony Cyber-shot HX400V

Of those eight cameras, three are pocket-sized and offer 30X zooms. The other five are bridge (SLR-style) cameras with focal lengths ranging from 600mm to an unbelievable 2000mm (35mm-equivalent).

And with that, let’s take a look at some consumer-level travel zoom cameras!

Articles: Digital Photography Review (dpreview.com)

 
Comments Off on 2016 Roundup: Consumer Long Zoom Compacts

Posted in Uncategorized