RSS
 

Posts Tagged ‘Locations’

6 Tips for More Unique Travel Photos in Busy Tourist Locations

10 Sep

Imagine this: you’ve scrimped and saved for months for your dream vacation, and a snazzy digital camera, hoping to capture some unique travel photography images along the way, only to be flustered by the hordes of other tourists with the same intentions. With the increased accessibility of cameras on devices of every kind, this is becoming a common scenario that can frustrate many photographers, both professional and amateur. But don’t lose hope! With these tips, I’ll show you some ways to think of travel photography in a new light so that you can take unique travel photos in busy tourist locations.

DPS Travel Photography 03

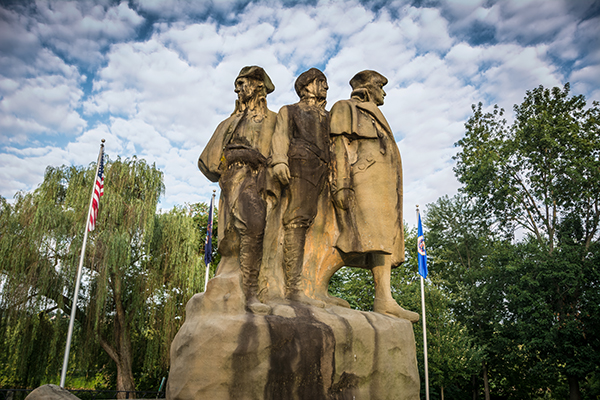
1. Take shots from different angles

To get a unique photo, consider your subject from a wide variety of angles. Get down on your knees and shoot from below, or step up on a bench, or use a monopod to shoot from on high. Do whatever you can, within reason, to shoot from different perspectives; this will greatly increase the odds of capturing a unique image.

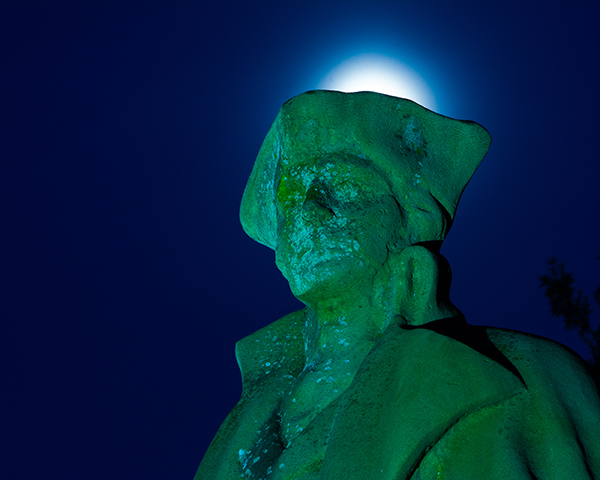
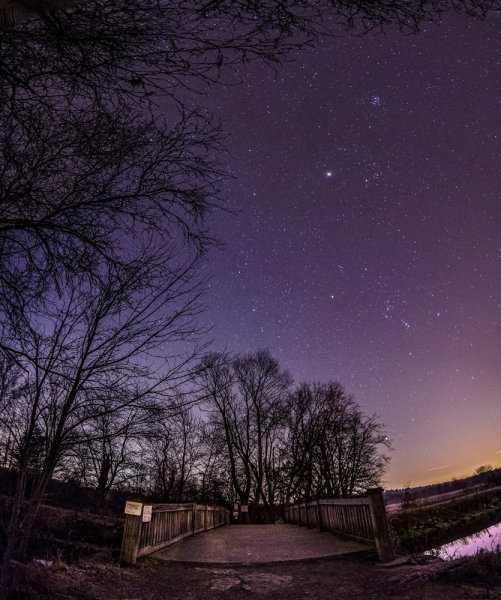
2. Time your visits to outdoor attractions to coincide with the most ideal natural lighting available

One of the biggest challenges to shooting outdoor attractions can be harsh shadows due to lack of lighting control. You obviously don’t want to bring strobes and excessive flashes with you when you travel, so it’s best to use the sun to your advantage. Do your research with apps, such as The Photographer’s Ephemeris, to see where the sun will be, and plan your trip accordingly. Sunrise and sunset are probably among the most ideal times, but be aware that you’ll likely get competition from other photographers thinking the same thing (see image above).

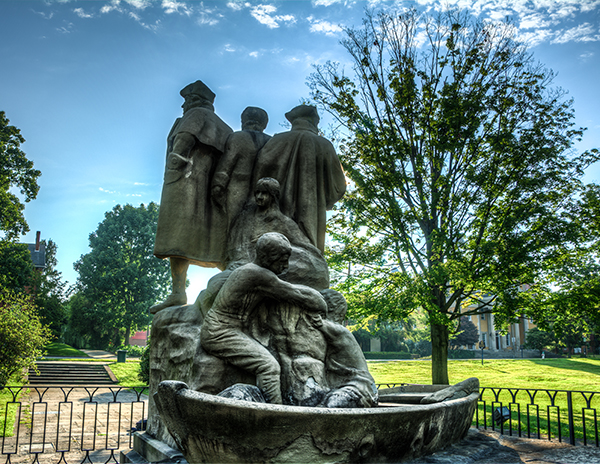
3. Go where the crowds aren’t going

DPS Travel Photography 05

If the crowd in a tourist attraction is fixated on one particular part, turn around and see what is behind them. Look for details that are being passed by and not given attention. This gives you less competition, in addition to increasing the odds, of capturing a unique image that everyone else is overlooking. While you’re shooting in the opposite direction, this also gives you something to do while waiting for the crowd to thin out so that you have more time to capture a clean shot of the main attraction. Having patience, and waiting for breaks in the crowd, is also a key to shooting unique images.

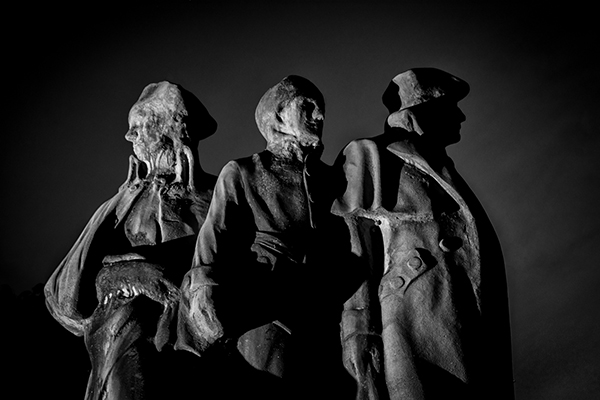
4. Pull out your zoom lens and focus in on details

Challenge your photography skills and creativity by shooting exclusively with a macro, or zoom lens, for a while. Shooting with a longer focal length will encourage you to take in the intricate details of a place; something that is usually overlooked by other tourists who likely focus on taking selfies and wide-angle shots. There’s beauty in details, and zooming in close eliminates most of the risk of having other people block your shots.

DPS Travel Photography 04

5. Make other tourists part of your shot

Instead of viewing the hundreds of other tourists around you as burdens, why not make them a part of your photo? Pull a fast one on other shooters by pointing your camera in their direction. Many tourists will likely duck or move out of your way, so act fast to catch them in natural poses. The point is, think like a photojournalist, or marketing photographer, and consider the idea that conveying the idea of a full, and popular, tourist attraction is a photo-worthy moment in itself.

DPS Travel Photography 01

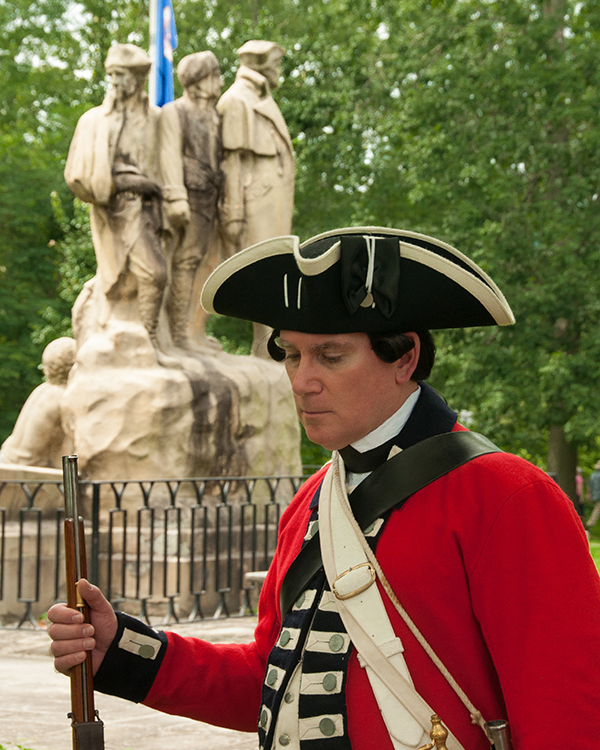
6. Take candid shots or portraits of the locals

In and around many tourist attractions, you’ll likely find lots of locals in the forms of security guards, vendors, taxi drivers, and more. If you’re searching for truly unique photo subjects, consider pointing your camera at some of these people who help run the tourist attraction, and making them a part of your photo. You could even get bold and approach some locals for a portrait. This might be tricky if you’re in an area where language barrier is a problem, but if you get creative with your body language, it’s fairly easy to get your point across. Portraits not only give you more opportunities to get creative, but also provide opportunities to chat with people, and perhaps find out other unique photo ideas in the area.

DPS Travel Photography 02

Have you got some great photos from crowded tourist locations? Please share them and your tips in the comments below.

The post 6 Tips for More Unique Travel Photos in Busy Tourist Locations by Suzi Pratt appeared first on Digital Photography School.


Digital Photography School

 
Comments Off on 6 Tips for More Unique Travel Photos in Busy Tourist Locations

Posted in Photography


Beyond the Postcard – 14 Tips for Creating Unique Photographs in Iconic Locations

28 Aug

Photography has been around since the early 1820’s. Of course, back then the technology of “picture taking” was not accessible to the common person. But have things ever changed! With the availability of digital cameras ever present, even in our cell phones, take a moment to consider these facts. Every two minutes today there are as many photos taken as were taken in the entire 19th century (1800s), and ten percent of all the photos ever taken were snapped within the last twelve months!

The Postcard: The Start Westward Monument in Marietta, Ohio.  (18mm 1/80th of a second at f/5, ISO 100)

The Postcard: The Start Westward Monument in Marietta, Ohio. (18mm 1/80th of a second at f/5, ISO 100)

So, with nearly 200 years worth of photographs in our collective albums and portfolios, it has become challenging to find an iconic view or subject that hasn’t been overdone by millions of photographers, especially when it comes to state and national outdoor landmarks. In order to look beyond the “postcard shot”, you need to research unique perspectives and techniques to capture that popular subject in a way that creates an original image. But first, go ahead and take that “postcard shot”. (You know you want to!) Then consider the following 14 different suggestions for creating unique photographs of the most popular spots.

#1 Check the internet

This is a resource past generations would have loved to have! By searching Google, Flickr, 500px and other photo sharing sites you can see how other photographers have captured most popular scenes. Besides seeing the images that have already been done, this will give you an idea of the layout of the location before you arrive. You may also find ideas that other photographers have tried and notice something that you might do differently to make the same image better.

#2 Get to know your location

Research the area by downloading maps and brochures from the internet. If your destination is only open certain days and hours, be sure you’ve garnered that information before you head out on your shoot. Stop at the visitor centers and ask questions.

#3 Talk to the locals

Talking to a “local” can often lead you to all kinds of special photo opportunities that may have never been visited before, such as discovering a special lighting effect that only happens at a certain time of the day or year, or maybe a waterfall that is hidden from view.

#4 Shoot at popular sites during the week

Avoid the weekends when the crowds can make it almost impossible to get an image, especially if you are looking for a shot free of human presence.

#5 Look for new angles

While looking for different angles, don't forget to explore all sides of your subject.

While looking for different angles, don’t forget to explore all sides of your subject.

Try to avoid the obvious straight-on shot that presents itself right in front of you,(the typical postcard shot), but look around for other angles instead – high, low or from the right or left. If you must shoot straight in front, try to include a foreground object.

Caution: If you are in a state or national park, be sure to abide by all park rules! Photographers sometimes tend to think that rules do not apply to them, but you will find that most park rangers will not agree with this point of view. These rules are put in place for your safety or to preserve the beauty of the area you are photographing.

#6 Photograph in different seasons

Photograph the scene or subject in all four seasons. Mother Nature provides amazing changes to scenery, from the different angles of the sun to the different colors of the leaves on the trees.

#7 Look for special events in nature

Some natural happenings can make your image unique, such as a full moon which may be included in the image if you are into nighttime photography. Special weather conditions can be conducive to producing a once-in-a-lifetime image. For example, some photographers may reject shooting on rainy days, but if you have the protective gear for your equipment, the rain can add special visual effects such as reflections or rainbows. Ice and snow coatings are often quite striking additions to outdoor objects both in nature or manmade.

#8 Look for special lighting

Of course the best light of every day will come during the golden hours, following the early morning sunrise and just before evening sunset. If you must shoot in the harsher lighting of midday, consider black and white images which can often produce some visually appealing contrast. If you are out on a heavily overcast day, you may be able to shoot all day, but in most of these cases avoid including the sky in your image. If you have the option, research natural lighting sources by using computer software, such as The Photographer’s Ephemeris, that show the position of the sun and moon to help you determine when the lighting will be best, and what time to arrive to capture your shot. These kinds of software can allow you to anticipate exactly when and where the best lighting may fall, on just the right spot, to create that once in a lifetime image.

Black and white image shot after dark was lit with an off camera flash from the left side of the image.

Black and white image shot after dark was lit with an off camera flash from the left side of the image.

#9 Add the human element

Including a person in the scene not only will add a sense of scale, but can also add excitement and fun to your photo, which will make your image much more interesting to your viewer.

Special events present an opportunity to include a human element, which add extra excitement to your image.

Special events present opportunities to include human elements, which add extra excitement to your images.

#10 Focus on details

Narrowing your focus to capture details can be an especially effective way to create a unique photo. Whether zeroing in on the part of the vista that makes that site unique, or the feature of the statue that expresses its purpose, an original visual story may be captured in your image.

#11 Include a foreground element

Incorporating a foreground object to frame the subject can add depth to your scene and also enhance the image. A foreground object can also be used to lead the viewer’s eye to the subject of your photo.

#12 Use special effects

Two filters that could help make that standout image are the polarizing and neutral density filters. Use of a polarizing filter will enhance the blue of the sky and add color saturation. Use of a neutral density filter will cut down the light entering your camera, which allows you to slow down shutter speeds to capture interesting motion effects with the sky or water. Experimenting with your white balance can also create some interesting results.

This image was created by using multiple exposures. the first image was of the monument against the sky, in the second the camera was turned upside down and captured the top of some nearby tree tops. In each image the sky was overexposed creating the white background.

This image was created by using multiple exposures. The first exposure was of the monument against the sky.  In the second exposure, the camera was turned upside down, capturing the top of some nearby trees. The sky was overexposed in each image, creating the white background.

In this image shot at night the white balance was changed to Tungsten, which causes the monument to have a teal color. The glow above the head was created by the moon glow.

This image was shot at night the white balance was changed to Tungsten, which caused the monument to have a teal color. The glow above the head was created by the moon’s glow.

#13 Vary your focal length

Try different lenses to get varied results, for instance a telephoto lens will not only bring the scene closer to you, but will also compress the scene. On the other hand, a wide-angle lens allow you get more of your subject in the view, make background objects appear farther away, which adds depth to the scene.

In this image the monument is captured just after sunrise giving the monument a nice glow. Also by using a telephoto lens at 150 mm @ f4.8 we compress the photo and the background is out of focus to make the monument stand out

In this image the monument is captured just after sunrise giving it a nice glow. Also by using a 150mm telephoto lens at f/4.8 we compress the photo and the background is out of focus to make the monument stand out.

#14 Experiment with DOF

To narrow your depth of field, open your aperture to a lower number, such as f/ 2.8, and make your subject stand out from the background. A distant landscape requires more depth of field to keep objects in focus, so you may want to close your aperture to something like f/16 to sharpen your image.

Researching your options and incorporating some of these tips will enhance the creative bent so many photographers already possess! Just don’t settle for the easiest, most common photographic result if you can take the time to shoot a more memorable image. Think and imagine your own photographic creations “beyond the postcard”. You’ll be glad you did!

Have any unique photographs from iconic locations or landmarks? Please share in the comments.

The post Beyond the Postcard – 14 Tips for Creating Unique Photographs in Iconic Locations by Bruce Wunderlich appeared first on Digital Photography School.


Digital Photography School

 
Comments Off on Beyond the Postcard – 14 Tips for Creating Unique Photographs in Iconic Locations

Posted in Photography


Finding New Photography Locations Just Got Easier With ShotHotspot

26 Jul

There are many ways to go about finding photography locations, but if you’re struggling to find new locations I’d suggest giving ShotHotspot a try.

shothotshop

Five Reasons to check out ShotHotspot?

#1 Great search functionality

shothotspot

Search locations, keywords, and type of photography

The standout feature of ShotHotspot has got to be the search functionality that they have built into the site. Much like Stuck on Earth the photographs they are using come from Flickr and Panoramio, but unlike Stuck on Earth and other outlets ShotHotspot allows you to search based on keywords, style of photography, location distance, and gives you full control over how strong the matching system should be.

shothotspot4

Search within a drawn box

As if that wasn’t enough, it gets even better!. Say you’re not exactly sure what the location that you want to search is called, but you have a general idea of where it is located on a map, you can simply draw a box and search only within that box for photographs taken there and still have access to the various filtering options.

By far they have one of the best search engines I’ve come across for finding locations to photograph, and with time it will only get better.

#2 Crowdsourced corrections from all visitors

One of the problems with pulling data from sites like Flickr and Panoramio is that you rely on the accuracy of the photographer’s location data and key wording. ShotHotspot occasionally will ask for your help in order to help make the location data better. It does this through a simple “Help us Out” box that asks for various information about the location that you are currently browsing.

shothotspot5

ShotHotspot asks for help from a human brain when it needs it

#3 User generated hotspots and information

On top of crowdsourcing for location corrections, ShotHotspot also allows its users to add hotspot locations to their database and edit information about current hotspots that they currently store. This allows for a massive worldwide approach to finding spots to photograph, and determining which ones are better than others. As a user you can add things like type of suitable photography, best time to visit, equipment required, cost of entry or even a general description of the location.

shothotspot6

Add information to locations to help make the database stronger

#4 Integrated with The Photographer’s Ephemeris

While the search functionality is probably the best feature of the site there are a couple of other cool additions that only add to the experience. The first of which is that HotShotspot is directly hooked into The Photographer’s Ephemeris. This allows you to get information on sunrise, sunset, anything else you’d like to know about the location with the click of a button.

shothotspot7

Clicking on the sun/moon calculator will open The Photographer’s Ephemeris

shothotspot2

Get all the details you need to plan for your shoot

#5 Integrated with Wikipedia

Finally ShotHotspot has also tapped into the gigantic database of Wikipedia for information about the locations it has in the database. Not every location has a wiki page so you’ll find some that are empty, but more popular locations will have a vast amount of information for you to browse through.

shothotspot3

Information from Wikipedia with a link to the Wiki page of the location makes it easy to find out more about where you’re going.

It’s still early, but I think ShotHotspot is a winner

In just a few minutes I found two locations I didn’t even know existed less than 20 miles from my house. I’m not saying that this will happen for everyone, but it’s a great sign for a site that’s only just getting started. Check out ShotHotspot and then come back here and let me know what you think.

The post Finding New Photography Locations Just Got Easier With ShotHotspot by John Davenport appeared first on Digital Photography School.


Digital Photography School

 
Comments Off on Finding New Photography Locations Just Got Easier With ShotHotspot

Posted in Photography


Surrealist Disaster-Proof Structures for Dangerous Locations

20 Mar

[ By Steph in Architecture & Houses & Residential. ]

Surrealist Disaster Proof Architecture 1

Some spots are such beautiful potential locations for a home, yet repeated natural disasters make them inhospitable for all but the strongest and most durable of dwellings. Architect Dionisio Gonzales imagines just how creative we could get in building disaster-proof structures with ‘Architecture for Resistance,’ a series of surrealist fantasies that often take their cues from natural shapes like shells.

Surrealist Disaster Proof Architecture 2

Individual collections envision architecture for a particular location. ‘Dauphin Island’ is a series of hurricane-resistant designs for the island of the same name, located just south of Mobile, Alabama. The island has been hit by one hurricane after another. Gonzales believes that sustainable architecture could stop nature’s cycle of destruction with a dramatic change in the way our houses look.

Surrealist Disaster Proof Architecture 3

Surrealist Disaster Proof Architecture 4

The Dauphin Island creations are “real futuristic forts made of iron and concrete,” with shapes that call to mind sea shells, crustaceans and other marine organisms. It’s easy to imagine these structures closing up like forts to guard against high winds and flooding.

Surrealist Disaster Proof Architecture 5

Gonzales also designed bizarro-world versions of Brazil’s favelas and the shabby settlements in the hills of Busan, South Korea, making a commentary on the coexistence of the wealthy and the very poor. The designs bring visually disjointed, futuristic structures into neighborhoods that are already chaotic in an attempt to legitimize the architectural vernacular of each location.

Share on Facebook


[ By Steph in Architecture & Houses & Residential. ]

[ WebUrbanist | Archives | Galleries | Privacy | TOS ]


WebUrbanist

 
Comments Off on Surrealist Disaster-Proof Structures for Dangerous Locations

Posted in Creativity


Top Photo Spots – a New Way to Find Locations for Photography

20 Mar

Top Photo Spots is a hugely ambitious project headed up by James Brandon (a regular  dPS writer) that aims to take the guesswork out of travel photography. James has asked me to introduce TPS here on Digital Photography School in hopes of bringing attention to the project and helping bring his vision to life. It’s a great idea and one, that if it can be accomplished, could become a go-to resource for photographers looking to find locations for photography around the world – however it’s a long way from that point right now.

So what is Top Photo Spots?

topphotospots1

The best way to introduce TPS is to take a quote from the man who created it – from James himself.

You can Google something like “best places to photograph in Big Sur” and while you might get some helpful information, it will mostly be from random one-off websites and it won’t always be geared towards photographers.

In essence TPS aims to solve the problem of searching the web, which is filled with tourists photos of various locations, inaccurate or confusing information on where and how the photographs were taken, and replace that with something that’s geared specifically towards photographers.

The concept, layout and design are there

Overall TPS has a unique concept that will fill a huge need in this industry, the layout and design are modern, easy to navigate and complement the concept well, but – oh yes there’s a but – the big hurdle that TPS needs to conquer is content (which I’ll touch on in a bit). So, let’s focus on the good first.

As I said, the design is great and well thought out. Each location that’s been added to TPS has a sample photograph, Google map with location pins for points of interest, and a description of what to expect.

topphotospots2

After the brief introduction to the overarching location, in this case Santa Cruz, California, there are sub-posts that describe various photographic opportunities within the location in more detail.

topphotospots3

Moving into one of these sub-locations will provide you with a sample photograph from that specific location as well as another Google map giving you exact coordinates to get you there and of course more information on the location itself. It’s a really well thought out concept and I can see these guides being very helpful to people visiting locations and looking for not only ideas of things to photograph, but exactly how and where to take photographs.

Now – about the content problem

Currently James has TPS listed in a beta status while he builds content and brings in contributors. As I’ve said from the start of this article – this is an ambitious project – it’s going to take a lot of time and effort to get it to the point where it needs to be in order to truly be meaningful to the majority of people searching for locations to photograph.

Currently there are only a few dozen locations, most of which are within the United States, so the location you are traveling to probably isn’t yet listed – which means there’s a lot of room to grow. But this is where you can help!

TPS is openly looking for contributors to help fill out the site with locations around the world. If you’ve got an interesting location and know a bit about writing for the web I’d suggest that you check out the write for TPS page and help James get the site rolling – it could be the next big thing in travel photography.

Final Thoughts and Suggestions

Top Photo Spots is a great concept that is too ambitious for the vast majority of people to even attempt – which is why it’s such a good idea. If James can succeed in his vision I think that TPS will become an extremely valuable resource for photographers looking for spots to photograph on their next trip.

That said, I do have a few suggestions for James, and I’m sure he’ll entertain more in the comments – here are the three big things that I’d like to see integrated into the site at some point in the future.

  • A visually appealing way to browse through all the currently available locations – sometimes people don’t know where they want to travel, but rather are looking for something to inspire them.
  • The ability to print and download guides, or save them to a mobile device. Ideally I’d want to have quick and easy access to the guide when I’m on location without having to refer back to TPS – especially if the location is in a remote location where access to the internet might be limited.
  • Integrate TPS with other photographers around the world who are willing to set up photo walks and guides of locations that are featured on TPS. This could take some time – but I think that a site like TPS is set up perfectly for this and would be a huge benefit to people traveling to the new locations. Not only that, but it would set it even further apart from the ‘Google search’ method that we are currently using to find places to photograph.

So go have a look at Top Photo Spots and check out what James has put together so far. Then come back here and tell us what you would add to the TPS wish-list above.

For more on travel photography:

  • Tips for Photographing Popular Tourist Destinations
  • 10 Ways to Improve your Vacation Photos
  • 6 Tips for Photographing People When Travelling

The post Top Photo Spots – a New Way to Find Locations for Photography by John Davenport appeared first on Digital Photography School.


Digital Photography School

 
Comments Off on Top Photo Spots – a New Way to Find Locations for Photography

Posted in Photography


5 Creative Ways to Find New Locations to Photograph

05 Oct

There’s truly nothing like visiting a location for the first time – I absolutely love it and I strive to always photograph at least one new location a month.

When I started on my photography journey this wasn’t a hard challenge to meet as even my own backyard was new to me and my camera, but as time went on things got a bit more difficult. New locations became ‘go-to’ spots and there came a point where I was only photographing at places that I had previously visited.

While I’d love to travel the world on a whim I just don’t have the means or time to do so which severely limits the range of my ‘new locations’ to places within driving distance from my house. As a result I’ve developed this list of useful techniques for getting the most out of my local area and I hope that it will help you do the same!

Creative Ways to Find New Photography Locations

#1 – Stuck on Earth

While Google Maps, Google Earth and Google’s Street View tools are great for getting location data, one of the best tools that I’ve used to find locations to photograph is the amazing app created by the people at Stuck in Customs called Stuck on Earth.

It works by fusing Flickr location data with a beautiful map to give you an amazing resource of not only useful locations, but the photographs other photographers have taken at those locations.

On top of searching random locations for photographs that have been tagged in various locations around the world, they have top location lists that have been curated by actual photographers to showcase the best photographs in cities around the world. There’s a bunch of other cool features as well and I highly recommend it as a resource (after all it is free).

You can find out more about it here.

#2 – Join a Photo Club

I’d have to say that one of the best ways to get out and find new locations is by meeting new people local to your area. Even if you’ve lived there your entire life odds are someone else has found interesting locations you haven’t – or better yet – has been able to find a new perspective on a location you thought you’ve picked clean.

Photography clubs often will also hold photo walks which will help you get out to different locations many of which might become your new ‘go-to’ spot when you’re in a pinch to get on location before sunset. It’s a great experience and I highly recommend trying it if you haven’t done so yet.

Have you ever gone on a photowalk? Tell us about the experience in the comments!

#3 – Make an Old Place New By Going At Night

One trick that I’ve done is not necessarily to find a new location, but instead to photograph the same location in the middle of the night.

A-lot-of-Stars

Night changes the way we perceive the world and will more than likely change the way you see a familiar location. It opens up a whole new set of challenges and pushes your camera to its limits of low light image capture, but in my opinion it’s one of the most fun types of photography there is.

Read more about photographing at night here.

#4 – Buy a Guide Book to Your Local State

Guide books might seem dated these days with instant access to so many great tools online, but there’s something to be said about a good guide book that has a friendly voice guiding you to the spots, telling you what to expect, where to park and when the best time to visit is.

Trap Falls 2013

I never would have found out about Trap Falls (pictured above) if I hadn’t gotten a guide book detailing the hundreds of waterfalls and cascades that New England has to offer. It’s amazing the detail that the book goes into about not only where the waterfalls are, but how difficult the hikes are, and how picturesque the fall is.

There are tons of great guide books on Amazon and other bookstores and many of them can be downloaded as eBooks right to your phone or eReader so you can take it with you on your trip!

#5 – Fill up your tank and just drive

Finally, if all else fails, just fill up you tank and drive. One of my favorite things to do is pick a highway and a direction and tell myself, “I’m driving for 50 miles and taking the first exit I see after that”. What I end up doing is putting myself into an unknown town with all sorts of new things to see. I like to bring a friend along for the ride to keep me company as well as a second pair of eyes so that I can be sure to see potential photography opportunities.

Double Yellow

Of course it’s not a fool proof plan and driving around aimlessly can be a bit tricky. While it’s certainly possible that you’ll find a location you might otherwise have overlooked – it’s nearly just as likely that you’ll spend your day driving around with nothing to show for the effort, time and gas you burned.

How Do You Find New Locations to Photograph?

Okay now it’s your turn to help build upon this list – I’d love to hear what techniques you use to continue to discover new locations – leave a comment below and let us know!

Post originally from: Digital Photography Tips.

Check out our more Photography Tips at Photography Tips for Beginners, Portrait Photography Tips and Wedding Photography Tips.

5 Creative Ways to Find New Locations to Photograph

The post 5 Creative Ways to Find New Locations to Photograph appeared first on Digital Photography School.


Digital Photography School

 
Comments Off on 5 Creative Ways to Find New Locations to Photograph

Posted in Photography


Microsoft PowerPoint 2010 – Change Default AutoRecover and Presentation File Locations

20 May

Change the default directory where PowerPoint 2010 presentations are saved as well as where AutoRecover files are kept.

By default, as with other Office 2010 applications, Microsoft PowerPoint 2010 defaults to the user Documents directory to save presentations. AutoRecover files, useful if PowerPoint 2010 or your system crashes before a document is saved, are placed in the user’s AppData directory. For example, on standard Windows 7 installations, documents default to the C:\ Users\ YOUR_USER_NAME\ Documents folder, and AutoRecover files are stored at C:\ Users\ YOUR_USER_NAME\ AppData\ Roaming\ Microsoft\ PowerPoint.

If you have multiple hard drives and/or partitions, you may have one designated to keep data files and documents separate from programs and your operating system. Thus, moving these default locations to the other hard drive or partition might prove quite useful. And here’s how to do so:…

Read more at MalekTips.
New Computer and Technology Help and Tips – MalekTips.Com

 
Comments Off on Microsoft PowerPoint 2010 – Change Default AutoRecover and Presentation File Locations

Posted in Technology