RSS
 

Posts Tagged ‘Local’

LensCoat diverts its US production facilities to make masks for local hospital

10 Apr

More used to making protective gear for camera lenses, New Jersey-based LensCoat has turned its attention to making protective masks for health workers during the Coronavirus outbreak in the United States. The company has given over 50% of its production capacity to making the masks for its local hospital in Freehold, NJ.

LensCoat owner and nature photographer Scott Elowitz told DP Review that he responded to an appeal by the New York governor for companies to make Personal Protection Equipment but was told the governor was really looking for those who already had federal certification.

Scott says he was driven by a personal story in which one of his Freehold neighbor’s family had been ravaged by CV19 which lead to seven members being hospitalized and four dying.

‘I was a little dejected that we couldn’t make certified equipment but continued to look for ways to help’ he tells DPReview. ‘Then one of my staff alerted me that the Freehold Township Residents Community group was putting together a group of at-home sewers to make masks for our CentraState hospital and local first responders.’ Scott contacted the group to offer the company’s sewing skills and capacity and soon began making the masks.

Lenscoat’s usual product line is camo covers for lenses, cameras and photographers

LensCoat has a large stock of camouflaged material that it uses for its usual products and used this to make some very cool-looking masks. ‘We are a Realtree licensee (Realtree is the world’s leading camouflage designer). They heard about what we were doing and contacted us to also donate fabric to our local cause.’

Scott explains that the masks are not FDA surgical grade, so they are used over N95 and surgical masks as well as given to others in the hospital so that the hospital can use their limited resources more efficiently. ‘And I feel good about finding a way to help out our local community. We are all in this together. We have to do what we can to help even if it’s just staying home and not becoming a victim or part of the problem. The sooner we get this under control the sooner we will be able to get back to a sense of normalcy.’

For more information on the company see the LensCoat website.

Articles: Digital Photography Review (dpreview.com)

 
Comments Off on LensCoat diverts its US production facilities to make masks for local hospital

Posted in Uncategorized


DxO PhotoLab 3.2 introduces improved local adjustment tools, new camera support and more

19 Mar

DxO PhotoLab 3 has been updated to version 3.2. The free update includes numerous improvements plus raw file support for five new cameras. Long known for its local adjustment tools, DxO PhotoLab 3.2 introduces new Duplicate and Rename features in the Local Adjustments Palette. The Repair Tool, used to remove distracting elements from your image, has a new display mode for better visibility. DxO PhotoLab 3.2 includes new multi-image keywords, plus Windows users now have access to renaming functionality.

Regarding improved local adjustment mask management, with the new Duplicate and Rename features, users can reproduce masks from image to image. Once applied to a new image, the mask can then be adapted as needed for each image. To aid in easy identification of individual masks you have created, DxO PhotoLab 3.2 adds the ability to rename your masks. You can also quickly move each mask with a single click when using the brush tool.

DxO PhotoLab 3.2 introduces new Duplicate and Rename functionality for local adjustment masks. Image credit: DxO

The simplified Repair Tool display mode interface has been redesigned to allow the user to see more of the background when removing objects. This means that it will be easier to make accurate and realistic looking repairs to your images. The area being retouched is now outlined with a thin line, as can be seen in the screenshot below.

The Repair tool in DxO PhotoLab 3.2 has a simplified repair tool user interface. This introduces a new thin white outline surrounding the area being retouched. Image credit: DxO

In prior versions of DxO PhotoLab 3, users could add and delete individual keywords. In PhotoLab 3.2, users can now differentiate between keywords that are tagged to multiple images. As mentioned earlier, Windows users can also now rename keywords.

In DxO PhotoLab 3.2, users can differentiate between keywords that are tagged to multiple images. Image credit: DxO

DxO PhotoLab is well regarded for its excellent and powerful optical corrections, which are customized by the DxO team for different camera and lens combinations. DxO PhotoLab 3.2 introduces support for five new cameras: The Canon EOS-1D X Mark III, Nikon D780, Olympus E-M1 Mark III, Leica D-Lux 7 and Leica Q2. Nearly 770 new optical modules have been added in DxO PhotoLab 3.2, which now includes more than 60 million different camera and lens combinations.

For existing DxO PhotoLab 3 users, the 3.2 update is available free of charge. For new customers, DxO PhotoLab 3.2 is available in Essential and Elite editions. To learn more about which version is best for you, click here to see a breakdown of version differences. With the new 3.2 update, DxO has introduced special pricing for new users. Until March 31, new users can purchase DxO PhotoLab 3.2 Essential for $ 99.99 USD or the Elite edition for $ 149.99. These are savings of $ 30 and $ 50 respectively. For more information or to download a free trial of the software, visit DxO.

Articles: Digital Photography Review (dpreview.com)

 
Comments Off on DxO PhotoLab 3.2 introduces improved local adjustment tools, new camera support and more

Posted in Uncategorized


How to Photograph a Local Project When Traveling is Not an Option

29 Oct

The post How to Photograph a Local Project When Traveling is Not an Option appeared first on Digital Photography School. It was authored by Jeremy Flint.

how-to-photograph-a-local-project

If traveling is not an option, a great way to enjoy your photography is to go out and shoot a project in your local environment. Your local patch provides a wonderful opportunity for photography and is a location often overlooked and taken for granted. To photograph a local project is a hugely satisfying undertaking, especially because you don’t have to go far to achieve it.

Staying near to home also provides ample time to visit a particular place, and means you can reach a location with ease. As travel is minimal, you will incur lower transport costs and you can go back to a particular location as often as you like. Shooting locally is also a great way to practice and improve your photography whilst getting you out with your camera. Have you ever thought about what local projects to photograph and how to go about it? Well, here are some of the best ways to achieve this goal.

Choose a subject that interests you

Image: Blenheim Palace, Oxford

Blenheim Palace, Oxford

This may seem obvious, but the first thing I recommend doing is to consider and choose a subject that interests you for the project. This way, you will be more motivated to go out and shoot it.

Focus on one aspect such as a local landscape, a river, a local park, a zoo, a piece of coastline, a particular time of day, birds and wildlife in a wetland area, a particular season or even a famous building or local landmark.

Whilst finding and shooting a project close to where you live, photo opportunities can present themselves when least expected.

With a bit of luck, your timing can be greatly rewarding.

For instance, I recently shot some images of a local landmark ‘Blenheim Palace’ in Oxfordshire. It is a gorgeous historic building surrounded by wonderful parkland, manicured landscapes, and woodlands.

I planned to photograph the autumn colors during my visit and was fortunate to encounter a unique and unexpected exhibition of artworks by Maurizio Cattelan. The exhibition included these carpets of union jacks (pictured) which provided a unique point of interest in the images.

Once at your local destination consider the following:

Select a lens

photograph-a-local-project

Starling murmurations, England

The fun starts once you have found a subject for your local project and you are at your location.

Think about what it is you are photographing, and the best way to capture it. This will give you insight into the type of lens you should use. If, for example, you live in a city and have decided to do cityscapes at blue hour, you may opt for a wide-angle lens. That way, you can fit more of the city into one scene. It would also allow you to fit in large architectural buildings, or capture bustling street scenes.

Another scenario may be that you want to capture local markets where you live. In this scenario, you may opt for a wide-angle lens to capture the overall nature of the market, and a portrait lens, such as a 50mm or 85mm, to get some more intimate people shots or detail shots of things sold at the market.

You may also decide to challenge yourself by using just one fixed prime lens, such as a 50mm. You could capture a range of subjects that give insight into the area where you live.

Alternatively, you may choose a telephoto lens to zoom in closer to subjects such as distant wildlife or birds. A telephoto lens is a great way to compress perspective, bringing foreground subjects closer to the background like these starlings.

Experiment photographing your subject

photograph-a-local-project

Starling murmurations, England

One thing I recommend doing when you photograph a local project is to just experiment photographing your subject.

Try using different camera settings and techniques and see what works and what doesn’t. For example, if you want to achieve a faster shutter speed as I did to capture these birds in flight, you could raise the ISO.

You may also want to experiment with your aperture. Shooting in Aperture Mode (Aperture Priority) is a great way to do this (if you are not yet on Manual Mode) as the ISO and shutter speed automatically adapt when you change the aperture setting. I achieved a wider, more detailed field of view by reducing the aperture and increasing the f-number to around f/8.

You may prefer to make certain parts of your image sharp (rather than the whole scene) and throw the rest out of focus. You can achieve this by opting for a larger aperture (smaller f-number) such as f/4. This can give you some nice bokeh backgrounds too, especially if moving to an even smaller f-number like f/2.

Change your angle

Image: Starling murmurations, England

Starling murmurations, England

Once you have taken some shots, try changing your perspective to get a different angle on your subject. You may find a different vantage point results in a better composition and image. Another way to change your angle besides repositioning yourself is to move your lens in closer and change your framing.

If you are working with a tripod, vary the height of its legs to give a fresh angle.

Reshoot

The great thing when you photograph a local project is that you can go back and re-shoot anytime. This would be much more expensive and time-consuming if you had to travel to capture your pictures.

Sometimes you won’t get the photo you desire the first time around, so a good option is to return and re-shoot. Unforeseen circumstances and factors out of your control that may warrant a reshoot include adverse changes in weather, building works in operation, too many people and wildlife that may not be present.

photograph-a-local-project

Blenheim Palace, Oxford

Going back to reshoot is a good exercise and a great chance to practice your skills too. It can help you improve your photography by learning from your mistakes and offers an opportunity to capture your project in various lighting conditions. Why not time your reshoot with a different time of day to capture some different images for your project. Alternatively, capture the same images just under different lighting conditions.

Each return visit can provide something new to photograph too. That’s because you are likely to see something different on your return in terms of your subject or pattern of light.

You may also decide to change lenses for the reshoot, or decide to focus on close up details on one visit and wide shots on another.

Summary

So go grab your gear and get out there to photograph a local project. It is a great way to capture a subject of interest that is on your doorstep and is a brilliant way to hone your skills.

Be sure to experiment with aperture, shutter speed and ISO, vary your angle of view and reshoot to improve your pictures.

What local project are you thinking of photographing? Share your thoughts and images with us below.


The post How to Photograph a Local Project When Traveling is Not an Option appeared first on Digital Photography School. It was authored by Jeremy Flint.


Digital Photography School

 
Comments Off on How to Photograph a Local Project When Traveling is Not an Option

Posted in Photography


DxO PhotoLab 3 brings improved repair tools, local adjustment masks and new camera support

25 Oct

DxO has launched DxO PhotoLab 3, the latest version of the company’s photo editing software. The new version of PhotoLab brings new and improved tools, including an optimized Repair Tool and entirely new Local Adjustments Masks Manager, as well as support for keyword searches in PhotoLibrary and new camera support.

PhotoLab 3 introduces a new color adjustment mode as part of the software’s Hue, Saturation, and Luminance (HSL) Tool, one that is based on the DxO ColorWheel. With the tool, users are able to choose color ranges from eight separate channels, according to the company, as well as replacement colors and more.

Joining the ColorWheel is the new Local Adjustments Masks Manager, which enables users to manage an image’s layered local correction masks. This control includes individually adjusting opacity, reversing selected masks, and more.

Below is a brief rundown of the new features from photographer Robin Whalley:

Beyond that, PhotoLab’s Repair Tool, which allows users to scrub specific elements from an image, has also been ‘optimized’ to include a new Clone Mode and support for manually repositioning the tool’s source area. Both Repair Tool modes include support for opacity adjustment and feathering.

As mentioned, the software’s PhotoLibrary has also been updated to include keyword searches and management. The PhotoLibrary now shows image keywords in the interface, plus there’s the ability to add, rename, and delete keywords, including for multiple images at once. At this time, support for keywords in multi-criteria searches is only available on the macOS version of the software, but DxO says it will bring the same functionality to the Windows version soon.

DxO is offering PhotoLab 3 Essential and Elite Editions for Mac and PC at discounted prices until November 24:

  • DxO PhotoLab 3 Essential Edition: €99.99 / £86.99 / $ 99.99
  • DxO PhotoLab 3 Elite Edition: €149.99 / £129.99 / $ 149.99

DxO PhotoLab 3: The most colourful upgrade yet

DxO, one of the most innovative companies in the photography and image editing industry, is announcing its latest version of DxO PhotoLab, the most advanced photo editing software on the market in terms of image quality. With its completely redesigned HSL colour adjustment feature, optimized Repair Tool, and brand-new Local Adjustments Masks Manager, DxO PhotoLab 3 offers an exceptional level of colorimetry control, making the photographer’s job easier than ever before. Because the DxO PhotoLibrary now supports keyword searches, it offers an even more comprehensive workflow and improved compatibility with other photo editing software programs.

A new approach to adjusting colour

With its innovative and visual approach to colour management, DxO PhotoLab 3’s HSL (Hue, Saturation, and Luminance) Tool offers unparalleled control so you can produce even more natural- looking or creative images. It features a new colour adjustment mode based on a chromatic circle called the DxO ColorWheel. With this tool, you can select a colour range from eight different channels, fine-tune the value, select a replacement colour, and adjust your transitions to your heart’s desire. A new Uniformity setting also lets you adjust colour variations within a specific range. The Saturation and Luminance sliders now operate more independently, which offers more flexibility, especially when converting from colour to black and white and creating partially desaturated images.

“With the DxO ColorWheel, we were looking to create a new approach that could make colour management both flexible and fun. This tool is incredibly user friendly,” says Jean-Marc Alexia, VP Marketing & Product Strategy at DxO.

A Repair Tool that offers even more control

DxO PhotoLab 3 continues to improve its local adjustments options to offer users even more precision. One of these features, the Repair Tool, which acts as a brush that can erase unwanted elements from the image, has been updated. You can now manually reposition the area in the source image that you want to use to reconstruct an area in the image being edited. In addition to Repair Mode, DxO PhotoLab 3 also offers Clone Mode, which lets you directly replace the area you are editing. Feathering and opacity level can also be adjusted in both modes.

New Local Adjustments Masks Manager

DxO PhotoLab 3’s new Local Adjustments palette lets you manage local correction masks that have been layered within a single image. Make them visible, mask them, or adjust their opacity individually. The tool also lets you reverse the selected mask with a single click, adding additional flexibility and saving a significant amount of time.

A more complete workflow through keywords

In addition to the search criteria that are already available in the DxO PhotoLibrary (metadata, shooting parameters, folders, etc.), DxO PhotoLab 3 now offers keyword management and optimizes image organization all the way up to export. The keywords associated with an image can now be displayed in the interface, including when they are imported from other software programs. You can now add, delete, or rename keywords for one or multiple images simultaneously and include them in multi-criteria searches (macOS version only; this feature will be available in the Windows version in the near future). DxO PhotoLab 3 also offers more complete information and metadata display options as well as additional Projects management options.

New camera support

DxO PhotoLab 3 continues to add new cameras to the list of equipment it supports. It recently added the Canon G5 X Mark II and G7 X Mark III, the Nikon P1000, the Panasonic Lumix DC- G90/G95/G99/G91, the Lumix DC FZ1000 II and Lumix TZ95/ZS80, the Ricoh GR III, and the Sony A7R IV and RX100 VII. More than 3,000 optical modules have also been added to the database, which now includes over 50,000 different camera/lens combinations. The software’s de-noising capabilities for RAW photos taken with certain Canon and Olympus cameras has been improved as well.

Price & availability

The ESSENTIAL and ELITE editions of DxO PhotoLab 3 (PC and Mac) are now available for download on DxO’s website for the following launch prices until November 24, 2019:

page2image570121568

DxO PhotoLab 3 ESSENTIAL Edition: DxO PhotoLab 3 ELITE Edition:

DxO PhotoLab 3 ESSENTIAL Edition: DxO PhotoLab 3 ELITE Edition:

DxO PhotoLab 3 ESSENTIAL Edition: DxO PhotoLab 3 ELITE Edition:

€99.99 instead of €129 €149.99 instead of €199

£86.99 instead of £112 £129.99 instead of £169

$ 99.99 instead of $ 129 $ 149.99 instead of $ 199

You do not need a subscription to use DxO PhotoLab 3. You can install the program on two computers with the DxO PhotoLab 3 ESSENTIAL Edition or on three computers with the DxO PhotoLab 3 ELITE Edition. Photographers with a license for DxO OpticsPro or DxO PhotoLab 2 can purchase an upgrade license for DxO PhotoLab 3 by signing into their customer account on www.dxo.com. A fully-functional, one-month trial version of DxO PhotoLab 3 is available on the DxO website.

Articles: Digital Photography Review (dpreview.com)

 
Comments Off on DxO PhotoLab 3 brings improved repair tools, local adjustment masks and new camera support

Posted in Uncategorized


Lightroom Local Adjustments – Radial Filter Versus the Adjustment Brush

18 Aug

Adobe Lightroom is image editing software that allows you to edit and make color adjustments to your photos. Among many, the Radial Filter and Adjustment Brush are two very useful local adjustment tools in Lightroom.

But often people get confused between both of these tools and are not sure which one to use in which situation. So I thought I’d share a few tips on the basis of which you can easily figure out the importance of each respective tool.

Radial Filter Tool

This tool is a blessing for portrait, event, wedding, and wildlife photographers. The reason why I am pointing to these genres of photography is that such photos usually have a single subject in the frame which needs to be highlighted.

The Radial Filter allows you to select an area using an elliptical mask. Then the shape of the ellipse can be changed by dragging one of the points. Once the area is selected, you can make adjustments inside or outside the shape using the new Brush component depending on your requirements.

radial filter Lightroom local adjustments

Adjustment Brush Tool

The Adjustment Brush is like painting the image canvas with the required adjustments. You can use the mouse pointer, drag and select the area manually where you wish to make desired adjustments. You have the ability to increase or reduce the size of the brush to make a fine and precise selection.

 Lightroom local adjustments - adjustment brush

Radial Filter or Adjustment Brush? How to Decide?

As you saw in the example above, using the Radial Filter allows you to select a particular area using the elliptical mask whereas the Adjustment Brush allows you to manually select the area using the cursor.

As a photographer and a creative person, you have to first visualize the result you want to achieve for your picture. If you believe that using the Radial Filter would suffice for your editing needs, go ahead with it. But if you feel that you need more manual and precise control over the selection of the area where you need desired changes, go with the Adjustment Brush.

It may sound easy but it might be challenging in some situations, so let me help you with this by looking at two examples.

Example 1: When to use the Radial Filter

 Lightroom local adjustments - radial filter image of an Indian boy

In the image above, my intention was to make changes to the area around the face of the boy. Now as the shape of the face is defined, I can easily select the area using the elliptical shape of the Radial Filter tool. Later, if I feel that I need to change the shape of the selection I can easily do that by dragging the points or using the Brush feature.

It does not make any sense to use the Adjustment Brush in this particular scenario as I can save my time by simply using the Radial Filter.

Basically, you should use the Radial Filter when the shape of your subject is defined and you can easily make the selection using the ellipse. Weddings, portraits, wildlife, events, and sports are some of the genres of photography where you can use the Radial filter to make changes faster.

Example 2: When to use the Adjustment Brush Tool

 Lightroom local adjustments - landscape scene sky selected

In this particular image, I wanted to make exposure and highlight changes selectively in the sky region. As you can clearly see, the shape of the sky area in this photo is not defined therefore I can not use the Radial Filter. If I use the Radial Filter I would either select unwanted areas of the mountains or would miss out some parts of the sky.

But by using the Adjustment Tool I can manually select the area I want to make changes in and I was able to do that precisely. Though this approach is a bit time consuming as compared to the Radial Filter, but you surely get an accurate selection. Now whatever changes I make would perfectly be made only on the sky region.

Conclusion

So the conclusion is that you should be using the Adjustment Brush when the shape of the area that you wish to select is not well defined. Landscapes, Cityscapes, or any photo where the shape of the subject is very complex, the Adjustment Tool would give you much accurate selection than the Radial Filter.

If you want to read more about each of these tools check out these dPS articles:

  • Creative Use of the Radial Filter in Lightroom
  • Lightroom’s Secret Weapon: The Radial Filter and How to Use it
  • Lightroom Mastery: The Power of the Adjustment Brush
  • 5 Tips for Using the Lightroom Adjustment Brush Tool
  • How to Use the Local Adjustments Tools Inside Lightroom

The post Lightroom Local Adjustments – Radial Filter Versus the Adjustment Brush appeared first on Digital Photography School.


Digital Photography School

 
Comments Off on Lightroom Local Adjustments – Radial Filter Versus the Adjustment Brush

Posted in Photography


DxO updates Nik Collection, releases PhotoLab 1.2 with U Point local adjustments

07 Jun
DxO Photolab 1.2 includes improved local adjustments.

DxO Labs – which split from DxO Mark in January – announced bankruptcy a few months back, but with a silver-lining: its flagship desktop software, Photolab, would receive a free update by summer. The company also announced that the Nik Software Collection – purchased from Google in late 2017 – would receive its first update since 2017.

As of today, both promises have been fulfilled, in a welcome indication that DxO Labs seems committed to its desktop editing business.

Nik Collection 2018

DxO engineers spent about six months working on code improvements to the Nik Collection, mostly with the aim of fixing bugs to ensure operational stability on the latest 64-bit Macs and PCs. There are no new features, but all seven plugins should also now work properly with the latest versions of Adobe Photoshop and Elements.

This is the first update to the collection since 2017, but it will come at a cost: until July 1st you can download the collection for $ 49.99 / £39.99 / €49.99. But after July 1st it will cost $ 69 / £59 / €69. There’s no word yet from DxO on how much future updates will cost, but we’re told that the company plans on releasing a new version yearly and it seems likely that those who download version 2018 will get a discount on future versions.

Download Nik Collection 2018 here.

Photolab 1.2

The latest version of Photolab, which is free for current users, incorporates the Nik Collection’s U Point technology, adding a much-loved set of local adjustments to the popular editing software. This update also adds hue and selective tone local adjustments, as well as support for recent cameras.

Download Photolab 1.2 here.

RIP DxO ONE Camera

This final bit of news should come as no surprise, but the DxO ONE camera is officially discontinued. The camera will continue to be sold by some retailers in the USA and France as long as they have inventory, so if you’ve been sitting on the fence about buying one, you’d better hurry.

Press Release:

With the Nik Collection 2018 by DxO and DxO PhotoLab 1.2, DxO continues to develop innovative solutions for photographers and creative professionals

The first update of the plugin suite that DxO acquired in late 2017, the Nik Collection 2018 by DxO offers full compatibility with the latest Mac and PC OSs and Adobe CC products, while DxO PhotoLab 1.2 enhances its local setup tools that incorporate exclusive U Point technology.

PARIS – June 6, 2018 – DxO, one of the world’s most innovative consumer imaging companies, today announced the immediate availability of the Nik Collection 2018 by DxO, an updated suite of Adobe Lightroom and Photoshop plugins for photographers and creative professionals. Eagerly awaited by the user community, this “by DxO” update marks the return to the market of the Nik Collection with the first stable version and with customer support. Also available today, DxO PhotoLab 1.2, an update of DxO’s acclaimed RAW and JPEG image processing software, adds new local correction features and adds support for seven additional cameras.

Nik Collection 2018 by DxO: Better user experience and stability

Since the acquisition of the Nik Collection from Google in late 2017, the DxO development team has spent several months analyzing and optimizing the code of the seven plugins that make up the software suite to make them stable and operational. “The process was long and complex,” explained Bruno Sayakhom, Product Owner at DxO. “It was necessary to recover and recompile source code that had not been maintained for a long time in order to make it compatible with the latest versions of Adobe products and the latest Apple OS updates. This is a first step that allows us to start afresh.”

The Nik Collection 2018 by DxO is now fully functional and compatible with all 64-bit Windows and Mac platforms, as well as with Adobe Lightroom Classic CC, Photoshop CC 2018, and Photoshop Elements 2017/2018. In addition, DxO now provides support in four languages on its website (http://nikcollection.dxo.com/), which will soon include exclusive tutorials. The software suite update, including the seven plugins, is now available in 13 languages, and includes a free 30-day trial period.

“We are proud to relaunch the Nik Collection, which users have been waiting for,” said Jean-Marc Alexia, DxO’s VP of Product Strategy and Marketing. “We have put all of our know-how into offering photographers and creative artists the best possible user experience. This is just the first step: using Uservoice-type surveys, we will be reaching out to the user community, from whom we greatly desire to gather feedback about their experiences and gain insight into their expectations.”

Designed for expert photographers and graphic designers, the Nik Collection includes seven powerful plugins for Adobe Lightroom, Photoshop, and Photoshop Elements that offer a full range of creative effects and filters:

  • Analog Efex Pro applies analog film, camera and lens simulations to digital photos.
  • Color Efex Pro includes a set of filters for color correction, touch-up, and creative effects.
  • Dfine reduces the noise of digital images by analyzing the specificities of each device.
  • HDR Efex Pro processes images in HDR.
  • Sharpener Pro increases the accuracy and enhances the detail of digital images.
  • Silver Efex Pro is a black and white image conversion solution inspired by darkroom techniques.
  • Viveza locally adjusts the color and tone of specific areas of the image.

Thanks to exclusive U Point technology, the Nik Collection plugins allow you to apply local settings to specific areas in a fluid and precise way.

The Nik Collection 2018 by DxO is available for download on the DxO website (http://shop.dxo.com/us/photo-software/dxo-nikcollection) for $ 49.99 / £39.99 / €49.99 instead of $ 69 / £59 / €69 until July 1st, 2018.

DxO PhotoLab 1.2 improves its local adjustment tools that integrate U Point technology

Recently awarded the 2018 TIPA Award for Best Image Processing Software, DxO PhotoLab (formerly DxO OpticsPro) offers a complete RAW and JPEG processing solution based on optical corrections from mathematically established laboratory models, as well as such exclusive features as PRIME noise reduction technology and DxO Smart Lighting intelligent exposure optimization.

DxO has integrated Nik Software’s U Point technology, acquired from Google in late 2017, into DxO PhotoLab. This exclusive technology allows photographers to apply local settings in a non-destructive RAW stream to specific areas in an image.

With version 1.2 of DxO PhotoLab, DxO continues to enhance its software by adding the Hue (HSL) and Selective Tone settings, to unblock locally dark areas or recover overexposed areas. The tool’s equalizer system has been redesigned accordingly, and local settings are now grouped by categories: Light, Color, and Detail. Each category can be shown or hidden with a single click, for an efficient workflow.

In response to user requests, we have added a new keyboard shortcut that displays the U Point mask in grayscale and shows the area that will be affected by the correction.

Finally, DxO PhotoLab 1.2 adds support for images from the Sony A7 III; the Panasonic Lumix DMC-G9, TZ90, and GF9; the Canon EOS 2000D; and the Apple iPhone 8 Plus and iPhone X. Thanks to the quality of DxO PhotoLab’s RAW conversion, which is based on prior calibration of each sensor in the laboratory, images taken with these cameras and smartphones will automatically be corrected for optical defects.

The ESSENTIAL and ELITE editions of DxO PhotoLab (PC and Mac) are available for download on the DxO website (http://shop.dxo.com/), and from retailers at $ 129 / £99 / €129 and $ 199 / £159 / €199, respectively (recommended retail prices).

Photographers who own a version of DxO OpticsPro can acquire an upgrade to DxO PhotoLab by logging into their customer account at www.dxo.com. A fully-functional trial version of DxO PhotoLab, valid for one month, is available on the DxO website: https://www.dxo.com/us/photography/download.

About DxO

For over 10 years, DxO has been developing some of the world’s most advanced image processing technologies, which have already enabled more than 400 million devices to capture images of unparalleled quality. DxO develops DxO PhotoLab (formerly DxO OpticsPro), as well as other image processing software for Mac and PC, which have been acclaimed by the world’s leading photographers.

Articles: Digital Photography Review (dpreview.com)

 
Comments Off on DxO updates Nik Collection, releases PhotoLab 1.2 with U Point local adjustments

Posted in Uncategorized


Tips for Doing Nature Photography at Your Local Parks

18 Mar

For myself and many other photographers, probably you included, one of the more difficult parts of the hobby is figuring out where to shoot things like nature photography.

If you have a big trip or a vacation planned, whether it be an exotic location or somewhere not so far away, then that question is answered for you. But for evening shoots after work, spontaneous sessions or weekend outings, a bit of planning is necessary. Enter the wonders of your local parks!

Tips for Doing Nature Photography at Your Local Parks

A park can take many forms and can exist in any location, and almost any country. It is generally defined as a “large public green area, used for recreation”. They come in all sizes, and each features their own unique variety of plants, animals, and landscapes.

Parks can be as small as a local city or county park, a larger state park, all the way up to a massive national park. Their common thread is that they have been well-defined and set aside for public use, and are perfect areas to practice nature photography.

Why shoot at a park?

Parks are unique and useful to us photographers because they can be a testing ground for new equipment, a safe practice area for new techniques, or a fully-realized background for your real work.

Parks are attractive because they are a (usually) safe, well-defined area, a miniature representation of the local environment. They give you a small, diverse biosphere of flora and fauna, all wrapped up in one package.

Tips for Doing Nature Photography at Your Local Parks

Parks are also numerous, and you have a lot to choose from, regardless of size or classification. Even national parks, with the fewest number of all the types, are plentiful. Over 100 countries worldwide have lands designated as national parks, including 59 in the United States alone. This doesn’t even count other sites in the national registry, such as forests, seashores, and historic sites.

The bottom line is you’ll never have a lack of subject matter when visiting one of these areas.

Preparing for the shoot

Preparing for a photo shoot in a park isn’t really any different than most other outdoor environments. You’ll want to pack and check all of your normal gear, including:

  • Camera body – If you’re hiking to a location, you’ll probably want to keep the number of bodies down to one; otherwise, maybe bring a film or instant camera as well for backup.
  • Lenses – Again, you don’t want to weigh yourself down too much, but always bring lenses to cover most of the situations you’ll find yourself in. If you’re shooting landscapes, bring a wide-angle prime lens, or at least a zoom that covers focal lengths down to 18 to 24 mm.
  • Tripod – Some camera bags and backpacks have holders for your tripod. Otherwise, take this into consideration as tripods are often not heavy, but bulky and unwieldy to carry while tromping through the park with your other gear.

Tips for Doing Nature Photography at Your Local Parks - use a tripod

  • Filters and other accessories – Don’t forget the little things such as UV filters, neutral density filters, remote shutter releases, and microfiber cloths to keep lens glass clean.

Since you’re shooting outside, you also need to be prepared for events and conditions outside your control, such as the weather. Depending on the size of the park, there may be hiking and long walking involved. So, you’ll also need to plan ahead and consider items such as:

  • Appropriate clothing – Long sleeves and long pants for mosquito-prone environments, hats, extra dry socks for long hikes.
  • Items to protect against the sun – Sunscreen and sunglasses.
  • Defensive items to keep yourself safe – A knife, or bear spray, if you’re traveling into areas where bears are known to live.
  • Location tools – To help identify where you are and where you’re going, such as a GPS receiver, paper maps (absolutely the best idea), and a compass.

Safety

As with any outdoor excursions, you’ll need to plan ahead a little, both physically and mentally, when venturing out into a park, especially a state or national park or forest.

First, just make sure you know what you’re getting into. If you’re going to a large, sprawling national park and have never been to the area before, then it’s pretty tough to physically scout the location before your shoot. The best you can do in that situation is to do as much research as you can online, or talk to friends or co-workers that have been to the area before.

For a smaller park, or one that’s close by, the best idea is to scout the location first. What hazards are present? Native animals? Plants?

Here in Florida, we have a tree (uncommon, but it exists in the wild) called a Manchineel. Everything about it from the leaves to the wood itself is extremely toxic. Even brushing up against it can end badly. These are the kinds of things you want to research well before you explore a park, especially the larger ones that may take you into more remote areas.

photo of a lake - Tips for Doing Nature Photography at Your Local Parks

Wildlife dangers

On the fauna side of possible dangers, you have the local wildlife. Here in Florida, it’s primarily alligators and snakes, although some areas of our state are habitats for small populations of bears and panthers. First aid and snakebite kits are a smart idea for almost any wilderness area around the world. Other areas of the United States and around the world have larger animals that can pose a serious threat to explorers and photographers, such as bears.

Black bears alone exist in approximately 40 of the 50 states in the U.S., and they, along with the other species, need to be respected and avoided. Many photographers and tourists have been making headlines in recent years by getting too close to bears, without thinking of the possible outcomes to themselves or the bear.

While unprovoked attacks aren’t very common, it is very easy to surprise or startle a bear, and it’s always recommended to carry bear spray in the wild when in bear territory.

What to Shoot

The possibilities of subjects in an outdoor park are almost endless. Some of us will go just to shoot a sunrise or sunset, while others want to take home photos of local wildlife.

Landscape photographers can focus on grabbing a shot of that sunset, or other features of the environment, such as lakes, mountains, and rivers. Open, panoramic scenes captured with wide-angle lenses are a favorite, as are forests, trees and the changes in the color of leaves. Flowing water such as waterfalls or fast moving rivers are good candidates for a long exposure photo, and even plains and prairies can be framed into beautiful minimalist compositions.

Tips for Doing Nature Photography at Your Local Parks

There is a never-ending variety of flora and fauna that can be photographed, such as flowers, trees, plants, and animals such as small mammals, reptiles, and an endless variety of birds. Many parks have some species that are concentrated in that area and offer opportunities for us photographers that we can’t get anywhere else.

Here on the west Florida coast, my nearest state park is home to the Florida Scrub Jay, endemic to this area, and concentrated higher in this one park than anywhere else. It’s almost a rite of passage to photograph one. Many parks around the world are home to their own species as well.

Tips for Doing Nature Photography at Your Local Parks - bird

Environmental Awareness

Finally, we need to address an overall importance when discussing capturing images of our beautiful environment; we as photographers need to be nature’s greatest champions.

I would suspect that most of us who love to be outdoors, already have a desire to be careful when enjoying our parks. But as we’ve seen recently in the news, not all of us take that into consideration. The commonly heard phrase, “leave nothing but footprints” may sound cliche, but it really is a best-case scenario of what we should strive for as we enjoy the great outdoors.

Tips for Doing Nature Photography at Your Local Parks - bird photo

The plants and animals that make their home in these areas were likely there long before we visited. It is our responsibility to leave the areas as we found them, without adding or taking away anything from the environment. This will ensure that future generations of photographers and explorers will be able to enjoy those areas too.

What was your best experience visiting and photographing a park for nature photography? Where do you want to go that you haven’t been yet? And what tips would you give others who are ready to visit and document the great outdoors? Please comment and let’s discuss below.

The post Tips for Doing Nature Photography at Your Local Parks by Tim Gilbreath appeared first on Digital Photography School.


Digital Photography School

 
Comments Off on Tips for Doing Nature Photography at Your Local Parks

Posted in Photography


How to use Filter Masks in Luminar for Powerful Local Adjustments

07 Nov

Luminar is a powerful, full-featured photo editor, with a massive array of features and editing tools. A great deal of its workflow is built around the fairly simple concept of applying filters. It’s much like the way you might edit a photo in Instagram or other similar programs – but you get much more power and control with Luminar.. You can use Luminar to add one or more filters to a picture in order to change properties like color, brightness, saturation, or even add fog effects or convert it to black and white.

However, this is where the similarities between Luminar and simple phone-based editing tools stops. Luminar’s filters are far more than just surface-level adjustments. They can be combined, layered, and customized in infinite combinations for photo editing far beyond what you might be used to in other programs. Add to that the use of filter masks to selectively choose where the edits to a filter are applied, and you have the recipe for a program that can become a very important part of your photography workflow.

How to use Filter Masks in Luminar for Powerful Local Adjustments

Understanding Filters

Luminar is built on a foundation of powerful editing algorithms that let you tweak every aspect of your photos. But unlike some other image editors on the market, it is extraordinarily simple to use the tools available to you. Rather than hundreds of confusing options, tiny buttons, and labyrinthine menus, many of the editing options in Luminar are available within a few clicks as Filters. Or you can access them by opening an image and clicking the “Add Filters” button on the upper-right portion of the user interface.

How to use Filter Masks in Luminar for Powerful Local Adjustments

Clicking “Add Filters” opens a menu that allows you to select from dozens of filters such as Clarity, Color Balance, Soft Focus, Tone, Vignette, and many others. If you’re unsure as to what all these filters actually do, just hover your cursor over one. A brief description will pop up along with a small sample image illustrating the type of editing that filter will do.

How to use Filter Masks in Luminar for Powerful Local Adjustments

The easiest way to apply one of these is to simply click it and adjust any of the parameters available for that filter. For example, if you click on Brilliance/Warmth, you can adjust two different aspects of the filter; Vividness and Warmth.

How to use Filter Masks in Luminar for Powerful Local Adjustments

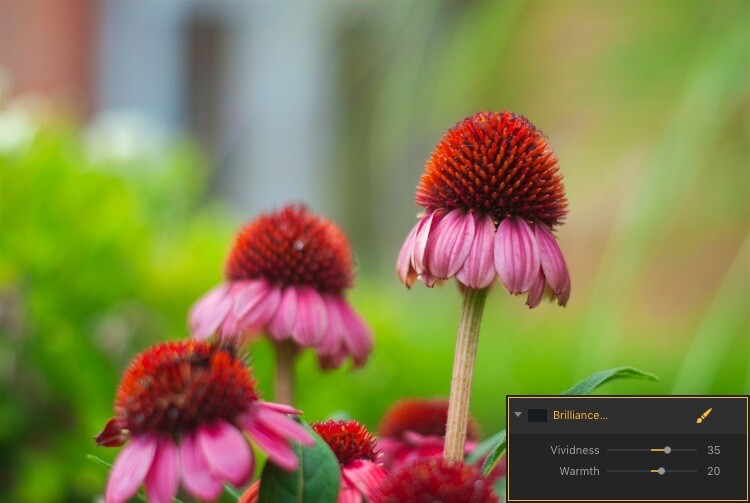
A few quick adjustments with a single filter made this bland RAW file go from ho-hum to frame-worthy.

Using Multiple Filters

You can combine as many filters as you want. You can even use layers, just as in Photoshop, to apply one or many filters. Then you can edit all of them at once with options like layer masking, which shows and hides everything on a single layer, and layer opacity.

It may sound complicated, but in actual use, the process is very simple: Load an image, add a filter, adjust the filter, and you’re done. The procedure only starts to get complicated if you want it to, at which point Luminar has a deep enough feature set to accommodate even the most highly demanding photographers.

Controlling the Effects with Filter Masks

Filters are all well and good, but the ace in Luminar’s sleeve is in the way it lets you apply them selectively with filter masks. If you have ever used a filter on Instagram you know that all your edits are applied across the entire image. That can be good but can also be quite frustrating if you only want to edit specific portions of the photo.

That’s where the simplicity and brilliance of Luminar’s approach really shine because you can control exactly where your edits are applied when you use a filter. To illustrate how this process works, I started with this photo (below) of a squirrel that was clearly in need of some editing.

I shot it in RAW in order to give myself the most amount of flexibility when editing the image, but Luminar works fine with JPG files too. Just know that you won’t have quite the same degree of control when editing JPG compared to RAW files.

How to use Filter Masks in Luminar for Powerful Local Adjustments

Apply Global Edits First

Before I started doing selective editing with filter masks, the first thing I did was to use two filters on the entire image. I used the Brightness/Contrast filter to make the picture brighter and then used Highlights/Shadows to lower the highlights a bit.

How to use Filter Masks in Luminar for Powerful Local Adjustments

So far so good, but I wanted to really make the squirrel stand out from the fountain in the background. Next, I added a Color Temperature filter but here I used the Brush icon in the top corner of the filter control box to apply it only to the squirrel.

Add Local Adjustments

This lets you literally paint in the filter adjustment in the same way you might use the Adjustment Brush tool in Lightroom to selectively edit an image. As you’re painting, you can use the toolbar at the top left of your screen to control the size, softness, and opacity of your brush as well as other settings that will feel right at home to most photographers.

How to use Filter Masks in Luminar for Powerful Local Adjustments

Click the Show Mask icon in the top left corner of the Luminar interface to show where you are applying (painting) a filter to the image.

By far, the most useful option here is Show Mask which you can select by clicking the eye icon in the top left, or by pressing the / key on your keyboard. This lets you see exactly where you are applying your adjustments in real-time while you paint. It is highly useful for making sure your edits are only applied where you want them to show up.

You can use the scroll wheel on your mouse to zoom into the image while brushing your filter adjustments. This allows you to fine-tune your editing to be exactly where you want it applied.

How to use Filter Masks in Luminar for Powerful Local Adjustments

With Show Mask enabled your filter adjustments show as red markings on the photo.

Add a Vignette on the Bottom Only

After editing the color temperature of the squirrel I used the Vignette filter. But instead of applying it to the whole picture I brushed it in just on the bottom corners (something users of Apple’s now-defunct image editing program Aperture might remember doing years ago).

How to use Filter Masks in Luminar for Powerful Local Adjustments

The icon in the top left corner of the filter window shows a black-and-white preview of where the mask has been applied. White reveals, black conceals – just like Photoshop. So anything shown in white is where that filter will be showing.

The ability to brush on filter adjustments is a huge game-changer for anyone who is used to the limited brushing options in Lightroom or overwhelmed by the prospect of doing this type of granular editing in Photoshop. And I say this as someone who uses both Lightroom and Photoshop!

Sometimes I just need a quick and simple editing workflow and the more I use Luminar the more it has replaced much of the work I do in those and other programs. To add a bit of icing to the editing cake, Luminar ships with full plugin support for many popular image editing programs including Photoshop and Lightroom. So you can still use those for your traditional workflow while simply hopping over to Luminar if you want to make use of that program as well.

Filter Mask Options

While my favorite aspect of filter making is the ability to brush adjustments precisely where I want them. But there are two other options that can be quite useful depending on the type of editing you want to do. In addition to a brush, you also have the option of applying Luminar filters with a Radial Mask, Gradient Mask, or Luminosity Mask.

Radial Mask

This applies the filter in a circular pattern which can be rotated, expanded, and contracted. It allows you to apply a filter in an even and controlled fashion. It works almost exactly like the Radial Filter in Lightroom. But instead of only letting you adjust the basic exposure, color, sharpness, and noise you can use it to apply any of Luminar’s dozens of filters.

Think of it like the Lightroom Radial Filter but much more powerful and customizable.

How to use Filter Masks in Luminar for Powerful Local Adjustments

The Radial Mask in Luminar can be used with any of its powerful Filters.

Gradient Mask

Similar to the Radial Mask, the Gradient Mask lets you apply a filter smoothly across an entire image while gradually changing the degree to which it is applied. Once again it works just like its Lightroom counterpart but for filters. Once you have either of the Radial or Gradient masks applied you can choose several additional options such as Disable, Invert, Density, and Feather.

How to use Filter Masks in Luminar for Powerful Local Adjustments

Luminosity Mask

This is an option that is somewhat unique to Luminar. Even though you can re-create this type of mask in Photoshop and other programs I have never seen it implemented so easily and smoothly as it is here.

When you enable a filter and click on the brush icon you have the option of creating a mask that applies the filter only to the brightest portions of the image. This is incredibly useful if you want to make changes and edits quickly without zooming in and painstakingly brushing in your adjustments at a granular level.

This feature is especially useful for landscape photographers who frequently have images with a lot of contrast between the lightest and darkest parts of the image. They often need to edit the sky separately from the rest of the image.

Luminosity Mask in Action

As an example of how this works, I have used the following image of a sunrise that I took in Nebraska one chilly winter morning.

How to use Filter Masks in Luminar for Powerful Local Adjustments

I wanted to make adjustments to the sky while also brightening the dark portions, but not have my edits interfere with each other.

The first step was to add a Brilliance/Warmth filter and then generate a Luminosity Mask. That would make sure any changes would be made just to the sky and not the foreground. I confirmed this by showing the Mask Overlay which gave me a clear idea of where the mask was being applied.

How to use Filter Masks in Luminar for Powerful Local Adjustments

I edited the values of the Brightness/Warmth slider to get the sky looking just right, then added a Highlight/Shadow filter to brighten up the foreground. After that, I finished with a Color Temperature filter which I applied only to the ground by using an inverted Luminosity Mask. That ensured it would apply only to the shadows and not the highlights.

The final image gave me a result that would have been much trickier to create in Lightroom, and require a lot of complicated selection editing and layer adjustments in Photoshop.

Note: the new version of Lightroom (Classic) that Adobe just released now has the ability to add a Luminosity mask to local adjustments as well. 

How to use Filter Masks in Luminar for Powerful Local Adjustments

Simply Powerful Editing

The real advantage for me when using Luminar’s Filter Masking is that it’s a way for me to do creative, complex edits to my images in a simple and efficient manner. Some people have asked me if it’s better than Photoshop and Lightroom, and my answer is a rather vague. “it depends”.

I think there is room for all three programs in a photographer’s workflow depending on that person’s individual needs. But there certainly is a lot to be said for how Luminar gives you access to such powerful and highly customizable image filters while making the adjustment process so easy to use.

If you just want to click a few filters and save your image, as you would in Instagram, then you can be on your way in seconds. However, if you want more fine-grain control over which parts of your photos that those filters are editing, then using Filter Masks in Luminar might be the answer you’ve been looking for.

Have you tried Luminar’s filter masking feature? I’m curious to know about your experience and any tips or tricks you might have uncovered. If you have not yet given these tools a chance you might be surprised at the results you can achieve.

Disclaimer: Macphun is a dPS advertising partner.

The post How to use Filter Masks in Luminar for Powerful Local Adjustments by Simon Ringsmuth appeared first on Digital Photography School.


Digital Photography School

 
Comments Off on How to use Filter Masks in Luminar for Powerful Local Adjustments

Posted in Photography


Judge determines FAA drone rules take precedence over local regulations

27 Sep

A court has ruled that federal drone laws trump local drone regulations in instances where the two are in conflict, setting a new and very important precedent for commercial and recreational drone pilots alike. The ruling was passed down by US District Judge William G. Young during a legal case involving the city of Newton, Massachusetts, and its drone regulations that are even more restrictive than the FAA’s rules.

According to the Wall Street Journal, the lawsuit was brought by Newton resident Michael Singer, who challenged four Newton provisions including a requirement to get permission before flying a drone over private property. The city had argued that the FAA allows for the local co-regulation of civilian drones, but Judge Young ruled otherwise, in part because the local regulations were sometimes in direct conflict with the FAA’s.

For instance, whereas the FAA allows small drones to be operated below 400ft, the city of Newton’s provisions banned the operation of drones below that altitude if they were over private property. This left pilots only one legal option: get permission from each property owner over whose property the drone would pass. Otherwise you’d either be violating Newton’s laws or the FAA’s regulations.

Referring to this particular law, Judge Young stated, “This thwarts not only the FAA’s objectives, but also those of Congress for the FAA to integrate drones into the national airspace.”

Newton drone provisions that weren’t challenged by the lawsuit have been left in place, and the city has indicated that it may appeal the ruling.

Articles: Digital Photography Review (dpreview.com)

 
Comments Off on Judge determines FAA drone rules take precedence over local regulations

Posted in Uncategorized


How to Create a Successful Local Marketing Strategy for your Photography Business

26 Aug

The internet has taken over most aspects of our daily lives. We can talk to the world at a moments notice, promote our services instantly, and sell anything we want day or night. However, in the quest to grow as many followers and fans as we can, it can become easy to forget about one of the most important opportunities that exist for your photography business. There is so much potential right outside your front door.

Think local

No photography business can afford to forget about their local community – so you need to create a complete marketing plan that addresses both the internet and your own local community.

Photography Business Marketing

You don’t need to reach an audience around the globe to receive a job from your neighbor down the street. How many people cross your path in a given day? How many of them know what you do or could potentially use your services? How many of them might be interested in what you have to offer?

Through local marketing, you want to create a daily strategy for your local connections to grow consistently.

Photography Business Marketing

Be informative not intrusive

You do not have to be overly intrusive about it. You do not have to sell to your friends, colleagues, or acquaintances directly. Have you ever had a friend that you haven’t seen in years suddenly contact you out of the blue asking to talk or to get together? Then you speak to them and realize that they have just gotten a job as a financial planner (or some other such thing) and are trying to sign you up as a client.

This is not what I mean by local marketing, but you do have to be effective at making people aware of what you do, whenever the situation presents itself. You want to intrigue people. When people ask what you do, help them understand your photography business. You are in a creative field, so make it sound as exciting as possible.

Photography Business Marketing

Just let people know what you do

If there is a crossover that might help the person, mention it. For instance, what type of photographer are you? What are the specific services that you provide? Depending on who the person is, tailor what you say to them or their situation.

Send out an official announcement letting everyone know about your photography business. Briefly, explain what your services are and how you might provide potential customers with assistance. When done correctly, this will not be intrusive but informative. People will congratulate you and celebrate your endeavor.

If you are trying to grow your family portrait or corporate business, the people you know will be a huge help. How many of your friends work for businesses or have families? I am assuming most of them. Why would these friends want to seek out a stranger to provide these services when they could work with someone they know? You can be that person.

Photography Business Marketing

Build relationships with other businesses

How many businesses do you frequent on a daily basis? From restaurants to law firms to local shops, there is a wealth of opportunity right under your nose. It is simple but can seem so daunting at the same time. Smile, talk to that business owner you have seen for years and tell them about your services and how they might benefit from them. Bring a brochure of your work.

For businesses that you do not have a prior relationship with, try to locate the person in the company who would be in charge of hiring out the type of work that you want to do. It can be much less effective to just walk in the door blind with the aim of speaking to the first person you see. Your prospective chances will improve significantly if you can make a pointed and direct contact with an influential person within a business.

Exhibit your work

Seek out gathering spaces, such as a coffee shop, a bar, or an event space to hold a show. This is good for their business as it provides art on their walls and a reason for people to enter their establishment. For you, it provides a fun space to show your work. If you live in a smaller community, where a lot of people who know you will come across the work, then this can be a great strategy. If you can draw people to the space to help show and sell your work, then that is a good thing. Many gallerists hold pop-up galleries in addition to their permanent spaces for just this purpose. Consider doing similar pop-up events of your work.

If you live in a smaller community, where a lot of people who know you will come across the work, then this can be a great strategy. If you can draw people to the space to help show and sell your work, that is a good thing. Many gallerists hold pop-up galleries in addition to their permanent spaces for just this purpose. Consider doing similar pop-up events of your work.

Photography Business Marketing

Make sure it’s on your terms

However, there are some pitfalls to this strategy. Providing your work to a business for an open-ended period of time at no cost doesn’t necessarily mean that your work will sell or that it will help you get noticed. I see artwork covering the walls of coffee shops all over New York, and most of it never moves. This is just giving the establishment free art with little or no benefit to you.

You need to select the correct establishment and have a way to draw people there with the specific purpose of seeing your art and hopefully purchasing it. Without that, this strategy can be as much of a drain on your time and resources as it can be a success. If these benefits are not there for you, the establishment should pay you for your work (or pay a rental fee) since you are providing a service to them. You are giving them an ambiance and improving the experience for their customers.

Photograph students at a local school

Another thing you could consider is contacting an acting or music teacher at a local school and offering to photograph the student’s headshots. If you do well, it will help build your portfolio and both the students and the teachers alike will tell others of your services. Hang an advertisement in a local business, do work for a local website, sell your work at a local fair; there are many creative ways to integrate what you do into your community.

Photography Business Marketing

There is an infamous and successful example of this type of strategy employed by a guitar teacher named Dan Smith in New York City. Beginning in the 1990s, Dan hung small ads in doorways and vestibules in businesses all over Manhattan. You could not walk into a diner or coffee shop without seeing one, and these ads persist today. He has built a business out of this single marketing strategy, and it lead him to be so ubiquitous that even The New York Times ran a profile of him.

The repetition is what worked for him, and it was not annoying; it was almost humorous and became a defining characteristic of growing up in the city. This is an example of the 80/20 rule, where 80 percent of your income can come from 20 percent of your marketing. Dan found a strategy that worked and pushed it to the extreme. It only worked because of the extreme measures that he took in plastering so much of the city with his ads. Other music teachers pasted their ads around the city, but none did it like Dan.

Conclusion

By working on a variety of local marketing strategies, these endeavors will combine to create an overall awareness of your business in the community. Some of the individual pieces might seem small, and all of this may seem tedious at first, but all together they can be very powerful.


For even more business help – join the Focus Summit 2017 Online Business and Marketing Conference for Photographers on Sept 26-28th 2017. We will cover marketing, business development, law, SEO, branding, blogging, and much more. Use the code “DPS” for a $ 50 discount.

The post How to Create a Successful Local Marketing Strategy for your Photography Business by James Maher appeared first on Digital Photography School.


Digital Photography School

 
Comments Off on How to Create a Successful Local Marketing Strategy for your Photography Business

Posted in Photography