RSS
 

Posts Tagged ‘lightroom’

5 Tips for a Faster Lightroom Workflow

17 Nov

At a recent workshop I joined, several of the attending photographers expressed frustration with the slowness of Lightroom, and were surprised to see how quickly I am able to process my photos in Lightroom. So I thought I’d share some of the workflow tricks that I’ve picked up over the last few years that have helped me get faster in Lightroom.

In addition to specific workflow practices, there are also some important configuration changes you can make to optimize Lightroom performance. However, in this post I will focus on workflow technique, not application configuration. Check out this post for more information on configuring Lightroom for optimal performance.

Note: The tips and screenshots in this article are from Lightroom 4.2, but most of these ideas are also applicable to older versions of Lightroom.

Let’s get on to the tips.

1. Start with Spot Removal, and use the 2003 process

As you begin to stack up edits in Lightroom, some of the tools get slower and slower. This is the nature of nondestructive editing. None of your edits have changed the underlying image data, so the more you do with an image, the more work your computer has to do to update the preview of your image in real time as you move sliders or work with other controls.

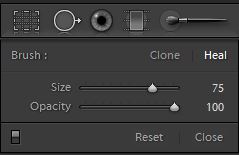
I’ve found this phenomenon to be the most annoying when using the Spot Removal tool to retouch portions of an image. Using the Spot Removal tool at the end of your workflow can be painfully slow. To address this, I’ve formed the habit of always doing spot removal first, before applying any other edits to an image. This is much faster, and there is also a creative advantage to removing the small distractions, before you go on to more serious editing work.

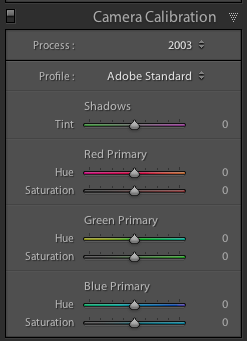
To further improve the performance of the Spot Removal tool, you can change to the “2003 Process.” This is especially helpful if you have an older computer. The process version is the algorithm that Lightroom uses to decode your Raw image file and display it in the Develop Module. Different process versions give you different options in the Development Module, with significant improvements in the later versions. The 2003 Process is the most basic, and therefore the fastest. The 2012 Process gives you much more flexibility, but is more resource intensive and forces your computer to work harder.

Check out this post for more information on process versions.

The process version setting is in the Camera Calibration section of the Develop Module:

screenshot showing Lightroom Camera Calibration Settings

In my own workflow, especially for portrait retouching were I use the Spot Removal tool extensively, I start by changing to the 2003 process, doing only spot removal, and then changing back to the 2012 process for the rest of my edits.

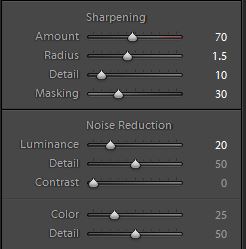
CAUTION: since the process versions are very different, some controls get zeroed out when you move between process versions. Avoid making adjustments like contrast, tone curve, noise reduction, sharpening, etc while you’re in the 2003 process as you might lose some of those settings when you return to the 2012 process. Just do your spot removal in the 2003 process, and then go back to 2012 process for the rest of your editing work. Doing this at the very beginning of your workflow saves time and makes for a happier, snappier, spot removal experience.

2. Learn (and use) keyboard shortcuts

There’s a lot going on in the Lightroom interface. Using just your mouse or trackpad to get from place to place can really slow you down. Use keyboard shortcuts to jump straight to the tool you need.

Lightroom has a help screen that will show you the keyboard shortcuts for the module you’re currently in. Look under Help > Lightroom Module Shortcuts, or use this keyboard shortcut:

Mac: CMD /
Windows: CTRL /

screenshot of the Lightroom Keyboard Shortcut help screen

In additional to consulting this screen, I also recommend learning the shortcuts as you go. As you navigate a menu for a certain control, take note of the keyboard shortcut and try to use it next time:

screenshot showing one of the menus in Lightroom

“Note to self, press SHIFT CMD C next time!”

Or when you reach for your mouse to access a tool in the interface, like the crop tool for example, hover over the tool and take note of the keyboard shortcut, then try to remember it for next time.

Screenshot showing a tooltip in Lightroom

“Note to self, press R next time!”

This is a good way to teach yourself the keyboard shortcuts that are most useful for you in your own workflow. You’ll be learning them in the order that is most useful for you personally.

There are lots of keyboard shortcuts in Lightroom, but here are the ones I use the most:

Changing Modules and Views

E – Enter Loupe View
D – Enter Develop Module
G – Enter Grid View

Develop Module Shortcuts:

\ – Toggle before / after view
Q – Enter Spot Removal Mode
M – Enter Graduated Filter Mode
K – Enter Adjustment Brush Mode
V – Toggle between Black and White and Color
W – White Balance Selector
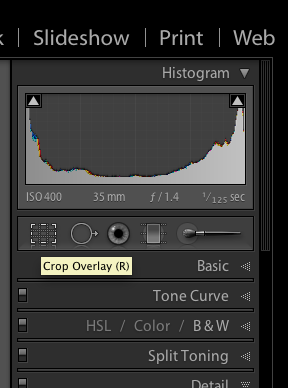
R – Enter Crop Mode
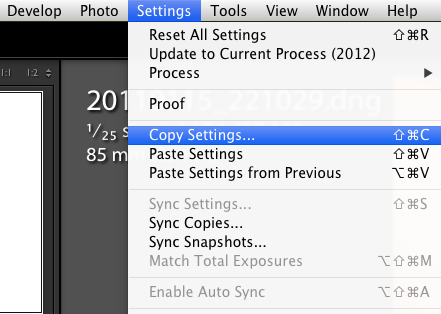
Shift CMD C (Shift CTRL C on Windows) – copy develop settings
Shift CMD V (Shift CTRL V on Windows) – past develop settings

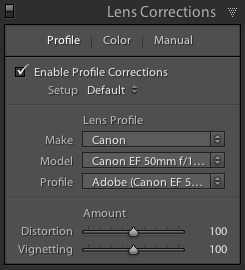
3. Enable Lens Correction at the end of your processing workflow

Lightroom includes lens profiles for many common lenses. Lens Correction works well to remove distortion and vignetting, especially from wide angle lenses. Sometimes this improves the image, sometimes it doesn’t.

If you choose to enable lens correction for a particular photo, enable it near the end of your workflow after you’ve made your other adjustments. Many of the controls in Lightroom, especially the Spot Removal tool and the Adjustment Brush, run more slowly with Lens Correction turned on.

screenshot showing Lightroom Lens Corrections Settings

4. Create Develop Presets for commonly used settings

In addition to using develop presets to quickly apply a desired visual effect, I also use them to reduce the number of mouse clicks required to access certain controls in the GUI, for which there is no keyboard shortcut. This is particularly useful for changing process versions quickly, as mentioned in #1 above, or for toggling lens corrections on or off.

screenshot showing Lightroom Develop Presets

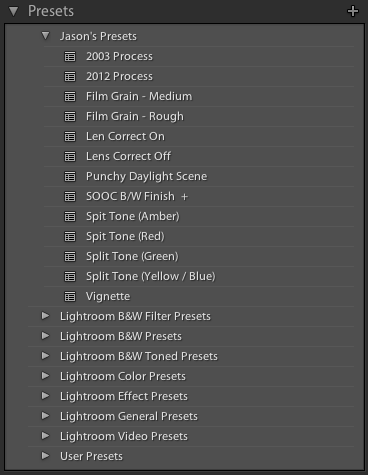
I’m basically using develop presets to pull some commonly used controls to the top of the GUI. It’s like creating a custom button.

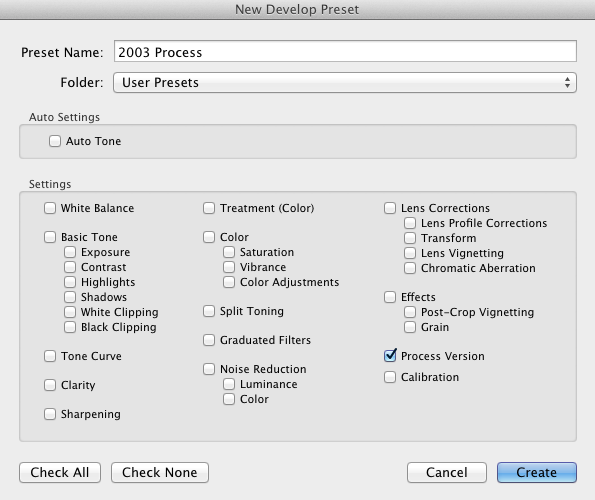
To create a Develop Preset:
1. Apply some settings to a photo in the develop module.
2. Navigate to the Develop menu and select “New Preset…”
3. Check the box next to the settings you want captured in the new Develop Preset

screenshot showing how to create a Lightroom Develop Preset

5. Shoot smaller files

This is not for everyone, and not for every situation, but there are times when you don’t need that full 18, or 22, or 36 megapixel Raw file. Depending on the project at hand, a 10mp file may be more than enough, and shooting smaller files are much faster to work with on the computer. Personally, I have a hard time letting go – when I shoot smaller files I always worry that I’m missing something. But it’s worth considering a smaller file size from time to time. What are you going to do with the photo? If you have a specific usage in mind and you know that you don’t need the full resolution your camera can capture, try shooting a smaller size.

I hope this article has been helpful, and that you’ve found at least one trick that you can use to get a little faster in Lightroom. Studying and processing your photos improves your creative vision, which over time impacts your shooting decisions. So a solid post-processing workflow is essential to developing yourself as a photographer.

Post originally from: Digital Photography Tips.

Check out our more Photography Tips at Photography Tips for Beginners, Portrait Photography Tips and Wedding Photography Tips.

5 Tips for a Faster Lightroom Workflow


Digital Photography School

 
Comments Off on 5 Tips for a Faster Lightroom Workflow

Posted in Photography


How to Create a Black & White High-Contrast and Filmic Image in Lightroom 4

13 Nov

Introduction

This tutorial is a demonstration of the SLR Lounge Lightroom 4 Preset System. With over 200 presets, the LR4 Preset System has been critically acclaimed as the most powerful and intuitive preset system available for Lightroom 4, click the link above to learn more/purchase. DPS users can get 10% off by using the DPS10 coupon code.

Overview

This is a step-by-step tutorial that will show you how to take a portrait and create to create a high contrast black and white portrait, as well as a film-like black and white portrait.

Lightroom 4 Preset System Mixology

If you own the SLR Lounge Lightroom 4 Preset System, this effect can be achieved in around 10 seconds. If you don’t own the preset system, please skip to Step 1 to learn how to do it manually.

High-Contrast Black & White Portrait
1. MY MIXOLOGY > 00 Standard Import
2. MY MIXOLOGY > 13 Standard B&W (Soft | Portrait)
3. BASE ADJUSTMENTS > 45 Medium Darken (Blacks)

Filmic Black & White Portrait
1. MY MIXOLOGY > 00 Standard Import
2. MY MIXOLOGY > 13 Standard B&W (Soft | Portrait)
3. ANTIQUE CURVES > 41 B&W (Vintage Punch)
4. BASE ADJUSTMENTS > 42 Neutral (Blacks)
5. BASE ADJUSTMENTS > 33 Light Boost (Contrast)
6. SPECIAL EFFECTS > 23 Medium (Film Grain)

The Original Image

Fotosiamo_Original SLR Lounge

Step 1. Removing Dust and Particles from Our Image

Whenever we are preparing images for printing, we always run a Dust Correction Curve check to make sure that we don’t have any noticeable dust on our image. The great thing about this curve is that it is also useful in detecting dandruff on dark clothing in addition to any other distracting dust or flecks in the scene. We do this by applying the 82 Advanced Dust Correction Curve temporarily.

For those that don’t have the Lightroom 4 Preset System, here is what the curve looks like.

Fotosiamo_Dust Correction Curves SLR Lounge

The spikes and troughs on the curve creates a super high contrast (and frankly quite wonky) look to our image which helps in detecting hard to see spots, dust, flecks and anything else that might be distracting as you can see below:

SLR Lounge Dust Correction Curve

From here, we will select the Spot Removal Tool (Q) to remove any distracting elements.

Spot Heal Brush

Once we have finished, we will simply reset the Curve (without resetting the Spot Removal adjustments that we just made).

Step 2. Applying Our Basic Adjustments

At this point, we need to first convert our image to Black and White by hitting “V”. Since this is a portrait, we will want to smooth out highlights on our skin tones, add contrast, and make other Basic Panel adjustments necessary for our Portrait. We are going to smooth skin tone highlights by decreasing our Highlights and Whites, while adding additional contrast by reducing our Shadows and Blacks. In addition, to further boost contrast, we will also adjust the Contrast slider. Finally, to further smooth the skin, let’s decrease Clarity. Your final Basic Panel adjustments should mirror the following:

01b SLR Lounge HiB&W Basic

Your image should now look like the following:

SLR Lounge HiB&W Basic

Step 3. Adding Additional Contrast via Curves

The adjustments made to smooth out our highlights are leaving our image just a bit flat. Rather than adding additional contrast with the Contrast slider, we are going to do so with the Tone Curve so that we have more control over where the contrast is added.

Make sure that you are using the Point Curve mode by clicking on the Curve icon at the bottom-right of the panel.

Using a custom Tone Curve, we will dial in a subtle contrast boosting “S” curve that looks like the following:

SLR Lounge HiB&W Tone Curve

This adjustment is quite subtle, so let’s move on to the next step.

Step 4. Sharpening and Noise Reduction

Normally, if you are using the SLR Lounge Preset System, the Sharpening are automatically applied. Here is what we typically apply to our image:

We also want to add Noise Reduction because we may have added some noise when we opened up the Shadows and Blacks. The key here is to balance out Noise Reduction and Sharpness so you can smooth out the skin while retaining the fine details in the hair and eyes. We use this setting for Noise Reduction:

SLR Lounge B&W-Noise-Reduction

Finally, let’s add some Lens Vignetting at +30 Amount and +30 Midpoint simply to even out edge to edge brightness.

SLR Lounge B&W-Soft-Portrait-Lens-Vignetting

That is all the settings that we use to create our High-Contrast Black and White Portrait. Your image should look similar to the image below:

Fotosiamo_HiB&W Finished SLR Lounge

Now we are going to create a black and white image with a filmic look. At this point, let’s create a Virtual Copy of our image so we can retain both black and white versions by hitting CTRL+’ on Windows and CMD+’ on Mac.

Step 4. Applying Our Basic Adjustments

Compared to the High-Contrast Black and White Portrait, the filmic black and white portrait is going to have less contrast. Additionally, the blacks are lifted by zeroing out Blacks and Shadows. The Highlights, White, and Clarity are still lowered in order to smooth out the skin tone. We also want to keep Contrast at +25 in order to retain contrast across the tonal range.

Your Basic Panel adjustment should look like this:

SLR Lounge FilmicBW Basic

Your image should look like the following:

SLR Lounge FilmicBW Basic

Step 5. Clipping The Blacks & Whites with Curves

The Tone Curve is the key to achieving the filmic look that we are looking for. In order to limit the dynamic range on both the blacks and whites, we are going to clip both ends. Additionally, we are going to increase the shape of the ”S” curve in order to push the contrast outward towards the shadows and highlights. This will also compress the highlights and the shadows, as well. Your Tone Curve should look similar to this:

SLR Lounge FilmicBW Tone Curve

And your image should look like the following:

SLR Lounge FilmicBW Tone Curve

Step 6. Sharpening and Noise Reduction

The Sharpening and Noise Reduction remain the same as the High-Contrast Black and White image, so your settings should look like the following:

SLR Lounge FilmicBW Detail

Step 7. Darkening the Edges with Vignette

Instead of opening up the edges by adding a lighter Lens Vignette like we did with the High-Contrast Black and White, we are going to darken them instead. We are only darkening the edges subtly, so your Vignette should like this:

SLR Lounge FilmicBW Vignette

Step 8. Adding Film Grain

Finally, to achieve the filmic look for our Black and White portrait, we are going to add a medium amount of Grain to the image.

SLR Lounge FilmicBW Grain

Here is the final image after we add the Film Grain:

Fotosiamo_FilmicBW Final SLR Lounge

Final Before and After Images

Here are the before and after images comparing the original image against the High-Contrast Black and White image and the Filmic Black and White image that are created using the SLR Lounge Lightroom 4 Preset System.

Fotosiamo_Original SLR Lounge
Original

04 Fotosiamo_HiB&W Finished SLR Lounge
High Contrast Black and White

09 Fotosiamo_FilmicBW Final SLR Lounge
Filmic Black and White

The Lightroom 4 Preset System

The SLR Lounge Lightroom 4 Preset System is designed to enable users to achieve virtually any look and effect within 3-5 simple clicks. From basic color correction, vintage fades, black & white effects, tilt-shift effects, faux HDR, retouching, detail enhancing, and so much more. The sky is the limit with what has been dubbed the most powerful and intuitive preset system available. Click the link above to learn more/purchase.

Post originally from: Digital Photography Tips.

Check out our more Photography Tips at Photography Tips for Beginners, Portrait Photography Tips and Wedding Photography Tips.

How to Create a Black & White High-Contrast and Filmic Image in Lightroom 4


Digital Photography School

 
Comments Off on How to Create a Black & White High-Contrast and Filmic Image in Lightroom 4

Posted in Photography


Adobe issues Lightroom 4.3 and Adobe Camera Raw 7.3 ‘release candidates’

09 Nov

shared:AdobeLogo.png

Adobe has issued a ‘release candidate’ version of Lightroom 4.3 and Adobe Camera Raw 7.3, including support for 13 additional cameras. The Mac version of Lightroom features a Develop module that supports Apple’s HiDPI mode that makes the interface easier to read on the ‘Retina’ panels used on recent Macs. The latest versions are available for download from the Adobe Labs website and, as the ‘release candidate’ tag denotes, are well tested but could benefit from some user feedback before finalized.

News: Digital Photography Review (dpreview.com)

 
Comments Off on Adobe issues Lightroom 4.3 and Adobe Camera Raw 7.3 ‘release candidates’

Posted in Uncategorized


Creative Coloring in Lightroom – Weekly Lightroom Edit w/ Post Production Pye – Episode 7

06 Nov

Purchase the Season One Lightroom 3 DVD for at – www.slrlounge.com Season One Lightroom 3 DVD Includes: – 20 Episodes – All exercise and catalog files – Popup Shortcut Tooltips – Full HD 1080p – No advertisements View article at – www.slrlounge.com Welcome to Episode 7 of our Weekly Lightroom Edit. In this Lightroom Tutorial episode we are going to work on doing some creative coloring and enhancing on this image that was shot out in China.
Video Rating: 5 / 5

 
Comments Off on Creative Coloring in Lightroom – Weekly Lightroom Edit w/ Post Production Pye – Episode 7

Posted in Retouching in Photoshop


Lightroom – Portrait Retouch Part 1

05 Nov

AJ demonstrates the setup in Lightroom for a roundtrip to Photoshop portrait retouch. Part 1 of 2. Share this video, Tweet to your friends: bit.ly Get the iPhone app: ajwood.com Find me on Twitter: twitter.com Become a Facebook Fan: ajwood.com Adobe Training by media-cats.com

 
Comments Off on Lightroom – Portrait Retouch Part 1

Posted in Retouching in Photoshop


Lightroom How-to: Make Your Digital Images Look Like Film

05 Nov

Lightroom How-to: Make your digital images look like film I shoot as much film as possible, but sometimes I need to shoot digital images with my Canon 5D MK II. My goal with digital images is to have them match as closely as possible my film images. Here is one way I do that. Key points: *Don’t overwork the image *Neutral color temperature is the goal *Low contrast, low black point: subtle contrast is best *Don’t use actions or textures *Expose to the right (overexpose) for the original RAW image *Unblock and lengthen the tonal range by increasing brightness slider *Correct lens distortion with the correct lens profile For more information please visit: mastinstudio.com/?blog
Video Rating: 4 / 5

 
Comments Off on Lightroom How-to: Make Your Digital Images Look Like Film

Posted in Photography Videos


Adjustment Brush in Lightroom 3

04 Nov

Kerry Garrison shows the local adjustment brush in Adobe Photoshop Lightroom 3. This video is from the Learning Resource Center at cameradojo.com
Video Rating: 4 / 5

Additional videos for this title: j.mp Lightroom 4 202: Nature and Landscapes by Martin Perhiniak Video 23 of 32 for Lightroom 4 202: Nature and Landscapes Mother Nature doesnt always cooperate when you take photos outdoors! Thats why weve asked Adobe Lightroom expert and acclaimed educator Martin Perhiniak to show you how to enhance and optimize even the most challenging Nature and Landscape photos. Martin starts off by underscoring the usefulness of the Camera Raw format as well as the importance of keeping your catalogs well-organized. He then covers a wide variety of techniques for enhancing your Landscape photos. Youll learn how to both visually recreate the original mood of a photo as well as how to create alternate artistic interpretations. Specifically, youll learn techniques for dealing with everything from tricky elements like water and clouds, as well as sunset and night conditions. Youll even have fun learning how to work with photos taken from airplanes! Then, Martin takes his photos over to Lightrooms sister product, Photoshop, to develop them further. He shows you how easy and smooth it is to move back and forth between the two Adobe family members. See how to convert and combine your photos to create realistic Panoramas and stunning HDR (High Dynamic Range) images! Upon finishing this course, youll have the the Lightroom skills to take your photos to the next level and beyond! Watch all of the advanced and specialized courses in our Lightroom 4 and

 
Comments Off on Adjustment Brush in Lightroom 3

Posted in Retouching in Photoshop


Skin Smoothing with Lightroom 3

03 Nov

Learn how to use Lightroom to smooth skin, then enhance it further and tweak the eyes and the lips to create that model skin finish! Learn how to use the Adjustment Brush Learn how to use Clarity to smooth skin

 
Comments Off on Skin Smoothing with Lightroom 3

Posted in Retouching in Photoshop


Enhance clouds in Lightroom

02 Nov

Video Rating: 3 / 5

 
Comments Off on Enhance clouds in Lightroom

Posted in Retouching in Photoshop


Dodging and burning a landscape photo with Lightroom 3

01 Nov

Jack Davis teaches you how to shape light (Dodge and Burn) in Adobe Lightroom 3 using the adjustment brushes and auto mask. Its a nice touch on your landscape photos. This is from his full-length training video Lightroom 3 Enhancing, effects and Integration available at photoshopCAFE.com and Software-Cinema www.photoshopcafe.com Note the original quality has been reduced for uploading purposes.
Video Rating: 4 / 5

 
Comments Off on Dodging and burning a landscape photo with Lightroom 3

Posted in Retouching in Photoshop