RSS
 

Posts Tagged ‘lightroom’

Understanding the Radial Filter in Lightroom

15 Feb

One of the most useful features in Lightroom is one that tends to get overlooked, or at least under-utilized. The Radial Filter, introduced in Lightroom 5, is an incredibly powerful image adjustment tool that can be used to enhance your photos in many ways. From creating vignettes, to enhancing colors, to adjusting the exposure, and white balance, this humble little icon sitting on the right-hand side of the Develop module can unlock a variety of creative possibilities and bring new life to not only your photos, but your photography as a whole.

bike-handle-before

Before you start using the Radial Filter, it’s important to understand just what it does. Similar to the Adjustment Brush and Graduated Filter, you can use the Radial Filter to add one or more specific adjustments to a select area of a photograph, and edit your changes dynamically after they have been implemented. But while the Graduated Filter adds a gradual adjustment in a linear fashion, the Radial Filter adds a similar adjustment in a circular pattern. For example, here’s a picture of a bicycle handle before adding a radial filter (see above image).

It’s a decent image, but I’d really like to draw the viewer’s eye directly to the yellow handle by adding a Radial Filter. In this image below the filter has been applied a bit too extreme, but I wanted to give you a clear idea of what exactly this tool does.

bike-handle-after

By adding a Radial Filter adjustment and decreasing the exposure, I created a vignette effect to highlight the bicycle handle.

Notice how the effect is centered on the hand grip and gradually fades from light to dark. Various parameters can be adjusted as well, such as the degree to which the filter darkens or lightens the image, how gradually it fades, and even whether to use a custom color for the filter itself. Radial Filter adjustments, like most edits done in post-processing, are better if the effect is subtle and understated. As you can see in the following example, the filter can be rotated to better match your creative vision for the shot.

bike-handle-radial-filter-rotated-closeup

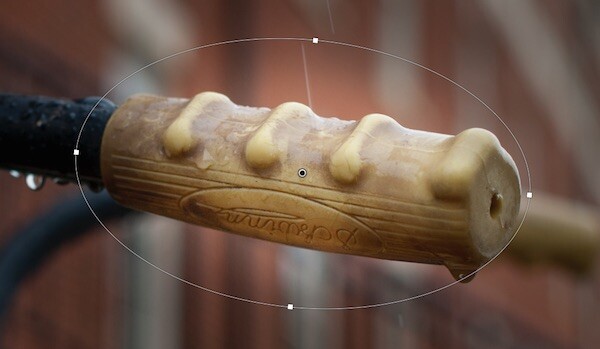
In this image the effect is subtle, but you can see how such flexibility would come in handy in other situations as well. By matching the rotation and size of the radial filter to the bicycle handle, I was able to create the exact type of adjustment that the picture needed.

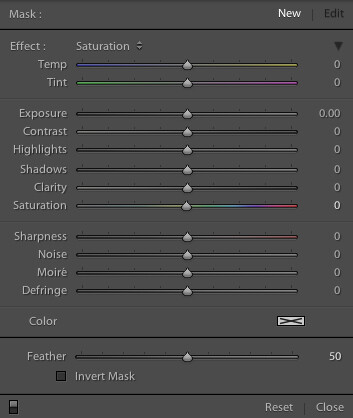
One of the best things about the Radial Filter, though, is that it is not limited to just making things brighter or darker. Lightroom gives you over a dozen parameters to adjust such as White Balance, Tint, Saturation, and even whether to invert the filter so the effects are applied on the inside of the circle, instead of on the outside.

radial-filter-panel

There are several built-in presets as well, so if you’re not quite sure where to start you can pick one of them and use it. You can also create your own presets for repeating a particular effect in the future.radial-filter-panel-presets

Finally, the flexibility of the Radial Filter can hardly be overstated. You are free to edit your adjustments at any time, and once you apply a filter to your image you can go back and change it as much as you like. You can use multiple filters on a single image too, giving you complete creative control over your photos.

For an example of how the filters can be used to adjust color and not just create a vignette, here’s a photo of a girl holding a teddy bear without any radial filter adjustments.

girl-before-filter

The original image, without any adjustments applied.

I was fairly pleased with the original, but wanted to isolate her face and focus the viewer’s attention on her, so I used two Radial Filters: one to increase the saturation and shadows on her face, and another one to de-saturate the entire rest of the photo.

I intentionally went a bit overboard with the changes here, and as with most adjustments a more balanced and subtle approach is probably best, but I wanted to give a clear illustration of how this works so you can start to see the usefulness of the Radial Filter in your own work.

girl-after-filter

Adding two different Radial Filters had a dramatic impact on the image as a whole.

At this point you might be wondering why you would use the Radial Filter, when some of these adjustments can be implemented using the Adjustment Brush tool. The key to remember is that the Radial Filter is graduated, meaning its effects are implemented in terms of increasing value–less at the edge, and more at the center. You can also control how gradual the filter actually works each time you use it, which is a bit different than the brush tool. While the latter does have a feather parameter to give you some control over how gradually a brush adjustment is implemented, it’s not well suited for adjustments that need to change in value over a wide area of the photo. That’s where the Radial Filter really shines.

Regardless of how you choose to implement it, the Radial Filter can be a powerful addition to your photo editing workflow and if you have never looked into it I would encourage you to do so.

What are your favorite uses for the Radial Filter? Do you have any other tips to share? Post them in the comments below!

googletag.cmd.push(function() {
tablet_slots.push( googletag.defineSlot( “/1005424/_dPSv4_tab-all-article-bottom_(300×250)”, [300, 250], “pb-ad-78623” ).addService( googletag.pubads() ) ); } );

googletag.cmd.push(function() {
mobile_slots.push( googletag.defineSlot( “/1005424/_dPSv4_mob-all-article-bottom_(300×250)”, [300, 250], “pb-ad-78158” ).addService( googletag.pubads() ) ); } );

The post Understanding the Radial Filter in Lightroom by Simon Ringsmuth appeared first on Digital Photography School.


Digital Photography School

 
Comments Off on Understanding the Radial Filter in Lightroom

Posted in Photography


How to Create a Simple Blurb Photo Book in Lightroom

07 Feb

How to create a simple photo book in Lightroom

The easiest way to get started with Lightroom’s Book module is to create a simple photo book, letting Lightroom do most of the work for you so you don’t get bogged down in the extensive design process involved in making a more complex book.

Things to do before you start

You will make the book design process much easier by doing, or at least thinking about, the following things before you start:

  • Select which photos you’re going to include. Or at least narrow it down as much as you can. You might change your mind many times as you work on the design. Organize them in a Collection.
  • Arrange the photos in the approximate order they will appear in the photo book by clicking and dragging. You can do this in the Filmstrip in the Book module, but it is much easier to do it in Grid View in the Library module. It helps if you have created a Collection containing the photos you wish to include in the photo book. Again, this doesn’t need to be precise as you will probably change your mind as you work your way through the design process.

How to create a simple photo book in Lightroom

  • Choose photos for the front and back covers. The cover photo is the first one in the Collection, the back cover photo is the last. You can change your mind later if you need to.
  • Process your files, if required. Naturally, you have probably already processed the photos you would like to include in your book, but are the photos processed in a consistent way? For example, if you are creating a book containing toned black and white photos have they all been toned the same colour, or are they different? It might be better for the book if they are all toned the same colour. If your photos need processing, it may be helpful to make Virtual Copies, so the originals are unaffected by the changes.
  • Pick which Blurb photo book size to use. There are five to choose from: small square, standard portrait, standard landscape, large landscape and large square. Sizes and prices of Blurb books are outlined on Blurb’s website.
  • Go to Book Preferences, which are found under the Book menu in the Book module (you can’t open them from any other module). Set Default Photo Zoom to Zoom to Fit and leave the Start new books by autofilling box unchecked. The other settings don’t matter for simple photo books.

How to create a simple photo book in Lightroom

Creating a simple photo book

Go to the Book module. If you set your Book Preferences as recommended above, you will see something like this.

How to create a simple photo book in Lightroom

Regardless of what you see on screen, start by clicking the Clear Book button at the top of the Content window. Then go to the Auto Layout panel, set the Preset to One Photo Per Page and use the drop down menu accessed by the double arrow icon to select Edit Auto Layout Preset. The Auto Layout Preset Editor window opens (below). Look for the Zoom Photos To setting and set it to Fit (if it isn’t there already). Click the Done button at the bottom of the window.

How to create a simple photo book in Lightroom

Click the Auto Layout button in the Auto Layout panel. Lightroom creates the book for you. It will look something like this, depending on the number of photos in your book.

How to create a simple photo book in Lightroom

At this stage you will see the words Unsaved Book in the top-left corner. They indicate that the current book layout hasn’t been saved. Click the Create Saved Book button. This prompts Lightroom to open the Create Book window and create a Book Collection – a specialized type of Collection containing photos used in a photo book.

Give the book a name and select a Collection Set to store it in. Click the Create button. Lightroom duplicates the current Collection and turns it into the new Book Collection. It is displayed in the Collections panel with a book icon to differentiate it from other Collections. The name of the Book Collection is also displayed in the top-left corner of the Book module. Lightroom updates the Book Collection every time you make a change, so you can come back to it at any time without losing your work.

How to create a simple photo book in Lightroom

Go to the Book Settings panel and select the Size of the book and the type of Cover you’d like (I chose Standard Landscape with Hardcover Image Wrap for this example). It’s important to decide now which you want, as it may affect the layout if you change them later.

Lightroom displays the estimated price of the photo book at the bottom of the panel (click the double arrow icon to the right of the price to see it in a different currency). The figure changes according to the size of the book, the number of pages in it, and the Paper Type (there is more information about paper types on Blurb’s website.

You can save money by including the Blurb logo page – an extra page at the back of the book with Blurb’s logo. Doing so gives you a discount, but adds an extra page to the layout.

http://www.blurb.com/proline

The first and last photos in the Book Collection are used as covers, but Auto Layout also adds them as the first and last photos in the book. If you don’t want them in those positions then you need to remove them.

Starting by going to the first image, right-clicking and selecting Remove Photo.

You should now see a grey square with a cross in it (if you don’t, go to the Guides panel and tick the Show Guides and Photo Cells boxes). The icon indicates the page contains an empty Photo Cell – Lightroom’s term for the spaces allocated to photos within the layout.

The left-hand page is dark grey, indicating that it’s the inside of the front cover, and that you can’t add anything to it.

How to create a simple photo book in Lightroom

Repeat the process with the last photo in the book. This time, right-click the photo and select Remove page.

How to create a simple photo book in Lightroom

Add a white border

The next step is to create a white border around the photos in the book, rather than run them up to the edge of the printed page. The photos will be smaller, but the additional white space will give the book a more professional look.

Click on a page containing a photo in the landscape orientation to activate it and go to the Cell panel. Grab the bottom slider and move it right. The other sliders should move with it at the same time (if they don’t, click the grey Link All square – when all the squares are white, they will move together). Adjust the sliders until the photo has a solid white border around it like the one in the screen shot below.

How to create a simple photo book in Lightroom

Right-click on the page and select Save as Custom Page. Switch to the Multi-Page View and go to Edit > Select All to select all the pages in the book (the cover isn’t included).

Click any arrow in a yellow frame, go to Custom Pages and select the page layout you just created. If this is the first time you have done this, it will be the only one there. Lightroom updates the selected pages with the chosen layout.

How to create a simple photo book in Lightroom

Design the covers

Go to the covers spread, click on the front cover and then the grey Add Photo Text button at the bottom. Type in the book title. You can change the font colour, size, and text in the Type panel. Click and drag the yellow border to move the text.

You can’t change the width of a Photo Text Cell. But you can easily move the title left or right by going to the Cell panel and moving the Left slider until the title is positioned where you want it.

How to create a simple photo book in Lightroom

Open the Background panel and select a background colour that complements the front and back covers.

How to create a simple photo book in Lightroom

Go to the title on the spine of the cover, and change it to the title of your book. For consistency, you should use the same font you selected for the title on the front cover.

How to create a simple photo book in Lightroom

Another option for the cover is to expand the photos so that they fill the available space. This will crop the photos, which you may not want, but can look really effective. You may also need to move the title. To do so, right-click on the cover images and select Zoom Photo to Fit Cell. This is what it looks like with my covers.

How to create a simple photo book in Lightroom

Congratulations, you have finished your photo book! There are lots of ways you can tweak and improve your design in the Book module,  I may go into those in a later article. But hopefully you now see how easy it is to get started in the Book module. Indeed, if you are happy with this simple design, you can create a photo book in a few minutes.

Uploading your photo to book to Blurb

In order to print your book with Blurb you need a Blurb account, which you can sign up for on their website.

Then, press the Send Book to Blurb button underneath the right-hand panels. Lightroom prompts you to sign into your account. Then, enter the title and author’s name and click the Upload Book button. The upload takes some time, but when it’s done you can sign into your Blurb account online and see your book. Leave this step until you’re ready to order though, as Blurb will delete the book from your account if you don’t order at least one copy within 15 days.

Here are some preview pages from the photo book I just created.

Have you made a book yet? Please share your comments and questions below.
lightroom-create-simple-photo-book-18
How to create a simple photo book in Lightroom


Mastering Lightroom: Book Five – The Other Modules ebook coverMastering Lightroom: Book Five – The Other Modules

My new ebook Mastering Lightroom: Book Five – The Other Modules shows you how to use Lightroom’s powerful features to create fun and interesting projects using the Map, Book, Slide show, Print and Web modules. Whether it’s geotagging, putting together a photo book, printing your best photos or creating web galleries all the information (and inspiration) you require is right here.

googletag.cmd.push(function() {
tablet_slots.push( googletag.defineSlot( “/1005424/_dPSv4_tab-all-article-bottom_(300×250)”, [300, 250], “pb-ad-78623” ).addService( googletag.pubads() ) ); } );

googletag.cmd.push(function() {
mobile_slots.push( googletag.defineSlot( “/1005424/_dPSv4_mob-all-article-bottom_(300×250)”, [300, 250], “pb-ad-78158” ).addService( googletag.pubads() ) ); } );

The post How to Create a Simple Blurb Photo Book in Lightroom by Andrew S. Gibson appeared first on Digital Photography School.


Digital Photography School

 
Comments Off on How to Create a Simple Blurb Photo Book in Lightroom

Posted in Photography


Natural Looking HDR in Photoshop and Lightroom in 5 Easy Steps

06 Feb

HDR (High Dynamic Range) photography was developed out of necessity to overcome limitations of photography equipment, mostly in digital cameras’ sensors. From the beginning, the technology was intended to make photographs as close as possible to human experience by bridging the gap between what the human eye perceives, and what the digital camera can actually capture.

NaturalLookingHDR Photo 1

Montreal, Canada – HDR processed, five exposures, tripod.

Think of HDR as a sophisticated, software based, ND (Neutral Density) filter. Instead of placing it in front of the lens at the moment of capturing photos, HDR allows you to accomplish it in post-processing. It sounds practical and convenient, right? There is no need for extra equipment and you can work on extending the dynamic range of the scene without rush, at your own pace, in the comfort of your home.

NaturalLookingHDR Photo 2

Montreal, Canada – HDR processed, three exposures, hand-held.

Why is HDR photography getting such bad press lately?

I believe that the main reason for this is the misconception in defining what HDR actually is. Somehow, there is a notion, that HDR is a new style in photography, which is completely false. HDR is not a style or genre; it is a technique of post-processing. It is a tool. The way the final photo looks is absolutely up to you, as you have full control over the entire process.

There are many different tools and techniques for creating HDR photographs and each one has its own advantages and limitations. If you are going for a surrealistic, edgy look in your images, Photomatix is your best friend.

But, if you are like me and your main goal is to achieve images that are as natural as possible and reflect the best aspects of the original scene, I definitely have a solution for you – one that I’ve successfully used for years and love.

On my blog, dedicated to travel and landscape photography (see my bio below for a link), you can find a detailed breakdown of my shooting and processing techniques for almost every photograph. In most cases where I used this technique, it is not easy to tell if the photo was processed as HDR unless you read the description. They look that natural.

NaturalLookingHDR Photo 3

Big Sur, California – HDR processed, three exposures, tripod.

The technique is somewhat underappreciated, but it is very powerful and easy to master. The beauty of it is that you do not have to learn additional software and there is no learning curve. You use familiar and powerful Adobe tools, Lightroom and Photoshop, and nothing else.

NaturalLookingHDR Photo 4

Cayo Coco beach, Cuba – HDR processed, three exposures, tripod.

This technique leverages the power of 32-bit processing in Photoshop HDR Pro, the module of Photoshop that was established in version CS3.

Below is the infographic that illustrates the schematic view of the entire process, from the time you take the photo to the moment you are ready to save the final image.

NaturalLookingHDR Photo 5

The Technique

1. Bracketing Photographs

Before you can start processing photos for HDR you need to take a series of bracketed shots with different exposure values. Normally, you take between three and five shots in each series but, in extreme lighting conditions (example: shooting directly into the sun), you might need to take anywhere from seven to even nine shots.

Ideally, you take multiple shots on a tripod but, since Photoshop has an extremely effective alignment tool, it is possible to take hand-held photos and let Photoshop align them.

2. Lightroom: Preprocessing

This is very simple step that should not take longer than one to two minutes. Import photos into Lightroom and only apply the following adjustments in the LENS CORRECTIONS panel:

  • Enable Profile Corrections. Lightroom detects the model of your lens and applies corrections to fix any type of distortions.
  • Remove Chromatic Aberration. Lightroom automatically cleans the edges in your photographs.

3. Photoshop: Tone Mapping

This is an almost completely automated process and should not take longer than two minutes.

In Lightroom, select the bracketed photos that you want to merge to HDR. Right click (option click on Mac) and go to Edit In > Merge to HDR Pro in Photoshop.

NaturalLookingHDR Photo 6

Your bracketed photos will open in Photoshop and will be placed on separate layers. Immediately, the complex algorithm will be applied in order to align the layers. This comes in handy if you took the photos hand-held, without a tripod.

Next, the HDR Pro interface is triggered. All you have to do here is select the tone mapping mode. Opt for the 32-bit option to ensure that you preserve as much information as possible from the original images. Click OK.

NaturalLookingHDR Photo 7HDR Pro will merge the bracketed photos into a new 32-bit image and open it in Photoshop’s main interface. The tone mapping is complete. All you have to do now is save the document (File > Save). The new HDR image will be saved and automatically imported back into Lightroom. You can find it next to the original bracketed photos.

4. Lightroom: Main Processing

This is the most exciting step. You edit the newly tone mapped HDR image with enormous bit depth (32-bit) to give it the desired look and feel you want. Use standard Lightroom workflow to achieve your artistic vision.

Here is the photograph I took in Cuba and processed using this technique. Below the photograph, you can find a screenshot of the Lightroom interface with all of the adjustments I performed in order to achieve the final look.

NaturalLookingHDR Photo 8

Cayo Santa Maria, Cuba – HDR processed, three exposures, tripod.

NaturalLookingHDR Photo 9

At this point, HDR processing is done. If you are happy with the way your photo looks, you can save it as a JPEG directly from Lightroom (“Export” in Lightroom).

5. Photoshop: Final Touches (Optional Step)

In some cases, HDR photos require additional edits, such as selective sharpening, noise reduction and HDR artifacts cleaning. Photoshop is your best friend for selective editing.

Select the HDR photo in Lightroom, right click and select Edit > Edit in Adobe Photoshop. In Photoshop, do what is necessary to improve your final photo. In the majority of cases, all you will need is to reduce noise and nothing else.

That is it. This is how you achieve natural looking HDR images in five easy steps or less.

NaturalLookingHDR Photo 10

Manhattan, New York – HDR processed, three exposures, hand-held.

PROS of 32-bit HDR processing in Photoshop HDR Pro

  • It does not require stand-alone HDR software
  • The learning curve is minimal
  • Tone mapping and editing are completely two separate processes and it is easy to achieve a natural look
  • This technique takes advantage of 32-bit editing

CONS of 32-bit HDR processing in Photoshop HDR Pro

  • In some cases when there are multiple moving objects in the scene (trees, leaves, water), it can cause artifacts that require additional cleaning.

Have you tried this method before? How do you process your HDR images? Please share in the comments below.

googletag.cmd.push(function() {
tablet_slots.push( googletag.defineSlot( “/1005424/_dPSv4_tab-all-article-bottom_(300×250)”, [300, 250], “pb-ad-78623” ).addService( googletag.pubads() ) ); } );

googletag.cmd.push(function() {
mobile_slots.push( googletag.defineSlot( “/1005424/_dPSv4_mob-all-article-bottom_(300×250)”, [300, 250], “pb-ad-78158” ).addService( googletag.pubads() ) ); } );

The post Natural Looking HDR in Photoshop and Lightroom in 5 Easy Steps by Viktor Elizarov appeared first on Digital Photography School.


Digital Photography School

 
Comments Off on Natural Looking HDR in Photoshop and Lightroom in 5 Easy Steps

Posted in Photography


Geotagging Photos in Lightroom in 4 Easy Steps

04 Feb

For travel photography, geotagging your photos has become fundamental. By geotagging your images, you’ll not only be able to remember the locations once you are back home, but also it will help on searches. If you intend to sell your photos at any time, adding the metadata pertaining to the location into the file is going to improve searches and make your photograph easier to find on the web.

Geotagging is a rather simple process and there are a couple different ways to do it. At the simplest level, you simply attach a GPS data-logger to your camera and the location will be recorded into the EXIF of the photo at the time you take it. That’s it. Now if you own multiple bodies, then you’ll need a different GPS device for each of them.

Bad_ElF_Geo_Tracker

The other option you have is to get an independent GPS tracker to record the data and then pair it with the photos. As I always carry at least two camera bodies, this is option I utilize. I have tried a couple of loggers and ended up with the Bad Elf 2200 GPS Pro. It is small, convenient and pro-rated, and it can be paired with up to five devices at the same time via Bluetooth. Of course there are other options on the market; all you need is to be sure that you’ll be able to obtain and export the recorded tracks from the device.

Working with Lightroom

Something that’s important before you start: to avoid headaches, is to always wise to check your camera clock. It should be set to the actual local time zone in which you are shooting, as once you import the data, Lightroom will try to synchronize the time of the EXIF data from the camera with the time of the recorded data from the GPS logger. If you forget to do this, there is a way to correct it later, but it will be much more seamless if you do it beforehand.

Once you do that, the process is fairly simple and can be done with the following steps.

1) Obtain your GPS file

Export the GPS data from your logger in the format .gpx. This is the standard for these type of files; save them as they can be useful for other applications as well in the future. As an example, in this recent post I have included a detailed map of my trek to illustrate a day in the field.

2) Import your files into Lightroom

Import your files into Lightroom as you normally do and then go to the Map Module.

Import_Photos

Go_to_Map_Module

3) Load your tracklog file

Select all the photos you want to add the GPS information to. This one is a bit tricky – you need to click on a menu down at the bottom close to the icon with the lock. From there, select “Load Tracklog” and navigate to the menu where you saved the file previously.

Load_Tracklog

Select_your_Track

4) Tag the photos with the GPS information

As soon as you import the file, you’ll see the track loaded into the map. Go to the same menu and select “Auto-Tag XXX Selected Photos.” That’s it – that should do it, and now you’ll also see a bubble over the track that indicates where the photos were taken. At this point the GPS coordinates have already been recorded in Lightroom.

Track_Loaded

Auto_Tag_Photos

GPS_Icon_Added

If for any reason you forgot to put the correct time on the camera, you can now adjust it by going to  “Set Time Zone Offset” from the same menu you were working.

Set_Time_Offset

You can take a look at the photos’ meta data and you’ll find the exact GPS coordinates along with location information. As you can see, this process takes only a minute or two to complete and it is fairly easy.

GPS_Data_LR

If you are not already tagging your photos, I hope you can incorporate the process into your workflow soon. I believe it will be important in the long run and you’ll never forget again where that photo was taken, especially in unfamiliar places.

googletag.cmd.push(function() {
tablet_slots.push( googletag.defineSlot( “/1005424/_dPSv4_tab-all-article-bottom_(300×250)”, [300, 250], “pb-ad-78623” ).addService( googletag.pubads() ) ); } );

googletag.cmd.push(function() {
mobile_slots.push( googletag.defineSlot( “/1005424/_dPSv4_mob-all-article-bottom_(300×250)”, [300, 250], “pb-ad-78158” ).addService( googletag.pubads() ) ); } );

The post Geotagging Photos in Lightroom in 4 Easy Steps by Daniel Korzeniewski appeared first on Digital Photography School.


Digital Photography School

 
Comments Off on Geotagging Photos in Lightroom in 4 Easy Steps

Posted in Photography


20+ Free Lightroom Presets to Make Your Images Pop

02 Feb

Speeding up your post processing workflow will help you to increase productivity and spend more time on shooting. For Lightroom users, making use of developed presets can be a great way to reduce the amount of time you spend in Lightroom. When it comes to Lightroom presets, you can create your own or use the ones created by others. There Continue Reading

The post 20+ Free Lightroom Presets to Make Your Images Pop appeared first on Photodoto.


Photodoto

 
Comments Off on 20+ Free Lightroom Presets to Make Your Images Pop

Posted in Photography


How to Choose Which Version of Lightroom to Buy

27 Jan

Lightroom creative cloud

Buying Lightroom used to be simple. All you had to do was buy the full version of the program, and upgrade (if you wished) every time a new version came out. But ever since Adobe announced the Creative Cloud subscription service, photographers have been faced with two choices. You can still go for the standalone version, or you can buy Lightroom as part of a Creative Cloud monthly membership. But how do you know which is the best option for you? Read on to find out.

Creative Cloud is announced

Adobe’s initial announcement of the Creative Cloud licensing concept was somewhat controversial as the price for a subscription to Photoshop ran at $ 20 a month (all prices in this article are in US dollars). For photographers who had already purchased the full version of Photoshop this represented a significant price increase. Not only was subscribing more expensive in the long run, compared to upgrading Photoshop regularly, but the license to use the software expired once monthly payments stopped.

There’s little doubt this was a raw deal, but Adobe listened and introduced a new package for photographers – a subscription to both Lightroom and Photoshop CC for $ 9.99 a month (or $ 119.88 per year).

Lightroom creative cloud

Read about this on forums and photography websites and you will still come across a lot of negativity towards the Creative Cloud subscription model, especially from Photoshop users upset at the loss of a perpetual licence. But today, I aim to cut through this negativity and take an objective look at the differences between the two options.

Two types of Lightroom users

To start, we have to acknowledge that there are two types of Lightroom users.

The first uses Lightroom in conjunction with Photoshop and wants access to both programs. For this user, the Creative Cloud option is the only choice if you want the latest version of Photoshop CC. Alternatively, if you own a version of Photoshop CS and are not bothered about upgrading to Photoshop CC, you can buy the standalone version of Lightroom and use them together.

The second type of user carries out the bulk of their image processing in Lightroom. For tasks Lightroom can’t handle, they may use an older version of Photoshop, a less powerful program like Photoshop Elements, or a plug-in such as the Nik Collection or Perfect Photo Suite 9. These users may be wondering whether to continue using the standalone version of the software or to subscribe.

Financial considerations

If you are on a budget, and don’t need Photoshop CC, then it is definitely less expensive to buy the standalone version of Lightroom. At the moment a new version of Lightroom comes out approximately every 18 months. At $ 9.99 a month, the subscription service would cost you $ 179.82 over that period. If you are new to Lightroom, the full version (priced at $ 149 from the Adobe website) saves you money, and if you already own Lightroom, then the upgrade (priced at $ 79) is even less, saving you a little over $ 100 over the same time period.

As a standalone version user you get free upgrades until a full new version comes out. So, if you upgraded to Lightroom 5.0 when it first came out, you can upgrade to the latest version (5.7) for free, taking advantage of new features introduced since then. But when Lightroom 6 comes out, you will need to pay the upgrade fee to use it. Upgrading isn’t compulsory, and you can continue to use your earlier version of Lightroom as long as you want.

Adobe have stressed their commitment to continuing the standalone version of Lightroom for the foreseeable future.

Note: The standalone version of Lightroom is a little hard to find on Adobe’s website. You can get there by going to Adobe’s home page and clicking the Menu option at the top. Click the All Products button at the bottom, scroll down to Lightroom and click Buy. Or you can also find it here on Amazon. 

Lightroom creative cloud

What the Creative Cloud subscription gives you

The Creative Cloud subscription is more expensive, so what do you get for that extra money? The two headline features are Photoshop CC, a powerful image editing program that you are likely familiar with, plus access to Lightroom Mobile, a mobile version of Lightroom that works with iPads and iPhones (but not currently with devices using the Android or Windows operating systems).

There are several additional features that may interest some people, such as 2GB of online storage space, access to Lightroom Web and the ability to use Photoshop CC and Lightroom on multiple machines (although not at the same time).

What happens when the Creative Cloud license ends?

If you stop paying your subscription fee you no longer have the right to use the full versions of Photoshop CC and Lightroom. Photoshop will stop working completely (or at least until you renew the subscription).

But Lightroom is different. Bear in mind that with Lightroom your Raw files are untouched. The edits you make are stored in the Catalog. If you lose access to the Catalog, you lose access to all the edits you have made to your images, including all post-processing.

Adobe doesn’t want that to happen, so it gives you partial access to Lightroom even if you cancel your Creative Cloud subscription. You have full access to the Library, Book, Print, Slideshow and Web modules. The Develop module is severely restricted (you can’t make any adjustments using the right-hand panels) and there is no access to the Map module.

Lightroom creative cloud

Your Catalog remains intact, including any Collections you’re created and any changes to metadata, including ratings and keywords. So does your post-processing, and the ability to make basic edits to photo files using the Quick Develop panel. You can also export your photos any time you want.

You need to have Lightroom Version 5.5 or later installed for this to work.

Conclusion

Hopefully you are now clearer about how the two ways of buying Lightroom differ, and which is best for you. If you want to use the most up to date version of Photoshop CC, or Lightroom Mobile, then the Creative Cloud subscription service is the choice for you.

However, if you don’t require the latest version of Photoshop CC, or Lightroom Mobile, then buying the standalone version is the least expensive way to go.

What do you think? Have Adobe got it right with the price and services offered for the Creative Cloud Photography plan? Do you use the Creative Cloud version of Lightroom or the standalone version? Please let us know in the comments.


Mastering Lightroom: Book Five – The Other Modules ebook coverMastering Lightroom: Book Five – The Other Modules

My new ebook Mastering Lightroom: Book Five – The Other Modules shows you how to use Lightroom’s powerful features to create fun and interesting projects using the Map, Book, Slide show, Print and Web modules. Whether it’s geotagging, putting together a photo book, printing your best photos or creating web galleries all the information (and inspiration) you require is right here.

googletag.cmd.push(function() {
tablet_slots.push( googletag.defineSlot( “/1005424/_dPSv4_tab-all-article-bottom_(300×250)”, [300, 250], “pb-ad-78623” ).addService( googletag.pubads() ) ); } );

googletag.cmd.push(function() {
mobile_slots.push( googletag.defineSlot( “/1005424/_dPSv4_mob-all-article-bottom_(300×250)”, [300, 250], “pb-ad-78158” ).addService( googletag.pubads() ) ); } );

The post How to Choose Which Version of Lightroom to Buy by Andrew S. Gibson appeared first on Digital Photography School.


Digital Photography School

 
Comments Off on How to Choose Which Version of Lightroom to Buy

Posted in Photography


Basic Portrait Processing in Lightroom

24 Jan

Over the past few years I have learned a great deal about doing portraits, especially of young kids. I think it’s because I get so much enjoyment out of these types of shoots that I end up doing them more, though at some point it hardly seems fair because I wonder if I’m having more fun than the children whose pictures I am taking.

While each session is unique, I have developed my own style (which, in many ways, will always be a work in progress as I continue to learn new things) when it comes to both the shooting and editing process, and I thought it might help those who are new to this type of photo session to see a few examples along with an explanation of the creative choices I made along the way. I do all my edits in Lightroom, and while I sometimes need to do some more in-depth adjustments in Photoshop, 98% of all the pictures I give to clients don’t need anything more than what Lightroom can do. If you don’t have this software, I highly recommend it!

DSC_8127

Get it in camera first

Before I get to the editing portion of this piece, I need to clarify one thing: no amount of editing can make up for initial on-location mistakes, which is why it’s so critical to get the initial picture as good as you can right from the beginning. This involves things like choosing a good place to take the photos, finding the right time of day, and communicating with your subjects (and their parents, if you are working with kids). Along with that are your own creative choices such as your aperture and focal length, the composition of your shot, the angle from which you choose to shoot, the lighting manipulation you use, and a host of other elements that have an enormous impact on the final outcome of any given photo session.

Of course if you work in a studio you have much greater control over some of these items, but at the end of the day a poorly-shot initial photo will remain exactly that, no matter how much you try to edit it in Lightroom or Photoshop. I say all this to make sure you understand that editing tools are not a magical cure-all to make all your pictures shine. And the best way to make sure your photos are as good as they can be from the beginning is to focus not on the editing, but on basics like exposure, lighting, framing, and composition. It also helps to shoot in RAW, not JPEG, in order to maximize the amount of data you can work with on each individual photograph.

DSC_6792-original

Basic portrait processing in Lightroom

I shot this picture with my Nikon D7100 at 50mm, f/1.8, ISO 200. Since the sun was setting and I was not working with off-camera strobes, my lighting options were a bit limited. I had his father stand behind me with my Neewer 43-inch reflector to capture a bit more of the available light. (If you don’t have one of these, I recommend getting one. They are quite cheap and a fantastic addition to any camera setup.)

histogram

The initial photo was a bit underexposed, as shown in the histogram as well.

I also chose to frame the child with the green bush in the background, and of the half-dozen images I got of this particular pose I liked this one in which he was not quite looking at the camera. Often when working with kids I have found that the best images are a bit more candid as opposed to posed, but again, this is a creative choice you will have to make for yourself. Finally, I made sure to shoot this in RAW to take advantage of as much data as possible in order to correct some things back at my computer. Right away you probably noticed that the image is a bit too dark, which was the first thing I fixed in Lightroom.

A quick look at the histogram showed me that overall I got things pretty good in camera, but to make it look a bit better I increased the exposure by 1.2 stops, as well as cropped it a bit to focus the viewer’s attention on the boy’s face without the distracting red building in the background.

DSC_6792-2

First edits: Cropped and increased the exposure by 1.2 stops.

So far so good, but there’s still a lot of work that needs to be done. While the overall brightness was better, the colorization was still a bit off. The initial white balance settings determined by my camera were 4900K and -9 tint, but I wanted something a bit warmer so I increased the temperature to 5700K and changed the tint to -7.

DSC_6792-3

Second edits: adjust white balance and tint.

I liked this much better, but there were still some things that needed fixing. Now that the overall photo was properly exposed, there were some parts that were a bit too bright which was handled by lowering the highlights slider by -19. After that I increased the saturation to +6 and added +4 contrast as well.

DSC_6792-4

Third edits: lower highlights, increase saturation and contrast.

I was much happier with this, but it’s important to remember that all of the changes you make to a photo in post-production are based on your own creative ideas and there is no right or wrong way to do things. Some people like images that are desaturated, some prefer selective coloring (i.e. one part is colorized or over-saturated while the rest of the image is more black-and-white), others use cropping to achieve different effects. The sky really is the limit. One thing I like to do from time to time is add a subtle vignette effect (using Post Crop Vignette at -26, Highlight Priority), which I did here to result in the final image I gave to the client.

DSC_6792-5

Final edits: add a bit of an edge vignette, other minor color adjustments.

You might look at this and think the colorization is a bit off, or the vignette should be stronger, or the entire framing should be different, but the beautiful part of photography is that we all have our own opinions on how to do things. I was happy and so were my clients, which is all that matters to me.

DSC_1776

In this photo I used the Brush tool to selectively desaturate the orange strip on the boy’s shirt, and the Radial Filter to add a more precise vignette.

I do think it’s important to maintain a sense of reality in photos, though, and not let the editing get out of hand. It’s easy to feel like an all-powerful genie when you start playing around with the tools in Lightroom, Photoshop, or other editing software, but my rule of thumb when editing is to try to make the final image represent what I saw, when I initially took the photo. In the above image, for example, the orange strip on the boy’s shirt was a bit distracting, so I was able to selectively desaturate it quite a bit with Lightroom’s Adjustment Brush tool. This, along with other edits similar to the ones described above, resulted in a photo that my client was quite pleased with.

My point is that it’s great to have these editing tools available but If I start to lean too heavily on the saturation, bump up the clarity to absurd levels, or making dozens of small changes with the brush tool, I usually end up with photos that bear little resemblance to the original and come across as emotionless and empty.

What about you? What style have you developed over the years, and what approach do you use when you sit down to edit? Post your thoughts in the comments section below.

googletag.cmd.push(function() {
tablet_slots.push( googletag.defineSlot( “/1005424/_dPSv4_tab-all-article-bottom_(300×250)”, [300, 250], “pb-ad-78623” ).addService( googletag.pubads() ) ); } );

googletag.cmd.push(function() {
mobile_slots.push( googletag.defineSlot( “/1005424/_dPSv4_mob-all-article-bottom_(300×250)”, [300, 250], “pb-ad-78158” ).addService( googletag.pubads() ) ); } );

The post Basic Portrait Processing in Lightroom by Simon Ringsmuth appeared first on Digital Photography School.


Digital Photography School

 
Comments Off on Basic Portrait Processing in Lightroom

Posted in Photography


Adobe details OS support for next version of Lightroom

23 Jan

In a new blog post, Adobe has said Lightroom 6 will require a 64-bit operating system, meaning it will only run in 64-bit versions of Windows 7, or OS X 10.8 or newer. The announcement suggests Lightroom 6 will continue as a stand-alone application, rather than being swallowed into the company’s subscription-only Creative Cloud program. Read more

Articles: Digital Photography Review (dpreview.com)

 
Comments Off on Adobe details OS support for next version of Lightroom

Posted in Uncategorized


A Super Simple Way to Make Landscape Photos POP Using Lightroom

17 Jan

It seems like virtually all outdoor or landscape photographs suffer from the same illness when they come out of the camera. The symptoms are:

  • An overly bright sky
  • Foreground that is too dark
  • A general lack of color and contrast.

Sound familiar?

Fortunately, there is a cure for this ailment. Actually, as anyone who has worked with post-processing software for any length of time knows, there are a lot of different cures. But I want to show you a super simple way to fix pictures with these problems. I performed these fixes in Lightroom, but you can also do them on the Adobe Camera Raw screens of Photoshop or Photoshop Elements.

Colorado road photo with Lightroom adjustments

The quick-fix shown here will involve nothing more than moving six sliders, each of which is in the Basic panel of Lightroom’s Develop module. The edits will take less than 30 seconds of your time. I performed these edits – and only these edits – to the pictures you see throughout this article to show you the effects.

The Steps

Let’s not dally with a lot of explanation just yet. Here are the steps to perform a quick-fix of landscape photos. The first three steps are the most important, where you will see about 90% of the changes to your pictures. After walking you through these steps I will explain the process in a little more detail.

  1. Decrease the Highlights: Just pull the highlights slider to the left as much as is needed to add more detail to your sky.
  2. Increase the Shadows:  Pull the Shadows slider to the right to brighten the foreground. Don’t worry if it looks a bit washed-out after this step.
  3. Reduce the Blacks: Pull the Blacks slider to the left. This will add contrast back to the picture, and will fix the washed-out look that might have crept into your picture after the last step.
  4. Increase Vibrance: Pull the Vibrance slider to the right a bit to add more color to the picture.
  5. Increase Contrast: Pull the Contrast slider to the right a little bit to increase overall contrast. Don’t go too far, or it might start to undo the changes you just made above.
  6. Increase Clarity: Pull the Clarity slider to the right to add some clarity (edge contrast) to your photo and make it appear less soft.

That’s it. Just move these six sliders and you should see a vast improvement in your landscape pictures. This might seem more complicated than it actually is, because there are six steps. But after a while you will be able to do all of it in a matter of seconds.

Bass Harbor photo with Lightroom adjustments

What’s Going on Here

Now that I’ve shown you the steps and a few examples, let’s talk about this process.

What you are doing first is reducing the tones in the sky by using the Highlights slider. The sky is typically the brightest part of landscape photos. The Highlights slider will ONLY affect the brightest tones in the image, so decreasing it should tone down your sky but not touch the darker portions of your picture. Decreasing the highlights will not only keep the sky from being too bright, but will also add detail and texture to the clouds.

After the change to the sky, step 2 is to increase the brightness of the foreground. The foreground is almost always too dark in outdoor photos, and you need to brighten it up and add detail there. As you pull the Shadows slider to the right, you should see your foreground brighten up. The sky, which is not among the shadows of your photo, should remain largely unaffected. Your photo should be looking a lot better at this point.

Many times, when you make the change to the foreground in step 2, that area starts to look a little bit washed-out. Therefore, step 3 is the pull the Blacks slider to the left. Whereas the previous step brightened the shadows, we are now taking the very darkest tones in the photo and bringing them closer to black. The shadows were made brighter in the last step, and now the blacks are made even blacker. That adds more contrast to the foreground and eliminates that washed-out look. It often adds a little bit more contrast to your sky as well.

Note: For a handy tip on using sliders, read The Magic Alt Key article here. 

At this point, your photo should be looking pretty good. In fact, about 90% of the effect is applied to your photo after step 3. Now you will just clean up by making the photo a little clearer, and more colorful.

Texas field photo with Lightroom adjustments

In step 4, we will just increase the vibrance of the photo to add more color to the scene. The Vibrance slider is just below the sliders you have been working with.  Pull it to the right to add more color to the picture. You can adjust this slider however you want, but don’t overdo it.

You might wonder why you should use the Vibrance slider instead of the Saturation slider. The answer is that vibrance is designed to have a higher impact on less saturated colors. Saturation adjustments apply to all colors equally, so an increase in saturation can make certain highly saturated colors look garish. Vibrance, by focusing on colors that are less saturated, lets you increase the overall saturation of your colors without overdoing any colors.

Next, you add a little contrast. Pull the Contrast slider to the right a little bit. You have to be careful here because essentially what you did in the first three moves of this process was reduce overall contrast (making the bright sky darker and the dark foreground lighter). If you crank the contrast up now using the Contrast slider, you will be working against the moves you previously made. A small or moderate increase in contrast, however, can add more texture to the photo, so I recommend you do that.

Finally, a small to moderate increase in Clarity usually makes the photo look sharper and clearer. Don’t overdo this, as clarity is a powerful tool. Just add a little bit by pulling the Clarity slider to the right, and this final step can really make your photos pop.

After having gone through this process, there is nothing stopping you from continuing with additional editing, if you wish.  You can take your photo into Photoshop and make a lot of other changes, or you can use the plug-in of your choice. But even if you decide to do additional editing, the process I have described in this article can still be a good starting point for your landscape photos. It also works really well when you are in a hurry or you’d like to process a lot of photos at once.

Head Harbor Lighthouse photo with Lightroom adjustments

Bonus Tip

I want to keep this process as simple as possible and not confuse it with a bunch of other things, but there is just one more tip I want to pass along in this article. It is a way to add more contrast to your skies in Lightroom (or in ACR in Photoshop).

Scroll down to the HSL/Color/B&W panel in Lightroom’s Develop module, where you will see sliders for eight different colors. Go to the Blue slider and make sure the Luminance tab is selected just above the colors. Decrease the luminance of the blues in your picture by pulling the Blue slider to the left. This will make the color in your sky a deeper, richer blue.

Recall that Step 1 of the process above was to decrease the highlights in an effort to tone down and add detail to your sky. If you decrease the luminance of the blues, you might find that you don’t need to do Step 1 (or at least that you do not need to pull down the highlights as much). In fact, keeping the highlights nice and bright, while decreasing the luminance of your blues, can really add some nice contrast to your skies.

Colorado National Monument photo with Lightroom adjustments

Conclusion

This is one simple way to make super fast changes to your landscape photos. After you have done it a few times, you can make these changes in mere seconds. I know we are all sensitive to falling into ruts and doing the same thing over and over again, so you don’t want to do this process all the time. But it is great when you just want high impact in a short amount of time, or as a quick baseline for further changes.

googletag.cmd.push(function() {
tablet_slots.push( googletag.defineSlot( “/1005424/_dPSv4_tab-all-article-bottom_(300×250)”, [300, 250], “pb-ad-78623” ).addService( googletag.pubads() ) ); } );

googletag.cmd.push(function() {
mobile_slots.push( googletag.defineSlot( “/1005424/_dPSv4_mob-all-article-bottom_(300×250)”, [300, 250], “pb-ad-78158” ).addService( googletag.pubads() ) ); } );

The post A Super Simple Way to Make Landscape Photos POP Using Lightroom by Jim Hamel appeared first on Digital Photography School.


Digital Photography School

 
Comments Off on A Super Simple Way to Make Landscape Photos POP Using Lightroom

Posted in Photography


Setting up Lightroom Mobile for First Time Users

11 Jan

I laughed at Lightroom Mobile the first time I saw it. “Why would I ever want to use that stripped down gadget on a small screen?” And now, here I am about help you install and use it. Why is this?

It’s because I have found how totally useful the app is in sorting through hundreds or thousands of images from the world of “any time, any where”. Most notably, in a comfy chair with good light or on a weekly airplane flight. iPads also became lighter and iPhone screens larger.

Let’s start with how to set up Lightroom Mobile on your iPad or iPhone and then give some examples of how I find it useful in managing a huge library. I will be using a Collection of mine that is a work in progress to craft black and white images of the Himalayas.

Setting up Lightroom for mobile use

Connect Lightroom to your Adobe ID

The first step is to make sure you have the right version of Lightroom on your PC or Mac. You need to have version 5.4 or later, you can download the latest version from Adobe here. You also need an Adobe ID (free) for this to all work as it is the hub in the cloud that makes this all spin. If you don’t have one, sign up here.

With Lightroom open, you will notice in the upper left corner the phrase “Get started with Lightroom mobile”

1

Click the triangle next to the words and log in with your Adobe ID

2

You will then see that the top left of the screen has changed to the name you gave to Adobe upon creating your Adobe ID.

3

Great! Now let’s set up Collections to synchronize

Setting up Collections to sync

Lightroom Mobile will currently only work with Collections. If you need help setting up a Collection, the free Adobe video here will help. To enable a Collection for syncronization, simply right click on the Collection and choose “Sync with Lightroom mobile”. Pretty easy!

4

After clicking, you will notice a double arrow appears to the left of the Collection. This indicates the Collection will be syncing when sync is turned on.

5 copy

Now, up in the top left, Lightroom will let you know it is starting the sync of those images.

6

As a first pass, we are done! Simply repeat this process for Collections you have already created. Additionally, when creating a new Collection, there is a box that can be checked to automatically sync the new Collection. It looks like this:

7

Setting up your iPad or iPhone for use

This is the easy part. First, ensure your iPad/iPhone is connected to the Internet. Go to the App Store and search for Lightroom Mobile.

Peter-West-Carey-adobe2014-1217-0225

Install (it’s free) and then start the app.

Peter-West-Carey-adobe2014-1217-0229

You will be presented with an Adobe ID screen after paging through the first time introduction.

Peter-West-Carey-adobe2014-1217-0230

After signing in you will be taken to a page showing all the Collections you have set up to sync on the desktop version of Lightroom.

Peter-West-Carey-adobe2014-1217-0232

Tap the main image and you will be taken to the Collection itself. The first time you run through Lightroom Mobile it will give you helpful contextual hints.

Peter-West-Carey-adobe2014-1217-0233

Tap on any picture to edit it.

Peter-West-Carey-adobe2014-1217-0235

Quick filtering with Lightroom mobile

While there are a lot of features in Lightroom Mobile that make it useful for photographers, this post is going to concentrate on the basics to get you started.

Now that you have a Collection synced to your iPad/iPhone (note: it might take a while to fully sync a larger Collection), you can start filtering. For me, filtering is the best use of this app, currently. I enjoy being able to filter my images from the comfort of my living room or while traveling. I also do some basic edits to images but I usually leave the major edits to my desktop. To filter images, I use both the flags and stars features. You can switch between changing those features by tapping the icons in the bottom left corner.

Peter-West-Carey-adobe2014-1217-0238-2

Peter-West-Carey-adobe2014-1217-0238

When the flag icon is highlighted, as it is here, simply move your finger up or down on the screen to pick, unpick or reject images. These settings will then sync over to your desktop within seconds as long as Lightroom is open on the desktop.

Peter-West-Carey-adobe2014-1217-0237

Peter-West-Carey-adobe2014-1217-0239

I use these two features to sort images. Flags are images I especially like and I know I want to work on back at my desktop. I then use two stars to indicate the image should be used for my stock photography work (the scale then goes up to three stars once edits are done, four stars when title and keywords are done and five stars when completely finished).

There are a lot of editing options available in Lightroom Mobile that can be accessed from tapping the icons at the bottom of the screen on an individual image.

Peter-West-Carey-adobe2014-1217-0241

All of these features are best left for a future post.

Offline use

One last thing; Lightroom Mobile usually needs to ‘see’ your desktop’s version of Lightroom in order to show previews the first time and make edits. Therefor, once I have a Collection fully sync’d, I will then turn on Offline Editing which allows me freedom from wifi to make edits, knowing they will sync the next time I am online.

To do this, click on the three little dots on the bottom of the Collection image:

Peter-West-Carey-adobe2014-1217-0232-2

This brings up a menu with many options.

Peter-West-Carey-adobe2014-1217-0243

Choose to Enable Offline Editing and Lightroom Mobile will now bring across Smart Previews of the images to your mobile device.

Peter-West-Carey-adobe2014-1217-0242

How do you use Lightroom Mobile

Lightroom Mobile has a host of other features such as automatically uploading images shot on your iPhone/iPad into Lightroom on your desktop.

What about you? What have you found useful in Adobe Lightroom Mobile?

googletag.cmd.push(function() {
tablet_slots.push( googletag.defineSlot( “/1005424/_dPSv4_tab-all-article-bottom_(300×250)”, [300, 250], “pb-ad-78623” ).addService( googletag.pubads() ) ); } );

googletag.cmd.push(function() {
mobile_slots.push( googletag.defineSlot( “/1005424/_dPSv4_mob-all-article-bottom_(300×250)”, [300, 250], “pb-ad-78158” ).addService( googletag.pubads() ) ); } );

The post Setting up Lightroom Mobile for First Time Users by Peter West Carey appeared first on Digital Photography School.


Digital Photography School

 
Comments Off on Setting up Lightroom Mobile for First Time Users

Posted in Photography