RSS
 

Posts Tagged ‘lightroom’

How to Shoot Images and Use Merge to HDR in Lightroom 6

15 Jun

Master teacher Phil Steele brings us a video on how to shoot bracketed images and merge them into and HDR image using the new Merge to HDR function in Lightroom 6 (or CC).

HDR is something that gets a bit of a bad rap and people seem to either love it or hate it. It’s one of those extreme things like opera and sushi. But the new Merge to HDR feature, inside Lightroom, makes it easy to try it and make realistic looking images in a snap – without the need for any other software or plugins.

Let’s have a look at Phil’s HDR shooting and LR processing tips:

If you enjoyed that and want to learn more about Lightroom you can check out Phil’s Lightroom course here.

googletag.cmd.push(function() {
tablet_slots.push( googletag.defineSlot( “/1005424/_dPSv4_tab-all-article-bottom_(300×250)”, [300, 250], “pb-ad-78623” ).addService( googletag.pubads() ) ); } );

googletag.cmd.push(function() {
mobile_slots.push( googletag.defineSlot( “/1005424/_dPSv4_mob-all-article-bottom_(300×250)”, [300, 250], “pb-ad-78158” ).addService( googletag.pubads() ) ); } );

The post How to Shoot Images and Use Merge to HDR in Lightroom 6 by Darlene Hildebrandt appeared first on Digital Photography School.


Digital Photography School

 
Comments Off on How to Shoot Images and Use Merge to HDR in Lightroom 6

Posted in Photography


Step by Step Using Merge to Panorama in Lightroom

09 Jun

Do you ever find yourself struggling to include everything you want to capture in a single frame? Well then, panoramic photography might be exactly what you need to solve this problem. With the new release of Lightroom 6, Adobe has made it possible to take multiple single frames of a panorama and stitch them seamlessly together with a few clicks of the mouse.

trap-falls-pano-2

Before we dive into the post production aspect of making a panoramic photograph, let’s take a step back and make sure you have a basic understanding of what you’ll need to capture in order to create an panoramic photograph.

Panoramic Photography 101

A quick guide to capturing suitable images

You’ll need at least two different frames to stitch together to create your panorama, but three to five will give you more to work with, and allow for a much richer image. When capturing these frames make sure to overlap each frame by about 30% or so to allow enough information for the algorithms to match each image with its neighbor.

A few other quick pointers to make it as simple as possible for yourself when you get back to the computer include:

  • Use a tripod to line up each shot.
  • Manually set your white balance, ISO, aperture and shutter speed as consistency between each frame is extremely important.
  • Make sure your area of focus remains consistent throughout the series of shots. Use back button focus, or autofocus and then switch to manual to lock it.

Of course, that was only a quick taste of what it takes to capture images for a panorama. For more on the subject of capturing the images read these two great dPS guides:

  • How to shoot panoramas
  • Getting started in panoramic photography

Panoramic Photography with Lightroom 6

Once you’ve captured a set of images for a panoramic photograph, and imported them into your Lightroom library, Adobe makes creating the panoramic photograph about as easy as: select, click, done. Let’s walk through the process.

Step #1 – Select the images you want to merge

panoramic photography

Here I’ve selected the three separate frames that make up the panorama attached at the top of this article. It doesn’t matter if you’re in the Develop module or the Library as you’ll be able to create the panoramic image from either place.

Step #2: Right click and select Photo Merge > Panorama

panoramic photography

Yep! It’s really that simple!

Once you’ve selected Panorama you’ll be brought into a new window called the Panorama Merge Preview. There you’ll be able to see what the resulting panoramic photograph will look like, and you’ll have a few options for customizing it.

panoramic photography

The settings here are not exactly self explanatory, and Lightroom doesn’t really provide any popup hints to help you out – so here’s the basic rundown of these options.

You have three options to choose from as to how you want your image to be projected as a panorama: Spherical, Cylindrical, and Perspective. This setting will determine how Lightroom merges the single frames together to control the distortion of the image.

Spherical – Great for wide panoramas and essentially transforms your selected images as if they were placed on the inside of a sphere.

Cylindrical – Similar to the spherical algorithm except that you’re images are now placed on the inside of a cylinder. In this case the vertical lines will remain straight.

Perspective – Great for architectural photography as it will try to keep all straight lines straight, however, wide panoramas may experience excessive distortion.

By selecting Auto Set Projection you can take the guess work out of this process by allowing Lightroom to pick the best option for you based on the images you’ve selected. In my experience Lightroom usually does a good job at choosing.

Finally, inside of the preview window you have the option to tell Lightroom to automatically crop the image. If left unchecked this is how the waterfall image above would have looked.

panoramic photography

However, even if you leave the Auto Crop box checked, using the crop tool once you’re back inside Lightroom will allow you to get back the uncropped image should you want to change anything at a later time.

Step #3 – Final Touches

Once you’re done merging your image it will be brought back into Lightroom, ready for you to finalize as you desire. Here I’ve just made a few small tweaks to bring out the colors and brighten the image up a bit.

panoramic photography

Another example – if you prefer video

Don’t forget that you can also use Lightroom to create panoramic images of a vertical scene as I’ve done here with this photograph below.

panoramic photography

Because everyone learns differently I’ve also created a simple video walkthrough of the process explained above, using this photograph to demonstrate the process click for click. Watch it below.

See more of Lightroom 6’s new features here.

googletag.cmd.push(function() {
tablet_slots.push( googletag.defineSlot( “/1005424/_dPSv4_tab-all-article-bottom_(300×250)”, [300, 250], “pb-ad-78623” ).addService( googletag.pubads() ) ); } );

googletag.cmd.push(function() {
mobile_slots.push( googletag.defineSlot( “/1005424/_dPSv4_mob-all-article-bottom_(300×250)”, [300, 250], “pb-ad-78158” ).addService( googletag.pubads() ) ); } );

The post Step by Step Using Merge to Panorama in Lightroom by John Davenport appeared first on Digital Photography School.


Digital Photography School

 
Comments Off on Step by Step Using Merge to Panorama in Lightroom

Posted in Photography


New Graduated and Radial Filter Features in Lightroom 6

30 May

Lightroom 6 graduated radial filter adjustments

Every time a new version of Lightroom comes out the first thing I look for are features that make the Develop module better, or easier to use. The ones I like best in Lightroom 6/CC are the improvements to the Graduated and Radial Filters. Let’s take a look at them.

Addition of mask overlay

In earlier versions of Lightroom you couldn’t tell with any precision which parts of the image were affected by the Graduated and Radial filters.

In Lightroom 6 you can toggle the mask overlay with the O keyboard shortcut, or by ticking the Show Selected Mask Overlay box in the Toolbar. Previously this was only available in the Adjustment Brush, it has now been added to both the Graduated and Radial Filters.

This screenshot below shows how it works. I wanted to make the background darker without affecting the dandelion head. The best tool to use for this is the Radial filter, but you need to be able to place it precisely. The mask overlay makes this easy.

As you can see, the effect of feathering meant that I needed to create a much bigger Radial filter than you might at first think.

Note: The Radial Filter was introduced in Lightroom 5 and is not available in earlier versions.

Lightroom 6 graduated radial filter adjustments

Mask overlay enabled.

Lightroom 6 graduated radial filter adjustments

Mask overlay disabled.

With the Radial filter in place, it is easy to make the required local adjustment. I moved the Exposure slider left to make the background darker.

Lightroom 6 graduated radial filter adjustments

This also works when you tick the Invert Mask box to apply the effect inside the Radial filter. In this situation the effect of feathering means you need to make the filter smaller than the area you want to cover. With the mask overlay enabled it is easy to place it precisely.

Lightroom 6 graduated radial filter adjustments

Then I increased Clarity and Exposure to bring out the texture of the dandelion head and make it brighter.

Lightroom 6 graduated radial filter adjustments

The other benefit of adding the mask overlay to the Radial filter is that it enables you to see the effect of the Feather setting. This was very difficult to judge before.

Lightroom 6 graduated radial filter adjustments

Feather: 50

Lightroom 6 graduated radial filter adjustments

Feather: 0

Lightroom 6 graduated radial filter adjustments

Feather: 100

Note: You can use the Shift+O shortcut to change the colour of the mask overlay.

Addition of Adjustment brush

A problem with the Graduated and Radial filters in earlier versions of Lightroom is that the shape of the mask is fixed. In Lightroom 6/CC Adobe has added the ability to combine the Adjustment brush, with both the Graduated and Radial filters.

Here’s an example of how it works. In this photo I wanted to make the top half of the wall darker without affecting the mailbox. In previous versions of Lightroom the only option was to use the Adjustment brush to paint in the irregular area. Now you can use the Graduated Filter instead.

This screenshot shows the area affected by the Graduated Filter (I changed the overlay colour to green as it’s easier to see on this image).

Lightroom 6 graduated radial filter adjustments

To apply an Adjustment brush, got to the Graduated filter panel and click the Brush option at top right. In this example I also chose the Erase option as I wanted to remove some of the mask overlay.

Lightroom 6 graduated radial filter adjustments

This the amended mask overlay, revealing the mailbox.

Lightroom 6 graduated radial filter adjustments

This is the result.

Lightroom 6 graduated radial filter adjustments

Your turn

These improvements are my favourite as they will make it much easier to process my photos in the Develop module. But what about you? Have you upgraded to Lightroom 6/CC yet? If you have, what are your favourite new features? Please let us know in the comments.


The Mastering Lightroom CollectionMastering Lightroom ebooks

My Mastering Lightroom ebooks will help you get the most out of Lightroom. They cover every aspect of the software from the Library module through to creating beautiful images in the Develop module. Click the link to learn more or buy.

googletag.cmd.push(function() {
tablet_slots.push( googletag.defineSlot( “/1005424/_dPSv4_tab-all-article-bottom_(300×250)”, [300, 250], “pb-ad-78623” ).addService( googletag.pubads() ) ); } );

googletag.cmd.push(function() {
mobile_slots.push( googletag.defineSlot( “/1005424/_dPSv4_mob-all-article-bottom_(300×250)”, [300, 250], “pb-ad-78158” ).addService( googletag.pubads() ) ); } );

The post New Graduated and Radial Filter Features in Lightroom 6 by Andrew S. Gibson appeared first on Digital Photography School.


Digital Photography School

 
Comments Off on New Graduated and Radial Filter Features in Lightroom 6

Posted in Photography


Get Excited About the New Adobe Lightroom CC

18 May

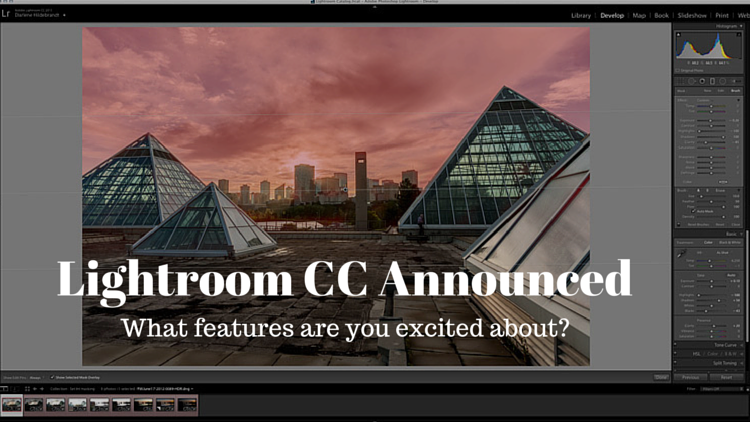
The day is upon us, my friends; Lightroom CC is here. The latest update to Adobe’s excellent photo management tool has arrived, and as cliche as it sounds, it really does offer something for everyone.

While the updates won’t necessarily satisfy hardcore Aperture users (who are still licking their proverbial wounds), Lightroom 4/5 users can easily justify this upgrade as a satisfying mix of under the hood, and hands-on improvements.

lr_splash

First and foremost, you’ll be ecstatic to learn that Adobe has released an independent version of the software in the form of Lightroom 6, available as a physical DVD or as a digital download. Subscribers of Adobe’s Creative Cloud service (that have Lightroom as part of their subscription plan) will automatically receive Lightroom CC, which is identical to Lightroom 6. We all let out a collective sigh when it was verified Adobe would not leave non-Creative Cloud users out in the cold.

The new and improved Lightroom sports several new features, and has included some improvements as well. Let’s go through a few of the highlights and see how they can make your photography workflow a more powerful and efficient process.

Improved Speed

While this is a behind-the-scenes improvement, it’s one of the biggest in this update. Instead of relying on the CPU (central processing unit) for all processing, as with Lightroom 5, Lightroom 6 has added the ability for some computations to be offloaded on the GPU (graphics processor) of your machine, specifically adjustments in the Develop module of the software.

This takes some of the load off of the central processor of your computer, and makes the entire program noticeably quicker. Efficiency through speed!

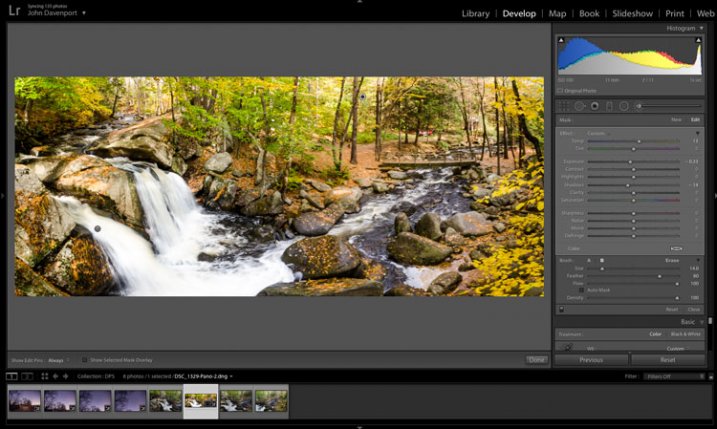
Photo Merge to Panorama

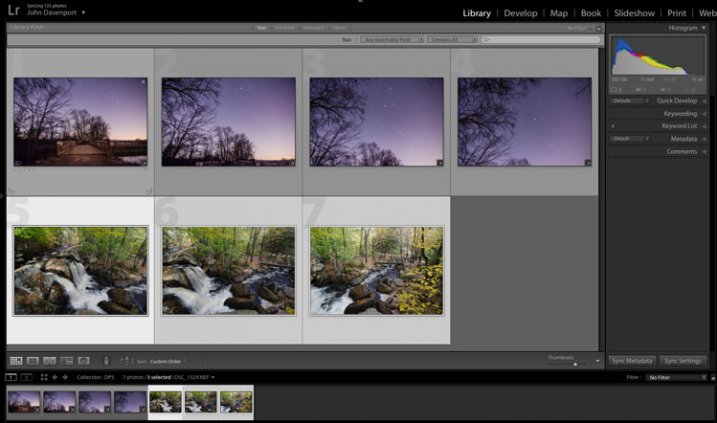
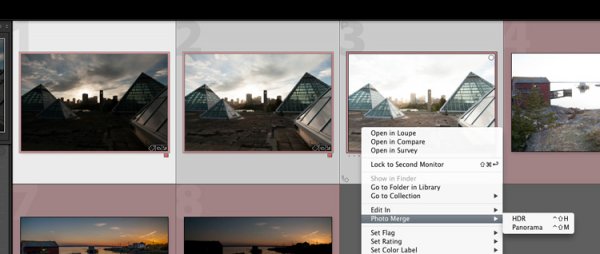
The new ability to create panoramic photos (multiple photos blended together to create a single super-wide image) directly within Lightroom will probably be one of the most talked about features of the update, along with HDR creation. In Lightroom 5, no “creation” of new pixels was allowed, meaning if you needed to create a panoramic image, you’d have to do it in Photoshop or a third-party piece of software.

pano1

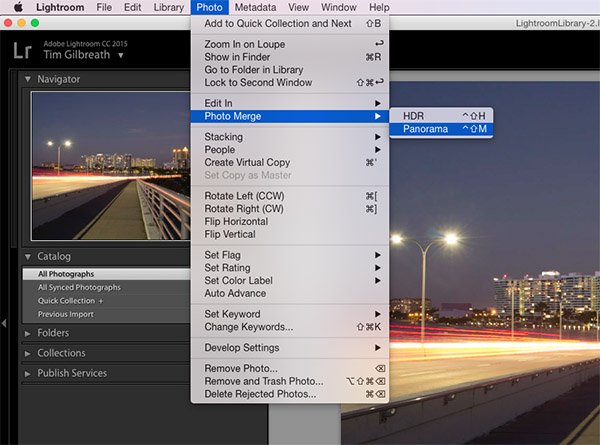
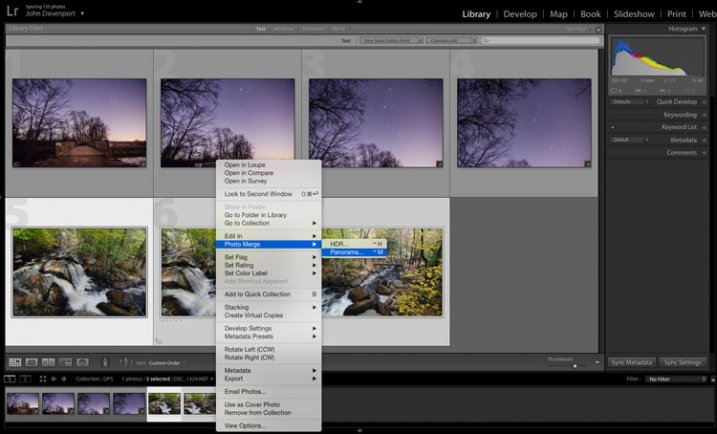
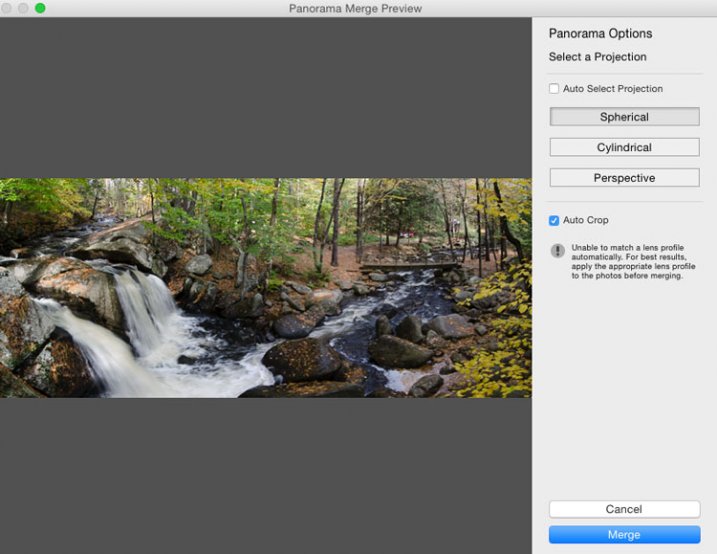
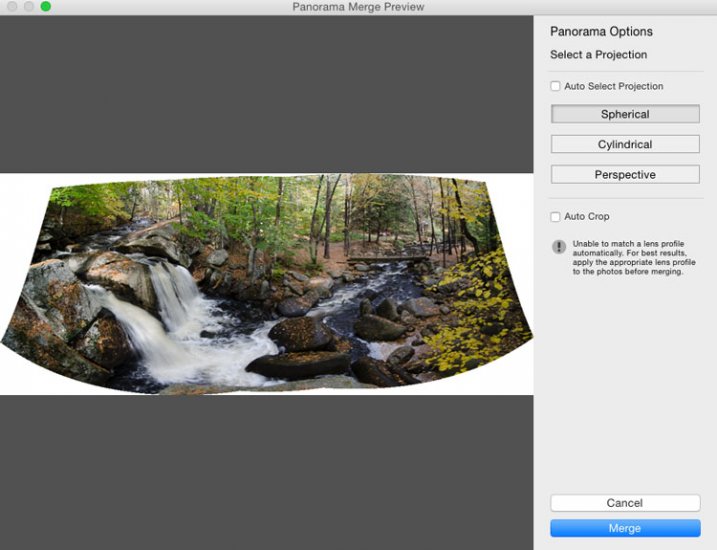
Now, Lightroom allows you to select a set of images, and it will stitch them together with a single click. The detailed controls for this process are sparse, but this is a good thing. You can even have the software automatically crop after the stitch is complete by ticking a checkbox in the creation dialog.

What do you get back after the build is complete? A 16-bit DNG (digital negative) file, a raw format that can be adjusted in the Develop module just like a RAW file. No compressed JPEG’s here.

pano2

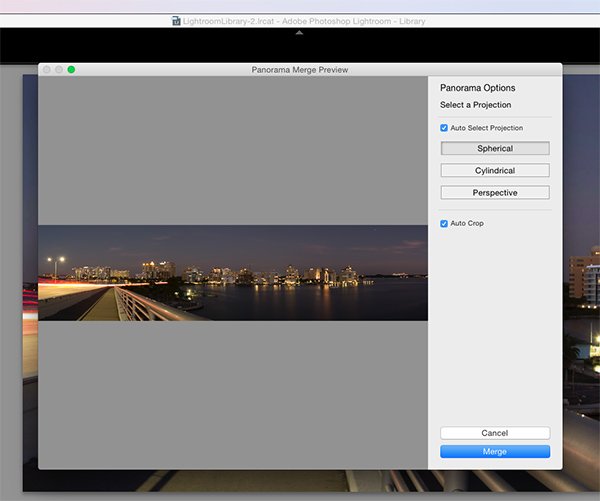
The beauty of this process is that unlike the full rendering done in Photoshop, you are giving a very quick low-resolution preview of the image, and it can then be sent to the background, while you work on a different image. The progress of the panorama’s build is viewable in the new Activity Center, which allows you to monitor and control ongoing background processes.
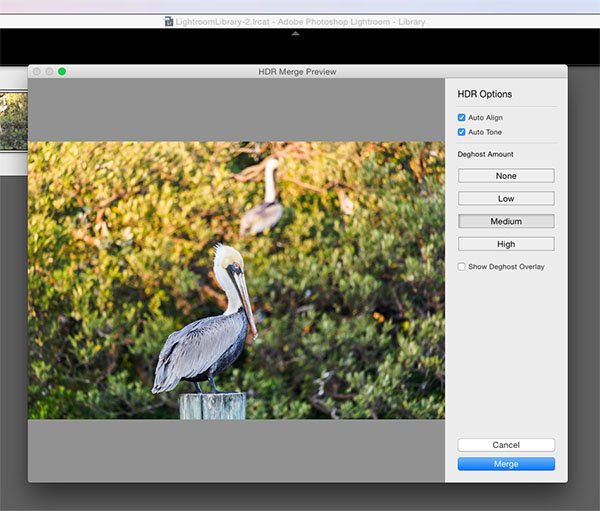
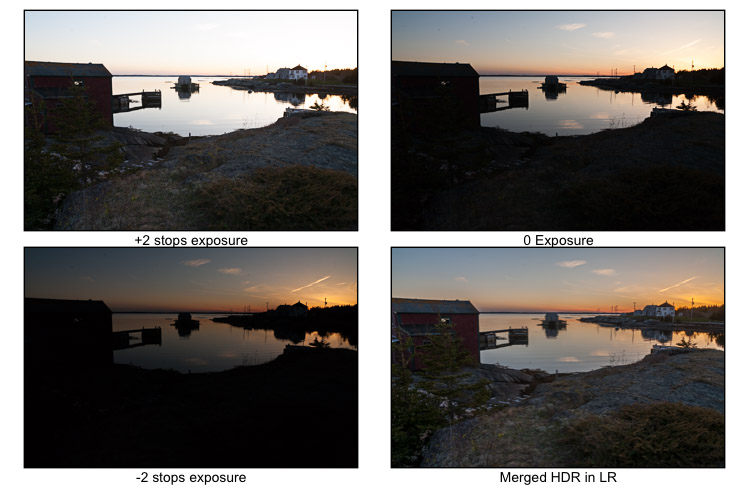
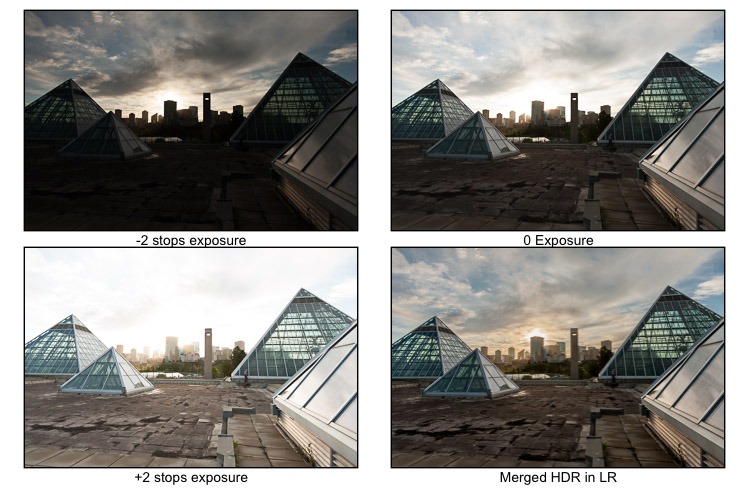
Photo Merge to HDR

The other high profile addition in Lightroom CC is undoubtedly the ability to create HDR (high dynamic range) files. HDR images are created by blending together several shots taken at various exposures, with the intention of pulling the optimal dynamic ranges from each of those images to create a photo that contains a larger dynamic range.

As with creating panoramas, HDR creation was not available in Lightroom 5, and was most often done via a third-party program such as Photomatix, or within Photoshop.

hdr1

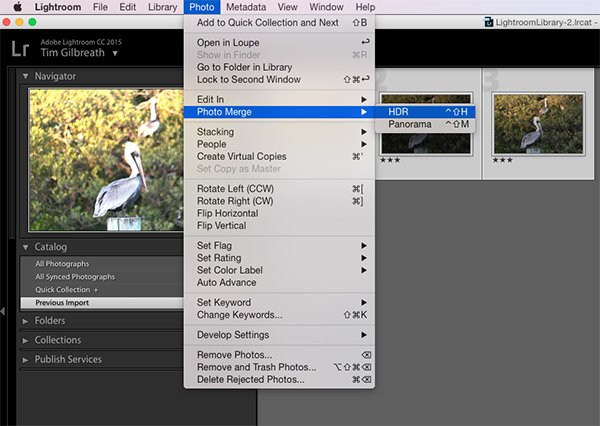
Just as with panoramic creation, Lightroom allows you to select several files within the software, and merges them together into a DNG file, with no compression. They may be modified with any of the sliders in the Develop module, just as you would do with any RAW file.

hdr2

The obvious primary benefit for both the HDR and Panorama creation tools in Lightroom CC is the ability to perform these functions right there in Lightroom, without having to merge the files together in a separate program and then import them back into your Lightroom workflow.

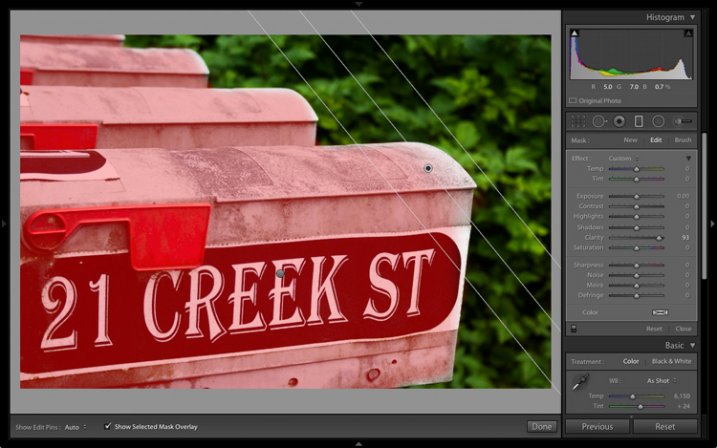
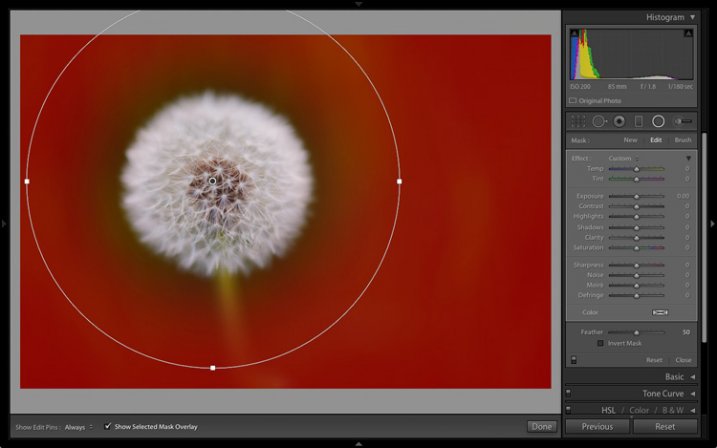
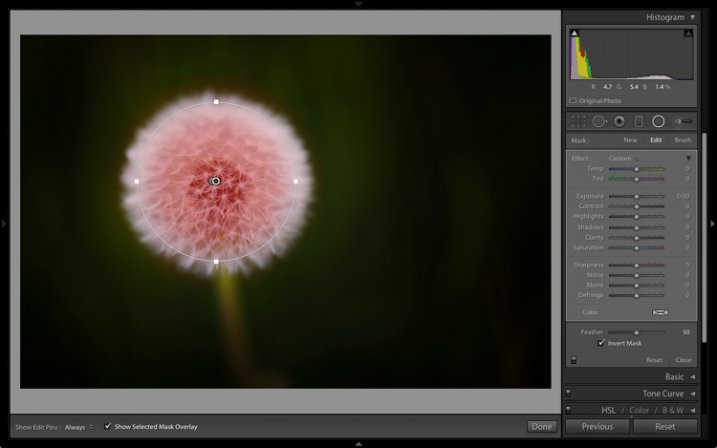
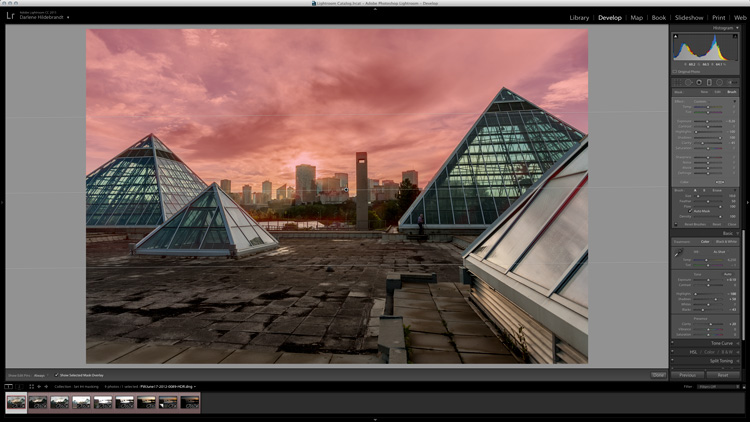
More Precise Adjustment Filters

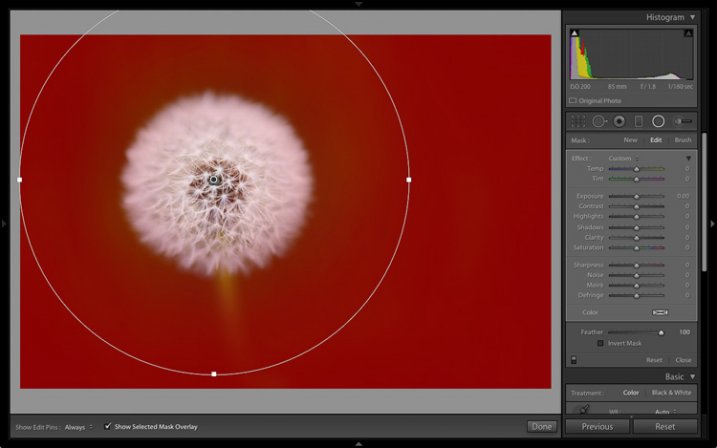
The graduated and radial filters available in Lightroom are some of its most-used features. They give you the ability to paint on a varying layer of adjustments including color, exposure, and many other options. A common example would be adding a graduated filter in a landscape shot to decrease exposure in a blown-out sky, while maintaining the proper exposure for the foreground.

adj_brush1

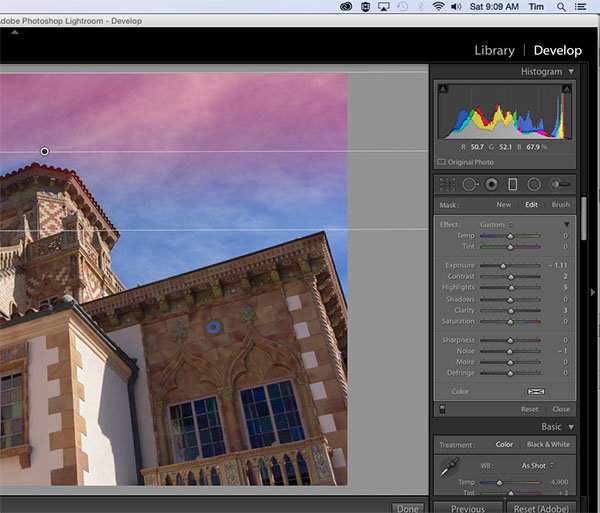
Note the red you see here is the new tool overlay which shows you where it is applying on your image. Just like the adjustment brush tool.

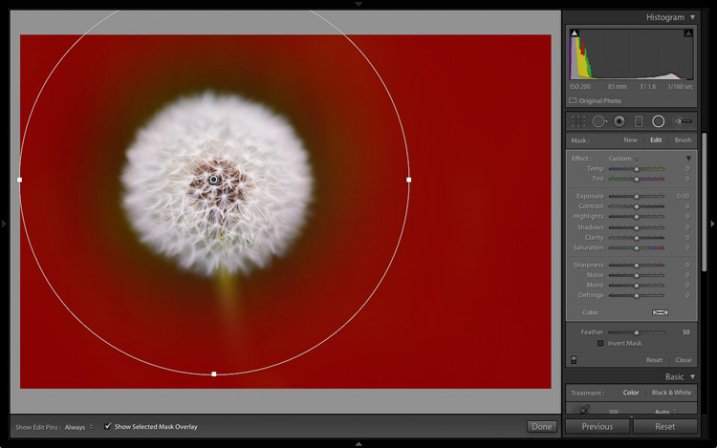
One caveat to using these filters before Lightroom CC was that they were all “what you see is what you get” implementations; if there was an object such as a tall building in your landscape image that extended to the top, a graduated filter to darken the sky would also darken the building.

adj_brush2

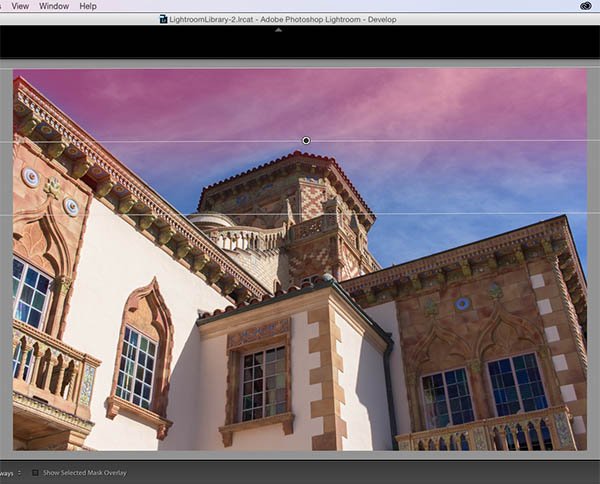
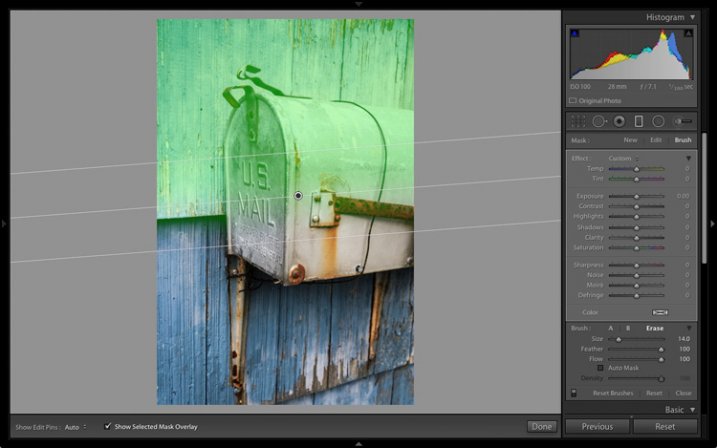
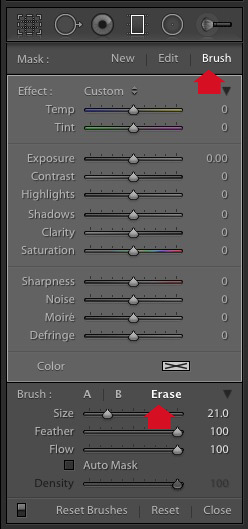
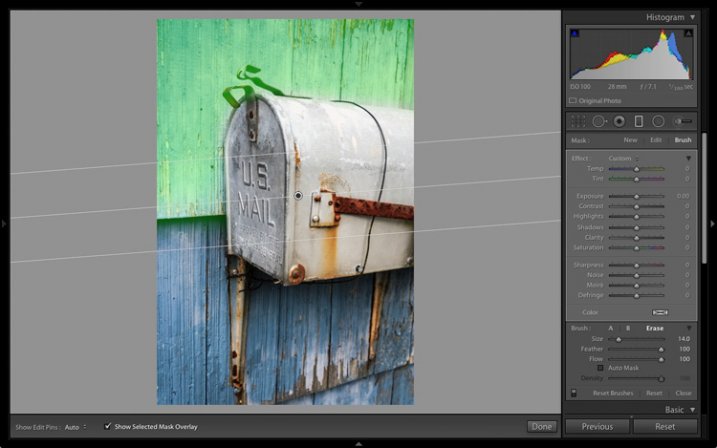
With Lightroom CC, this is no longer an issue. You can apply a graduated filter as usual, and then use a brush to mask the building so that the effect is only applied to the sky. This adds almost unlimited potential to the filters available in Lightroom.
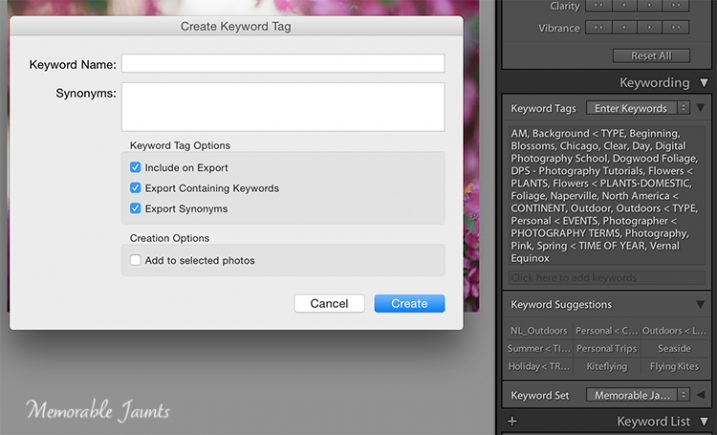
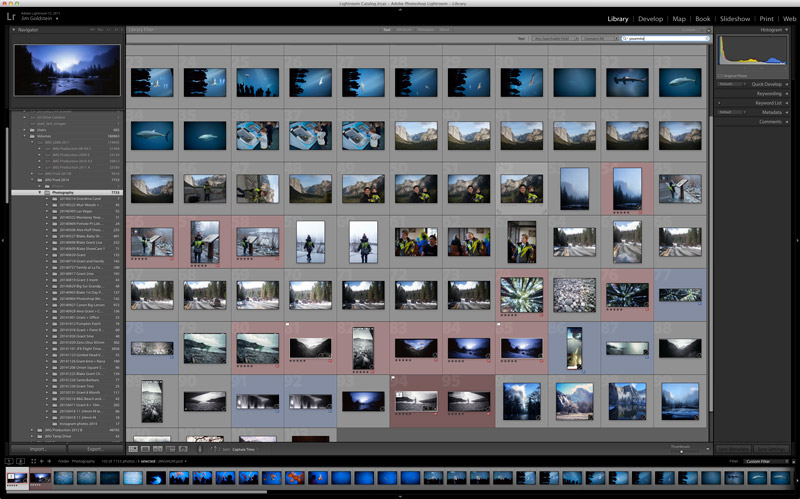
Facial Recognition

A feature becoming more and more popular in our social-sharing world, facial recognition is well-known in apps such as Facebook, where identifying and tagging friends and family in shared photos is ideal. Lightroom throws its hat in the ring with a new Facial Recognition feature that will allow you to tag people in your photos in a similar manner.

The software will automatically attempt to identify human faces, and allow you to name them for future use. Over time, you’ll build up a database of faces, and Lightroom will begin identifying faces from that database in your newly imported photos.

faces

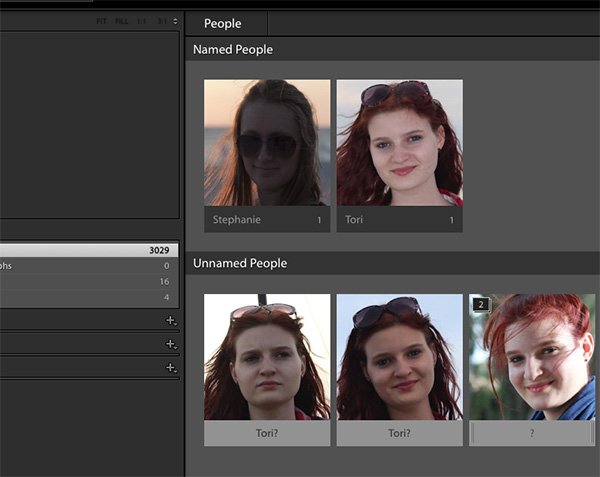
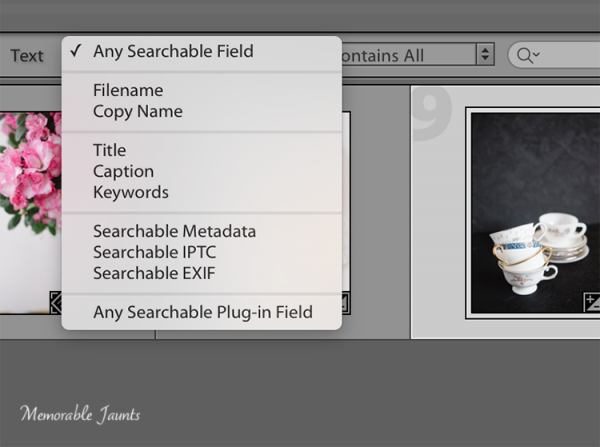
The tags that are created from this process can then be converted into searchable keywords in the metadata for the photo, and used as any other keyword could be.

What do you think?

There are several other smaller improvements and enhancements in Lightroom CC, including updates to the Slideshow module, pet eye removal, and tethered shooting, as well as an improved experience in Lightroom Mobile. Just as a reminder, to use Lightroom Mobile you’ll need to have an Adobe Creative Cloud plan that includes Lightroom.

We’ll likely have more in-depth analysis of Lightroom CC’s new features in the coming weeks, but early in the game, what do you think? Are you excited about the upgrade? Did it change your opinion of Adobe’s Creative Cloud direction of thinking? Thanks for reading, sound off in the comments below!

googletag.cmd.push(function() {
tablet_slots.push( googletag.defineSlot( “/1005424/_dPSv4_tab-all-article-bottom_(300×250)”, [300, 250], “pb-ad-78623” ).addService( googletag.pubads() ) ); } );

googletag.cmd.push(function() {
mobile_slots.push( googletag.defineSlot( “/1005424/_dPSv4_mob-all-article-bottom_(300×250)”, [300, 250], “pb-ad-78158” ).addService( googletag.pubads() ) ); } );

The post Get Excited About the New Adobe Lightroom CC by Tim Gilbreath appeared first on Digital Photography School.


Digital Photography School

 
Comments Off on Get Excited About the New Adobe Lightroom CC

Posted in Photography


The Power of Keywording in Lightroom

12 May

I have to admit, I did not know about keywords in Lightroom, or their powerful uses, until a couple of years ago. During one of Julieanne Kost’s tutorials, I heard the terms and saw it being used in a very practical sense – a way to add specific descriptors to images in a catalog. I was intrigued and the more I researched them, the more I realized what an amazing and awesome tool was available right at my finger tips.

Descriptive and Specific Keywords assigned to an image in Lightroom

Descriptive and Specific Keywords assigned to an image in Lightroom

In the simplest sense, Keywords in Lightroom are a way to describe key elements about a photograph. Just as the basic wikipedia definition of the term, keywords add description to an image and when used in conjunction with filters, are a great way to find specific images quickly in a large catalog. Keywords also provide a way for others to find your images on the web. Keywords get attached to images as part of the image metadata when an image is exported from Lightroom. These keywords in the metadata then act as an identifier and show up in internet searches when people search for certain words and phrases. If your images have your logo, watermark, or some other identifier, that is a another way for people to get exposed to your work.

Keywords can be found in the Library module in Lightroom. There are three panels related to keywords – Keywording, Keyword Suggestions and Keyword List. Each of these can be expanded or collapsed using the triangle looking arrow (see below image).

Keyword Panel in Lightroom's Library Module

Keyword Panel in Lightroom’s Library Module

Keyword List

Keyword List basically indexes all the keywords that you have setup in your catalog. To add a word to the Keyword List, click on the “+” symbol on the left hand side of the panel and a dialog box opens up. You can enter in the information (e.g. the name of the keyword, synonyms, etc.) and once you click okay, a keyword will be added to your list. Some of my keywords are Location, Time of Year, Seasons, Time of Day, Clients and Subjects.

Within these parent keywords, I have child keywords like name of the client, the four seasons of the year, type of photography, etc. To add a child keyword to a parent keyword, select the parent keyword and then select the “+” symbol. The same dialog box opens up except this time the keyword will be added to the parent keyword. Depending on the image, I select the relevant keywords and they get added to the keyword metadata for that specific image.

DPS Article on Keywords in LR by Memorable Jaunts - Adding Keywords to the Keyword List

Clicking on the “+” on the left of the Keyword List panel is a way to add new keywords and keyword categories.

Keyword Set

Keyword Set is a great way to setup a pre-qualified set of keywords. This is very helpful if you photograph different genres. I have three distinct set of keywords – Memorable Jaunts Wedding Photos, Memorable Jaunts Family Photos and Memorable Jaunts Outdoor Nature Photos. Each set has related keywords assigned to it. If I am working on a wedding gallery for a client, I can choose Wedding Photos and then have a shortlist of preassigned keywords to attach to specific images in that gallery. My wedding photos keyword set has words like bride, groom, candid, posed, family, wedding party, etc.

Keyword Suggestions

Keyword Suggestions are Lightroom’s way of anticipating what your keyword needs are. These suggestions are based on the latest, most frequently used keywords. If your keyword list is long like mine, you can use this to quickly assign keywords to images especially if you tend to work with similar type of images.

DPS Article on Keywords in LR by Memorable Jaunts - Assigning Keywords to images

Keywords Suggestions are based on the most recently used and frequently used keywords.

Once you assign keywords to a particular image in a galley, you can use Sync Metadata and assign the same keywords to all the images within that gallery, especially if they are all along the same lines – same session, same people, and same genre.

A few tips to keep in mind

#1 – Keyword lists can grow very quickly

It is important to take the time upfront to assign keywords to all images within your catalog. This makes sorting and filtering images based on specific keywords much easier.

#2 – Try not to add keywords on the fly

Ensure that keywords are always added using the appropriate hierarchy. For example, if you have four seasons – Fall, Summer, Winter and Spring under “Seasons” parent keyword group, resist the temptation to add Summer Equinox or Early Fall to a specific image without adding it to the “Seasons” parent keyword group. If you add a keyword that is not on the keyword list, Lightroom will add it as an orphaned keyword to your list. Soon you will have many adhoc keywords that don’t really belong to any specific category or group. Along the same lines, maintain your keywords – delete the keywords that you no longer use and no longer assign to any image.

#3 – Keywords can also be imported and exported from Lightroom

LR saves keywords as a txt document. What this means is that you can create your keyword list in a normal text editor, save the file as a “.txt” file and then import it into your catalog. You can also share your keywords list between computers, say your desktop at home and the laptop you use in the field.

#4 – Create a base keyword of your name or the name of your business and assign that to all your images

Remember that keywords gets stored as metadata information for images. This ensures that your name or business information is always present on each and every one of your images.

Another powerful advantage of assigning keywords to your images is the ability to search or filter images in your catalog based on specific keywords. When you filter in Lightroom, choose the Text option and the drop-down box to select Keywords, then start entering specific keywords. Lightroom will start sorting images based on the keyword until you find all the image that have that corresponding keyword in their metadata.

DPS Article on Keywords in LR by Memorable Jaunts - Filering using keywords - Searchable by keyword

Selecting Keywords as part of search criteria ensures the ability to get specific results based on exact keywords

DPS Article on Keywords in LR by Memorable Jaunts - Filering using keywords

Using keywords to sort through all images in a catalog

Regardless of whether your catalog is small or large, it is worth the time and the effort to assign appropriate and relevant keywords to all your images. This makes future management and maintenance of your catalog much easier and efficient.

Tell us in the comments below how you use keywords?

googletag.cmd.push(function() {
tablet_slots.push( googletag.defineSlot( “/1005424/_dPSv4_tab-all-article-bottom_(300×250)”, [300, 250], “pb-ad-78623” ).addService( googletag.pubads() ) ); } );

googletag.cmd.push(function() {
mobile_slots.push( googletag.defineSlot( “/1005424/_dPSv4_mob-all-article-bottom_(300×250)”, [300, 250], “pb-ad-78158” ).addService( googletag.pubads() ) ); } );

The post The Power of Keywording in Lightroom by Karthika Gupta appeared first on Digital Photography School.


Digital Photography School

 
Comments Off on The Power of Keywording in Lightroom

Posted in Photography


How to Isolate Your Subject in Lightroom

06 May

One of my favourite portrait techniques is to isolate the model by using a short telephoto lens and a wide aperture. The idea is to throw the background out of focus and keep the subject sharp, so there is a clear distinction between the two. This creates beautiful bokeh and the illusion of depth.

Isolating the subject in Lightroom

Another way to isolate the model is to place them in the light, against a dark background that is in the shade. The opening photo (above) used this technique. I asked the model to pose in a doorway, and she is separated from the background because there’s no light illuminating the interior of the building.

These techniques are very effective but sometimes the results won’t match what you visualized. It may be that the background isn’t quite as dark as you would like, or not out of focus enough. It may contain distracting colours or highlights. In these situations you can use Lightroom to give you a helping hand.

Take the following photo as an example. The model is an artist who creates artwork from scrap metal. He is lit by daylight coming through open doors to camera left. I originally visualized the scene with the background going dark. Here’s what I was hoping for (the final result, after editing in Lightroom):

Isolating the subject in Lightroom

In the event however, that didn’t happen. The workshop was illuminated by lighting coming through skylights and a window at the rear. The blurred area on the left is the door to the workshop – included to add a sense of depth and to hide a white metal tank in the background. The door is outside, so it came out very bright compared to the interior.

This is the photo, more or less straight out of the camera.

Isolating the subject in Lightroom

Quite a difference! Let’s look at some of the techniques I used to isolate the subject in Lightroom, and complete my original vision of the photo.

  • I added a Radial Filter and moved the Exposure slider left to darken the area around the subject. The Radial Filter is a very flexible tool as you can adjust the size and shape to match your subject.

    Isolating the subject in Lightroom

  • I used a Graduated Filter to darken the out of focus door. Now it doesn’t pull any attention away from the artist, who is the focal point of the photo. You can use Graduated Filters to darken any part of the background in the same way.

    Isolating the subject in Lightroom

  • Next I used the Adjustment Brush to darken some areas that weren’t covered by the Radial Filter. I painted in the area I wanted to adjust (shown by the red mask, below) and moved the Highlights and Shadows sliders left to make it darker. The Adjustment Brush tool is extremely useful for making local adjustments in areas that the Radial and Graduated Filters are unsuitable for.

    Isolating the subject in Lightroom

  • Finally I created another Adjustment Brush, painted over the model and moved the Clarity slider right. This made him look sharper by emphasizing the texture. It’s a technique that works better with men than with women as it affects skin texture, emphasizing wrinkles and other marks. A subtle touch is best. Here, increasing Clarity made the model’s skin brighter, so I moved the Highlights slider left to compensate.

    Isolating the subject in Lightroom

Here’s a before and after comparison so you can see the difference that those four simple adjustments made.

Isolating the subject in Lightroom

I’ve also created a YouTube video that shows how I processed this photo in depth.

You can also experiment with using the Adjustment Brush to select the background and making it softer by moving the Clarity slider left or desaturating it with the Saturation slider. Care is required with both techniques as they are easy to overdo – once again a subtle touch is best. They may come in useful when there are bright highlights or distracting colours in the background.

Isolating the subject in Lightroom

What techniques do you use to isolate the subject in Lightroom? Please let us know in the comments.


The Mastering Lightroom Collection

Mastering Lightroom ebooksMy Mastering Lightroom ebooks will help you get the most out of Lightroom 4 and Lightroom 5. They cover every aspect of the software from the Library module through to creating beautiful images in the Develop module. Click the link to learn more or buy.

googletag.cmd.push(function() {
tablet_slots.push( googletag.defineSlot( “/1005424/_dPSv4_tab-all-article-bottom_(300×250)”, [300, 250], “pb-ad-78623” ).addService( googletag.pubads() ) ); } );

googletag.cmd.push(function() {
mobile_slots.push( googletag.defineSlot( “/1005424/_dPSv4_mob-all-article-bottom_(300×250)”, [300, 250], “pb-ad-78158” ).addService( googletag.pubads() ) ); } );

The post How to Isolate Your Subject in Lightroom by Andrew S. Gibson appeared first on Digital Photography School.


Digital Photography School

 
Comments Off on How to Isolate Your Subject in Lightroom

Posted in Photography


Adobe Announces New Lightroom CC – What Features are You Most Excited About?

23 Apr

Lightroom CC

Well yesterday Adobe pulled the trigger on the much anticipated release of the new Lightroom 6, which is actually called Lightroom CC (part of the Creative Cloud). It will still be available as a stand alone product but many people, myself included were eagerly downloading the new version as soon as it was available.

We’ll have one of our writers doing a more involved look at the new features soon but I wanted to see what you are most interested in with this new version.

LR-CC-03

New Photo Merge feature in LR CC

What features were on your LR wish list?

So tell me in the comments below – what things were you hoping Adobe would build into this incarnation of Lightroom? Did you get all the features you wanted? What’s still missing in your opinion?

Was there anything you wanted removed?

What new features are you most fired up about?

In watching some of the live broadcast of the announcement I picked up on a few of the new features and was eager to try them out, most of all the Merge to HDR (Pano also available). It takes your bracketed shots which you previously had to take to either Photoshop or another plugin to work with – and now Lightroom merges them into a gorgeous 32-bit file which comes back in as a DNG no less! So you have all the editing power of a 32-bit file at your fingertips without every leaving Lightroom CC – I’m sold!

I ran a couple sets through the HDR to test it. Was pretty impressive and super easy. I’ll have to dig into it more later.

LR-CC-02 LR-CC-01

Previously on the set of images above I had to mask the sky back in – but using LR local adjustments and the new HDR Merge I was pretty happy with the result which took about three minutes.

Some of the new features I’m excited about and keen to try are:

  • The Merge feature (to Pano and HDR – it even handles alignment, auto tone and deghosting)
  • Add to Collection on import
  • Filter in Collections (search)
  • Enhanced video slideshows (I use it now for easy shows, this looks like it can make them look better now too)
  • Auto-straighten on the crop tool
  • New finer control using the graduated filter and radial filter. You can now brush out, or mask (hide) part of it to bring back buildings, trees and areas you do not want affected by the filter. Brilliant!

See a complete run down of all that’s new on the Adobe site.

LR-CC-04

New brush option on graduated filters, very slick!

How about you?

We’ll have more on the new Lightroom in the coming weeks but for now tell us what you think in the comments below.

googletag.cmd.push(function() {
tablet_slots.push( googletag.defineSlot( “/1005424/_dPSv4_tab-all-article-bottom_(300×250)”, [300, 250], “pb-ad-78623” ).addService( googletag.pubads() ) ); } );

googletag.cmd.push(function() {
mobile_slots.push( googletag.defineSlot( “/1005424/_dPSv4_mob-all-article-bottom_(300×250)”, [300, 250], “pb-ad-78158” ).addService( googletag.pubads() ) ); } );

The post Adobe Announces New Lightroom CC – What Features are You Most Excited About? by Darlene Hildebrandt appeared first on Digital Photography School.


Digital Photography School

 
Comments Off on Adobe Announces New Lightroom CC – What Features are You Most Excited About?

Posted in Photography


6 Steps to Save Your Ass With Lightroom Catalog Changes

22 Apr

Avoid downtime with these 6 steps to keep your Lightroom Catalog in tip top shape:

1. Know Where Your Catalog Resides

Lightroom saves catalogs in the following folders:

  • Windows: \Users\[user name]\Pictures\Lightroom
  • Mac OS: /Users/[user name]/Pictures/Lightroom

When in doubt check here:

(Mac OS) Lightroom > Catalog Settings

(Windows) Edit > Catalog Settings


Know Where Your Lightroom Catalog Resides

2. Save Metadata to Your Files

To save metadata to your files highlight your images and hit Command-S on Mac or Control-S on Windows. This will save author’s name, resolution, color space, copyright, and keywords to a sidecar file for proprietary RAW files or directly to the file if JPEG, TIFF, PSD, and DNG. This is a great precursor step that builds in redundancy in case there are any catastrophic failures in your future.

Why you should use DNG:  DNG, RAW and JPEG: What I Use & Why

More on Metadata: Metadata Basics and Actions via Adobe


Save Metadata to Your Files

3.  Back Up Your Catalog Regularly

There is one key prompt you should never ignore in Lightroom and it is the “Back Up Catalog” prompt.  Always take the time to regularly backup your catalog in the event your hard drive fails, you suffer file corruption or a meteor crashes into your home destroying your computer. Well for the last point see step 4 below.


Back Up Your Lightroom Catalog Regularly

4. Save Your Back Up Catalog to the Cloud

Redundancy is the name of the game in case you suffer a catastrophic data corruption or loss of equipment at home. By having your most recent catalog saved to the cloud (Dropbox for example) you can restore the organization (color coding, stars, edits, etc.) of your entire catalog assuming you have an off site backup of your image files.

The quick and dirty of how I back up my image files in case you’re wondering…

I have a hard drive enclosure that mirrors 2 drives (RAID 1). As I work on my files they’re saved to 2 drives simultaneously. At regular intervals I back up these mirrored drives to a 3rd drive that I keep offsite. In the event of a catastrophic event I always have 1 copy of my image files at an outside location. This combined with my Lightroom Catalog being saved to the cloud means that I can restore my Adobe Lightroom environment at any time.


Save Your Back Up Catalog to the Cloud

5. Before You Upgrade Lightroom Make A New Catalog Back Up

Lightroom will prompt you to upgrade your catalog when you upgrade your copy of Lightroom to the latest version.  To avoid any risk of a fluke corruption when you upgrade your Lightroom Catalog always make sure you have a very recent back up copy of your catalog. Before any upgrade my first step is to make sure I have a recent catalog backup.

Before You Upgrade Lightroom Make A New Catalog Back Up


6. Regularly Optimize Your Catalog

If you’re experiencing performance issues or you want to make sure that your catalog is in optimal condition then be sure to optimize your catalog from time to time. To do this go to Lightroom > Optimize Catalog

Regularly Optimize Your Lightroom Catalog


Recommended Reading: Lightroom Catalog FAQ and Lightroom Help / Optimize performance

Did I miss any precautions you take? If so add them to the comments.


Copyright Jim M. Goldstein, All Rights Reserved

6 Steps to Save Your Ass With Lightroom Catalog Changes

The post 6 Steps to Save Your Ass With Lightroom Catalog Changes appeared first on JMG-Galleries – Landscape, Nature & Travel Photography.


Related Stories

  • 6 Steps to Save Your Ass With Lightroom Catalog Changes – Enclosure
  • Talking Lightroom & Photography
  • Talking Lightroom & Photography – Enclosure


JMG-Galleries

 
Comments Off on 6 Steps to Save Your Ass With Lightroom Catalog Changes

Posted in Equipment


My Favorite Features in Adobe Lightroom 6 (CC)

22 Apr

The long awaited next version of Lightroom is out and below is my list of favorite features and improvements:

Note before you upgrade I recommend reviewing  Steps to Save Your Ass With Lightroom Catalog Changes

1. Graduated Filters – Brush function

A new Brush function has been added to Graduated Filters so that you can create custom edges versus a linear edge.

Graduated Filter Brush Function

2. Performance: Optimized Multi-Processor and Multi-Core Support + GPU  Utilization

This version of Lightroom has improved export performance that leverages more of your available system resources.  This means that Export is faster, but it also means that you’ll have less resources available during Export for other tasks such as other Lightroom, Photoshop and other application tasks. If you batch export this should be of great benefit for you.

Additionally if you use a 4K or 5K monitor Lightroom CC’s utilization of your computers Graphics Processing Unit (GPU) will result in marked performance improvements.

Requirements to use the GPU in Lightroom CC:

  • 64-­bit only
  • OpenGL 3.3 and up
  • Mac OS 10.9 and higher
  • Windows 7 and higher

Additional system requirements for Lightroom CC / Lightroom 6

3. In Application Panoramic and HDR

To do Panoramic or HDR merging you no longer need to bounce out of Lightroom to Photoshop. You can now do these functions in Lightroom. As an added bonus there is now a built in preview functionality. In regard to panoramic photos the coolest feature is the “Auto Select Projection” mode that automatically selects the best result between the Spherical, Cylindrical and Perspective modes.  One negative to note you won’t be able to batch process multiple panoramic or HDR photos, but you can repeat this function one after the other with each process running in tandem similar to past multi-exports running in tandem.

Panoramic Selections

Lightroom CC Pano Preview

Mono Lake Milky Way Pano

HDR Lightroom Selection

Lightroom CC HDR Preview

Lightroom CC HDR Image Comparison

4. Facial Recognition

Lightroom now contains facial recognition which is quite nice if you’re photographing events or family. Seeing that I’m known to take tons of photo of my two young boys this will come in handy. By assigning names to each person in your photo you’re essentially applying keywords behind the scenes. With an eye toward privacy names of those in your photos are not exported with keywords unless you adjust your preferences.

Lightroom CC Facial Recognition

Lightroom CC Facial Recognition

Lightroom CC & Photoshop CC Keywords

Lightroom CC & Photoshop CC Keyword Comparison After Lightroom Export

5. Improved Metadata Categorization (Date, Location, etc.)

Now Lightroom does a better job of automatically organizing your photos referencing Dates and Locations. If you utilize GPS in your photos you’ll now be able to make use of the Map module in an easier fashion. Similarly if you search or categorize by dates you’ll find Lightroom CC / 6 a little easier to work with.

6.  Adobe Slate – Publish to the Web

If you’ve yet to hear of Adobe Slate you may want to take note. If you utilize Lightroom CC as part of your Creative Cloud subscription you can publish images and stories to Adobe Slate, a visual blog publishing platform.

Copyright Jim M. Goldstein, All Rights Reserved

My Favorite Features in Adobe Lightroom 6 (CC)

The post My Favorite Features in Adobe Lightroom 6 (CC) appeared first on JMG-Galleries – Landscape, Nature & Travel Photography.


Related Stories

  • My Favorite Features in Adobe Lightroom 6 (CC) – Enclosure
  • 6 Steps to Save Your Ass With Lightroom Catalog Changes
  • 6 Steps to Save Your Ass With Lightroom Catalog Changes – Enclosure
Feed Ads by FeedBlitz
powered by ad choices


JMG-Galleries

 
Comments Off on My Favorite Features in Adobe Lightroom 6 (CC)

Posted in Equipment


Adobe rolls out Lightroom CC and Lightroom 6 with HDR and panorama tools

21 Apr

Adobe has announced standalone and Creative Cloud versions of its image management and Raw conversion software, Lightroom. Among other new features the latest versions gain simple HDR and Panorama merging tools that create 16-bit DNG files from the merged results.  Read more

Articles: Digital Photography Review (dpreview.com)

 
Comments Off on Adobe rolls out Lightroom CC and Lightroom 6 with HDR and panorama tools

Posted in Uncategorized