RSS
 

Posts Tagged ‘lighting’

OnePlus 6T comes with new Nightscape and Studio Lighting modes

29 Oct

OnePlus announced the OnePlus 6T, its latest high-end Android device, at an event in New York City today. On paper the 6T camera hardware looks identical to the OnePlus 6 which was launched earlier this year. However, the new model comes with a few improvements in the imaging software.

The 6T’s dual-camera has a 16Mp primary camera that uses a 1/2.55? sensor and F1.7 aperture. It also features optical image stabilization. The 20Mp secondary cam offers the same 25mm equivalent focal length as the primary but features a smaller 1/2.8? sensor and a non-stabilized F1.7 lens. The camera focuses using a PDAF system.

Like on the OnePlus 6, the device uses the secondary high-resolution sensor for optimizing noise and dynamic range, high-quality digital zoom and a simulated bokeh effect.

In terms of software features a new Nightscape mode promises night shots with better detail, reduced noise levels, better color rendering and a wider dynamic range than the default shooting mode.

The Studio Lighting feature looks very similar to Apple’s Portrait Lighting and modifies brightness and tonality on faces to simulate similar effects you could achieve with professional lighting equipment. In addition OnePlus says bokeh and HDR modes have been improved over the versions found in the 6.

In video mode the OnePlus 6T is capable of recording 4K footage at 60 frames per second. In Super Slow Motion mode you can shoot 1080p video at 240fps or 720p/480fps.

Non-camera specs are worthy of a high-end smartphone as well. The Android OS is powered by a Qualcomm Snapdragon 845 chipset and up to 8GB of RAM. According to OnePlus the 3,700mAh battery delivers a 20 percent better battery life than the OnePlus 6 and a new on-screen fingerprint reader is on board as well. The 6.41-inch AMOLED display comes with a 19.5:9 aspect ratio and 2340 x 1080 resolution.

The OnePlus 6T will be available from November 1, starting at $ 549.

Key Specifications:

  • Dual-camera
  • Main camera with 16Mp Sony IMX 519 1/2.55? sensor with 1.22 ?m pixels, F1.7 aperture, OIS
  • Secondary camera with 20Mp Sony IMX 376K 1/2.8? sensor with 1.0 ?m pixels, F2.0 aperture
  • 25mm equivalent focal length
  • PDAF
  • Dual-LED flash
  • 4K video at 30/60fps
  • 16Mp front camera with F2.0 aperture

Articles: Digital Photography Review (dpreview.com)

 
Comments Off on OnePlus 6T comes with new Nightscape and Studio Lighting modes

Posted in Uncategorized


Natural Photography Lighting And The Golden Hours

23 Sep

As an avid photographer it always used to irk me that I was so open to the elements and my


Fashion Photography Blog

 
Comments Off on Natural Photography Lighting And The Golden Hours

Posted in Uncategorized


4 Less Popular Types of Lighting Every Photographer Should Know

20 Aug

How can you, as a photographer, best use lighting to your advantage? Working with different kinds of light can be a challenge for even the most seasoned photographers. This often leads to a common suggestion: “Point your shadow at the subject.” Yet certain underutilized less popular types of lighting can actually enhance your photographs.

macro photography bokeh flower dahlia - Types of Lighting

In this article, you’ll get tips for working with four different types of natural lighting, including shade, overcast light, and strong backlighting. Hopefully, you’ll come away with the know-how and inspiration to start using more creative lighting in your own photographs.

macro photography bokeh flower tulip - Types of Lighting

1. Shade plus front light

By “shade plus front light” I’m referring to the lighting situation when the sun is behind you (and coming over your shoulder), but the subject is shaded. That is, the sun would normally front light the subject, but it is blocked by an object.

macro photography bokeh flower trout lily - Types of Lighting

I shaded this trout lily with my body, resulting in a shaded subject and a well-lit background.

Many photographers like to ignore shaded subjects. However, I love this lighting situation for a few reasons.

The first is that it is easier to expose for a shaded subject. You don’t have to deal with intense highlights and shadows. Instead, you can rest easy knowing that the range of lights and darks in your image will be rendered properly by your camera’s sensor.

purple flower - Types of Lighting

Another shaded but front lit situation. Notice the brighter background here.

The second is that this lighting scenario offers up wonderful backgrounds. This is an especially powerful technique when shooting during the “golden hours”, the time just after sunrise and just before sunset.

If you can position the subject so that the sun falls behind it, you can take images with rich, warm background colors. The key is to expose for the main subject (i.e., meter off it), and let the background remain bright. Use a wide aperture to ensure that the background is thrown out of focus.

macro photography bokeh flower cosmos - Types of Lighting

Shading this cosmos flower allowed me to produce a more subtle looking subject with a beautiful background.

Shaded subjects can make for great photographs if you know how to use them!

2. Shade plus backlight

To continue with the “shade” theme, let’s discuss another underutilized type of light: shade and backlight.

By this, I am referring to a situation with a shaded subject where the sun is positioned behind that subject so that you are pointed toward the sun. In this situation, you cannot do the shading yourself. Instead, you have to rely on environmental features to block the light.

macro photography bokeh flower - Types of Lighting

This flower was shaded by some nearby grasses. I was able to get these background highlights by including the edge of the sun in the frame.

What does this type of lighting offer you? Similar to a shaded and front lit subject, a shaded but backlit subject is easier to expose.

If you’re struggling to photograph a brightly colored flower, for instance, it might be beneficial to find a similar specimen in a shaded area. This will help prevent you from blowing out the highlights on the flower’s petals.

macro photography bokeh flower aster - Types of Lighting

Another compelling reason to use this particular type of lighting is that it can create beautiful bokeh. I’m not really talking about bokeh in the sense of that smooth, creamy look that we photographers love (for that, go back to shade plus front light).

Rather, I’m referring to those beautiful geometric shapes that occasionally appear in the background of photographs.

macro photography bokeh flower tulip - Types of Lighting

Notice the slight highlights in the background, created by the shade-sun combination.

How do you do this?

In a backlit environment, the light is often filtered through the surrounding greenery. These are often leaves, but also grasses, shrubs, branches, tree trunks, etc. The rays of the sun are broken up into small points of light, which are then rendered in that geometric fashion when incorporated into your images.

This is a beautiful effect that can add an extra punch to your photographs.

3. Overcast lighting

This type of lighting is more commonly used than the two mentioned above, but overcast light (i.e., light on cloudy days) deserves a mention.

macro photography bokeh flower aster - Types of Lighting

I photographed these flowers on a cloudy afternoon.

You might think that the camera should stay inside on overcast days. After all, the subjects aren’t very well lit, and everything seems a bit gloomy and bland.

Actually, overcast days are fantastic for photography. Especially if you go out toward the middle of the day when the sun is high in the sky (and blocked by clouds), you’ll find wonderfully diffused lighting.

The clouds act as a giant softbox, subtly lighting the entire landscape. This results in colors that are deeply saturated. Macro photographers such as myself love overcast lighting because our flower photographs become much more colorful.

macro photography bokeh flower tulip - Types of Lighting

Another advantage to shooting on overcast days is similar to that of shaded lighting in that the subjects are easier to expose well. There is no bright sunlight to create harsh shadows and unpleasant highlights.

Therefore, overcast days can be a great choice for photographing brightly colored subjects.

4. Direct backlighting

Direct backlighting refers to situations where the sun is directly behind the subject (and therefore directly in front of the photographer).

macro photography bokeh flower tulip - Types of Lighting

The sun is just out of the frame here, above the tulip.

This type of lighting is difficult to work with. Photographers often come away with unwanted flare and a drastically underexposed subject. However, using backlighting is simpler than you might think. Just remember a few key guidelines.

The first thing to note is that I don’t like to use direct backlighting unless the sun is low in the sky. Otherwise, instead of achieving a charming, warm look, you’ll find yourself with a harsh, contrasty image. Sunrise and sunset are your windows, so you’ll need to work quickly and efficiently.

Second, don’t put the sun in the image itself. This will result in a nearly impossible lighting situation. Instead, block the sun with your subject. Move around a bit. Get down low. If you do decide to include the sun in the image, put it at the very edge of the frame (as I did in one of the photos above).

macro photography bokeh flower bleeding heart - Types of Lighting

Backlighting (the sun was in the background on the right-hand side) produced some really interesting bokeh in this bleeding heart photograph.

Third, make sure that your subject stands out against the background. I often try to compose with the subject against the sky.

Fourth, expose for your main subject. Don’t worry about the bright background. Then, once you’ve settled on an accurate exposure for the subject itself, feel free to raise or lower the exposure. Lower it for a slightly darker, more dramatic look (and if you lower it a significant amount, you’ll end up shooting a silhouette). Raise it for a slightly brighter, in-your-face type image.

While there are certainly variations in backlighting conditions, these four guidelines will get you well on your way to shooting some creative backlit images.

Conclusion

While it can be difficult to think outside the box and take risks when it comes to lighting, the rewards can be great.

Try using some of the lighting scenarios discussed above: shade and front light or backlight, overcast light, or even direct backlighting.

Your images will become far more diverse and a lot more impressive!

macro photography bokeh flower aster - Types of Lighting

The post 4 Less Popular Types of Lighting Every Photographer Should Know appeared first on Digital Photography School.


Digital Photography School

 
Comments Off on 4 Less Popular Types of Lighting Every Photographer Should Know

Posted in Photography


SLC-OE-02: The Best Compact Lighting Bag Is Not a Photography Bag

13 Jul

Call me crazy, but I love the idea of finding a great piece of photo gear by going off-label. In this case, a lighting bag that is not technically a lighting bag.

It's perfectly sized, comes in a ridiculous array of colors and is $ 22.99 shipped. Read more »
Strobist

 
Comments Off on SLC-OE-02: The Best Compact Lighting Bag Is Not a Photography Bag

Posted in Photography


Artificial Lighting Recommendations for Beginners

12 Jul

At our studio, we incorporate many different types of lighting techniques and light sources into our repertoire so that we can be fully prepared for any type of lighting scenario. We utilize various types of artificial light sources into our in-studio sessions as well as our on-location photography shoots. Cultivating and perfecting the use of artificial light is very important Continue Reading

The post Artificial Lighting Recommendations for Beginners appeared first on Photodoto.


Photodoto

 
Comments Off on Artificial Lighting Recommendations for Beginners

Posted in Photography


Video: Pro lighting at hardware store prices

10 Jul

Everyone knows that good lighting is important when shooting video, but professional video lights can be prohibitively expensive. In this video, our friends over at ShareGrid demonstrate how to get professional looking results using inexpensive equipment available at any hardware store, including work lights, poster board and even a shower curtain.

Want some tips on getting pro quality sound as well? Our recent DPReview TV episode covers the basics of getting high quality, low cost sound.

Articles: Digital Photography Review (dpreview.com)

 
Comments Off on Video: Pro lighting at hardware store prices

Posted in Uncategorized


Tips for Great Lighting for Pet Photography

09 Jul

Pet photography is both challenging and extremely rewarding. You may really enjoy taking pictures of your own pets but if you apply some of the general rules that apply to all pet photography with studio lighting, you can really help you up your game.

The key to all pet photography is to get what appears to be an emotional connection with the animal being photographed. If you don’t do that, all the photographs will look more like snapshots and less like portraits.

Tips for Great Lighting for Pet Photography

Upping your game.

The Setup

You do not need to be huge space but you do need some room to work. Ideally, a studio setup includes:

  • Lighting
  • A backdrop
  • Flooring
  • Elevated furniture or a platform
  • Remote triggers

You will need enough space to get in front of the dog or cat such that the backdrop fills the background. You also need to consider that animals move and will not stay still in a very small confined area. Ideally, you need at least about 10 feet wide by about 25 feet depth. You will also need some space between your subject and the backdrop.

This arrangement will accommodate most pets except larger dogs. Large dogs need a lot more space. The larger they are, the more space you need. You also need to think about what they will be stepping on and if their paws are clean. Seamless paper is a great backdrop but is it not a great material for animals to step on as they leave footprints.

Tips for Great Lighting for Pet Photography

Setups for pet photography can be just this simple.

Be Prepared for Accidents

With any pet photography, you have to anticipate accidents. Appropriate cleaning supplies are a must. Be prepared for both #1 (urine) and #2 (feces) accidents. Dogs are much worse than cats. Older dogs tend to have fewer accidents than younger dogs, while puppies frequently have accidents.

If you are dealing with multiple animals (at different times), you need to also consider cross-contamination control measures. Good antiseptic cleaners with some bleach will work well. You will need cleaners with enzymes to break down pet urine for the occasional territory markers. Harder surfaces are easier to clean than soft surfaces.

Backdrops

Backdrops are useful and you can get creative with what you use. Seamless paper is a great option but you will go through it relatively fast and animals that walk on seamless paper will often scare themselves with the noise from the paper moving.

You also need to consider what the animals will stand or sit on. Melamine surfaces are great for flooring options but some animals don’t like being on melamine and the seams may need to be edited out in post-production if they are too visible.

Toys and treats for cats and dogs.

Equip your space with lots of animal-specific toys and treats available and ready to reach. Cats and dogs are not interested in the same types of toys or treats. Always ask if an animal has allergies before giving them any treats or better yet, ask the owner to bring some treats that their pet likes.

Camera Equipment

Most modern digital camera equipment will work for pet photography but you need to think about a few things.

Ideally, your camera needs to focus fast, preferably with a reliable continuous autofocus ability. If you are using strobes, you will be focusing under lower lighting conditions than the eventual shot. Slow focusing or inability to shoot quickly will mean you miss the shot or have lots of images out of focus.

You have limited time, so you need to be cognizant of your animal. In general, you will need a wider lens (you should probably start with a fast zoom lens), particularly if you are using a smaller space but wider lenses can mean your image is wider than your backdrop. Long lenses will compress features but unless you have an assistant to help wrangle the animal, you will likely need to be close enough to reach the animal to do it yourself.

gear for pet photography - Tips for Great Lighting for Pet Photography

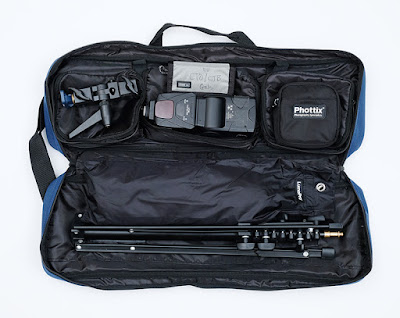
Basic camera gear for pet photography – camera, flash, and triggers.

Lighting is key and unless you are looking at using continuous (LED) lighting, you will also need a reliable way to trigger your lights. In your space, you should be able to control your lighting to get the desired effect. If you are using strobes or speedlights, you need a way to trigger the flashes.

Radio controls (most expensive option) are significantly easier to use than either optical slaves (speedlights) or cables (tripping hazard). Make sure you are familiar with your equipment before the animal to be photographed shows up.

Basic Rules for All Pet Photography

There are a few basic rules for pet photography that apply to all types not just in the studio, but become more important when you have pets in your space. You generally have more control over your environment in the studio. Because you are in your own space, you can plan to address each item for the animal before they arrive and adapt your environment for the particular requirements of each animal.

Be Calm

white dog - Tips for Great Lighting for Pet Photography

Calm person = calm dog.

Relax, pets feel your energy. If you are nervous or talk too much, they will feel it and become nervous as well. If you are calm, they will be calmer (NOTE: I did not say they would be calm).

Never assume a dog or cat will be calm, but you don’t want to make it more difficult for you for the pet. They can often be scared or anxious about new surroundings or that machine you keep putting up to your face between you and the animal.

Whatever you do, don’t yell or strike at the animals. They don’t speak languages you easily understand. Make sure you understand the warning signs from animals when they are nervous. With dogs, yawning is often a sign of anxiety and can be a warning just as it is with low growling. With cats, ears back is usually a sign of a cat feeling quite threatened.

dog with red bandana - Tips for Great Lighting for Pet Photography

Older animals tend to be calmer.

Get to Their Level

It is really important for all pets, no matter what size and shape, that you get down to their level. You can take a few different approaches to this but in the end, you need to find a way to be at the eye level (not below) of the pet you are photographing.

Many beginning photographers take pictures of their pets from a standing position and after looking at their results, they can’t figure out why they are unsatisfied with their images. Getting to eye level is a relatively universal requirement for all animal photographs, not just for pets.

grey cat - Tips for Great Lighting for Pet Photography

Get down to their level.

Getting to their level can either mean you go down to their eye height or they get up higher, closer to your height. The best thing to do is to get down and dirty at their level, particularly with larger animals.

But with smaller animals, you can also bring them up to a higher level with ottomans, tables, and chairs. With higher surfaces, you then need to worry about wrangling the animal so they don’t fall or jump off the table or chair. Puppies and kittens will often fall off tables.

Get Their Attention and Their Eyes

In order to connect with an animal, you need to be able to see their eyes and in particular the catchlights in their eyes. No eye contact means no connection, but you don’t only need the animal staring at you.

Animal eyes are shaped differently than human eyes so the catchlights will have a slightly different appearance than those in people’s eyes. There are two schools of thought regarding pet eye catchlights (i.e. one versus two catchlights). In human portraiture, typically it is taboo to have two catchlights in the eyes, but some pet photography works well with two catchlights because of the different eyeball shape.

Tips for Great Lighting for Pet Photography - black and white kitten

Having two catchlights in some pets eyes, like this little kitty, is okay.

Some pets may watch you when you photograph them but most don’t. Eye contact can be aggressive to them. In addition, as soon as you put the machine (camera) up to your face, you will no longer be visible to them. As soon as your face disappears, usually so does the animal’s attention. Getting an animal’s attention is usually a function of the type of animal.

For cats, laser pointers, toys, and strings can help focus their attention, treats less so. Some cats also will be focused on treats but this usually shouldn’t be your first choice. For dogs, squeakers, toys, and treats are always a good approach, so is making strange noises. But don’t give them the toy unless you want it in every shot. Again use treats as the last resort but they work well with many, but not all, dogs.

Different animals are motivated by different attention-getting devices. Treats will get them to move and often makes for interesting action shots, although I find treats work better for dogs than for cats. Remember to check for allergies before giving treats. Always use very small sized treats otherwise the animal will fill up on your treats and you will lose their attention.

Editor’s note: An even better idea is to get the owner to bring some treats that their pet likes, and which they approve of giving to their animal.

Tips for Great Lighting for Pet Photography

Move Quickly

All pets have a limited attention span, typically 15 minutes is the maximum time you’ll get from start to finish. It is best to move quickly and try to get your best photographs early in the shoot because as time passes, the attention-getting-object, toy, or treat will wear thin and they will become disinterested.

Planning is the best way to set up and get the shot the way you want. So plan your shoots and think about how to best highlight the animal. Props sometimes work, like baskets for cats (above) or feather boas for dogs (below).

Tips for Great Lighting for Pet Photography

Keep the Speed Up

You need to set your shutter speed to something relatively quick. If you are using strobes or speedlights, you will need to use the best speed that works with your equipment.

With speedlights, you won’t be able to shoot in bursts because of the recharge or recycle time. Even with strobes, you need to ensure your strobes can take multiple shots in quick succession. Typically for studio work and strobes, a shutter speed of 1/160th or slightly faster is the limit of your camera (flash sync speeds vary, check your camera user manual).

Even if you are using continuous lighting you will need to get your shutter speed up just to freeze the image because animals can move quickly.

grey and white cat - Tips for Great Lighting for Pet Photography

A fast shutter speed will freeze movement of the animal.

Use Continuous Tracking Focus

Pets move quickly, so focusing is tough, really tough. Single shot focusing regardless of how quick your camera focuses will likely mean that most of your shots will miss. Often after getting a focus lock, pets will move away from your focused location by the time you take the image.

Many modern cameras are now capable of tracking objects and focusing on moving targets. Continuous tracking allows for adjustments as the pets move. If your camera has continuous tracking focus you need to use it. Otherwise, most of your images will be out of focus.

Shoot in Short Quick Bursts


Spray and pray is generally a terrible way to take photographs. It usually implies a photographer didn’t take the time to set up a shot, but in the case of pet photography, it is usually the opposite.

dog in a basket - Tips for Great Lighting for Pet Photography

As you are watching for the decisive moment, you take a short burst of images (provided your lighting can keep up) because you will likely have several images in a sequence that are good. However, with pet photography, judicious use of rapid-fire bursts can lead to stunning images. The secret is to anticipate the moment and get a good focus lock. I personally use back button focus specifically to hold the continuous focus independent from the image taking.

Tips and Tails

With pets, if you are taking an image of the entire body, you need to include the tips and tails of that animal. You want the entire animal within the frame. You can intentionally crop for a close up of their face, but you lose something if you are missing the tips of their ears or the end of their tail.

Missing body parts make for incomplete looking images. The best way to approach the images is to remember the catchphrase, “Tips and Tails”. Always try to get the tips of their ears and the end of their tail within the frame. In addition, the same basic rules for human portraiture also apply to pets, specifically for tighter shots where you should never crop an image on the subject’s joints.

German Shepard puppy - Tips for Great Lighting for Pet Photography

Tips and Tails – I just got the end of this puppy’s tail in the shot. Cropping off part of it gives the tail an amputated look you want to avoid.

Also, unlike humans, most pets have longer noses, so it is generally better if you get their entire face in focus. Wider apertures will end up with the nose out of focus which is much more noticeable with pet photography as opposed to human portraits.

Get the whole face sharp. This image doesn’t work because of the cropped of paw and out of focus nose. 

Studio Lighting

Lighting in a studio means controlled lighting. Before you start using strobes, you will need to find out if the animal is sensitive to flashes. While strobes are the brightest lights available, that brightness can be a problem if the animals are sensitive and hate them or get easily startled.

The easiest way to see if they react negatively to the strobes is to manually fire the strobe while setting up before the animal is in place. It will be really obvious if the animal reacts to it. You’ll need a backup plan if they are scared of the flash.

Tips for Great Lighting for Pet Photography - grey kitty

Strobes are best.

Shooting in the studio allows you to control the light but you need to assess the best kind of lighting for your needs. There are generally three options, speedlights (the portable ones that go on the hot shoe on your camera), strobes (dedicate studio flashes that usually plug into an outlet), or continuous lights.

Strobes provide the most powerful lighting for the lowest cost but some animals are really sensitive to the flashes from strobes or speedlights. Continuous lighting has been really advancing lately but in order to be able to use them for pets, you need a fair bit of light to keep the shutter speed up. Continuous lights that are really bright are very expensive.

Lighting Setup

Lighting a pet in the studio is different than lighting people. Often you can light a person and get a decent image with only one light. You can create drama with shadows using long and short lighting techniques.

With pets, you are better off lighting them with a key and fill light in reasonably even proportions to one another with a much smaller difference in the intensity of the two lights (light ratio). Pet photography benefits from the super sharpness of being able to see all the details in a pet’s fur. Deep shadows tend to hide those details. Portraiture techniques such as butterfly lighting and Rembrandt lighting just don’t really work for pets.

Tips for Great Lighting for Pet Photography

Basic pet lighting setup.

A great lighting setup uses three medium softboxes: a key light and main light at 45-degrees on either side of the pet, and a hair light coming from above and behind the animal (see lighting diagram above).

Why? This set up works well because you can light the animal relatively evenly. Remember you are lighting an animal that is much shorter than you. Using this setup gives you room to get between the key and the fill light that are quite low to the ground. Generally the key and fill lights are centered about 4-5 feet off the ground.

The hair light provides some separation from the background and is generally not set at a high power. Separation is important, particularly if the animal has a dark coat and you have a dark background. I often use the key light at about 25% more light than the fill light, but the setup works even if the lights are close to the same power.

Using Strobes Usually Means Manual Mode


While there are TTL strobes available, they are quite pricey. Manually triggered strobes are readily available and can often be purchased used for very reasonable costs. In general, for pet photography, you can shoot entirely in manual mode with manually triggered strobes and get great results.

Because pet photography tends to use a simpler lighting setup, by using manually triggered strobes, once your lighting is set up you can simply focus on wrangling the animal and getting the best shots. The rule of flash or strobe photography is that shutter speed controls the background exposure and aperture controls the flash. In manual mode, you can set the power of the strobes and shoot.

Color cast

When you are shooting with strobes, depending upon how expensive your strobes are, there can be a fair bit of range for color temperature from your lights. You want to ensure the only source of light is your strobes because other lights, including tungsten and fluorescent lights, will create a color cast and your image that is difficult to remove.

It is best to set up and do a gray card test before you start shooting to get your white balance right. You can either use a customized white balance for your camera or if you are shooting in RAW, you can manually adjust the images later in your RAW processing software.

Often letting your camera choose by using Automatic White Balance, with strobes means that the color will vary from image to image. Setting it ahead of time with a custom white balance or a gray card calibration means that you can focus on the image rather than changing white balance in your images. It means less processing work to do later as well.

Tips for Great Lighting for Pet Photography - black dog with a red collar

Be aware of color casts.

Background Color Versus Animal Color

When you take pictures of animals it is always good to consider the dominant color of the animal’s coat relative to the background. It is best not to have the same color for both, although it can work out.

What this means is don’t use seamless white paper as a background for a white dog or a black background for a black cat. You need to be able to adapt on the fly and sometimes you can’t avoid it with animals that are mixed in the color of their coat (e.g. a black and white cat).

It is also good to ensure the color of the material that the animal is sitting on during the session works with the color of their coat and that of the background.

Tips for Great Lighting for Pet Photography

Make sure you have contrast between the color of the animal and that of the background.

Furniture

The last tip is a simple one but one that isn’t too obvious. When animals are stressed out they tend to shed. Animals get stressed when you photograph them. This means that there will be fur coming off them, sometimes in large amounts.

If you are using furniture to elevate an animal, just expect that their fur will get everywhere. Try to keep the furniture clean before you start and you may even want to touch it up as you go because removing the contrasting hairs from the furniture can be a tedious process in post-processing.

Conclusion

Studio shots of pet look awesome. With a bit of preparation, you can get high-quality images that show great drama and connection with the animal. The approach is the same as with any other animal photography but in the studio, you can control the light and the background much more allowing for better results.

If you have any questions for comments, feel free to drop me a comment below. Happy shooting!

The post Tips for Great Lighting for Pet Photography appeared first on Digital Photography School.


Digital Photography School

 
Comments Off on Tips for Great Lighting for Pet Photography

Posted in Photography


How to Improve Your Landscape Photography By Understanding Portrait Lighting

24 Jun

The further I have gone on my photography journey, the more I have come to learn about the importance of understanding light. I believe light is the single most important element that makes a photograph. Not a great subject. Not great composition. It’s great lighting that will make a photograph amazing.

colorful landscape scene - How to Improve Your Landscape Photography By Understanding Portrait Lighting

So what is great light? There is no one type of light that makes a photograph good or bad. Hardness, brightness, color, direction. All these things and more will dictate how your image looks, and more importantly, how it feels.

One of the ways I’ve learned to see and understand light and how it affects my landscape photography is by learning about and understanding portrait lighting. Portrait photographers know that the way light falls on the human form dramatically affects the photograph.

Although you can’t control the light in landscape photography, learning to apply the principles of portrait lighting will help you create far more dramatic landscapes that make the viewer feel something.

Light and Shadow

At its most basic level, a photograph is made up of light and shadow. We have a tendency to focus a lot on light in photography, but shadows are just as important, if not even more so. Shadows reveal shape, depth, and texture.

aerial photo - How to Improve Your Landscape Photography By Understanding Portrait Lighting

Portrait photographers understand light and shadow better than anyone. They shape a portrait by moving the light source around until the light falls in just the right way so that the shadows reveal the contours of the subject. When shooting with natural light that can’t be controlled, they will move the subject instead.

The transition from light to shadow is often lost in modern landscape photography. Camera sensors with incredible dynamic range, along with the popularity of HDR techniques, have allowed us to bring back a lot of detail in the shadows of our landscapes.

This isn’t a bad thing in itself, because usually, we want some detail in the shadows, but it often goes too far. Just because we can brighten the shadows doesn’t mean we should. Leaving parts of the image in darkness add mood and mystery.

long exposure seascape - How to Improve Your Landscape Photography By Understanding Portrait Lighting

Rembrandt Lighting

I learned about Rembrandt lighting before I had ever heard of the artist it was named after. Rembrandt was a master painter who understood the principles of light and shadow better than anyone. Studying his paintings will teach you a lot about how they can create mood and drama in an image.

Rembrandt self portrait - How to Improve Your Landscape Photography By Understanding Portrait Lighting

Rembrandt self-portrait.

Rembrandt lighting has become known as a classic lighting setup in portrait photography. Using soft side-lighting, this technique creates a beautiful look that you will likely recognize.

When the light source is coming from the side of the subject, it causes the light to reveal and conceal various elements. The parts of the subject that are visible to the light source will be illuminated while the parts which aren’t visible to the light source will be in shadow.

portrait lighting for landscape photography - How to Improve Your Landscape Photography By Understanding Portrait Lighting

Understanding portrait lighting to bring out texture and dimension.

You obviously can’t control the light source when photographing landscapes, but you can still apply the same principles.

Considering how the light will fall on your landscape can guide the way you photograph it. The position you shoot from, your composition, and the time of day will all affect how the lighting affects your landscapes. Even though you can’t control the light, it never stays the same, so waiting for the angle of the sun to change or for a gap in the clouds can make a big difference to that way it illuminates the scene.

Reverse Engineering Photos

A great exercise for learning to understand light is to reverse engineer a photograph. When I was learning portrait photography I would regularly study an image and try to figure out how it had been lit. Is it natural light or flash? How far away from the subject is it? How big is the light source? Is there more than one light source?

How to Improve Your Landscape Photography By Understanding Portrait Lighting - lighthouse on a rocky shoreline

These days as a landscape and travel photographer, I still ask myself those questions when looking at a photograph. Which direction is the light coming from? What time of day was it taken? Was the sky clear or cloudy? Learn to get in the habit of analyzing photos that you admire by asking yourself more specific questions like this rather than what gear or presets the photographer used.

Dodging and Burning

Shaping light and shadow doesn’t stop when you take the photo. Dodging and burning is the process of lightening and darkening areas of a photo in post-production. It doesn’t need to be a complicated process. Often all that is necessary is burning (darkening) areas that could use more shadow or might be distracting.

portrait lighting for landscape photography

One of the best ways to think of dodging and burning is to ask yourself where you want the viewer to look. It may be a specific element of the photo, or you may want to draw the viewer’s eye through the image. You can paint more light and shadow into a photo to guide this process.

Our eyes are naturally drawn to brighter parts of an image. Portrait photographers will often dodge and burn to draw the viewer to the subject’s eyes or another important element of the subject. When editing landscapes, try to paint in light and shadow to control which parts of the image are attracting your attention.

waterfall and mountain and reflection in a pool of water - How to Improve Your Landscape Photography By Understanding Portrait Lighting

Go Practice

The next time you’re photographing a landscape, try taking another look at the light. Ask yourself some of the questions I’ve mentioned. Look for the shadows. Experiment with side-lighting. Wait until the light changes. By understanding portrait lighting you will be better equiped to apply it to your landscape photography.

You’ll find that thinking of the landscape as contours with depth and shape rather than separate elements will help you make more engaging landscapes with mood and drama.

The post How to Improve Your Landscape Photography By Understanding Portrait Lighting appeared first on Digital Photography School.


Digital Photography School

 
Comments Off on How to Improve Your Landscape Photography By Understanding Portrait Lighting

Posted in Photography


7 Tips for How to Fix Bad Lighting

14 Jun

Golden hour is a great time to create stunning photos. The light is soft and warm, shadows are longer and more gentle. But it only happens twice a day, sometimes not at all, and it doesn’t always last an hour. But what do you do when the light is not right? How can you create interesting, meaningful photographs when there is bad lighting?

Balloons over Bagan Myanmar - 7 Tips for How to Fix Bad Lighting

Photography means; writing or drawing with light. When you want to produce a gentle portrait outdoors at noon in the sun it is like having to sign your name on a get well soon card with a piece of charcoal.

Full sun, strong backlighting, or just plain, flat, dull light can be challenging to work with. Managing to light your photos well, whatever the available light is like, is an invaluable skill to learn.

Here are seven tips to help you overcome bad lighting situations.

1. Fill Flash

Adding an external light source can bring a photo to life when the light is flat and dull. It can also help eradicate harsh shadows when the light is strong and contrast is high.

Off-camera fill flash of a boy at the Poi Sang Long festival in Mae Hong Son, Thailand. - 7 Tips for How to Fix Bad Lighting

The pre-sunrise light was very flat and dull, but the action was already happening. I held my flash off camera and balanced the output with the available light.

Aiming to balance the output of your flash with the available light will produce a more natural looking result. If your flash emits too much light you run the risk of it creating hard shadows.

The TTL function on most flashes is very useful. Sometimes the TTL output calculation is wrong and too much or too little light falls on your subject. In these situations switch to manual control. Take a few photos and review them on your camera’s LCD screen. Adjust the level of your flash output and experiment until you have the setting how you like it.

Bounce your flash off a light colored surface. A wall, ceiling, or reflector, etc. This will soften and spread the light. A modifying cone or softbox will also help the flash output look more natural.

fill flash used to create more depth in a portrait - 7 Tips for How to Fix Bad Lighting

Using fill flash with a small softbox, I have balanced the available light to create more even lighting and add dynamic to this portrait.

2. Use Reflected Light

Having a portable reflector with you, (and someone to hold it) can be of great assistance when the light is bad. For portraits, if your subject is backlit, reflecting some light into their face will provide a softness and add catchlights in their eyes.

Using a reflector well can also return good results in direct sun. Bouncing light back into your subject can help soften and reduce dark shadows.

Reflected light softens the dark shadows on a young Thai woman. 7 Tips for How to Fix Bad Lighting

We wanted to have the model stand in front of these old wood doors, but the light was so bright and the shadows dark. Using a reflector I have softened the shadows.

If you don’t have a reflector and assistant, look for locations where light is reflecting naturally. Light may be bouncing off a wall or fence, a light colored car, water, a window or the ground. Once you start looking for the direction from which the light is reflecting on sunny days you may be surprised at how you can use it.

On sunny days I often place a person just inside the shade of a building or tree. This way they are right at the edge of the sunshine, but it is not falling on them. The light bouncing up at them from the ground produces a soft, gentle glow.

3. Move Your Subject

Buddhist nun portrait - 7 Tips for How to Fix Bad Lighting

This lovely nun in the temple was happy to move closer to the window where the light was reflecting off the light colored tiles outside.

If you are photographing a subject that can move to a spot where the light is more favorable, do it. Lighting is so vital to good photographs and bad lighting can ruin a picture. If you have a wonderful subject to photograph but the lighting is bad, your results will be lacking.

Take time to choose a better location where the light is going to provide the mood and feel for the photo you want to create. Take your time, don’t rush the process. Look around you and consider other locations for improved light.

4. Compose Creatively

Creative composition to remedy bad lighting can at times produce very pleasing results.

Zooming or moving closer to your subject can help omit parts of your composition where the lighting is problematic. Try a vertical framing rather than horizontal. Or hold your camera at an unconventional angle if it helps hide troublesome lighting.

Iced tea in a glass - 7 Tips for How to Fix Bad Lighting

The bright backlighting did not work as well as I had hoped for the glasses of iced tea.

Creative composition of Thai iced tea. 7 Tips for How to Fix Bad Lighting

To avoid the bad lighting in the background I moved closer and changed the camera angle to a higher viewpoint.

This technique is most helpful in avoiding bright lights which are behind your main subject. Changing your point of view, even slightly, can hide a distracting bright light or window.

Think about ways you could crop the photo later also. Thinking of a composition as a very wide image (a panoramic) cropped top and bottom can help with difficult light in the sky.

5. Think Black and White

When the light is strong or very flat these conditions can be conducive to creating black and white photographs.

Black and white photography of a Kayaw girl - 7 Tips for How to Fix Bad Lighting

In this portrait of a young Kayaw girl black and white works well. Because of the strong contrast mood is added to the picture.

Use dull lighting to create images with a full, rich tonal range. Work with full sunshine to expose for the highlights and have the shadow regions turn black. Manipulate your exposures to bring mood and atmosphere to life in black and white.

Photographing in color can be far more restrictive if the light is difficult. By thinking in black and white and choosing to expose alternatively you may find that you get much more interesting results.

6. Filter

Filter the light. Attaching a filter to your lens can alter bad lighting conditions considerably. Polarizers and neutral graduated filters are two of the more popular filters.

A polarizer will reduce glare. When light is harsh and you are experiencing unsightly glare, it’s time to attach a polarizing filter. This filter can also darken the sky and minimize reflections.

Polarizing filter used to make the sky look a deeper blue behind the golden chedi - 7 Tips for How to Fix Bad Lighting

Looking up at the blue sky and using a polarizing filter helps enhance the color.

A graduated neutral filter will help with very bright skies, a reflection of snow or water in the foreground, and in many other situations.

7. Post-Process

Finally, I will suggest post-processing. Fixing bad lighting in a photo with your computer can be incredibly effective.

I started learning photography when post-processing was not possible unless you had a darkroom. I prefer to get as much right in the camera as I can rather than fixing in post-production. However, I do enjoy enhancing an image that’s lacking as a result of bad lighting.

Black and white post-processed portrait of a gold leaf worker in Mandalay - 7 Tips for How to Fix Bad Lighting

For this portrait, I had no option to use a different background. It was too light so I have burned it in to make it darker which helps my subject stand out more.

So much can be done if your exposure is good and you are working with a high-resolution RAW file. You can use sliders to alter highlights, shadows, contrast, and more. Filters and actions are abundantly available and can be used to great effect.

Having knowledge of how you can manipulate an image in post-production will help you when you are taking photos. It is particularly useful when the light is bad and you know you will have to tweak the photo later.

Experiment

When the light is less than ideal, experiment more. Tweak your exposures beyond what your camera is telling you is correct. Move around and find alternative points of view to photograph your subject.

Use your flash and/or a reflector. Consider converting to black and white. You may produce a far more appealing series of photos in monochrome when the light is difficult for color.

Reflected light enhances a photo of a Thai woman being kissed by an elephant. 7 Tips for How to Fix Bad Lighting

Light reflecting off the ground beside my wife adds more life to a fun photo as the elephant kisses her.

So much of photography depends on your state of mind. You are the creative component, your camera is just a tool. Use it to achieve what you want. Think positively.

When the light is difficult, pick up the challenge to dig deeper into your creative self and produce some more beautiful photographs.

The post 7 Tips for How to Fix Bad Lighting appeared first on Digital Photography School.


Digital Photography School

 
Comments Off on 7 Tips for How to Fix Bad Lighting

Posted in Photography


Apollo app for iOS uses dual-cam depth map to create impressive lighting tricks

25 May
Apple’s dual-camera setup can create a depth map to simulate background blur – but now, someone’s figured out how to simulate lighting effects with an impressive level of control.

Apple’s dual camera devices (the 7 Plus, 8 Plus and X to be precise) generate a depth map to create the effects of Portrait Mode and Portrait Lighting that we’ve all come to know well. Whether you love, hate or feel generally ‘meh’ toward fake background blur, things get interesting when Apple makes that depth map information available to third party app developers. Enter Apollo: Immersive illumination, a $ 1.99 iOS app with an unusual name and a few interesting tricks up its sleeve.

Apollo uses the depth map not for background-blurring purposes, but to allow users to add realistic lighting effects to photos after they’re taken. Up to 20 light sources can be positioned throughout an image, with the ability to adjust intensity, color and distance. With the depth information provided, light sources interact with subjects in a three-dimensional fashion, and can even be positioned behind a subject to create a rim light.

It’s hard not to be a little taken aback the first time you drag a light source around your image and see how it interacts with your subject

It’s essentially an interactive version of Apple’s Portrait Lighting, which applies different light style effects to images. Apollo’s effects are highly customizable, and with so many parameters to play with it’s naturally quite a bit more complicated to use than Apple’s very simple lighting modes.

In use

We’ve been messing around with the Apollo app (for an admittedly short period of time), and have to say we’re impressed with what it’s capable of – but that doesn’t mean we don’t have a few requests for the next version.

$ (document).ready(function() { SampleGalleryV2({“containerId”:”embeddedSampleGallery_7103999524″,”galleryId”:”7103999524″,”isEmbeddedWidget”:true,”selectedImageIndex”:0,”isMobile”:false}) });

Click through to see the images full-screen and see how many lights were used in the Apollo app.

It’s hard not to be a little taken aback the first time you drag a light source around your image and see how it interacts with your subject(s). You are able to adjust the color, brightness and spread of your source, which are all fairly self descriptive.

You can also change the ‘Distance’ of your light, or it’s position in Z-space; this means you can move the light to be closer to you, the photographer, or further away into the background of your scene.

Lastly, there are two global adjustments, ‘Shadows’ and ‘Effect Range.’ Shadows essentially controls overall image brightness, though it biases toward the darker tones. Effect Range adjusts the brightness of all of your lights simultaneously in the image, though keeping the brightness ratios between them constant as it does so.

Along the bottom are the parameters you’re allowed for each light source you create (up to 20). Two global adjustments are ‘Shadows’ which adjusts overall brightness and Effect Range which adjusts the brightness of all lights simultaneously.

Overall, it’s an incredibly neat – and kind of addictive – first effort. But there are a few things that we’d like to see addressed in future versions.

Currently, every new ‘light’ you create starts out with a certain set of default parameters. This is alright, except for the fact that the default color is a yellowy tungsten sort of thing; it should really just begin as ‘white.’

Also, if I’ve already tuned in a ‘light’ and just want another one based on those, it’d be nice to be able to duplicate one that I’ve already created instead of having to start from scratch each time.

And once you’ve finished with your new creation, you can save it out as a JPEG – but there’s no way to save the lights themselves so that you can come back and tweak later. Each time you exit to tackle another image, the app asks you, ‘Close photo and discard all changes?’ Well, I’d rather not discard them, but if I have to, then I suppose that’s that.

Lastly, it doesn’t look like there’s any way to preserve the blurriness of the background once you’ve added your lights. It’d be great to be able to still take advantage of the depth map and progressive blurring while adding in your own lighting sources.

Wrapping up

Okay, so those are some fairly major requests on our part. But we make them because we’re really blown away by what the app already offers, and are excited to see how it evolves. It wasn’t so long ago you’d need a powerful workstation and some serious software skills to manipulate lighting in the same way that this app does with a few taps and drags.

If you have a dual camera iPhone and want to give the Apollo app a try, head on over to the App Store yourself and take it for a spin.

Articles: Digital Photography Review (dpreview.com)

 
Comments Off on Apollo app for iOS uses dual-cam depth map to create impressive lighting tricks

Posted in Uncategorized