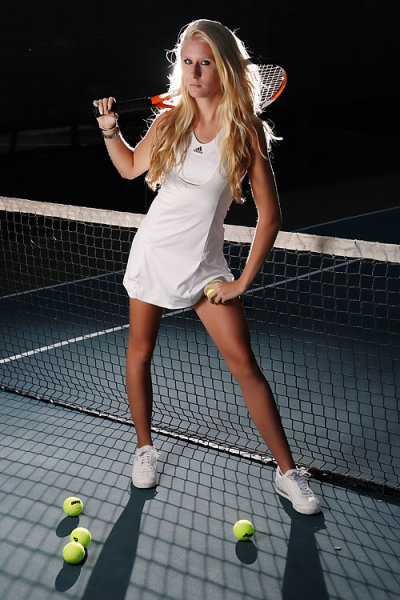
For this shot, only the strip box was used, to camera left. The back light was also used, but I turned the kicker light off for more dramatic lighting.
I was contacted by a local model who also happened to be a tennis player, and she wanted to do a tennis shoot for her portfolio. We discussed ideas, as well as location. A tennis court was the obvious choice for location. I had decided I wanted dramatic lighting, similar to what’s seen in sports drink ads, or athletic apparel ads. I knew that would require two or three lights, and a darkened overall scene to get the look I was after.
Since the shoot took place in the later afternoon, when there was still plenty of daylight, in order to get the darkened look, I needed to play around with my exposure. I was using the EOS-1D Mark IV, which has a top sync speed of 1/300. For lighting I used two Canon 580 EX II speedlites off camera in softboxes. One softbox was a Westcott Apollo 28″ softbox, while the other was a Westcott 18×42 strip box. For the shots where the model was backlit as well, I used a Canon 430 EX II speedlite on a light stand with no modifier. The 18×42 strip box is asymmetrical offers the ability to light a full length figure with soft falloff at the lower legs, while the 28″ Apollo softbox lights the upper half well when close up, or when pulled back can light a full length figure. I used the strip box to light the model from the front, and the 28″ softbox as the kicker light from the right rear. For the dramatic backlight, I used a bare Canon 430 EX II speedlite pointed back towards the camera.
In order to allow the speedlites to be the main source of light, I needed to deaden the daylight. I did this by setting the flash to E-TTL, and the camera to shutter priority. I then dialed back the camera’s exposure compensation to -3. This served to darken the ambient exposure, allowing the speedlites to provide lighting at the proper exposure. This made it appear I was shooting at night, or in a darkened stadium. It’s important to understand that there is a difference between exposure compensation and Flash Exposure Compensation. Exposure compensation will affect the exposure of ambient light, but will not affect flash output. This allows you to balance the flash exposure with the ambient exposure in any way you prefer. The speedlites were set to ratio their exposure based on E-TTL metering. Canon speedlites can ratio A:B. If a third group of speedlites is set to Group C, these can be adjusted using flash exposure compensation. The main ratio used was 4:1, but I did vary this throughout the shoot. The backlight was set to E-TTL, Group C, with Flash Exposure Compensation set to +3.
For athletes, in order to give them that larger than life look, it’s best to shoot from a low angle. I instructed the model to vary her poses between intimidating looks and stances. I used tennis balls to add to the theme, and by sending the backlight through the net, added a dramatic shadow to the foreground. This ended up being a set I was really happy with, and the model was happy with her shots.
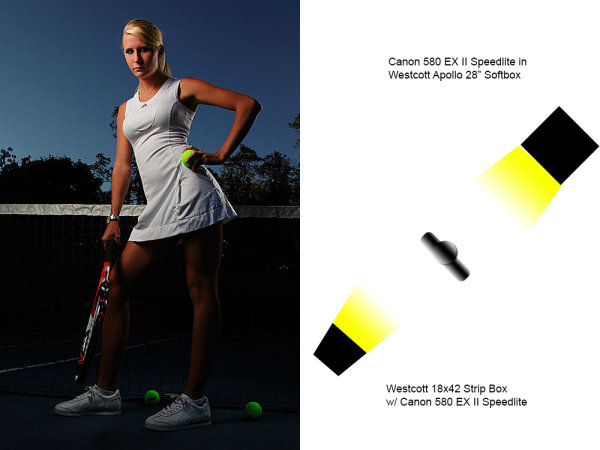
In this shot, the backlight was turned off, and the 28″ softbox was positioned behind and to camera right of the model. This created a dramatic shadow to the front of the model while strip box lit her left side. The backlight was turned off for this shot.
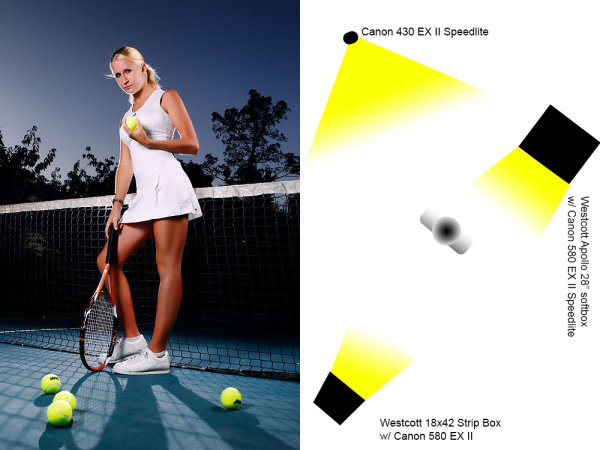
For this shot, all three lights were in play. The backlight caused the dramatic shadows and a highlight effect, while the kicker illuminated the model’s right rear, and the strip box lit her face and front side.
Post originally from: Digital Photography Tips.
Check out our more Photography Tips at Photography Tips for Beginners, Portrait Photography Tips and Wedding Photography Tips.
Lighting Setup: The Athlete


 Portrait photography, IMHO, is up there in degrees of difficulty with wildlife and sports/action photography … but at least, when faced with a tiger or a pole vaulter, you don’t have to face a possibly irate subject when you’ve finished the shot. Hopefully!


You must be logged in to post a comment.