RSS
 

Posts Tagged ‘Light’

Dispelling the Myth of Good Light and Bad Light

24 Jul

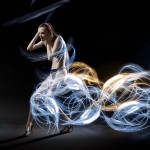
There is no such thing as bad light, there is just light. Take advantage of every situation.

20131206 Bagan 563b

Photography is all about the light. In fact, if there is no light hitting the sensor, there is no photo. Different times of the day, or weather conditions, can create different moods and situations. As you probably know, you can achieve amazing and compelling results by shooting in the early morning, or from late afternoon well into twilight. This is known as the golden hour and the blue hour, respectively.

Coral Gables City Hallb

However, there is no such thing as good light or bad light, there is just light. It is not always possible to shoot under ideal conditions, especially when traveling. Yes, you can wake up early; yes, you can skip dinner or eat it later. But what are you going to do the rest of the day or if there is bad weather? If anything, when you are on tour, chances are you’ll be wandering around at midday, in overcast conditions or even in the rain. Here are some tips and examples you can follow to make the most of the situation under any kind of weather or light conditions.

Tips for using any kind of light to make great photos

High sun, midday light

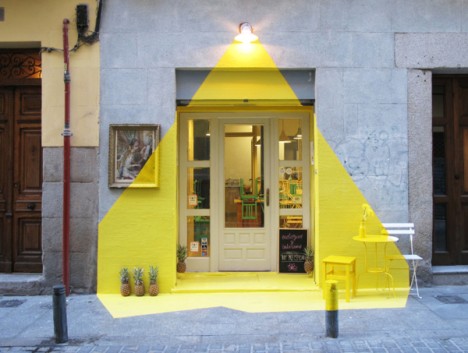
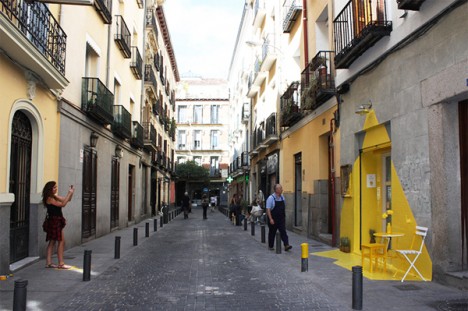
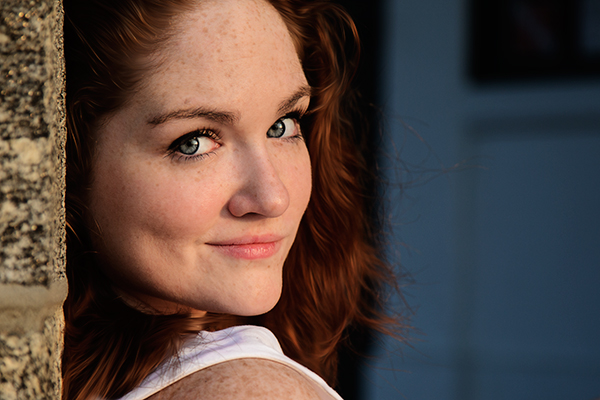
In most cases you’ll be out exploring places during the daytime under midday light. This is not an ideal situation. Direct, harsh sunlight creates hard shadows that are not very flattering. Taking portraits of locals is one of the best ways to capture the essence of places; if you’re going after this, you can try to move your subject into the shade. If they are wearing a hat, you can also position them in a way where their face is under the brim. The key for this is to come close enough to the person and compose your shot right into them. Alternatively, use an off-camera flash to fill the shadows and compensate for the brightness in your background.

20131212 Inle Lake 535b

20140410 Arequipa 267b

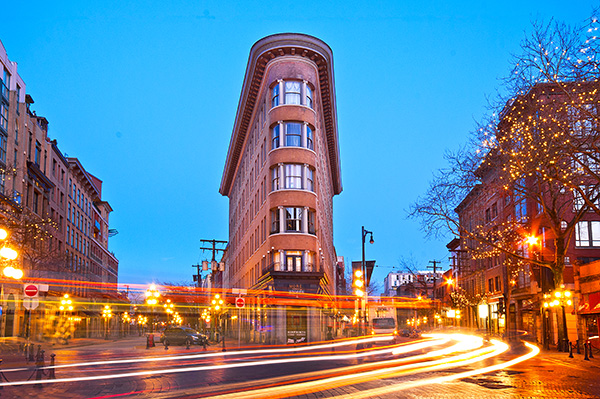
If you are looking for street scenes or iconic locations, you can always use the hard shadows created by the direct sunlight to your benefit and arrange the image in a way that helps to create a compelling composition. You may have to wait for the right moment, waiting for someone to walk into your scene or simply using the shadow element intentionally as part of your photograph.

20140222 untitled 0063b

20140402 Lima 108b

Clouds in the sky, overcast light

Granted, this is not an ideal situation either; however, there is much you can do. In this case, contrary to the high sun, you have a very soft light. This is great for shooting portraits. The light will be even and very soft; throw in some stormy clouds and the effect could be very dramatic. Again, get close to your subject.

Another technique is to avoid the sky. Look for locations and activities for which the sky is not an important element and simply avoid shooting it. A good example for this is local markets or similar indoor activities. By the way, local markets are fun to shoot, and moreover, they’re an excellent way to connect to and experience local culture.

20131211 Inle Lake 13b

20131208 Mandalay 362b

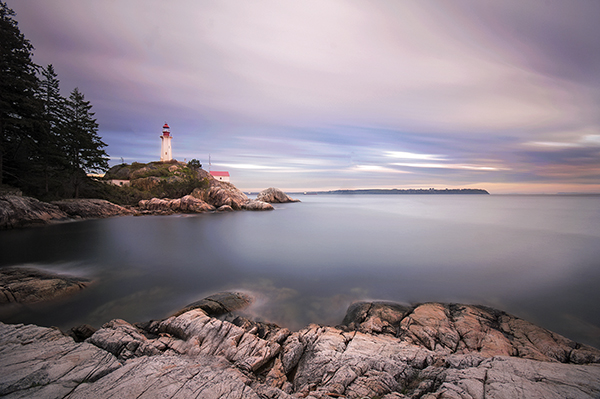
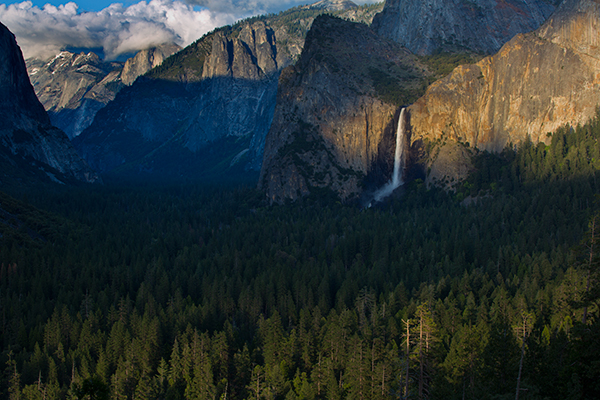
Nevertheless, you can also work with landscape and exterior photos during these conditions. In fact, there are some places where it’s almost impossible to avoid. Due to local weather characteristics you may find that during certain seasonal periods you’ll encounter misty mornings, stormy afternoons, and so on. Go ahead and shoot it. What better way to capture a region the way you see it, the way you feel it?
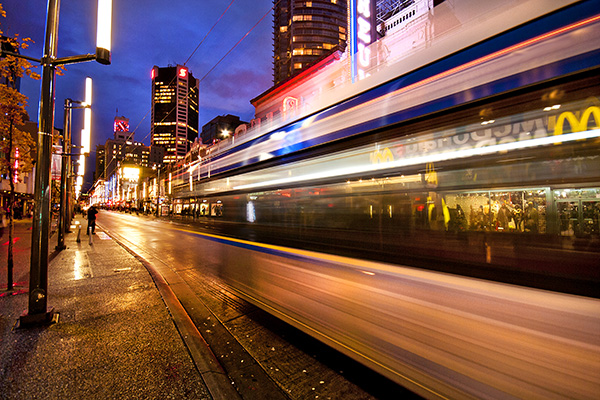
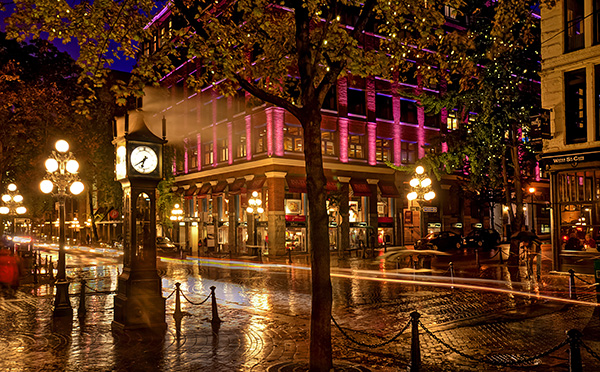
20140402 Lima 56b

Rainy days

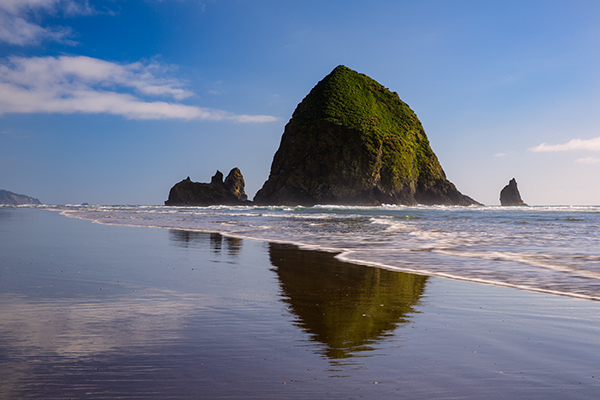
This is the time when most photographers stay inside, but I’d strongly suggest you get out there. It can seem a little bit scary, we tend to overprotect our gear, but with some preparation there is nothing to fear and you’ll get fantastic results. When it starts to rain, good photographers head outside. Downpours bring life, a different look; in certain cases, some areas are just magical in the rain. Think about shooting reflections, ponds, and playing with water drops. The possibilities are endless and you’ll definitely love it.

20131209 Mandalay 772b

20140223 untitled 0022b

As you can see, good light, bad light, is just a myth. There are certainly ideal situations where you can achieve exceptional photos, but it is not always possible to be out during perfect circumstances. So go ahead and take advantage of every condition, try to think how you can leverage and play it to your convenience. In the end, photography is fun, and great images can be obtained under almost any condition.

The post Dispelling the Myth of Good Light and Bad Light by Daniel Korzeniewski appeared first on Digital Photography School.


Digital Photography School

 
Comments Off on Dispelling the Myth of Good Light and Bad Light

Posted in Photography


Head Light: Popup Wall Lamp Has Horns that Glow in Shadows

18 Jul

[ By WebUrbanist in Design & Fixtures & Interiors. ]

light and dark headlight

A classy alternative to hanging animal parts, this deer head wall lamp started as a design concept, went viral as a prototype and has just been funded for full production via a successful crowdfunding campaign.

popup lighting design

owl lamp pop up

peacock lamp pop up

This particular popup lighting design is the first in a series of pieces that combine abstracted animals (including an owl and a peacock) and minimalist home lighting design – a sort of modern (and less morbid) take on faux taxidermy.

popup dear head light

deer head light pair

pop up light night

Chen Bikovski is a Tel Aviv-based designer exploring the relation of light and space. “Since I was a child, I was fascinated by Pop-up books…The excitement before turning a page, a simple pull that uncovers a whole new world. I loved how the story came to life, how the books created a fantasy world that flew off the page. The magic, the excitement, the naiveté…”

dear head light design

pop up lighting

dear head light in room

Named ‘Promising Young Designer of 2012,’ Chen’s work is presented in prominent galleries and featured in leading design publications. “The idea behind Popup Lighting was to create a permanent light fixture that would bring a magical ambiance to any space. A multi-dimensional light that would inspire the senses and ignite the imagination.”

Share on Facebook


[ By WebUrbanist in Design & Fixtures & Interiors. ]

[ WebUrbanist | Archives | Galleries | Privacy | TOS ]


WebUrbanist

 
Comments Off on Head Light: Popup Wall Lamp Has Horns that Glow in Shadows

Posted in Creativity


Lighting Tutorial: The Science Behind Light

05 Jul

Alana Tyler Slutsky image from Surrealia series as featured on Fashion Photography Blog (FashionPhotograpyBlog.com)

Light : The Science of it All

Hey FashionPhotographyBlog.com readers. Happy Independence Day!

Today we are going to be talking about:

Light. Learn to understand it, learn to see it and the better you’ll be able to manipulate it. After all, the whole science behind photography is based on the principles of light. Stick it out through these next three days and things will get a lot more interesting. Before you can learn to manipulate light (or if you’re a curious person like me,) it’s good to understand the “how” and “why” behind it.

So, welcome to the science of light.

(I know this is the boring part, just stick with me…)

Light and Color Science:

The human eye is only sensitive to the visible spectrum of the electromagnetic spectrum.  White light contains all colors.  We learned this when Newton split white light with a prism.

Electromagnetic Spectrum Chart

Electromagnetic Spectrum

Color Prism By Pink Floyd

(Thanks Pink Floyd)

Additive Primaries – Red, Green, Blue

When you add equal parts of the additive primaries together (Red, Green, and Blue), you create white light.  RGB is the color method used in today’s digital world.  Mixing just two of the additive primaries will result with one of the subtractive primaries.

RGB Color Light Chart

Subtractive Primaries – Cyan, Magenta, Yellow

The subtractive primaries absorb their compliments (RGB) and subtract them from white light.  CMYK is the color model for printing (K referring to Black).  When subtractive primaries are mixed, they subtract brightness from white, resulting in Black.

CMYK Color Light Chart

Each additive color has a subtractive color that is its compliment.

Red – Cyan

Green – Magenta

Blue – Yellow

Before you can learn to modify and use light, you need to understand how it works! The first things to be conscious of are the qualities of light which include direction, contrast, color, brightness, diffused, and specular.

Direction is where the light is coming from.  This controls the relationship between light and shadow.  Direction can also be understood as the position or placement of the light.

Contrast is the relationship between light and shade.

Color is the color temperature or actual color of the light source.  (We’ll get into this in a minute.)

Brightness is the intensity of the light.

Diffused light is a softer light typically produced by a larger light source.

Specular light, in short, is light from a source that is not modified. Most of you guys will refer to this as “harsh” or “hard” light.

How can you tell if something is diffused or specular?  Look where the shadow meets the lighted areas.  If the transition is gradual, it is diffused. If the transition is knife edge its specular.  Aka – Does the shadow end very abruptly? Think of high noon light and how the shadows cast by the sun are very crisp.  This is specular light.

Shadow Transition Examples

Pay attention to the transitions at the edge of the shadows

Source

The size of a light source (as relative to your subject) will greatly effect the type of light produced.  A small source will produce hard light, hard edges and harder shadows.  A large light source will produce a shadowless or softer light with softer shadows.

Distance also effects your light.  A light close to your subject will create a softer light, whereas the same light when placed farther away will create a harder light.  Think of the sun!  It’s far away, appears quite small but produces an extremely harsh light/shade relationship unless there are clouds to diffuse the light.  When the sky is overcast, it acts as a giant soft box for the sun.

We’ll dive a little further into distance and light tomorrow.

Until then –

Alana

IMAGE SOURCE:

Feature image & image 1: photography by Alana Tyler Slutsky from her Surrealia series. To view the rest of the photos from this series visit her website.

Image 2, 3, 4 & 5: Alana Tyler Slutsky

Image 6:  150m.com


Fashion Photography Blog

 
Comments Off on Lighting Tutorial: The Science Behind Light

Posted in Uncategorized


How to do Long Exposure Photography and Light Trails at Night

03 Jun
Gastown Light Trails

Gastown light trails, Vancouver, Canada

Before I understood how photography worked, I was always intrigued by light trails in images. I never understood how that happened. When I began to study photography, one of the first assignments I did was an advanced course on night photography. I decided I would try and capture some light trails. I set up my camera, made sure the settings were correct and waited. A few cars went past, but my timing was off and the shots were not great. I continued to wait. After about an hour of trying and experimenting, I got the shot I was looking for. It was like magic to me. The car was not in the shot but the lights seemed to float in mid air. I was hooked. This was something that mystified me for a long time and, I had managed to get it right.

What was so mesmerizing for me was that the image I saw on my LCD screen was not what I saw in real life. The camera had managed to capture a scene that my eyes could not capture in the same way. This seemed amazing to me. I soon realized that the camera was able to “see” things differently to the way my eyes saw them. I spent many nights trying to capture light trails in various locations. I was also doing lots of reading and research and came across a technique called long exposures. This too was amazing. It had the ability to alter a scene in such away that it looked totally different to the way our eyes normally see it. Again I was hooked and still, to this day, long exposures and light trails are some of my favourite techniques in photography.

Long exposure photography and light trails have similar techniques, it is the subject matter that differs, so I will discuss each technique separately and tell you how to get the best results in both.

How to do long exposure photography

Shooting long exposures effectively requires that you should be shooting in Manual mode as much as possible. If you are not sure how to shoot in Manual, take a look at Getting off Auto – Manual, Aperture and Shutter Priority modes explained to learn more about these modes. To be able to get sharp and effective long exposure images, here is a checklist of item you will need.

1. What equipment is needed to shoot long exposures?

  • A tripod – this is a good piece of equipment to have in most instance, but is a critical piece of equipment for shooting long exposures. Make sure your camera is properly mounted onto the tripod before you start shooting.
  • A camera – obviously you will need a camera, but many people assume you can only do this type of photography with an SLR. Some advanced point-and-shoot cameras can also do long exposures if they have a Shutter Priority function. Take a look in your camera’s manual to see if it has this function, you may be surprised.
  • Cable release – your camera will be on a tripod, so it should be very still, however, sometimes the action of pressing the shutter release button can cause the camera to move slightly and this movement can cause your image to blur very slightly. You may not notice this on the LCD screen, but when you open the image on your computer, it will be evident. I recommend getting a cable release (also called a remote trigger). It is simply a cable that attaches to your camera and acts as a shutter release button. Using a cable release means you can set up your camera, step away from the tripod and press the button without touching the camera. Cable releases can be wireless too. If you don’t have a cable release or don’t want to buy one, you could use your camera’s self-timer function to trigger the shutter.
  • Warm clothes and comfortable shoes – depending where you live, and the time of year you plan to be shooting, you may need to dress warmly. Long exposures work well after dark and it may get cold, so be sure to wear warm clothes. Be sure that you have comfortable footwear too as you may be standing for a few hours.

2. What subjects are best for long exposure photography?

Long exposures work well for certain types of subjects like seascapes, landscapes and cityscapes. The key to getting a successful long exposure image is to have something in your image that is perfectly still and something that is moving. Water, clouds and trees blowing in the wind all work well if the rest of the scene is stationary. This difference between the elements in the scene will create drama and will add significant value to your image. The viewer will be seeing something that cannot be seen with the naked eye. The reason why long exposure images are so compelling is that they warp time. Water looks like a soft mist, trees look like a dull blur and clouds become long and streaky. This is what makes a familiar scene more compelling.

Long Exposure scene in Vancouver BC

Long exposure scene in Vancouver, Canada

3. What camera settings should be used?

Long exposures are ideally shot on Manual mode. If you are not sure how to shoot in Manual mode, you can use one of the other semi-manual modes such as Aperture priority or Shutter priority. Here are some quick pointers on the settings:

  • Shutter speed – depending on the light in your scene, your shutter time will need to be at least a 10 to 15 seconds, or longer if necessary. If you are doing a seascape and the water is moving quickly, then a few seconds may be long enough to make the water look misty.
  • Aperture – you will want to have your aperture set at anywhere between f/8 and f/16. This again, will be determined by how much light is in the scene and how long you want to expose for.
  • ISO – keep your ISO settings as low as possible, ISO 100 is what I use for long exposures.

4. When is the best time of day to shoot long exposures?

It’s normally a good idea to shoot long exposures as the sun is setting, or just after sunset. My suggestion is to be on the scene an hour before sunset. That way you can test some shots, make sure your composition is good and be sure all your settings are correct. Then wait. Personally, sometimes I will simply sit there and enjoy the scene, other times I may listen to some music, but I like to be relaxed and ready for when the light starts to work. Normally you will want to start shooting about 15 minutes before the sun has completely set and up to an hour after it is below the horizon.

The important part is to be willing to experiment. Each time you decide to shoot long exposures will be a little different. The light may be brighter than you think, the sunset may not be as dramatic as you hoped, or the shot may not be just as you imagined. Be patient and experiment. I will sometimes go back to a location two or three times to try and get the shot I am looking for. Once I have it though, the sense of reward is fantastic and the patience and effort is paid off!

Long Exposure of Science World in Vancouver

Long exposure of Science World in Vancouver

How to shoot light trails

Much of the advice for shooting light trails is very similar to the tips above. The key difference is in the timing and location of your shoot.

1. What equipment is needed to shoot light trails?

  • Same as above 

2. What subjects are best for light trails?

For light trails to work, you need to have something with lights moving through your scene. A car, a bus, a train and even an aircraft can work. Be sure to be out of the direction of the vehicle you are photographing. Please do not stand in the middle of the road, or on train tracks. Position yourself in a safe place to make this work. Always be aware of your surroundings. It is easy to become immersed in what you are shooting and lose sight of where you are standing. Be safe, first and foremost!

A moving bus in the scene made this shot more dynamic

A moving bus in the scene made this shot more dynamic

3. What camera settings should be used?

Light trials, like long exposures are ideally shot in Manual mode.

  • Shutter speed – depending on the light in your scene, your shutter time will need to be at least 10 to 15 seconds, or longer if necessary. Make sure that your shutter speed is long enough to capture longish light trails. You don’t want to cut them off too soon as you will have some short trails in your image that may look strange.
  • Aperture – you will want to have your aperture set at anywhere between f/5 and f/11. This again, will be determined by how much light is in the scene and how long you want the exposure.
  • ISO – keep your ISO settings as low as possible, ISO 100 is what I use for light trails. If your ISO is set to 500 or higher, your exposure will be shorter and you run the risk of overexposing the highlights ESPECIALLY when shooting car headlights.

4. When is the best time of day to shoot light trails?

Light trails can be shot in the early evening, or after the sun has set. Each scene will be different, but sometimes it is too light to get effective light trails just after sunset. You may need to wait until 30 minutes after the sun has set to get longer light trials.

The important part, once again, is to be willing to experiment. Try different times after sunset and see what works for you. Spend time behind your camera perfecting your timing. Scout locations during the day that you will think will work for light trails and then go and try it out.

Steam Clock in Gastown, light trails on the road

Steam Clock in Gastown, light trails on the road

Photographing after dark can be very rewarding. It is worth the effort to learn how to use these techniques to bring new images into your portfolio, and to have new skills which will enable you to shoot under any lighting conditions. Experiment and enjoy! Happy shooting.

The post How to do Long Exposure Photography and Light Trails at Night by Barry J Brady appeared first on Digital Photography School.


Digital Photography School

 
Comments Off on How to do Long Exposure Photography and Light Trails at Night

Posted in Photography


Virtual Light: Facade Installation Casts Fake Illumination

30 May

[ By WebUrbanist in Art & Installation & Sound. ]

facade light cast installation

A temporary project set in Madrid, this bright yellow artistic reconfiguration was rendered all the more engaging due to its location in a semi-dark alleyway of the city.

facade passers by viewing

facade across street photo

It was created by (fos), an alliance of artists and designers (the word meaning ‘light’ in Greek and ‘melted’ in Catalan), utilizing the front of a vegan restaurant in the semi-secluded Lope de Vega street.

facade art detail temporary

facade painted detail temporary

A combination of sun-bright yellow tape and paint were deployed in a pattern intended to abstractly simulate the casting of light, surrounded by shadow, with a few artistic liberties taken in terms of angles and scope.

facade paint yellow closeup

facade yellow white meet

facade project design creators

The context, mostly made of stone or painted in muted tones, made the vivid yellow intervention stand out as something extreme, drawing a great deal of attention from passers by through its stark contrasts.

Share on Facebook


[ By WebUrbanist in Art & Installation & Sound. ]

[ WebUrbanist | Archives | Galleries | Privacy | TOS ]


WebUrbanist

 
Comments Off on Virtual Light: Facade Installation Casts Fake Illumination

Posted in Creativity


SmugMug Films: Lava Light

29 May

lava.jpg

We’ve been following SmugMug Films’ ongoing behind-the-lens series, which provide a look at people who follow their passions in photography. The latest installment features Hawaii-based duo CJ Kale and Nick Selway, who have spent the last ten years photographing volcanic lava flows in their home state. We asked them a few questions about how they got started and what keeps them out of harm’s way. Read the Q&A

News: Digital Photography Review (dpreview.com)

 
Comments Off on SmugMug Films: Lava Light

Posted in Uncategorized


Interactive Wonderland: Light Projection Art Animates Sydney

28 May

[ By WebUrbanist in Destinations & Sights & Travel. ]

light art city projections

A series of dynamic light art installations have begun to take over the largest city in Australia, turning tunnels into painted bouquets and the converting the sails iconic Sydney Opera House sails into a colorful storytelling canvass.

light art tree closeup

Part of this VividSydney event (running through June 9th), the MLC building begins its animated tale as a small stand of trees that entangle and intertwine to become a single huge trunk.  As the visual story unfolds, “leaves flutter in a virtual breeze. Before your very eyes, a colossal tree seeds, sprouts, and rapidly spreads.”

light art tree animation

The process is full of small and sudden surprises as well as slow-building suspense.“Like the dwellers and vehicles that bring energy and movement to a large city, beetles, bugs, centipedes and birds emerge out of the tree, scurry about their business, and then vanish again into the canopy. A symbiotic ecosystem is created [from] previously lifeless concrete and glass.”

Vivid Sydney 2014

light art opera house

vivid sydney aerial sails

Meanwhile, along the waterfront, this year’s ambitious all-new light art production for the opera house will “take the iconic building on a dramatic journey through time – from the birth of architecture and civilization through to the pinnacle of human and technological achievement.”

light art walking platforms

light art geodesic dome

light art bridge

vivid sydney ferry lights

Other illuminated installations can be found all around the city, lighting up everything from buildings and bridges to ferries and fountains. And light art is only one of its three dimensions. VividSydney “is a unique annual event of light, music and ideas, featuring many of the world’s most important creative industry forums, a mesmerising free public exhibition of outdoor lighting sculptures and installations, a cutting-edge contemporary music program and the spectacular illumination of Sydney’s iconic architecture.”

Share on Facebook


[ By WebUrbanist in Destinations & Sights & Travel. ]

[ WebUrbanist | Archives | Galleries | Privacy | TOS ]


WebUrbanist

 
Comments Off on Interactive Wonderland: Light Projection Art Animates Sydney

Posted in Creativity


5 Advanced Tips for Light Trail Photography

27 May

If you’ve never shot light trails before, start with Darren Rowse’s excellent article How to Shoot Light Trails. Once you’re comfortable with the basics, here are five advanced tips for creating your own unique light trail photography.

1. Go big or go home

Smith 1

You don’t want an image with tiny light trails. You want big, Texas-sized, light trails streaking across the photo. As with any subject, if you want the subject to appear large, get close to it. Exaggerate the effect by using a wide-angle lens. Another way to add a sense of size to a subject is to shoot it from below. Shooting a person from a low point of view makes the person appear larger and more powerful. The same is true with light trails.

Get as low as you can, and as close as you can safely, to the traffic. If you’re shooting along a busy street, place two of your tripod legs barely into the street so that they are resting against the curb. Lower your tripod as far as you can and point it up. By getting as low and close as I could in the Chicago Theatre image (above), the top trails of the bus appear taller than the theatre marquee.

2. Visualize and compose for the light trails

Look at any of the images in this article and picture them without the light trails. You’re left with a boring composition that doesn’t work. When photographing light trails, you need to visualize how the trails will look in the image and compose your image with them in mind.

Treat light trails as if they were a river meandering through your image. You wouldn’t compose the shot so that the river moved straight across your frame, so don’t do it with light trails either. Pay attention to where the trails enter and leave the frame. Your eye will be drawn to the spot in the frame where the cars are beginning as it will have some of the densest and brightest trails. Place this location as you would place a main subject using the rule of thirds. The trails should move across your image and end at either the corners of the frame, or a vanishing point. Place this vanishing point in the opposite third of the frame. If the light trails enter in the lower left, have them end in the upper right. This lends a sense of movement to your composition.

Smith 2

If you can get to the middle of the road with traffic on either side of you, consider going for a perfectly symmetrical shot. You’ll need an interesting subject to go along with the trails, so look for a bridge or interesting buildings on the side of the road. Wait to hit the shutter until you have traffic on both sides of you to create a balanced composition. More importantly, make sure that you’re in a safe position. Stand in the median, or off the street. Never set up in the middle of a busy street.

Smith 3

3. Isolate the light trails from the scene

To create an interesting abstract image of light trails, put yourself in a position where the lights from the cars are the only light source. An expressway overpass is an ideal location. You don’t want any buildings or other light sources in the frame. Find a location where the road takes an interesting path and underexpose the scene so that the only things that appear are the light trails and streetlights.

When you open the photo on your computer, increase the exposure of the light trails while keeping the black areas black. You can increase the exposure of just the trails by increasing the whites slider in Lightroom, lowering the white point, or making an adjustment to the tone curve in Lightroom or Photoshop. You’ll be left with an image that shows only the path of the trails that makes for a unique abstract image.

Smith 4

4

. You don’t need cars for light trails

You can create light trail images at night by shooting anything that is moving and emitting light. If you’re photographing a city like Chicago, you’ll mostly shoot cars and buses, but don’t forget about trains, bikes, horse-drawn carriages, or even a bunch of kids walking by swinging glow sticks. The rules for photographing any of these is the same as with cars, but you’ll be able to shoot them in locations that cars don’t drive, and the trails that they leave are different than your standard cars.

Smith 5

Smith 6

5. Make your own light trails

Who says that you need to stand around and wait for something to drive by? If you’re in a more remote location, set up your tripod, set up a long exposure, use the 10-second delay feature in your camera, jump in the car, and drive around in front of your camera. You can drive in any path that you think might be interesting. Experiment until you find something you like. You’re essentially light painting with your car lights. This technique works even better with a friend. One person drives while the other shoots! Find an empty parking lot or a winding road and make your own light trails.

Smith 7

What do you do to spice up your light trail shots? Have you tried any of these techniques? Tell us in the comments below.

The post 5 Advanced Tips for Light Trail Photography by Chris Smith appeared first on Digital Photography School.


Digital Photography School

 
Comments Off on 5 Advanced Tips for Light Trail Photography

Posted in Photography


Light field cameras: Focusing on the future

15 May

Screen_Shot_2014-05-14_at_10.56.37_AM.png

Lytro’s new Illum camera packs in a few tricks that will appeal to some still photographers, but its aim is really to introduce a new type of imagery. Time will tell if that medium succeeds. Technology writer Liam McCabe spoke with a few players in the light field camera industry to get a sense of where this technology is headed in the next few years and beyond. Learn more

News: Digital Photography Review (dpreview.com)

 
Comments Off on Light field cameras: Focusing on the future

Posted in Uncategorized


The Magic Light of the Golden Hour

29 Apr
EOS-1D Mark IV with EF 24-105 f/4L IS. 1/500 at f/4, ISO 200.

EOS-1D Mark IV with EF 24-105 f/4L IS. 1/500 at f/4, ISO 200.

What is Golden Hour?

My absolute favorite time to photograph anything is a time of day called the Golden Hour. The Golden Hour occurs during the time just before sunset, and just after sunrise. When the sun is lower in the sky, near the horizon, it must travel through more of the atmosphere, reducing the intensity of direct light and thus reducing the contrast in the scene. More blue light is scattered, so sunlight will appear reddish and shadows won’t be as deep as when the sun is higher in the sky. In addition, the lower angle of the sun creates longer shadows, which can add interest to images.

EOS 5D Mark II with EF 24-105 f/4L IS. 1/15 at f/14, ISO 100.

EOS 5D Mark II with EF 24-105 f/4L IS. 1/15 at f/14, ISO 100. The low sun casts a longer shadow, creating foreground interest for this shot.

The Golden Hour does not necessarily last an hour. The closer to the equator you are, the shorter the Golden Hour is. The further from the equator, the longer the golden hour lasts. For instance, in Alaska during the summer, there is a period of several hours of Golden Hour light later in the evening, and during the winter, nearly all daylight hours have a Golden Hour quality to them.

EOS 5D Mark II with EF 24-70 f/2.8L. 1/2500, f/4, ISO 200. The sun was placed over the boy's shoulder to camera left, and a reflector to camera right.

EOS 5D Mark II with EF 24-70 f/2.8L. 1/2500, f/4, ISO 200. The sun was placed over the boy’s shoulder to camera left, and a reflector to camera right.

Golden Hour light is so good, I find it hard to convince myself to photograph at other times.  It’s excellent lighting for any subject, but especially lends itself to portraits and landscapes.

Portraits at Golden Hour


For portraits, I use the light in a couple of ways.  First, I will position my subject so that the sun is shining on their face directly, as in the image at the top of this article.  The light tends to be so soft, I can put down my reflector and just let the shadows fall and create depth.  Simply position your subject so the sun is full in their face, and ask them to turn back and forth to watch the way the shadows fall. Move around your subject to watch how the light changes.  Shoot from multiple angles. It will end up being like you changed your lighting setup for each shot.

The only portrait angle that will be difficult to shoot at the Golden Hour will be when your subject is completely backlit. In this case, I will use a reflector. Since the light already has a warm temperature, I use the white side of the reflector, or silver if the reflector has no white.  I will position my subject so the sun is behind him and over his shoulder, and will position the reflector in front of him on the opposite side. The effect is similar to having two lights, a hair light, and a fill. Again, move around your subject, and have them turn as well, placing the sun at different angles to them. Do the same with the reflector to see the ways you can make the light fall on your subject’s face.  The beautiful thing about Golden Hour light is that it comes from such a low angle, you can hold the reflector higher and position it just above your subject’s head, to get those pleasing downward shadows from the nose and other facial features.

Golden Hour for Landscapes

The Golden Hour is also perfect for shooting landscapes.  The light creates depth by casting long shadows and defining the character of the landscape.  I will often try to put the sun to my side when shooting Golden Hour landscapes. This allows the light to rake across the landscape and create shadows where the surface changes, or create greater detail in grasses, or trees, creating more apparent detail and sharpness than if the light was from the front. This is apparent in the two images below.

EOS 5D Mark II with TS-E 24mm f/3.5.  1/1250 at f/3.5 ISO 100.  The sun coming from camera right creates definition in the sand and dune grass.

EOS 5D Mark II with TS-E 24mm f/3.5. 1/1250 at f/3.5 ISO 100. The sun coming from camera right creates definition in the sand and dune grass.

EOS 5D Mark III with EF 70-300 f/4-5.6L IS. 1/13 at f/16, ISO 100. The low angle of the sun and warm golden light creates definition in the foreground trees.

EOS 5D Mark III with EF 70-300 f/4-5.6L IS. 1/13 at f/16, ISO 100. The low angle of the sun and warm golden light creates definition in the foreground trees.

In addition, landscapes shot during the Golden Hour have more color in the sky, especially if there are clouds picking up the warm reddish light. However, shooting directly into the sun, capturing a sunset, creates a very contrasty scene. In cases like that, I use graduated neutral density filters to darken the sky and bring it down so that the foreground and the sky both fall within the dynamic range of the camera, as with the image of the crashing wave and rocks (below). A graduated neutral density filter (ND Grad for short) is half darkened glass, half clear. You can position the filter so the darker area covers the sun and sky, and the clear is over the darker foreground.  This helps bring the color back to those sunsets or sunrises, whereas without the filter, the sky would appear washed out and lifeless.

The Golden Hour offers plenty of opportunities for great photos, and the really beautiful thing is that it happens twice a day!

EOS 5D Mark III with EF 24-70 f/2.8L II. 1/6 at f/14, ISO 200.  A 4-stop ND grad was used to darken the sky and match the foreground exposure.

EOS 5D Mark III with EF 24-70 f/2.8L II. 1/6 at f/14, ISO 200. A 4-stop ND grad was used to darken the sky and match the foreground exposure.

EOS 5D Mark III with EF 24-70 f/2.8L II. 1/15 at f/16, ISO 100.

EOS 5D Mark III with EF 24-70 f/2.8L II. 1/15 at f/16, ISO 100.

EOS 5D Mark II with EF 24-105 f/4L IS. 1/1000 at f/4, ISO 100.  In this case, the sun was positioned more to the side with a reflector bouncing light back into the subject's face.

EOS 5D Mark II with EF 24-105 f/4L IS. 1/1000 at f/4, ISO 100. In this case, the sun was positioned more to the side with a reflector bouncing light back into the subject’s face.

EOS 5D Mark III with EF 70-200 f/2.8L IS II. 1/1000 at f/2.8, ISO 100.

EOS 5D Mark III with EF 70-200 f/2.8L IS II. 1/1000 at f/2.8, ISO 100. The soft, warm light of the Golden Hour was perfect for this shot.

More tips on working with light in the Golden Hour:

  • The Golden Hour – Perfect Times for Portraits
  • Finding and Working with Available Light
  • 5 Reasons for Doing Natural Light Portraits
  • 10 Reasons to Shoot Portraits During the Golden Hour [Illustrated]

On sale now at SnapnDeals – Golden Hours eBook + Exposure Blending eBook – grab the pair now before the sale is over! 

The post The Magic Light of the Golden Hour by Rick Berk appeared first on Digital Photography School.


Digital Photography School

 
Comments Off on The Magic Light of the Golden Hour

Posted in Photography