How many times have you captured the perfect picture, only to download it and discover a rogue tree branch jutting into your frame from the side, or a random person’s head sneaking into your foreground? At one time or another, maybe even often, it’s happened to all of us – and it’s a bad habit that’s easy to repeat if we allow it. Let’s call this photo ailment of ours blind excitement; letting the excitement of our subject blind us to all other elements that are in our frame. Is there a cure? Absolutely.
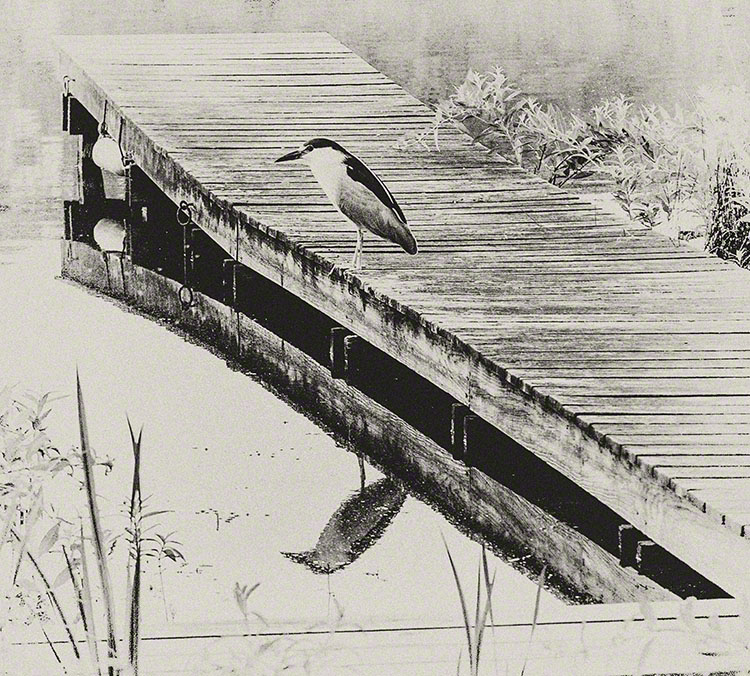
“On The Dock” – There was a lot going on here, much to see and evaluate before pressing the shutter. Other birds, kayakers on the lake, and windblown reeds all played a role in my “seeing” this image the way I wanted to capture it.
Blind Excitement
You know the feeling of looking through your viewfinder at that beautiful, rare subject that you have been waiting to capture, that’s all you see. Blind excitement, or being overcome by your subject, has kept you from seeing the other elements in your viewfinder; elements that very well may ruin your treasured image to be. You know that feeling, don’t you?
One of the best tips that I ever received on creating artistic photography came years ago from a mentor helping me to hone my photographic skills. Keep it simple; eliminate all unnecessary elements in the image, take your time, and be sure to really see what you are shooting before pressing the shutter. That’s the tip. Simple, right? Sounds like a no brainer doesn’t it? Keep reading!
“Beware The Serpent” – an example of being able to quickly and accurately see the whole frame and capture. The illusion of a sea serpent reaching for a female in background lasted but a moment.
Seeing…and Believing!
It does takes some work learning to slow down, breaking the ol’ trigger finger on the shutter habit for you to truly see what’s in the frame – but with that tip my photography really did start to become art. I looked through the viewfinder and began to see things that I never noticed before; things that had added no value to my image, things that only served to detract from the intended message of my work. I slowed down and LOOKED through the viewfinder before pressing the shutter, I mean REALLY looked. I walked around and found better angles, lower and higher to shoot from that eliminated photo clutter. I was no longer blinded by the main subject of my frame, but now saw everything within it.
It’s amazing what appears when you take the time to see! I had made a conscience decision to actually compose my photograph BEFORE pressing the shutter. Yes, I know…I, too, thought I was doing that all along, but surprise, surprise – I learned differently.
A Boat or Two

Take a look at these two images taken in Antigua. The day was amazing, the sun, the surf, music, and colors of the Caribbean all filling my head and eyes – with blind excitement. The whole idea was to capture some island flavor for a client with the colorful boat sail, the sand, and the beautiful blue water of the Caribbean. I looked and pressed the shutter, but I didn’t see! I didn’t see the second boat sneaking in behind my subject – you see it now, don’t you? Image #2 is free of this distraction and makes a much better photograph; keep it simple and clean. When the full sail came around with all that color, my blind excitement pressed the shutter and that’s all I saw. Fortunately I had other opportunities this time, and got the shot – but that won’t always be the case!

On Second Thought
I then began to review some of my older work scrutinizing each for the importance of the things in my images. “Wow, how could I have missed that?” was the phrase I found myself uttering more often than I care to admit. I couldn’t believe how many things I discovered stuck into my image from the edge, or lurking without value in the background. I was truly amazed at what I was now seeing. Why didn’t I see that in my frame before I took the shot? Answer: Because I didn’t know how to see.
It’s always a great exercise to take some time and look at your work from a year ago, from three years ago, etc., and compare to your latest. I am always working at my photography. To see the difference in my work from several years ago is rewarding and it also acts to confirm that compared with today, I was flying half blind back then.
See below, one of my photographs that garnered considerable attention and won multiple awards, including Best Seascape in a national exhibit. I think this is a good example of eliminating all unneeded elements in capturing the desired mood – calmness. Read what the gallery director wrote of my work Morning Calm:

The exhibition is showing four of Baker’s pieces, but my favorite is Morning Calm. This photograph shows how little is needed to create a beautiful and amazing image; and, while there is very little in this photograph, one can also say that there is so much in this photograph. There are so few physical elements…the horizon, a hill, a boat and its shadow. There is, of course, a lack of color. There is even a lack of shades of gray, being basically a black boat, a light gray backdrop, and a medium gray horizon and hill. But the photograph says so much with so little. The photograph has tremendous spirit and depth. It speaks…with silence. It surely says different things to different people, but, without question, this photograph speaks. A beautiful and amazing image.
While there is so little in this photograph, one can say that there is so much in this photography. Exactly! What do you want your image to say? What are the elements in your frame acting to say in your desired overall message? If you don’t know, or they are sending the wrong message, something is amiss. It’s time to recompose, time to slow down and actually SEE what you are shooting.
While Morning Calm leans towards the extreme of minimalism, you could say that I succeeded in capturing a message of calmness. That early, quiet, spectacular morning on Cape Cod when I captured this shot, I knew it would be special. I was excited looking at the subject, but I took my time, I looked at everything in my viewfinder, and positioned myself to be sure that none of the other boats would be in my frame. I waited to be sure no birds were flying in the space, absolutely still water, nothing but what I wanted my audience to see – and feel – when viewing Morning Calm. Click. I breathed and smiled, as I knew that I had learned to see and got the shot that I wanted. Knowing that you got the shot is such a great feeling, isn’t it?

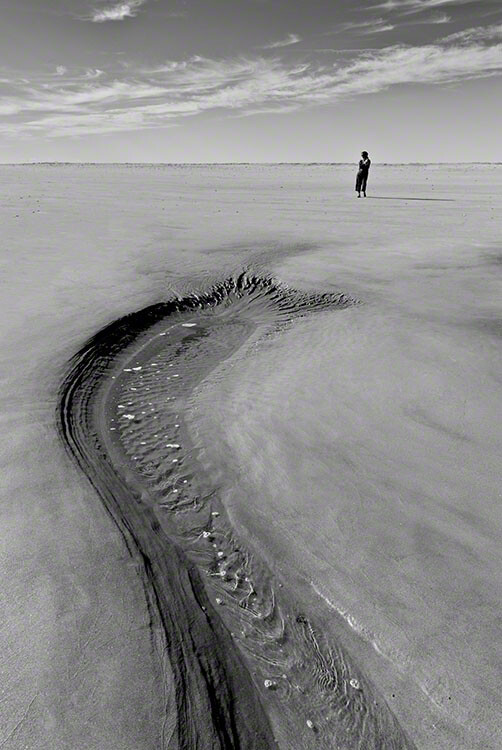
In my image, Alone Together there are more elements in the frame than in Morning Calm; you have an angry sky, rocks and water sculpted sand. Here all the elements work together in supporting the subject (a person in thought contemplating a lone tree); they do not detract from the main subject, but add to the mood that will evoke thought and emotion from the viewer. One of the keys to creating this shot was to see, before pressing the shutter, that I needed a space between the subject’s head and the land; without this space the shot would have been ruined.
To this day, I can still recall that cold February day on Cape Cod knowing that I needed to be sure the person’s head was clear of the land and adjusting my shooting angle to be certain I had that needed space. A couple of years earlier, I know that in my blind excitement to capture the shot (believe it or not, this was not posed) I would have just gone ahead and pressed the shutter only to be disappointed later when viewing in my studio and realizing the person was attached to the land at her head. Years of practicing how to see before pressing the shutter allowed me to act quickly in surveying what was in my frame, and keying on a most important must have compositional item, the space above the subject’s head – before the subject moved and/or learned I had arrived behind them.
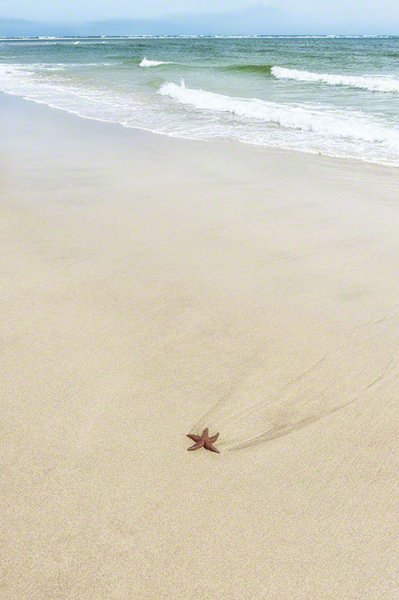
“Shooting Star” – most of my work is coastal. Not only do you need to be aware of intrusions into the frame (people, birds, etc.) you must also consider the potential of intruding on beach goers privacy by placing them in your frame unwanted! Also, parents are understandably super sensitive to anyone near their child with a camera. Don’t put yourself in that position by not seeing everything!
Are you excited? Now look, and SEE!
Take a good look at your work. Look at all the elements in your image. The next time you are out shooting, pause and REALLY look before pressing the shutter. Set yourself apart from the glut of shutter-happy shooters with well thought out, well seen, well composed photography. Trust me, this exercise of making yourself pause, look, and see, will make a BIG difference in your photography and with practice will become your way of composing before shooting.
Now go make some art!
All images in this article are © Bobby Baker Photography
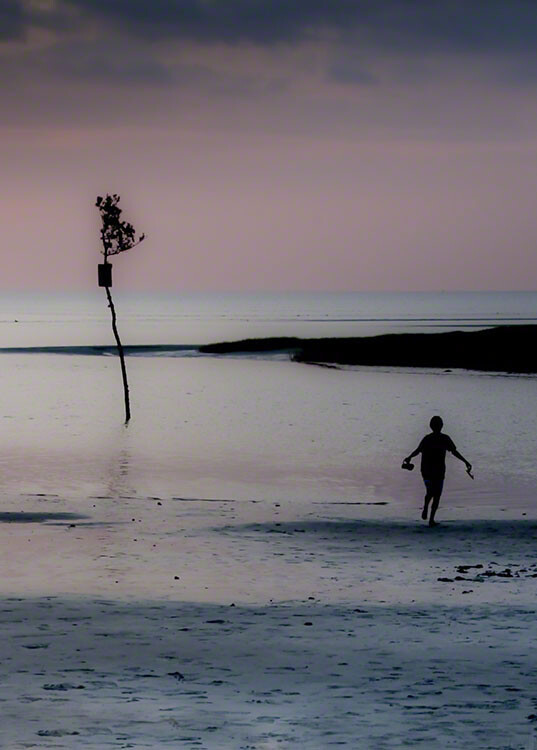
“Rock Harbor Romp” – The isolated, silhouetted person was not created by cropping, rather by moving my camera to the left while framing the image. The girl’s friends are to the right side of the frame, and I was able to see that they would create clutter in the image if captured. The lone tree and lone girl act to balance each other in this image.
googletag.cmd.push(function() {
tablet_slots.push( googletag.defineSlot( “/1005424/_dPSv4_tab-all-article-bottom_(300×250)”, [300, 250], “pb-ad-78623” ).addService( googletag.pubads() ) ); } );
googletag.cmd.push(function() {
mobile_slots.push( googletag.defineSlot( “/1005424/_dPSv4_mob-all-article-bottom_(300×250)”, [300, 250], “pb-ad-78158” ).addService( googletag.pubads() ) ); } );
The post Composition and Learning to See by Bobby Baker appeared first on Digital Photography School.

Digital Photography School


You must be logged in to post a comment.