RSS
 

Posts Tagged ‘Landscapes’

How to Shoot Landscapes at Sunset

26 Jul

Sunsets are a huge draw for landscape photographers due to the unique light at the end of the day. Not only is the colour of the light attractive but also its low angle as the sun goes down gives greater texture to the landscape.

Whilst the conditions at sunset have the potential to yield great images, they also provide challenges that need to be overcome to maximise that potential.  Here I want to share some tips and approaches for shooting landscapes at sunset.

Camera Settings

One thing I am often asked is “what settings should I use to photograph a sunset?”.  Photographing at sunset is no different to shooting any other landscape; therefore the following make a good starting point:

Shooting mode: Manual
ISO: 100
Aperture: f/11 (maximising depth of field, without compromising image quality)
Shutter speed: Adjust so that detail is retained in the sky highlights (if too bright, make it faster, if too dark, make it slower)
White balance: Daylight/Sunny (if shooting in JPEG)

However camera settings alone do not guarantee success, there are a few other things to consider.

Sunset with star burst

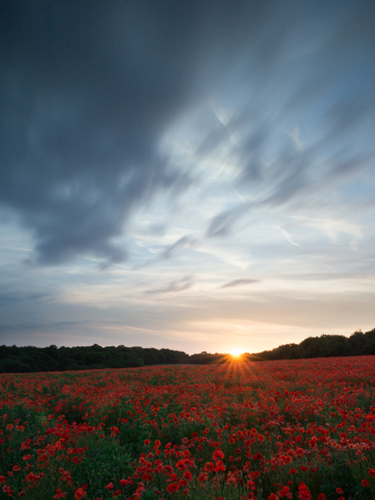
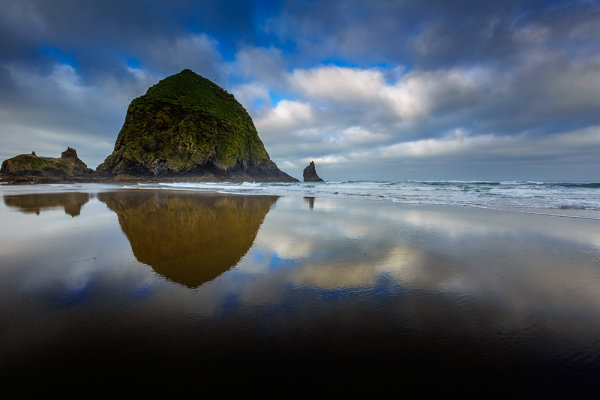
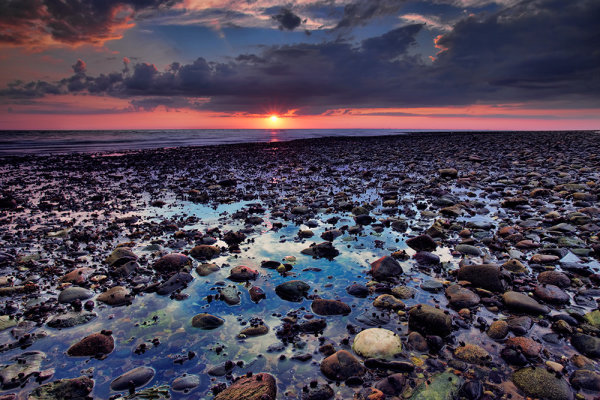
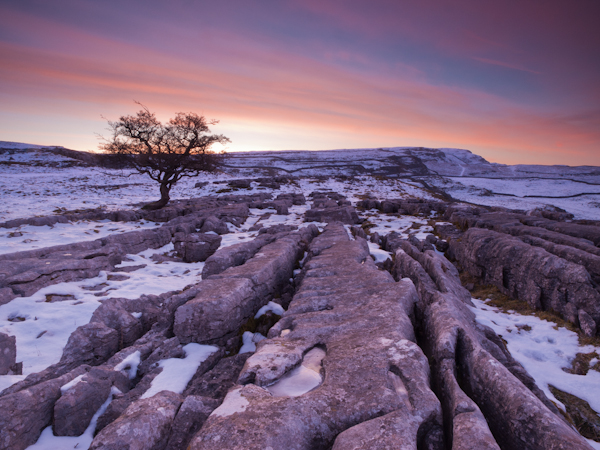
Shot into the sun as the sun crossed the tree line (ISO 200, f/11, 30s, using 3-stop graduated ND filter, 10-stop ND filter)

Exposure

Often, the draw of a sunset is a brightly coloured sky containing reds, pinks and oranges and the temptation can be to make the sky the focal point of the image, expose for it, and throw everything else into silhouette.  If there is an interesting skyline, this can work compositionally however if not, you will be left with an image that can lose the viewers interest quickly – after the sky, there is nowhere left for the eye to go.

Also, one of the joys of sunset is capturing the golden light illuminating the world in front of you and casting long shadows.  Therefore, capturing both the land and sky correctly exposed can produce images with a much higher impact that will hold the viewers attention for longer.  However, therein lies one of the challenges.

When the sun is low, the sky will appear very bright in comparison to the land.  Due to the limited dynamic range of digital sensors, the difference in brightness between the sky and the land can cause problems for the resulting image – if the difference is too great, you will either lose detail in the highlights (sky) or shadows (land).

There are two ways to overcome this:

  1. Use graduated neutral density filters (as covered in this post) to reign in the bright sky, and ensure that you can record the full range of highlights and shadows in one image
  2. Take multiple images (one exposed for the sky, one exposed for the land as a minimum) and blend the two together using photo editing software.

Both approaches come with complications (the potential for unwanted flare or colour casts from filters, or unwanted movement between exposures for the blending).  My preference is to use graduated neutral density filters, with the aim of getting as much right in-camera in one image, to save having to spend time blending exposures when back at my computer.

Sunset, shot away from the sun

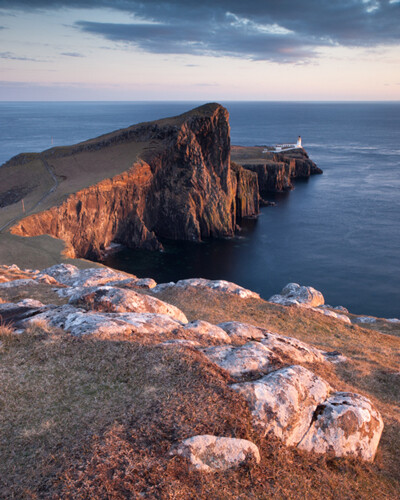
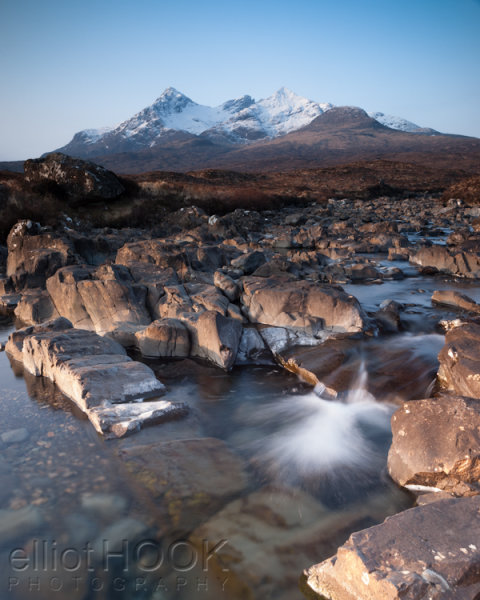
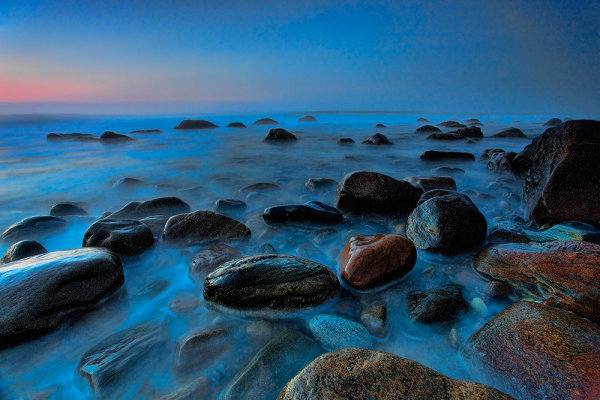
Shot with the sun at 90 degrees to my right highlighting the foreground rock detail (ISO 100, f/11, 1.6s, using 3-stop graduated ND filter)

Don’t pack up when the sun goes down

Too many people pack up and head home when the sun goes down, but it’s only 10 or so minutes after the sun has set that the real colour display in the sky begins.  A small amount of time after the sun drops below the horizon, you often see any clouds in the sky take on a red/pink hue.  As there is no bright light source at this time, shutter speeds soon increase to a few seconds, so a tripod is a must, but you will be able to capture images with incredible saturation in the sky, without any post processing.

Sunset taken after the sun went down

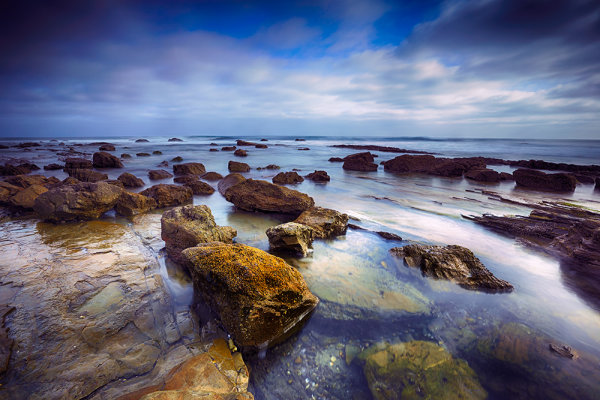
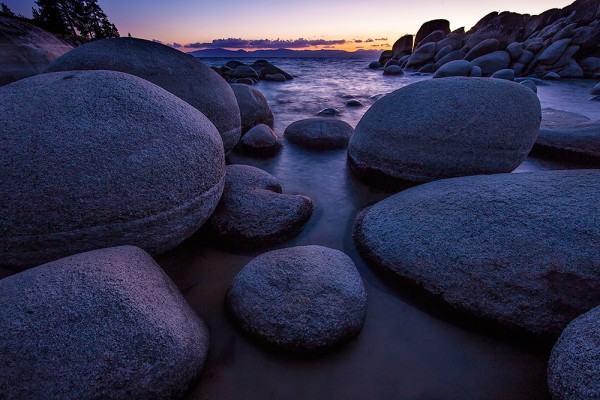
Taken approx. 30 minutes after the first image above, showing the clouds taking on the pink/purple tones (ISO 200, f/11, 4s, using 2-stop graduated ND filter)

Don’t forget sunrise

Everything I’ve written here discusses shooting at sunset, but it all applies to sunrise too.  It is a much more difficult to motivate yourself to go out at sunrise, but it is my favourite time of day to take landscape images as the light is just as magical and, depending on the overnight temperatures, you can often be greeted with early morning mists that can add a whole new dimension to your landscape images.

Sunrise with mist rolling over landscape

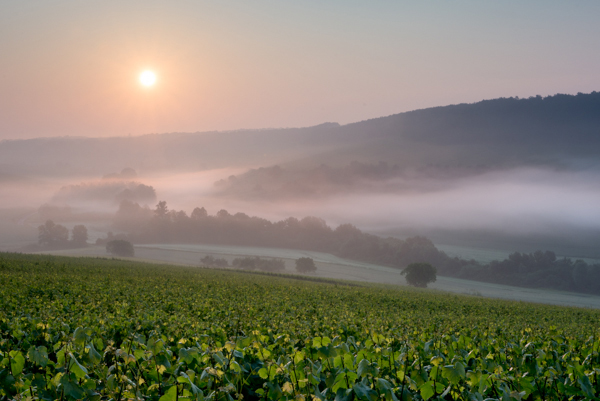
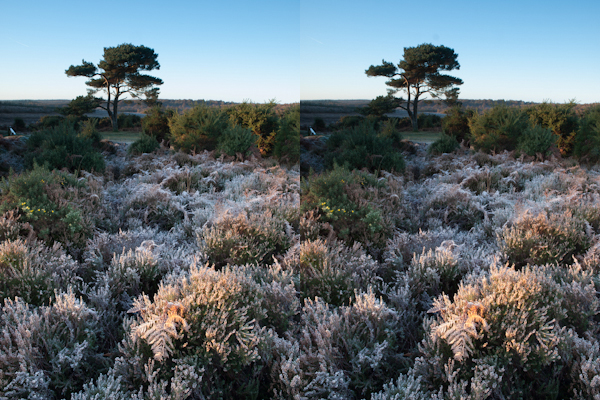
Taken just after sunrise with mist rolling in the valley below (ISO 100, f/11, 1/40s, using 3-stop graduated ND filter)

So whilst sunrise or sunset are challenging times of day to shoot effectively, hopefully the above tips will help you go out and capture the full potential of the landscape in front of your lens.

Post originally from: Digital Photography Tips.

Check out our more Photography Tips at Photography Tips for Beginners, Portrait Photography Tips and Wedding Photography Tips.

How to Shoot Landscapes at Sunset


Digital Photography School

 
Comments Off on How to Shoot Landscapes at Sunset

Posted in Photography


Living Landscapes: A Guide to Stunning Landscape Photography

24 Jul

Landscapes coverToday I’m very excited to announce the launch of an eBook that we’ve been working on all year at dPS HQ. It is called Living Landscapes: A Guide to Stunning Landscape Photography – an eBook authored by New Zealand Landscape Photographers Todd and Sarah Sisson.

The eBook We Just Had to Release

Before this release we’ve built up a library of 12 dPS eBooks but the one request we keep getting from readers has been for a Landscape Photography guide.

I’ve long wanted to publish one as Landscape Photography was my own first love but have been waiting for just the right photographer to author the eBook.

I’m glad I waited because at the beginning of last year I stumbled on a Google Hangout with Trey Ratcliff which Todd Sisson. I was impressed with Todd for a couple of reasons.

Firstly his photos were gorgeous – I got lost for a good hour or so looking through his portfolio.

Secondly Todd was a great communicator. He was funny, personal and even on that short Google Hangout I learned a thing or two about shooting landscapes.

Todd and I began to talk about a potential collaboration on this eBook last year and as a result of that initial conversation he guest posted here on dPS with a post called Composing Dynamic Landscape Images. That post was our 3rd most popular post on the site in 2012 and helped hundreds of thousands of people improve their Landscape photography.

This showed us the need for a more comprehensive guide to shooting landscapes and so Todd – and his wife Sarah who is also an accomplished landscape photographer – began to work on creating this guide.

Informative and Inspiring – You’ll Love It!

The result is a gorgeous eBook filled with some amazing photography – it is going to inspire you – but also some really practical tips from Todd and Sarah.

They write this guide in a very down to earth and personal way which will be accessible to those just starting out but also helpful to those who’ve been shooting landscapes for years.

What You’ll Discover in this 130+ page eBook

Here’s some of what you’ll find in Living Landscapes:

  • How to simplify the process of making engaging and technically proficient landscape images.
  • How to overcome the unique challenges that landscape photography presents.
  • The 4 landscape fundamentals that turn bland into beautiful.
  • Workshops and guided tours of some amazing landscape images.
  • A straight forward explanation of the gear you need.
  • Landscape specific post-processing techniques.
  • Advanced tips and techniques specific to the following landscape photography topics: mountains, water, bush and forest, black and white and panoramic stitching.

Grab Your Copy Today and Save 33%

I LOVE this eBook and am so excited to practice what I picked up in it in an upcoming family trip. I’m also looking forward to seeing the images that our readers take as a result of reading this eBook.

Living Landscapes is available for you to purchase and download right now at the special Early Bird Price of $ 19.99 – a 33% discount on it’s regular price.

Want more information about this eBook? Get the Full Lowdown Here. Or grab your copy by hitting the ‘download it now’ button below.

download_it_now_landscapes

// < ![CDATA[ // < ![CDATA[ // < ![CDATA[ // < ![CDATA[ // < ![CDATA[ // < ![CDATA[ function EJEJC_lc(th) { return false; } // ]]>

Post originally from: Digital Photography Tips.

Check out our more Photography Tips at Photography Tips for Beginners, Portrait Photography Tips and Wedding Photography Tips.

Living Landscapes: A Guide to Stunning Landscape Photography


Digital Photography School

 
Comments Off on Living Landscapes: A Guide to Stunning Landscape Photography

Posted in Photography


The Basics of Using ND Grads to Improve Your Landscapes

02 Jul
For this image, I used a 4-stop hard-edged ND grad to hold back the sky.  I also used a 5-stop ND filter to slow the exposure enough to get the water silky smooth. 6 seconds, f/16, ISO 100. EOS 5D Mark III with EF 16-35mm f/2.8L II.

For this image, I used a 4-stop hard-edged ND grad to hold back the sky. I also used a 5-stop ND filter to slow the exposure enough to get the water silky smooth. 6 seconds, f/16, ISO 100. EOS 5D Mark III with EF 16-35mm f/2.8L II.

As I’ve written before, the hardest part of landscape photography is retaining detail in a bright sky with a darker foreground.  There are several ways to deal with this issue. The newest ways involve various post-processing techniques in Photoshop or Lightroom, or using High Dynamic Range photography to blend several exposures together, retaining both shadow and highlight detail from these exposures.  There is nothing wrong with these techniques, and in fact there are times where these may be the best method for keeping detail in the sky. There are issues with both blending and HDR.  HDR tends to have a very processed look to it when not done well, and blending takes time to do well. I am not one who likes to spend much time in Photoshop with my images.  In addition, you still need to be sure that you somehow capture enough information in the sky that you are not simply darkening down white pixels.

On the left is a 2-stop, hard-edged ND grad.  On the right is a soft-edged 2-stop ND grad.

On the left is a 2-stop, hard-edged ND grad. On the right is a soft-edged 2-stop ND grad.

To ensure you’re capturing enough detail, the use of graduated neutral density filters is needed. Graduated Neutral Density Filters (ND grads, for short), are pieces of glass or photographic resin that are half clear, and gradually gets darker as it moves to the other end.  This darkening begins in the middle of the piece of glass.  First of all, these filters come in two forms.  The first of which is a typical screw-on filter that screws onto the front of the lens. While this style is fine for polarizers or skylight filters, it’s problematic for ND grads, because the horizon can’t be repositioned.  The other way these filters come is in 4×5 or 4×6 inch glass or resin.  These pieces of glass are then placed in holders, and the horizon can be repositioned as needed. The biggest advantage these filters have over the screw-in kind is the fact that they allow you freedom of composition to put the horizon where you want.   The most popular holders and systems for this type of filter are the Cokin systems, which come in various sizes, and the Lee system, which typically accepts a 4″ wide filter.  The Cokin systems tend to be a bit cheaper both in terms of cost of the holder and cost of the filters.  The Lee system is a bit more expensive on both fronts.

Once you’ve decided on which system to use, there is then the choice of which ND grads to choose. There are several companies that manufacture these filters, from  Cokin for their systems, to Lee, to to Formatt Hi Tech, to Schneider Optics, among others.  The prices vary, depending on whether you’re buying photographic resin or glass.  Resin filters tend to be cheaper while glass is most expensive. Resin doesn’t break when dropped but can scratch more easily than glass does. ND grads are available in various densities, including  2 stops, 3 stops, and 4 stops.

The selection doesn’t stop there, however. In addition to choosing which density you need, you also must choose how gradual the density is. Graduated neutral density filters come in both hard-edge and soft-edge graduations.   You would use hard-edge filters when you have a clear horizon and no object in the foreground intersects it.  You would use soft-edged filters when there is an object that intersects the horizon.  Soft-edge filters have a much smoother gradation, which allows it to look more natural when used in a photo.  A hard-edged filter will create a more definitive line between light and dark in the image.

These filters have become some of the most important tools in my bag when creating landscape photos. If you’re just starting out, get an inexpensive set of filters- there is no “one size fits all” to ND grads.   However, if you can only start with one, I’d suggest a soft-edged three stop ND grad. The hard-edged can be limiting at times, and two stops never seems to be enough on its own.  I often stack ND grads to get the effect I’m looking for.

Happy shooting!

Because Haystack Rock stood above the horizon line, and was quite a bit darker than the sky behind it, I had to use a 3-stop, soft-edged ND grad filter here. 1/20, f/16, ISO 100. EOS 5D Mark III with EF 16-35mm f/2.8L II.

Because Haystack Rock stood above the horizon line, and was quite a bit darker than the sky behind it, I had to use a 3-stop, soft-edged ND grad filter here. 1/20, f/16, ISO 100. EOS 5D Mark III with EF 16-35mm f/2.8L II.

Post originally from: Digital Photography Tips.

Check out our more Photography Tips at Photography Tips for Beginners, Portrait Photography Tips and Wedding Photography Tips.

The Basics of Using ND Grads to Improve Your Landscapes


Digital Photography School

 
Comments Off on The Basics of Using ND Grads to Improve Your Landscapes

Posted in Photography


Getting Landscapes Sharp: Focus Stacking

07 May

A key aspect of successful landscape photography is image sharpness.  Usually, it is desirable to ensure that all elements of a scene, whether close or far, are captured in sharp focus.  This can prove to be challenging and, if not achieved with the click of the shutter, cannot be corrected later during post processing.

One approach that is often taken is to use the smallest aperture available, e.g. f/22, to obtain the largest depth of field.  Whilst maximising the depth of field is a good intent, using such a small aperture will actually result in softer images due to an effect known as diffraction.

Most lenses are at their sharpest when used at apertures between f/8 and f/11 and whilst hypefocal focussing may allow you to capture an entire scene acceptably sharp in one image using these apertures; it is always still a compromise between a number of factors and there will be times when you cannot generate enough depth of field to capture a whole scene at optimum sharpness.

That is where focus stacking comes in.

Focus stacking is the technique of stacking (or blending) a number of images that have been focussed at different points throughout a scene to give a final image that contains the sharpest portions of the originals, seamlessly blended into one.  It isn’t as laborious as it sounds and can give really good results, rendering scenes far sharper than possible in just one exposure.

Focus Stack Initial Image

The initial image, shot at f/8, lacked front-to-back sharpness as there was not sufficient depth of field. ISO100, f/8, 2 secs

In the field…

As you will be stacking the images into one, aside from the point of focus, you want the individual photographs to be identical in all other respects.  Therefore, it is best to have the camera positioned on a tripod and use a remote release.

Using your optimum aperture (can easily be determined for a given camera/lens combo using focus charts, however you will most likely find that f/8 is a good starting point), take the required number of images focussed at different points throughout the frame.

A minimum of two images are required, i.e. one focussed for the foreground and one focussed for the background, however an additional third image, focussed for the middle ground can also be a good idea.

Focus stack comparison foreground

A comparison of a 100% crop of the foreground from two images, one focussed for the foreground (left) and one focussed for the background (right).  Both shot at ISO100, f/8, 2 secs.

Focus stack comparison background

A comparison of a 100% crop of the background from two images, one focussed for the foreground (left) and one focussed for the background (right).  Both shot at ISO100, f/8, 2 secs.

Back at home…

Open the two images in Photoshop and create a new file that contains both images as different layers, in the one file (to make life easier, name the layers accordingly, e.g. near, far).

Select both layers and go to Edit > Auto-Align Layers to ensure both images overlay perfectly.  Select the ‘Auto’ option, and deselect the ‘Vignette Removal’ and ‘Geometric Distortion’ options.

Then select Edit > Auto-Blend Layers, and choose ‘Stack Images’, ensuring ’Seamless Tones and Colours’ is selected.

Focus stack auto blend dialog box

The Auto-Blend dialog box

At this point, Photoshop will determine the sharpest portions of each image to incorporate into the final image, and apply a mask to each layer.  Below you can see the layer masks applied to the two images.  In this instance, you can see the rocks in the lower portion of the image are the main area selected by the layer mask for the ‘near’ layer whereas the rocks in the middle distance and the background mountains are incorporated from the ‘far’ layer.

Focus stacks layer masks

The automatically generated layer masks, applied to each layer, includes the sharpest portions of each layer (shown in white).

It is worth checking the image at 100% zoom to ensure that there are no strange artefacts caused by poor blending of any moving grasses or branches.  These can be fixed by manually painting white or black on to the relevant layer mask (remember: white reveals, black conceals).  For those using Elements, if you are only using 2 or 3 images, it is possible to do the blend manually using layer masks and white/black gradients.  In some instances, it actually gives better results, with fewer ‘blending artefacts’ to do the blend manually.

Once you are happy with the blend, merge the layers to give your final, focus stacked image.

Focus Stack final image

The final image with good sharpness from the foreground rocks right through to the mountains in the background

It may not be immediately apparent when showing images at web resolutions, but the difference in the overall sharpness when using optimum apertures and focus stacking is astounding when printing images.  To be able to focus stack, it only takes a little more forethought when out capturing the scene, and a few short processing steps when back at your computer so why not give it a go the next time you are out photographing landscapes.

Post originally from: Digital Photography Tips.

Check out our more Photography Tips at Photography Tips for Beginners, Portrait Photography Tips and Wedding Photography Tips.

Getting Landscapes Sharp: Focus Stacking


Digital Photography School

 
Comments Off on Getting Landscapes Sharp: Focus Stacking

Posted in Photography


What’s In My Bag- Landscapes

03 May

I’m often asked by beginning photographers about what I use to shoot my photos, whether it’s landscapes, portraits, sports, or some other subject.  Most often, they are referring to the camera used, the lenses, maybe the flash. But the truth is that there’s more to taking great photos than just the camera.  The truth is, the contents of my bag changes dependent on what I plan to be shooting. I’ve compiled a list of items that are always in my bag when I’m on a landscape photo outing, along with how they’ve helped me in my quest for better photos.

1. My Three-Legged Friend

Without a tripod and neutral density filters, I couldn't possibly hope to capture this image. Using a 6-stop ND filter, exposure was ISO 100, 10 seconds, at f/16.

Without a tripod and neutral density filters, I couldn’t possibly hope to capture this image. Using a 6-stop ND filter, exposure was ISO 100, 10 seconds, at f/16.

The truth is, I’d be lost without a tripod on a landscape outing. I currently have two I use regularly. Which ones I use is far less important than the process of choosing a tripod. Too often, beginning photographers skimp on the tripod purchase, going for something cheap that doesn’t suit their needs, and in the end, their images suffer. First and foremost, a tripod needs to support the weight you plan to put on it. This means taking the total weight of your camera and heaviest lens, and making sure your tripod will support that weight.  The fact is, a heavy tripod will better support the weight you put on it, but in today’s world a premium is put on lighter weight. Carbon fiber tripods are lighter weight and generally support heavier loads than aluminum tripods, but at a higher expense. One of the tripods I use is a Manfrotto XPro B, with an Arca Swiss B1 ball head.   This tripod and head combination weighs over 6 lbs., but is rock solid in any conditions. The tripod legs are rated to support 15.4 lbs, and the head is rated to support over 90 lbs! My other tripod is a Gitzo 1541T Traveler with an Acratech GPss ball head. The legs are rated to hold 17.6 lbs, and the head is rated to hold 25 lbs.  This is a smaller setup that folds down to about 20″, and weighs less than 3 lbs. This is what I use when I fly, or when I am hiking longer distances. The thing to realize about a tripod is that a good one is built to last. If you take care of it, a tripod can last a lifetime of shooting.

2. Stepping Up A Level

My trusty bubble level always reminds me to be sure my camera is straight. Nothing annoys me more than a crooked horizon line!

My trusty bubble level always reminds me to be sure my camera is straight. Nothing annoys me more than a crooked horizon line!

These days, just about every DSLR out there has a built-in electronic level, a feature I simply LOVE.  However, sometimes in the heat of the moment I will simply forget to level my camera properly, since the built-in level isn’t always visible on the screen.  Because of this, I still carry a hot-shoe mounted spirit level in my bag.  It’s hard to miss it sitting on top of the camera, and it always reminds me to be sure the camera is level.  And yes, while some tripods do have levels built-in, they aren’t always easy to see, and depending on where they are mounted, it may indicate the legs are level, but doesn’t mean the camera is level because the head can still tilt.

3. Filters

I’m a big fan of using neutral density filters and graduated neutral density filters for landscape work.  I have a set of Schneider filters that I use with a Lee filter holder. The Schneider filters are not cheap.  They are optical glass, heavy, and high quality. There are more economic options available in Lee-style filters, including Cokin, Formatt, and Lee.  The filters I use are 4×5 size, which allows me to adjust the horizon on the graduated filters based on my composition. My kit consists of 3-, 4-, 5-, and 6-stop ND filters, and 2-,3-, and 4- stop grads, which come in both hard and soft-edged styles.  Which style you use is dependent on the scene in front of you.  I also have a circular polarizer I use often for controlling reflections and cutting haze.

4. Flashlight

I often find myself shooting before the sun rises, and after the sun sets. This means hiking to and from my location in the dark. A flashlight can be a lifesaver in these situations.  In addition, at times I go out to shoot night landscapes, to get stars in the sky, or the moon. If there’s no light in the foreground and I’d like some, a flashlight is the perfect way to paint some light back in.  I also carry a headlamp in my bag so I can work handsfree and have a light on while digging around in my bag.

5. Step-Up Rings

When you have lenses that have different diameter front elements, it can be maddening to have to buy filters for each lens. An easy workaround for this is to buy step-up rings.  I have a complete set that covers from 52mm up to 82mm.  I then simply purchase the filter for the largest lenses I own and use the step up rings for smaller lenses. Much easier and more cost effective than buying filters to fit each lens.

For this image, I used a 4-stop hard edged ND grad, to bring the sky back within the dynamic range of the camera. I used the hard edge here because there was nothing intersecting the horizon from the foreground, which made it very easy to line up the darkened edge with the horizon out on the bay. Exposure was 1.3 seconds, ISO 100, f/16. EOS 5D Mark II with EF 17-40 f/4L.

For this image, I used a 4-stop hard edged ND grad, to bring the sky back within the dynamic range of the camera. I used the hard edge here because there was nothing intersecting the horizon from the foreground, which made it very easy to line up the darkened edge with the horizon out on the bay. Exposure was 1.3 seconds, ISO 100, f/16. EOS 5D Mark II with EF 17-40 f/4L.

Post originally from: Digital Photography Tips.

Check out our more Photography Tips at Photography Tips for Beginners, Portrait Photography Tips and Wedding Photography Tips.

What’s In My Bag- Landscapes


Digital Photography School

 
Comments Off on What’s In My Bag- Landscapes

Posted in Photography


Tips for Shooting Landscapes with a Telephoto Lens

10 Apr

Landscape photography is often synonymous with wide-angle lenses, strategically placed foreground elements and all encompassing vistas that stretch from the very near to the very far.  There is no doubt that using that approach can create wonderful images that lead the viewer through a grand landscape however there is also merit in taking a different approach and using a telephoto lens.

Telephoto Landscape - Rolling Farmland

This rolling farmland was isolated using a focal length equivalent to 280mm, f/13, 1/200s, ISO 200, using a tripod

Often, when photographing a landscape, there is a particular element of the scene that has caught your eye and made you want to capture the image.  With a telephoto lens, it is possible to isolate that key element and bring it to the fore of the composition, rather than let it get lost amongst the other distractions introduced when shooting with a wide angle.  You will find that a telephoto lens will also compress the perspective of the landscape, brining distant objects much closer, giving a different sense of scale to when using a wide-angle lens.

The approach taken to shoot landscapes with a telephoto lens is similar to when using a wide-angle lens, though there are some additional considerations.  Here are a few tips to help you along the way:

1. Composition: Look for a strong feature of the landscape and try to isolate it within the frame, leaving out unnecessary elements that detract from the composition, for example, the sky – we often feel the need to include the sky within landscape images, however if it doesn’t add significant interest, or would detract from the main element, why not leave it out?

2. Sturdy support: You will want to use a sturdy tripod to ensure you can shoot without suffering from camera shake.  Telephoto lenses are very sensitive to the slightest movement so a solid support is key to capturing sharp images.  If shooting handheld, a good rule of thumb is to aim for a shutter speed quicker than ‘1/focal length’ to avoid camera shake however depending on the available light that is not always possible, hence the recommendation for a tripod.

3. Camera shake: Utilise ‘mirror lock-up’ or a remote shutter release (even both) to further reduce the chances of vibrations.  When the shutter is pressed, the movement of the mirror can introduce vibrations that can cause loss of sharpness, so the ‘mirror lock-up’ feature (found within the menus of most DSLRs) introduces a small delay between lifting the mirror and opening the shutter.

4. Image Stabilisation: Switch off any image stabilisation features on the lens or within the camera body.  That feature that you rely on when shooting handheld can actually introduce camera shake if left on when your camera is mounted on a tripod, and when using a telephoto lens, those movements will be exaggerated and result in a softer image.

Telephoto Landscapes - Tuscan Sunset

A Tuscan landscape captured using a focal length equivalent to 120 mm

5. Aperture selection: Be aware of the optimum aperture required to capture the scene in sharp focus.  When the subject is distant, a large depth of field can be easily achieved (even with a telephoto lens) so consider using apertures within the ‘sweet spot’ of your lens (typically f/8 to f/11).

6. Filters: If you do chose to incorporate the sky within a telephoto landscape you may find that the dynamic range of the scene is greater than your camera can capture in one shot.  Typically, you may use graduated neutral density filters to overcome this, however it is more than likely that the diameter of your wide-angle lens will differ to your telephoto lens, meaning you may not have the appropriate filter ring size to use with your telephoto lens.  Adapter rings are fairly cheap to buy and keep in your camera bag just in case, otherwise think about capturing bracketed exposures (exposed correctly for the sky and land) in order to blend them together later on.

Telephoto Landscapes - Panorama

A panorama stitched from 7 images taken at a focal length equivalent to 100 mm.

7. Panoramas: Telephotos lenses are great for capturing panoramas as there is very little distortion due to focal length.  This means you can zoom in even further on a feature within the landscape and capture a number of images to stitch together into one panoramic image (even though the final field of view may not actually be that wide).

Seeing compositions that work with a telephoto lens may be challenging initially, however it won’t be long before you start isolating elements of the landscape in your minds eye.  A good exercise is to go out and challenge yourself to shoot landscapes with only your telephoto lens.  You will find that the change of focal length may be refreshing as even local landscapes can be transformed to something unfamiliar when seen through a telephoto lens.

Post originally from: Digital Photography Tips.

Check out our more Photography Tips at Photography Tips for Beginners, Portrait Photography Tips and Wedding Photography Tips.

Tips for Shooting Landscapes with a Telephoto Lens


Digital Photography School

 
Comments Off on Tips for Shooting Landscapes with a Telephoto Lens

Posted in Photography


Hunt, Peck & Paint: Chromatic Typewriter Prints Landscapes

11 Mar

[ By WebUrbanist in Technology & Vintage & Retro. ]

chromatic typewriter

Many works of amazing literary art have been printed on typewriters in times past, but this re-purposing takes an old machine beyond words and into the realm of colorful painting.

chromatic upcycled landscape printer

Tyree Callahan has recycled (or upcycled, perhaps) a classic 1937 Underwood typewriter by replacing letters with sponges soaked across the spectrum with bright yellows, reds, blues and combinations thereof.

chromatic abstract art prints

Based in the Seattle area of Washington, the artist writes of his environs: “I’m constantly amazed at the play of light through our moist air and over the varied landscape of the Pacific Northwest. I especially enjoy early morning light–that short interval of time just before the last of the fog burns off–and evening light, especially on humid evenings, when the atmosphere itself is aglow with evening’s hues. We live in an environment that can produce both vivid and somber landscapes, often both within an hour’s time.”

chromatic landscape printing machine

There is something so satisfying about the click-clack sounds of a traditional typewriter, translating the mechanical motions of your fingers into physical results on the page in front of you – but imagine making those impressions in vivid colors instead of black on white. Sounds relaxing, hopefully literally.

Share on Facebook


[ By WebUrbanist in Technology & Vintage & Retro. ]

[ WebUrbanist | Archives | Galleries | Privacy | TOS ]


WebUrbanist

 
Comments Off on Hunt, Peck & Paint: Chromatic Typewriter Prints Landscapes

Posted in Creativity


The Silent Valley: Landscapes Overtaken by Urbanization

01 Mar

[ By Steph in Art & Drawing & Digital. ]

Silent Cities Yongliang 1

The rapid industrialization of China and its effects on the nation’s beautiful natural scenery are depicted taking over traditional landscape scenes in a stunningly detailed series of digital works by artist Yang Yongliang. The imagery of Song dynasty artists, who painted pastoral scenes filled with peaceful mountains and pristine waterways, is juxtaposed to disconcerting effect with futuristic megacities, leaving little land untouched by urban growth.

Silent Cities Yongliang 2

Silent Cities Yongliang 4

The viewer must get very close to each work to see all of the complexities contained within them. Yongliang has envisioned a future in which there is virtually no escape from the hand of man, with skyscrapers clinging to the sides of mountains and rivers clogged with boats. What might be a dark nighttime scene is hazy with light pollution, made even brighter by presumably smog-filled skies.

Silent Cities Yongliang 5

‘Sleepless Wonderland’, pictured above, even mimics the artistic style of 12th century Song dynasty painters with ‘cun’, traditional texture strokes that were used to outline trees and texture land surfaces. These Song landscapes have long been considered an ideal representation of the beauty of Chinese nature.

Silent Cities Yongliang 9

Silent Cities Yongliang 8

Silent Cities Yongliang 7

In other works, such as ‘Crocodile and Shotgun’, figures in traditional Chinese dress look out upon wasted landscapes filled with industrial remnants and land mines. ‘Bowl of Tapei’ offers two variations of the city: one idyllic, with hovering clouds, the other dystopian and steaming with factory smoke. See more at Galerie Paris Beijing.

Share on Facebook


[ By Steph in Art & Drawing & Digital. ]

[ WebUrbanist | Archives | Galleries | Privacy | TOS ]


WebUrbanist

 
Comments Off on The Silent Valley: Landscapes Overtaken by Urbanization

Posted in Creativity


Getting Landscapes Sharp: Hyperfocal Distances and Aperture Selection

26 Feb

An important element of landscape photography is ensuring that all of the key elements within your composition are sharp.  This can often include foreground objects that are a matter of meters from your camera as well as background elements that can be kilometres away.  Therefore, to achieve this, you need to ensure your depth of field is large enough to render everything of interest, suitably sharp.

Sunrise over the limestone pavement

In this scene it was important to capture everything from the frozen puddle in the foreground, to the hills in the background, in sharp focus

When you focus on an individual point within your landscape, you are in fact creating a plane of focus that lies parallel to the sensor.  Everything in front of, and behind, that plane is technically not in focus, however there is a region within which objects will appear acceptably sharp – that is the depth of field.  For instance, in the scene below the camera has been focussed on a rock.  Therefore, the plane of focus lies parallel to the sensor across that rock and the limits of acceptable sharpness, that form the bounds of the depth of field, lie in front of, and behind, that plane.

Hyperfocal Distance Diagram 1

A theoretical example showing the depth of field for a given focal length, aperture and point of focus. The depth of field will always extend one third of the distance in front of the focal plane, and two thirds of the distance behind it.

In the diagram above, the depth of field is not sufficient to capture all of the trees within the range of acceptable sharpness, i.e. they will appear out of focus.  However, the depth of field can be easily manipulated to extend as far as you wish as it is controlled by a number of factors, namely: focal length, aperture and distance to the focal point. (I’m not going to include sensor size here as, after the purchase of your camera, it is not subject to user control; however it does not hurt to appreciate that the depth of field is inversely proportional to sensor size meaning that different cameras have different capabilities with respect to achievable depth of field).  The relationship that these factors have with depth of field is given below:

  • Focal length: Up first is focal length as, typically, your focal length will be determined by your composition.  Changing your focal length will alter your field of view and therefore your composition, meaning that you don’t often adjust your focal length to alter your depth of field but generally manipulate the other factors at your chosen focal length.  A short focal length, i.e. wide-angle, will give you a greater depth of field than a long focal length, i.e. telephoto.
  • Aperture: Probably the most obvious factor in depth of field control is aperture. A narrower aperture, i.e. larger f/ number, gives you a greater depth of field and vice-versa.  It is important to select the smallest, diffraction-limited aperture so to obtain the maximum depth of field without suffering from image degradation.
  • Distance to focal point: In combination with a given focal length and aperture, deciding where to place that plane of focus will impact the resulting depth of field.  The depth of field increases as the distance to the focal point from the camera increases.  Therefore, once a focal length has been chosen, it is generally the combination of the selected aperture and distance to the focal point that controls the depth of field.

Hyperfocal Distance

One way to ensure that the entire frame is in focus (well, ‘acceptably sharp’) is to ensure that the depth of field extends from the foreground to infinity.  To do this, you need to focus at the ‘hyperfocal distance’: for a given focal length and aperture, there will be a distance where setting your point of focus will result in the entire scene being within the depth of field.

Hyperfocal Distance Diagram 2

By focussing at the hyperfocal distance, the entire scene (and more beyond) will fall within the depth of field

So theoretically, by selecting the correct aperture and moving the point of focus to the hyperfocal distance (assuming the composition and therefore focal length remain unchanged) it would be possible to render the entire scene in focus.  A point worth noting is that when focussing at the hyperfocal distance, the near acceptable limit is always half of the hyperfocal distance.

The calculation to determine the hyperfocal distance isn’t trivial, so there are numerous sites or apps to help you when out in the field.  However by frequent application, it isn’t long until you gain an appreciation of where to set your point of focus, for a given aperture at your commonly used focal lengths.

Aperture Selection

For any focal plane, the depth of field extends 1/3rd in front and 2/3rd behind the point of focus.  Therefore, an easy, but potentially flawed, application of hyperfocal focussing is to select a very small aperture, e.g. f/22 or f/18, and to focus 1/3rd of the way into the scene from the bottom of the frame.  It’s not a bad assumption, as often you will achieve the desired depth of field, however in choosing such a small aperture, you may well be losing any benefits of infinite focus due to decreased image sharpness as a result of diffraction.

For example, the image below shows a comparison of the same scene, shot at f/8 (left) and f/16 (right).

Hyperfocal distance aperture selection 1

The frosty fern leaf in the centre of the frame at the bottom of the image, was an important part of the foreground interest here.  Even though both images look perfectly sharp, the 100% zoom for each image below shows the difference in sharpness for between using f/8 and f/16, even though both apertures result in a depth of field that extends from before the fern leaf to infinity:

Hyperfocal distance aperture selection 2

The sharpness of the fern leaf at f/8 (left) vs. f/16 (right). Even though the lens was stopped down from f/22 to f/16, the resulting image could still be captured with greater sharpness throughout, by using a wider aperture of f/8, and focussing at the hyperfocal distance

Diffraction becomes an issue all lenses as the aperture gets smaller, especially at the edges of the image, and will be more pronounced on inexpensive lenses.  Typically, the sweet spot, in terms of lens performance, will be somewhere between f/8 and f/11.  Therefore, use of the smallest  ‘diffraction limited’ aperture that can still achieve the required depth of field becomes important.

So, hopefully, you will see that it is worth being aware of the hyperfocal distance for your commonly used focal lengths, especially for the apertures that result in optimum lens performance.  With the tools available to us today, it isn’t difficult to work it out, even when out in the field, so why not give it a go the next time you are out photographing landscapes.

Post originally from: Digital Photography Tips.

Check out our more Photography Tips at Photography Tips for Beginners, Portrait Photography Tips and Wedding Photography Tips.

Getting Landscapes Sharp: Hyperfocal Distances and Aperture Selection


Digital Photography School

 
Comments Off on Getting Landscapes Sharp: Hyperfocal Distances and Aperture Selection

Posted in Photography


Include The Foreground For Dramatic Landscapes

30 Jan

When I came upon this small cascade, I felt it would make a nice image. I began working up close and felt like something was missing. Then I walked further downstream and found these interesting rock formations. Camera was Canon EOS 5D Mark III, with EF 17-40mm f/4L. Exposure was 2.5 sec., f/18, ISO 100.

When photographing landscapes, it’s very easy to get lost in the grandiosity of the overall view, and sometimes , lose sight of what could be a better image.  Many times, I’ve been taken in by a grand expanse that was simply beautiful to look at, but was unable to translate that beauty into a compelling image. In the past few years, one of my favorite landscape techniques is to use an ultra wide angle lens to emphasize the foreground and use that beautiful expanse as background for an image.

I was never what one would call a true “wide angle shooter”, but as I began exploring landscape photography more and more, I fell in love with lenses such as the 16-35mm f/2.8, the 14mm f/2.8, and the 8-15mm Fisheye Zoom. These lenses have become my go-to lenses when shooting landscape images.  They allow me to capture wide expanses, while emphasizing elements of the composition immediately in front of me.

The dune grass created a lot of foreground interest for me, with a nice texture that pointed towards the lighthouse. A low shooting angle ensured I'd be able to include that dramatic sky as well. Canon EOS 5D Mark III, with EF 8-15mm f/4L Fisheye Zoom. Exposure 1/60, f/16, ISO 100. The perspective was then corrected in Photoshop.

The first thing to realize when shooting with these lenses is that you have to be close to that foreground element. It needs to be prominent and stand out. Being able to spot those elements that will do that for your image is a skill that requires some practice to perfect.  It took me some time to learn to “see” like a wide angle lens would.  But now I constantly pick out elements and frame my image around that element being right in front of the camera, rather than looking at the bigger picture first and accidentally getting a nice foreground.

It’s important to take into account point of view when placing your foreground in the scene.  Too often I see photographers extending their tripod legs to the height that would be best for them standing at their full height.  The problem with this is that this is the height at which most people look at things, so for the most part the point of view in the scene won’t be too different from everyone else’s point of view.  I prefer to be able to get low when possible, and really get close to the foreground.  It’s a point of view most people don’t bother to get to, and it also makes the chosen foreground element that much more prominent in the scene. By being low, there’s also the added benefit that if the sky is dramatic, you can angle the camera up just a bit to include more of the sky.

These rocks made a beautiful foreground to place against the warm tones created by the sunset. EOS 5D Mark II with EF 14mm f/2.8L II. Exposure was 2.5 sec., f/11, ISO 100.

Once you have that foreground element in place, you want to be sure it’s in focus.  But more than that, you want to be sure EVERYTHING that you want to be sharp, IS sharp. To do this, you’ll have to figure hyperfocal distance. Hyperfocal distance is defined as  the closest distance at which a lens can be focused while keeping objects at infinity acceptably sharp. When the lens is focused at this distance, all objects at distances from half of the hyperfocal distance out to infinity will be acceptably sharp.  There are two ways to figure this out.  The first way is to do some math.  Math makes my head hurt, so I do it the easy way and use a depth of field calculator on my smart phone.  There are several out there, so I’d suggest trying some of the free ones first before spending money on the paid apps.  Once you tell the app what camera you are using (sensor size), focal length, and f-stop, as well as the distance to the foreground element you want in focus, the calculator will tell you what the hyperfocal distance is- the distance you should focus your lens to, as well as the near limit- or how far the nearest area of sharp focus is from the camera. Everything beyond that point should also be acceptably sharp all the way to infinity.

Of course, the foreground does not always lend itself to being included in our compositions.  These are choices we as photographers must make for every image we take.  As I said, it can be very easy to be sucked in by a beautiful vista.  But it’s just as easy to be turned off when the vista is only so-so. By looking at all areas of the scene, the foreground, as well as the middle ground and background, more options open up to your camera, and of course, more photos.

Fog and mist at sunrise obliterated the grander vista I had intended to shoot this morning. The lighthouse was shrouded in fog, but as the sun came up it created this beautifully soft light. A long exposure using a variable ND filter allowed me to give a misty effect to the water. The wet rocks glistening in the soft light gave the foreground added interest. Canon EOS 5D Mark II, EF 17-40mm f/4L. Exposure: 20 sec., f/11, ISO 800.

Post originally from: Digital Photography Tips.

Check out our more Photography Tips at Photography Tips for Beginners, Portrait Photography Tips and Wedding Photography Tips.

Include The Foreground For Dramatic Landscapes


Digital Photography School

 
Comments Off on Include The Foreground For Dramatic Landscapes

Posted in Photography