RSS
 

Posts Tagged ‘Landscapes’

How to Create Glass Ball Landscapes – 6 Techniques

29 Dec

In photography, creative inspiration can often come from trying something new and photographing a scene with that technique. Creating glass ball landscapes is one example of this, as it allows you to capture a fish-eye like scene, using a telephoto lens. The glass ball creates a mystique, as many people associate looking into a crystal ball with seeing into the future. However, visions inside a glass ball are easy to achieve with a few simple steps!

How to take landscape photos with a glass ball

img_8070-copy

In order to get good landscape photos with the glass ball, you’ll need to apply some basic rules, an understanding of the science at work also helps. If you read my previous article on crystal ball photography you will already be familiar with the 7 steps you can follow to take this type of image. Here’s a quick recap:

  1. Choose a scene that you’d normally shoot with a wide angle lens.
  2. Photograph this scene with the sun behind you, lighting up the scene you wish to shoot.
  3. Place the ball somewhere it won’t fall.
  4. Compose your scene with the glass ball in it.
  5. Ensure the horizon lines inside the ball and in the background match.
  6. Focus the camera on the scene inside the ball, which is best achieved using live-view and manual focus.
  7. Use an aperture of around f/4 as this will keep the ball sharp and the background blurred.
  8. Take the photograph, and repeat if you’re not happy with the sharpness inside the ball.
  9. Rotate your image in post-processing so the scene in the ball isn’t upside down. In some cases, you can skip this step.

Alternative glass ball landscapes, and how to compose them

It’s easy to get it in your mind that every scene or situation needs a crystal ball photo. This is not the case and careful consideration needs to be taken when selecting the photograph you’ll take. The most important thing to do is find a compelling subject that shows prominently inside the glass ball. Once you have this basic parameter established below are some differing ways you can compose your glass ball landscape photograph.

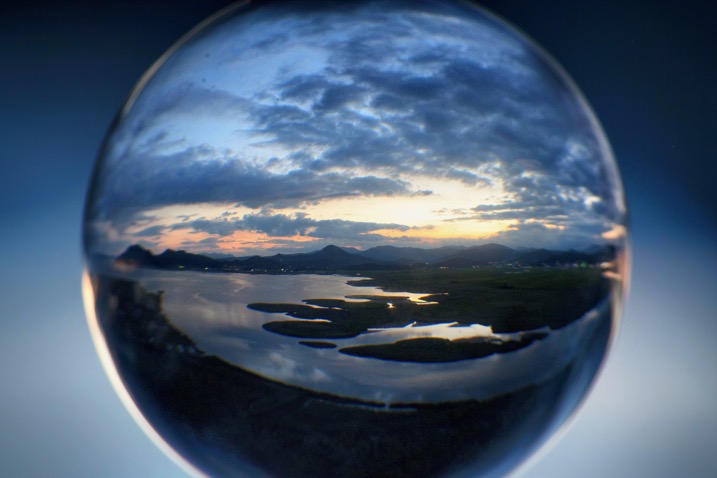
1 – The classic composition

Glass ball landscapes use the rule of thirds. This classic composition shows the entire ball and was shot at 100mm.

Glass ball landscape using the rule of thirds. This classic composition shows the entire ball and was shot at 100mm.

In this type of composition the ball fills the majority of the frame, with the entire edge of the ball visible. This will lead to glass ball landscapes that have an immediate impact and areas to the side of the ball that are blurred out and minimalist in nature. This type of image is most easily taken with a macro or telephoto lens with an aperture of f/4 to create the nice bokeh around the ball.
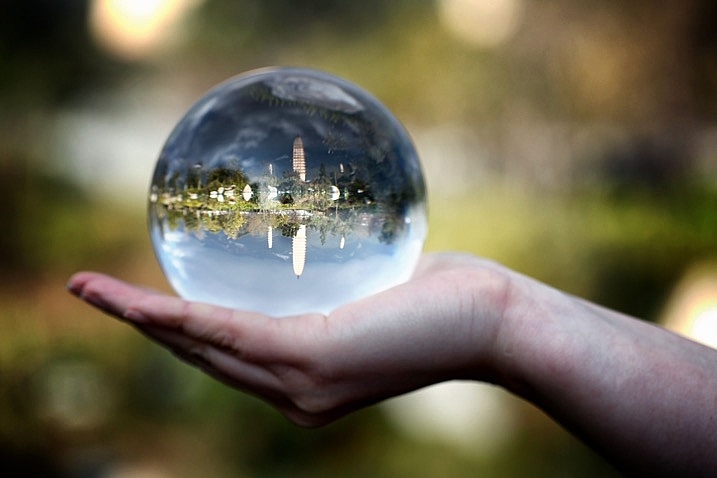
2- Get in close

Getting closer to the glass ball will emphasize the scene within the ball, this also entails framing that cuts some of the edges of the ball away. A centered composition with both the top and bottom part of the ball can work here, this has the advantage that top and bottom parts of the scene cannot be easily deduced. The other composition follows the rule of thirds, with the edge of the ball showing in the left or right third of the image.

glass ball landscape photography

A closer crop focuses the eye more on the image in the ball.

3 – Give the ball a bit of space

There are many ways to photograph the glass ball, and using a wide-angle lens with this technique can be very effective. In this case, you want the background scene to be minimalist, with the ball becoming an accent in the scene. The scene will not likely be rotated during post-processing, so compose to the scene in the background. In this type of the photo, the ball and the landscape scene should form a balanced composition.

A wider angle of 20mm is used here. The ball is an accent within this frame.

A wider angle of 20mm is used here. The ball is an accent within this frame.

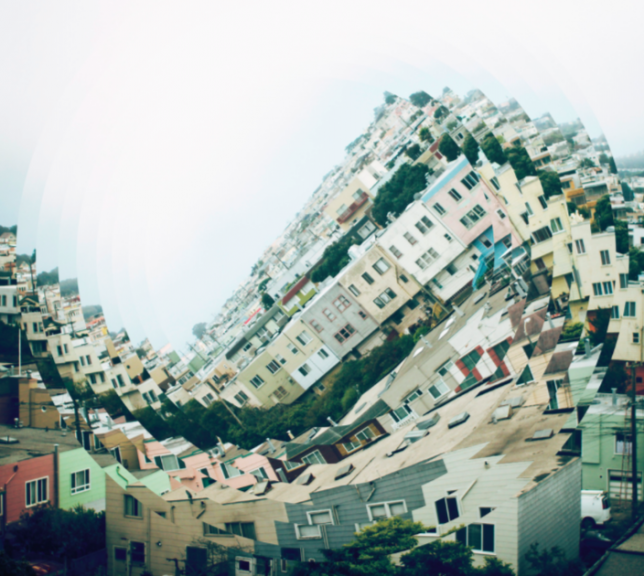
4 – Take it to the high life

Glass ball landscape photographs

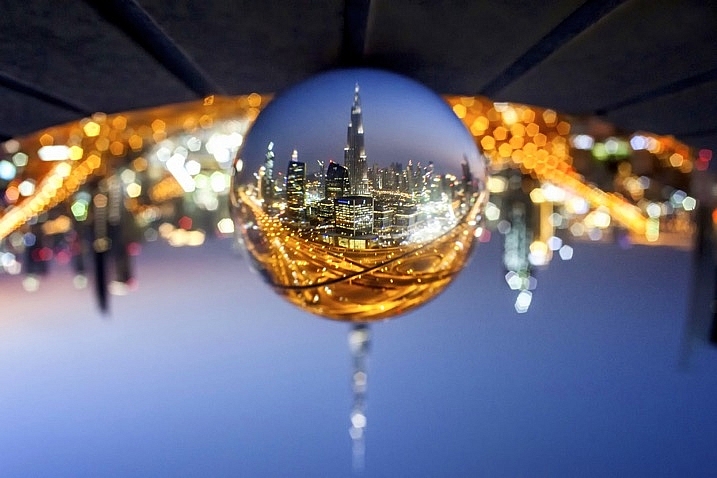
Gaining access to the rooftop provided a great vantage point.

As with all landscape photos, a high vantage point for glass ball images works well. Gaining access to a high building overlooking a city, or climbing a hill are both good options. Once at your high vantage point find a good position to place the ball, so you can see the landscape inside it. You need to ensure the ball will not fall, be very careful with its positioning.

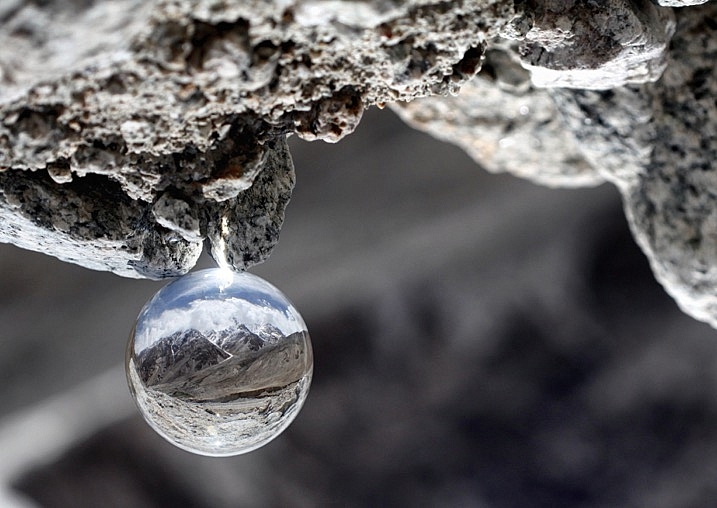
5 – Don’t forget the view from the floor

Apartment buildings in Busan, South Korea. This photo shows a glass ball being held by hand.

The view looking up can be just as good as the view looking down.

Deserts and canyons make for great locations to photograph with the ball. In this photo the ball is place on the ground, the stones in the foreground add a nice element to this photo.

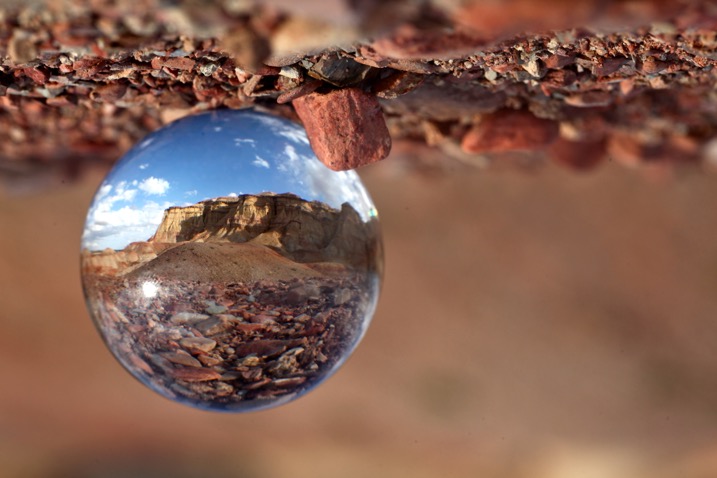
In this photo the ball was placed on the ground, the stones in the foreground add a nice element to this photo.

Placing the ball at street level doesn’t always work, as half the scene will be taken up by the ground. That said there are several situations that really work well with the ball on the ground.

  • The ball is ever so slightly higher than the rest of the scene, so it might be at the top of an undulation.
  • There is a reflection in the scene from a marble surface or a puddle.
  • The ground is an appealing element of the photo because it’s a leaf bed for example.

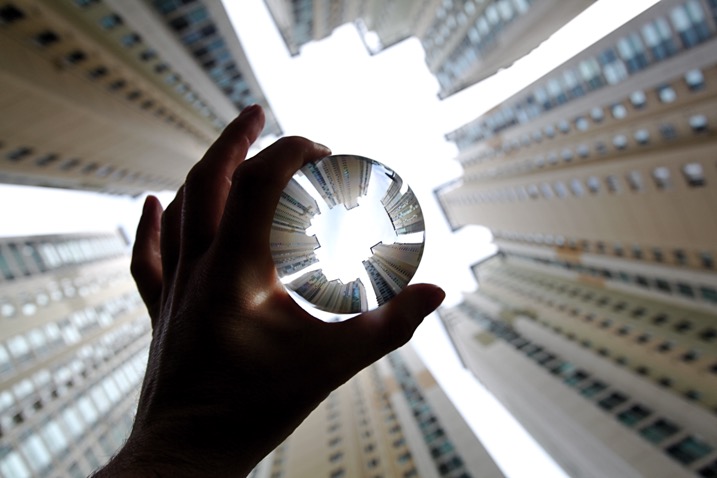
6 – The human element

A friend holding the ball in position is an alternative to putting the ball on the ground.

A friend holding the ball in position is an alternative to putting the ball on the ground.

The glass ball landscapes are not always best suited to having people in them. The blurred background may look less appealing with a human shape included in it. There are a couple of ways to humanize your image, though, while still maintaining a minimal feel.

  • You eclipse the people inside the ball. Use a long telephoto lens, compression will cause people to appear inside the ball. The background will be clean without the shapes of people in it (as below).
  • You take the photo, and someone else is holding the ball. The hand is the human element of this photo, with the landscape still inside the ball (as above).
glass ball landscape photography

Photographing people inside the ball is tricky, but not impossible.

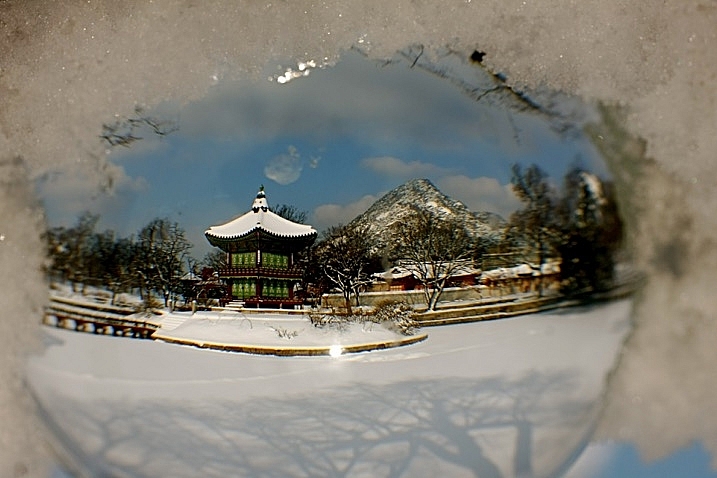
Where to try this technique

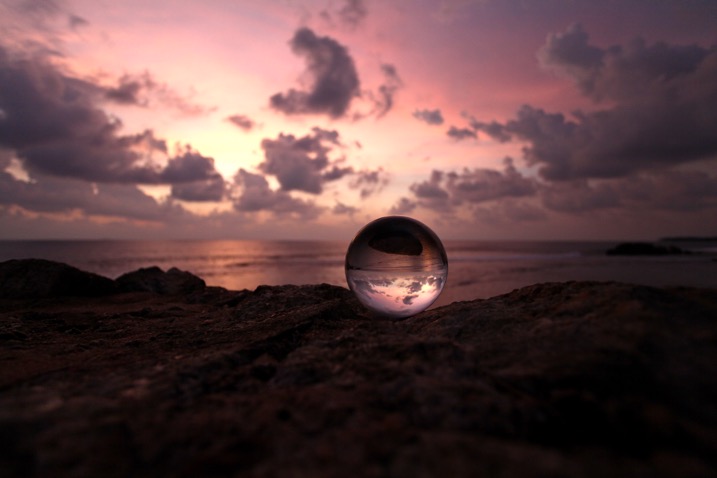
The places you’d visit for regular landscapes will also work for glass ball landscapes. The rooftops of tall buildings in cities work very well or a worm’s eye view from street level can be just as good. The beach or the desert are excellent options due to the minimalist nature of those locations.

Sunset photos at the beach with the glass ball are one of the classics in this genre of photography. Mountains and forests make for good locations as well. A lone tree can be a nice subject, as can lines of tree trunks inside the glass ball. Up in the mountains, you can easily fill the scene inside the ball with a large peak jutting up into the landscape.

The snow globe is a well known souvenir gift, which the glass ball can replicate.

The snow globe is a well-known souvenir gift, which the glass ball can replicate.

Getting out with the glass ball

In my last article on refraction I linked to a site selling an 80mm glass ball, this is a great option though it can be heavy to carry. You can also use a smaller ball for many situations, and when you are carrying a heavy bag of camera gear this is a good idea.

Once you have a glass ball it’s best to dive in and see what works best for you. I’d love to see more examples of your work, it was great to see so many pictures last time. One final tip, be careful in the sunlight with the ball. The glass ball acts as a magnifying glass with the sun’s rays and can burn you, or your property.

googletag.cmd.push(function() {
tablet_slots.push( googletag.defineSlot( “/1005424/_dPSv4_tab-all-article-bottom_(300×250)”, [300, 250], “pb-ad-78623” ).addService( googletag.pubads() ) ); } );

googletag.cmd.push(function() {
mobile_slots.push( googletag.defineSlot( “/1005424/_dPSv4_mob-all-article-bottom_(300×250)”, [300, 250], “pb-ad-78158” ).addService( googletag.pubads() ) ); } );

The post How to Create Glass Ball Landscapes – 6 Techniques by Simon Bond appeared first on Digital Photography School.


Digital Photography School

 
Comments Off on How to Create Glass Ball Landscapes – 6 Techniques

Posted in Photography


Warped Worlds: 30 Surreal Digitally Manipulated Landscapes

02 Aug

[ By SA Rogers in Art & Photography & Video. ]

distorted landscapes 4

The plot of the movie ‘Inception’ is almost an afterthought compared to the impact that its distorted, dreamlike manipulations of architecture and landscapes has had on a generation of artists and designers. Inspired by the concept of warping a scene in ways that completely defy the laws of physics yet still remain photo-realistic, the following artists have created new worlds that are strange and yet also familiar.

Erik Johansson

erik johansson 1

erik johansson 2

eric johansson 3

erik johansson 5
Nothing is quite as it seems in the images produced by Swedish-born, Berlin-based photo artist Erik Johansson. Grassy land cascades over the edge of the world like a waterfall, the surface of the earth is unzipped, cars appear to hover upside-down on the road. It’s difficult to tell reality from illusion, and that’s the point; the scenes he creates are as playful as they are impossible. Setting up and taking the photos takes about as long as manipulating them in Photoshop, and a single image can consist of over 100 layers.

Cubic Landscape by Petey Ulatan

distorted landscapes 1

distorted landscapes 2

distorted landscapes 3

distorted landscapes 6

distorted landscapes 7

Flattened views of landscapes are flipped and folded to create cubes, their edges bent at 90 degree angles, eliminating the very gradual and subtle curves that make up the surface of the Earth. Artist Petey Ulatan takes inspiration from the films ‘Inception’ and ‘Interstellar’ to reshape the world, almost as if a giant hand were making it into origami.

Turkey Turned Upside-Down by Aydin Büyüktas

distorted turkey 1

distorted turkey 2

distorted turkey 3

distorted turkey 4

distorted landscape 6

distorted turkey 6

Many of the same manipulations are happening in the work of Aydin Büyüktas, except focused on the Turkish city of Istanbul, with all of its landmarks and neighborhoods warped in ways that defy the laws of physics. The artist uses drone photography and 3D software to create these composite images. “We live in places that most of the times don’t draw our attention, places that transform our memories, places that the artist gives another dimension; where the perceptions that generally crosses our minds will be demolished and new ones will arise. These works aims to leave the viewer alone with a surprising visuality ironic as well, multidimensional romantic point of view.”

‘Inception Park’ in Buenos Aires by Black Sheep Films

inception park 1

inception park 2

inception park 3

What if you could ride a trackless rollercoaster around the city, almost as if you’re on the back of some kind of mystical flying creature? Black Sheep Films gives us an idea of what this would feel like with ‘Inception Park,’ a strange little video set in Buenos Aires. It’s fun to watch the snake of rollercoaster cars meander through the space, interacting with architecture.

Twisted Architecture by Nicholas Kennedy Sitton

Screen Shot 2016-07-31 at 7.25.44 PM

Screen Shot 2016-07-31 at 7.26.13 PM

Screen Shot 2016-07-31 at 7.26.27 PM

“These photos are a result of how intriguing the concept of distortion translates to architecture,” says artist Nicholas Kennedy Sitton of his ‘Twisted Architecture’ series. “It creates a sense of falling into itself, like capturing a moment of demolition. I can destroy titanous steel structures with the click of a mouse and create new twisted versions of reality. I was also inspired by San Francisco. I had just moved there and being in a new city was disorienting and exciting and I wanted to capture how my whole world had changed.”

Next Page – Click Below to Read More:
Warped Worlds 30 Surreal Digitally Manipulated Landscapes

Share on Facebook


[ By SA Rogers in Art & Photography & Video. ]

[ WebUrbanist | Archives | Galleries | Privacy | TOS ]


WebUrbanist

 
Comments Off on Warped Worlds: 30 Surreal Digitally Manipulated Landscapes

Posted in Creativity


Top tips for composing great landscapes

23 Jul

In this article I’ll try to outline a handful of the key elements that I look for when composing a photo in the field. The process of composing a photo can be daunting at times, but I hope that some of these tips will help you to lay the groundwork for developing an eye for composition in landscape photography.

Compositional Visualization: See the ball, be the ball

Developing an eye for composition in landscape photography is something that takes a great deal of time and practice in the field. Practice, persistence and due diligence do pay off and over time you will find yourself becoming more comfortable behind the lens.

The Mossy Grotto in the Columbia River Gorge in Oregon is incredibly difficult to shoot due to the limited compositional choices. I hiked around for almost 30 minutes before I settled on this composition which had a lot of layering and some nice diagonal leading lines to help to lead the eye to the focal point.

Mossy Grotto, Columbia River Gorge, OR

Sony a7R, Canon 16-35mm F2.8, 16mm- multiple exposures used for focus stacking and water movement. 

One thing that I’ve learned over time is that you absolutely have to pre-visualize your shot. This process starts with four key elements – the direction of the light, the focal point, the foreground and the leading line(s).

The focal point is often the first thing that your eye gravitates toward. It could be a waterfall, a mountain or even a stand of trees. If your eye gravitates toward it chances are it may serve as a good focal point to build your composition around. The next step in the process is to look for a leading line that guides your eye through the scene to your focal point.

I decided to use the river you see in this image as the leading line in this composition because it was able to the lead the viewer to the main focal point without detracting interest from it. I also enjoyed how the light in the composition added layers and depth to the image as well.

Glacier National Park, MT

Sony a7R, Canon 16-35mm F2.8, 16mm, F11, 1/15sec, ISO 160, single exposure

The ‘line’ is figurative of course. It can be a rock formation, a river, a series of interesting trees, vegetation or foliage, flowers, or even a trail. Choosing the correct leading line can have a large impact on your image. It is important to note though that the leading line may not work depending upon the direction of the light in the scene.

Let the light guide your eye to the focal point in the image

All of the elements need to work together to form a pleasing composition. Let the light guide your eye to the focal point in the image. Shadows and light play a huge role in guiding your eye through the scene and, when used correctly, can add a great deal of depth and interest to your photo.

I chose the Lupine you see here as my foreground because I felt the colors complimented the sky well (blue/purple and yellows tend to work well together) and the light play in the flowers also helped to guide your eye through the scene to the focal point at the back of the image.

Sony a7R, Canon 16-35mm F2.8L II, 16mm, F10, 1/50sec, ISO 100, multiple exposures for focus stacking and sunstar.

Choosing the correct foreground can have a large impact on the success of your image. I always try to choose a foreground that offers a complementary color palette to the other elements in the scene such as the sky or mountains. I also tend to look for elements that add depth and interest to the overall image without overwhelming the viewer- it’s a bit of a balancing act in regard to keeping the image dynamic yet visually pleasing. I also try to choose a foreground that offers a color palette that helps to ‘connect’ the overall image. When colors work well together they can really help to solidify an already aesthetically pleasing image.

Ted Gore recently published an excellent article on color theory that complements this article nicely. Using groups of colors that work in harmony and flow nicely can help to solidify an already robust composition and can add a whole new ‘layer’ of interest to the photo.

Articles: Digital Photography Review (dpreview.com)

 
Comments Off on Top tips for composing great landscapes

Posted in Uncategorized


Tips for Processing Winter Landscapes in Lightroom

20 Apr

I see a lot of winter. The interior of Alaska, where I live, gets a solid six months, often seven, of the white stuff. Essentially anytime from October to mid-April, we are likely to have snow on the ground. Unless I put the camera down for most of the year (which I don’t), I end up with a lot of photos on my computer of snowy mountains, forest, and tundra. Come the early-spring, brown season, I have a lot of computer work to take care of.

Kelly DONE-1

Though the method of processing winter images is largely the same as many other types of outdoor images, you’ve got to approach snowy images with cold focus (insert laughter here). I jest, but actually the cold, and bright blue tones of winter, are elements that should not be forgotten (or overdone).

My Approach

When I come at an image in Lightroom, I don’t tackle it with a standard formula. Rather, I consider the time and place I made it, what the landscape looked like, and just as importantly, how it felt. Those memories play an important role in my vision for the final image.

With that in mind let’s dive into the first of the three winter images I want to walk you through my processing steps.

Brooks Range, Alaska – Early winter

Kelly 1

On a river trip in early September, down the remote Kelly River of the western Brooks Range, my clients and I were hit by the first snowfall of winter. It started the evening before I made this image, with a few big, wet flakes falling from the overcast sky. By the following morning, my tent, the gravel bar on which we were camped, and the entire landscape, was covered in six inches of fresh snow. The snow was tapering off, and I could see breaks in the clouds where patches of blue sky shone through. It didn’t take long before those patches were turned into beams of sunlight on the mountains. I walked down to the river with my camera, and started making images of the shifting light on the land. This shot came out of that session.

The light and color is typical of many winter images, bright, with lots of blue. Take a look at the histogram in the upper right, and you can see how it’s pushed to the right, meaning the image is on the bright side (but no blown-out highlights), exactly what I want with an out-of-camera winter shot.

Step One – White Balance

The first thing to consider is the white balance. Cloudy days tend to cause warmer tones, and snow, particularly under-exposed snow, can take on a yellowish hue. This can be off-putting, so pushing your white balance toward the blues can help provide a more pleasing, and accurate tonality. In this case, my camera selected an appropriate White Balance in the field, and didn’t need any adjustment in Lightroom. But keep this in mind when processing your own images.

Step Two – Exposure

Kelly 2

The next step was to bring down the exposure by 0.75 stops, making the image a bit moodier, and less bright. I then bumped the contrast a hair to +16 just to make those highlights more clear before I dove into the more important contrast adjustments.

As a quick note, I bet I do 85% of my Lightroom edits in the Basic panel. This very effective section of the program is one you should know intimately, before you go exploring too much of the huge variety of other tools provided by the software.

Kelly 3

The next four sliders provide a more specific modification of lighting in the image. In this case, I wanted to recollect some of the feeling of the dissipating storm by emphasizing the dark clouds. To do so, I pulled the Shadows slider down nearly all the way, making the dark blues and grays of the clouds appear more menacing. The Highlights, I bumped just a notch, adding some pop to the bright patch on the mountains. Whites and Blacks each got a nudge up (Whites) and down (Blacks) respectively, finishing the job I started with the first two sliders.

Step Three – Clarity

Kelly 4

The first of the next three sliders is Clarity. This nifty tool, increases the contrast where dark and bright edges meet, and adds apparent sharpness to the image. On the morning I made the image, the clear morning light made the mountains very sharp to the eye. Wanting to emulate that effect in the image, I gave the Clarity a substantial boost to +62. That’s about as high as you can go on most images without appearing artificial.

Step Four – Vibrance and Saturation

The Vibrance and Saturation sliders are dangerous. Photographers tend to believe that bright colors mean a good image. I want to say this very clearly: Do NOT over-saturate your images. It doesn’t look as good as you think it does, so, you know, just don’t.

Vibrance increases the intensity of the less saturated tones. When used in moderation it adds pop. In this image, I left the saturation slider completely alone.

Kelly 5

The rectangular icon in the row below the histogram is the Graduated Filter. This useful tool allows you to adjust a portion of the frame, without affecting the other areas. Just as importantly, you can adjust the edge softness (transition area) as hard or soft as you like. In this case, I wanted my changes to taper naturally into the frame so made the filter edge fairly wide (set feather to a high number). Using this tool, I chose to darken the sky, and draw attention to the mountains at the bottom of the frame. After adjusting the placement, I lowered the exposure in the sky. This allowed me to subtly darken the sky, without affecting the brighter tones of the mountains.

Kelly 6

Adjusting contrast can cause previously invisible imperfections to appear. In this case, it was a dust spot on my sensor, which I cloned out using the “Heal” tool.

The final image, as you can see, is a substantial improvement over the original, and holds true to the scene as I remember it.

Before

Before processing

Kelly DONE-1

After processing

Color in the Cold

Not all images of the winter rely on cool tones for their success. At times, it is the juxtaposition of those cool tones and bright warm colors that make an image.

Beams 1

This is one such image. I made it on an extremely cold mid-winter day, on the ice of the small creek that flows on the lower part of my property north of Fairbanks, Alaska. It was about -35f (-37c), and water, pushed up from the bottom of the creek by the pressure of the ice, was trickling out onto the surface where it steamed into the frigid air, before freezing. It was midday, and the sun, just a few ticks above the horizon to the south, was throwing orange beams through the branches of the snow-colored spruces. Fortunately, I had my camera, and managed this photo before the sun slipped away.

Beams 2

On that cold day, I was forced to underexpose the image to keep the beams of sunlight and the sky from blowing out. My first step was to return some of that brightness to the image by raising the Exposure +1.10 stops.

Beams 3

In general, I dislike High Dynamic Range (HDR) images, particularly the over-processed ones that appear regularly on Facebook and Instagram feeds. That said, HDR, or my Lightroom version of it, can be helpful in highly contrasted images like this one. Here, I pulled the highlights all the way down, bringing the beams and the sky back to more appealing levels. The Shadows I brought up, which revealed details in the trees and shrubs which were previously too dark to see. The effect, when used appropriately, does not look artificial.

Beams 4

The image was already colorful and sharp so required very little in the way of Clarity, Vibrance or Saturation. A small boost (+9) to Clarity, +11 to Vibrance, and no change in Saturation was all the image needed.

Beams 6

The lens I used to make the image has a hood, which I realized after the fact, was slightly mis-aligned and threw a vignette over the corners of the photo. If I want a vignette (see next), it needs to be purposeful, not the accident of a poorly fitted hood. So, using the Lens Corrections module, I made a single adjustment, sliding the Lens Vignetting slider to the right, brightening the corners, and almost entirely eliminating the ugly dark area in the top right.

Beams 7

The last thing I wanted to do was darken the sky a touch more, and bring further attention to the starburst of sunbeams coming through the trees. So, using the Effects Module, I added a -20 Post-crop Vignette, which effectively darkened the sky and lower corners.

With that final change, the image was complete, a starburst of color on a brutal winter day.

Before processing

Before processing

Beams Done-1

After processing

The Storm

A number of years ago, I spent 10 days trekking through the Himalayas of Bhutan. It was October, the tail end of the trekking season for the little mountain kingdom. My group and I hiked up from the lowlands, to a high camp at over 13,000 feet, where we planned to cross over two 15,000 foot passes before making a long descent back to the city of Thimpu. It didn’t work out as planned. We’d scheduled two nights at the high camp to acclimatize before crossing the passes. Just before bed on the second night, a storm rolled in, and by the time we woke up the following morning, there were eight inches of snow on the ground. Any hopes of penetrating higher into the mountains were dashed. Making the best of it, I rose and made photos of the dark mountains and falling snow.

Bhutan 1

In the field, I purposely underexposed to keep the small patch of bright sky surrounding the sun from blowing out entirely. The mountains ended up nearly black, and the sky dark gray. Though consistent with my desire to make a moody, foreboding image, I wanted to emphasize that feeling even more.

Bhutan 2

In the Basic Module, you can see that I darkened the image a bit more, left the highlights more or less alone, darkened the shadows a hair, and bumped the blacks just a bit to bring some texture into the dark lower corners. The Clarity slider I pushed notably to the right, which made the textures in the sky and mountain pop against the otherwise soft grays. I left the color adjustments mostly alone.

Bhutan 3

The more I looked a the photo, the more I realized the top and bottom edges added nothing to the image. Using the crop tool, I nipped them off, bringing all the attention to the action in the central part of the frame.

Bhutan 4

At this point, the processing got a bit complicated. I wanted to deal with the sky and mountains separately. One I wanted to brighten, the other darken. There were two ways to deal with this:

  1. Use the Adjustment Brush tool to select and develop the two areas
  2. Use Graduated filters to accomplish the same thing. Because the Graduated filter allows more flexibility to change the softness of the adjustment edge, I decided to use that.

The filter that adjusted the sky I darkened, and increased the clarity. The one for the mountains, I brightened, boosted the highlights, to make the scudding clouds pop, and added some clarity.

Bhutan 5

As noted earlier, the changes in contrast can emphasize imperfections, and I took a moment to remove lens flares and dust spots.

Last, I did a second pass of the Vibrance and Saturation. The yellowish patch around the sun was annoying me, so I dropped both the color sliders down reducing the image to a near black-and-white.

Bhutan-Jangothang-snowstorm-04

Before processing

Bhutan Done-1

Finished image after processing

I really like the final image. It provides a sense of the storm and the foreboding nature of mountain weather. Looking back, I can easily remember my nervousness that snowy morning, the uncertainty, and eventually, our retreat back the way we’d come.

Conclusion

Great images can come from snow. Many photographers put their cameras away during a winter storm, but I strongly recommend you don’t because there is great stuff out there if you’ve got the perseverance to suffer through some cold days. The images you gather, like these, can be optimized in your computer. Remember to take a moment before you begin, to recall how the scene looked and felt when you made the image, then use those memories as your guide.

Do you have any winter images on your computer that are begging to be processed? Now’s the time to do it, please share your images and comments below.

googletag.cmd.push(function() {
tablet_slots.push( googletag.defineSlot( “/1005424/_dPSv4_tab-all-article-bottom_(300×250)”, [300, 250], “pb-ad-78623” ).addService( googletag.pubads() ) ); } );

googletag.cmd.push(function() {
mobile_slots.push( googletag.defineSlot( “/1005424/_dPSv4_mob-all-article-bottom_(300×250)”, [300, 250], “pb-ad-78158” ).addService( googletag.pubads() ) ); } );

The post Tips for Processing Winter Landscapes in Lightroom by David Shaw appeared first on Digital Photography School.


Digital Photography School

 
Comments Off on Tips for Processing Winter Landscapes in Lightroom

Posted in Photography


10 Tips for Photographing Wide-Angle Landscapes

17 Apr

A wide-angle lens is considered an essential piece of gear for any landscape photographer because it gives you a perspective that you cannot achieve with any other lens. You’ll not only be able to photograph grand vistas, but you’ll see lines in a different way, and emphasize subjects by getting super close.

So if you haven’t tried one yet, borrow or rent a wide angle lens and get ready to make images with a different flavour using these tips.

Organ Pipe Cactus National Monument, Arizona

21mm, ISO 100, f/18, 1/15 second

What is a wide-angle lens?

Camera lenses are defined by comparison to the field of view that the eye naturally sees – which is 50mm on a full frame camera or 35mm on a crop sensor camera. This is known as a normal focal length. Any wider than that is a considered wide-angle.

My favourite wide-angle lens is in the 10-20mm range on my crop sensor camera, or 16-35mm on a full frame camera.

When to use a wide-angle lens

Many people think the purpose of a wide-angle lens is to photograph grand vistas and get a lot in the frame. While that is one purpose for a wide-angle lens, its real power is in using its perspective to emphasize objects that are very close to you and de-emphasizing objects that are farther away.

1. Emphasize a foreground element

Wide-angle lenses allow you to get really close to something in the foreground, which will emphasize it and make it look larger and more important than the background elements. A wide lens has a way of changing the relative size of the objects in the frame, so that things that are closer to the lens appear larger, and things in the background appear smaller proportionally.

Black Eyed Susan by Anne McKinnell

20mm, ISO 200. f/5.6, 1/160 second

Try using a low angle and getting very close to your main subject. By close, I mean inches away. You’ll be surprised when you look through the viewfinder and discover that objects don’t appear quite so close through the lens.

2. Photograph your subject and its environment

My favourite way to use the lens is to get very close to my main subject so it is large in the frame, as mentioned above, but also include other elements in its environment in the frame. This is a great way to create a story-telling image that provides context for the main subject.

Balancing Rocks at Little Finland, Nevada by Anne McKinnell

16mm, ISO 200, f/8, 1.3 seconds

3. Get everything in focus

Another great power of a wide-angle lens is its ability to have incredible depth of field. You can get everything from two feet away to infinity in focus. Of course, this depends on the exact lens and the aperture you choose, but all wide-angle lenses have a greater ability to get more in focus than a telephoto lens (which is excellent at shallow depth of field by blurring the background). You’d be hard pressed to blur the background with a wide-angle lens.

Whitney Pockets, Nevada by Anne McKinnell

19mm, ISO 100, f/20, 1/20 second

You can use a hyperfocal distance calculator to figure out exactly what will be in focus for your lens at the aperture you choose. But generally speaking, if you focus on something close to you and use a small aperture like f/18, everything from front to back will be in focus.

4. Watch out for distractions

Since wide-angle lenses include a lot in the frame, you’ll need to be extra vigilant to make sure there are no distractions. Everything that is in the frame should have a purpose.

Check your composition to make sure there is nothing in the foreground that you didn’t notice, since objects just inches away from you will be in the frame. As well, check the background to make sure there you haven’t included something unintentional.

Ideally, your composition should clearly show what the main subject is, what the supporting elements are using an interesting graphic design, and not include anything else. Simplify the composition as much as possible.

Kirkjufellsfoss, Iceland by Anne McKinnell

11mm, ISO 100, f/20, 1/6 second

Because the frame contains such a wide field of view, it will have a lot in it, so it is especially important that the main subject is obvious.

5. Keep the camera level

Wide-angle lenses are notorious for displaying distortion around the edges. Anything with straight lines at the edges of the frame will appear to lean inwards. To avoid or minimize distortion, keep the camera level with the ground and don’t angle it up or down.

6. Angle your camera upwards

On the other hand, you can use this distortion to your advantage! Just make sure it is intentional and you are using it to emphasize something. For example, by angling the camera upwards you can emphasize the sky, and any clouds in it will appear to point towards the center of the frame.

Valley of the Gods, Utah by Anne McKinnell

15mm, ISO 100, f/11, 1/60 second

7. Angle your camera downwards

Similarly, if you angle your camera downwards you can emphasize leading lines on the ground and create a perspective that really draws the viewer in.

Fire Canyon Arch in the Valley of Fire State Park, Nevada by Anne McKinnell

10mm, ISO 200, f/11, 1/20 second

8. Make images in close quarters

Whenever you are in an enclosed space, making images with impact can become difficult, since you cannot get far enough away from your subject. If you are in a tight situation, a wide-angle lens is a necessity!

Antelope Canyon, Arizona by Anne McKinnell

21mm, ISO 100, f/11, 5.0 seconds

9. Beware of polarizing filters

You may already know that polarizing filters can darken skies, emphasize clouds, and saturate colours when you are photographing in a 90 degree angle to the sun. If you are photographing with the sun directly in front of you or behind you, the filter does not have this affect.

With a wide-angle lens, you may find that part of the scene in the frame is at a 90 degree angle and is affected by the polarizing filter, and the other side is not. When this happens, it is better not to use the polarizing filter at all (it will give you an uneven sky which is darker on one side).

10. Manage uneven light

When photographing landscapes with a wide-angle lens you’ll frequently encounter varying amounts of light in the frame. Often the sky in the background is much brighter than your foreground. When this happens, you can use a graduated neutral density filter to darken the top portion of your image and even out the exposure.

Wildflowers in Big Bend Ranch State Park, Texas by Anne McKinnell

10mm, ISO 200, f/11, 1/100 second

A wide-angle lens is often the favourite lens in the kit for landscape photographers and with these tips it may become your favourite lens too.

What do you like to shoot with your wide lens? Please share your tips and images below.

googletag.cmd.push(function() {
tablet_slots.push( googletag.defineSlot( “/1005424/_dPSv4_tab-all-article-bottom_(300×250)”, [300, 250], “pb-ad-78623” ).addService( googletag.pubads() ) ); } );

googletag.cmd.push(function() {
mobile_slots.push( googletag.defineSlot( “/1005424/_dPSv4_mob-all-article-bottom_(300×250)”, [300, 250], “pb-ad-78158” ).addService( googletag.pubads() ) ); } );

The post 10 Tips for Photographing Wide-Angle Landscapes by Anne McKinnell appeared first on Digital Photography School.


Digital Photography School

 
Comments Off on 10 Tips for Photographing Wide-Angle Landscapes

Posted in Photography


Travels in China: Photographing the landscapes and people of Guilin and XiaPu

16 Apr

$ (document).ready(function() { SampleGalleryV2({“containerId”:”embeddedSampleGallery_0533137695″,”galleryId”:”0533137695″,”isEmbeddedWidget”:true,”standalone”:false,”selectedImageIndex”:0,”startInCommentsView”:false,”isMobile”:false}) });

A seasoned travel photographer knows that there’s hard work involved in getting the best photos from a trip. So when Ken Koskela arrived in China on a 17-day trip, he wasn’t exactly planning on a relaxing vacation. He rose at 4 AM each day to get himself into position to photograph sunrise over the rivers, rice terraces and mountains of Guilin and XiaPu. Then, spending his afternoons with a guide, he interacted and photographed residents of the villages in the region, and spent evenings capturing sunset.

He operated on an average of four hours of sleep per night, but his hard work paid of in memorable images that capture the beauty of the region and its people. Take a look at a few images here and head to Resource Travel for the full story. Do you sacrifice sleep for great shots when you’re traveling? Let us know in the comments.

Articles: Digital Photography Review (dpreview.com)

 
Comments Off on Travels in China: Photographing the landscapes and people of Guilin and XiaPu

Posted in Uncategorized


Augmented Reality: Aerial Footage of Distorted Alien Landscapes

16 Feb

[ By Steph in Art & Drawing & Digital. ]

alien landscapes 1

“Technology can help nature understand itself,” says AUJIK, a self-proclaimed cult that melds faux mythologies, fictitious landscapes and wildly distorted architecture with a philosophy they call “animism for the Digital Age.” The quasi-spiritualist Japanese collective gives us a look into the world of their imagination via simulated drone footage, swooping us over and through their vision of nature awakened in a new way by technological integration.

alien landscapes 4

aujik 14

“Since the late 2000’s, the online presence of mysterious nature/tech cult AUJIK quietly spread across video platforms featuring proposed active members and fabricated histories. These virtual appearances suggest decades-old lineage through theoretical schematics outlining their transgression emission, citing faux reports arguing the life of inanimate matter and modern forms of animism from fictional anthropologists and philosophers.”

alien landscapes 2

alien landscapes 3

alien landscapes 5

“For AUJIK, nature is divided into Refined and Primitive categories. This separation presents a conflict that is the root of all chaos in the world, and in order to reach a sublime state, AUJIK generates rituals to harmonize the organic and synthetic realms. Refined nature consists of evolved technology such as robotics, artificial intelligence, cybernetics, DNA manipulations, and body enhancements. The Primitive includes fauna, flora, and the Earth itself with its precious stones, minerals, and metals.”

aujik 12

aujik 13

aujik 11

Natural settings, rocks, plants and even living creatures become something more than themselves, infused with a new power, growing in a way that they never actually could in our current reality, bound as it is by the laws of physics. Digital forces invade and transform everything from dark forests to dense cities, warping the architecture, creating a bizarre parallel universe.

Share on Facebook


[ By Steph in Art & Drawing & Digital. ]

[ WebUrbanist | Archives | Galleries | Privacy | TOS ]


WebUrbanist

 
Comments Off on Augmented Reality: Aerial Footage of Distorted Alien Landscapes

Posted in Creativity


Rugged Landscapes: 3D Art Carpets Transform Indoor Environments

14 Feb

[ By WebUrbanist in Design & Furniture & Decor. ]

3d carpet art

Inspired by natural landscapes and crafted with carpet factory remnants, these labor-intensive creations are as much terrains as textiles.

3d room rug

Alexandra Kehayoglou is an artist from Argentina who uses leftover scraps from the family business, a carpet factory in Buenos Aires, to build her wool room-wrapping creations.

3d landscape carpet

3d island design

3d landscape tufted

Her use of materials mimics natural textures of natural moss, water, trees and ice, providing the functions of a traditional rug with a layer of artistic flair via memory-evoking scenery, often on creations that wrap vertically to become tapestries.

3d chair flowing

3d rug factory

3d creation proces

The source material, she says, are the landscapes of her homeland, from grasslands to deserts, lakes to glaciers. They are richly-textured when on the floor, but gain additional dimensions as they wrap up walls or onto furniture, becoming more than just a horizontal surface.

Share on Facebook


[ By WebUrbanist in Design & Furniture & Decor. ]

[ WebUrbanist | Archives | Galleries | Privacy | TOS ]


WebUrbanist

 
Comments Off on Rugged Landscapes: 3D Art Carpets Transform Indoor Environments

Posted in Creativity


Impossible Landscapes: Distorted Scenes Disrupt Reality

28 Nov

[ By Steph in Art & Photography & Video. ]

impossible landscapes 4

The laws of physics no longer apply as landscapes bend and flip, air and water blend together so that porpoises swim through the sky, surfers catch waves of clouds and the moon grows to many times its normal size. Jakarta-based graphic designer Jati Putra digitally blends photographs of nature, architecture and human subjects to create otherworldly scenes.

Screen Shot 2015-11-27 at 9.46.21 AM Screen Shot 2015-11-27 at 9.47.03 AM Screen Shot 2015-11-27 at 9.47.17 AM

These creative compositions masterfully combine images that don’t really go together in the real world, but match up beautifully in mood, tone and color so the results are surreal, yet somehow almost believable. It makes it easy to imagine a world in which you can walk up to the edge of a cliff and see the moon floating in the clouds just off in the distance.

impossible landscapes 1 impossible landscapes 2 impossible landscapes 3

Other manipulations create Inception-like landscapes that fold upon themselves in strange ways, the shape of the Earth and gravity temporarily suspended. But some are so subtle it takes a moment to realize that the trees in a forest are mirrored, with roots and another soil surface where the leaves and sky should be.

impossible landscapes 7

impossible landscapes 5

Screen Shot 2015-11-27 at 9.52.54 AM

Check out more of Putra’s work at his Instagram, @jatiputra.

Share on Facebook


[ By Steph in Art & Photography & Video. ]

[ WebUrbanist | Archives | Galleries | Privacy | TOS ]


WebUrbanist

 
Comments Off on Impossible Landscapes: Distorted Scenes Disrupt Reality

Posted in Creativity


Playable Landscapes: Custom Concrete 3D Puzzles of Cityscapes

13 Nov

[ By WebUrbanist in Design & Products & Packaging. ]

3d city maps

Pick any spot in the world and this company can print out a custom mould for a concrete pour, which, when cured, will make a 16- or 32-piece puzzle out of your favorite place.

3d cityscape

Using Open Street Map data, Logiplaces has already created a preliminary set of popular places voted up by fans for mass production, including downtown San Francisco and the Grand Canyon.

Liked a traditional puzzle, the sides of each piece can be matched up to create the whole, but unlike most puzzles, it is the vertical rather than the horizontal shapes that allow for matching. It becomes a matter of figure and ground, connecting building scales and typographies rather than colors and 2D patterns.

3d puzzles

At this point, fully-custom selections are cost-prohibitive for consumers, but the goal of the company is to make these accessible to mass markets as well. “When we came up with the idea of LOGIPLACES, we believed it had the potential to go global with loads of different places to cover. However, right now, we would first like to see, what are your favourite places that we can start manufacturing, and of course, we’re interested in what our first consumers think.”

Share on Facebook


[ By WebUrbanist in Design & Products & Packaging. ]

[ WebUrbanist | Archives | Galleries | Privacy | TOS ]


WebUrbanist

 
Comments Off on Playable Landscapes: Custom Concrete 3D Puzzles of Cityscapes

Posted in Creativity