RSS
 

Posts Tagged ‘Landscape’

Connect: Landscape tips for smartphone shooters

30 Nov

Daniel_Berman_small.jpg

It’s all too easy to take for granted the wide dynamic range, variety of focal lengths and control over depth of field we have at our disposal. And ironically, one way to practice a a more traditional, disciplined approach to photography that introduces, rather than eliminates limitations, is to spend some time shooting with the latest smartphone. Read about how some photographers are embracing the challenges of creating compelling landscape images with their wide angle fixed-aperture smartphones.

News: Digital Photography Review (dpreview.com)

 
Comments Off on Connect: Landscape tips for smartphone shooters

Posted in Uncategorized


The Night Sky In Landscape Photography

26 Nov

This shot was taken with an EOS 5D Mark II and EF 24mm f/1.4L II lens. Exposure was 15 seconds, ISO 800, at f/1.4. The exposure for star fields should not be much longer than 15 seconds. Beyond 15 seconds, movement begins to creep in and slight star trails get recorded. In order to get the star fields to be as prominent as they are, I had to wait until the moon set behind me. Light pollution of any kind, be it the moon, street lights, or buildings, will diminish the intensity of the light of the stars. Moonless nights are best for photographing the night sky.

As a landscape photographer, I typically liked to work at sunrise and sunset.  But the night sky holds its own magic, with countless stars, the moon, and the Milky Way all out there waiting to be photographed.

Obviously, all night landscape photography happens on a tripod.  What type of shots you go for will depend greatly on your patience.  Night sky exposures can range from 15 seconds to several hours, depending on your goals.  Star fields can be captured with exposures of about 15 seconds, with aperture and ISO varying depending on the lens in use.

One important thing to be aware of is the available light around you. Any ambient light will diminish the intensity of the stars.  This includes the moon, streetlights, a town or city with buildings that have outside lights on, or even just car lights.  All of these will have negative effects on the exposure of the night sky.  The best thing to do is to find a rural area where there aren’t any street lights, traffic, buildings etc.  The stars will be most intense and easily photographed.

Because the night sky is best photographed, well, at night, it will be important to have a flashlight or other illumination to light the way while you hike to your location or assemble your gear.  Headlamps work exceptionally well for this.  These lights also come in handy for “painting” the foreground with light, to add some extra depth to your images.

In addition to the camera and lens, a remote release, or even better, a time controller is a necessity.  The remote release will allow you to trigger your camera without touching it. A timer remote control (such as the Canon TC-80N3) does that and more.  When shooting star trails, the timer can be programmed to take as long an exposure as needed. It can also be programmed to take several exposures in sequence if needed. This is helpful for stacking images, a common technique when shooting star trails.

I previously mentioned having a flashlight handy for painting the foreground.  Depending on the type of flashlight used, color correction gels can be useful as well.  Newer, LED flashlights have a much cooler light source than traditional flashlights, so a warming gel will help make it more natural looking. For lights using traditional bulbs, a cooling gel may be desired. Experimentation is essential here.  Too much light will ruin the exposure, too little won’t help the foreground the way that was intended. Generally, a quick kiss of light is all that may be needed.  A neutral density gel over the flashlight will help regulate it so just the right amount of light is applied.

For this image at Valley of Fire in Nevada, the arch made for the perfect foreground. But it was silhouetted against the night sky. Using an LED headlamp and a warming filter, I was able to illuminate the red rocks and balance that illumination with the ambient exposure for the night sky. This image was taken with the EOS 5D Mark III with EF 8-15mm Fisheye Zoom. Exposure was 15 seconds, ISO 6400 at f/4.

One problem with night time photography is the long exposures.  Digital imaging sensors generate heat when they capture an image, and that heat manifests itself as noise in a long exposure.   Today’s digital SLRs all have settings for long exposure noise reduction.  This is generally done through a method known as “Dark Frame Subtraction”.  First, the camera takes the image at the intended exposure.  For this case, let’s say it’s a 30 second exposure.  When long exposure noise reduction is enabled, the camera then takes a second exposure, this one with the shutter closed. The imaging sensor is charged, for the same amount of time as the original exposure. This second, dark frame, is then compared to the first frame taken.  Since both frames were “exposed” for the same length of time, the heat generated on the sensor should be the same, and thus the noise generated should be the same. The camera then compares the two frames, and removes the noise that is consistent in both frames. While the camera does this, it is not possible to take another exposure, so this can become a very long process for star trail images that could be as long as an hour or more. Batteries are of paramount importance for this procedure, as the image won’t be recorded if the battery dies before long exposure noise reduction is complete.  If your camera has an AC adapter, and a generator or other power source is available, it will make the stress of wondering if the camera has enough battery power go away.  If you plan on stacking multiple images for star trails, this feature should be turned off, since continuous images are needed to keep the star trails continuous.

Every year in the spring, during the full moon, a moonbow is created by the mist at Yosemite Falls. Taken with an EOS 5D Mark III, EF24mm f/1.4L II lens. Exposure was 10 seconds, ISO 1250, at f/4. It is readily apparent that the presence of the moon in the sky reduces the intensity of the stars, as compared to the shot of Half Dome above.


This image of the skies over upstate New York was made with the EOS-1D X with EF 8-15mm f/4L Fisheye Zoom. Exposure was 15 minutes, ISO 400 at f/4. One 15 minute exposure took 30 minutes due to the long exposure noise reduction setting. If longer star trails are desired, you can use a longer exposure and keep the long exposure noise reduction on, or you can take shorter exposures of about 5 minutes, in succession. Turn off long exposure noise reduction, and combine the images later on in Photoshop or other image editing software.

Post originally from: Digital Photography Tips.

Check out our more Photography Tips at Photography Tips for Beginners, Portrait Photography Tips and Wedding Photography Tips.

The Night Sky In Landscape Photography


Digital Photography School

 
Comments Off on The Night Sky In Landscape Photography

Posted in Photography


How to scan landscape images | lynda.com tutorial

25 Nov

This SilverFast tutorial explores the best practices for scanning an ocean scene and other landscape images. Watch more at www.lynda.com This specific tutorial is just a single movie from chapter six of the Scanning Techniques for Photography, Art, and Design course presented by lynda.com author Taz Tally. The complete Scanning Techniques for Photography, Art, and Design course has a total duration of 6 hours and 53 minutes, and introduces the industry-standard SilverFast scanning software, shares the settings that achieve the best results from a scan, and explains the core concepts of scanning, such as how resolution and interpolation affect scans Scanning Techniques for Photography, Art, and Design table of contents: Introduction 1. Scanning Fundamentals 2. Preparing to Scan 3. Evaluating Your Images 4. Special Scanning Considerations 5. Specific Scanning Tasks 6. Scanning Projects: Start to Finish Conclusion
Video Rating: 5 / 5

 
Comments Off on How to scan landscape images | lynda.com tutorial

Posted in Photography Videos


Zeroplusplus Landscape Portfolio

25 Nov

Landscape photographers love megapixels, we love big prints, images we can stick our nose up to and see the finest details. Traditionally we have 2 options to do this. Either shoot with a 4×5 view camera or shoot with a 000 digital back. I use a different method that I feel has finally come of age, its called stitching. In my product video I use this software method to create images 50-100 MP in size, that are much sharper than a 000 digital back. Stitching software is the way to go IF YOUR COMPUTER is fast. Yes this works on people too, but we have to plan ahead…not for the faint hearted, lol. My method uses a combination of hardware and software to complete the stitch. Yes you can do this with any camera from 6-24MP, I prefer these anyway. Have a Canon 5D II or a Nikon D3x…well those files would be 2x the size of my D2x images…and sharper still. Mind blowing resolution and prints that would shame a single exposure from a expensive digital back. My videos are about getting premium results on a budget, that is how I teach, zero hype…just the facts.
Video Rating: 4 / 5

Learn More at www.tenba.com Tenba Air Cases are an ever-growing family of maximum-protection cases for everything from cameras to computers, light stands to laptops, and much more. A unique assortment of problem solving products with exceptional, exclusive features, and the best protection available. All Transport products are hand made in our Brooklyn, New York factory. www.tenba.com
Video Rating: 4 / 5

 
Comments Off on Zeroplusplus Landscape Portfolio

Posted in Nikon Videos


Torres del Paine landscape photography, patagonia

20 Nov

Join Bruce Percy on a photographic journey through Chile’s Torres del Paine national park.
Video Rating: 4 / 5

International superstar and iconic tough guy Charles Bronson stars in this gritty, action-packed TV series. Bronson portrays Mike Kovac, a New York City freelance photographer who specializes in getting difficult shots other lensmen cannot. Assisting law enforcement and insurance agencies, he invariable winds up acting as a private eye and gets himself into plenty of trouble!
Video Rating: 5 / 5

 
Comments Off on Torres del Paine landscape photography, patagonia

Posted in Photography Videos


Photography Tutorial: Unique Composition 3 (landscape photography)

17 Nov

See my photos at: www.momentsofnaturephotography.com In this tutorial I talk about how I took one of my more unique shots. Use the tips and techniques that you see in this video to make your own more unique photographs. A nikon D300 and nikon 12-24mm lens were used to capture the photo in the video. DONT TRY TO COPY THE IMAGE IN THE VIDEO, IT IS COPYRIGHTED.
Video Rating: 4 / 5

 
Comments Off on Photography Tutorial: Unique Composition 3 (landscape photography)

Posted in Nikon Videos


Photography Tips from Landscape Photographer Andy Katz

17 Nov

Photographer Andy Katz joins us today on the Marc Silber show to share advice on achieving great natural lighting and composition for photographs. He does not confine himself to only one type of photography—although he mainly shoots landscapes, he also enjoys working with people, especially when he’s able to shoot record album cover photographs. Andy enjoys working outdoors to use the light of the sun, rather than staying in a studio with lighting equipment. He refers to the three elements present in any great photograph: content, composition and light. Any photo must have all three of these to successfully draw a viewer into the image. He loves taking photos when the sun is close to the horizon, since it produces a rich, golden light and creates gorgeous shadows. He is adamant about shooting photos only when the light is ideal and will often wait until the sun hits the right angle for that perfect shot. As a seasoned photographer, Andy understands how crucial it is to have reliable equipment with him at all times. When working with natural light, he needs to capture as many photographs as he can in a limited amount of time. With SanDisk large-capacity memory cards, photographers never have to worry about missing that perfect photograph.

 
Comments Off on Photography Tips from Landscape Photographer Andy Katz

Posted in Photography Videos


Web Design | Photoshop tutorial – Landscape with sunset effect – English subtitles

06 Nov

Check out this informative tutorial : labottegadellafotografia.noiblogger.com In this tutorial I explain how to add a sunset in a photo. Produced by Luciano Boschetti, photographer 2011 trustseo.com Web Designs in Miami Thanks to the premire uploader of this video was ellebi62
Video Rating: 1 / 5

 
Comments Off on Web Design | Photoshop tutorial – Landscape with sunset effect – English subtitles

Posted in Retouching in Photoshop


Dodging and burning a landscape photo with Lightroom 3

01 Nov

Jack Davis teaches you how to shape light (Dodge and Burn) in Adobe Lightroom 3 using the adjustment brushes and auto mask. Its a nice touch on your landscape photos. This is from his full-length training video Lightroom 3 Enhancing, effects and Integration available at photoshopCAFE.com and Software-Cinema www.photoshopcafe.com Note the original quality has been reduced for uploading purposes.
Video Rating: 4 / 5

 
Comments Off on Dodging and burning a landscape photo with Lightroom 3

Posted in Retouching in Photoshop


Aspect Ratios in Landscape Photography

31 Oct

Composition is often the key to the difference between a good landscape photograph and a great landscape photograph.  There are oft quoted rules that we all try to adhere to and break in equal measure (rule of thirds, leading lines, golden spiral etc.) yet when considering what we are trying to capture within the frame, we don’t always consider the frame itself.

The aspect ratio of the photograph can make or break the composition by both emphasising the subject and removing distractions, or by putting the whole scene off-balance.  When looking through the viewfinder, about to press the shutter, it’s a good idea to try and envisage the final shot, including the aspect ratio, in order to optimise your composition (too often the aspect ratio is an after-thought, being edited and applied during post-processing to correct for poor compositional choice).

But how does each aspect ratio impact our composition?  Hopefully, that’s where this article comes in.  I’m going to discuss a few common aspect ratios, with examples, and show the benefits and draw backs for each, considering where each one may be applied.

(Note, there is an argument for cropping your photo without sticking to a defined ratio to give an image a custom ratio based on your subject matter.  I believe that can make printing/framing awkward so will therefore be sticking to well-defined ratios that most should be familiar with).

1:1 –Square format

The square format can often be used to simplify an image and give a subject a striking presence at the centre of the frame.  By keeping the width equal to the height, the way in which we read the photograph changes, as there is less of a need to move left-to-right through the frame.  The square format lends a good opportunity to break the rules we so often follow – place the horizon along the centre of the image or place a subject in centre of the frame, and the composition may only get stronger.  You’ll often see a 1:1 aspect ratio used to emphasise minimalism (again, along the theme of simplification).

Derwent Water, Lake District, UK presented in a 1:1 aspect ratio

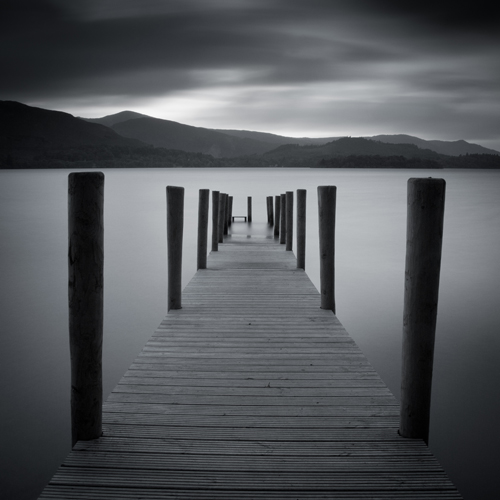
A 1:1 aspect ratio used to add to the simplicity of this image

4:3 – Four-thirds format

This format is the default aspect ratio of cameras that use four-thirds sensors.  The image is wider than it is tall, meaning that the eye naturally wants to move left-to-right through the image.  However, given that the image is still fairly tall, in relation to the width, this ratio is perfect for leading the eye into the scene through leading lines from foreground interest.  The relative height of the image encourages the use of wide-angle focal lengths to capture the depth of a scene within an image, without capturing excess details at the edge of each frame.

Lavender field at sunrise presented in a 4:3 format

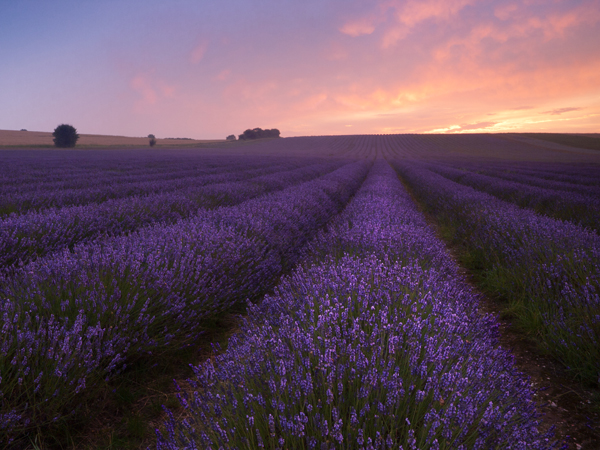
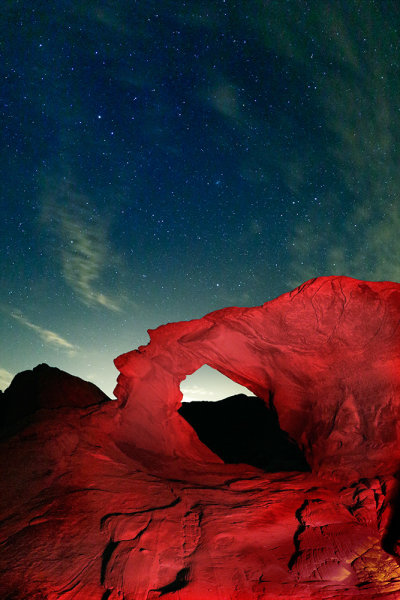
A 4:3 format allows for capturing close foreground detail and leading lines to draw the eye into the image

6:4 – 35 mm format (also called 3:2)

This is the default aspect ratio for 35 mm film, and therefore for full frame and APS-C sensors used in most Nikon/Canon cameras.  The width of the image is significantly wider than the height that, again, encourages reading through the image from left-to-right, meaning diagonal leading lines can work a treat.  A limitation of this aspect ratio is that the height is that much shorter in relation to the width, meaning that capturing foreground detail using a wide-angle lens becomes more difficult due to the limited vertical space with which to work.  It can cause the subjects within the frame to become too disparate and therefore lose impact.  The 6:4 ratio can however be a format that is suited to capturing scenes where there is little to no foreground interest, with mid-range focal lengths (e.g. 35 mm).

Rain over Lake Como presented in a 6:4 aspect ratio

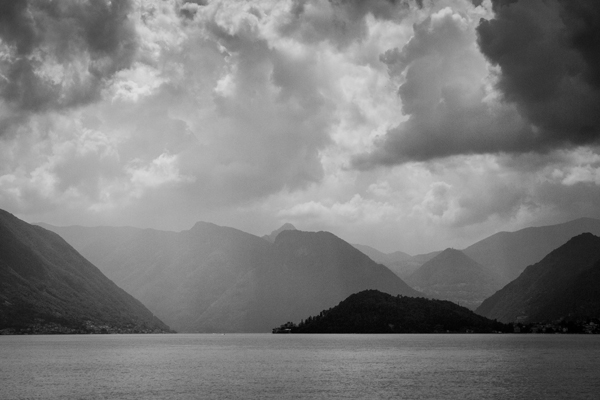
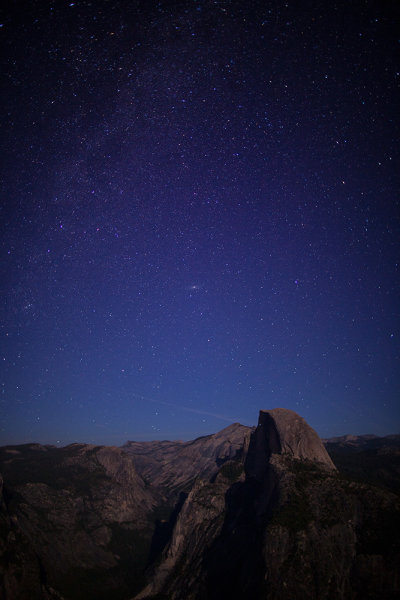
A 6:4 aspect ratio is used here as no close foreground detail is being captured, yet the scene still benefits from a wide aspect

16:9 – widescreen panoramic

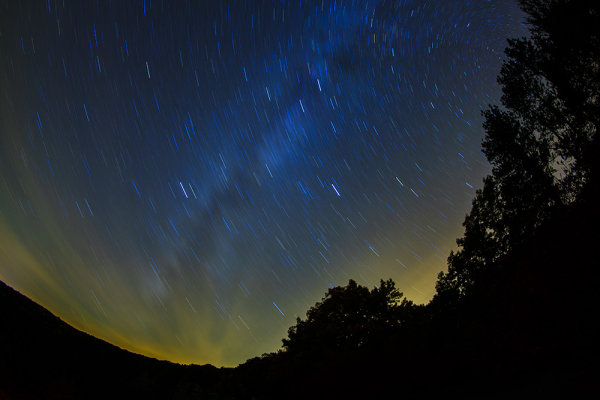
This format was supported in film by the advanced photo system (APS) on its introduction and has recently become more popular due to the prevalence of 16:9 aspect ratio displays in the home – tvs, computer monitors, mobile devices.  With this format, the width of the image is dominant, meaning leading the viewer in from the foreground is difficult, but the format is ideally suited to presenting portions of landscape scenes captured with longer focal lengths (i.e. zoom lenses) from a distance.

Beach abstraction presented in a 16:9 format

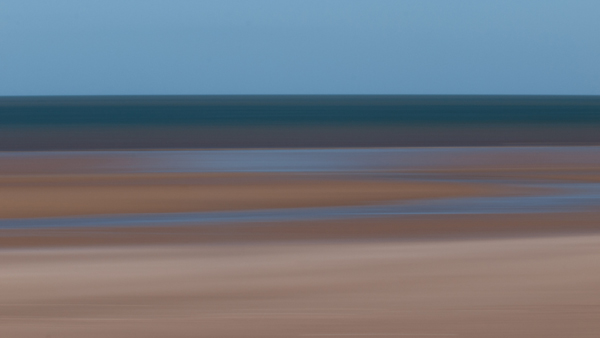
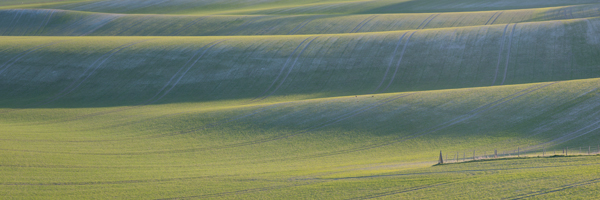
A wide and narrow 16:9 format was used here to emphasise the horizontal bands of colour

12:6 or 18:6 – panoramic (also called 2:1 or 3:1)

I’ve chosen to adopt 12:6 or 18:6 as the panoramic format here for a few reasons.  Both 2:1 and 3:1 seem to be fairly well supported in that panoramic picture frame options are typically either 2:1 or 3:1.  2:1 is a panoramic format supported by a number of medium format film cameras and 3:1 was supported by the APS.  Typically, panoramic ratios will be used to present the result of stitching 2 or more images together – it’s quite challenging to capture a 3:1 aspect ratio image from one frame and it sill be large enough to print at any meaningful size – and often frames to be stitched will have been captured using a longer focal length in order to pick out details distant in the landscape.  There is no real option of including foreground detail here.

Chalkfields at sunrise presented in a 3:1 aspect ratio

An ultra-wide 18:6 (3:1) aspect ratio was used to present this panorama of 7 stitched images, captured using a focal length of approx. 140 mm
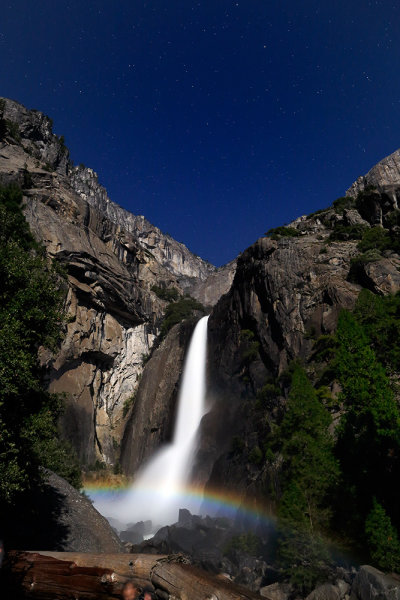
‘Portrait’ mode

I’m aware that I’ve discussed a number of different aspect ratios in the ‘landscape’ format and not in ‘portrait’ format.  That is because I believe the options for successful presentation of landscapes in ‘portrait’ format to be much fewer in number.  For a landscape to work, you need to balance the composition throughout a frame and aspect ratios such as 6;4 make that very difficult due to the image being too tall, relative to its width.  For ‘portrait’ landscapes to work, fatter rectangles such as 4:3, 7:6 or 5:4 are ideal, 5:4 being heavily used by professional landscape photographers using medium and large format cameras.  These formats allow the eye to be taken through an image, still from-left-to-right, without having an excess amount of sky putting the frame off-balance.

Bwlch Y Groes, Wales, UK presented in three different portrait formats

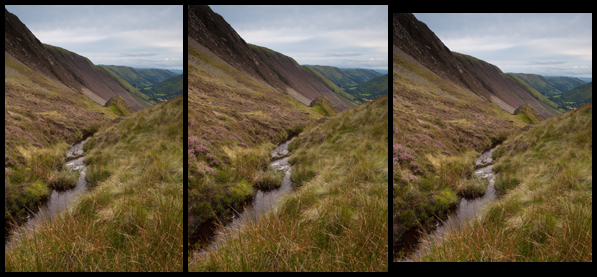
From left to right: 6:4, 4:3, 5:4. Which one looks best?

Conclusion

Whilst I have tried to describe specific uses to certain aspect ratios, I am aware that not all scenes will follow the suggestions I’ve made, and some images may well work in one ratio, not another, contrary to what I’ve suggested.

However, I’m hoping this introduction to aspect ratios will encourage you to think about them when composing your shot, before pressing the shutter.  It isn’t always ideal to fill the frame of your camera with the landscape in front of you, and knowing that the aspect ratio you choose is not dictated by which camera you use means you may be able to use them effectively to boost the impact of your landscape photographs.

Post originally from: Digital Photography Tips.

Check out our more Photography Tips at Photography Tips for Beginners, Portrait Photography Tips and Wedding Photography Tips.

Aspect Ratios in Landscape Photography


Digital Photography School

 
Comments Off on Aspect Ratios in Landscape Photography

Posted in Photography