As photographers, you’re all looking to “wow” the people we’re taking pictures of, whether they’re clients or just friends. When you show final images, there’s that sense of anticipation, excitement and nervousness as you gauge reactions. And when you hear the words “amazing” or “I love them,” it’s truly a great feeling. So how do you get the “wow” and avoid the “just okay?” Well that’s not always easy. With so many good photographers out there and so much of their work getting exposure via social networks, expectations for good photography is as high as it’s ever been.
Here are three ways to achieve killer portraits with the use of a tripod that we use in our studio. These include the following, all of which we’ll show you – keep reading:
Shutter Drags
Composites
HDRs
Required Equipment
Sturdy tripod – that old hand-me-down tripod might not be stable enough, as any movement will show in the images
Shutter release – using a cable release will help you avoid touching the camera and causing movement
Wide angle lens – as you can see from the images in this article, a wider lens is going to bring out many of the “wow” elements like the clouds, the ocean, the streaking lights, and more
Camera – as with any type of photography, the camera is only as good as the photographer. You can get amazing results with both entry level DSLRs and full frame cameras.
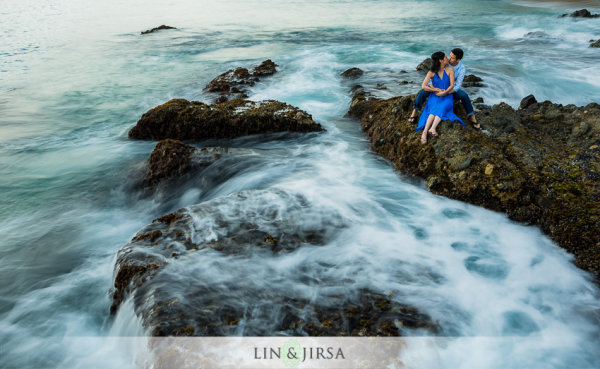
1. Shutter Drags (Long Exposure Photography)
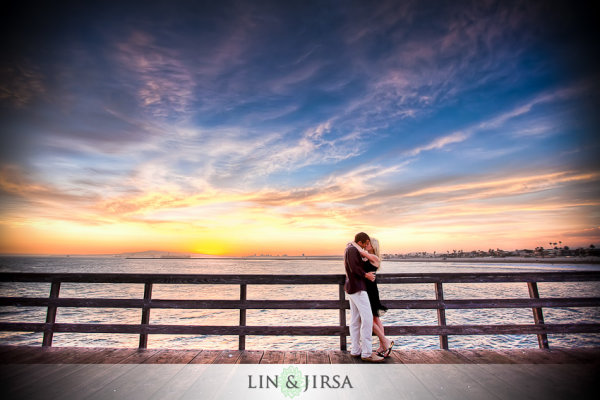
Dragging the shutter refers to using slower shutter speeds to capture movement. This captures motion of anything in your frame that is moving, while keeping the static objects in the scene nice and crisp. If you can get your couple to hold still, you have the opportunity to create awesome effects with moving people, cars or waves like you see in the image below. Additional saturation and contrast is added in post production using some Lightroom Presets.
Shutter Drag Quick Tips:
How slow do you go? – well that depends entirely on how fast the other elements in the scene are moving. If cars are zooming by, you can get away with faster shutter speeds like 1/60 or 1/30, but if you are capturing moving people and they are slowly strolling, you may have to drop it even lower like 1/10th or even lower. For water, like the shots above, we are generally around 1/2 to 1 second.
Ensure that your subjects are holding really still – instruct your subjects to hold very still, avoid blinking during the shot or sequence of shots, and even hold their breath.
Utilize static poses – posing for these types of photos will have to be static. Dips, jumps, and walks will add too much motion in the scene and result in blurry photos. However, static does not have to mean boring. You can still have them in flattering, romantic poses.
Snap a few extra shots to ensure you have one crisp photo – take a few extra shots because a photo may look crisp on the back of your camera, only to show noticeable motion blur as it’s taken into post production.
2. Composites
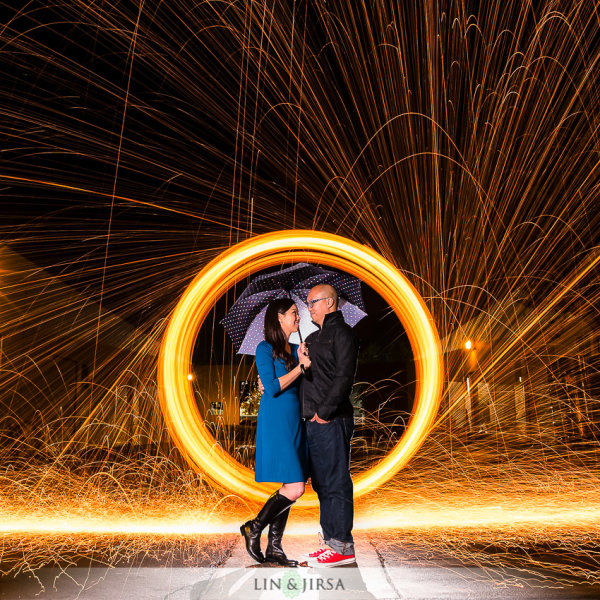
Compositing multiple photographs into one is sometimes the best solution when it’s unreasonable to have your couple hold still for as long as you need to achieve the desired effect. For example, if you’re looking to capture the beautiful stars in a night sky or if you’re looking combine multiple streaks of passing car lights – the five, ten, or even 30 second exposure time is much too long to expect any live subject to be still. Below is an example where our couple would have had to hold still for around 15 seconds as we spin flaming steel wool just behind them.
Composite Tips:
The tips for capturing composites are actually very similar as the tips for capturing shutter drags. For example, you still need a sturdy tripod and a shutter release; and you should certainly snap a few extras to make sure you have enough choices to work with in post-production. In addition, here are some more quick tips for capturing composite photos.
Expose for the couple’s skin tones first – your lighting can be anything from flash to constant lights; but the most important thing is to focus primarily on the subject.
Have the subjects exit the scene – after you’re sure you have a shot with a good pose and good lighting, you can have them exit the scene.
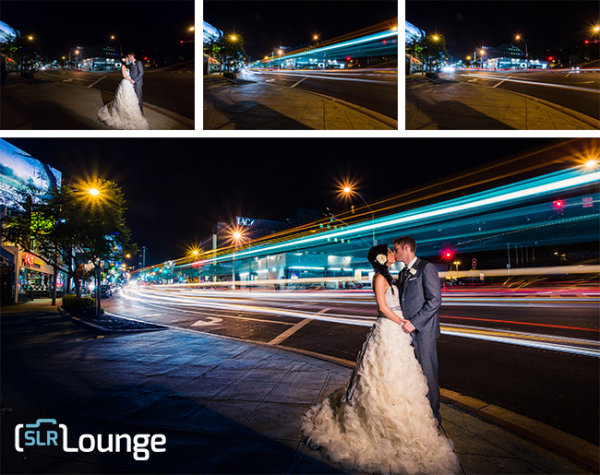
Then adjust your settings as needed to expose for the background and create your desired effects. For example, if you’re looking to capture the streaking lights, adjust your shutter speed down and wait for the cars to pass.
If you can keep the overall exposures identical between shots, compositing will be incredibly simple. Just layer the images in Photoshop, and then mask in and out elements on each layer. However, if the exposures and look of each image varies, then it will require quite a bit more advanced compositing work which would be beyond the scope of this article.
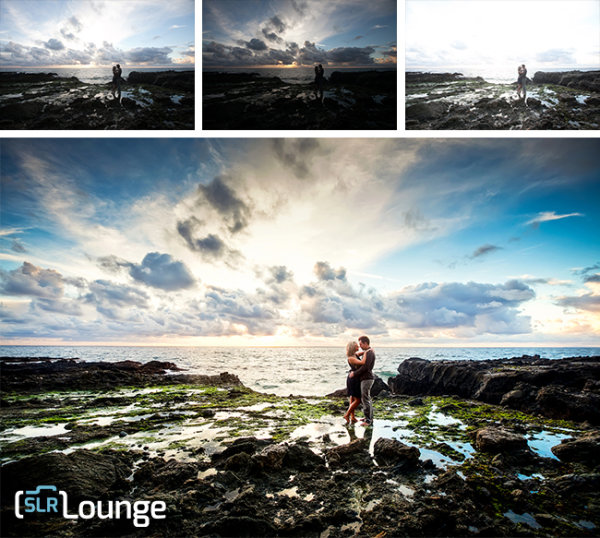
3. Try HDR Portrait Photography
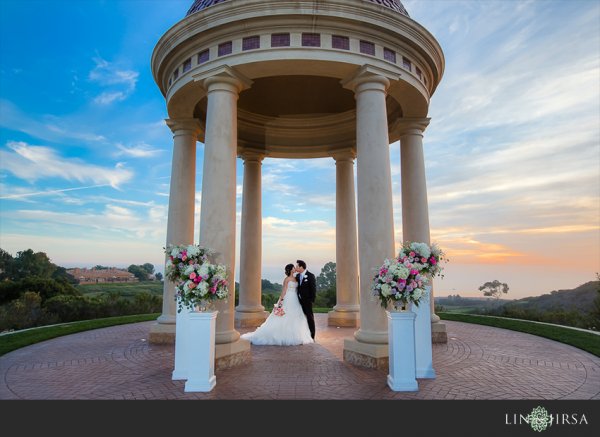
While HDR Photography gets a bad rap sometimes for being gaudy and fake, when done correctly, you have the opportunity to create memorable, distinct photography. This is especially true with outdoor scenes on a cloudy day. Grab your tripod, pose your couple in a static pose, dial in the right settings, and shoot away. What are the right settings? Well start with ISO 100 and a decent aperture (f/4 and up). From there, the shutter will vary depending on the brightness of the scene. For more information, feel free to check out some of these HDR tips on dPS.
HDR Quick Tips:
Here are a few more things to keep in mind.
Study how to bracket exposures on your specific camera. Almost all cameras have the AEB (Auto Exposure Bracketing) feature, but you will need to know how to access it to dial in the correct settings.
Keep your minimum shutter speed at 1/200 or higher. Any movement in the couple or background can cause unnatural “ghosting,” so keeping the shutter speed high will really help you save time in post production.
Avoid strong and overpowering flares. If you’re shooting into the sun, strong flares can desaturate your image and create a loss of sharpness. If you are shooting into the sun for compositional purposes, choose an angle where the flare isn’t going to distract from the subject.
Choose the right time of day. Sunrise and sunset are still going to one of best times to shoot, as you are most likely to have amazing color in the sky during that time. Remember that the same general photography rules still apply when shooting HDR, we simply are using the HDR process to bring out more detail.
Watch the weather report. Partly cloudy days are great times to shoot HDR photography. Capturing all of the contrast and interest in the clouds, as you see in the sample images in this article, really add the “wow” factor.
Conclusion
By no means are these three techniques enough for a solid session. In fact, the majority of the photos you take during any portrait session should revolve around candid posing, story-telling, and emotion. For us, we use these dramatic environmental shots to “set the stage” in a final album, canvas mural or other print medium. They are the big grand images that sets the scene, and they are followed by the close up candid images showing the couple interact in said scene and environment.
These techniques are also wonderful in creating “wow” shots, i.e. the shots they share on Facebook and the shots they end up printing on a canvas at their wedding. The shots that make everyone else go, “how’d they do that!?”
Do you have any other killer tips you’d like to share? Please do so in the comment section below.
The post 3 Ways to Get Killer Portraits Using a Tripod by Post Production Pye appeared first on Digital Photography School.
Another tiny, rugged, HD, WiFi-enabled video camera on the market may offer GoPro some real competition. Able to capture 12MP photos and 1080p video, the Air Pro 3 has a 160-degree lens that can be adjusted to be less extreme, but still very wide, 140- or 150-degree angle. Learn more on connect.dpreview.com.
When it comes to movies, editing is kind of a big deal.
Without it, we wouldn’t have twist endings. (Looking at you, M. Night.) We wouldn’t have out-of-order movies to entertain our brains (Marty McFly 4ever). We wouldn’t even have beginnings, middles, and ends!
Frankly, movies would be pretty weird and probably not very good at all without editing.
Thanks to Instagram’s 4.1 update, you can now upload videos to Instagram, meaning a whole new world of video editing has opened up!
Sound, filters, transitions, sequencing — there is so much you can do to an Instagram video before uploading it. And awesomely, you can do it all on your phone.
Consider this guide an editing workshop that’ll turn your Instagram videos into cinematic artworks served 15 seconds at a time.
10 Tips for Editing Instagram Videos
You Can Now *Upload* Vids to Instagram
Instagram must’ve read our minds with the 4.1 update because we were like Man, wish we could upload #tbt vids!
Now, you totally can. You can upload any video that’s in your phone’s library, and with a quick file transfer, you can even upload videos that are sitting on your computer (we’ll show you how in the guide below!).
Being able to upload video opens up a whole new world! It means that you can get way more precise about how you shoot and edit your videos because you can use outside apps, add sound and video effects, splice together clips, and speed up or slow down your footage.
Read on to learn how to which tools and apps are the handiest, how to optimize shooting and editing within Instagram itself, and how to make a workflow for churning out really great videos!
Pre-req reading: Check out our essential guide to Instagram video if you haven’t yet. It answers all the questions you might have about Instagram video and also give you ideas to start.
How to Get Videos onto Your Phone
Shoot it on your phone.
Shooting videos on your phone is obviously the fastest way to get videos onto your phone.. But did you know there are lots of options besides shooting within the Instagram app?
Yeah! It’s actually quite refreshing to shoot video outside the Instagram app.
You’ll pick how you shoot your video based on what you want your end-result to be like. Here are a couple options and why you’d use them:
Your phone’s native camera app.
Use this to shoot multiple clips that you can then arrange in the order you’d like in Instagram. This gives you more freedom with time and set-up because you don’t have to shoot in order like you do in the Instagram app. (Also, you don’t have to fear accidentally losing your work-in-progress while working in the app!)
A filter app.
Use this to get a different look besides the filters that Instagram offers. We dig Vintagio (Android & iOS) and 8mm (iOS). Or you can even layer filters to come up with your own feel.
An advanced video editing app.
Apps like iMovie (iOS) equip you with extra tools that give you more precise editing tools and control over sound and transitions. If you find yourself using one of these often, then you might end up shooting through these apps to make it seamless.
PRO-TIP: When you upload a rectangular video (which is what most other apps shoot in), your video will be cropped in Instagram. Instagram crops to center your video, so while you’re shooting, just envision that either side of your video will be lopped off.
Transfer files from your computer to your phone easily.
Maybe you have phone videos that you long ago saved to your computer. Maybe you have vids you shot on your DSLR. Maybe you have childhood vids transferred from old VHSs.
Whatever it is, your video’s trapped on your computer, and you need to get it to your phone so you can share its amazingness with all of your Instagram followers STAT.
The file might be too big to email to yourself and bothering with cables can be cumbersome and take time.
Here’s how to do it the e-z way:
Use an iFlash Drive to transfer files. This is a spacious drive (up to 16GB) that lets you quickly transfer files between your phone and your laptop. One end connects to your phone, the other a USB.
Use an EyeFi SD card to wirelessly send vids straight from your DSLR and onto your phone. (IT DOES THAT.) You can see how it works in the vid above!
Use an app like Dropbox (Android & iOS) or Cloud to store in internet-space and download it on whatever device you want, whenever you need it. If you have a iThingies, you can also use iCloud to sync your files across computers and devices.
Make Your Video Legit with Transitions
Instead of having your video abruptly switch from scene to scene all choppy-like, you can use transitions to give your video a more cinematic, elegant flow.
Use objects as a clever transition.
One really clever way to transition scenes is to use objects as a divider between two completely different shots. Check out the vid to the right to see how cool this effect is!
How to do it? Pan your camera horizontally across your first scene and place your transitional object at the end of it. (We used bags as our objects in the sample video above. Yours can be anything — a tree, a person, a telephone pole.) When your video pans half-way through that object, cut the scene.
Now, go to a new location for your next scene, and place the same object at the start of the new panning scene. Start shooting at the halfway mark of the object where you stopped your previous scene and end the scene halfway through the next object. Repeat for however many scenes you want to sequence together. The end result will look like one seamless pan that completely changes location between objects. That’s movie magic, baby.
PRO-TIP: Measure how far your object is away from your camera, so that you can make it consistent from one scene to the next.
BONUS IDEA: Place a piece of paper over your phone lens to give yourself a black screen between scenes. You can also pull it away and allow your camera to adjust exposure and come into focus as you’re filming — this ends up looking like a dreamy fade-in. Check out our example.
Use apps to add transitions between scenes.
Apps are great because they give us access to tools that previously only pros had. Case in point, iMovie (iOS) and WeVideo (Android & iOS) give you options for placing transitions between video scenes.
You can do a simple fade in/fade out, text (think silent movies!), and all the transition types that you never really thought about but have probably seen on TV or in movies.
Pull focus a.k.a. Changing depth of field
Pulling focus is this fancy thing cinematographers do to get movie-watchers to pay attention to a particular part of the screen or to spice up a moment with visual drama.
You’ve seen this in movies when an out-of-focus shot suddenly comes into sharp focus or when something that’s in the foreground falls out of focus and the background comes into focus instead.
Pulling focus can also mean simply keeping your subject in focus as they move within your shot.
The cool thing about all of this? You can do it on your phone! Here are two ways:
Tapping to focus.
While your phone doesn’t have much of depth of field to work with, you will still notice certain parts of your shot going in and out of focus as you move your phone. This is especially true if one subject in your shot is a lot closer to your lens than everything else in the shot.
As you move or as your subject moves, pay attention to how your focus changes, and tap your screen to keep what you want in focus nice and sharp. You might *want* something to fall out of focus, so tap a different part of your screen to get them to fall out of focus.
Using a telephoto phone lens for dramatic depth of field.
Watch the video above to see just how dramatic of a focus shift you can get with a telephoto phone lens! Because it’s telephoto, you get a nice range of depth of field. It also has a focusing ring that lets you control exactly where focus falls in your shot.
Another way to do it is by using an iPhone SLR lens mount to shoot phone photos and vids with SLR lenses. You read right — you can shoot videos using your SLR lenses mounted onto your phone.
Chopping & Sequencing Clips
The editing choices you make can really make your video stand out from the rest. Remember Memento? Yeah, those guys were nominated for best film editing at the Oscars for the super clever way they edited the story out of order. Now bookmark that in your brain, and get your tapping finger ready.
Plan your video.
When it comes to editing, the best thing you can do is to plan out what you’re going to shoot before you even start. This can be as quick as taking out 30 seconds to come up with a vision for your video in your mind.
Questions to ask yourself: What are you trying to get across in your video? What will the beginning, middle, and end be? How long should each clip be, so that you can fit your entire story into your time limit? Maybe your idea’s worth spanning over more than one Instagram post — how many?
Chopping.
Maybe your clip is too long or you want to sequence a bunch of clips together, but they don’t quite start or end the way you want them to. Go to town like a lumberjack on a tree trunk: chop. it. down.
How? Instagram lets you trim down video clips. After you load a video, hit Next. Then use the slider to shorten the video to the length you want. Move the video timeline underneath the slider to indicate exactly which part of the video you want to crop down to.
Most phones’ native camera apps also already have simple editing tools that let you shorten your video clips down just how you like them. In iOS, view a video in your library, and move the slider on each end of your video clip’s timeline to where you’d like it. Then hit the “Trim” button that appears in the top right corner.
Sequencing.
Sequencing is all about the order of your clips and how you transition between them. If your video is spur of the moment, you can edit as you shoot within Instagram by viewing your video and the going back to the previous screen to delete and add scenes.
However, if you’re shooting something more complex, there’s a disadvantage to editing together clips as you go within Instagram. You can’t rearrange the order of videos you’ve already placed into your Instagram video. So if you wanted to be able to do that and get more precise with how your clips transition and the order that they play, then you’ll want to use a video editing app like iMovie or WeVideo. If you work better on the big screen, you might even edit it on your computer and then transfer the file back to your phone.
Fast & Slow Motion
Slow motion is the raddest. Everyone and their mom knows it. While there has yet to emerge one great app that gives you the kind of slow-motion effects you see coming out of a Phantom Flex camera, there’s no harm in pushing the limits of slow-motion tools that currently exist in apps.
We were able to speed up the video above using Vintagio. Because the speed up and slow down tool only lets you change the speed a little bit, we ran the video through the app twice to speed it up doubly. You can do the same thing for slowing down your video.
Keep in mind, it won’t look as smooth as other slow motion videos because your phone just doesn’t shoot video at a high enough frame per second. Again, there’s no harm in playing with what you have, so experiment!
We haven’t found a great Android app for slowing down or speeding up video, but if you know of one, let us know.
Oh yeah, and if you’re into editing video on your desktop, Twixtor is a tool that manipulates video to make it look like it was shot at a higher frame per second than it actually was. In short, it gives you a slow motion effect without having to use an expensive slow motion camera.
Adding Music, Sound Effects, and Muting
One amazing advantage to being able to upload videos to Instagram is that you can edit sound on your videos before you post them!
Depending on what app you’re using for video editing, you can control the sound in your videos in all kinds of ways.
Here are some ideas:
Mute or lower the sound in your video
Record narration or sound effects to lay over your video
Import music from your phone’s library
If you’re wondering which apps do what, here’s a quick rundown. iMovie and Vintagio give you the ability to control volume on your video. The iMovie app in particular lets you lay over a narration or any recording that you make, as well as import music and sound effects.
Meanwhile, WeVideo doesn’t let you edit sound within the phone app, but the app syncs your video to the desktop app, which gives you sound editing options. Vintagio comes with pre-selected music that you can play over your video, too.
Filters, in Apps and By Hand
Instagram video comes with a set of squeaky new filters, but what if you’re looking for something different?
Outside apps.
8mm and Vintagio do a good job of covering specific film looks based on time period. For example, if you want a black and white ‘20s silent film look vs. a warm 70s vibe.
If those aren’t enough iMovie and WeVideo have filters, too. And if you’re into experimentation, overlap filters across apps to make your own awesome filter! You can even name it after your favorite celebrity cat.
Filters by hand.
DIY the dang thing. We’re talking hold up anything that looks like it could potentially Shooting a horror vid? Hold up some red glass over your lens.
Want to make it lo-fi? Grab some plastic to give your video dreamy vignetting.
Want to give your video a warm tint Coen brothers style? Use your sunglasses to wash your video in color. If you’re into these ideas, check out our roundup of 10 DIY Filters on the Cheap.
Dreamy lens flares.
We’ve played around with how to create intentional lens flares. Here are two fun and easy ways to do it:
1) Lens whacking is a videography technique that’s similar to free-lensing. You remove the lens from your DSLR and slightly move it away from the camera body. The purpose here is to let light hit the camera sensor to create moving light leaks, which we can attest are very pretty and –heck we’ll say it– dreamy. If you shoot on a DSLR, here’s a guide with samples.
Since phone’s don’t quite work this same way, you can still create the illusion of light leaks by having your subject backlit and letting your phone’s auto-exposure shift with the movement of your camera or your subject. This can create rays of light in your video that can look quite lovely.
2) Sprinkling water either directly on your lens or onto a clear sheet in front of your lens. Try something like a pane of glass, mylar or anything clear. Here’s our full guide on playing with water for lens effects.
360-Degree Time-lapses
Time-lapses are cool, but have you ever seen a panning time-lapse? It’s dually impressive! It’s one of those effects that stops you in your tracks because you wonder, How’d they do that?
If you’re not sure what a panning time-lapse is, it’s when your camera pans across a landscape and simultaneously shoots a time-lapse.
Two popular ways to make a panning time-lapse is by using a slider that moves your camera horizontally or by using a rotating mount that turns your camera 360-degrees.
We were able to make the 360-degree time-lapse above with a simple rotating mount called the Camalapse. You can use this mount with any camera that has a tripod thread, but we mounted our phone by pairing it with the Glif (a tripod mount for iPhones).
Just grab a time-lapse app, like Lapse-It (Android & iOS), set up how long you want to shoot your time-lapse for, twist the Camalapse (twists similar to a kitchen timer), and let ‘er go. In the end, you’ll get a rad video that all your buddies will be asking you about.
PRO-TIP: Because time-lapses are usually slow-paced, we sped ours up by running it through Vintagio’s speed-up tool two times.
STOP-MOTION & Editing Photos into Video
If you’re using the internet right now, there’s a good chance you’ve seen a stop-motion or two. Stop-motions, when well done, have the power to blow people’s minds, and that’s a good thing!
Stop-Motion Tips.
We have so many tips in our Ultimate Guide to Stop-Motion, but here are the essentials. Of utmost importance, keep your camera still. Put it on a tripod or set it somewhere where it absolutely won’t move.
Aim for consistent lighting. If this is going to take a while, shoot in a place where your light isn’t moving (i.e. the sun traveling across the sky), unless o’ course that’s what you want.
If you’re shooting and editing within Instagram, tap lightly and quickly to record, so you don’t accidentally make each clip too long. For smooth movement, each clip should be as brief as you can shoot it.
To get more precise, you can shoot individual photos for each frame in your phone’s native camera app, and then import the photos to create a video in iMovie or WeVideo. This’ll let you throw out any mess-up shots or figure out if you need to reshoot a particular part of the stop-motion.
PRO-TIP: A camera phone remote can make shooting tiny clips easier and also prevent you from accidentally moving your phone while tapping.
The Quickie Slideshow — Your Life in Instagram Flashed Before Your Eyes.
You might’ve heard about Pummelvision. It was a web app that took all of your Facebook or Flickr photos and turned them into a lightning-fast slideshow. It was like watching your life flash before your eyes! We cried, not kidding.
Everlapse is a similar idea, but it takes your most popular Instagram photos and turns them into a short reel that you can share on Instagram. We’re getting verklempt just thinking about all the memories.
Instagrammers with Vid Skillzzz
Hopefully at this point, you’ve abandoned this article and are outside shooting and maybe will not read these words until hours from now (which we’re fine with because OMG you should be out shooting!).
And if not, your brain’s about to be so full of ideas they’ll start to leak out your ears/eyeballs/face. Why will that happen? Because gathered up a list of amazing Instagram videographers for your personal inspiration.
@megancignoli — A photographer/director with a jelly-worthy talent for stop-motion. Girl’s got creativity *and* patience.
@nazfilms — A cinematographer who makes incredible experimental Instagram videos completely shot and edited on his iPhone. Watch with sound. Also, watch for his just started #flickstagramseries.
@bythebrush — A painter who needs to get into movie-making stat. Especially good for inspiration on transitions between scenes, as well as music use.
@pinot — An illustrator & animator whose animations makes us question reality.
@teresa_franco — A nurse who can wield a macro phone lens like a pro. Check out her amazing insect videos.
@mariamsitchinava — An editorial photographer who turns her stills into gorgeous filmic vignettes.
@cole_rise — While this photographer/pilot doesn’t have a lot of videos up right now, he’s one to watch.
@rokuthecat — Just because.
Related posts:
Pro-Tips for Shooting Better Instagram Videos Extra vids for bloggers: 1, 2, 3 “Well that’s weird,”…
FlipClips — Print Your Short Videos into Magical Flipbooks If you bought your digital camera in the past few…
10 Tips to Make Your Phone Photos Amazing; Plus, Our New Phoneography Blog! Phoneography is the best. No matter where you go, you’ve…
The moon has long been a source of deep fascination for mankind. As long as anyone can remember, human beings have stared up into its source of light in the pitch black of night and wondered about it. Some have even gone a bit batty thanks to the moon’s effects (at least, some would have you believe). But hardcore photographers Continue Reading
The post Killer Tips for Photographing the Moon That You Can’t Pass Up appeared first on Photodoto.
www.dombower.com In this video i show you another creative lighting technique with my nikon d300 or fuji s5pro and my speedlight sb900 with a colour filter gel on the front. using a cls system and off camera flash to make an interesting dramatic photo. Video Rating: 3 / 5
If your just getting started in off camera flash and studio photography then single light setups are a fantastic, uncomplicated way of getting to grips with lighting techniques. Despite the wide range of effects that can be achieved with a one light setup, working with multiple lights provides even greater range of creative options and my favourite multi light setup has to be the clamshell. This lighting setup can be used to produce a soft wrapping quality of light; a perfectly white background and stunning catch lights resulting in a classic beauty look ideal for photographing female models. Best of all its incredibly easy, so hopefully with the following guide you can also have a go at this great lighting setup.
Setup & Equipment
The basic idea behind this setup is to use a single large light source both as a backdrop and to provide wrap around light. The subject is then illuminated from above using a second light with any remaining shadows filled in using a flat reflector.
For this setup you will need two light sources; ideally strobe heads although speedlights are also fine but might take slightly longer to recycle given the higher power required. To achieve the soft quality of light both lights should be shot through large soft boxes, although if you don’t have these then you could us a large sheet as a background and something like an umbrella for the main light.
The basic setup is as follows; the key point to remember is to ensure the backlight completely fills the background.
Lighting Diagram – A Simple Two Light Setup
Metering
Metering for this shot is actually fairly simple and whilst a light meter can be helpful in speeding things up its easy enough to set the exposure for this shot by eye. The main steps are as follows:
Start by leaving your flashes off and start with your camera settings. Set a small aperture, (something like f8 or f11), a fast shutter speed (around 1/200 to 1/250) and set your ISO to its lowest setting.
Turn your back light on and starting with a low power take a test shot and check the image preview on your camera to see how ‘white’ the background is, a properly exposed background should be solid bright white. A good way to check is to take a look at the image histogram, most of the reading should be to the very right hand edge of the graph indicating that the tones in the image are tending towards solid white. If the background isn’t exposed properly increase the flash power and repeat.
Now its time to get your model in position and check the amount of wrap around light from the background. Place your model in front of the back light and take another test shot. Vary the distance between the subject and backlight to change the amount of light wrapping around your subjects head and shoulders. The purpose of the wrap is to provide some separation and help add definition, so all you need to do is highlight the edges of your model.
Now turn your subject light on and take a test shot. Check the overall exposure and vary the power/position of the light until your models face is correctly exposed.
Finally position a reflector below your subjects jawline and use this to bounce fill light into any dark areas of the shot in particular under your models chin, nose and eyes.
Summary
Hopefully the steps above are simple enough to convince you to give this lighting setup a try. Not only is this a great way to try working with multiple lights but it also results in a really satisfying and flattering image and of course double the lights means double the creativity!
Post originally from: Digital Photography Tips.
Check out our more Photography Tips at Photography Tips for Beginners, Portrait Photography Tips and Wedding Photography Tips.
KILLER Shock Waves was released by Mausoleum in 1984. KILLER was the first Belgian metalband inspired by the upcoming success of the NWOBHM bands such as Saxon, Iron Maiden, Def Leppard. This Foto-Video-Clip “Shock Waves” has been made with my Nikon D300 & D80 and is assembled with Vegas 6.0 (Sony). The photo’s have been made in 2009. This sound is recorded with ZOOM H4Next & 2 Røde NT3 mic’s. by Helly Lemmy alias Snake Video Rating: 4 / 5
dombowerphoto.blogspot.com Double the size of the sensor, you give your photosites a much greater size meaning you should be able to caputre much greater dynamic range. I just tested it out on the D300 vs the D700 (both with 12mp but the D700 has double the size sensor = double the area = bigger photosites) yet it is almost impossible for me to notice any difference in the images produced by the two. Dont be fooled into thinking that pixel density has anything to do with dynamic range, I suspect it is far more to do with sensor techology and photosite layout rather than number of pixels per area. If you enjoy my videos please post them on your facebook page and let others know about this channel, please subscribe and share on facebook and twitter. Also check out the links below. If you really like my work please feel free to check out or buy a copy of the my photography book: Getting There With Photography: By Dom Bower www.blurb.com Twitter page twitter.com Facebook page www.facebook.com Website www.dombower.com T-shirt page Point and destroy clothing http Video Rating: 4 / 5
International superstar and iconic tough guy Charles Bronson stars in this gritty, action-packed TV series. Bronson portrays Mike Kovac, a New York City freelance photographer who specializes in getting difficult shots other lensmen cannot. Assisting law enforcement and insurance agencies, he invariable winds up acting as a private eye and gets himself into plenty of trouble!
Comments Off on Man With a Camera – Profile Of A Killer
Art Money for Dog Killer! #SFmayor uproar over @OtternessStudio @Central_Subway art Image by Steve Rhodes
Friday’s lurid Examiner front page put a focus on art in the mayoral campaign
It doesn’t mention it happened in 1977 & he has said he’s sorry many times (though it is in the story) It also makes it seem as if he is pocketing nearly a million dollars when a lot of the money will go towards fabricating almost 60 sculptures & a working clock
SFMTA & the Arts Commission say they didn’t know about the film You’d think they would have googled the artists – there was a similar uproar in NYC in May


You must be logged in to post a comment.