This weekend I went out with some new gear to test, namely the Hasselblad H5D medium format DSLR and Hasselblad 300mm f/4.5 lens via BorrowLenses.com. The location of choice was Asilomar State Beach. The H5D has roughly twice the resolution as my Canon 5D Mark II with a whopping 40 megapixels per image. I had been curious to find out if Hasselblad’s reputation was hype or not. To cut to the chase I’ll tell you that the reputation is justified. Focusing just on resolution for the sake of this post I’ll tell you that working with a 40 megapixel image is breathtaking especially when Hasselblad optics reveal so much sharp detail.
Fury – Asilomar State Beach, California
Above is the original image I took (7304 x 4578 pixels) before cropping it down to a ~2:1 ration (7304 x 3539 pixels). This particular composition I knew ahead of time I’d crop down into a panoramic format as much of the extreme background and foreground were uninteresting and unnecessary to include.
Fury – Asilomar State Beach, California – Detail
Above is a tighter crop into the image to highlight the sharpness Hasselblad lenses provide. This particular image was cropped down to 2604 x 1953 pixels and below is a 1 to 1 crop of the original image.
Fury – Asilomar State Beach, California – Hasselblad H5D 1-to-1 crop
In case you were curious this was the setup for the previous test shots. Expect a few more photos and thoughts on my experience with Hasselblad in the near future.
Hasselblad H5D and 300mm f/4.5 Auto Focus HC Lens
Photo Details:
ISO 100, f/13, 1/350 sec, 300mm on a H5D-40
Copyright Jim M. Goldstein, All Rights Reserved
Fury, Asilomar State Beach – Diving Into Digital Medium Format
The post Fury, Asilomar State Beach – Diving Into Digital Medium Format appeared first on JMG-Galleries – Landscape, Nature & Travel Photography.
Fury – Point Lobos State Natural Reserve, California
This weekend I went out with some new gear to test, namely the Hasselblad H5D medium format DSLR and Hasselblad 300mm f/4.5 lens via BorrowLenses.com. The location of choice was Point Lobos State Natural Reserve. The H5D has roughly twice the resolution as my Canon 5D Mark II with a whopping 40 megapixels per image. I had been curious to find out if Hasselblad’s reputation was hype or not. To cut to the chase I’ll tell you that the reputation is justified. Focusing just on resolution for the sake of this post I’ll tell you that working with a 40 megapixel image is breathtaking especially when Hasselblad optics reveal so much sharp detail.
Fury – Point Lobos State Natural Reserve, California
Above is the original image I took (7304 x 4578 pixels) before cropping it down to a ~2:1 ration (7304 x 3539 pixels). This particular composition I knew ahead of time I’d crop down into a panoramic format as much of the extreme background and foreground were uninteresting and unnecessary to include.
Fury – Point Lobos State Natural Reserve, California – Detail
Above is a tighter crop into the image to highlight the sharpness Hasselblad lenses provide. This particular image was cropped down to 2604 x 1953 pixels and below is a 1 to 1 crop of the original image.
Fury – Point Lobos State Natural Reserve, California – Hasselblad H5D 1-to-1 crop
In case you were curious this was the setup for the previous test shots. Expect a few more photos and thoughts on my experience with Hasselblad in the near future.
Hasselblad H5D and 300mm f/4.5 Auto Focus HC Lens
Photo Details:
ISO 100, f/13, 1/350 sec, 300mm on a H5D-40
Copyright Jim M. Goldstein, All Rights Reserved
Fury, Point Lobos State Natural Reserve – Diving Into Digital Medium Format
The post Fury, Point Lobos State Natural Reserve – Diving Into Digital Medium Format appeared first on JMG-Galleries – Landscape, Nature & Travel Photography.
Those Star Trek special effects guys are going to feel pret-ty foolish when they find out about Adam Kennedy.
Turns out you don’t need years of computer-generated image training to create breathtakingly detailed alien planets.
Adam finds his planets on the street! Fire hydrants, my friends.
He photographs, the rusted, peeling spheres that sit atop fire hydrants and edits them into wonderfully awe-inspiring habitats.
The best part about Adam’s planet project is that it started with a single imaginative thought.
It’s what inspires street art, photographers, and artists of every kind.
So the next time you think, hey that thing looks like that other thing, you know exactly what to do.
(Make art!)
Planets Made Out of Fire Hydrants
p.s. Wedding season is here! Get 40% off pro photo prints from Nations Photo Lab with code PHOTOJOJO.
p.p.s. We’re hiring A WEB DEVELOPER and AN EVANGELIST/BIZ DEV HERO. If you love photography and San Francisco, APPLY HERE.
Related posts:
The Ultimate Tool for Street Photography, Kid Photography, and the Camera-Shy Welcome back to returning sponsor Lensbaby and their cool new…
Low-Fi Street Lenticulars = Photo Inspiration in Street Art ~ BACK IN STOCK! The Chalkboard Speech Bubble (Our oh-so-popular-but-we-kinda-wish-you-weren’t-because-we-can’t-keep-you-in-stock…
How to Make Tiny Planets in Google Street View Hackers do more than type fast and indiscriminately hax0r the…
As smartphone cameras continuously improve, this dynamic technology has us wondering what’s in store for both the future of such devices and the way we use them as photographers. Will the constant upgrade cycle and users’ desire for new features make for smartphones with super cameras? Or maybe they’ll play more nicely as companion gadgets to dedicated cameras, rather than attempting to do it all themselves. Looking at what’s currently rumored to be in the works, maybe we can wrap our heads around what the future of such connected cameras – and photography – might look like, today on Connect.
There are many approaches to HDR, some better than others. In our latest techniques tutorial Glenn Guy explores the topic with HDR and How to Shoot Into The Light.
Don’t forget our "win-an-iPad
with all our software included" contest.
Win a New 128GB iPad with Retina Display
Including all Major Luminous Landscape Videos
– Pre-Installed –
Your iPad is your Sunday Times. Your game console. Your encyclopedia. The guardian of your deepest, darkest secrets. (Better put a password on that!)
And now, it’s your new studio light!
It’s true. Your tablet is powerful enough to illuminate your subject in almost any photo situation.
This guide will show you how a tablet can super charge your shots with creative backdrops, custom light shapes, and pop art colors.
Just when you thought your tablet reached peak awesomeness, it suddenly got so much awesomer.
Turn Your Tablet Into a Studio Light
p.s. Our Phoneography 101 course for both Android and iPhone students is starting April 1st! The last days to enroll are coming up quick, so make sure to enroll today!
Why It’s Cool:
Studio lights and softboxes are big, cumbersome, and cost a bundle!
By comparison, your tablet is like a cheetah vs a hippo. It’s quick, versatile, and light on its feet.
Download backdrops for free and create customized shapes and reflections that will make your photos stand out from the crowd.
The Ingredients:
Tablet
Phone, compact camera, or DSLR
iOS: Softbox Lite (Free)
Android: Softlight (Free)
Shape It Up
With a little help from your tablet you can add shiny shapes to your reflective subjects.
For this shot you will need a something reflective like a camera lens or a wine glass.
Download a simple shape like a star or a triangle or select a shape on your lighting app.
Setup your tablet at an angle so that it bounces off your subject and into the cameras lens.
It takes some experimentation to get the angle just right so if you are using a DSLR try turning on live view on your rear LCD screen.
This should make it easier to see the reflections.
Glitz Up Your Portrait:
For a playful sparkle in the eye and dramatic portrait lighting, look no farther than your tablet!
A tripod is helpful if you are doing a self portrait and you will need to shoot this pic in a dark environment.
Select a shape on your tablet and setup your camera with a short timer.
Focus the camera on your face and shuffle just slightly to the right.
Hold your tablet out in front of you and up to the left and let the magic happen.
Open That Aperture:
This technique will leave you with a softly glowing background like the embers of a camp fire.
First, pick a subject with some depth to it like a large leaf or a clump of berries.
Put a circular pattern on your tablet that complements your subjects color.
Get up close and open your aperture as wide as possible.
This shot works great with a DSLR and a macro lens but is more difficult with a phone’s camera which produces very little shallow depth of field.
Double Glow:
If you have two tablets you can make a light tepee for bright and shiny macro closeups.
Place your tablets with their screens turned inward so they make a roof over your subject.
Hold the tablets together at the top with your fingers or use a little tape.
Now shoot your subject down the corridor of your glowing cyber tunnel.
Make a Silhouette
Like the iPod commercials of yesteryear you can use your tablet to create cool silhouette style photos.
Put a solid color on your screen and place your subject halfway between your camera and tablet.
If you have a DSLR change your light metering to spot and aim your focus point at the tablets glowing screen.
You may want to focus manually since the room will need to be pretty dark.
Shine Up Your Food Shots:
Give your food shots that extra sparkle by zapping your snack with a tablet softbox.
Place your food items against a black backdrop in a dark room.
Set a long exposure, maybe 25 seconds, f/11, ISO 200.
Start your exposure and paint your food with your tablet making sure the screen is facing away from your camera.
This trick work great with a phone too!
Pick a Backdrop
A matching background will do wonders to enhance your macro shots.
Simply download a backdrop and place your subject on top of your tablets screen.
If you are shooting with a DSLR use a small aperture, maybe f/22.
Phones will work great for this shot as they already have a wide depth of field.
You can avoid glare by shooting your tablets screen at a sharp angle instead of straight on.
Incorporate Movement
Create ghostly effects in your photos by moving your tablet through the background of your shot.
To achieve this pic you will need a completely dark environment so decide on your camera settings before you turn out the lights.
First set your camera for a long exposure maybe 20-30 seconds and pick out a pattern on your tablet.
Mount your camera on a tripod, focus on your subject, and then switch your camera to manual focus so auto focus doesn’t kick in with the lights off.
Hit the lights, press the shutter button, and move your tablet through the back of your shot while the shutter is open.
You can use a phone set to a white screen to paint in your subject with light.
Shine a Spotlight
A circular shape is a great way to highlight your subject with dramatic lighting.
First select a shape from your softbox app or download a picture from the internet.
Place your subject on top of your tablet so that it’s illuminated from beneath.
Setting your camera to center weighted light metering will allow you to just capture light from your spotlit subject and keep out background light.
If the object you’re shooting is clear, you get a cool glowing effect all the way up to the top.
Take it further
Shoot one subject lit with a variety of colors. Then combine the images into a photo square with Photoshop or Pic Stitch.
Jesse Rosten takes it to a whole nother level with an all iPad photo shoot.
Make 3D light paintings with your iPad using apps like Holographium.
Thanks to the members of the Softbox Pro Flickr group for their photo inspiration!
Related posts:
Turn Your Laptop into a Photo Light Box Could you pick your laptop out of a lineup? We’ll…
DIY: Make Crazy Detailed Light Paintings with Photo Light Stencils Extra photos for bloggers: 1, 2, 3 Ever tried painting…
You Only Need 5 Things to Make Your Own Home Studio Extra photos for bloggers: 1, 2 Photography doesn’t have to…
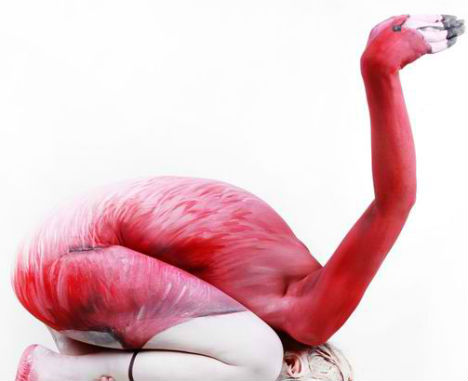
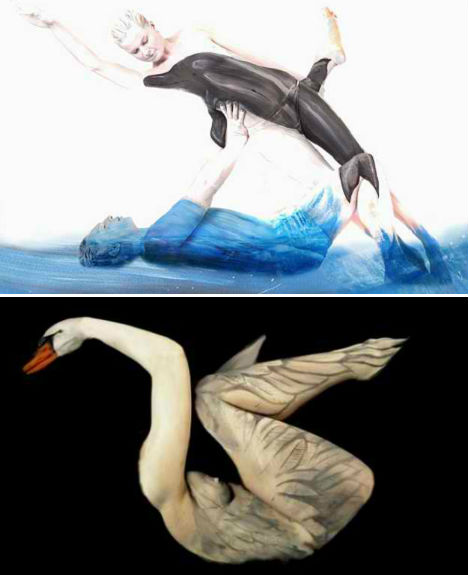
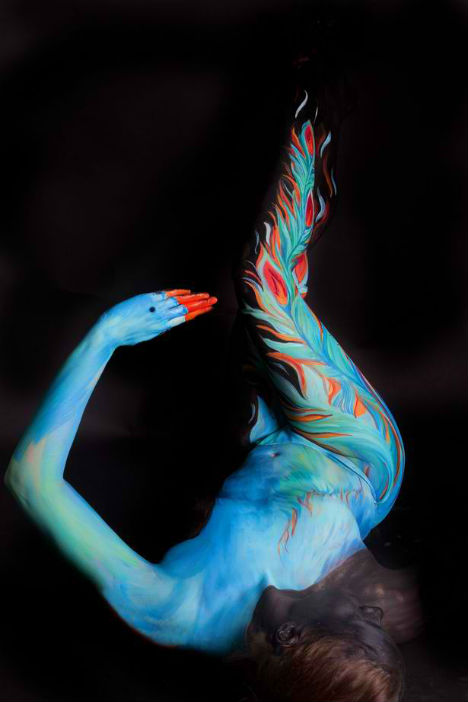
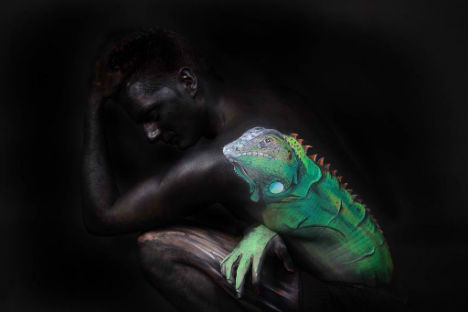
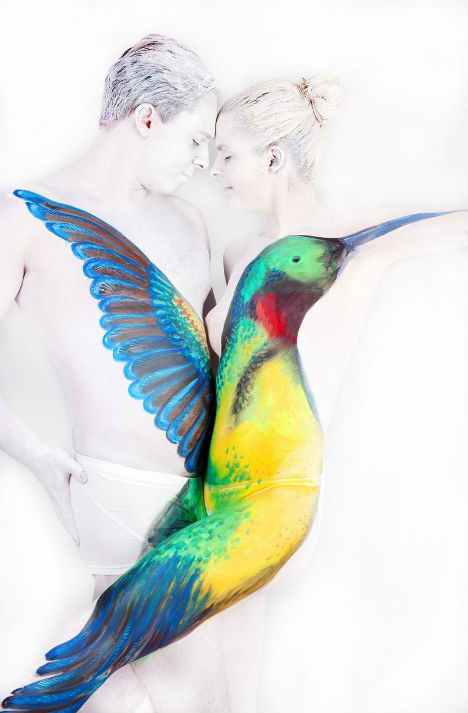
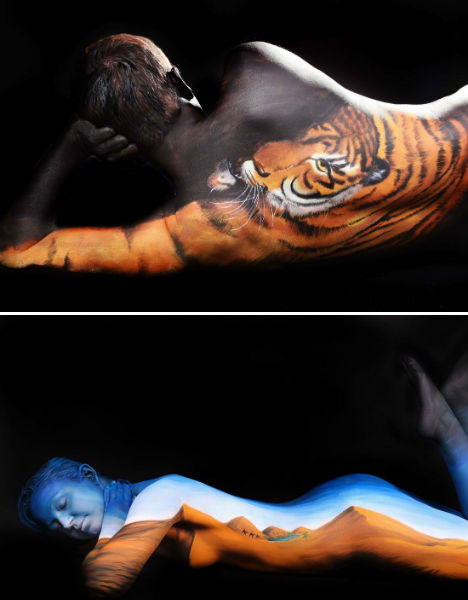
Intricately painted and carefully posed, the human bodies serving as canvases for artist Gesine Marwedel are virtually unrecognizable as they morph into swans, flamingos and iguanas. The 25-year-old German painter employs performance artists to bring her colorful illusions to life, leaving their faces and other body parts visible as part of each composition.
The ability to contort into unusual positions is a crucial element of making each of these incredible three-dimensional paintings work. Each photograph depicts not only the painted animal, but also its grace and movement.
“Body painting is not just paint on a living canvas, it is picking up the body shapes in a subject and the painting on the body,” Marwedel told PSFK. “It is the transformation of a human being into a breathing, moving, living work of art.”
Marwedel began to explore body art after providing therapy for disabled and autistic children through speech and music. See more of her work at her website, or in person at the World Body Painting Festival, to be held in Austria in July 2013.
What could be better than a shiny new camera? How about a walk-in camera?
That’s right! We’re making cameras big enough to have a party in.
Check out this tutorial for a step by step guide to turning any room into a giant camera.
It’s kind of like making a pinhole camera but on a real-life scale.
So grab some poster board, a roll of tape, and invite your friends over for a camera party.
Turn Your Room into a Camera Obscura
p.s. Want even more Photojojo? Yeah, you do! Like us on Facebook for more DIYs & inspiring photo stuff. (…) Read the rest of DIY: Turn Your Room into a Walk-In Camera (858 words)
[ By Steph in Architecture & Offices & Commercial. ]
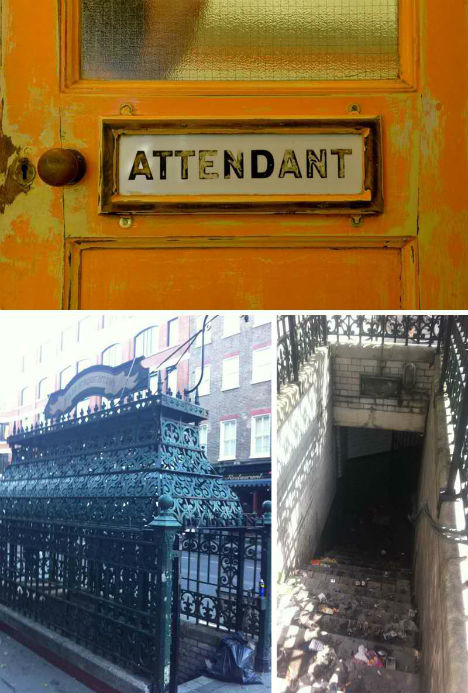
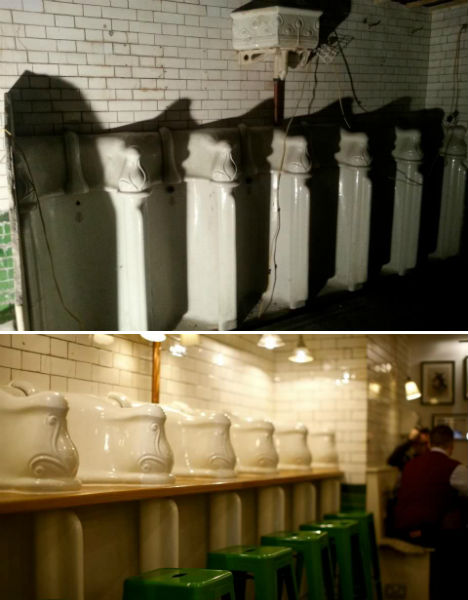
Sit at a counter embedded into a wall of urinals and enjoy a nice sandwich at Attendant, an eatery in London built in a former men’s bathroom. While it’s virtually unrecognizable after an extensive $ 150,000 renovation, it’s hard to imagine how the owners were able to look into the trash-strewn pit of a subterranean restroom and think about food.
The Attendant restroom had been abandoned for more than fifty years before its two-year transformation. It now serves sandwiches, soup, breakfast, cakes and espresso drinks, with many ingredients plucked from the New Covent Garden Marketplace just down the street.
Partners Peter Tomlinson and Ben Russell removed 12 layers of paint dating back over a century from the ornate wrought iron entrance and removed a wall that separated the urinals from the attendant’s space. The urinals were polished, a counter was added and a kitchen was built. Green seating matches the original Victorian floor tiles.
[ By Steph in Architecture & Offices & Commercial. ]
As a hobbyist, self-taught photographer, I find myself often wondering about the esoteric nature of photography and what it is exactly that separates the average photographer from the professional or even world renown photographer. Is it technical skill, creative expertise, some sort of profound psychological perspective, post-processing acumen or just plain blind luck? In reality, it is likely a combination of all these things, but recently I have become more and more interested in the more introspective nature of photography and how powerfully creative and self-expressive it can be in shaping who you are as a photographer and a person.
Recently, I read a fantastic article “5 Ways to Improve Your Photography Without Touching Your Camera,” by Richard Walker over on Lightstalking.com. When you get a chance you should definitely check it out. The article discusses the inferiority complex one gets after looking at amazing photos, once the feelings of self-doubt and negativity creep into your mind, as you ponder the fact that you could never take a photo as great as the one you are viewing. Now, I do not know about you, but this happens to me all the time. I am constantly striving to improve my technique and skill and wonder if there is some enigmatic factor that I am missing that is preventing me from really producing something magical. In fact, it has just been in the past two years that I realized the same concept that Richard Walker introduces in his article of “making a photo.” This is an important and elegant concept that we all need to learn and aptly apply to our photographic process.
Making a Photo
So what does “making a photo” mean? It means to take some time and reflect upon that which your are shooting. Think about what it is you want your photo to look like prior to taking the shot. Pre-visualize the final product and refine your composition, lighting, angle, or background. It involves planning and thought prior to pressing the shutter so that you already have your personalized interpretation in mind. This is such an important concept. I cannot even express what an epiphany this was for me and have definitely been able to see my own progression as a photographer as I have transitioned from snapping photos and started creating them. So how does one start this process?
Know Thyself – The process of artistic creation starts with yourself. You need to really analyze what makes you tick and drives your motivation to be able to express it in your photography. Are you a hopeless romantic, edgy and adventurous, calm and serene, or just downright crazy? As you can imagine each of these personality types would create a different photo based upon what they find inspiring. Really turn the microscope onto yourself and start unravelling the threads of your emotional and psychological make-up. It is truly a fascinating process and will open up and expose that creative core that is necessary to start inspiring your photography.
Likes and Dislikes – Analyze your own photographic likes and dislikes. Keep a running file folder of photos that you have seen or found that you admire or that inspire you. Group them in separate monthly folders so that you can see how your likes change as you grow as a person. More importantly, and often forgotten, you should do the same thing (although to a lesser extent) with photos that you dislike. It is critical to understand what you do not like in a photo just as much as it is to comprehend what it is you like. Somewhere between these likes and dislikes is your own vision or desired artistic niche.
Visualization – Once you have an idea of who you are and what you like, use it to transform your photographic process. When you are getting ready to take your next photo, think about the shot for a few minutes and how you want it to look after post-processing. Consider the angle you are shooting at, the depth of field, available lighting and shadow, the colors involved in the scene and the emotive glimpse of self expression that you want to portray. If you are going for sad and lonely you might want a solitary subject with lots of dramatic soft shadows and a more drab color palette. If you want edgy and adventurous you might capture some action with harsh contrast and bring out the details of the scene with a lot of contrast added in post-processing. Basically, you need to know where you are going with the shot so that you can get there in the end.
Execution – The last step is the easiest and most gratifying of them all. By this point, you have a bit of a concept and feel for your shot. Now all you have to do is make the photo. Using your pre-visualized plan, start shooting. Take a few shots and study them and see if you are getting what you want. Refine the shot. Play around with white balance a bit a see how it changes your shot. Expose for highlight in the scene or for shadow and see how it changes the mood. Work the composition some and most of all enjoy the process and make sure you are accomplishing your goal for the shot.
When you stop taking photos and start making them, it is definitely a gradual process. You will not notice the results right away. In fact, you will likely try it a few times and want to abandon the process as foolish cause you find yourself struggling. Just remember, it takes time, practice, persistence and most of all confidence. It is not going to happen overnight. Stay positive and keep working at it. Analyze the problems you think you are having or how your vision is not being captured by your photos. Take your time and embrace the learning process. Soon you will be looking at your photos and start seeing a few glimpses of your vision. This will progress further and further and eventually you will have that one magical defining moment where you are looking through your viewfinder and you recognize your vision, your hope, your dream, and yourself in that one perfect click of the shutter. You my friend have just made a photo!
Post originally from: Digital Photography Tips.
Check out our more Photography Tips at Photography Tips for Beginners, Portrait Photography Tips and Wedding Photography Tips.


 Studio lights and softboxes are big, cumbersome, and cost a bundle!
 With a little help from your tablet you can add shiny shapes to your reflective subjects.
 For a playful sparkle in the eye and dramatic portrait lighting, look no farther than your tablet!
 This technique will leave you with a softly glowing background like the embers of a camp fire.
  If you have two tablets you can make a light tepee for bright and shiny macro closeups.
 Like the iPod commercials of yesteryear you can use your tablet to create cool silhouette style photos.
  Give your food shots that extra sparkle by zapping your snack with a tablet softbox.
 A matching background will do wonders to enhance your macro shots.
  Create ghostly effects in your photos by moving your tablet through the background of your shot.
 A circular shape is a great way to highlight your subject with dramatic lighting.


 As a hobbyist, self-taught photographer, I find myself often wondering about the esoteric nature of photography and what it is exactly that separates the average photographer from the professional or even world renown photographer. Is it technical skill, creative expertise, some sort of profound psychological perspective, post-processing acumen or just plain blind luck? In reality, it is likely a combination of all these things, but recently I have become more and more interested in the more introspective nature of photography and how powerfully creative and self-expressive it can be in shaping who you are as a photographer and a person.


You must be logged in to post a comment.