RSS
 

Posts Tagged ‘inside’

All those moving elements: LensRentals looks inside the Leica SL 24-90mm F2.8-4

25 Feb

LensRentals Leica SL 24-90mm F2.8-4 teardown

The Leica SL 24-90mm F2.8-4 may not break any new technical ground, but when the SL’s ‘kit’ lens made its way to LensRentals headquarters, the team endeavored to take a careful look inside. With the solidly constructed lens partially disassembled, they got a closer look at its impressive number of moving elements. Take a look at some of the highlights here, and for a full look inside the 24-90mm head over to LensRentals.

Weather-sealing

Sliding the rear of the lens off took a little muscle according to LensRentals’ Roger Cicala, ‘as it’s very tightly sealed by the thick, greenish weather gasket underneath.’ Leica promises this keeps the lens protected from dust, moisture and splashes.

The inner barrel assembly

With the zoom key and six screws in the internal chassis removed, the outer assembly of the lens barrel can be removed, and Cicala finds that ‘the zoom and focus rings are one modular assembly connected to the main chassis.’

Not all focusing mechanisms are created equally

With the inner barrel exposed, part of the 24-90mm’s focus-by-wire linkage can be seen. Says Cicala: ‘I won’t argue with those who prefer a mechanical focusing linkage, and I agree that some electric focusing mechanisms feel sloppy and inaccurate. But I’ll add that they aren’t all made equally, and the Leica focus feels quite good and seems very accurate.’

A ‘complex dance’ of moving elements

With the casing and front barrel removed, the lens’ helicoid grooves are visible. These allow the moving elements to travel on their separate paths. ‘This is a really nice example of the mathematical formulas involved when you move elements. Notice none of those grooves are parallel; as you zoom the lens the various elements move in a rather complex dance.’

Focusing assembly up close

Although they’d sworn not to do a full teardown, Roger and company wanted a better look at the focusing group so out it came. And that’s where things got interesting. 

‘You can see the stepper motor (green line) of course. The actual focusing element is what Aaron is holding the group by. The larger group in the center is where the entire assembly is attached to the helicoid. One of the first things we notice (red arrows) is this group has 3 pairs of adjustable eccentric collars. These were thoroughly glued in place so we left them alone, but it seems each pair has one collar for tilt and another for centering of this group. None of the other moving groups had eccentric adjustment collars visible.’

A peek at IS

The teardown stops at this point, but not before a glance up the barrel toward the image stabilization unit. While those screws tempt Cicala and crew, memories of finicky IS systems kept them from going any further.

Articles: Digital Photography Review (dpreview.com)

 
Comments Off on All those moving elements: LensRentals looks inside the Leica SL 24-90mm F2.8-4

Posted in Uncategorized


Worth the wait? A look inside the Pentax K-1

18 Feb

Announcing the K-1

Here it is – the long awaited full-frame Pentax. The K-1 is a solidly constructed camera that feels good in the hand, and should appeal to many photographers looking to step up from APS-C Pentax DSLRs, as well as those looking to use older K-mount glass on a full-frame format.

The body of the K-1 is constructed of a lightweight magnesium alloy, and has 87 seals around the body. Ricoh claims that the K-1 is dustproof, weather-resistant and cold-resistant.

Big viewfinder

Although most people are likely to buy a full-frame camera because they tend to offer better image quality than smaller sensor models, full frame DSLRs gain an operational benefit as a side effect. The larger mirror needed to cover the larger sensor means that more light is reflected up into the viewfinder, meaning it’s easier for a full-frame DSLR to have a large, bright viewfinder, compared to a smaller-sensor version.

The K-1’s viewfinder offers a ‘near 100%’ field of view at a pretty substantial 0.7x magnification. This isn’t the very largest available but it’s still very large and very bright, and will be a significant step up for any users of APS-C cameras. By way of comparison, the Pentax K-3 II’s 0.95x viewfinder is equivalent to 0.63x once you take crop factor into account.

Tilting cradle LCD

The K-1 features an unusual rear LCD arrangement. The panel itself is attached to a tilting cradle that itself is mounted on four legs that slide along a cross-shaped series of slots. As the legs slide out towards the outer points of this cross, the screen moves outwards from the back of the camera. Because the legs all move independently, the cradle can tilt slightly up/down and left/right, even before the LCD is tilted up or down.

The ribbon cable extending from the back of the camera to the LCD is enclosed in a rubber sleeve, so that the weather sealing extends to the rear screen.

LED lights

On the back of the LCD cradle are four small LED lamps that can be used to shed light on the camera’s rear controls. Ricoh says that compared to backlit buttons, this is a better way of providing illumination while maintaining the weather sealing of the buttons on the back of the camera. You do, of course, have to position the LCD in such a way that it the light from those LEDs reaches the controls.

Another LED sits below the viewfinder hump and lights up the lens mount to make it easier to swap lenses in the dark. Finally, there’s an LED fixed in the camera’s card bay that lights up both the card slots and the socket for remote control connection. The brightness of each of these lamps can be configured independently, so that only the area of illumination you want to operate have any effect when you press the lamp button on the top of the camera.

Multi Function Dial

One of the main areas on which the K-1’s controls differ from the well-liked K-3 series bodies is the addition of the Multi Function Dial. This adds a third command dial to the camera’s rear corner but one whose function can be changed simply by rotating a labelled dial just next to the viewfinder hump.

This means that an already customizable two-dial camera becomes a three dial camera whose behavior can be altered without digging into the camera’s menus. We suspect most people will leave the third dial set to ISO or Exposure Comp, most of the time, but it’s an interesting way of extending the degree of direct control and we’ll be interested to see how it ends up being used.

Autofocus module

The autofocus sensor, which Ricoh is calling SAFOX 12, has been updated. Thirty-three AF sensors, twenty-five of which are cross-type (and centrally located), cover a relatively small portion of the frame. The center point along with those directly above and below can focus down to -3EV, and are also ‘high precision’ (longer baseline), which means that when a F2.8 or faster lens is attached, focusing using these points leads to higher accuracy. This is particularly important when shoot faster primes with this camera: as we’ve seen on other brands’ DSLRs, 36 megapixels have a way of highlighting any slight focus imprecision. We’d expect users to have to do some focus fine-tuning to get the best from the K-1, and Ricoh offers a rudimentary AF microadjustment feature to do just that.

With the current ecosystem of Pentax lenses, we expect autofocus speeds to vary considerably based on lens (with older screw-driven lenses in particular likely to exhibit slower performance), but the good news is that the newest Pentax zoom lenses we’ve tried do appear to have significantly quicker AF motors.

Metering and continuous AF

Ricoh is also claiming a ‘Real-Time Scene Analysis System’ that utilizes the new PRIME IV engine and an 86,000-pixel RGB metering sensor for scene analysis using color, facial information, and movement to aid the camera’s metering and AF systems. Not only does this promise to increase accuracy of metering, it also allows the camera to automatically select the correct AF point to stay on your subject (subject tracking) when using continuous AF.

This isn’t new to Pentax – nor any recent Nikon or Canon DSLR with 3D tracking and iTR, respectively – but we’ve found performance to be lacking in previous bodies like the K-3. A brief play with a pre-production K-1 and the relatively fast-to-focus 15-30mm F2.8 in a non-test environment indicated that the system, while fairly accurate, was slow at tracking subjects across the frame. The AF points do move to stay on a moving subject, but do so sluggishly, which means it’ll be of limited utility with faster moving subjects. The limited AF coverage also means it’s unlikely fast-paced shooters will experience much success shooting this way, possibly falling back to relying on single point AF.

Pixel-shift to sample all colors

The K-1 includes an updated version of the Pixel-Shift Resolution mode introduced on the K-3 II. Like that camera, the K-1 takes four shots, shifting its sensor by one pixel between each shot. This means it captures red, green and blue information at every capture location, resulting in an image with full color information for every output pixel.

The latest implementation tries to cancel-out the effects of subject movement as its shooting the four images. Ricoh tells us not to expect it to cope with major changes, such as a car driving across the frame but that it should cope with leaves moving in the breeze.

As well as the more accurate color capture, the benefit of capturing four frames is that the noise performance is improved (because noise can be averaged-out between the frames). It should also mean higher dynamic range, which theoretically could improve up to 2 EV from sampling four images, possibly putting it in competition with the 645Z’s industry-leading Raw dynamic range.

AA-filter simulation

The K-1 also offers the anti-aliasing filter simulator feature that first appeared on the K-3. This vibrates the sensor during exposure just enough to blur the light across more than one pixel. This removes the risk of high frequency patterns clashing with the camera’s color filter, which otherwise results in false color and spurious patterns (aliases) appearing in images.

The camera offers two intensities of filter simulation and, because the sensor itself doesn’t have a physical AA filter, it can also offer an ‘Off’ mode. As on the K-3 II there’s also a filter bracketing option that lets you shoot consecutive images with different degrees of AA filter effect applied, so that you can use a filtered version of the shot if the unfiltered version exhibits moiré.

Astrotracer

The K-1 includes built-in GPS and an electromagnetic compass, giving it the kind of location awareness that you’d usually only expect from a smartphone. The camera uses this, in conjunction with its image stabilization system, to offer the Astrotracer feature that Pentax developed back in 2011. This uses the GPS to work out where the camera is and hence how much the Earth’s rotation will affect the apparent position of the stars overhead.

The camera can then shift and rotate its sensor during a long exposure to track the relative movement of the stars so that they appear as points, rather than trails, in the resulting image. Since this inevitably blurs static objects in the scene, it is most useful for creating low noise starscapes. Night time landscape photographers will also find this tool useful if they combine images with the Astrotracer on and off, using appropriate masking techniques. (Image courtesy of Pentax)

Lens-lineup: FA lenses

At the time of launch, Ricoh offers approximately 12 FA and DFA full-frame lenses. This list includes five FA primes, including the 31, 43 and 77mm ‘Limited’ series. On top of these there are five D FA zooms: a 15-30mm F2.8, 24-70mm F2.8 and 70-200mm F2.8, along with the newly-announced 28-150mm F3.5-5.6 and the 150-450mm F4.5-5.6. Finally, there are two D FA macro lenses: a 50mm and a 100mm.

In addition to these, the camera includes lens correction data for 14 out-of-production lenses – making clear how important backwards compatibility is to this camera.

Using crop lenses on K-1

The K-1 can, of course, still use the Pentax DA lenses designed for the company’s APS-C cameras. By default the camera will use a 15MP APS-C-sized crop of the sensor if a DA lens is mounted but can be made to use its full sensor region, if you’d prefer. Ricoh has published a list of those lenses (all of which are primes) that will produce relatively useable results in full frame mode, if the aperture is stopped down.

DA Prime Lens / Utility on K-1
DA 14mm Crop Mode Only DA 50mm F1.8 Stopped-down
DA 21mm Limited Crop Mode Only DA* 55mm F1.4 Stopped-down
DA 15 F4 Limited Crop Mode Only DA 70mm Limited Stopped-down
DA 35mm F2.4 Stopped-down DA* 200mm F2.8 SDM Fully Functional
DA 35mm F2.8 Macro Stopped-down DA* 300mm F4 SDM Fully Functional
DA 40mm Limited Stopped-down DA 560mm F5.6 Fully Functional
DA 40mm XS Stopped-down RC1.4X Crop Mode Only

Summary

It should be apparent to anyone that the K-1 is a very impressive-looking camera. While we doubt it’s going to be cutting-edge in every respect when it comes to performance, it offers a very solid looking set of specifications with some very clever and genuinely useful flourishes in a very solid looking body.

That in itself is likely to be enough to satisfy the patient Pentax lens owners who’ve been wanting a camera like this for so long. For those people not already committed to the system, there’s the appeal of the price. $ 1799 is an aggressive price for a camera of this caliber and should help extend its appeal beyond the system’s existing users.

Articles: Digital Photography Review (dpreview.com)

 
Comments Off on Worth the wait? A look inside the Pentax K-1

Posted in Uncategorized


Roger Cicala finds innovation sealed inside the Sony 35mm F1.4 ZA

27 Jan

Sony FE 35mm F1.4 ZA teardown

We’ve already looked at Roger Cicala’s teardown of the Canon EF 35mm F1.4L II, where he showed it to be a heavy duty design with extensive adjustability to bring it back to spec after a period of abuse. LensRental’s look inside the Sony FE 35mm F1.4 turned up a lens designed with a radically different approach. It’s easy to over-interpret the differences and start trying to picture the different use-cases they’ve been designed for, but even if you don’t want to extrapolate so far, it’s fascinating to see how unconventional Sony’s approach is.

Taking a more linear route

The most fundamental difference Cicala highlights between the two designs is how the focus elements are moved. The Canon uses a traditional helicoid design – rotating the focus element along a helical track, in much the same way as manual focus lenses would. The Sony design instead uses a piezoelectric drive to push and pull the lens element along a rail, meaning that there’s no rotational movement occurring at all. Instead it can be shuffled back and forth in very fine increments.

Sony calls this design ‘Direct Drive SSM’ (with SSM standing for Supersonic motor), and it’s based on technology used for in-body image stabilization in Sony A-mount cameras, hinting at the speed and precision that such systems can provide. It’s distinctly different from the linear motor technology used in the FE 55mm F1.8, which you can see in operation here.

Direct drive SSM

The Piezoelectric drive mechanism is fascinating, and we saw it embedded in a cut-in-half FE 35mm at CP+ last year. It involves a drive element that can be expanded or contracted by applying an electric current. Expanding it slowly moves the lens out along its mounting rail, but the connection to the rail is designed to slide in response to rapid movement, so rapidly contracting the drive element leaves the lens in the more distant position but with the drive element retracted. Repeating this pattern of slow extension and rapid contraction progressively nudges the lens away from the drive element. Pulling the lens back again involves reversing the process: rapidly expanding the drive element so that it slips through the clamp, then slowing drawing the lens back in, one step at a time.

Why do it this way? Well, it’d certainly be quiet and it allows very fast movement, giving the lens possibly the fastest focusing we’ve ever seen in this class: when paired with the a7R II’s phase-detect AF system, autofocus is quick and precise. A single element able to move quickly back and forth in tiny steps lends itself well both to contrast detection focus in video as well as being able to reverse directions when subjects erratically switch between approaching and receding.

Adding a snap to aperture-by-wire

Another interesting design detail is the switch for engaging and disengaging the stepped, clicking aperture. A weather-sealed switch pushes a small, sprung ball bearing against a series of tiny teeth, to give tactile feedback as you rotate the aperture ring. However, no other mechanical connection is engaged: the aperture is entirely controlled by-wire, with a sensor detecting movement of the aperture ring and relaying it to the aperture motor.

Locked on place

The other major difference between the Canon and the Sony is the philosophy behind lens alignment. Where the Canon had a series of shims and adjustment screws to allow the different elements to be re-aligned, and re-centered, the Sony has most of its elements glued together in one giant module. This whole module then has three shims offering only a small degree of adjustment. LensRentals’ testing of its copies suggests this adjustment isn’t sufficient to give the consistency you might hope for.

Individual replacement parts are not available for after-market repair: the only option is to slot a whole new module in, with limited adjustment to ensure its alignment within the lens barrel. This approach means Sony has a good level of control over the alignment within each module but means the lens is harder and more expensive to service if it goes out of alignment or if the front element gets scratched.

In summary

The construction and adjustment isn’t quite as extensive as in the Canon but, as Cicala highlights: nor is it in most lenses. Instead it appears Sony has designed its lens so that it’s durable and everything is fixed in place, whereas Canon has built its lens to be tough but accepted that as a photojournalist’s workhorse, it’ll need to be beaten back into shape every now and again.

it’s clear, though, that Sony has built this lens to be tough: not only is each element individually positioned, rather than being spaced apart, relative to another, but Sony has included extensive amounts of weather sealing at every step of the design (just look at the size of the rubber gaskets, in the picture above). Cicala concludes: ‘This lens has the most rubber gaskets I’ve ever seen. The weather and dust resistance in the lens itself should be superb.’

Articles: Digital Photography Review (dpreview.com)

 
Comments Off on Roger Cicala finds innovation sealed inside the Sony 35mm F1.4 ZA

Posted in Uncategorized


5 Questions to Help You Make sure Your Photos are Safe Inside Lightroom

29 Nov

Lightroom quiz lead image

New Lightroom users often get into trouble because of a lack of understanding as to how Lightroom works. Unfortunately the result of these misunderstandings is often that their precious photos are lost, either permanently or temporarily. When you are new to Lightroom it can help if you understand some basics about how Lightroom works to ensure that your precious photos are safe.

Here’s a quick five question quiz to see if your photos are safe in your hands.

Question 1: True or False?

Lightroom stores a copy of your photos for you. When you delete a photo from Lightroom even if you opt to delete it from disk, the original is still safe.

What happens when you select to Delete from Disk in Lightroom

Answer: False

Lightroom simply keeps an record of where your images are on your hard disk. It does not actually store any images. So, if you remove a photo from Lightroom, and when prompted select Delete from Disk, then then you’re deleting the original of that image. If that was your only copy you’ll have deleted that forever.

Question 2: True or False?

You have deleted all the photos from a folder inside Lightroom. This means that there are no photos left in that folder so it’s safe for you to open Finder or Windows Explorer and delete the folder itself.

Is an empty folder in Lightroom really empty?

Answer: False

Lightroom can only handle photo and video file formats. Even if you delete all the photos and videos from a folder in Lightroom there may still be other files in that folder that Lightroom can’t handle, such as PDF files, Microsoft Word, Excel and Quicken files. You cannot know that a folder is empty of files unless you check it by opening it in Finder or Windows Explorer.

Question 3: True or False?

Your photos are safe because every time you see a prompt to backup Lightroom you always click to do so.

Does Lightroom backup your photos when you select to Backup?

Answer: False

When you choose to backup upon exiting Lightroom, all you’re doing is backing up the Lightroom catalog, NOT your photos. Your photos are never backed up by Lightroom, so you will need to set up some other routine for backing up your image files. Also note that, in most cases, Lightroom saves the catalog backup on the same drive as the original catalog is stored so, if your drive crashes, you’ll lose the original catalog and all backups – so make sure you change it to save the backup on an external drive. (Note: you can only do this in the dialog box above when it pops up)

Question 4: True or False?

When you make changes to a file in Lightroom those changes are written to the file so, if you open the file in Bridge, Photoshop or some other graphics program you will see the image as it was edited in Lightroom

Are edits always saved to your Lightroom files

Answer: Not necessarily True

Whether or not the changes that you make to a photo in Lightroom are written to the photo files will depend on how your Lightroom preferences are configured. Choose Lightroom > Catalog Settings (Edit > Catalog Settings, on the PC) and select the Metadata tab. There are two settings of concern here: Include Develop settings in metadata inside JPEG, TIFF, PNG, and PSD files and Automatically write changes into XMP – for the edits you make in Lightroom to be written to the files themselves, both checkboxes should be checked.

Question 5: True or False?

You have moved or renamed some folders on your drive which contain photos. When you next open Lightroom you see that Lightroom can’t find those photos any longer. You must now reimport those photos into Lightroom.

how to resolve issues where you changed files outside Lightroom

Answer: False

When you move or rename folders outside Lightroom it is true that Lightroom will report the images as missing. However, instead of importing the images again, you simply need to tell Lightroom where the images now reside. To do this, click the exclamation mark icon, and choose Locate. Navigate to the folder that you renamed or moved, and select the image that matches the one that was missing (you need to find the exact image that was marked as missing). Click the image, and make sure that the Find nearby missing photos checkbox is checked, then click Select. The Lightroom catalog will be updated with the new location of the image and any other images that are in close proximity to it.

Note: You can also do this by right-clicking on a missing folder in the left panel of the Library module. Then navigate to find the entire folder and relink it to Lightroom.

In future, it is best to move images and folders, as well as rename folders, inside Lightroom. Changes such as this, that you make inside Lightroom, are written to your drive automatically. The benefit is that when Lightroom makes the changes, it always knows where your photos are, and won’t report them as being missing.

How did you do?

If you answered any of these questions incorrectly, your lack of understanding of how Lightroom works might be putting your photos at risk. Spending some time learning how Lightroom operates will help you keep your photos safe.

Now if you got all these questions right and if you are a Lightroom expert – what questions would you ask of a new user to help them keep their photos safe? We invite you to pose these as True/False questions – but remember, to help folks out – you should give them the answer, as well as pointing them in the direction of keeping their photos safe.

googletag.cmd.push(function() {
tablet_slots.push( googletag.defineSlot( “/1005424/_dPSv4_tab-all-article-bottom_(300×250)”, [300, 250], “pb-ad-78623” ).addService( googletag.pubads() ) ); } );

googletag.cmd.push(function() {
mobile_slots.push( googletag.defineSlot( “/1005424/_dPSv4_mob-all-article-bottom_(300×250)”, [300, 250], “pb-ad-78158” ).addService( googletag.pubads() ) ); } );

The post 5 Questions to Help You Make sure Your Photos are Safe Inside Lightroom by Helen Bradley appeared first on Digital Photography School.


Digital Photography School

 
Comments Off on 5 Questions to Help You Make sure Your Photos are Safe Inside Lightroom

Posted in Photography


How to Use the Local Adjustments Tools Inside Lightroom

27 Oct

Local adjustments in Lightroom

Whenever you take a photo, no matter what the subject, it would be extremely unusual if it couldn’t be improved in some way by making local adjustments in Lightroom.

Local adjustments affect part of the image. Whenever you carry out any processing action in Lightroom you are either making a local adjustment (only affects part of the image) or a global adjustment (affects the entire image).

If you have been following this series and trying out some of the techniques I wrote about in my earlier Lightroom articles that you have been mainly making global adjustments. There is an exception. Adding a vignette in the Effects panel is a local adjustment because it affects the edges of the image but not the centre.

Lightroom gives you three powerful tools for making local adjustments. They are the Adjustment Brush, the Graduated filter, and Radial filter.

The Adjustment Brush

The Adjustment Brush is for creating an odd shaped mask – one that can’t be made easily with the Graduated or Radial filters.

Local adjustments in LightroomNote that masks work differently in Lightroom than in Photoshop. In Photoshop, the adjustment is applied to the area that isn’t covered by the mask. In Lightroom, the adjustment is applied to the area covered by the mask.

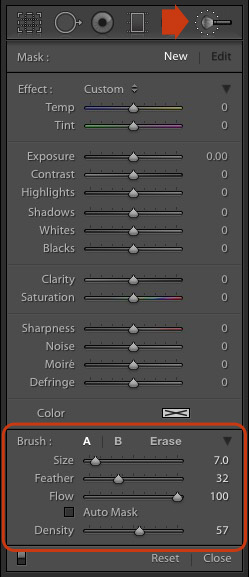
Creating a mask in Lightroom is the same as making a selection in Photoshop. Go to the Develop module and click the Adjustment Brush icon (marked on the right) or use the keyboard shortcut K.

The Adjustment Brush panel opens up underneath the icon. The first 14 sliders show the adjustments you can make with this tool. The Effect menu contains a number of presets that you can use (click the word “Custom” to see the pull-down menu).

At the bottom (circled) are sliders for setting the size, softness and strength of the Adjustment Brush.

To start, select Brush A (if not already selected) and use the [ and ] keys to make the brush smaller or larger respectively, until it is the right size to create the mask you need. You can also use the Size slider, but the keyboard shortcuts are easiest.

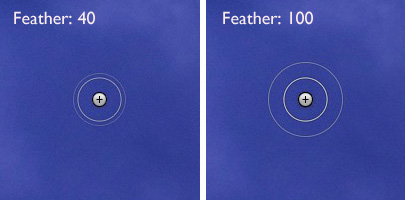
Hold down the Shift key and use the [ or ] to adjust the amount of feathering. Again, you can use the Feather slider but the keyboard shortcuts are faster once you get to know them.

The size of the Adjustment Brush is shown by two concentric circles on the screen. The inner circle shows the area fully covered by the brush. The outer circle shows more or less where the effect of feathering ends. The distance between the circles increases when you increase the feathering amount. This diagram shows how it looks on screen.

Local adjustments in Lightroom

You can create another Adjustment Brush by clicking on B and changing the parameters. You can switch between the A and B brushes whenever you like, useful for complex retouching.

Select Erase to delete part of the mask that you have created. You can adjust the size and feathering of the Erase brush as well.

Flow controls the opacity of the mask. 100 is full strength. Set it here unless you have a reason to do otherwise.

Density sets the maximum strength of the effect.

The difference between Density and Flow is this. If you set Flow to 25% and repeatedly brush over part of the image, each brush mark builds on the one below it, increasing the strength of the effect until you reach 100%. If you set Density to 50%, and flow to 25%, then repeatedly brush, the maximum strength you can reach is 50%.

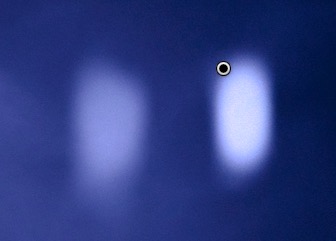
This diagram shows the difference. On the left I set the Exposure slider to +4.00, Flow to 25%, Density to 50% and brushed repeatedly. On the right I did the same with Density set to 100%.

Local adjustments in Lightroom

Tick the Auto Mask box to limit the edges of the mask to any edges in the photo. Sometimes this tool works well, but other times it reacts to textures and creates a patchy mask that doesn’t cover the area you want. I leave this unticked most of the time.

You can add as many Adjustment Brushes to an image as you like. Each one is represented by a grey dot that is revealed when you select the Adjustment brush tool and move the mouse over the photo. The current Adjustment Brush is marked by a black circle within the grey pin. Click on a grey dot to activate that adjustment and make changes to it, or delete it (press the Backspace key).

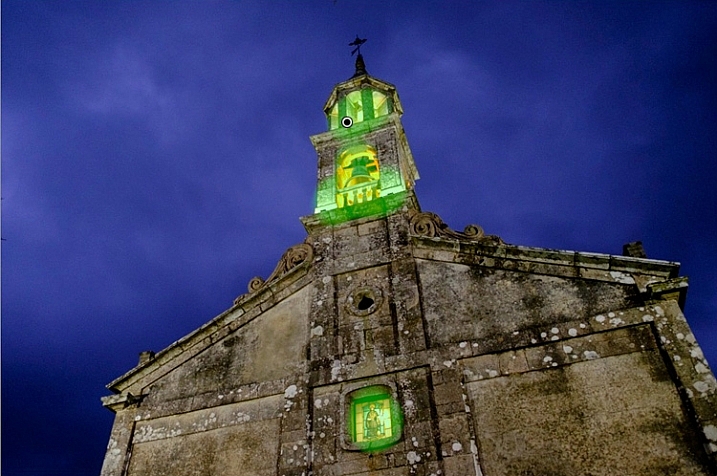
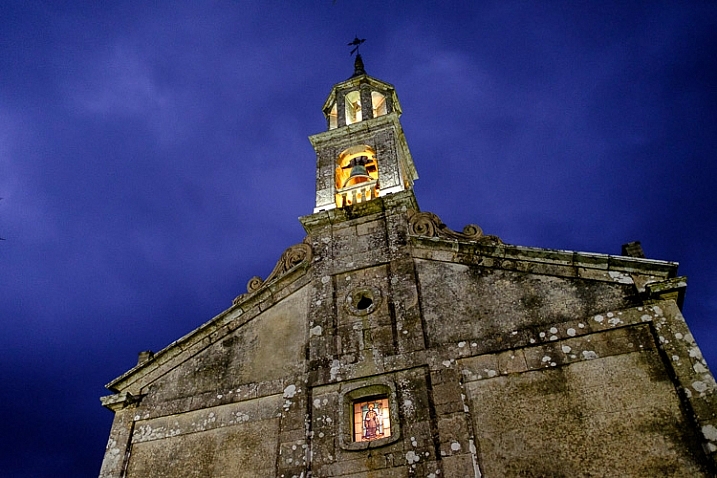
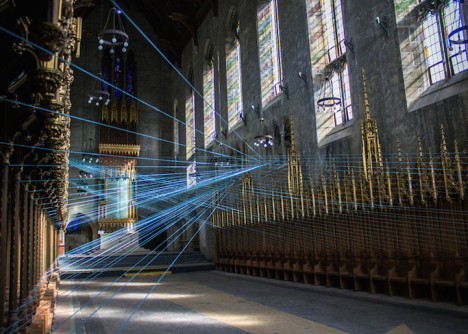
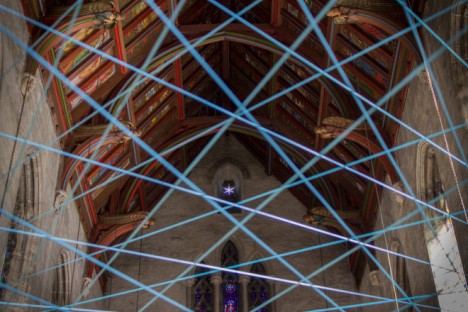
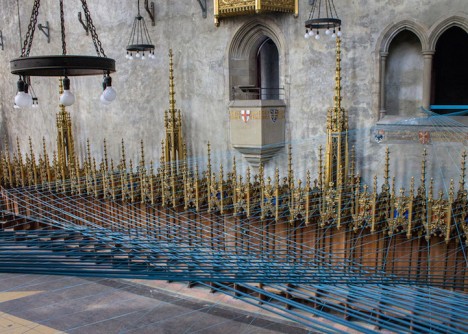
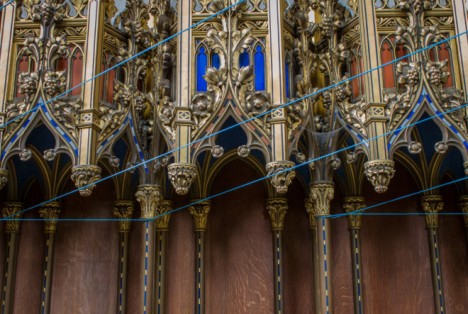
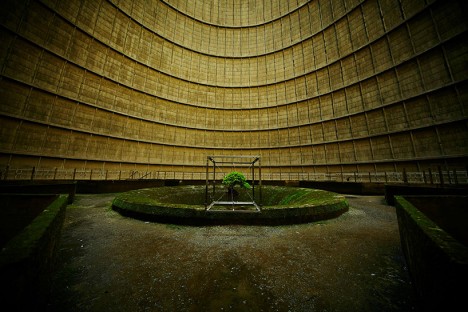
Now, let’s put that into practice. I’d like to do two things to the photo below. One is reduce the intensity of the highlights created by the lights inside the church; the second is emphasize the texture of the stone. We can do both with the Adjustment Brush.

Local adjustments in Lightroom

First, I brushed in the areas affected by the bright highlights (shown in green below).

Local adjustments in Lightroom

You can see the area covered by the Adjustment Brush at any time by pressing the O key.

This is called the Mask Overlay and is coloured green in my screen shots. The default colour is red. Press the Shift and O keys together to change it. Press O again to hide the Mask Overlay.

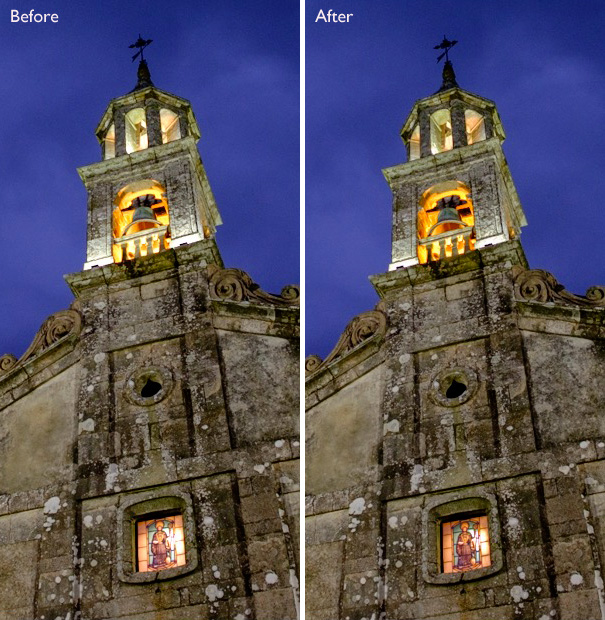
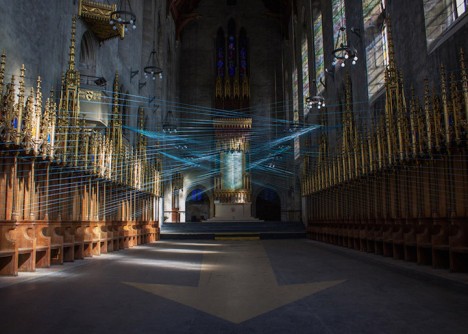
Then I moved the Highlights slider left (to -67) to reduce the intensity of the highlights. These screen shots show the difference.

Local adjustments in Lightroom

Next, I created a new mask covering the stonework.

Local adjustments in Lightroom

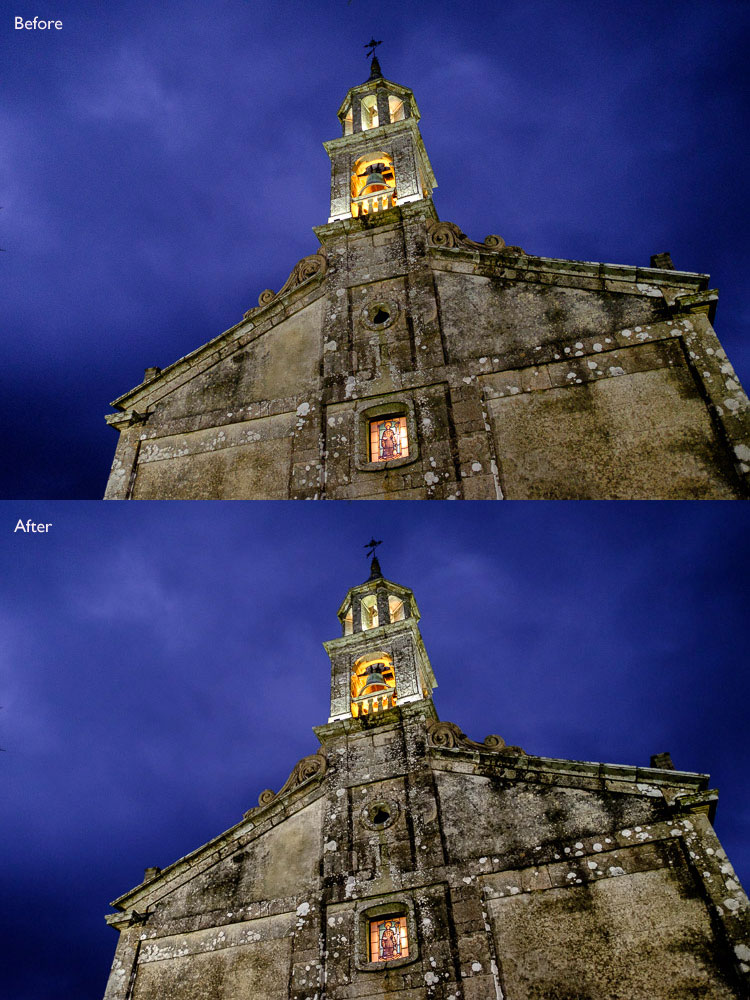
Then I increased Clarity to +58 to bring out the texture of the stone wall.

Here’s the final result, compared to the original.

Local adjustments in Lightroom

Here are some more uses for the Adjustment Brush:

  • Portrait retouching. Use the Adjustment Brush to select the model’s skin and apply the Soften Skin preset. You can also enhance eyes by increasing exposure and Clarity.
  • Enhancing black and white photos. Many black and white images rely heavily on texture for impact. Use the Adjustment Brush to select the textured areas you would like to have the most impact, and increase Clarity to enhance them.
  • Selectively desaturating the background to add impact to portraits.

My article, Four Ways to Improve your Photos with the Clarity Slider in Lightroom, shows you how to do it.

The Graduated filter

Lightroom’s Graduated filter is named after the type of filter used by landscape photographers to make skies darker.

This is also the most obvious use for Lightroom’s Graduated filter. However, it only works if detail was recorded in the sky. it doesn’t replace a physical graduated neutral density filter.Local adjustments in Lightroom

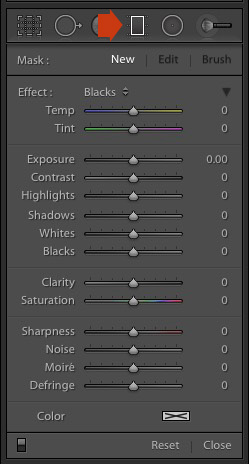
Go to the Develop module and click the Graduated filter icon (marked right), or click the keyboard shortcut – M. The Graduated filter panel opens, revealing the same sliders as the Adjustment Brush.

Click and hold the left mouse button down, and pull the mouse down over the image. Lightroom adds a Graduated filter to the photo.

The Graduated filter is marked by three lines that move further apart as you move the mouse across the photo. The lines represent the softness of the filter – the further they are apart, the more graduation you get.

Let go of the mouse button to place the filter. If you do so close to the edge of the photo, you will create a filter with three lines close together. This is a hard filter, with a rapid graduation between full effect and no effect.

If you hold the mouse button down for longer, you get a filter with three lines spaced far apart. This is a soft filter, with a gentle graduation between full effect and no effect.

The two types of filter are shown below. I pressed the O key to show the Mask Overlay (you can only do this in Lightroom 6 and Lightroom CC).

Local adjustments in Lightroom

After creating the filter, you can move it by clicking and dragging the central pin.

If you hold the Shift key down while creating the filter, it is placed parallel to the edge that you started from.

To rotate the filter, hold the mouse over the central line (the one with the pin) until the cursor changes from a plus sign to a curly double arrow. Hold the left mouse button down and move the mouse to rotate the filter.

To change the softness of the filter, hold the mouse over the outer line until the cursor changes to a hand. Click and drag to move the line closer to, or further from, the central line. If you hold the Alt key down while you do so, the central line stays in position.

The best way to come to grips with this is to try it out. It may sound complex, but it’s quite simple, and you’ll quickly get the hang of it.

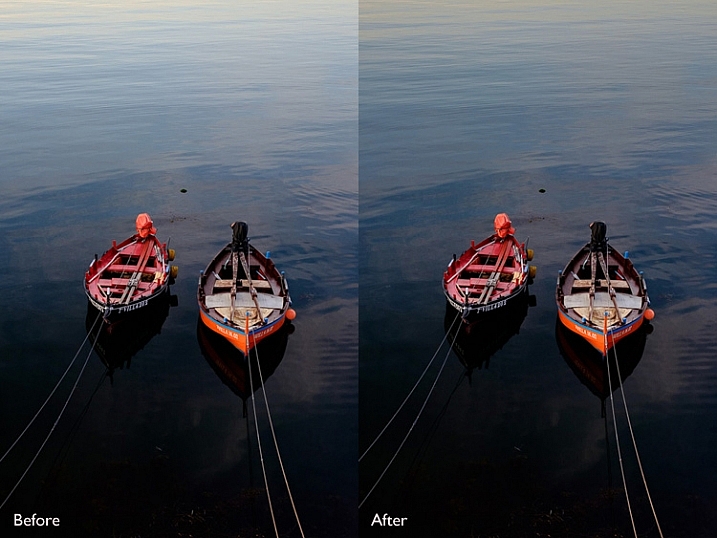
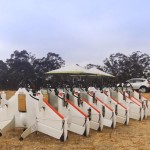
Here’s an example of how you can use the Graduated filter to improve an image. The water behind these boats is very bright, and I wanted to make it darker to fit in with the foreground. The Graduated filter is the perfect tool for this. Before and After photos shown below.

Local adjustments in Lightroom

In Lightroom 6 and Lightroom CC you can combine the Graduated filter with the Adjustment Brush. The Adjustment Brush is used to alter the shape of the mask created by the Graduated filter.

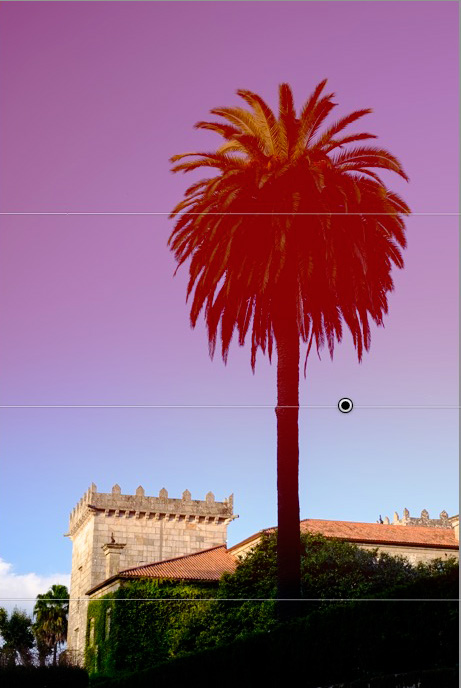
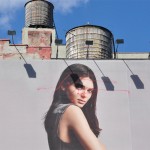
In this example, I used the Graduated filter to darken the sky. The only problem is that the Graduated Filter also makes the palm tree darker, which I don’t want. Here’s the Mask Overlay (shown in red).

Local adjustments in Lightroom

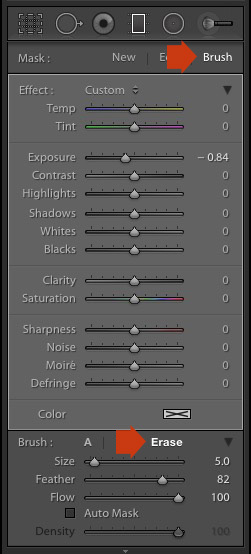
Press O to show the Mask Overlay, then click on the word Brush in the Graduated filter panel (marked below). The Brush options open up below the panel. Click Erase (also marked below) and adjust the size (and other settings) to suit.

Local adjustments in Lightroom

Here’s what the Mask Overlay looks like with the part that covers the palm tree erased.

Local adjustments in Lightroom

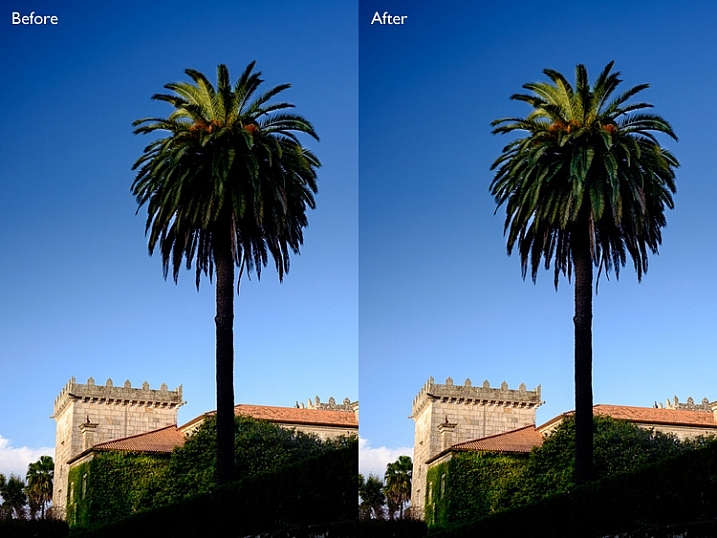
Here are the before and after versions.

Local adjustments in Lightroom

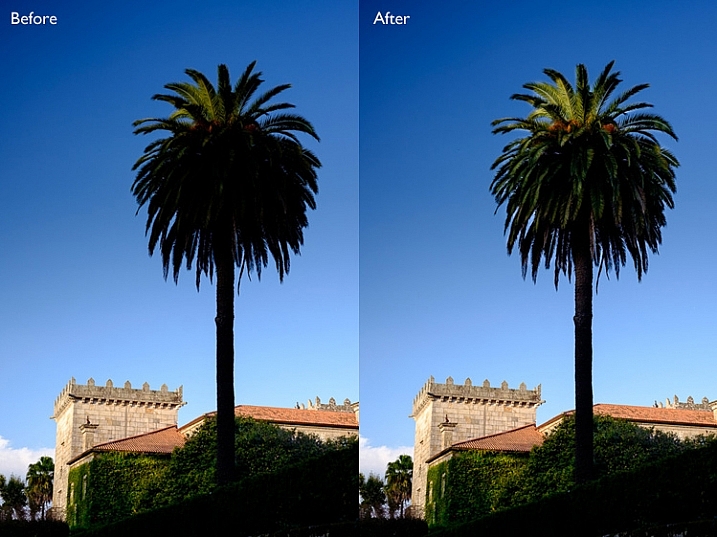
Before (left) showing the graduated filter to darken the sky. After (right) showing the tree portion having been erased or masked out from being darkened by the graduated filter.

My article Improve Your Images with the Lightroom Graduated Filter Tool shows you six ways you can use the Graduated filter to improve your photos.

The Radial filter

The Radial filter (new in Lightroom 5) is for creating circle or oval shaped masks. If you have Lightroom 6 or Lightroom CC you can press O to show the Mask Overlay. You can also combine the Radial filter with the Adjustment Brush.Local adjustments in Lightroom

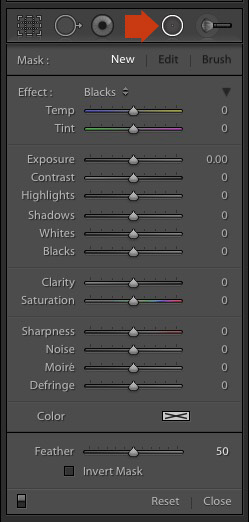
Go to the Develop module and click the Radial filter icon (marked right). The Radial filter panel opens. The sliders are the same as those used by the Graduated filter and the Adjustment Brush.

Hold the left mouse button down and drag the mouse across the photo. Let the mouse button go when you are done.

Change the size and shape of the Radial filter by clicking and dragging the four white squares at the compass points of the filter.

Rotate the Radial filter by moving the cursor to the edge of the filter until it changes from a hand or plus icon to a double curly arrow. Click and drag to rotate.

Use the Feather slider to set the softness of the gradient at the edges of the Radial filter. The default setting of 50 seems to work well for most masks, but you can change it if you need to.

By default Lightroom applies the adjustments to the area outside the Radial filter. Tick the Invert Mask box to apply the adjustments to the area inside it instead.

The screenshot below shows a Radial filter that I placed on photo used in the previous demonstration. I ticked the Invert Mask box to apply the adjustment to the area inside the Radial filter. The Mask Overlay is on to show you the affected area (in red).

Local adjustments in Lightroom

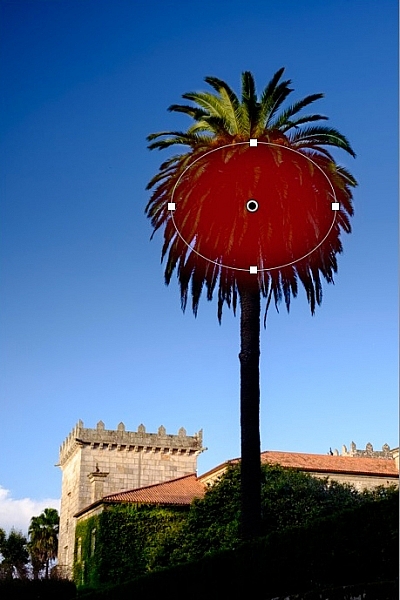
Then I increased Exposure to bring out some detail in the palm tree. Before and after versions below.

Local adjustments in Lightroom

Here are some uses for the Radial filter:

  • Portrait retouching. Select eyes or lips and enhance using exposure and Clarity sliders.
  • Making portrait backgrounds darker. Place a Radial filter over the model’s face and make the background darker.
  • Add a vignette to off-centre subjects. When you create a vignette in the Effects panel, it is always centred. With the Radial filter, you can place it wherever you need.

In my next article I’ll show you how to harness the power of Lightroom using Virtual Copies. Until then, if you have any questions about the techniques in this article, or you would like to share how you use local adjustments in Lightroom, please let us know in the comments.


The Mastering Lightroom CollectionMastering Lightroom ebooks

My Mastering Lightroom ebooks will help you get the most out of Lightroom. They cover every aspect of the software from the Library module through to creating beautiful images in the Develop module. Click the link to learn more or buy.

googletag.cmd.push(function() {
tablet_slots.push( googletag.defineSlot( “/1005424/_dPSv4_tab-all-article-bottom_(300×250)”, [300, 250], “pb-ad-78623” ).addService( googletag.pubads() ) ); } );

googletag.cmd.push(function() {
mobile_slots.push( googletag.defineSlot( “/1005424/_dPSv4_mob-all-article-bottom_(300×250)”, [300, 250], “pb-ad-78158” ).addService( googletag.pubads() ) ); } );

The post How to Use the Local Adjustments Tools Inside Lightroom by Andrew S. Gibson appeared first on Digital Photography School.


Digital Photography School

 
Comments Off on How to Use the Local Adjustments Tools Inside Lightroom

Posted in Photography


Liberty City: Inside an Urban Governmental Drone Test Complex

20 Aug

[ By WebUrbanist in Travel & Urban Exploration. ]

drone system

If you have ever wondered how and where the Department Homeland Security evaluates drones for real-world applications, this Freedom of Information Act request reveals some of the secrets behind the operations taking place at one of these rather mysterious locations. Not to be confused with its video game namesake, tracing back to Grand Theft Auto’s own digital Liberty City, this real-world test site is fascinating to learn about remotely but not somewhere you want to have an actual vehicular adventure.

artifical-street-urban-complex

For years, the government has been testing drones for everything from monitoring infrastructure and special events to patrolling harbors and supporting first responders. Run by Robotic Aircraft for Public Safety (RAPS), Liberty City and sites like it let local, regional and national governments deploy different models of drone and decide which best suit their needs. Like Gravesend in the UK (pictured above), officers and troops are also called in on the ground to interact in these remarkably complete but staged environments.

urban drone testing

Variegated urban terrains help those overseeing the tests determine a drone’s ability to identify key objects and individuals in the built environment, distinguish assailants and perpetrators in complex situations and track persons through challenging architectural landscapes. Simulations revolve around everything from ordinary robberies to hostage situations and terrorist attacks. The goal, ultimately, is to figure out what (completely or partially) autonomous vehicle technologies will work both generally and around specific purposes, for applications ranging from emergency search-and-rescue to broader everyday surveillance. While the work they are doing in these places is not classified as such, it is still highly secretive and much of it still remains undisclosed after years of inquiry.

drone testing documents_edited-1

Submitted via MuckRock, the FOIA request behind the details featured here sheds light on the reasons and methods behind these processes and places. Per Shawn Musgrave, “The broad objective of RAPS is to determine whether drones can play a practical role in a broad range of public safety deployments. Such applications include law enforcement, firefighting, disaster response, and search-and-rescue. The RAPS testing program evaluates each drone model for ease of operation, durability and performance in simulated scenarios. Reviewers compile their findings into a database for first responders nationwide to use when weighing a drone purchase.”

Share on Facebook


[ By WebUrbanist in Travel & Urban Exploration. ]

[ WebUrbanist | Archives | Galleries | Privacy | TOS ]


WebUrbanist

 
Comments Off on Liberty City: Inside an Urban Governmental Drone Test Complex

Posted in Creativity


Light Lines: Stunning String Installation Inside Abandoned Church

04 Jul

[ By Steph in Art & Installation & Sound. ]

abandoned church installation 1

What seems at first to be narrow rays of turquoise light streaming in through the stained glass windows of a vacant Gothic Revival church turn out to be over 6,500 feet of paracord painstakingly wound around ornate posts and columns. Artist Aaron Asis temporarily transformed West Philadelphia’s St. Andrew’s Collegiate Chapel, which has been closed for more than 40 years, with a geometric string installation that shifts the spatial perception within its darkened nave.

abadoned church installation 2 abandoned church installation 3 abandoned church installation 4

Entitled Ci-Lines, the project re-opened the disused chapel for three days over three weekends so visitors could take in both the grandeur of the church itself and the surreal sight of criss-crossing string creating new geometries within the negative space. Built in 1924, the chapel was used for sermon lessons and school services until 1974, and though the larger complex has been reclaimed for other uses, the chapel remains vacant.

abandoned church installation 5 abandoned church installation 6 abandoned church installation 7

“The geometry of Ci-Lines is like an artistic exercise in connecting the dots, crisscrossing overhead and inviting visitors to visually explore a sculptural form as a portal into the nuances of a vacant environ,” says Asis. “The resultant series of cords in tension draws direct inspiration from the existing architectural form inside the chapel. These cords literally render a woven and symmetrical connection between the ornamental posts lining the chapel walls and architectural columns featured along the balconies above, combining to act as a temporary catalyst for observation, investigation, conversation, and realization of spatial majesty in vacant context.”

abandoned church installtion 9 abandoned church installation 10 abandoned church installation 8

Asia hopes that the project will renew interest in the historic structure, helping to preserve it as the cityscape around it shifts and changes. Making use of vacant spaces for art installations helps the public see them in a new light and can spur ideas for revitalization.

Share on Facebook


[ By Steph in Art & Installation & Sound. ]

[ WebUrbanist | Archives | Galleries | Privacy | TOS ]


WebUrbanist

 
Comments Off on Light Lines: Stunning String Installation Inside Abandoned Church

Posted in Creativity


The Hand of Man: Bonsai Hangs Inside Abandoned Power Plant

20 Jun

[ By Steph in Art & Installation & Sound. ]

bonsai power plant 1

Inside the cooling tower of an abandoned power plant, a tiny bonsai tree hangs from a geometric metal frame, its roots exposed. The only other sign of life inside the cavernous space is an occasional slick of moss. The project meets at the junction between urban exploration, installation art and photography, with no one but the artist witnessing it in person before it was quietly whisked away, the bonsai re-planted to continue its life.

bonsai power plant 2

bonsai power plant 3

Located in the city of Charleroi, Belgium and originally built in 1921, the coal-burning power plant was decommissioned in 2007 after criticism of its inefficiency. While much of it was demolished, the tower – which once cooled 480,000 gallons of water per minute – still stands as a dystopian monument, drawing in determined explorers despite the security guards posted outside. Before protests shut it down, it was responsible for 10 percent of the total carbon dioxide emissions in the nation.

bonsai power plant 4

bonsai power plant 5

bonsai power plant 6

Japanese botanical artist Azuma Makoto doesn’t typically provide any explanation for the meaning behind his installations, but it’s hard not to see some potent symbolism in this image. Bonsai plants are painstakingly constrained by human intervention, and here one floats without the soil it needs to thrive, within a cavernous representation of waste and short-sighted thinking.

bonsai space

bonsai space 2

Makoto previously sent a bonsai into space for the Exobiotanica project, suspending a Japanese white pine and a bouquet of lilies and other flowers from carbon-fiber frames and launching them into the sky with a specially-equipped balloon. Six GoPro cameras captured their journey. Said the artist, “Roots, soil and gravity – by giving up the links to life, what kind of ‘beauty’ shall be born? Within the harsh ‘nature,’ at an altitude of 30,000 meters and minus 50 degrees celsius, the plants evolve into exbiota (extraterrestrial life.)”

Share on Facebook


[ By Steph in Art & Installation & Sound. ]

[ WebUrbanist | Archives | Galleries | Privacy | TOS ]


WebUrbanist

 
Comments Off on The Hand of Man: Bonsai Hangs Inside Abandoned Power Plant

Posted in Creativity


Kickstarter Project That Will Change Your Photography Career Forever (Exclusive Freebie Inside)

17 Mar

You might have already heard about Defrozo, a free multi-tool business app for photographers as it has been mentioned in the media quite a lot lately. Today the Defrozo Kickstarter went live, and it’s become a Staff Pick in less than 1 hour after the launch! With a working Beta, over 2000 users on board, and some quite ambitious goals, the Continue Reading

The post Kickstarter Project That Will Change Your Photography Career Forever (Exclusive Freebie Inside) appeared first on Photodoto.


Photodoto

 
Comments Off on Kickstarter Project That Will Change Your Photography Career Forever (Exclusive Freebie Inside)

Posted in Photography


Making ‘Art’: We go inside Sigma’s lens factory

09 Mar

On our recent visit to Japan to attend the CP+ show in Yokohama we were fortunate to be invited to tour Sigma’s factory in Aizu. The Aizu factory is where almost all of Sigma’s lenses are manufactured, including the company’s impressive new ‘Art’ line of primes. Click through to take a virtual tour of the factory, in the company of Kazuto Yamaki, Sigma’s CEO. 

Articles: Digital Photography Review (dpreview.com)

 
Comments Off on Making ‘Art’: We go inside Sigma’s lens factory

Posted in Uncategorized