RSS
 

Posts Tagged ‘improve’

How Cropping in Post-Production Can Improve Composition

16 Nov

Even though I strive to get the best compositional shot in-camera. I do see ‘cropping’ as essential to my post editing workflow. For such a simple post edit technique, it can really enhance and improve composition of the image. I have also found cropping an image, be it small or in a creative sense can transform an image dramatically.

How Cropping in Post-Production

I like to view cropping as reframing the scene. The initial framing of the scene comes when you look through the viewfinder, then next when you have uploaded your images onto your computer for editing.

You get the chance and time to critically see if your image(s) needs cropping and what type is required. For example, there might be some distracting elements in the foreground that you missed when you looked through the viewfinder, or a horizon line isn’t quite as straight as it should be.

In this article, I’m going to illustrate the following reasons why you might crop your images in post-production:

  • To straighten lines: keep the horizons even and the vertical lines vertical.
  • To move your subject or object: a little more to the left, right, up or down.
  • To trim away distracting elements, especially at the sides or the near foreground.
  • To zoom in to show impact, especially portrait or head-shots.
  • To use the rule of odds – instead of two subjects just use one.
  • For creative cropping – rotate image, use perspective crop.

Let’s take the first example, I took this shot handheld when I should have used a tripod. An uneven horizon line does not make for a good composition. The eye is immediately drawn there, for the wrong reason.

crooked-horizon-line

Seascape with a crooked horizon line.

However, this is easily remedied in most photo editing programs. As Adobe Photoshop CS6 is my go-to photo editing software. I will be referencing it for the rest of this article.

straighten-button

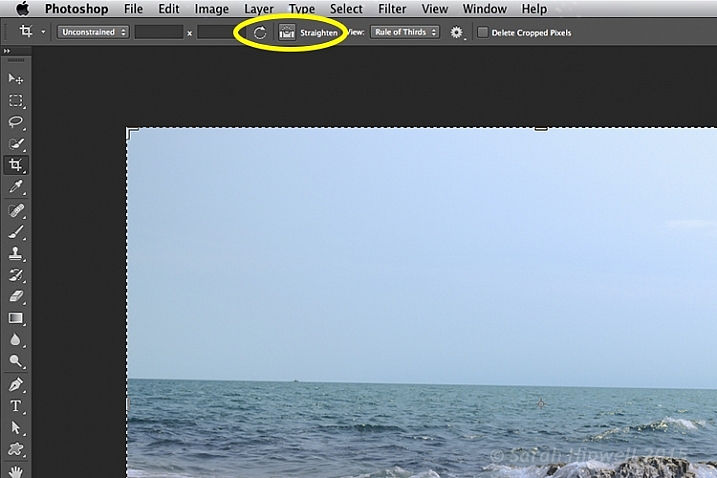
Once you click on the Crop Tool in the Tools panel, there is a dedicated straighten button in the Options Bar.

Click on the Crop Tool in the Tools panel. Go up to the the Options Bar where there is a dedicated Straighten button. Make sure this is selected, click and drag along the crooked horizon line. Release it, and Photoshop straightens the line and crops the image in one action! The same process can equally be applied to vertical lines.

straightened-horizon-line

Horizon lines are easily fixed using the Crop Tool in Photoshop.

The Crop Tool in Photoshop CS6 is impressive. It now works non-destructively. But you must make sure Delete Cropped Pixels isn’t ticked up in the Options Bar (leaving this box unticked keeps cropped portions which can be recovered later if needed).

Delete-cropped-pixels

The Crop Tool in Photoshop CS6 works non-destructively if the Delete Cropped Pixels box is unchecked.

Inside most editing programs there is usually a choice of overlay guides, based on traditional compositional concepts like the Rule of Thirds or the Golden Ratio. You can read more about Composition in this article: Easy Tips to Help Beginners Understand Composition The crop overlays are great visual guides for good compositional techniques and makes it much easier to crop your image. I usually set it to Rule of Thirds.

So in the next image, I wanted the focus of this shot to be entirely on the sunflowers. The background, although blurred, is still too distracting with the color of the garments worn by the passersby.

sunflowers

Although the background is blurred, the colour of the garments worn by the passersby is too distracting.

I started with one of the aspect ratio presets. These can be found under this tab Unconstrained. I selected 5 x 7.

Aspect-ratio-5x7

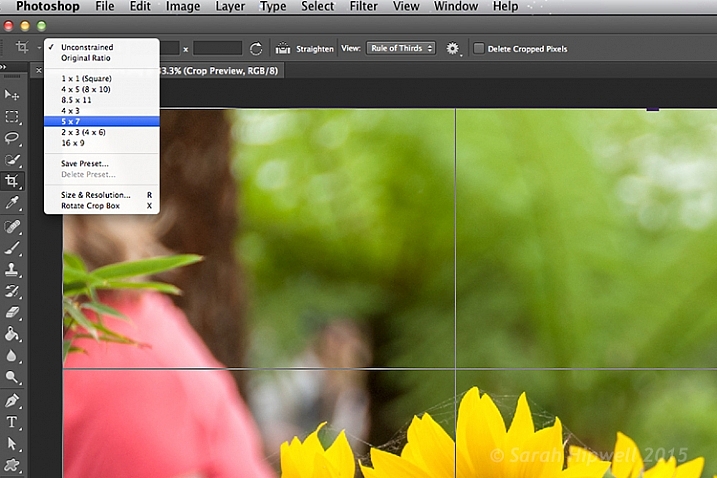
There are various preset aspect ratios when you click on the Unconstrained tab. You can also save your own presets too.

I dragged the top right corner handle of the crop box down, and in towards the centre, to maintain this aspect ratio. By clicking on the image inside the crop box, I was able to move and reposition the image into place.

sunflowers-cropped

The sunflowers are now the main focus point in this image, and the green blurred background is complimentary, without being a distraction.

I am strong believer in using my feet to get close to the subject, or if you have a nice telephoto lens, then happy days. Unfortunately for my next shot, I didn’t have the option of either of the above.

I was at the zoo on a family outing, so I wasn’t taking dedicated shots for anyone. I was behind a barrier and a good 30 feet (approx.) away from the seals. I didn’t get time to think or compose for this shot. I just wanted to grab a shot of the seals.

seals-at-the-zoo

Seals taken at the zoo.

The day was fantastic weather wise, and these seals were really enjoying the sunshine. I wanted to crop in tightly, just on the seals, but I had the megapixels to play with because I had a 24 megapixel camera with me, which can produce a 20×13” at 300 dpi print. The final crop for this image would give me 5.5×4” at 300 dpi print.

seals-cropped

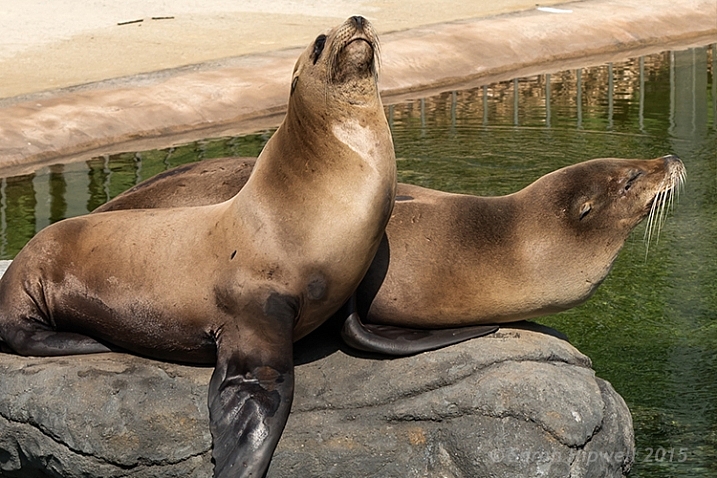
I cropped in tight to get a close-up of the seals. I didn’t like the railings at the back, but I would have preferred to have kept the reflection of the seals in the water, but there is always a trade off!

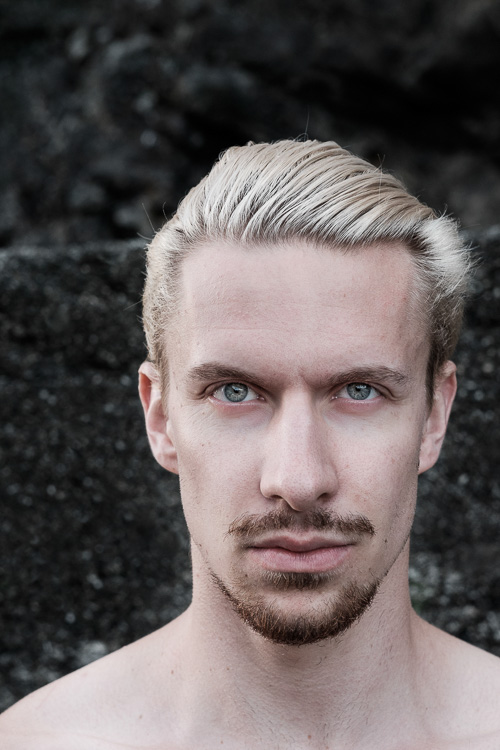
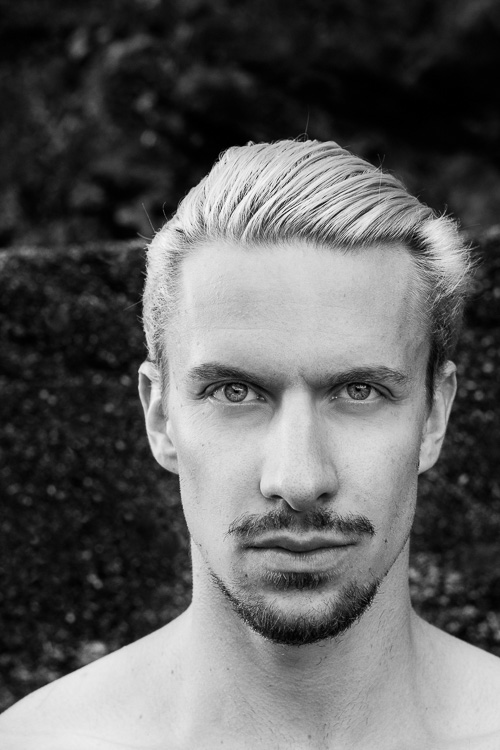
In this next shot, cropping in tight on a subject can convey more impact, especially for portrait shots. No two people reveal the same expression. As a photographer, some subjects are easier to capture an expression over others.

Emmet-and-Lucy

Emmet and Lucy enjoying the nice weather and the chat!

I wanted to convey Lucy looking at Emmet in an adoring fashion, I-only-have-eyes-for-you type of expression.

Lucy-cropped

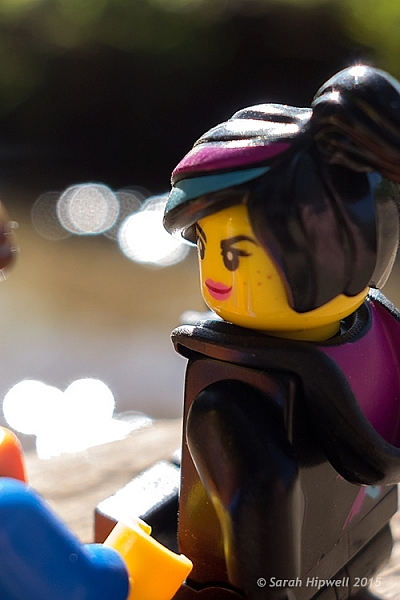
Lucy hanging on to every word that Emmet is saying! The look of I-only-have-eyes-for-you!

Another way to convey impact is to focus on the action. Here, in this shot below, I cropped out my other daughter, so that the focus was on my youngest daughter running to shore.

fun-at-the-beach

Fun at the beach.

fun-at-the-beach-cropped

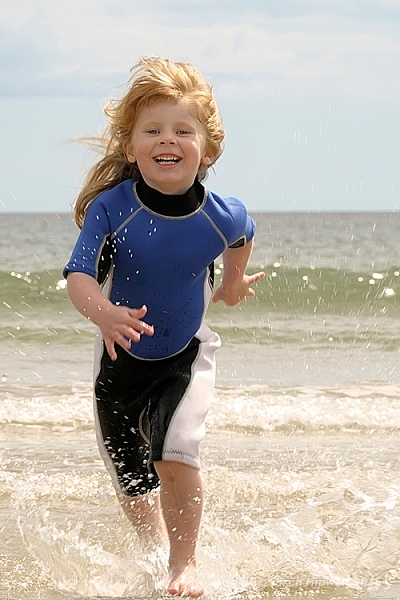
By cropping out my other daughter, the focus is on the action. It’s also using the Rule of Odds to focus on the single subject.

Cropping an image is a great way to apply the Rule of Odds. A good example of this is in the following shot. The two subjects are side-by-side. By cropping in tight on each subject, I have created two distinct head-shots from one single image.

two-portraits-together

Two subjects shot sitting on a bench side-by-side.

two-separate-portraits

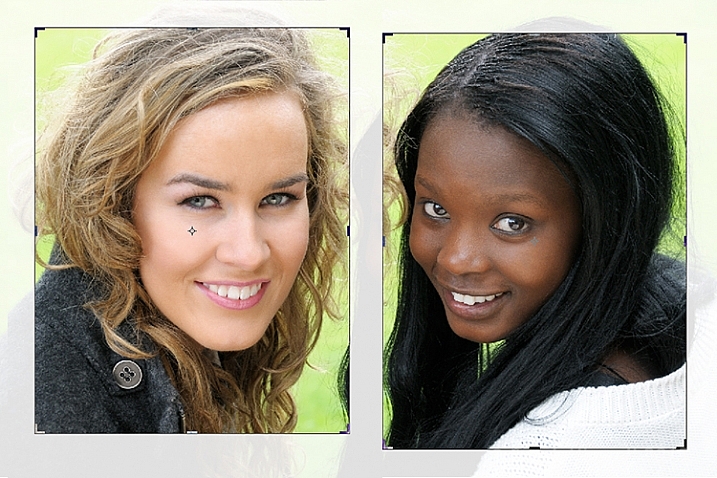
After the image is cropped, I now have two distinct portraits.

Last but by not least, try and experiment with rotating your image to the left or right, and then cropping. This may be particularly useful with photos of tall buildings, where you want the focus to be on the height of the building.

I had taken the following photo in Berlin some years back from a boat on the river Spree. This modern building was quite impressive, but the reflection of the sky and clouds in the glass, caught my eye. It made for a nice abstract composition.

Berlin

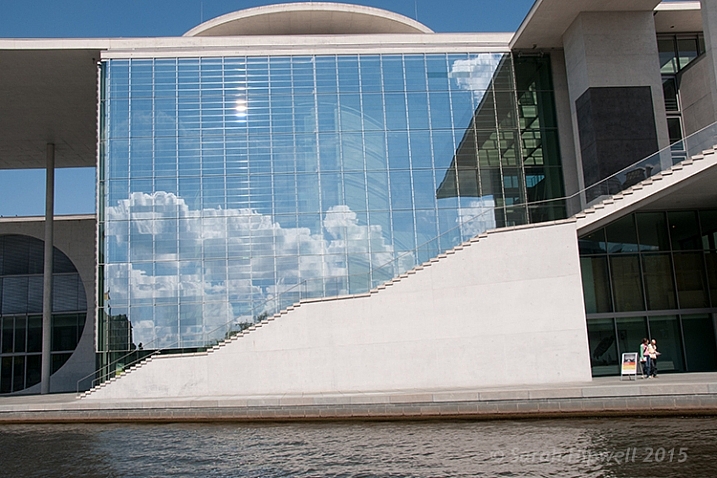
A shot of a building while in a boat on the river Spree in Berlin. Compositionally, this by itself is not a good shot.

The Crop Tool in Photoshop has another feature, the Perspective Crop Tool. When you click on the Crop Tool and hold, a fly-out menu appears with four options. The Perspective Crop Tool is directly under the Crop Tool.

perspective-crop-tool

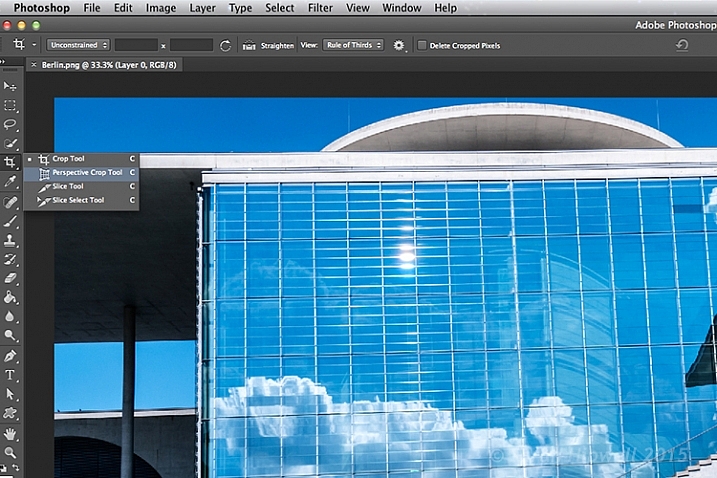
With some editing to highlight the reflection in the glass of this building, I used the Perspective Crop Tool to create an abstract composition.

Starting at one corner, click and drag across to the other corner, and repeat around the lines of the window frame. A grid appears around where you have clicked within the image. Click the commit button at the top in the Options Bar, or press the enter key. Make finer adjustments by clicking back to the regular Crop Tool.

perspective-crop-grid

The perspective Crop Tool in action.

abstract-composition

I created this abstract composition using the Perspective Crop Tool in Photoshop.

Cropping is, after-all, getting an alternative perspective to enhance a better composition.

To crop or not to crop, that is the question? Share your comments and images below please.

This week on dPS we’re featuring a series of articles about composition. Many different elements and ways to compose images for more impact. Check out the ones we’ve done so far:

  • Using Framing for More Effective Compositions
  • 7 Tips to Improve Your Skyline Photos
  • 33 Images that Exemplify Compositional Elements
  • Weekly Photography Challenge – Composition Craziness
  • How to Take Control of Aperture and Create Stronger Photos

googletag.cmd.push(function() {
tablet_slots.push( googletag.defineSlot( “/1005424/_dPSv4_tab-all-article-bottom_(300×250)”, [300, 250], “pb-ad-78623” ).addService( googletag.pubads() ) ); } );

googletag.cmd.push(function() {
mobile_slots.push( googletag.defineSlot( “/1005424/_dPSv4_mob-all-article-bottom_(300×250)”, [300, 250], “pb-ad-78158” ).addService( googletag.pubads() ) ); } );

The post How Cropping in Post-Production Can Improve Composition by Sarah Hipwell appeared first on Digital Photography School.


Digital Photography School

 
Comments Off on How Cropping in Post-Production Can Improve Composition

Posted in Photography


3 Body Language Hacks to Improve Your Portrait Photography

01 Nov

DPSarticle 1main

I’m going to ask you to put your camera down for now. I know it’s a lot to ask, but the secret I’ve discovered to better portrait photography has, in fact, very little to do with your camera.

One of the most common mistakes budding portrait photographers make is to be so focused on getting the technical aspects right, they completely forget about the most important feature of a portrait – the person standing in front of their lens.

I’m not saying that your camera and technique aren’t important, they absolutely are. But even when you have the best technique in the world, you will not have a good portrait if your subject feels, and looks, uncomfortable.

The secret to helping your subject be relaxed and look good in pictures is body language – both yours and their’s.

Body Language

DPSarticle 2bodylanguage

Body language is how our bodies communicate our feelings and intentions, and it makes up for a majority of how we communicate. Some studies found that as much as 92% of our communication is nonverbal, and experts all agree that, as humans, we rely first on what we see and feel, before believing any spoken word.

Why is this important in portrait photography? Because body language is the language spoken in our portraits.

Within one second of seeing a photograph, we make a snap judgment about the person – or people – in the image, and what our brain relies on to make this judgment is their body language. Big cues like slouched shoulders or crossed arms are obvious, but it’s also the small cues like a fake smile, tense hands, slightly pursed lips, or squinting eyes, that tell our brains on an instinctive level, how that person is feeling. Furthermore, if the feelings are negative, it can ruin your portrait.

So, what can you do? Let’s look at three things you can start doing right now to help your subject settle into relaxed and positive body language.

1. Identify discomfort

DPSarticle 3discomfort

It’s pretty uncomfortable for most people to have their portrait taken, even if they are really looking forward to it. This tension appears mainly through blocking and pacifying cues.

Blocking gestures occur when we put something between ourselves and an uncomfortable situation. Crossed or closed arms are the most obvious signs, but the person may also be holding something like a bag or a laptop in front of them, turning their bodies away from you, and even crossing their legs tightly when standing.

Rubbing or pressure movements are called pacifying gestures. You will observe this when she’s playing with her necklace, rubbing her arms or legs, or he’s playing with his clothes, or squeezing his fingers together. Another place to look for pacifying gestures is the mouth. Lip pressing and licking, and tongue movements pressing inside the cheeks or lips show high levels of stress.

When you see this happening before or during the shoot, your subject is feeling uncomfortable and it’s going to show up in your portraits. Let’s look at how you can help them relax.

2. Show, don’t tell

DPSarticle 4showdonttell

People feel uncomfortable during a photo shoot mostly because they don’t know what to do. It’s really stressful to be in front of a lens and be told to pose or act natural. They have no idea what you want from them, and telling them doesn’t help.

A client of mine shared this story with me;

At my last photo shoot, the photographer asked me to smile. So I smiled. “No! Not like that!” he said “you know, relax and smile!” All I could think is “Damn, I’m not relaxed, how do I relax?” which made me stress even more, and the more he was telling me to relax, the less I was! It was horrible! I look like I’m growling in all the photos. I hate them!

So if telling them what to do doesn’t help, what can you do? Show them! People can easily mirror what you want them to do. Ask them to mirror you, and show them exactly the pose you want them to take. Not only this will help them relax, it also allows you to get them into the right body language for the picture. When working with children, you can turn this into an imitation game, and they will be playing along with you in seconds.

Mirroring is a key bonding behavior in human body language. This interaction creates an immediate connection between you and your subject, and allows them to shift their attention away from the lens and focus on you instead.

3. Be in control -even when you’re not

DPSarticle 5incontrol

From the minute you meet your subject, until they walk away from the session, it’s vital that you appear in control by using confident body language, keeping your energy up, using positive words, and never showing any signs of stress – even when you’re freaking out because the settings you’re trying aren’t working.

I know this one is tough when you’re starting out, and you have to think of a million things – camera settings, composition, lighting, backgrounds, etc., and now I’m asking you to also think about what your client’s body is saying! But let’s think about this for a minute. How do you think your subject feels when they are working with a silent, stressed out, and fidgety photographer who is focusing all their attention on the camera or the lights? Not so great right? Guess where that’s going to show up? In your pictures.

They need to know that you’re in control, even when you’re not! This is a, “fake it until you become it” moment in your life. Talk to them. Explain what you’re doing. You might be concerned that they won’t take you seriously, but really, they are just curious about what’s going on. If they feel that you’re in control, that you know what you’re doing, you will keep the connection with them and help them to relax.

The best part is that you’re also going to feel more in control. Recent studies on body language have found that by changing our posture and behavior, we actually change our feelings too. Not only will you appear more confident, you’re actually going to feel more confident.

What’s next

DPSarticle 6next

This is really just the very beginning of how body language can help you with your portrait photography. The choice of body language cues you’re going to use in your portraits will also have a huge impact on the feeling and quality of your images, and your relationships with your subjects.

Understanding body language is not just an option if you want to be a portrait photographer, it’s a vital skill; as vital as breathing is to a singer, or taste is to a chef. You will not be able to consistently create beautiful portraits of people, or create a fun experience for them if you ignore it.

The good news is that this is a skill you are born with, and have unconsciously practiced since your youngest age. However, most of us simply don’t pay attention to it because nonverbal communication is not part of our training curriculum, at school or later. Just like a musician will be more alert to sounds through practice, and a chef to taste through experience, I’m confident that you will soon become attuned to your subjects body language if you put in a little work.

Soon you will have mastered an amazing skill that will not only be useful in your work as a photographer, but also in everyday life.

Do you have another other tips about body language? Please share in the comments below along with any images demonstrating body language in your portraits.

googletag.cmd.push(function() {
tablet_slots.push( googletag.defineSlot( “/1005424/_dPSv4_tab-all-article-bottom_(300×250)”, [300, 250], “pb-ad-78623” ).addService( googletag.pubads() ) ); } );

googletag.cmd.push(function() {
mobile_slots.push( googletag.defineSlot( “/1005424/_dPSv4_mob-all-article-bottom_(300×250)”, [300, 250], “pb-ad-78158” ).addService( googletag.pubads() ) ); } );

The post 3 Body Language Hacks to Improve Your Portrait Photography by Dee Libine appeared first on Digital Photography School.


Digital Photography School

 
Comments Off on 3 Body Language Hacks to Improve Your Portrait Photography

Posted in Photography


20 Tips to Improve Your Travel Stock Photos

20 Oct

Here are 20 tips to help you take the best stock photos while traveling or around your hometown. Even if you don’t do stock photography, you can use these tips to help you get better images.

NEAR SKOGAR, ICELAND - JUN 19:  Skogafoss waterfall on June 19, 2015, was in the film The Secret Life of Walter Mitty in 2013.

NEAR SKOGAR, ICELAND – JUN 19: Skogafoss waterfall on June 19, 2015, was in the film The Secret Life of Walter Mitty in 2013.

1. Check stock photo websites to see popular locations

In addition to doing some web searches for areas of interest, a great way to know which locations are popular is to check popular stock photo websites, such as Shutterstock or iStockphoto. You’re not looking to recreate any existing shots, but it helps to know what’s been done well already and, more importantly, what is missing.

2. Check the itinerary of sightseeing buses

A great way to see what popular locations are is by reviewing any websites for sightseeing buses. Make a note of their stops and add them to your shot list.

3. For international travel, learn the basic words of the language

Iceland rushing water 750 px

Learning some key words like, “please”, “thank you”, and “Okay?” can make communication much easier abroad, and help spur friendships. uTalk is a terrific app to learn a new language, and Duolingo is great to refresh a language you are already familiar with.

4. Check out popular postcards

Taking a peek at postcards in tourist shops will give you an idea of the popular sites. Again, you are not looking to recreate shots, but you might be able to add a few locations to your shot list.

5. Get recommendations from locals

Check with the clerk at the grocery store, or gift shop, at your current stop for nearby locations that would be worth photographing. You may learn about some lovely hidden gems that will enrich your experience.

6. Consider renting a car to have greater control of your travel plans

Iceland goats 750 px

You never know what you’ll encounter on the road

Public transportation is fine within many cities, but if you’re going between towns renting a car allows you to pull off by the side of the road, and take those random shots that were not on your itinerary.

7. Take photos when you have a chance, you might not go back the way you came

Don’t figure you’ll catch something on your way back, you never know when serendipity will take you in a different direction than you intended. Get the shot now.

8. Take the sightseeing bus (or boat)

A sightseeing bus is a great way to get to the popular destinations, and if it’s a double decker bus, or a boat, you get views you couldn’t get otherwise.

9. If shooting for editorial stock always note the location of the photo

An editorial stock photo is going to require a location in the caption, so always note the name of the town. Take a quick shot of the welcome sign as you enter the town, or take a photo of a store with the town’s name. Of course having the location saved on your photo itself helps a lot too, but having it embedded within your photos makes it easier to quickly remember where you were. As another reminder, save all handouts from tourist spots, maps, and travel guides you pick up along the way to refer to later when processing your photos.

Iceland car GPS 750 px

10. Check your photo settings frequently

You don’t want to look back on your photos for the day and realize you had set your ISO to very high for an indoor shot, and forgot to reset it when you went out into a sunny location so your outdoor photos are grainy. Or you set your photo size to small when you need a big file to get photos large enough to be accepted by the stock photo sites. If this sounds like the voice of experience, it is. We all make these mistakes – don’t be too tough on yourself if you make them too, just live and learn.

11. Ask the experts

You’ll sometimes find professional photographers taking shots. If they seem approachable, ask them, politely, what they are photographing. Some will be very eager to discuss what they are doing, others not so much, but it’s worth a shot. You might get some great insights.

12. Give yourself time to get the shot right

You’ve traveled thousands of miles to get there, you won’t be able to go back and reshoot, so give yourself the time to get the shot right. Work the photograph to clean up the background, to remove distractions so the focus is on the area of interest. Sometimes just taking a few steps to the side, or turning a bit can make a dramatic difference by removing distracting elements in your background, or focusing the eye on the area of interest.

Iceland Glacier Lagoon big blue side 750 px

Glacier on the side, not noticeable

Iceland Glacier Lagoon big blue 750 px

Glacier is the main focus of the shot

Hanging around also allows you to absorb the atmosphere of the place, and keeps you from rushing from photo to photo.

13. Think layers

While you’re waiting for that right shot, think in terms of three layers: The area of interest as the middle layer, with a clean background layer to set it off. Wait for an interesting foreground to present itself, maybe people, or animals in this case, going past your area of interest. This makes the photograph come alive, gives it some depth, adds to the interest.

Iceland Glacier Lagoon geese 750 px

Geese add a sense of proportion to the glacier and bring the scene to life

14. Think like a guidebook author or a nature artist, or…

Pretend you are writing for a tourist guidebook – what kind of shots do you want in your guidebook? What would your potential readers like to see? How about if you were an artist preparing for a nature exhibit – what photographs would you want as part of your exhibit? Look at each location from different perspectives to get new ideas.

15. Take a variety of shots

Give your clients as many options as possible. Take 15-20 shots at any one location, walk around and check different positions, try different angles, think close-ups, wide shots, vertical as well as horizontal shots. You’ll then have plenty of options to choose from for your final photographs.

Iceland puffin with fish left 750 px

Iceland puffin with fish and buddies 750 px

Close-up and wide shots gives you and your clients options

16. Look behind you as you leave your location

Don’t leave the best shots behind your back. As you leave a location turn around and see what shot you might be missing.

Iceland Seljalandfoss exit side 750 px

Don’t miss the great shot behind you

17. Offer to take photographs for others

Share your skills – if you see a group of people taking a group photograph, offer to take the shot for them. It makes for another chance to interact with people, and if you learned a bit of the language, all the better.

18. Be mindful of other people’s desire for privacy

People will make it pretty clear whether they are okay with being included in your photographs. Stay away from editorial photos of little children, and if you accidentally take a photo of someone who clearly doesn’t want to be in your photo, let them know you have erased the shot. On the other hand, many people will be eager to have you take their picture, and oblige happily.

19. Back up your photographs every night and cull as you go

Upload your photographs to your laptop and/or to the cloud, you’d hate to have your camera stolen or lost mid-travel, and lose all those shots. While you’re at it, delete the photos you know are not going to work out, those with people blocking the view, or out of focus, etc. Don’t wait until you get home to the daunting task of sifting through thousands of photographs.

20. Process your photos right away upon your return

The longer you wait to process your photos the harder it will be to get to it. Unprocessed photos tend to get heavier with time and sink to the bottom of your to-do list. It’s best to process them while you remember what the sights really looked like, so you remember to uncover that rainbow you know was there but might not be so visible before Photoshop.

Iceland Gulfoss rainbows 750 px

Don’t forget to uncover the rainbow.

Best wishes on your photography adventures. Please share in the comments below if you have any questions or additional tips.

googletag.cmd.push(function() {
tablet_slots.push( googletag.defineSlot( “/1005424/_dPSv4_tab-all-article-bottom_(300×250)”, [300, 250], “pb-ad-78623” ).addService( googletag.pubads() ) ); } );

googletag.cmd.push(function() {
mobile_slots.push( googletag.defineSlot( “/1005424/_dPSv4_mob-all-article-bottom_(300×250)”, [300, 250], “pb-ad-78158” ).addService( googletag.pubads() ) ); } );

The post 20 Tips to Improve Your Travel Stock Photos by Susan Montgomery appeared first on Digital Photography School.


Digital Photography School

 
Comments Off on 20 Tips to Improve Your Travel Stock Photos

Posted in Photography


How to Improve Your Long Exposure with Photo Stacking

06 Oct

Recently long exposure photography has been quite popular, mainly in the landscape photography arena. One of the reasons (among the others) is that through a long exposure it is possible to visualize a scene with much more softness and harmony in respect to a standard exposure.

Thanks to the rapid evolution of digital cameras, we are now able to take really long exposures without getting so much digital noise, due to sensor overheating. Moreover, the improvements in neutral density filter quality allow us to take pictures with almost no color cast, and no decrease in sharpness.

Dps les venezia

Venezia by Luca Libralato: stacking of 3 x 260s exposures for a total of 780s (13 minutes)

If you love long exposure photography and you would like to push the exposure time to the edge, this technique of long exposure photo stacking is for you.

Here is the quick explanation of the Long Exposure Stacking technique: by taking several pictures (usually at least 30 seconds each for the purpose of this technique) you can blend them to get a result the equivalent of a long exposure photo with a total exposure time equal (or almost equal) to the sum of the single exposure frames.

This technique is mostly useful, and recommended for landscape photography, but some of the benefits may also be used in other types of photography, where you need maximum quality with several minutes of exposure. The step by step guide will be focused on landscape photography.

The advantages of using this approach are several:

  • Increase the total exposure time.
  • Reduce digital noise and hot pixels (shorter exposure pictures have less digital noise and hot pixels).
  • Reduce vignetting (you will be using a lower ND power per shot with this technique, resulting in less vignetting).
  • Minimize the risk of wasting time and photos (tripod shocks, sudden light change, etc.).
  • Possibility to decide later on the strength of the long exposure effect.
dps_les_manarola

Manarola by Luca Libralato: stacking of 3 x 260 second exposures for a total of 780 seconds (13 minutes)

The disadvantages are:

  • You don’t have a single exposure and this is something which some competitions/contests rules don’t like.
  • Some post-processing skills are required to blend the several exposures.
  • If you are a purist – you may not like this technique.

When this technique should be used:

  • If you want to push the exposure time to some really high values.
  • If your camera sensor is adding a lot of digital noise due to overheating.
  • If you are not sure about the final result of a very long exposure. Since this techniques is based on the sum of several short exposures, you can easily decide later how long the final exposure shall be (check also here for a similar approach: Long Exposure Photography Without a Tripod).
  • With hostile ambient/weather conditions, you can use this technique to minimize the risk of wasting exposure time.
  • If you want to maximize the probability to not miss the right moment in a fast changing light (the right moment can last few seconds, if you are exposing for several minutes, you can miss it for wrong exposure time for example).

Before going over the explanation of the technique, there are at least a couple of required skills you should have (apart from the basics for taking pictures with your camera):

  1. How to perform standard long exposure photography: you can check this awesome tutorial by Francesco Gola to improve your long exposure skills: Step-by-step Guide to Long Exposure Photography.
  2. Basic knowledge of Adobe Photoshop or similar photographic software which allows you to work on images using layers.

Let’s get on with the fun part: the implementation of Long Exposure Stacking!

dps_les_punta_aderci

The Magic Of Punta Aderci by Luca Libralato: stacking of 2 x 260 second exposures for a total of 520 seconds (8:40 min)

Step 1: Gear

The photographic gear needed for this technique is luckily the same gear needed for taking long exposure photos. So if you are already familiar with long exposure photography, you are set. Otherwise here is a short list of all the tools:

  • Digital Camera (which allows long exposure) + Lens (which allows you to mount neutral density filters)
  • Tripod
  • Remote trigger (optional, but suggested)
  • Neutral density filters (optional if you shoot when it’s dark)

For further details about taking long exposure photography, you can check the related resources listed at the bottom of the article.

Step 2: Plan the shot

Never hit the shutter without having properly planned the photo. Of course there are a lot of variables involved, but planning can really play the most important part in a good photo. Do not underestimate the power of accurately planning a landscape photo – because luck can help you once, but planning your photography consistently, will increase the probability that you’ll be ready when the right conditions are present.

dps_les_santa_marinella

Rips Of Darkness by Luca Libralato: stacking of 5 x 120 second exposures for a total of 600 seconds (10 minutes)

Step 3: Take the shots

Once you have planned your photo and you are on location, you should then decide the two most important things in any photo (at least this kind of photo): composition and exposure (supposing you are taking landscape photography, depth of field should not be a variable in most cases). Composition is up to your taste, while exposure is a complex matter and depends upon different factors.

First thing every landscape photographer usually does before taking any picture, is metering the light to decide the exposure time. The final exposure time depends on several factors, such as strength of the wind, the movement of the clouds, water flow, and so on. The question at this point is, “How long shall I expose for?”.

If the light is changing suddenly, or there is a strong wind which can shake your camera/tripod during exposure, you may decide to avoid really long exposures (to avoid wasting shots or missing the right light). This is where this technique comes to your rescue.

Suppose you would like to have a total of eight minutes of exposure, instead of taking one single long exposure file you can split the total exposure time into four consecutive shots of two minutes each (for example). You can freely decide the final length of each exposure and the total number of shots, just keep in mind that you should keep the gap of time between the different photos to a minimum, if you are planning to do stacking. Needless to say that you should be careful in avoiding moving the tripod and the camera between each shot of the sequence. Once you have your consecutive shots, in the next step you will understand what to do in post-processing.

Before you start shooting: make sure you focused correctly and your tripod is stable (avoid sand or uneven floors where possible).

After the shot: make sure your histogram is fine and your picture is properly exposed, or exposed to the right.

Dps les 01 Dps les 02
Dps les 03 Dps les 04
Dps les 05 Dps les 06

Arco Della Pace by Luca Libralato: 6 x 130 second exposures, for a total of 780 seconds (13 minutes)

Step 4: Image Stacking

You should now be at home, or in your favourite cafe/pub with your laptop, and hopefully a coffee/beer. You should have downloaded all of your shots and selected the ones you would like to stack.

The stacking process will be shown for Adobe Photoshop (almost any version supports the feature) but you can use any software of your choice, which allows the use of layers. In Photoshop there are two different methods that can be used to stack files, with the goal to merge them into a simulated longer exposure:

  1. Load files into stack function (Files > Scripts > Load Files into Stack)
  2. Manual stacking

4.1 Load files into a stack

With the first method the procedure is semi automated, since you just need to go to Files > Scripts > Load Files into Stack

Dps les ps stack 01

Photoshop: Load Files into Stack

All you have to do is then select the single long exposure, flag the boxes to Automatic Align Source Images and Create Smart Object.

Dps les ps stack 02

Photoshop: Select files and create Smart Object

Once you have a new document with the Smart Object selected, all you have to do is go to menu Edit > Smart Objects > Stack Mode > Mean. This will weigh all images embedded into the Smart Object, rendering them as a new image which similar to what you would have obtained with a single long exposure of a total time equal to the sum of the single exposure.

Dps les ps stack 03

Photoshop: Set Stack Mode to Mean

You can check the result on the image below.

Dps les ps stack result

Photoshop: Result after stacking

4.2 Manual stacking

By using the second method (which I trust can be used with every software which allows layers) the blending process is manual. The rule is that you have to fine tune the opacity of each layer by decreasing it after each shot.

The mathematic rule is as follows: each shot should have an opacity equal to 1 divided by its position in the stack. Here is a table which shows the rule:

  • First photo (the one at the bottom) 100% (1/1)
  • Second photo 50% (1/2)
  • Third photo 33% (1/3)
  • Fourth photo 25% (1/4)
  • Fifth photo 20% (1/5)
  • Sixth photo 17% (1/6)
  • Nth photo 1/N

This process will exactly replicate the first method (the result will be identical to an automatic Stack in Mean mode).

Step 4: Post processing workflow

At this point, all you have to do is follow your typical post-processing workflow:

  • Clean dust spots, straighten the image, crop
  • Adjust dynamic range with other exposures (3 or 5 bracketing shots for static underexposed parts)
  • Adjust exposure and contrasts
  • Adjust colors
  • Add finishing touches to suit your taste
  • Export

Here is the final result of the example

Dps les arco della pace

Arco Della Pace by Luca Libralato: stacking of 6 x 130 second exposures for a total of 780 seconds (13 minutes)

Conclusions

This technique is very useful sometimes because of its flexibility. Moreover you should consider the benefit in increasing the final quality of your file because of the stacking. It has been proven that by stacking images you can benefit by reduction in random digital noise equal to the square root of the total photos used. So for example if you use four photos, you will have in static part of the photo a reduction by half of the total random digital noise, which is a great achievement especially for underexposed portions. This technique is used a lot (even if with some different variations and implications) in astrophotography or in other fields when increasing the exposure time of a single shot is not suitable.

Don’t hesitate to ask questions in the comments box below if you need help or further explanations.

Related Resources:

  • Step-by-step Guide to Long Exposure Photography by Francesco Gola
  • Long Exposure Photography Without a Tripod by Viktor Elizarov
  • How to do Long Exposure Photography and Light Trails at Night by Barry J Brady
  • 11 Accessories for Long Exposure Photography by Scott Wyden Kivowitz
  • 5 Tips for Better Long Exposure Landscape Photography by David Cleland
  • 8 Tips for Long Exposure Photography by Elliot Hook
  • 5 Tips for Getting Sharper Images When Doing Long Exposures by Kevin Choi

googletag.cmd.push(function() {
tablet_slots.push( googletag.defineSlot( “/1005424/_dPSv4_tab-all-article-bottom_(300×250)”, [300, 250], “pb-ad-78623” ).addService( googletag.pubads() ) ); } );

googletag.cmd.push(function() {
mobile_slots.push( googletag.defineSlot( “/1005424/_dPSv4_mob-all-article-bottom_(300×250)”, [300, 250], “pb-ad-78158” ).addService( googletag.pubads() ) ); } );

The post How to Improve Your Long Exposure with Photo Stacking by Luca Libralato appeared first on Digital Photography School.


Digital Photography School

 
Comments Off on How to Improve Your Long Exposure with Photo Stacking

Posted in Photography


How to Improve Your Photography Without Buying New Gear

11 Sep

It’s not the camera that makes good photography; it’s the photographer. How many times have you heard that? Probably a lot more times than you can count. It has become a bit of a cliché than anything, but it’s one that still rings true. You don’t need to spend thousands of dollars on brand new, state of the art camera systems and lenses, to be able to create great photos. You know that by now. There’s just one problem. All of those lenses and cameras are so, so shiny.

Most of that shininess is just a product of the camera manufacturers’ marketing departments churning out a constant onslaught of, “Buy me! Buy me! I’m so shiny! Buy me now!”

Shiny lenses are great, but are they the best investment for your photography right now?

Shiny new lenses are great, but are they the best investment for your photography right now?

The best advice? Ignore it as much as possible.

A bad photo made with a $ 5000 camera, is no better than a bad photo made with a $ 700 camera. It may be sharper and it may have a higher dynamic range, but it’s still a bad photo.

It’s okay to want new and better things, and depending on how fast you progress in your photography and what you want to achieve with it, you will eventually have to upgrade and buy new pieces of kit. There may be a few exceptions in genres like macro and wildlife photography; however, the chances are that you don’t need that several thousand dollar lens right now.

Grow out of your equipment

If you take the time to really learn and put into practice all of the various skill sets, you will eventually come to a wall you can’t pass with modest equipment. That’s when it’s time to upgrade. Take your time getting there though, and enjoy the experience. With well rounded skills, you will know that moment the instant it arrives.

Other ways to invest in your photography

However, there are places where you can invest your money that will not only help your photography, but also speed up the process quite a lot. These are education and experiences. Really, they’re both the same thing, but it’s easier to describe them in terms of two sub-categories.

Education

Everybody needs to learn. Constantly. Never stop learning; otherwise you’ll get left behind.

The Internet is full of free resources, and you should absolutely use every bit of it to your full advantage. To quickly rise to the top of the learning curve, however, you should consider adding things like books, online courses, and workshops to your shopping list.

Workshops can be great value for money and provide a boost to your skills.

Workshops can be great value for money and provide a boost to your skills as well as introduce you to new locations.

Photography books tend to be focused on a particular subject. They also tend to go much further in depth than other resources. Most importantly, they’re relatively cheap. Try to avoid books that try to encompass everything about photography, and stick to specific topics like lighting, portraits or food.

How big of a library can you put together for the cost a lens that you’ve been after?

In the same vein, workshops and seminars can deliver a huge amount of information in a very short period of time for a reasonable cost. They also have the benefit of giving you face to face tuition with someone who’s experienced in the field that they are teaching. This is often invaluable, particularly if you learn better with a hands-on approach.

When considering workshops, please do your research and be sure of what you’re buying. Just think, would you buy something from eBay without first checking a seller’s feedback?

Personally, I feel one of the most overlooked, yet one of the most valuable tools, to learn photography is monographs and coffee table books. Studying the work of accomplished photographers will show you all of the things you’ve learned in theory, put into practice. It can also help you discern your likes and dislikes and give you ideas on what to try for your own portfolios. Don’t just stick with the old masters like Edward Weston and Imogen Cunningham; include contemporary photographers like Martin Parr and Mario Testino for a more thorough reference.

Experiences

Spending money on travel can help to force you to use the gear you have.

Spending money on travel can help to force you use the gear you have.

If education is learning, then experience is the actual doing. Do you want to be a travel photographer? Then don’t upgrade your lenses, buy a plane ticket instead. Do you want to be a fashion photographer? Hire experienced models and make-up artists. Wildlife photographer? Go photograph wolves on a workshop and rent the lens you need, rather than buying it.

If that’s a bit too expensive, then consider buying things to photograph. Food, toys, flowers, whatever fits in-line with your interests, and gets you up and using the camera you have now.

Purchasing things to photograph will help you build a portfolio which is far more important in the long run.

Purchasing things to photograph will help you build a portfolio which is far more important in the long run.

You can read all the theory in the world, but if you don’t put it into practice it just stays theory. The bonus here is that by actually working toward your goal, you will probably wind up earning a bit of money to put towards that fancy kit when you do need it.

It all comes back to the “grow out of your equipment” idea discussed earlier in this article.

You already have what you need. If you have read this article through, then the chances are that you already have everything you need to go out and make photos and develop your skills.

Now, I don’t presume to know every situation out there, and my experiences are only mine. I cannot, and will not, tell you what to do, but if you’re yearning for a new piece of gear I can only encourage you to honestly answer the question, “Do I really need this for my photography to progress or do I just want it?”

googletag.cmd.push(function() {
tablet_slots.push( googletag.defineSlot( “/1005424/_dPSv4_tab-all-article-bottom_(300×250)”, [300, 250], “pb-ad-78623” ).addService( googletag.pubads() ) ); } );

googletag.cmd.push(function() {
mobile_slots.push( googletag.defineSlot( “/1005424/_dPSv4_mob-all-article-bottom_(300×250)”, [300, 250], “pb-ad-78158” ).addService( googletag.pubads() ) ); } );

The post How to Improve Your Photography Without Buying New Gear by John McIntire appeared first on Digital Photography School.


Digital Photography School

 
Comments Off on How to Improve Your Photography Without Buying New Gear

Posted in Photography


5 Ways a Telephoto Lens Can Improve Your Landscape Photography

04 Sep

2-for-1 special

As part of Landscape Photography Week here on dPS, we’re offering TWO for the price of ONE on our best-selling Living & Loving Landscape Photography ebooks!

Click here to take advantage of this offer.


While it may seem counter-intuitive at first, the most sophisticated compositions are often the simplest. For this reason, ultra wide angle lenses are not typically the ideal choice for outdoor images. By including too much information, you risk losing the subject to visual clutter. This creates a unique challenge for landscape photography. While it’s tempting to include the vast expanse of a splendid horizon, a stronger image may only contain a small portion of it. This is where a telephoto lens becomes an invaluable part of your kit.

Here are five ways using a telephoto lens can help you do better landscape photography:

1) Eliminate Clutter

It’s rare to come upon a landscape that doesn’t require decluttering. Common sights include power wires, fences, trail head signs, unsightly dirt patches, and dumpsters. You can try to compose with your feet at first, but what about those situations when you can’t go any further?

Where a wide angle lens falls short, a telephoto in the 70-300mm range, will be very useful. With such a lens, you can pick the precise area where all of the essential elements come together, and work to eliminate everything else.

2) Isolate Your Main Subject

A telephoto lens gives you the ability to pick a single part of a larger landscape and bring attention to it. Of course the increased reach isn’t the only part of the equation. You’ll still need to consider various methods of composition, like the rule of thirds and a strong foreground element. Try shooting from a low vantage point, through flowers or grass for added depth. At wide apertures foreground elements will become a nice wash of color that lead the eye to the subject.

3) Expand Your Horizons

The potential for subject matter multiples with a longer focal range. For instance, wildlife that would appear very small at 55mm, become much more prominent at 420mm. No longer are you just shooting landscapes, but possibly wildlife as well. Just remember that good technique is essential for sharp telephoto images. Even the slightest bit of camera shake will be magnified if your shutter speed is too slow. When shooting hand-held, try to set an exposure no slower than 1/500th of a second. Image stabilized lenses and camera bodies absolutely offer some flexibility here, but it’s best to err on the side of caution if your goal is to make tack sharp enlargements.

4) A Different Perspective

If you look at the front cover of many photo magazines, they often encourage the use of ultra wide angle lenses for landscapes. While it’s true that certain scenes come to life at 16mm, it’s the exception rather than the rule. If you’re looking to create a unique representation of a scene, a greater focal range can help you find it. At a time when it seems just about everyone has a camera, going beyond the reach of a normal kit lens can lead to extraordinary results.

5) Finding Patterns

By searching for organized patterns and repetition with a long lens, you can bring order to the world around you. This method of seeing will help to further develop your eye and strengthen your compositions. Rather than looking at the bigger picture, you’re choosing to focus on the smaller details.

While this particular strategy of composition doesn’t require any overly technical methods, it does require a different approach. The trick is to zoom in and carefully scan the landscape through your viewfinder. Patterns don’t always reveal themselves right away, so take your time and compose carefully. You may be surprised at where you’ll find these unique photo opportunities as they can appear just about anywhere.

All of these images were captured in Iceland where landscapes often have an abundance of empty space. There were definitely times when the wide angle came in handy, in tight quarters for example, or at the base of a waterfall. For just about everything else, a 40-150mm (Olympus OMD EM1 with the 40-150mm f/2.8, effective 80-300mm) proved more effective. In fact, many of my favorites were shot at the long end of the lens’ range. The next time you head out to photograph scenery, think long, and make a telephoto lens your first option.


Here on dPS it is landscape week. You can see the previous ones listed below. Watch for a new article (or two) on landscape photography daily for the next week.

  • 6 Tips for Better Low-Light Landscape Photography
  • Landscape Photography and the Human Element

googletag.cmd.push(function() {
tablet_slots.push( googletag.defineSlot( “/1005424/_dPSv4_tab-all-article-bottom_(300×250)”, [300, 250], “pb-ad-78623” ).addService( googletag.pubads() ) ); } );

googletag.cmd.push(function() {
mobile_slots.push( googletag.defineSlot( “/1005424/_dPSv4_mob-all-article-bottom_(300×250)”, [300, 250], “pb-ad-78158” ).addService( googletag.pubads() ) ); } );

The post 5 Ways a Telephoto Lens Can Improve Your Landscape Photography by Chris Corradino appeared first on Digital Photography School.


Digital Photography School

 
Comments Off on 5 Ways a Telephoto Lens Can Improve Your Landscape Photography

Posted in Photography


How to Improve Your Chances of Winning a Photography Contest

23 Aug

My name is Andrew Suryono and I’m an amateur travel photographer. When you read the title, you may feel funny that an amateur photographer like me is writing this article. “Shouldn’t winning a photography contest be reserved only for the professionals?” you may ask.

Well, speaking from my experience, the answer is no. I’m one of many amateur photographers in the world that have won photography contests. This year is special for me because I won first place in the world’s largest photography competition, the Sony World Photography Award (Indonesia National Category).

Image 1 andrew suryono trophy

I’m writing this article to share my experience and give my personal tips to you on how to increase your chance in winning a photography competition. Yes, YOU can win in a photography contest!

Why enter photo contests?

Before we start though, let’s look at some of the benefits of joining a photo contest.

Get exposure

The first benefit of joining a photography competition is you can get exposure for your work quickly. The bigger the photography competition, the quicker and the more exposure you’ll get. By submitting your photos to a contest, you give easy access to people all over the world to view your work. If you’re struggling to get people to look at your photography website or portfolio, try joining a photography competition.

andrewsuryono-peacock

This image appeared in Bryan Peterson’s newsletter

Market your work

By giving yourself lots of exposure, you also increase your chance to market your work. If people are interested in your work, they might contact you to buy some prints or strike licensing deals. After joining several photo competitions, I got contacted by many people who wanted to do licensing deals for books, magazines, greeting cards and many other things. To my surprise, my work not only attracted small publishers, but also big ones like National Geographic.

You really never know who is looking at and interested in your work!

Measure your work against others

A photo competition is a good way to measure your work against other photographers’ work. You’ll have a chance to look at other their images and see how your works compares. It’s important that you don’t judge your work too harshly when you do this. See what you
find interesting from other people’s work, like how they use of composition or color, and learn from it.

Image 2 andrew suryono orangutan in the rain

Winning image!

Make new friends

Finally, a photo competition is a good way to make new friends and connections. Through photo competitions, I’ve gotten many like-minded friends who I enjoy speaking to, and sharing my work with regularly. We even went on to create a private Facebook group where we share our work to get each other’s feedback, helpful online tips that we find, and many more.

Are you already feeling excited? Great!

How to increase your chances of winning

Now that you know all the benefits of joining a photo competition, let’s look at some ways to increase your chance of winning one.

The first and the most important thing that you should do before joining a photo contest is spend some time to know the rules inside out. Here are some things that you should pay attention to:

Copyright ownership

I decide whether I enter a photo contest or not based on this information alone. Make sure you retain full rights and ownership of your photos before joining in any contests. Personally, I would avoid any photo contests that want me to give any rights to them. I want to keep all rights to myself and they must ask me for permission if they want to use my photos for anything.

Appeared in Bryan Peterson's newsletter

Appeared in Bryan Peterson’s newsletter

Image dimensions

Pay attention to the image dimension that they require you to submit. Typically, a lot of photo contests are bombarded with image submissions
from all over the world, so they only require you to submit a small resolution version of your image. Make sure to resize your image according to their specification. Some photo contests are so strict that they’ll immediately disqualify your image if it’s not submitted according to their specifications.

Submission deadline

This is pretty explanatory, but still worth mentioning. Make sure you pay attention to the submission deadline. Photo contests won’t let you
submit images once the deadline has passed. Mark your calendar and set reminders!

Research

After you’re done going through all the contests’ rules and regulations, it’s time to do some research. You’ll need to research and study previous winners’ work, and the judges’ work if you want to increase your chance of winning in the competition.

Image 3 study judges work

By looking through the previous winners’ work, you’ll get a sense of how they won the contest. Pay attention to the composition, color and most importantly the message that they’re conveying through their photos. Pay close attention to their post-processing work, and look at how it strengthen their images.

Photography contests are judged by humans. It’s subjective by nature. By looking at the judges’ work, you’ll get a sense of their style and what kind of works they like to see. For example, if you find that most judges in the contest love strong black and white images, you’d better think twice about sending images with bright, saturated, and punchy colors.

Image selection

After you’re done with your research on the previous winners and the judges’ work, you’ll need to select images for submission based on your findings.

Go through your portfolio of images and see which images stand a chance of winning the competition. Be very selective with your own work. I know it’s hard criticizing and selecting your own work, but doing this will dramatically increase your chance of winning a photo contest.

Pick photos that you personally think are better than the previous winners’ photos, match with the judges’ style, and strongly show
your unique photography style. Then, submit your images, cross your fingers, and wait for good things to happen!

Image 4 andrew suryono pictures trophy

Remember that I can’t guarantee you win will any photo competition, but at the very least, I have given you some tips that you can use to increase your chances.

Don’t get discouraged if you submit an image and it doesn’t win. Remember that a photography competition is always subjective by nature. If one image doesn’t win in one competition, it doesn’t mean it won’t win in another. Also, there are also plenty of benefits that you can get by joining a photo contest, even though you didn’t win it.

Follow the guidelines above, enter as many photography contests as you possibly can, and hopefully you get to win in some of them. It’s a number’s game!

Keep shooting and don’t forget to have fun!

googletag.cmd.push(function() {
tablet_slots.push( googletag.defineSlot( “/1005424/_dPSv4_tab-all-article-bottom_(300×250)”, [300, 250], “pb-ad-78623” ).addService( googletag.pubads() ) ); } );

googletag.cmd.push(function() {
mobile_slots.push( googletag.defineSlot( “/1005424/_dPSv4_mob-all-article-bottom_(300×250)”, [300, 250], “pb-ad-78158” ).addService( googletag.pubads() ) ); } );

The post How to Improve Your Chances of Winning a Photography Contest by Andrew Suryono appeared first on Digital Photography School.


Digital Photography School

 
Comments Off on How to Improve Your Chances of Winning a Photography Contest

Posted in Photography


Improve Your Lighting Skills with a Trip to the Toy Store

19 Jul

You’ve heard it before: Photography is seeing and capturing light. It’s absolutely true, but what’s the best way to learn how to see something that can be infinitely shaped, altered by both environmental factors, and through intentional manipulation? As with most things, there’s a hard way and an easier way.

Learn lighting with toys batman

The hard way entails grabbing your camera and photographing everything you can, in every possible condition, and hoping everything clicks in one magic moment, thereby learning gradually through scattered experience. This works, but it can take an awful lot of time and practice before it leads to any real understanding of various lighting conditions.

The easier method, that this article covers, involves a more structured and goal oriented approach. It can get you looking at light in new ways and push you to the top of the learning curve in a very short period of time.

A trip to the toy store

Because of the studious nature of this exercise, it can seem far less exciting and adventurous than being out and about with your camera. To combat this, I propose using toys as your subjects. Aside from the quirkiness and fun this can add to the exercise, a lot of toys, particularly action figures, have insane amounts of fine details that will really show off any changes in lighting conditions.

Learn lighting with toys ff 2859

Another bonus of using toys for studying light is that if you use a character from a film or game that you know, you already have some idea of cinematic lighting schemes associated with that character, and you will quickly recognize some of them as you move through this process.

What you need to start

  • A camera set on manual mode
  • A tripod
  • A toy
  • A light source (natural or artificial with a modifier of your choice)
  • A reflector
  • A notebook (not required, but taking notes on what works and what doesn’t work never hurts)
  • A macro lens for smaller toys is useful if you have one

Note: I’m using studio strobes for this exercise out of personal preference and ease, as it’s easier to move a light source around a subject than it is to move a subject around a fixed light source such as a window. Strobes also allow you to keep the exposure constant, provided the distance from light source to subject doesn’t change.

Also, please bear in mind that the intent of these exercises isn’t to create a final polished image. You’re simply watching and gaining experience with altering light. However, you can use the images you get from these exercises to build your own reference sheet for lighting effects for various light sources and modifiers.

Exercise one

To start off, place your light source directly in front of your subject, pointed down at a 45 degree angle. Work out the correct exposure for your setup and dial it into your camera. These settings won’t change.

Now take your first photo.

Once that’s done, move your light source gradually around your subject, a little bit at a time, and take another photo at each angle. Repeat until you’ve come back to your starting position. Just make sure that your light source stays the same distance from the subject, while still pointed directly at it, each time you move it.

What you’re looking for is a series of images that clearly show how the light is altering as it moves around the toy. You can use these images to study how the light records in a photograph from any of the positions.

Learn lighting with toys yoshi 2795

Exercise two

For the second part of this task, start with your light source directly in front of your chosen subject and as high possible. Work out your exposure and take the first photo. This time, move your light source down a few inches, again keeping it pointed directly at your toy. Repeat this until you can’t lower your light source any further. Now, your exposure will probably change this time as your light source gets physically closer to your subject. It’s up to you if you want to calculate a new exposure for each interval.

Learn lighting with toys dalek 2785

Top Left: Highest position of the light source. Bottom Right: Lowest position of the light source.

If you feel inclined, don’t be afraid to take the extra time and repeat this exercise once in each of the vertical positions as well. Doing so will only give you a more complete lighting reference in the end.

Exercise three


In this step, start with your light source as close to your subject as you can and place it at a 45 degree angle to camera right, pointed down at your subject. Once you have taken your first image, move it backward one foot.

Changing the distance of your light source from your subject is going to alter your exposure settings. By moving it backward, you will have less light falling on your scene. Simply recalculate your exposure and take your second shot. Repeat this until you can’t move your light source any further back.

What you should see as you do this is the light changing in quality. The closer your light source is to your subject, the softer the light. The further your light source from your subject, the harder the light. A lot people tend to have a personal preference on how they prefer their quality of light. Try to use this exercise and see if you can figure out yours.

When you change your modifiers, you may start to notice a shift in the colour temperature as shown in the bottom right image of the example. No two modifiers will be the same in this regard, so it’s always good to know exactly what you’re getting when you use your equipment.

learn-lighting-with-toys-yoda-2890

Top Left: Softbox at 2′ (61cm) away
Top Right: 4′ (1.2m) away
Bottom Left: 6′ (1.8m) away
Bottom Right: 8′ (2.4m) away

Exercise four

The next step is to start modifying your light; with a reflector in this case. Start with your light source pointed directly at your subject from camera left and above. Calculate your exposure and take a starting image with no modification.

For the next image, put your reflector at camera right, parallel to your light source.

Next, place it directly in front of your subject but as low down as you need to not block your lens and to keep it out of the frame.

Finally, if you can, curve your reflector and hold it at camera right with the centre pointed at 45 degrees from your subject.

Feel free to play around here and take photos with your reflector in as many positions as you can/want. The goal is to observe the changes it makes to the overall images. These changes can be extremely subtle so the more you can observe the better (more you will learn).

Learn lighting with toys ff 2815

Top Left: No reflector. Top Right: Reflector from the right. Bottom Left: Reflector from in front and below the subject. Bottom Right. Reflector curved around the front right corner.

Exercise five

If you have a light source that can be modified with grids or similar (or maybe a window with blinds) it might be advantageous to study the different effects these modifiers provide. If you have a selection of modifiers available, you can use this as an opportunity to study the differences between them in a no pressure environment.

Like exercise one, your light source should be directly in front of your subject and pointed downward at a 45 degree angle. Start with no modifier at all and calculate your exposure and take your first image.

Add each of your different modifiers (softboxes, umbrellas, beauty dishes, etc.) taking a photo at each step. With that, you should have a reference for each of the modifications you can make to a particular light source.

    Top Left: No modifier ( bare bulb)     Top Right: 60 degree reflector     Bottom Left: Beauty dish     Bottom Right: Softbox

Top Left: No modifier ( bare bulb)
Top Right: 60 degree reflector
Bottom Left: Beauty dish
Bottom Right: Softbox

After-matter

By going through these exercises, you will have lit a subject from a huge variety of angles, with a good variety of modifications. From this, you should already start to see which angles are flattering and which aren’t. You may have also spotted ones that have affinity with your own personal tastes.

If you repeat the exercises with any new modifiers you get, as well as in natural lighting conditions at various times a day, then all of this should add together to quicken your understanding of light and how to apply it to your final images without a lengthy trial and error process. From here, you can start to automatically decide how to light or manipulate based on what you’ve learned.

Of course, if you don’t like the idea of using toys, feel free to use food, flowers, people or anything that’s fun and interesting to you!

googletag.cmd.push(function() {
tablet_slots.push( googletag.defineSlot( “/1005424/_dPSv4_tab-all-article-bottom_(300×250)”, [300, 250], “pb-ad-78623” ).addService( googletag.pubads() ) ); } );

googletag.cmd.push(function() {
mobile_slots.push( googletag.defineSlot( “/1005424/_dPSv4_mob-all-article-bottom_(300×250)”, [300, 250], “pb-ad-78158” ).addService( googletag.pubads() ) ); } );

The post Improve Your Lighting Skills with a Trip to the Toy Store by John McIntire appeared first on Digital Photography School.


Digital Photography School

 
Comments Off on Improve Your Lighting Skills with a Trip to the Toy Store

Posted in Photography


6 Tips Using Visual Weight to Improve Your Composition

19 Jun

Andrew’s newest ebook Mastering Composition is now on special for a limited time only at Snapndeals.

Visual weight (also called visual mass) is the principle that some elements of the photo pull the eye more than others.

Take a look at the portrait below. Where does your eye go? It should go straight to the eyes, because they have the most visual weight. They are the element exerting the greatest pull.

Visual weight and composition

Notice that the model’s eyes are not positioned on the traditional intersection points created by the rule of thirds. That doesn’t stop them from pulling the eye, although it could be argued that their visual weight would be strengthened by placing them on a third.

Let’s look at the principles of visual weight (or visual mass) that you can use to improve the composition of your photos.

1. Light tones

Light tones and highlights pull the eye more than dark ones (the basis of tonal contrast). There is a strong contrast in the portrait above between the model’s skin and hair, and the dark background. It is easier to see in a black and white version of the same photo.

Visual weight and composition

2. People

Curiosity about other people is part of the human condition. Our eye goes straight to any human figure that is present in a photo. Recognixable faces exert a stronger pull, while the eyes (the window to the soul) have the strongest visual weight of all.

This explains why you can use people, small in the frame, to give scale and context. It works because our eyes go straight to those figures, as long as they stand out from the background (gestalt theory in action).

The people in the photo below are small, yet the eye goes straight to them. The inclusion of the human figures helps give the scene scale, and emphasizes the size of the mountain behind them.

Visual weight and composition

3. Visual weight and size

The larger the element of a photo, the more it pulls the viewer’s eye. This principle works in harmony with the others discussed in this section. A small human figure, for example, can have much more pull than a large, inanimate object. A small splash of red can also pull the eye very strongly. But for objects of similar texture and colour, the larger one has the stronger pull.

For example, the dials in this photo are virtually identical in terms of shape and design. The one on the right has the most visual weight because it is the largest of the two.

Visual weight and composition

4. Sharp or recognizable elements

Objects that are sharp or easy to recognize pull the eye more than ones that aren’t. According to gestalt theory, the mind looks for patterns and shapes that helps it make sense of chaotic scenes. Once something is identified, it gains significance in the frame compared to those that aren’t.

The most obvious example of this is a portrait taken against a strongly blurred background. The visual weight of the background is reduced because it is no longer sharp, and no longer recognizable. The use of negative space also comes into play.

Visual weight and composition

5. High contrast

High contrast subjects have more visual weight than low contrast ones. This is a good principle to apply in post-processing as well as the photo taking stage. Instead of increasing contrast universally across the image, try increasing it more in the areas where you want the viewer’s eye to travel. Lightroom’s Clarity slider is an excellent tool for this.

In this example I used the Clarity slider to emphasise the texture of the old car and help draw the eye to it.

Visual weight and composition

6. Visual weight and colour

Bright, saturated colours draw the eye. But not all colours are equal. Warm hues have more visual weight than cool ones. Red is the strongest colour of all.

Simplifying the composition makes the relationship between the colours in the photo easier to see. A technique you can use, if your subject is brightly coloured, is to position it against a background comprised subdued, less powerful hues like grey, green and brown.

Simplifying works for all aspects of visual weight. Eliminate everything that isn’t necessary. Keep the background as simple as you can. Once you’ve done this, look at the remaining elements and think about how the eye will move around between them, according to the principles of visual weight. The relationships between them become clearer as the composition is simplified.

The red figurine in the centre of the photo below has the most visual weight. I emphasised this in post-processing by using the Clarity slider to increase its contrast and adding a vignette to darken the background.

Visual weight and composition


Mastering CompositionMastering Composition

My new ebook Mastering Composition will help you learn to see and compose photos better. It takes you on a journey beyond the rule of thirds, exploring the principles of composition you need to understand in order to make beautiful images. It’s on special for a limited time only at Snapndeals.

googletag.cmd.push(function() {
tablet_slots.push( googletag.defineSlot( “/1005424/_dPSv4_tab-all-article-bottom_(300×250)”, [300, 250], “pb-ad-78623” ).addService( googletag.pubads() ) ); } );

googletag.cmd.push(function() {
mobile_slots.push( googletag.defineSlot( “/1005424/_dPSv4_mob-all-article-bottom_(300×250)”, [300, 250], “pb-ad-78158” ).addService( googletag.pubads() ) ); } );

The post 6 Tips Using Visual Weight to Improve Your Composition by Andrew S. Gibson appeared first on Digital Photography School.


Digital Photography School

 
Comments Off on 6 Tips Using Visual Weight to Improve Your Composition

Posted in Photography


5 Reasons to Use Flash to Improve Your Travel Photography

19 Mar

When it comes to travel photography, I am all in for carrying less. However, a good flash is always within reach in my everyday camera bag. I strongly believe that a flash helps to achieve much better results in a number of situations, and here are five reasons and examples:

1) Fill the shadows

Fishing on the Cau River

The alleyway that protects these fishing villagers from the heat in Vietnam makes it almost impossible to have a good balance between the bright sunlight on the river, and the walls of the alley. The use of flash, in a controlled way, over the foreground helps to open up the shadows and show some detail on the otherwise totally dark foreground.

2) Under-expose your background

Farmer in Van Ha

When making portraits, it is always good to have decent separation between your main subject and the background. Granted, one of the most popular ways is to use a shallow depth of field and blur the background while keeping the principal element of your photo sharp. Another way is to intentionally under-expose your photo one or two stops, and light your subject with flash to compensate.

3) Freeze motion

For the love of the kids

If you are working with moving subjects, the use of flash will help to freeze some of the motion if you intend to do so. This depends on a number of factors, including what shutter speed you are shooting at and the length of the flash duration. But, if you notice in the example above, the flash is only being used to achieve points one and two of this article, meaning I am also underexposing the image a tad, and opening up the shadows in the main subject to bring more attention to them.

4) Dark interiors

Old Black Hmong man

This artisan from the Hmong minorities in North Vietnam was working his craft inside his house where no lights are available. Despite being close to a window, it was way too dark to photograph, even at high ISO. If you encounter a similar condition, the use of flash will not only make a big difference, but could also be the reason you get the shot at all.

5) Keep shooting at night

Street performer at night in New Orleans

Some places are meant to be enjoyed at night. All kind of photos are possible during this time. Cityscapes and lights trails are certainly compelling propositions, but when it comes to capturing street life there is no better way than with the aid of flash. That extra pop of light will make your subjects come alive and stand out.

The key to doing this is to practice and learn how to manage and balance ratios. Every moment is different and sometimes your key light will be your flash, and other times you’ll be using it just to fill. My personal preference is to do it manually. I think you have much better control by dialling in the power of your speedlights manually, rather than letting the camera figure it out. It takes practice, but it is not difficult to master.

In terms of equipment, I really like the Yongnuo YN 560-III, the main reason is the integrated radio trigger. The units are inexpensive, but well made, which doesn’t hurt either. But as I always use it off-camera, the fact that I don’t need to attach cables or be worried about optical slaves is something that I appreciate. That radio signal goes everywhere, even behind walls, making it very easy to trigger.

What about you? Do you use any flash in your travel photos or in situations like these? Share your images and comments below.

googletag.cmd.push(function() {
tablet_slots.push( googletag.defineSlot( “/1005424/_dPSv4_tab-all-article-bottom_(300×250)”, [300, 250], “pb-ad-78623” ).addService( googletag.pubads() ) ); googletag.pubads().enableSingleRequest();
googletag.pubads().disableInitialLoad();
googletag.pubads().collapseEmptyDivs( true );
googletag.enableServices();
} );

googletag.cmd.push( function() { googletag.display( ‘pb-ad-78623’ ); } );

googletag.cmd.push(function() {
mobile_slots.push( googletag.defineSlot( “/1005424/_dPSv4_mob-all-article-bottom_(300×250)”, [300, 250], “pb-ad-78158” ).addService( googletag.pubads() ) ); googletag.pubads().enableSingleRequest();
googletag.pubads().disableInitialLoad();
googletag.pubads().collapseEmptyDivs( true );
googletag.enableServices();
} );

googletag.cmd.push( function() { googletag.display( ‘pb-ad-78158’ ); } );

The post 5 Reasons to Use Flash to Improve Your Travel Photography by Daniel Korzeniewski appeared first on Digital Photography School.


Digital Photography School

 
Comments Off on 5 Reasons to Use Flash to Improve Your Travel Photography

Posted in Photography