RSS
 

Posts Tagged ‘Images’

Nikon 105mm F1.4E ED sample images

29 Sep

The Nikon 105mm F1.4 is an ultra-fast prime lens perfect for portrait photography or as a general-use telephoto. It’s pretty heavy 34.7oz / 2.17lb, and features a relatively large, 82mm front element. But gosh darn it, there’s a lot to like about the kind of images you can get with it. We did some heavy lifting and took it out for a spin.

Articles: Digital Photography Review (dpreview.com)

 
Comments Off on Nikon 105mm F1.4E ED sample images

Posted in Uncategorized


Google algorithm can caption images with 93.9 % accuracy

27 Sep

Anyone who manages a large image library knows how important keywording and captioning are for categorizing and keeping things searchable. They also know how time-consuming these tasks can be. That’s where artificial intelligence may be able to lend a hand though, and the updated version of Google’s trainable ‘Show and Tell’ algorithm, which has just been made open source, is now capable of describing the contents of an image with an impressive 93.9% accuracy.

Google’s model generates a new captions by using concepts learned from pre-captioned images in the training set.

According to an article on the Google Research Blog the updated algorithm is faster to train and produces more detailed descriptions. The Google researchers trained ‘Show and Tell’ by showing it pre-captioned images of a specific scene to teach it to accurately caption similar scenes without any human help. By making ‘Show and Tell’ open source Google aims to promote research in the field of image recognition.

After the update the image model is now capable of providing more detailed descriptions and more likely to include color descriptions.

Articles: Digital Photography Review (dpreview.com)

 
Comments Off on Google algorithm can caption images with 93.9 % accuracy

Posted in Uncategorized


18 Shape Defining Silhouette Images

23 Sep

Doing a good silhouette requires a few things. A subject with a good shape, proper exposure, and position of the subject to best showcase its shape and define its outline.

Lighting is key, and contrast is essential to get a nice clean silhouette. Look at how these photographers pulled off some great silhouette images. Take note of the kinds of subjects make good silhouettes.

Club Med UK

By Club Med UK

Kenneth Garcia

By Kenneth Garcia

Grendelkhan

By grendelkhan

Darron Birgenheier

By Darron Birgenheier

Jqpubliq

By jqpubliq

Nicolas Alejandro

By Nicolas Alejandro

Iggyshoot

By iggyshoot

Grant

By Grant

Jonathan Camuzo

By Jonathan Camuzo

Deven Dadbhawala

By Deven Dadbhawala

Nattu

By Nattu

Matthew Roth

By Matthew Roth

Tara R.

By Tara R.

Andy Tolsma

By Andy Tolsma

Wheats

By Wheats

Jenny Downing

By jenny downing

Brian Gratwicke

By Brian Gratwicke

Chuck Holland

By Chuck Holland

googletag.cmd.push(function() {
tablet_slots.push( googletag.defineSlot( “/1005424/_dPSv4_tab-all-article-bottom_(300×250)”, [300, 250], “pb-ad-78623” ).addService( googletag.pubads() ) ); } );

googletag.cmd.push(function() {
mobile_slots.push( googletag.defineSlot( “/1005424/_dPSv4_mob-all-article-bottom_(300×250)”, [300, 250], “pb-ad-78158” ).addService( googletag.pubads() ) ); } );

The post 18 Shape Defining Silhouette Images by Darlene Hildebrandt appeared first on Digital Photography School.


Digital Photography School

 
Comments Off on 18 Shape Defining Silhouette Images

Posted in Photography


Getty Images and Instagram announce grant winners

22 Sep

Getty Images Instagram Grant Winners Announced

Photo by Girma Berta, @gboxcreative, Getty Images Instagram Grant Recipient 2016

Getty Images and Instagram have announced the winners of the second annual Getty Images Instagram Grant, a program founded to support photographers using Instagram to document stories from underrepresented communities around the world.

The three winners will receive grants of $ 10,000 and will also have their work exhibited at the Photoville photography festival in New York from September 21-25. Click through to learn about the recipients and to see their winning images.

Christian Rodriguez

Photo by Christian Rodriguez, @christian_foto, Getty Images Instagram Grant Recipient 2016

Christian Rodriguez, a documentary photographer from Uruguay, received a grant for his project Teen Mom, which depicts teen pregnancy in Latin America. Directly impacted by teenage motherhood, Christian hopes to raise awareness of the issue and highlight its impact on local communities. He finds inspiration in the literary trend of magical realism and considers Instagram a powerful tool to gain feedback and information about the realities many teenagers are faced with.

Christian Rodriguez

Photo by Christian Rodriguez, @christian_foto, Getty Images Instagram Grant Recipient 2016

Portrait of Graciela (13) , Norma (8) and Lupita (7) hiding behind their house in a small village called Ocotal Grande in Veracruz. They belong to the popoluca community. Popoluca is a Nahuatl term (meaning “gibberish, unintelligible speech”) given to various indigenous communities of southeastern Veracruz.

Christian Rodriguez

Photo by Christian Rodriguez, @christian_foto, Getty Images Instagram Grant Recipient 2016

Gloria (13) belongs to the Mixe Community of Maluco, a small village in the north of the “Itsmo de Tehuantepec”, Oaxaca. She lives with her mother and 8 of her 10 siblings, who are between 4 and 20 years old. Gloria became mother at the age of 12, consequence of the constant sexual abuse of her father who has also attacked two of her sisters, aged 8 and 16.

Christian Rodriguez

Photo by Christian Rodriguez, @christian_foto, Getty Images Instagram Grant Recipient 2016

Angela Mieres (15) hugs her sister Patricia during labor. Her boyfriend and father of the baby was shot dead 20 days before birth.

Christian Rodriguez

Photo by Christian Rodriguez, @christian_foto, Getty Images Instagram Grant Recipient 2016

Micaela and her son, Franco. Micaela’s mother was, like her, a teenage mother.

Ronny Sen

Photo by Ronny Sen, @ronnysen, @whatdoestheendoftimelooklike, Getty Images Instagram Grant Recipient 2016

Children wait for their parents to return from work, both of whom are coal pickers inside a coal mine in Jharia.

Ronny Sen, from India, received a grant for his work documenting the fires that have burned for just over one hundred years in mineral-rich Jharia. A documentary photographer compelled to visually document his immediate reality, Ronny’s work uses both photography and videography to spotlight the plight of people who have been affected by big corporations and depicts survival in an apocalyptic-like landscape.

Ronny Sen

Photo by Ronny Sen, @ronnysen, @whatdoestheendoftimelooklike, Getty Images Instagram Grant Recipient 2016

The wall of a broken temple in a village near a coal mine in Jharia. Due to the blasting and the underground fire lots of the buildings and houses in nearby villages are being destroyed.

Ronny Sen

Photo by Ronny Sen, @ronnysen, @whatdoestheendoftimelooklike, Getty Images Instagram Grant Recipient 2016

A contractual labour inside one of the coal mines in Jharia. He will make two dollars after loading almost five trucks with coal in Jharia.

Ronny Sen

Photo by Ronny Sen, @ronnysen, @whatdoestheendoftimelooklike, Getty Images Instagram Grant Recipient 2016

Coal scavengers work very early in the morning before the mine officials come inside the mines in Jharia.

Girma Berta

Photo by Girma Berta, @gboxcreative, Getty Images Instagram Grant Recipient 2016

Girma Berta resides in Addis Ababa and uses his iPhone to capture the vibrant color and grunge of street life in the capital of Ethiopia. Girma uses his background in graphics and painting as a guide for lighting and composition, playing with colors and infusing street photography with fine art. Girma’s project, Moving Shadows, showcases local street scenes against backdrops of color. A member of @everydayafrica, he uses Instagram as a platform for self-expression and to share his work with the rest of the world. 

Girma Berta

Photo by Girma Berta, @gboxcreative, Getty Images Instagram Grant Recipient 2016

Girma Berta

Photo by Girma Berta, @gboxcreative, Getty Images Instagram Grant Recipient 2016

Girma Berta

Photo by Girma Berta, @gboxcreative, Getty Images Instagram Grant Recipient 2016

Articles: Digital Photography Review (dpreview.com)

 
Comments Off on Getty Images and Instagram announce grant winners

Posted in Uncategorized


How to Prepare Your Images for Print and Display

18 Sep

If you’re into photography at some point you’ve probably had the desire to print and display your work. Whether it be for exhibition in a gallery or local community center, to hang on your own wall, or to give a print as a gift to a friend or loved one, you want to present your work in the best way possible. Treating it as the piece of art that it is. Displaying your printed work can sometimes result in a lot of angst, due to problems printing, decisions with regards to matting and framing, and finally, lighting.

Displaying Your Images

Many photographers believe an image isn’t fully realized until it has been printed and hung.

“The negative is the equivalent of the composer’s score, and the print the performance.” – Ansel Adams

While situations, intentions, and desires may vary from one photographer to the next, here are a few things to consider when preparing an image for print and display.

home-display-of-prints

Monitor Calibration

Before you even choose which route to go with in terms of printing your images, you have to address the biggest issue facing photographers today – monitor calibration.

The settings you have applied to your computer screen can drastically affect the way the image looks on screen. And while you may have edited the image to look fine onscreen, when you go to print it, there is a very good chance your printed output will look nothing like what you saw when editing. To solve that issue, you have to match your screen to a known standard. One that sets the color and brightness so that what you see on screen will translate to what comes back from the photo lab, or out of your printer.

Calibrating Your Monitor

Unless your monitor is properly calibrated, you can’t be sure that the vibrant colors you see on screen will be the same as those seen in a print.

There are several available options for monitor calibration, but they all do the same thing. They get your monitor set to a known state that the printing engine can translate to similar output. In other words, what you see onscreen is what you get out of the printer or lab! Finally, it’s important to realize that the lighting under which your print will be displayed will affect the way the image looks. Too cool lighting will make it look bluer, while fluorescent lighting will make it greener, and tungsten lighting will warm the tones.

Finally, it’s important to realize that the lighting under which your print will be displayed will affect the way the image looks. Lighting that is too cool will make it look bluer, while fluorescent lighting will make it appear greener, and tungsten lighting will add warm the tones.

Type of Print

Obviously, if you plan to display one or many of your images, the first thing you need to do is have it printed. You have several options available, and while none are wrong, some are better than others. The simplest option, in terms of work for you, is to use a photo lab or print service. If you like more control, you can choose to print the images yourself on your own photo quality inkjet printer. Even then, there are things to consider.

Making Prints

When you do decide to print an image, you have several choices to make, include what process to use, what media to print on, and how it should be finished.

There are two main printing methods prevalent today, depending on where you go for your prints of digital images:

Inkjet prints:

Inkjet prints are produced by placing tiny drops of ink on paper or canvas to produce an image. Professional inkjet printers tend to have more colors than consumer models, with high-end printers now featuring up to 12 different color inks to create a richly colored image.

Inkjet printers use inks that fall into one of two categories; pigment or dye-based inks. Pigment inks are made of tiny particles that sit on top of the paper, while dye-based inks are absorbed into the paper. Pigment inks are archival and can last up to 200 years or more in the proper conditions (under museum-quality lighting and framing). Pigment-based inks are more expensive but also suffer two main drawbacks. First, pigment based inks can suffer from metamerism, which appears as a shift in the color when viewing the print at an angle. The second drawback is that pigment-based inks are not as vibrant as dye-based ones. Dye-based inks tend to fade more quickly, though some are rated to last up to 75 years or more in proper conditions. Professional printers will usually use pigment-based inks.

Digital C-Print (Lightjet):

This method of printing involves using a laser to expose chromogenic paper, which is then processed in chemicals, similar to a traditional photographic print. It’s a continuous tone print, unlike inkjet which produces tiny dots of ink on the paper to create the image. The laser produces true photographic quality with continuous gradations and tones. Kodak Endura and Fuji Crystal Archive are the two most popular papers used in this process, and both produce archival prints that will last up to 200 years under proper conditions.

Displaying Your Work

While it’s fun to show off your images online, there is nothing quite like having one of your images printed and framed.

Choosing a Lab

Labs offer some decided advantages over printing images yourself. When choosing a lab, you want to find one with a reputation for good quality control and customer service. I’ve found getting recommendations from other photographers to be incredibly helpful when looking for a lab.

Other things you’ll want to consider are their products. Do they print using the method you want? Do they offer the sizes you want? Do they print on media other than photo paper, such as canvas, acrylic, or metal? What kinds of finishing options do they offer? Is the canvas gallery wrapped? Do they offer mounting or framing? Do you want or need those services? Answer those questions, knowing what you want or need, and that should give you a good answer as to whether the lab will fulfill your needs.

Answer those questions, knowing what you want or need, and that should give you a good answer as to whether the lab will fulfill your needs.

Displaying the Print

If you choose to go with a print on metal, acrylic, or canvas, once the print is made, you probably won’t have much else to do. These options are generally finished and require no framing, though a decorative frame can be added to canvas if desired. If you’ve printed on paper, you still have a little work to do.

canvas-wrap

Matting

Paper prints, to be properly displayed, need to be matted and framed. You can find various qualities of mat board, using terms such as “Buffered pH Neutral” or “Acid-Free”. These are basically the same thing, meaning the acid has been removed from the paper to avoid harming the prints. Acid-free mats have a protective lifespan of about 7-12 years.

The next grade of mat board is known as “conservation grade acid-free” or sometimes “museum rag”, which is what you’d want to use for a serious art display in a gallery. In addition to removing the acid, another component harmful to paper, called lignin, is also removed from the mat board. Conservation mats that are acid and lignin free have a protective lifespan of 50 years or more. Conservation grade mats aremore expensive than simple acid-free ones.

Which type of mat should you choose? It really depends on your purpose. If you’re planning to display the print as art in a gallery and possibly for sale, conservation grade mats are the best choice. This helps add value to the print by preserving it, and lets the buyer know you are serious about your work and their potential investment in it. If the use is something less important, such as a temporary display that won’t be for sale, you can certainly save some money and go with a simple acid-free mat.
matted-prints

Framing

Framing prints can present you with some difficult choices, depending on where the print will be hanging. Since you never know where someone may hang a print, for galleries and art shows I suggest a simple, understated black frame, that lets the image breathe and speak for itself.

Framed Print

A matt and frame finish off an image and complete the piece for hanging.

One of the big mistakes I see new photographers and artists make when showing work in a gallery or exhibition is framing their work in overly ornate or colorful frames. When an art buyer purchases a new piece of art, if it is framed already, that frame becomes part of the consideration. By keeping the frame simple and understated, it allows the buyer to view the art neutrally without considering the frame. They won’t feel the frame has to be married to the image and can feel free to consider their own framing choices.

If you want to get really serious about the frames you use, you’ll want to use museum quality framing. Like conservation mats, it is designed to preserve the print for as long as possible. Museum quality framing includes UV filtered glass to reduce the UV rays from the sun that are a print’s worst enemy and keep it from fading. It should include conservation matting as described above, and will have a final layer of archival backing to further protect the print.

The Finishing Touch

Signing Your Prints

An artist should always sign his or her work, on the print, in the corner.

As with any artwork, you should always, without fail, sign your images. Signing your images signifies that you created the image, personally took responsibility for it from capture to print, and lets whoever is hanging the print on their wall know who created it. It adds value for art collectors.

There is always some debate, it seems, but I will go on the record as saying that it is always the print that should be signed, and never the mat. The mat can be removed, and thus, so can your signature. Choose either the bottom left or bottom right corner and sign your prints with a neat, clear signature that identifies the image as your own. Again, you’ll want to use archival ink that won’t harm the print, in a color that will stand out. For darker prints, silver or gold metallic works nicely, while for lighter colored prints, a black ink will suffice. I prefer the Deco Color Liquid Fine Paint Markers to sign my prints, canvases, metal prints, and acrylics. There are several thicknesses available so you may want to experiment to find what works best for you.

artist-pen

Your photos are meant to be seen, not just take up space on a hard drive! So take these tips and start showing your images off. What are your favorite tips for displaying photos?

googletag.cmd.push(function() {
tablet_slots.push( googletag.defineSlot( “/1005424/_dPSv4_tab-all-article-bottom_(300×250)”, [300, 250], “pb-ad-78623” ).addService( googletag.pubads() ) ); } );

googletag.cmd.push(function() {
mobile_slots.push( googletag.defineSlot( “/1005424/_dPSv4_mob-all-article-bottom_(300×250)”, [300, 250], “pb-ad-78158” ).addService( googletag.pubads() ) ); } );

The post How to Prepare Your Images for Print and Display by Rick Berk appeared first on Digital Photography School.


Digital Photography School

 
Comments Off on How to Prepare Your Images for Print and Display

Posted in Photography


Winning images from the Weather Channel’s 2016 It’s Amazing Out There contest

17 Sep

2016 It’s Amazing Out There winners

Grand Prize winner. Photo by Greg Gulbransen

The Weather Channel recently announced winners of its annual It’s Amazing Out There photo contest, awarding $ 15,000 to the grand prize winner. Second and third place winners took home cash prizes as well, and a total of 64 finalists were recognized for their photos celebrating fantastic weather, wildlife and adventure. Take a look at a few favorites here, including one from a familiar face.

2016 It’s Amazing Out There winners

Grand Prize winner. Photo by Greg Gulbransen

Greg Gulbransen captured this photo of a polar bear on the frozen Hudson Bay in Manitoba, Canada when a rapid temperature drop at sunrise created the mist in this image.

‘I said to myself, “I hope a bear walks into this scene’ and sure enough this bear just walked into the scene,” he says. ‘The bear walked out there with his head down. I was so cold, I couldn’t feel my fingertips and I was praying my battery wouldn’t freeze and I said, “bear, would you just lift your head about 8 inches?” And sure enough, it lifted its head and that’s when I got the shot. I knew it was a special moment when I took it.’

If only nature was always so cooperative for photos.

2016 It’s Amazing Out There winners

Second place. Jomblang (Grubug) Cave, Indonesia. Photo by Dale Johnson

We featured Dale Johnson’s work last year as part of our Readers’ Showcase series and since then he’s continued to gain recognition for his photos. He describes this shot from a trip inside Jomblang Cave in Indonesia as ‘the toughest selfie I’ve ever taken.’ If Instagram selfies were half as good as this one, we’d generally like them a whole lot more.

2016 It’s Amazing Out There winners

Third place. Photo by Derek Burdney

Derek Burdney’s photo of a Texas thunderstorm earns him the contest’s third place prize. Based in Omaha, Neb. Burdney says of this storm ‘The [weather] models looked good, so we got in position and watched this thing develop. It was a beautiful storm and everything was good for tornado production. It was really rotating. It never threw a tornado down, but it was really photogenic.’

2016 It’s Amazing Out There winners

Finalist. ‘Walking in the clouds.’ Midway Geyser at Yellowstone National Park. Photo by Derek Burdney

2016 It’s Amazing Out There winners

Finalist. ‘Playtime.’ Photo by Jimmy Marz

2016 It’s Amazing Out There winners

Finalist. ‘Galactic Rainbow.’ Stargazing on top of Maui’s Haleakala Volcano. Photo by Michael Trofimov

2016 It’s Amazing Out There winners

Finalist. ‘Sunset gallop through the marshes.’ A herd of Camargue White Horses galloping through a marshy area in the Camargue region, southern France. Photo by Steve Lange

2016 It’s Amazing Out There winners

Finalist. ‘Fisherman on the Dam.’ Three fly fisherman crossing the dam on a small creek in Tennessee. Photo by Shane Durrance

2016 It’s Amazing Out There winners

Finalist. ‘Step of rice terrace at Chiangmai, Thailand.’ Rice terrace at Chiangmai, Thailand, before rain. Photo by Sarawut Intarob

2016 It’s Amazing Out There winners

Finalist. ‘Weeki Wachee Springs.’ A bird’s eye view of the Weeki Wachee River in the Tampa Bay Area of Florida. Photo by David Underwood

Articles: Digital Photography Review (dpreview.com)

 
Comments Off on Winning images from the Weather Channel’s 2016 It’s Amazing Out There contest

Posted in Uncategorized


21 Technicolor Images of Fall Leaves

16 Sep

Here in the Northern Hemisphere fall is upon us and the leaves are already changing color. What better time to get out and photograph them!

Let’s see what these photographers captured in this colorful images of fall leaves:

Louise Leclerc

By Louise Leclerc

Ram Yoga

By Ram Yoga

Darlene Hildebrandt

By Darlene Hildebrandt

Chechi Peinado

By Chechi Peinado

Stanley Zimny (Thank You For 19 Million Views)

By Stanley Zimny (Thank You for 19 Million views)

Jacki-dee

By jacki-dee

*Psyche Delia*

By *Psyche Delia*

Nicole Nicky

By Nicole Nicky

Greg Johnston

By Greg Johnston

Peaceful-jp-scenery

By peaceful-jp-scenery

Anne Worner

By Anne Worner

Susana Fernandez

By Susana Fernandez

Gisella Klein

By Gisella Klein

Stanley Zimny (Thank You For 19 Million Views)

By Stanley Zimny (Thank You for 19 Million views)

Paulo Valdivieso

By Paulo Valdivieso

Crifo

By crifo

Mike Monaghan

By Mike Monaghan

J J

By J J

Ms.Kimberly_B

By Ms.Kimberly_B

Susanne Nilsson

By Susanne Nilsson

Mirai Takahashi

By Mirai Takahashi

googletag.cmd.push(function() {
tablet_slots.push( googletag.defineSlot( “/1005424/_dPSv4_tab-all-article-bottom_(300×250)”, [300, 250], “pb-ad-78623” ).addService( googletag.pubads() ) ); } );

googletag.cmd.push(function() {
mobile_slots.push( googletag.defineSlot( “/1005424/_dPSv4_mob-all-article-bottom_(300×250)”, [300, 250], “pb-ad-78158” ).addService( googletag.pubads() ) ); } );

The post 21 Technicolor Images of Fall Leaves by Darlene Hildebrandt appeared first on Digital Photography School.


Digital Photography School

 
Comments Off on 21 Technicolor Images of Fall Leaves

Posted in Photography


Getty Images asks court to throw out $1B lawsuit

14 Sep

Getty Images has responded to the $ 1 billion lawsuit filed against it by photographer Carol Highsmith, arguing that she can no longer make copyright claims about the photos because they have been entered into the public domain. According to reports from the AP, the company further argues that it has done nothing wrong by offering licenses of the images because ‘public domain works are routinely commercialized…’ Getty points toward Shakespeare plays and Dickens novels sold by publishers as examples.

The issue revolves around the lawsuit filed in late July alleging that a Getty subsidiary has been issuing notices that demand licensing fees for Highsmith’s images. Those notices are at odds with the public domain status of the works and, according to the lawsuit, have caused damage to Highsmith’s reputation. Highsmith’s lawsuit also alleges that Getty and its subsidiaries falsely represented themselves as the copyright owners, which Highsmith’s lawyers argue violates provisions of the Digital Millennium Copyright Act.

In its response to the lawsuit’s DMCA claims, Getty says it has committed no such violations, because doing so would have required ‘intent to induce, enable, facilitate, or conceal infringement.’ Because the photos are in the public domain, Getty argues that it ‘could not have acted with the requisite intent or knowledge of infringement.’

Ultimately, Getty has asked the court to dismiss Highsmith’s lawsuit against it, also stating that it has not violated the state laws alleged in the lawsuit and that other other legal claims are unfounded. 

Articles: Digital Photography Review (dpreview.com)

 
Comments Off on Getty Images asks court to throw out $1B lawsuit

Posted in Uncategorized


How to Cull Your Images to Tell a Stronger Story in Your Blog or Social Media Posts

13 Sep

I have this photographer friend. This person is wildly talented, with impeccable images and an amazing eye. I love seeing what she is going to create next until she puts up a blog post. So let’s talk about how and why to cull your images.

These posts are usually a long, meandering wander through her shoots, with no thought to tell a story. Images that you swear are repeats – until you look closely and realize the model’s left pinky finger has maybe moved ever so slightly. Blurry shots that should have been culled in the first round. It boggles my dang mind to look at these posts because we as photographers should know better.

Cull-Images-top


You are better served to share your images in a way that compels viewers to keep coming back for more. While I may not be a pro-level blogger, I still think it’s an excellent way to share your images, and there are a few tricks that I always try to keep in mind as I’m putting together a blog post.

Step 1: Be Brutal

Think about this from the viewer’s perspective. They weren’t at the shoot. So how can you tell them the story in a concise way that shows off your best work? To do this, you have to be brutal. Cull like a maniac, and then cull some more.

Does it hurt to eliminate images that you love from the narrative of your post? Yep, it’s like choosing your favorite child, but you gotta shrink down the number of images you share. You must. Beyond the obvious culling— things like strange facial expressions, awkward hands, etc., there are so many photographers who feel they need to share each and every image that they love. Unfortunately, this is a good way to head straight to Boring Postville.

Do not share the same scene, and the same pose five times in a row! The viewer’s eye will get bored and start to skip over. Your goal is for each new image to draw the eye, and surprise the viewer in some way. If the images start blurring together, the surprise element is gone and you’ve lost their interest. Be brutal in editing: your posts will thank you.

culling (2 of 2)

culling (1 of 2)

Lovely people, lovely images, but they’re so much alike and it’s killing me softly. These do not both need to be in a post together.

Step 2: Change Your Perspective

If you were an invisible spy at the photo shoot, how would you absorb all the information of the day? You’d start far away and move in closer. Too many posts start with the super-tight ring shot, or the close up of the hand on the face, and the viewer is left wondering subconsciously, “How did we get here?”

So aim to tell your story from the perspective of someone who was peeking over your shoulder. A great example is a wedding day. You don’t start a wedding day with the big dramatic first kiss, right? Set your scene. Show the viewer your location. Introduce them to the setup, then move in close to get the detail shots. It’s a much closer proximation to the reality of the day, and it helps our brains understand what’s going on when we’re viewing it on a computer after the fact.

Start broad.

Start broad.

Then move in for more detail...

Then move in for more detail…

... and then even more detail.

… and then, even more detail.

From there, remember to include varying visual perspectives. If you’ve already shared a couple’s full-body portraits, don’t overdo it with the same angle. Move into a closeup of their faces, or a detail of their outfits. Or share a different detail from the day altogether. But for the love of Richard Avedon, please don’t share a dozen nearly-identical photos! Find a new perspective, and make it memorable.

culling (4 of 1)

Far away!

culling (3 of 1)

Close up! And it’s unique enough of a perspective, that including this shot rounds out the story of the previous one.

Step 3: Tell the Truth – Kind of

My favorite Emily Dickenson line is, “tell all the truth but tell it slant.” This is advice straight from a poet to a photographer, so use it wisely. Friends, there is no grand blog court that has ruled that you must share every image, from every scene, in every shoot. YOU are the artist, and YOU get to decide how you’re going to tell the truth! Let’s not squander that freedom! You’re an artist, and you can unfold a story in the most artistic way you deem worthy. Here’s what you do NOT have to do:

  • Share images in the precise order you shot them.
  • Share images from the scenes or poses that you wanted to try but didn’t quite work (and hey, good job trying new stuff!).
  • Share images the client asked you to take that don’t totally represent your vision or your brand.
  • Share images that don’t progress the story you want to tell.

The science of photography is that you always get to tell the truth. The art of photography is that you can tell it slant. Play that line because you can.

culling (5 of 1)

Step 4: Stay in the Flow

So, now that you’ve culled only the very best of your images, laid them out in a compelling story, shared your artistic skill with the world, and put together a bomb post, make sure the little details aren’t subtly throwing shade onto your creation.

Step away from your computer, go for a walk, have a glass of wine, do you… and then come back to review what you’ve written, shared, and how it all comes together. Try to have fresh eyes.

Is anything too repetitive? Do your shots flow together? Do your black and white images land in places throughout the post that make sense? If you include captions, do they add or detract from the overall effect of your story? These little details can take a post from good to truly excellent, so make sure you give your post another look before you click “Publish.”

culling (6 of 1)

What are your tips for culling photos for a great social media or blog post? What are your big no noes? I’d love to hear them.

googletag.cmd.push(function() {
tablet_slots.push( googletag.defineSlot( “/1005424/_dPSv4_tab-all-article-bottom_(300×250)”, [300, 250], “pb-ad-78623” ).addService( googletag.pubads() ) ); } );

googletag.cmd.push(function() {
mobile_slots.push( googletag.defineSlot( “/1005424/_dPSv4_mob-all-article-bottom_(300×250)”, [300, 250], “pb-ad-78158” ).addService( googletag.pubads() ) ); } );

The post How to Cull Your Images to Tell a Stronger Story in Your Blog or Social Media Posts by Laura Sullivan appeared first on Digital Photography School.


Digital Photography School

 
Comments Off on How to Cull Your Images to Tell a Stronger Story in Your Blog or Social Media Posts

Posted in Photography


ImageRights – Finding and Pursuing Copyright Infringement of Your Images

11 Sep

PWC-Image-Rights-11
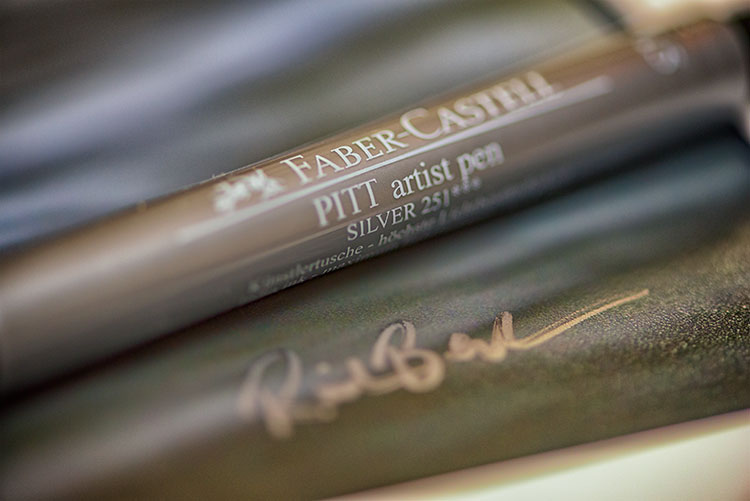
Image Rights (imagerights.com) is a middleman for those of us not in tune with the various legal systems, as they pertain to unauthorized use of our images. It’s an opportunity to go after copyright infringement (entities who use your photo work without your permission) and effectively hire a lawyer in a number of countries. It’s also a discovery service to find out where you images are being used.

It’s not perfect, and does not pertain to every case of copyright infringement, but it is a useful tool for those with a lot of online images. This article is an overview of the service, as an in-depth how-to would be very lengthy.

How it Works

Getting Started

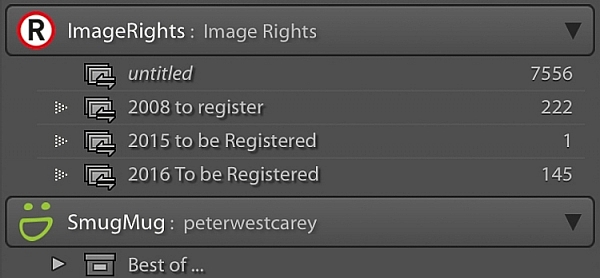
Let’s take a look at the dashboard of Image Rights.

PWC-Image-Rights-01

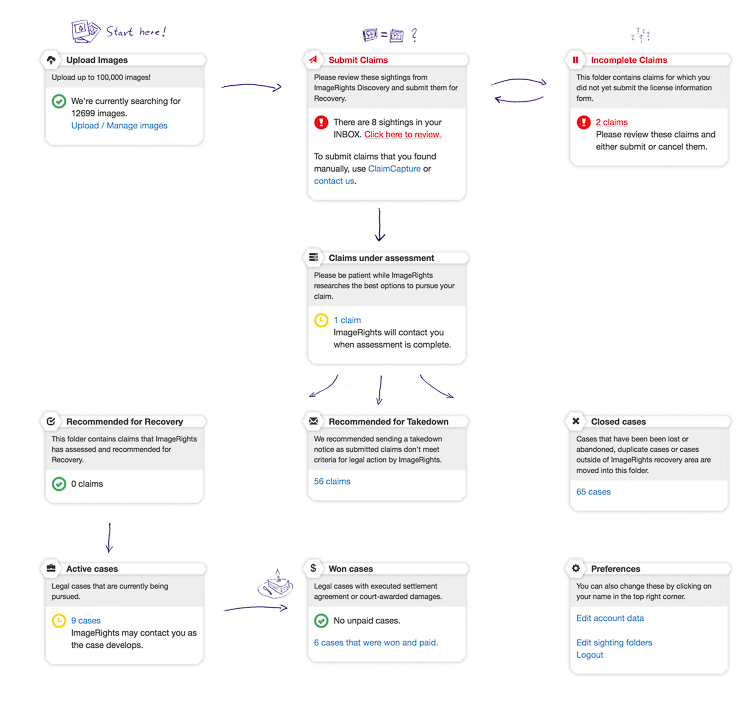
I like that Image Rights (IR) uses a simple flow diagram to help me visualize what goes where, and what comes next. Images are uploaded by you (upper left), then when a discovery happens (upper middle) there are some options. Starting with the Inbox, you are shown all the current matches for your images. It is then up to you to filter the noise form the signal.

PWC-Image-Rights-02-Edit

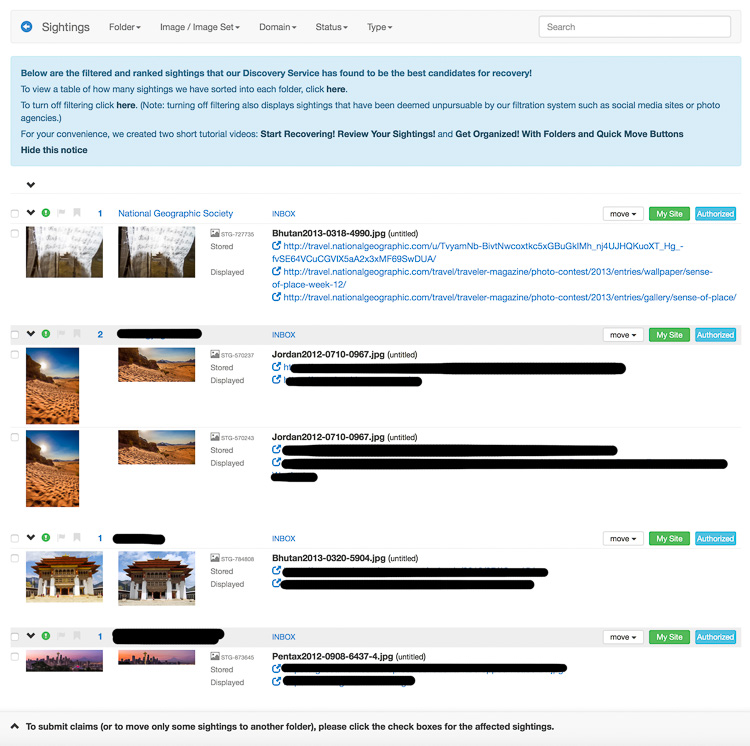
I have redacted the names to protect the (potentially) innocent or guilty, except for National Geographic. I left them up there so you can see the details. That was a photo I entered in their contest, so I know that is an authorized use of my image.

IR gives you a link to where the image is stored (it will also show you items that are hot-linked) and where it is used. At this point, you click through the links to see if the image is actually used on the site (sometimes it no longer exists) and if it really is yours.

Opening a Case

Clicking the check box next to an image means you want to open a case to start an investigation. Doing so brings up the Prepare Case screen (see below).

PWC-Image-Rights-03

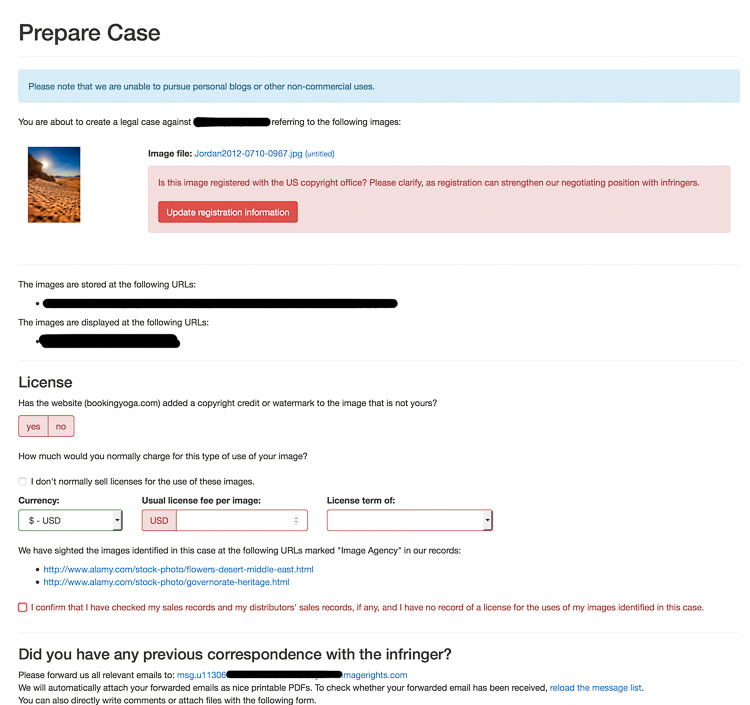
Here is your chance to triple check the image use, let IR know if the image is registered with the US Copyright Office (USCO), and give them details of your normal fees.

Down at the bottom is where you finish your submission and provide more details. I often have images show up from articles posted here on dPS, that are scrapped by a number of disrespectful sites. I will mention the total number of images and their use. Real people read these comments, and they help clarify all the details to prevent too much back and forth during the discovery phase.

PWC-Image-Rights-04-Edit

Once you click Submit, then poof! Away it goes to be reviewed.

Sorting the Wheat from the Chaff

Getting back to the Inbox for a moment, there are more options than just opening a case. Take a look at the drop down offered next to each item.

PWC-Image-Rights-05

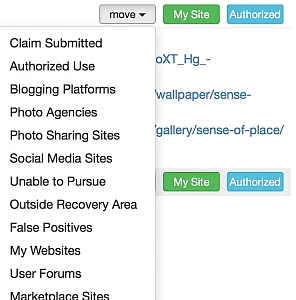
The Sightings Folders explains each of these.

PWC-Image-Rights-06

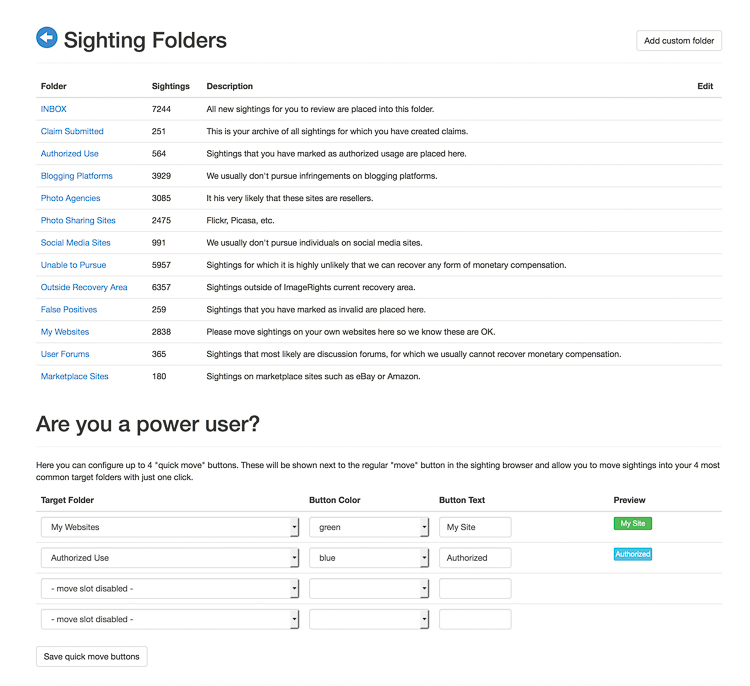
Those are my real world numbers after using the service for 18 months, along with explanations that most of these things will not be followed up by IR. I use the Authorized and My Site options often, as IR will find my images here on dPS, as well as other sites where I write. This is why they have the “Power User” section at the bottom of that screen; to help you create Quick Move buttons if you find you are clicking the same things over and over again.

Where it Goes Next

Back to the dashboard:

PWC-Image-Rights-01

After submission, your claim will be assessed by real people at IR, then it will be taken on one of three paths.

  1. Case Closed: Various reasons can close a case. Often this is because the claim is outside of countries where IR has legal relationships.
  2. Takedown: The case may have merit, but recovery prospects look low, or no firm will take on the case. These items are moved to “Recommended for Takedown”. These are up to you to complete and sometimes recovery of a fee is still possible on your own.
  3. Recommended for Recovery: this is where you hope your case will end up. You will receive an email asking you what you want to do. Here, the law firm has given input to IR about how much should be asked from the infringer and you are given options to pursue or not.

If you agree to the terms, the case will move to the active stage, and the law firm will being their lawyering activities to attempt to recover a fee from the infringer. I have seen cases sit open for 6-12 months. My oldest is now 16 months. Sometimes it takes a while.

Winning, or Not

In an over-simplified view of the site, cases that are open will either be won or lost. Sometimes they are closed because of no action.

If you win, yay! IR will send you an email, and a note will be added to your case describing how much was recovered and what your cut will be. Payments can take a month or two to filter through.

What Does it Cost?

ImageRights has three basic levels of service.

PWC-Image-Rights-07

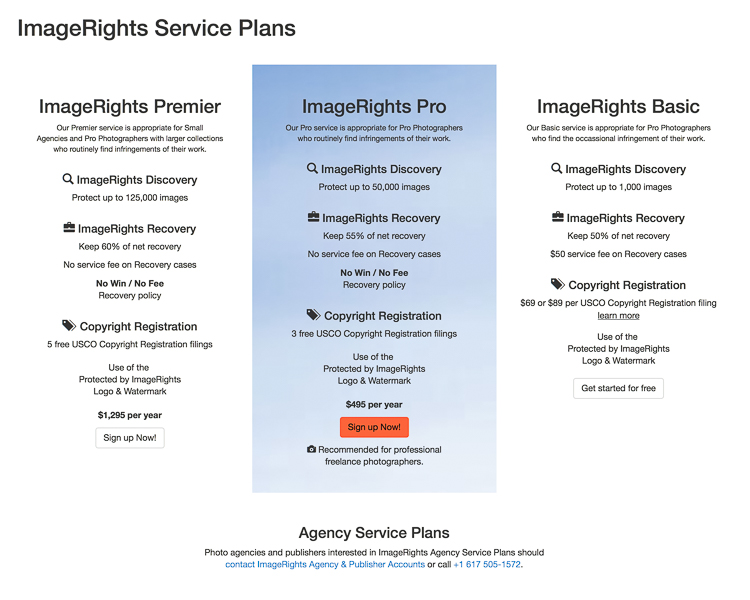
The basic level allows you to upload 1000 images, costs $ 50 each time you open a case, and allows you to keep 50% of any money recovered from infringers.

The Pro level allows you to upload 50,000 images, costs $ 495/year and gives a 55% payout. It also comes with three free USCO registrations (more on that in a minute).

The Premier level allows you to upload 125,000 images, costs $ 1295/year, pays out 60%, and comes with five USCO registrations.

How Photographers can Use ImageRights

The most obvious use of IR is to find out who is using your images, and if you choose, make them stop and/or pay for the use of your image.

As their Basic service is free and includes up to 1000 images, it’s a good way to kick the tires and see if the service is useful to you. Be prepared for a bit of noise at first as the crawlers are given your fresh files. Also, if you have some common photos of icons (e.g. The Taj Mahal) be prepared for some false positives.

In the past year I have recovered more money using IR that I have sold via Alamy, my stock photography host. That stat is also common among the my friends who use the service, and also sell stock photos.

I have also found it is a good way to build your CV and electronic tear sheets. One of my clients uses my images in their advertising and is allowed to distribute them to re-sellers of their service for advertising. I can see where the images are used and potentially find new clients who are in need of similar images.

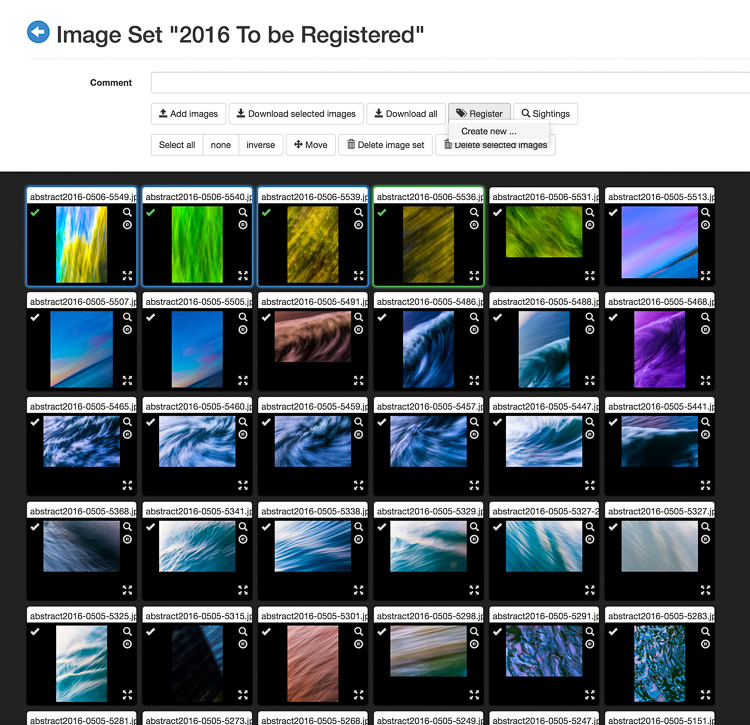
Copyright Registration

IR also has a useful USA copyright registration feature. You can register up to 750 images at a time in one process.

PWC-Image-Rights-08-Edit

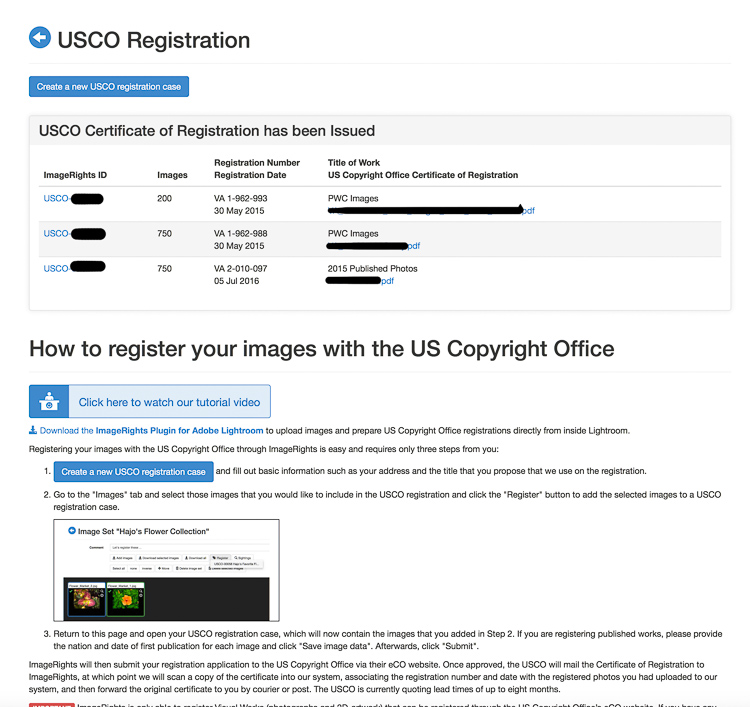
You can do this in the Images area, by selecting individual images you wish to register, then clicking “Register” at the top. Or you can start a registration from the USCO Registration tab, which will eventually loop you around to selecting individual items.

PWC-Image-Rights-09

The fee is $ 89 ($ 55 of which is the USCO fee) for Basic members and the other tiers each get a number of registrations free. You will receive a certificate in the mail, and an email with all the file names listed. IR will also remember which items are in process, or have finished registration, when it comes to opening cases. They will even put this data into the metadata of your image file if you use Lightroom!

Lightroom Publishing Service

Lastly, IR has a Lightroom Publishing Service which is a godsend for those of us addicted to the Adobe world of image edits. Create folders in the service just like you would in any other service and then publish them to the site.

PWC-Image-Rights-10

IR then scours the Internet looking for new matches. Plus, if you register any images with the US Copyright Office, that information will be shown in the image metadata inside Lightroom.

Limits of the system

First, there are the countries where IR has no partner legal firm. China, Colombia, Mali; these are some of the many countries without well-defined, and fair copyright protection systems.

Second, there are many uses which just aren’t worth a lawyer’s time to pursue. Blogs, image share sites, and social media platforms are a few of the instances where the payout, or lack of a chance of payout, means no firm will take your case. You are still free to pursue action yourself though.

Also, the bots that run the checks don’t catch everything. Other services like TinEye and Google Image Search are useful in finding other cases of infringement. IR does have a feature called ClaimCapture that let’s you manually enter an infringement in order to purse, so using other search sites is helpful.

People can also simply fail to respond and often there is little you can do. I had a law firm, of all people, blatantly (website banner) use one of my images without permission. They were contacted by IR’s law firm and I noticed the image was promptly removed, but they simply ignored future requests for payment. Knowing that the cost of taking another firm to court would outweigh the benefit, this case was closed after a year of non-response.

Most-stolen-image-rights

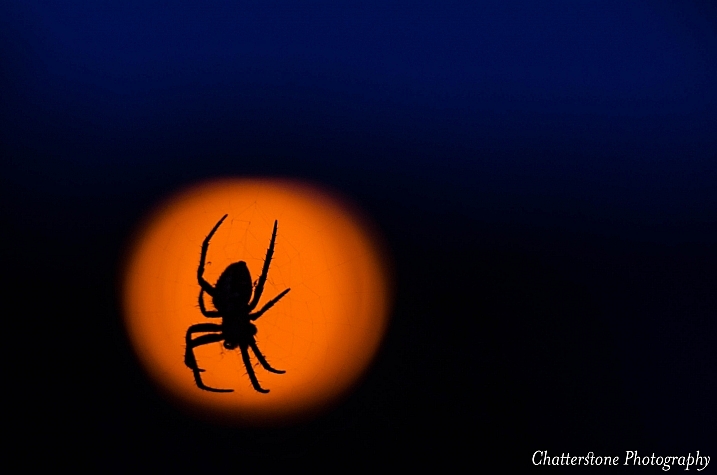
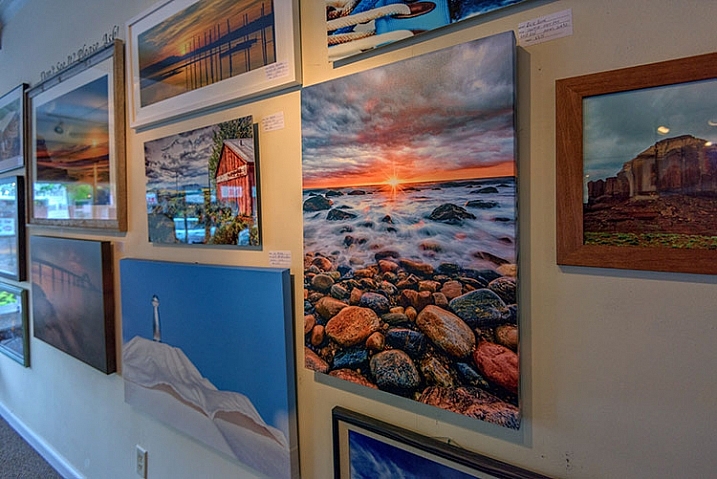
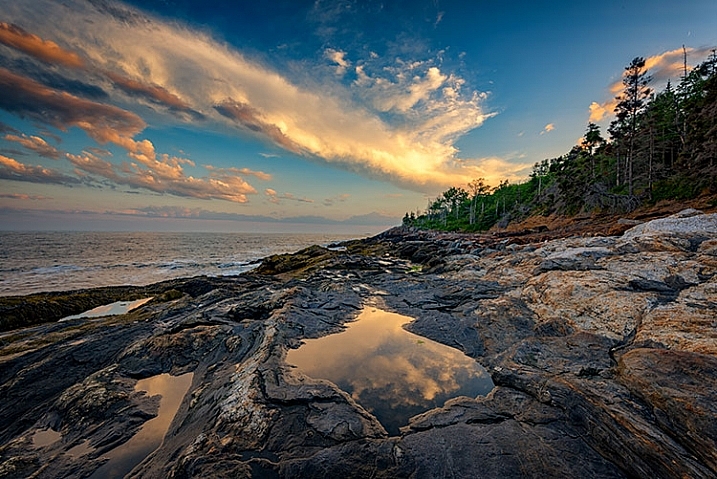
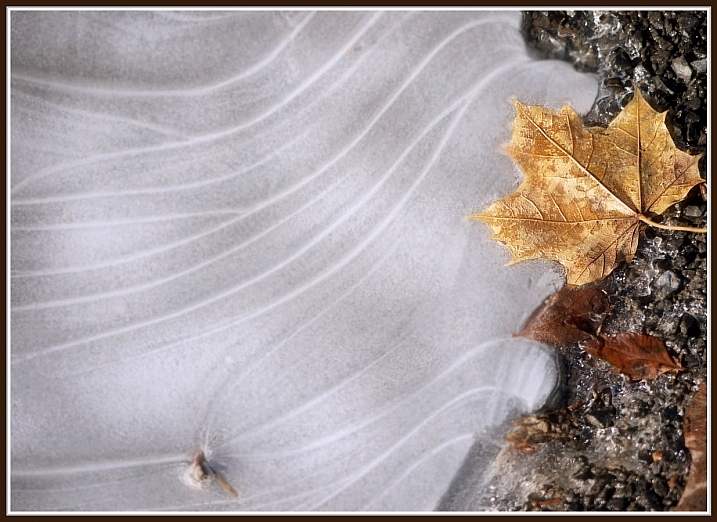
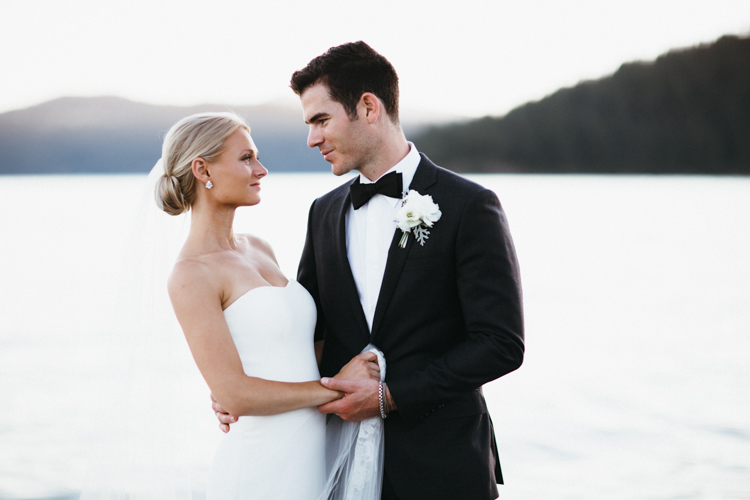
This is my most found image, it’s been taken and used on 15 sites without my permission.

How much time does it take

There is a learning curve at first, for sure. I spent maybe an hour a day at first, or after I uploaded a major amount of images. But like anything, I started seeing what was actionable and what was just not worth it. Now it is about 10 minutes a day, as things are more calm. At first it is a lot of work until you start seeing the types of sites taking your images. I notice Russian or Chinese or Nepali sites and I know I have no chance of recovery, so I put them in the “no chance for recovery” type piles instead of taking the time to submit them, only to have IR reject them. That part is just learned from doing. But it was certainly worth it for me as for pay out.

Conclusion

It’s not a perfect system. If you opt for the Pro plan there is risk of not seeing a return. So far it has worked okay for me, but it’s not like I will retire on all the illegal use of my photos. I like that it gives me some recourse when there is an obvious infringement (like Yahoo using my photo and removing my copyright). It also highlights sites where a Digital Millennium Copyright Act takedown notice is needed. Lastly, it is a relatively easy way to register your images with the US Copyright Office.

Do you do anything to protect your stock photography? What services or methods do you use? If you do photography as a hobby, it may not be worthwhile for you to go to all this trouble. But if you make a living from your images you may want to look into ImageRights.

googletag.cmd.push(function() {
tablet_slots.push( googletag.defineSlot( “/1005424/_dPSv4_tab-all-article-bottom_(300×250)”, [300, 250], “pb-ad-78623” ).addService( googletag.pubads() ) ); } );

googletag.cmd.push(function() {
mobile_slots.push( googletag.defineSlot( “/1005424/_dPSv4_mob-all-article-bottom_(300×250)”, [300, 250], “pb-ad-78158” ).addService( googletag.pubads() ) ); } );

The post ImageRights – Finding and Pursuing Copyright Infringement of Your Images by Peter West Carey appeared first on Digital Photography School.


Digital Photography School

 
Comments Off on ImageRights – Finding and Pursuing Copyright Infringement of Your Images

Posted in Photography