RSS
 

Posts Tagged ‘Hour’

5 Tips for Golden Hour Photography

06 Aug

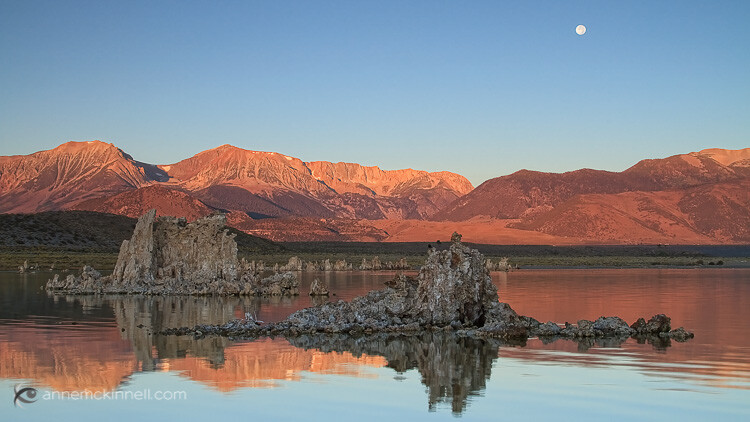
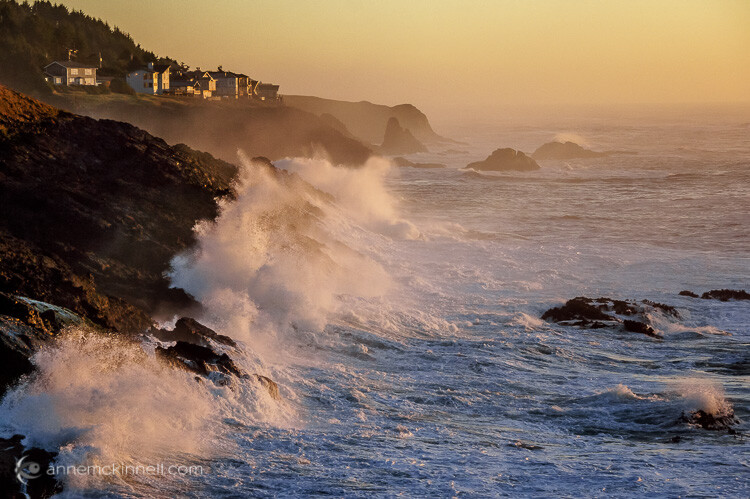
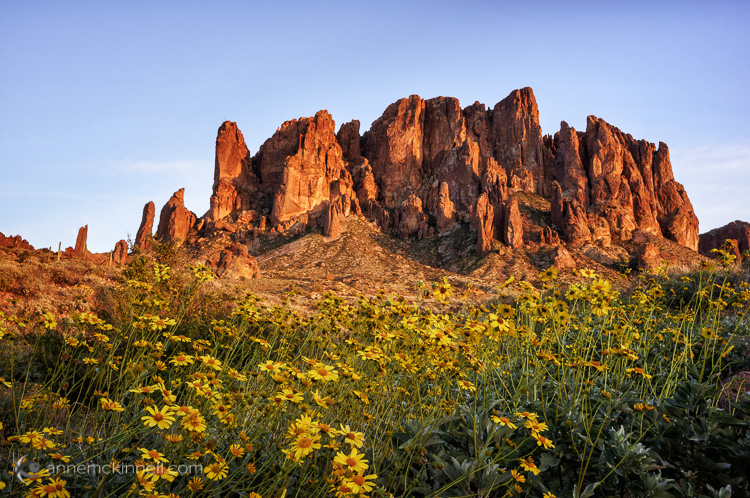
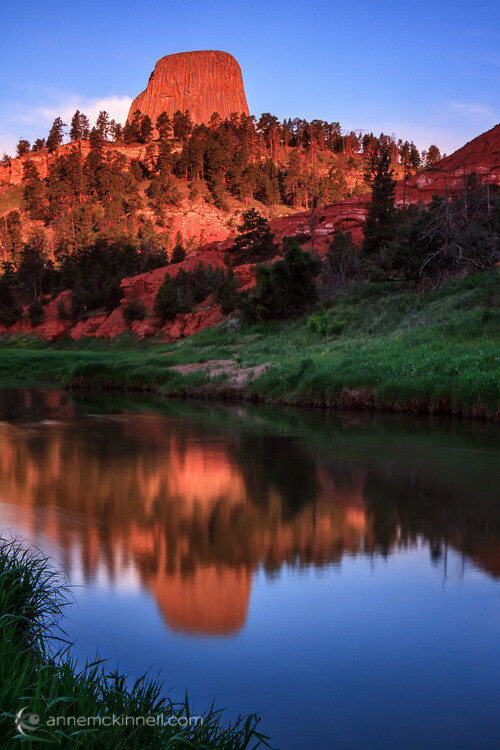
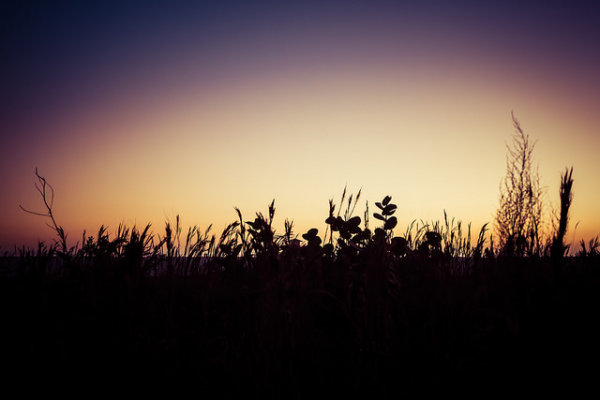
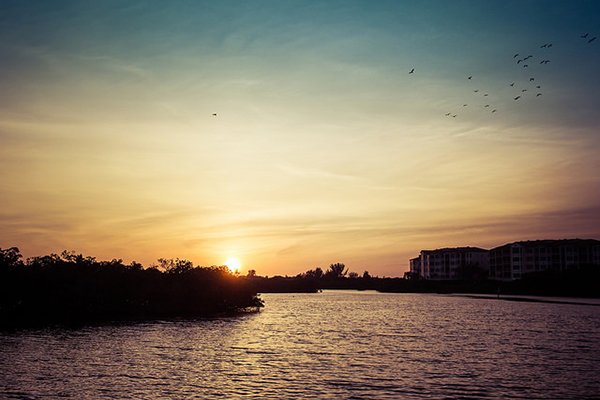
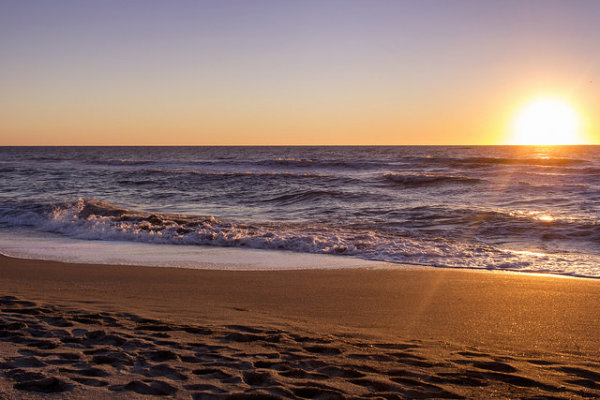
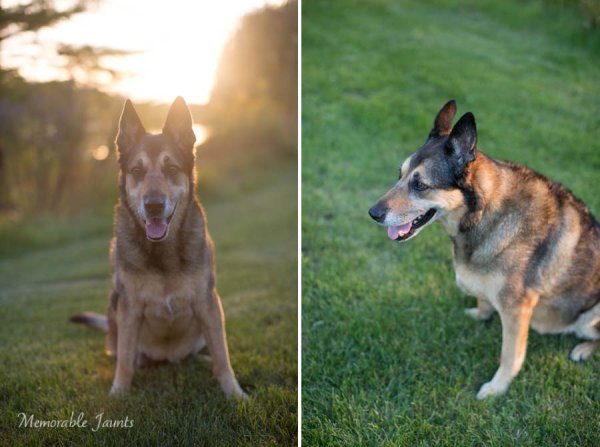
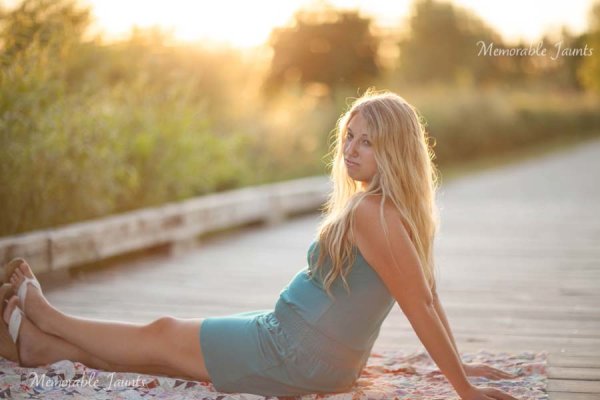
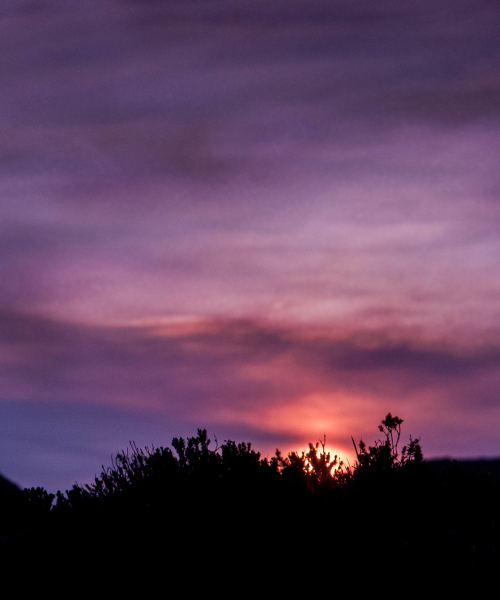
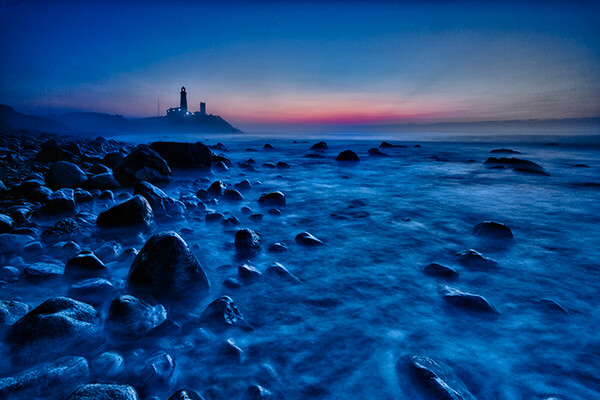
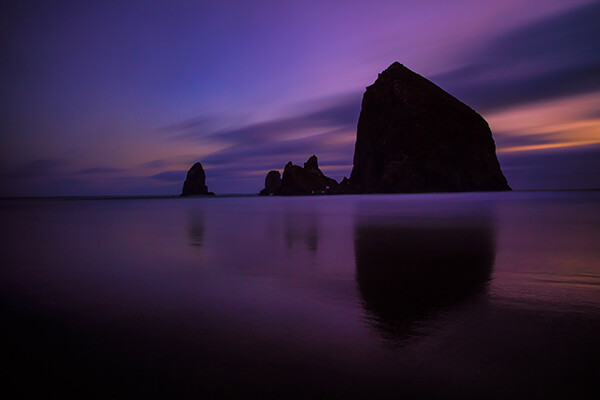
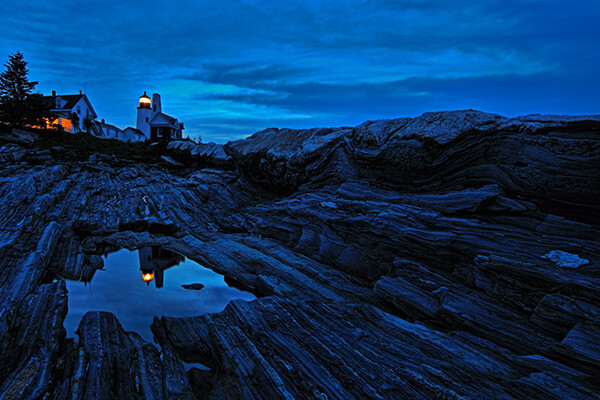
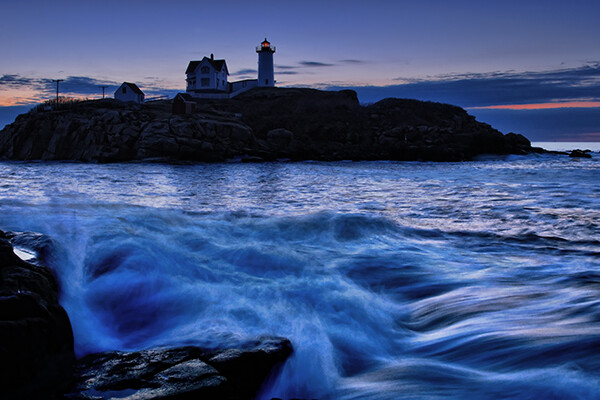
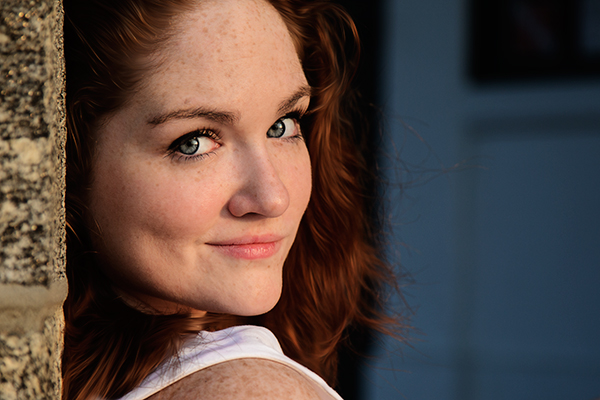
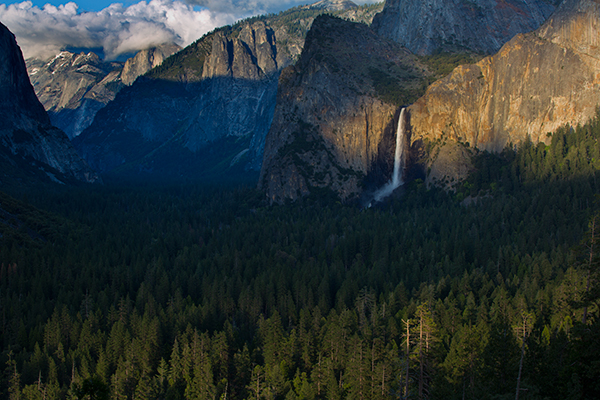
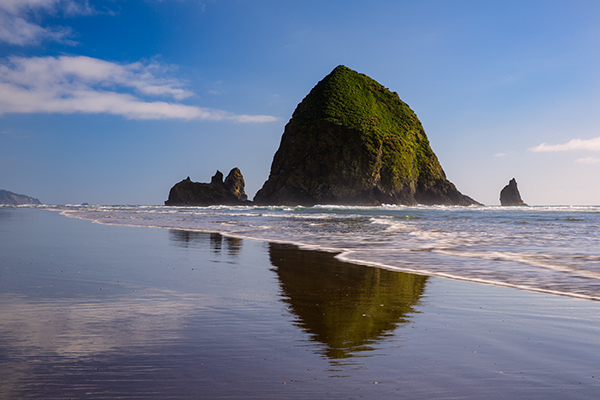
It’s pretty much an accepted fact that the earlier and later parts of the day are best for photography, but if you want the absolute richest, warmest, most beautiful light, the hours directly following sunrise and leading up to sunset – known as the golden hours – are prime time for natural light.

This is when the subtle golden light from the low-hanging sun bathes the world in a warm glow, and shadows become long and dramatic, but not harsh.

Mono Lake, California, by Anne McKinnell

Those hours can be short-lived, though as once the sun starts to rise or set, it isn’t long before it climbs too high, or disappears altogether. To help you get every second out of each golden hour, consider these tips when you go out shooting.

1. Be There

The first step to making the most of the golden hours is knowing exactly what time that magic light is going to happen. Because the golden light is caused by our view of the sun, the timing will change with the seasons. Exactly what time the sun passes over the horizon depends the time of year and your location.

Sedona, Arizona, by Anne McKinnell

The time of sunrise and set is easy to find in your newspaper or online and that is a good place to start to calculate when the golden light will happen. But golden hour may not be anywhere near as long as an hour depending, on the season and your location. For example, near the equator, the sun rises quickly and you may only get golden minutes. On the other hand, in far northern locations the sun may not rise very high in the sky at all and you might get golden light all day.

You also need to watch how the clouds are forming throughout the day, since clouds on the horizon will cut your golden hour short.

2. Prepare Early

The golden hour (or minutes) can pass very quickly, so if you’re not already out shooting when the golden light starts, it’s likely to be over by the time you find your subject, choose a composition, set up your camera, and take the shot. If you know in advance what time you need to be there, you can plan ahead. Go out a couple of hours beforehand so you’ll have time to get to your location, get set up, and be ready to take the photo by the time the horizon starts to glow.

Depoe Bay, Oregon, by Anne McKinnell

By doing this, of course, you have to think into the future a bit. Rather than compose your image based on where the sun is, you must arrange your frame according to where the sun will be. To do this, think about the path the sun takes through the sky. It rises in the east, so you know where you can expect to see it first, and because it sets in the west you know which direction it’s moving. You can even find out the exact position where the sun will set on the horizon using various website and apps. Plan your shots with this information in mind. A compass will come in handy. Compose your photograph where the sun is going to be, then just relax and wait for the moment to present itself.

3. Balance the Exposure

The contrast between light and shadow isn’t as extreme during the golden hours as it is in the middle of the day, but there can still be a huge tonal range between highlights and lowlights (shadows). Especially if you’re trying to capture the sky itself in the picture, its brightness will almost certainly overpower the scene below it.

There are many ways to balance a difference in brightness between two parts of your composition. Bracketing your shots is a good start – use your camera’s exposure compensation feature (+/- button) to take several pictures of a scene with different levels of brightness. There might be a perfect exposure setting that captures both light and shadow areas.

Organ Pipe National Monument, Arizona, by Anne McKinnell

If you shoot in your camera’s uncompressed RAW format you’ll be able to individually adjust your photo’s highlights and lowlights in post-processing, reducing the contrast while preserving as much detail as possible. This way, if one area of your photo is too dark and another is too bright, you can tone down the whiter shades while bringing up the darker shades to create a well-balanced image. This level of control isn’t possible with compressed JPG files, which don’t save the subtle information in those areas.

If the sky is consistently too bright in your photos, consider using a graduated filter that is tinted at one end, but fades out and is transparent on the other. This will reduce the exposure on only half of the image. By putting the tinted half at the top it will darken the appearance of the sky.

Another option is to take your bracketed shots and combine them in post-processing to make a high dynamic range (HDR) image (Merge to HDR in LR or another method).

4. Use Fill-Flash

Rather than take light away from the brighter areas, your other option is to add light to the darker parts instead. You can do this with a continuous light source like a lamp. Moving the light closer to the subject will make it brighter, and pulling the light away will dim it.

Superstition Mountains by Anne McKinnell

Of course, if you’re outside you probably don’t have a lamp on hand. What you probably do have, though, is your on-camera (or off-camera) flash. Flash doesn’t always have to act as the main light source in a picture – it can enhance an existing light source (such as the sun) by simply adding light into the shadow areas of a photograph.

Flashes also don’t have to be used at full power. Nearly every camera will have a Flash Compensation option. This gives you the ability to turn the brightness of your flash up or down. A dimmer flash will still add light to your scene, but it won’t be strong enough to overtake the primary light source and create new shadows of its own. Using it in this way is known as fill-flash. When your subject is backlit, such as by a fiery sunset, use this method to prevent silhouetting. Bracket your shots using different flash settings to achieve the right balance of brightness between the foreground and background.

5. Set the Colour Temperature

Combining two light sources can cause other complications though – particularly with the white balance. Every light source has a different hue, or colour temperature. Incandescent bulbs have a yellow/orange (warm) cast, while fluorescents are sort of blue/green (cool). Our eyes adjust to those slight shifts on their own, but a camera has to measure the balance of the light so it can alter its colours, and ensure that a white object looks white and not yellow/orange or blue/green. Modern cameras can do this automatically, or you can manually select what kind of light to balance the camera to (daylight, indoor light, candlelight, etc.).

Devils Tower, Wyoming, by Anne McKinnell

The golden hours have a lot of warm coloured light, so if left on auto white balance, the camera will adjust its colours to be a little more blue to compensate. However, if you add in the light of a flash, which is cool in tone, one of two things will happen: the camera will keep the same white balance setting as before, and the flash’s light will appear even more blue, or the camera will re-adjust itself to the white balance of the flash, causing it to look normal but the rest of the picture to appear more orange.

When using two different light sources, it’s important to notice the colour temperature of each. Then, decide which of them you want to appear neutral, and which one should retain its natural colour. Rather than keeping your camera on auto white balance, set it to the type of light you want neutralized. If you shoot in RAW format, this can also be changed in post-processing.

Arch at Whitney Pocket, Nevada, by Anne McKinnell

Remember, golden hour is not sunset or sunrise, but shortly before and after those times when your subject still has direct light falling on it. The magical golden light will transform your photos from ordinary to extraordinary. It’s all about the light!

googletag.cmd.push(function() {
tablet_slots.push( googletag.defineSlot( “/1005424/_dPSv4_tab-all-article-bottom_(300×250)”, [300, 250], “pb-ad-78623” ).addService( googletag.pubads() ) ); } );

googletag.cmd.push(function() {
mobile_slots.push( googletag.defineSlot( “/1005424/_dPSv4_mob-all-article-bottom_(300×250)”, [300, 250], “pb-ad-78158” ).addService( googletag.pubads() ) ); } );

The post 5 Tips for Golden Hour Photography by Anne McKinnell appeared first on Digital Photography School.
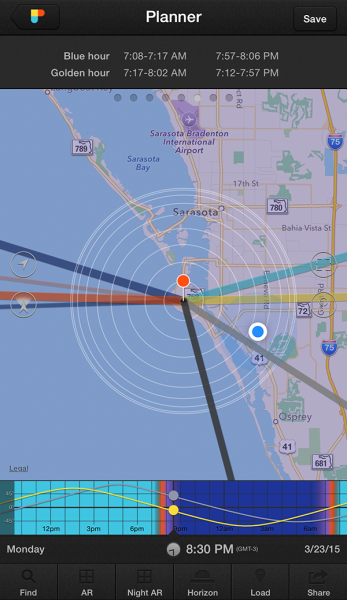

Digital Photography School

 
Comments Off on 5 Tips for Golden Hour Photography

Posted in Photography


Das 24 Hour Project in München

08 May

0:06 Exhausted

2012, als Instagram noch das Netzwerk der Smartphone-Enthusiasten war, kamen zwei Amerikaner auf die Idee, ein Fotoprojekt der besonderen Art aus der Taufe zu heben: Samuel Smotherman und Renzo Grande dachten, dass es spannend sein könnte, eine Stadt über einen Zeitraum von 24 Stunden nonstop zu dokumentieren.
kwerfeldein – Fotografie Magazin | Fotocommunity

 
Comments Off on Das 24 Hour Project in München

Posted in Equipment


Tips for Creating Landscape Photos during the Golden Hour

26 Mar

The golden hour. Even if you haven’t been involved in photography for very long, you undoubtedly have heard the term thrown around. As photographers we are in the business of capturing light, and there is no better light to have cast on our subjects, than sun light that is low on the horizon.

The golden hour is defined as periods of time; specifically, the hour after sunrise, and the hour before sunset. The length and time of these occurrences depends on your location on our planet, and time of the year.

siesta_silhouette

Regardless of the type of photography you do, natural light generally falls into two categories; harsh (hard) and soft. Harsh light is what you see when the sun is high in the sky, during the middle of the day (cloudless day).

Because the light is at its most intense during that time, and shining directly down from above, shadows are sharp and well defined. They can also appear in places you don’t want them, such as on a human subject’s face. You can sometimes counter this by using fill flash and reflectors. When you’re shooting landscapes, you see the more unwelcome effects on the sky, with less warmth and higher contrast.

Your subjects are well lit, but generally only from one direction. Images shot during at midday can be rather dull and uninspiring, and it becomes more difficult to capture something spectacular.

goldenhour_article_new4

After the sun lowers in the horizon and sunset approaches however, everything changes. Simply put, taking photos during the golden hour give the images atmosphere. These times give the best light for all kinds of photography, but what advantages do you gain by shooting your landscapes during the golden hour?

Reduced Contrast

Light from the golden hour effectively reduces the contrast in your images. A black and white street shot could benefit from harsher light in the middle of the day, because the higher contrast and sharp shadows better define the subject and the environment. For landscape photos however, the world comes alive when the sun is low, and the light is soft and diffused. Shadows become longer and less defined, and the tonal range changes significantly. Clouds are illuminated differently, and their visual transitions against the sky soften.

Colors

The position of the sun during the day creattes varying temperatures of light, as you can see by the different colors as it crosses the sky. When we discuss temperature in photography, we’re discussing tthat of color, instead of heat. Neutral temperatures are what you see during the middle of the day. The main point to take away from this is that neutral temperatures are fairly uninteresting in regards to their aesthetic effect on your photography.

sunsetcolors

Color ranges become more vibrant and pronounced when the sun is closer to the horizon.

During the golden hour periods, colors tend to bend to the extremes, and give you much more pronounced effects on your images. During the morning golden hour, just after sunrise, the color temperatures are cooler, and give a moody, bluish hue to the shot. In the evening before sunset occurs, the spectrum shifts to warmer colors, providing you with warm oranges and reds.

A photo captured during the golden hour has a wonderful warmth and feel that’s impossible to capture at midday.

Softer Light Through Diffusion

Diffusion can be visualized with the words, scattering and softening. Light that is diffused is soft with less defined edges, and scattered across a greater area than non-diffused light. A good example of that is a diffuser attachment for your DSLR flash unit. The translucency of the diffuser attachment emulates the soft light you get from the sun being in a low position in the sky, and takes away hard shadows.

diffusion

Diffused light is more evenly and softly applied throughout a scene, and a low-hanging sun or sunlight projecting through clouds becomes a great natural diffuser.

Your landscape photos benefit from this by less pronounced shadows from objects in your shot, and in general the light that falls on your subjects within the landscape scatters in a more even, favorable manner. What does this all give you? Again, the one thing you’re ultimately striving for in landscape shots; atmosphere.

Sun Flare Effects

Another advantage of shooting during the golden hours is the opportunity to introduce sun flare effects and backlighting into your images. Because of the sun’s position in the sky (low and near the horizon), you have the ability to better introduce it as a subject, or as a compliment to the subject in your shot.

flare

Sun flares are easier to capture during the golden hours, and produces a much more dramatic effect on the final image.

Flaring occurs when the sun is either at or near the edge of the frame of your photo, and while in some situations it is unwanted (photographers typically use lens hood attachments to minimize these effects), flares can add mood and drama to a landscape shot.

So now that you’re aware of the wonderful effects of photographing during the golden hour, how do you go about shooting our landscape images during these times?

Settings

Your camera settings for shooting during the early mornings or late evenings are going to depend on your exact subject, but in general, since less light is getting to your sensor, a larger aperture is usually required.

You may also need to bump up your ISO setting to compensate for the lower amount of light. This will increase noise, but usually not to a noticeable point, and even then, there are steps in post-processing that can easily remove it.

Again, this all depends on what type of shot you are doing. If you’re looking at a long exposure capture, you would set your camera for a smaller aperture and lower ISO.

goldenhour_article_new3

Use a Tripod

As a landscape photographer you are always encouraged to use a tripod. Since generally you will be shooting in one static location for each set of shots, the tripod will allow you a wider range of apertures to work with. You always want your landscapes crisp!

Prepare

By definition, you have two hours each day to shoot for the best light, so your preparation for those times are even more critical than usual (you’re always prepared for any shoot, right?). If you’re planning on just taking your gear and spending time to set everything up on location, you run the risk of missing the shots you’re looking to get in the first place.

Either prepare before you leave, or allow extra time well before the golden hour to get everything settled. Scout the location ahead of time. Have your settings ready for the appropriate shots, and pack anything extra that you might need, including food, drinks or something warm to cover up with.

Keep Shooting!

While the scope of this article has been the golden hour, don’t forget that the magic doesn’t stop after the sun dips below the horizon. After this point, the blue hour begins, when colors and tones change even more rapidly and dramatically. Keep adjusting your settings, and shoot until there’s no light left to capture. You’ll be surprised at what you have when you finally get those images unloaded on your computer.

White Balance

While white balance is a setting on your camera, because of its overall effect on the atmosphere of your images, it warrants a little extra attention when shooting landscapes during golden hour. My recommendation is to take your camera off of AWB (automatic white balance) because the camera will attempt to neutralize the warmth of the image on this setting. Most DSLR’s have a cloudy or shade setting that will retain that color tone.

If you’re shooting RAW images, this is a step that can be adjusted in post-production.

goldenhour_article_new2Helpful Apps

Thankfully, there are several Smartphone apps that can also help your planning process. A search on the Apple app store and Google Play shop will provide no shortage of this kind of apps, although there a few that I’ve used that seem a bit more robust, and worth the price you’ll pay. These apps provide calculators that will let you see when the golden and blue hours occur in any location in the world, and also include calculations for exposure, depth of field, time lapse, and more.

  • PhotoPills – iPhone/iPad, $ 9.99
  • Golden Hour – iPhone/iPad, £1.49
  • The Photographer’s Ephemeris – iPhone/iPad, $ 8.99, Android, $ 4.99

Enjoy the Light!

Shooting at optimal times of the day is one of the easiest things you can do to improve your photography. Nothing else adds character, atmosphere, and dimension to your work so dramatically.

What other golden hour tips do you have to share? How do you apply these guidelines to your own photography? Be sure to join in the conversation below, and keep churning out those golden shots!

googletag.cmd.push(function() {
tablet_slots.push( googletag.defineSlot( “/1005424/_dPSv4_tab-all-article-bottom_(300×250)”, [300, 250], “pb-ad-78623” ).addService( googletag.pubads() ) ); } );

googletag.cmd.push(function() {
mobile_slots.push( googletag.defineSlot( “/1005424/_dPSv4_mob-all-article-bottom_(300×250)”, [300, 250], “pb-ad-78158” ).addService( googletag.pubads() ) ); } );

The post Tips for Creating Landscape Photos during the Golden Hour by Tim Gilbreath appeared first on Digital Photography School.


Digital Photography School

 
Comments Off on Tips for Creating Landscape Photos during the Golden Hour

Posted in Photography


Tips for Using Golden Hour Light for Portraits

24 Mar

Memorable_Jaunts_Portraits_During_Golden_Hour_DPS_Article-12

Most photographers will argue vehemently that the golden hour – that pocket of time just after sunrise and just before sunset – produces some of the most gorgeous light ever. Golden light shows up during this time, generally about an hour or so before sunset (after sunrise). However these times are not exact because golden light does depend on where you live. The further away from the equator you are located, the longer golden hour lasts. The closer to the equator you are, the shorter it is. Golden hour is also seasonal.

Memorable_Jaunts_Portraits_During_Golden_Hour_DPS_Article-13

There is a reason why most natural light photographers tend to schedule their portrait sessions around golden hour – to maximize the amount of golden light that they can use and get amazing results for their clients.

Why do you want to use golden light?

There are several reasons why golden light is so sought after.

Golden light is very soft

Memorable_Jaunts_Portraits_During_Golden_Hour_DPS_Article-7

Soft light illuminates the skin tones evenly.

Since the sun is almost setting or just rising during golden hour, the sunlight tends to be much softer than when the sun is high in the sky. During the golden hour, you can have your subjects look towards the sun and not have to squint or shield their eyes. Practice discretion on how long you want them to stare at the sun, and also take care not to point lens and cameras directly into the sun.

Golden light is warm

Memorable_Jaunts_Portraits_During_Golden_Hour_DPS_Article-10

The warm colors of sunlight are striking against the green grass.

It is easy to think that any form of sunlight is warm – whether the sun is high in the sky, or close to the horizon. But in reality, the warmth varies as the sun moves across the sky. Sun near the horizon has less intensity of direct light since it must travel through more of the atmosphere. You may notice, it is much easier to look at a sunrise and sunset with the naked eye – not that you should because it can damage the retina. As per wikipedia, more blue light is scattered during golden hour, so the sun’s light appears more reddish.

Golden light has dimension

When the sun is high in the sky, particularly around noon, the overhead light is very harsh, creating strong highlights and dark shadows. This type of lighting is not very flattering or desirable especially in portrait photography. Most photographers will use external flash or even a reflector to add additional light to the subject’s face or body, to make the light more even. Because the contrast is lower during golden hour, shadows and highlights are not that extreme. In addition, the sun’s smaller angle to the horizon produces long shadows.

Memorable_Jaunts_Portraits_During_Golden_Hour_DPS_Article-14

How do you use golden light?

Location scouting

Take the time to know the area that you are looking to do photography. There are many website and apps that can provide exact sunrise and sunset times. Some even take it a step further and provide golden hour times – which is specifically for photographers! Even the location matters when searching for golden light. If your photoshoot is in a park that has a lot of tree cover, the light will be further diffused, giving you the option of having a spotlight type effect for your portraits. If you are in a big city, take advantage of the natural block that tall buildings provide when photographing a subject.

Metering

Golden light can be challenging from a metering perspective. Most people leave it in standard (matrix or evaluative) mode and then play around in post-production to try and get the look they want. There is an easier way to eliminate all that time spent in front of the camera. Spot metering is my preferred metering method particularly for backlighting situations. I spot meter off the subject’s face or shadowy part of the image and then recompose and adjust exposure compensation half a stop or more to get the look I want.

Front lighting

Memorable_Jaunts_Portraits_During_Golden_Hour_DPS_Article-1

Options for front lighting include the sun along the side of the subject as well as subject facing the sun.

Front lighting is when your subjects face the sun directly. Because of the low angle of the sun and the soft light, the sun isn’t as harsh and your subjects will not be squinting as they face the sun. The light is even and warm so make sure that is the look you want – gorgeous, warmly lit, imagery!

Backlighting

Memorable_Jaunts_Portraits_During_Golden_Hour_DPS_Article-9

Memorable_Jaunts_Portraits_During_Golden_Hour_DPS_Article-6

Backlighting is when you put the subjects between you and the sun. This creates a warm glow and looks really stunning. Make sure you expose for your subject’s skin tones. If you expose for the sun, then you will get a silhouette effect (which might not be the look you are going for, but is equally stunning).

Rim light

Memorable_Jaunts_Portraits_During_Golden_Hour_DPS_Article-3

Rim lighting occurs when you are using the sun to backlight the subject. Here the subject is between you and the sun. If you have a darker background, you can see a faint glow outlining them. That is a rim light and it really helps the subjects pop out in the image, drawing attention to them, adding separation of subject from the background.

No matter what type of golden hour lighting you use, you are bound to get some awesome images. Experiment with various locations and techniques. Also go back to the same location at various times of the year and track how golden hour lighting changes – you will learn to gauge, judge, and use light as a key element in your portrait photography.

googletag.cmd.push(function() {
tablet_slots.push( googletag.defineSlot( “/1005424/_dPSv4_tab-all-article-bottom_(300×250)”, [300, 250], “pb-ad-78623” ).addService( googletag.pubads() ) ); } );

googletag.cmd.push(function() {
mobile_slots.push( googletag.defineSlot( “/1005424/_dPSv4_mob-all-article-bottom_(300×250)”, [300, 250], “pb-ad-78158” ).addService( googletag.pubads() ) ); } );

The post Tips for Using Golden Hour Light for Portraits by Karthika Gupta appeared first on Digital Photography School.


Digital Photography School

 
Comments Off on Tips for Using Golden Hour Light for Portraits

Posted in Photography


6 Ways to Take WOW Photos in Less Than an Hour

08 Sep

If you’re like most photographers, nothing gets you more excited than a new tip or trick that can help you make your photographs more awe inspiring. The problem is that a lot of these processes can take some time to learn and execute correctly. Pretty quickly you realize that it may take you more than a few tries to master the new technique to become a better photographer.

IMG_6179

A mundane parking lot light stand can become something wondrous.

You’re also busy with more than just photography to take care of, and with instant gratification pervading all aspects of our lives, who wouldn’t appreciate a few SIMPLE photo strategies that provide immediate results?

Forget about aperture and shutter speed, focal length, ISO, and all the technical stuff for now. If you use the techniques in this article, alone, or mix and match, I guarantee you’ll learn how to take WOW photos in less than an hour. I use my “Snapshots to WOW Shots” process with many of my photography classes, from grade one kids who’ve never seen a camera before, to seasoned professionals who need to inject a quick fix into their  photographic repertoire. It works for everyone, guaranteed. Give it a try!

Method One: Bird’s Eye View

In our day to day lives we see the world from a height of about five to six feet. To create a WOW shot you need to alter that perspective. Show your viewers a point of view they don’t normally see. Just about any subject can be transformed into a WOW if you shoot it with your camera pointing straight down. This is what is called the bird’s eye view.

IMG_3957.Wjpg

Looking straight down on antique silverware – a different point of view.

IMG_4813W

Shot by one of my grade 4 students – atop the play structure, pointing the camera straight down. 

Picture-197W

A crazy abstract shot looking down at colored pages in a binder.

Picture-366

An herbal still life shot through a glass coffee table, straight down.

Method Two: Worms Eye View

Similarly, not too many of us spend our days down on the ground. So shoot from a very low angle, and point your camera up, or just explore the world from the point of view of a worm (down on your belly!) and mundane things look a whole lot more interesting. Instant WOW shots, from the worm’s eye view.

These shots usually have the added benefit of helping to eliminate distracting backgrounds such as buildings, tree,s or other objects that you don’t want in your image. Bonus!

_DSC7921W

Feeling so small…the worm’s eye view.

DSC04831-eyes

One of my school students shot this one – taking the worm’s eye view literally, but it’s a very freaky WOW Shot.

nat_fieldW

nat_hamlton-bank-copy5W

Taken lying on the floor of the lobby looking up at the top of the staircase. 

Method Three: Shoot at an Angle

Just as our five foot world gives us a consistently average perspective, it also provides us with horizontal lines and vertical angles. We see the world this way 90% of the time, and there’s nothing particularly WOW in that. But give your camera a twist; a 45 degree angle can add dynamism and drama, instantly!  Just make sure that it’s a big enough angle that it’s clear you did it on purpose, and not by mistake.

Buildings, trees, large objects, and even people look great with a bit of angular rotation when you want to make a point or add impact.

A bit of an angle - on purpose, give the image a more dynamic feel.

A bit of an angle – on purpose, gives the image a more dynamic feel.

A little "off kilter" makes us pay more attention.

A little “off kilter” makes us pay more attention.

Method Four: Get the Sun Behind Your Subject

There are all sorts of fabulously detailed techniques for shooting silhouettes, rim lighting, and other back-lighting effects. But really all you need to get an instant WOW Shot is to either place your subject so that the sun or light source is directly behind them, with their head or body blocking the main point of light. Shoot in manual mode and be sure your flash is off.  Point and expose for the sun, then recompose with the sun directly behind your subject.  Whether it’s an animal or a person or an object, use that subject to block the sun, and you’ll have a winner.

Picture-053W

Drama abounds in this simple shot – just a quick iPhone grab during a school photo class.

Picture-388W

Method Five: Use Shadows

Nothing tells a story more than shadows – they are ethereal, transient, and mystical. Incorporate shadows into your image, or shoot only the shadows. They always tell an intriguing story, and create a captivating image.

Picture-955

Abstract or editorial, the shadow knows.

IMG_6203W

Do you know what’s happening here – the shadows are a riddle and the answer.

photo-1

The Ultimate WOW Shots

The ultimate WOW shots are created when you use one of more of these techniques by combining elements, angles, and points of view.

_2DS2507W

Combining the worm’s eye view AND the sun behind the subject.

A simple street scene is so much more dynamic with long shadows.

Combine shadows with the sun behind the subject. A simple street scene is so much more dynamic with long shadows.

Combine a bird's eye view with shadows. It adds interest and drama.

Combine a bird’s eye view with shadows. It adds interest and drama.

A worm's eye view and the sun behind the subject. Simple. Wow!

A worm’s eye view and the sun behind the subject. Simple. Wow!

Apply what you have learned

To wrap it all up, these five easy methods will give you dramatic results, and if you’re already proficient with a camera and have a bit of knowledge about composition, color theory, and light, you’ll be shooting like a rock-star photographer in less than an hour –  including the time it took to read this article.  If you’re already a skilled shooter, give these a try and it will help simplify your photographic life while adding more finesse to your portfolio.

Show me your WOW shots, I’d love to see how you put this into action! Share in the comments below.

The post 6 Ways to Take WOW Photos in Less Than an Hour by Alex Morrison appeared first on Digital Photography School.


Digital Photography School

 
Comments Off on 6 Ways to Take WOW Photos in Less Than an Hour

Posted in Photography


New Photographer’s Guide to Blue Hour

14 Aug

Among the many tips and tricks new photographers get with regards to lighting, the time of day is an essential concept, which for getting some shots of landscapes and some dynamic shots of natural light and artificial light, is the time at dusk or dawn. This time is just before the appearance of the sun or just after it, when the light is soft enough to emphasize most of the dark of the scene, and yet not so dark that it necessitates the use of additional light source. This is a guide to Blue Hour, that natural time frame which is so poplar among photographers.

Blue hour 03

What is Blue Hour?

Blue Hour can be defined as the period of the day when the colour of the sky ranges from blue to dark blue, followed by black sky or vice versa depending upon the time of day it is being considered (i.e. for sunrise or sunset). It is termed as BLUE HOUR based on the consideration that the blue hue in the sky lasts for about an hour. In reality it lasts between 30 to 40 minutes approximately. Its duration also depends upon the geographical location and the season.

Rule of Thumb for Blue Hour times

The rule of thumb for Blue Hour is when exactly it starts and ends:

  • Sunrise: during this part of the day the Blue Hour starts around 30 minutes prior to sunrise. The peak of it can be 10 minutes before the sunrise. During sunrise, the blue hour diminishes very fast towards the sun rising on the horizon.
  • Sunset: during the sunset the Blue Hour roughly starts 10 to 15 minutes after the sun has set. I personally prefer to capture Blue Hour during the sunset as it gives me added time to setup my equipment, or change my location before the actual Blue Hour starts.
  • There are websites available where one can find out the approximate blue hour duration at any location so that you can plan your trip accordingly.
  • If the sky is overcast then the duration of Blue Hour will shorten and in some instances the clouds can be too dense soas to wash out the complete Blue Hour.

What to capture during Blue Hour

Blue hour 04

Blue Hour is best to capture cityscapes, landscapes and scenic beaches. The shots require long exposure or slow shutter speed thus making it difficult for taking pictures of people or moving bodies, as a slight movement can make the picture blurry but yet the light is optimum to bring out the vibrance of the landscapes.

Why to capture Blue Hour pictures

#1 Creativity in capturing motion

Since, Blue Hour photography requires long exposures or fairly slow shutter speed, depending upon the scenario the long exposure can be creatively used to capture motion. The best part about Blue Hour is to capture light trails of vehicles while also capturing cityscapes, and if it is partially cloudy then the movements of the clouds can be used to create a drag effect. When capturing scenic beaches the movement of water appears to be dreamy. All of these effects add to the dynamics of the photograph.

#2 Easy control of parameters in dim light

I personally find capturing shots during Blue Hour fairly easy and interesting as compared to bright light conditions. With the availability of the right gear (e.g. tripod, remote trigger or shutter release) it’s easy to control various parameters to compose your shots. In comparison to this during a bright sunny day there are chances of getting overexposed images or burnt spots if there is no proper control of the light source with regards to the subject. However, every photography technique has its own pros and cons.

Blue hour 05

List of Equipment for Blue Hour

The following are the essentials which can be considered as a must for Blue Hour photography:

  • DLSR – a must for taking any pictures. The better the DSLR, the better will be the noise performance for long exposures.
  • A rigid tripod – this as a must and the reason being long exposure/slow shutter speed during blue hour. So handheld shots maximize the chances of blurry images.
  • A cable or wireless remote shutter release – this is also one of the essential items which can help you in avoiding camera shake. An alternative to this is self-timer mode but at times you may need to use Bulb (exposures longer than 30 seconds) mode to capture the surroundings (for multiple layer blending) when shooting Blue Hour.
  • A handy flash light – to look around the surrounding areas when setting up your tripod in case the place is a bit dark.
  • A stop watch – this is now available in most of mobile phones, and comes very handy when you need to monitor the duration of shutter release in case your DSLR or remote doesn’t do that.
  • A wide angle zoom lens or lens suitable for composition – not a must but a wide angle zoom lens will help you in composing your frame properly as you can zoom in and out depending upon what you need to see in your picture.
  • Lens cleaning cloth and blower – this is one of the essentials to keep the lens clean in case of fingerprints or dirt. Although this isn’t specifically a Blue hour essential, it is a photography essential nevertheless.
  • Miscellaneous bits – these things can be handy and will make your photography comfortable. If you are setting up your camera around grass then a bug repellent will be useful and also if the weather is hot don’t forget to carry a small towel to wipe off the sweat rather than dripping onto your DSLR or lens.

Blue hour 02

How to capture Blue Hour

Step one: Setting up your equipment

The first and foremost is to setup your camera on a tripod, on firm ground, to avoid any camera shake. Place the tripod on the ground and give a firm press against it, to make sure it is set in position. Place your camera on the tripod and make sure it is properly locked on. Take a look from the viewfinder and compose your frame, and also make sure that the camera is properly aligned using a bubble level or electronic level (if available in your camera). Do make sure that you are not directly under a source of bright light, which can make lens flare.

Connect the remote to the DSLR if it’s a wired one, or keep a wireless remote ready to be used. Looking into the viewfinder, try and use the autofocus to lock focus on any of the bright objects in your frame. Once the focus has been locked put the focusing switch on your lens to Manual Focus in order to avoid any re-focusing and lost focus.

Try capturing picture in RAW format, rather than JPEG, as it gives us more flexibility and details when post-processing the image. Double check that your focus is covering the complete frame properly by taking a couple of test shots. I always try and make sure that I am there well before Blue Hour so that I can take my sweet time to setup my equipment and be ready to take pictures.

Blue hour 01

Step two: Taking multiple exposures

Once your equipment has been setup, and the lens has been focused properly, set the aperture between f/8 and f/16 to make sure you have a good depth of field. My personal preference is that I keep a balance of ISO and shutter speed to control the noise in the picture. The preferred setting for ISO is between 100-200, and the rest I leave to the shutter speed which ranges from five seconds to over a minute, depending upon the foreground details or any light show I need to capture. I prefer shooting in full manual mode so that I can control all the parameters.

If you have set a frame of the shot which contains trees and grass, try and capture couple of exposure in well lit condition so that you may use those during the post-processing. This will also give you an idea of what shutter speed you will need to capture the sky.

Keep taking shots at different intervals during the Blue Hour in order to use the best exposure during the post-processing of the image. If your composition contains any light shows or any other architecture which has a lot of light, you can adjust the shutter speed to suit, and prevent it from being overexposed. At the same time you should keep reviewing your shots to make sure they are correctly exposed for post-processing.

Post-processing of exposures

This can be a separate article on “Multiple Layer Blending in Adobe Photoshop” but I will give a brief description about it here.

I use Adobe Photoshop for multiple layer blending of my photographs of Blue Hour. If the picture is a RAW file format then you can change the basic parameters like Exposure, Clarity, Vibrance, Temperature, etc., when you open the file. Once you have done that, the actual image opens up in Adobe Photoshop. Select and open multiple images on the basis of exposure of sky, foreground, etc. Select one image that has the best Blue Hour exposure and create a blank “New Layer” to copy the other image which has good exposure of the foreground.

Layer blending

Arrange the different layers as per the priority of coverage in the example image the layer having a major section of the sky to be set as top layer followed by the foreground layer. Use the Erase tool to remove the underexposed areas from the top layer to reveal the correctly exposed layer for the foreground (you can also use a layer mask). Adjust the parameters like Selective Colour, Shadow/Highlights, Contrast, etc., of every layer to have an even colour effect. Merge these layers to form a single layer upon completion and you have got your final image ready.

I personally don’t merge the layers which gives me the flexibility to alter any of the layers if required in future.

Feel free to drop your suggestions and comments, if you have any, as I am always eager to learn more and more.

The post New Photographer’s Guide to Blue Hour by Ausaaf Ahmad appeared first on Digital Photography School.


Digital Photography School

 
Comments Off on New Photographer’s Guide to Blue Hour

Posted in Photography


Sweeten Your Photos by Shooting During the Blue Hour

09 May
Montauk Point, NY. EOS 5D Mark II with EF 17-40 f/4L. 15 seconds at f/11, ISO 800.

Montauk Point, NY. EOS 5D Mark II with EF 17-40 f/4L. 15 seconds at f/11, ISO 800.

There is a period of time each day, just before sunrise and just after sunset, when the sun is below the horizon, when the light is known as “sweet light.” This period of time is known as “The Blue Hour.” This is a period of time each morning and evening when there is neither full daylight, nor full darkness. The light is almost ethereal, with a soft blue glow bathing the scene. The Blue Hour happens in tandem with the Golden Hour, making the beginning and end of the day exceptional for photography, providing two very different types of light within a single time span.

Equipment and settings

The Blue Hour is a prime time for landscape photography. Subjects that have their own lighting, such as city buildings or lighthouses, tend to look especially good, as the yellow glow of their lights cuts through the blue.  A tripod will be necessary to capture these scenes, unless you’re willing to raise your ISO to the point you can hand hold your exposures.  Setting a proper white balance is one of the keys to Blue Hour photography.  When set to AWB (auto white balance), the camera will try to correct for the blue tone the light has, which can result in flattening your image. If you shoot RAW, you can correct for this in pos- processing, to get just the right white balance for your taste. If you’re a JPEG shooter, you may want to try setting a custom white balance, or you can use your camera’s Live View setting to preview what different white balance settings will do to the scene.

Boston's Zakim Bridge. EOS-1D Mark III with EF 24-105 f/4L IS. 30 seconds, f/11, ISO 100.

Boston’s Zakim Bridge. EOS-1D Mark III with EF 24-105 f/4L IS. 30 seconds, f/11, ISO 100.

I prefer the time during the Blue Hour when the sun is close enough to the horizon that there is a soft orange glow along the horizon. This adds an extra quality to the image, especially when you consider that orange is blue’s complementary color.  You may want to bracket your exposures, as this will vary the intensity of any light in the image, be it the orange glow remaining from the sun, or artificial lighting on buildings.  Blending exposures for HDR images may not be necessary, but it will be possible if you use a tripod and decide to try some HDR.

Cannon Beach, Oregon. EOS 5D Mark III with EF 24-70 f/2.8L II. !20 seconds, f/11, ISO 640.

Cannon Beach, Oregon. EOS 5D Mark III with EF 24-70 f/2.8L II. !20 seconds, f/11, ISO 640.

The window of opportunity for Blue Hour shooting is small, and probably much shorter than during the Golden Hour. You’ll want to be at your spot ready to go well in advance of the Blue Hour. To plan your time, you can visit The Blue Hour Site to find out when the Blue Hour starts and ends at your location.  If you don’t have access to the internet, a good rule of thumb is that the Blue Hour starts about 15 minutes after sunset, and ends around an hour after sunset.  For sunrise, it will start roughly an hour before sunrise and end 15 minutes before sunrise.  When I plan to shoot landscapes, be it at sunrise or sunset, I always plan to shoot both the Golden Hour and the Blue Hour.  I tend to get a lot of variety due to the change in light, and it makes the time spent that much more worthwhile.

Pemaquid Point, Maine. EOS 5D Mark II with TS-E 17mm f/4L. 8 seconds, f/11, ISO 400.

Pemaquid Point, Maine. EOS 5D Mark II with TS-E 17mm f/4L. 8 seconds, f/11, ISO 400.

Boston Skyline. EOS 5D Mark II with EF 24-105 f/4L IS. 1 second, f/11, ISO 100.

Boston Skyline. EOS 5D Mark II with EF 24-105 f/4L IS. 1 second, f/11, ISO 100.

Cape Neddick, Maine. EOS-1D Mark III with EF 17-40 f/4L. 0.4 seconds, f/8, ISO 400.

Cape Neddick, Maine. EOS-1D Mark III with EF 17-40 f/4L. 0.4 seconds, f/8, ISO 400.

_MG_0306

Please share your Blue Hour photos and comments below.

The post Sweeten Your Photos by Shooting During the Blue Hour by Rick Berk appeared first on Digital Photography School.


Digital Photography School

 
Comments Off on Sweeten Your Photos by Shooting During the Blue Hour

Posted in Photography


The Magic Light of the Golden Hour

29 Apr
EOS-1D Mark IV with EF 24-105 f/4L IS. 1/500 at f/4, ISO 200.

EOS-1D Mark IV with EF 24-105 f/4L IS. 1/500 at f/4, ISO 200.

What is Golden Hour?

My absolute favorite time to photograph anything is a time of day called the Golden Hour. The Golden Hour occurs during the time just before sunset, and just after sunrise. When the sun is lower in the sky, near the horizon, it must travel through more of the atmosphere, reducing the intensity of direct light and thus reducing the contrast in the scene. More blue light is scattered, so sunlight will appear reddish and shadows won’t be as deep as when the sun is higher in the sky. In addition, the lower angle of the sun creates longer shadows, which can add interest to images.

EOS 5D Mark II with EF 24-105 f/4L IS. 1/15 at f/14, ISO 100.

EOS 5D Mark II with EF 24-105 f/4L IS. 1/15 at f/14, ISO 100. The low sun casts a longer shadow, creating foreground interest for this shot.

The Golden Hour does not necessarily last an hour. The closer to the equator you are, the shorter the Golden Hour is. The further from the equator, the longer the golden hour lasts. For instance, in Alaska during the summer, there is a period of several hours of Golden Hour light later in the evening, and during the winter, nearly all daylight hours have a Golden Hour quality to them.

EOS 5D Mark II with EF 24-70 f/2.8L. 1/2500, f/4, ISO 200. The sun was placed over the boy's shoulder to camera left, and a reflector to camera right.

EOS 5D Mark II with EF 24-70 f/2.8L. 1/2500, f/4, ISO 200. The sun was placed over the boy’s shoulder to camera left, and a reflector to camera right.

Golden Hour light is so good, I find it hard to convince myself to photograph at other times.  It’s excellent lighting for any subject, but especially lends itself to portraits and landscapes.

Portraits at Golden Hour


For portraits, I use the light in a couple of ways.  First, I will position my subject so that the sun is shining on their face directly, as in the image at the top of this article.  The light tends to be so soft, I can put down my reflector and just let the shadows fall and create depth.  Simply position your subject so the sun is full in their face, and ask them to turn back and forth to watch the way the shadows fall. Move around your subject to watch how the light changes.  Shoot from multiple angles. It will end up being like you changed your lighting setup for each shot.

The only portrait angle that will be difficult to shoot at the Golden Hour will be when your subject is completely backlit. In this case, I will use a reflector. Since the light already has a warm temperature, I use the white side of the reflector, or silver if the reflector has no white.  I will position my subject so the sun is behind him and over his shoulder, and will position the reflector in front of him on the opposite side. The effect is similar to having two lights, a hair light, and a fill. Again, move around your subject, and have them turn as well, placing the sun at different angles to them. Do the same with the reflector to see the ways you can make the light fall on your subject’s face.  The beautiful thing about Golden Hour light is that it comes from such a low angle, you can hold the reflector higher and position it just above your subject’s head, to get those pleasing downward shadows from the nose and other facial features.

Golden Hour for Landscapes

The Golden Hour is also perfect for shooting landscapes.  The light creates depth by casting long shadows and defining the character of the landscape.  I will often try to put the sun to my side when shooting Golden Hour landscapes. This allows the light to rake across the landscape and create shadows where the surface changes, or create greater detail in grasses, or trees, creating more apparent detail and sharpness than if the light was from the front. This is apparent in the two images below.

EOS 5D Mark II with TS-E 24mm f/3.5.  1/1250 at f/3.5 ISO 100.  The sun coming from camera right creates definition in the sand and dune grass.

EOS 5D Mark II with TS-E 24mm f/3.5. 1/1250 at f/3.5 ISO 100. The sun coming from camera right creates definition in the sand and dune grass.

EOS 5D Mark III with EF 70-300 f/4-5.6L IS. 1/13 at f/16, ISO 100. The low angle of the sun and warm golden light creates definition in the foreground trees.

EOS 5D Mark III with EF 70-300 f/4-5.6L IS. 1/13 at f/16, ISO 100. The low angle of the sun and warm golden light creates definition in the foreground trees.

In addition, landscapes shot during the Golden Hour have more color in the sky, especially if there are clouds picking up the warm reddish light. However, shooting directly into the sun, capturing a sunset, creates a very contrasty scene. In cases like that, I use graduated neutral density filters to darken the sky and bring it down so that the foreground and the sky both fall within the dynamic range of the camera, as with the image of the crashing wave and rocks (below). A graduated neutral density filter (ND Grad for short) is half darkened glass, half clear. You can position the filter so the darker area covers the sun and sky, and the clear is over the darker foreground.  This helps bring the color back to those sunsets or sunrises, whereas without the filter, the sky would appear washed out and lifeless.

The Golden Hour offers plenty of opportunities for great photos, and the really beautiful thing is that it happens twice a day!

EOS 5D Mark III with EF 24-70 f/2.8L II. 1/6 at f/14, ISO 200.  A 4-stop ND grad was used to darken the sky and match the foreground exposure.

EOS 5D Mark III with EF 24-70 f/2.8L II. 1/6 at f/14, ISO 200. A 4-stop ND grad was used to darken the sky and match the foreground exposure.

EOS 5D Mark III with EF 24-70 f/2.8L II. 1/15 at f/16, ISO 100.

EOS 5D Mark III with EF 24-70 f/2.8L II. 1/15 at f/16, ISO 100.

EOS 5D Mark II with EF 24-105 f/4L IS. 1/1000 at f/4, ISO 100.  In this case, the sun was positioned more to the side with a reflector bouncing light back into the subject's face.

EOS 5D Mark II with EF 24-105 f/4L IS. 1/1000 at f/4, ISO 100. In this case, the sun was positioned more to the side with a reflector bouncing light back into the subject’s face.

EOS 5D Mark III with EF 70-200 f/2.8L IS II. 1/1000 at f/2.8, ISO 100.

EOS 5D Mark III with EF 70-200 f/2.8L IS II. 1/1000 at f/2.8, ISO 100. The soft, warm light of the Golden Hour was perfect for this shot.

More tips on working with light in the Golden Hour:

  • The Golden Hour – Perfect Times for Portraits
  • Finding and Working with Available Light
  • 5 Reasons for Doing Natural Light Portraits
  • 10 Reasons to Shoot Portraits During the Golden Hour [Illustrated]

On sale now at SnapnDeals – Golden Hours eBook + Exposure Blending eBook – grab the pair now before the sale is over! 

The post The Magic Light of the Golden Hour by Rick Berk appeared first on Digital Photography School.


Digital Photography School

 
Comments Off on The Magic Light of the Golden Hour

Posted in Photography


Micropolitan: Mini Model City Cycles 100,000 Cars Per Hour

14 Mar

[ By WebUrbanist in Art & Installation & Sound. ]

dynamic kinetic car highway

Even when you can observe it fly by from outside, seemingly above the fray, experiencing rush hour traffic may not be as stress-free as you might imagine it would. But you can see and hear for yourself, thanks to conceptual artist Chris Burden and his dynamic sculpture, featured in the nifty short film below (a Vimeo Staff Pick).

A multi-year staple that can be seen at the Los Angeles Museum of Art, Metropolis II is an intense kinetic sculpture, modeled after a fast paced, frenetic modern city. Steel beams form an eclectic grid interwoven with an elaborate system of 18 roadways, including one six lane freeway, and HO scale train tracks.”

dynamic micro car video

dynamic miniature rush hour

More from the LACMA: “Miniature cars speed through the city at 240 scale miles per hour; every hour, the equivalent of approximately 100,000 cars circulate through the dense network of buildings. According to Burden, ‘The noise, the continuous flow of the trains, and the speeding toy cars produce in the viewer the stress of living in a dynamic, active and bustling 21st century city.’”

dynamic micro city sculpture

dynamic museum roadway infrastructure

At the push of a button, a fleet of toy-sized cars (as well as trains) zip out of their hiding spots and quickly fill up the looping tracks, weaving between structures and speeding along side streets only to rejoin the main highways later in their never-ending little rat-sized race to nowhere.

Share on Facebook


[ By WebUrbanist in Art & Installation & Sound. ]

[ WebUrbanist | Archives | Galleries | Privacy | TOS ]


WebUrbanist

 
Comments Off on Micropolitan: Mini Model City Cycles 100,000 Cars Per Hour

Posted in Creativity


Color-Coded Cars: Time-Collapse Film Reorders Rush Hour

30 Dec

[ By WebUrbanist in Art & Photography & Video. ]

color sorted car art

There is no computer-generated imagery behind this surreal-seeming scenography, but rather a skillful remixing of reality to sort actual automobiles by color.

Artist and filmmaker Cy Kuckenbaker explains that his “aim is to reveal the color palette and color preferences of contemporary San Diego drivers in addition to traffic patterns and volumes. There are no CG elements, these are all real cars that have been removed from one sample and reorganized.”

color white black gray

Sure enough, the dominant colors are actually revealed to be anything but colorful – vehicles are mainly white, gray or black, with some reds and blues then very few oranges or yellows. Both lanes below and the overpass ahead are integrated into the artificial choreography.

color blue red cars

Shot in San Diego and reorganized in post-production, the seamless transitions in this film serve to make the piece simultaneously more realistic and implausible. Just imagine your reaction  if you saw something like this actually unfolding on the highway before you.

In a similar previous project, Kuckenbaker captured a series of landings at the San Deigo airport and then overlaid the results of hours of filming. The sky was effectively green-screened so that the planes could be overlapped in front of a seemingly-consistent background.

Share on Facebook


[ By WebUrbanist in Art & Photography & Video. ]

[ WebUrbanist | Archives | Galleries | Privacy | TOS ]


WebUrbanist

 
Comments Off on Color-Coded Cars: Time-Collapse Film Reorders Rush Hour

Posted in Creativity