RSS
 

Posts Tagged ‘head’

Phottix launches Cerberus adapter for using hotshoe flashes in Bowens and Elinchrom studio head modifiers

19 Apr

Flash manufacturer Phottix has launched a new adapter that is designed to allow hotshoe flash units to be used with standard studio accessories, such as softboxes, umbrellas and snoots. The Cerberus consists of a universal grip that holds the flash directly in the middle of an adapter ring that can be used to attach existing studio flash accessories in the Bowens S, Elinchrom and the Phottix Transfolder softbox range. The idea is that if users already have studio light modifiers they can use them with their hotshoe guns instead of having to buy accessories dedicated to smaller units.

The clamp used is the Phottix Griffin, which has a pair of spring-loaded jaws that close around the head of the flash unit, leaving the hotshoe free for remote triggers. The clamp is attached to a mounting bracket that can be fitted with the adapter ring to suit the mount of the modifiers you want to use. The unit is called Cerberus after the three-headed hound of Hades from Greek mythology because its interchangeable mount can accept modifiers in three different fittings.

The kit comes with a Phottix Varos Pro BG jointed Umbrella Adapter that is used to mount the whole kit on to a lighting stand or tripod. The Phottix Cerberus multi-mount kit, which includes the Bowens and Elinchrom rings, costs $ 92.50. For more information visit the Phottix website.


Manufacturer’s dramatic product video:

Press release:

Meet the Phottix Cerberus Flash Mount

There’s a new mounting system in town – the Phottix Cerberus Multi Mount.

The Phottix Cerberus Multi Mount is your all-in-one mounting solution for hot shoe flashes. Use your hot shoe flashes with Bowens-compatible accessories, Elinchrom-compatible accessories, and the Phottix Transfolder Softbox range.

The Cerberus system comes with:

  • Phottix Griffin with Phottix Easy-Folder-Compatible Mount and Phottix Varos Pro BG *
  • Cerberus Elinchrom-Compatible Mount
  • Cerberus Bowens-Compatible Mount
  • Cerberus Phottix Transfolder-Compatible Mount

Like the mythical Cerberus, the Phottix Cerberus Multi Mount has three heads. The standard round mount works with the range of Phottix Transfolder Softboxes. Add the Bowen-compatible mount – and traditional S-Mount compatible accessories can be used with your hot shoe flash. Swap that out for the Elinchrom-compatible mount and use Elinchrom’s vast array of accessories with your hot shoe flash.

The durable and patented Phottix Griffin Universal Flash Mount holds many popular hot shoe flash models secure in a synthetic-lined spring-loaded clamp. The system was designed to be both durable and easy to use. A Phottix Varos Pro BG Umbrella Adapter is included to mount the Phottix Cerberus Multi Mount to a light stand or boom. The Phottiax Griffin is available on its own as well as being included with the Cerberus Multi Mount set.

Several configurations of the Phottix Cerberus are avaialble. Talk to you local Phottix dealer or buy from the Phottix Online Store.

* Note: The Phottix Griffin Mount with this set is affixed to the Phottix Cerberus Softbox Mount and cannot be removed. Varos Pro BG does not come with metal Coldshoe and male 3/8” and ¼ “ screw.

Articles: Digital Photography Review (dpreview.com)

 
Comments Off on Phottix launches Cerberus adapter for using hotshoe flashes in Bowens and Elinchrom studio head modifiers

Posted in Uncategorized


The 3Pod P3COR Tripod and SH-PG Ball Head Review

06 Mar

In one of my previous articles, while reviewing the Nitz Strap heavy-duty camera strap, I mentioned that straps fall into the category of accessories most of us photographers hate to spend money on. We know that we need them, and we know that we usually get what we pay for, but our minds don’t connect the piece of hardware that doesn’t technically take the image we’re capturing, and the image itself.

Tripods seem to fall in that category as well. We know that a sturdier tripod can lead to a sharper, clearer image, yet we cringe at the thought of dropping $ 200, or more, on one. My first tripod was a wobbly Velbon50 that I picked up for $ 10 at a local garage sale. It helped me along through my first landscape images, but I didn’t actually think about the fact that my images could suffer from using unsturdy equipment.

3pp3cor_12

Image courtesy Adorama and 3Pod

Of course, the images from less sturdy tripods can be perfectly acceptable, and you can make the argument that there are some excellent tripod setups to be had for $ 100 or less. But, once you’ve used a beast of a piece of hardware, such as the 3Pod Orbit 3 Carbon Fiber setup I’ll be discussing here (see photo above), it’s really hard to go back, and makes you wonder why you didn’t buy something this solid in the first place.

When I received my tripod (Orbit 3 Section Carbon Fiber, P3COR) and head (Pistol Grip Ballhead, SH-PG) from 3Pod, the first thing I noticed was the heft. Pulling the tripod itself out of the box, I got the feeling I was handling a piece of military equipment – tough and rugged.

3pp3cor

Image courtesy Adorama and 3Pod

The tripod weighs in at 4.25 lbs. (1.9kg), while the head was a considerable 1.85 lbs. (0.84kg) so it’s clear from the beginning, this isn’t a nimble photographer’s setup. The P3COR is meant to be an absolute oak, to mount heavy camera and lens combinations on top of, without so much as a wobble. Carbon fiber is the material choice (lighter and sturdy, but more costly) for this tripod, as opposed to the usual aluminum setup.

3pp3cor_2 3pp3cor_4

The tripod features the Orbit Overhead Shot System, which means the vertically-adjustable center column, and its accompanying standard direct-mount plate, can be pivoted at almost any angle (see photos above, images courtesy Adorama and 3Pod), allowing for some interesting composition possibilities.

013016__myshot-600

The three carbon fiber legs are rated to hold 18 lbs. (8.16kg), and the unit can be extended to a maximum usable height of just over 69 inches (1.75m), while collapsing to a very manageable 28.5 inches (0.72m). The legs use a standard flip lock, for raising and lowering, and they work very well. The locks aren’t too simple to disengage, but don’t take a ton of strength either, making them easy to manage while giving you peace of mind.

The screw mount itself is reversible from 3/8″ to a 1/4″  variety, by flipping the mount block upside down. I found the mount easy to remove and lock, and my Canon 60D felt very sturdy when locked into the mount. Coverable foot spikes allow you to ensure stability in any situation, from dirt, rocks and sand, to smooth indoor floors, without worrying about damaging any sensitive surfaces.

3pp3cor_6

Attractive appearance (Image courtesy Adorama and 3Pod)

With appearances having absolutely no impact on the functionality of a tripod, it must be said that this particular 3Pod model is beautiful, with metallic red color accents, against dark carbon fiber pieces. An attention-getter at the local beach, let me tell you!

013016__myshot-3-cropped

013016__myshot-4

This was my first experience with a pistol-grip type tripod head, and let’s just say I’m sold on the concept. The 3Pod SH-PG is a delight to use. No more hassling with various screws on various planes of movement to get the perfect horizontal and vertical positions; simply squeeze the trigger on this unit, adjust to the desired angle, and release. The position is set in stone, and you’re free to concentrate on your primary focus, taking a great picture.

The advantage of this setup, is the ability to compose your image with one hand, freeing up the other to operate the camera itself. The mount is situated directly on the ball, and can be moved to allow for several configurations, including left-handed, right-handed, and traditional joystick orientation (see example photos below). A thumb-operated dial on the grip allows for modifying tension within the handle; lighter camera setups can use less tension, for more precise adjustments.

3pshpg_11

Image courtesy Adorama and 3Pod

3pshpg_04

Image courtesy Adorama and 3Pod

The rotation of the ball head is a full 360 degrees, with -20 to 90 degrees of tilt. The head features the expected quick-release plate, and a bubble level, separate from the tripod body. The head itself weighs in at 1.85 lbs. (0.84kg), and supports up to 11 pounds (4.99kg) of camera body and lenses, although it feels as if it would support more weight.

I tested the head and tripod legs at a couple of different locations, as well as indoors. I was pleased at how well the unit gripped all surfaces. The legs predictably sank and settled perfectly into beach sand, as well as a grassier area just inland. I place the tripod in a rather sandy/muddy situation as well, and again, found the support for my camera to be very sturdy. Finally, covering the adjustable leg spikes allowed me to use the tripod indoors in a carpeted area, with no worry of damage to the fibres.

3pp3cor_10

Carbon fiber legs with flip lock mechanisms (Image courtesy Adorama and 3Pod)

3pp3cor_11

Spikes and covers on the legs (Image courtesy Adorama and 3Pod)

I was met with the usual high winds on the beachfront, and found I was able to capture standard shots, as well as long exposures without any issue. Images were crisp and clear. As solid and hefty as the unit is, I was able to collapse it down to its smallest size, and carry it over my shoulder with my 60D still attached, for the long walk back to the parking lot, fairly easily.

This particular setup will set you back $ 249.95 USD for the tripod and $ 39.95 USD for the pistol-grip head. Many photographers won’t scoff at a $ 300 USD entry price for a very solid piece of hardware, but some beginners/enthusiasts may not feel such a price is doable for their first tripod. As we discussed in the beginning of this article, some accessories have qualities that reflect their price point, and we see that here with 3Pod’s offerings.

3pshpg_1

Image courtesy Adorama and 3Pod

At the end of my review period, I boxed up the 3Pod with a bit of a heavy heart, as I had no desire to send it back. For me as a photographer with a focus on landscape and nature, the Orbit 3 and pistol grip head are the perfect combination, and I can see how owning this particular setup will make my photography immensely easier, and therefore more enjoyable and satisfying. Which means one thing – I’ve got a new spot in my budget for a purchase this year.

Have you used 3Pod tripods and heads before? What has your experience been? Sound off below and let us know how these quality pieces of hardware have helped your photography.

Editor’s note: these products were loaned to our author by Adorama at no cost, but in no way influence Tim’s review and opinion of this tripod and head combination.

googletag.cmd.push(function() {
tablet_slots.push( googletag.defineSlot( “/1005424/_dPSv4_tab-all-article-bottom_(300×250)”, [300, 250], “pb-ad-78623” ).addService( googletag.pubads() ) ); } );

googletag.cmd.push(function() {
mobile_slots.push( googletag.defineSlot( “/1005424/_dPSv4_mob-all-article-bottom_(300×250)”, [300, 250], “pb-ad-78158” ).addService( googletag.pubads() ) ); } );

The post The 3Pod P3COR Tripod and SH-PG Ball Head Review by Tim Gilbreath appeared first on Digital Photography School.


Digital Photography School

 
Comments Off on The 3Pod P3COR Tripod and SH-PG Ball Head Review

Posted in Photography


Polaroid launches Eyeball panoramic tripod head

27 Feb

A remote control spinning tripod head that is said to be ideal for shooting panoramas has been launched in the US and UK by Polaroid. The Panorama Eyeball Head fits on a tripod or stands freely on its own feet, and can accommodate DSLRs as well as compacts. The control unit connects with the head via an IR link and manages both the speed and direction of rotation. 

The head is capable of turning a full 360° and the company says that careful gearing ensures the motion is always smooth. There are five speed modes as well as a mode that provides three fixed viewpoints up to 75° apart. 

The head is powered by a built-in rechargeable battery that is said to provide up to five hours of standby time, and which can be recharged via a powered USB port. 

The Polaroid Panorama Eyeball Head costs £44.99/$ 49.99 through Amazon. 


Press release:

RIDGEFIELD PARK, NJ – The versatile Polaroid remote-controlled 360° panorama eyeball head accessory is a compact, portable freestanding mini tripod that can also be placed on a tripod, slider or even selfie stick. Designed for Polaroid cameras, other small popular cameras and SLRs, the Polaroid remote-controlled 360° panorama eyeball head is ideal for creating the perfect panoramic video or picture. IR remote controls offer five speed modes, clockwise and counter clockwise rotation, as well as a triangle mode up to 75°.

Panoramic Shooting Made Plenty Fun

For the contemporary videographer, being able to capture expansive panoramic vistas without any shake or distortion is an absolute must. Thankfully, the Polaroid remote-controlled 360° panorama eyeball head delivers effortless and precisely controlled results. It is compatible with a range of action cameras such as the Polaroid Cube lifestyle action camera line and smaller digital cameras (with ¼” threaded hole). Attachment comes included.

Turns on a Dime – or Quarter

The Polaroid remote-controlled panorama eyeball head rotates your camera in its place, clockwise or counterclockwise, for smooth shooting action. Users can easily control the turning degree from 0 to 360°.

Heeds Your Need for Speed

Using the remote, shooters can also control the exact rotational speed. Press a button to speed up, and press a button to slow down. And thanks to finely calibrated gears, the action always remains perfectly smooth.

Functions Free or Mounted

At the top, a ¼” threaded screw connects to a wide variety of cameras. A padded platform prevents motion-related scratches. At the bottom, a ¼” threaded hole accepts tripod and slider connections for greater application flexibility.

Runs on Built-In Battery

To make this already compact and pocket-sized head as portable as possible, the built-in battery is rechargeable from any USB port or power outlet. A single charge provides five hours of standby and over three hours of non-stop runtime.

The Polaroid remote-controlled 360° panorama eyeball head accessory is available now for $ 49.99.

Articles: Digital Photography Review (dpreview.com)

 
Comments Off on Polaroid launches Eyeball panoramic tripod head

Posted in Uncategorized


Review of the Manfrotto 322RC2 Joystick Tripod Head

31 Jan
Manfrotto-322RC2-Joystick-head-in-horizontal-position

Manfrotto 322RC2 Joystick Tripod Head

I don’t use my tripod extensively in the same way a landscape shooter does, but I do consider a tripod an essential part of a photographer’s arsenal.

With regard to tripod heads, I have used a ball head for many years and they are extremely versatile. They’re very quick and easy to adjust. The most basic models having a single locking screw or lever; release it and you get a full range of pan, tilt, and swivel adjustments. Once you have the camera in position, you simply tighten the screw/lever to lock the head in place.

I use my tripod essentially in the following ways:

  • When the shutter speed is too slow to hand hold my camera, and I want to get a tack sharp image (s), or shooting in low light conditions.
  • Framing the shot through the viewfinder and then taking in the scene with my eyes without having to hold my camera, or having it on me. I like to see the shot I want to to take, rather than take the shot that I see through the viewfinder.
  • Most simply to act as a perch for the camera, ready to go. I spend most of my time prepping the shot before taking it.

The ball head that I used was the Manfrotto 486RC2 compact ball head which has now been discontinued and replaced by the 496RC2.

Manfrotto-496RC2-Ball-Head-2

Image courtesy of Manfrotto

Over recent months, I have found this system of loosening the screw/lever on the ball head to make small adjustments frustrating, due to the weight of the camera and lens. I had to hold the camera with one hand and move the lever with the other. This was cumbersome at times, as the lever was sometimes too tight.

This may sound fickle. But I like my gear to work efficiently, and for me not be conscious of it, or thwarted by it. I prefer to concentrate on the shot I am about to take.

It was time for me to purchase a new head but I was undecided over whether to stick with the ball head type, or try a different style head altogether. Recently, I was working on a job in tandem with another photographer. He had the joystick type head on his tripod. I gave it a go, and found it it incredibly intuitive to use.
Talk about being smitten. I just loved it. It turned out to be the Manfrotto 322RC2.

Build

Manfrotto-322RC2-Joystick-head-in-vertical-position

The Manfrotto 322RC2 is built out of magnesium. It weighs 1.43 lbs (.70kg).

The 322RC2 is made of magnesium, and is designed to keep the weight of your kit as close as possible to the tripod’s centre of gravity, by way of its reduced height. It weighs 1.43 pounds (.70kg), and while it’s not lightweight, it doesn’t feel heavy either, and the accompanying literature states that it can accommodate up to 11 lb. (5kg).

Camera-in-horizontal-mode

I have my Nikon D750 with the 24-120mm f/4G ED VR attached which is roughly 1.510kg (just over 3 lb.).

Key Features

Let’s take a closer look at the key features:

  • One single lever for quick control of all movements
  • Quick release plate with built-in secondary safety pin
  • Built-in bubble spirit level
  • Friction control, adjustable for different camera weights
  • Customizable for left or right handed use, in a vertical or horizontal position
Top-view-of-322RC2-joystick-head

Top view of the Manfrotto 322RC2. The trigger is big so that all your fingers rest against in when squeezing it.

Camera-in-vertical-mode

Going from horizontal to vertical mode is so easy using this joystick head.

Straight out of the box, I was able to attach the head to my tripod. It does come assembled for right-hand users, but the 200PL quick release plate assembly can be removed and positioned for left-handed use. Uniquely, it can also be placed on the top of the grip in a vertical position like the traditional 222 design, but when used in this position the maximum load reverts to 2.5 kg capacity.

Where-the-200PL-assembly-plate-sits-on-the-grip-handle

Top view of the end of the grip on the Manfrotto 322RC2, where you can attach the 200PL assembly plate, so that the camera sits on top, similar in deign of the 222 model by Manfrotto.

I was able to adjust the friction wheel by turning it either to the right or left. I then placed my camera and lens onto the quick release plate, and made further adjustments allowing for the weight of both. This friction control wheel lets you regulate the power of the blocking mechanism to match the weight of your camera/lens, which is key to its design.

close-up-of-tension-indicator

The friction wheel scrolls to the right or left. The small red strip is the tension indicator which moves to the left or right as you adjust the friction wheel.

The built-in bubble spirit level is a nice touch. There wasn’t one on the ball head, so this feature just makes orientating your camera, horizontally or vertically, quick and easy.

Spirit-bubble

The bubble spirit level is a handy feature, especially if you are adjusting your camera positions between landscape and portrait modes.

Observations

I’ve only had this joystick head a mere six weeks, so I can’t really comment on what the cons may be at this point. Obviously, this type of tripod head may not be to your liking, or suit your photography needs.

Although, this tripod head isn’t lightweight, I feel the weight justifies what it will be holding, especially when you combine the weight of a DSLR body and a large zoom lens. That said, from my experience, I only wish I had come across it sooner. The two areas I find it most useful are:

Title-Manfrotto-322RC2-Joystick-head

  • It is easy and intuitive to use
  • It offers very flexible camera positioning, using just one hand

In fact, the more I use it, the more I like it. Maybe over time, I will encounter some negative aspects, one thing I noticed is that it doesn’t fit into my existing tripod case with the head attached. By placing the head in a vertical position, this adds another nine inches to the total length.

I didn’t want to buy another dedicated camera tripod bag, as they can be expensive. So instead, I just bought a Hockey bag ($ 16.00) to store my tripod away when not in use, or to bring to location shoots. I now use my old tripod case for my small light stands and umbrellas.

There isn’t an independent pan lock. This doesn’t bother me, but I can see this being a necessary feature for some photographers who shoot panoramas, and so forth.

Conclusion

I would definitely recommend this tripod head, but I think the best advice is to test it out first. This type of tripod head is a matter of personal choice. Plus, this head is not new on the market, so check around for deals.

Disclaimer: I was not contacted or sponsored to test the above equipment. Opinions are purely by the author only.

googletag.cmd.push(function() {
tablet_slots.push( googletag.defineSlot( “/1005424/_dPSv4_tab-all-article-bottom_(300×250)”, [300, 250], “pb-ad-78623” ).addService( googletag.pubads() ) ); } );

googletag.cmd.push(function() {
mobile_slots.push( googletag.defineSlot( “/1005424/_dPSv4_mob-all-article-bottom_(300×250)”, [300, 250], “pb-ad-78158” ).addService( googletag.pubads() ) ); } );

The post Review of the Manfrotto 322RC2 Joystick Tripod Head by Sarah Hipwell appeared first on Digital Photography School.


Digital Photography School

 
Comments Off on Review of the Manfrotto 322RC2 Joystick Tripod Head

Posted in Photography


How to do a Head Swap using Photoshop

26 Oct

When looking through your pictures, have you ever had that sinking feeling of seeing everyone in a single image perfectly happy and smiling except for one person who was sneezing, sniffling, or looking at a squirrel? I can recall several times when I have returned from photo shoots being all optimistic about the experience, but realized as I combed through my images, that while I had several good shots where most people were perfectly posed, I didn’t have any shots where everyone looked just right.

It can be intensely frustrating, especially if you know you did everything in your power to get just the right shot. Fortunately Photoshop can help. With a few simple steps, you can learn how to load up a couple of images and perform a face or head-swapping maneuver with surgical precision, that would make Nicolas Cage blush (as in from the movie: Face Off). If it’s done correctly, no one will ever be able to tell that the final image has been altered.

Face-swapping can be incredibly useful when dealing with squirmy kids. This impromptu photo at a birthday party is actually a composite of three separate pictures.

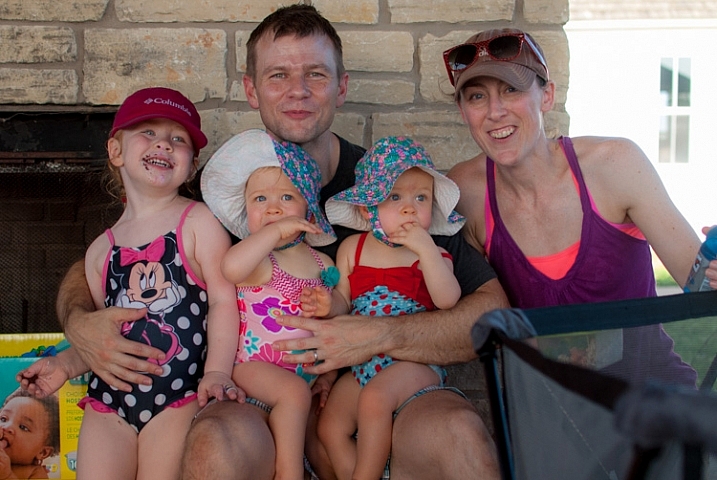
Heade-swapping can be incredibly useful when dealing with squirmy kids. This impromptu photo at a birthday party is actually a composite of three separate pictures.

When going through my pictures, I always start with Lightroom to cull the images down to the best ones, and do initial edits, such as exposure and color adjustments. If I come across a situation where I need to take a face from one photo, and put it in another, I open both pictures in Photoshop (which is a simple matter of right-clicking and choosing: Open as Layers in Photoshop). For example, the following picture turned out fine except for the boy who was distracted by something off to the side.

This family picture I took on July 4 is fine, but the boy's expression is not the greatest.

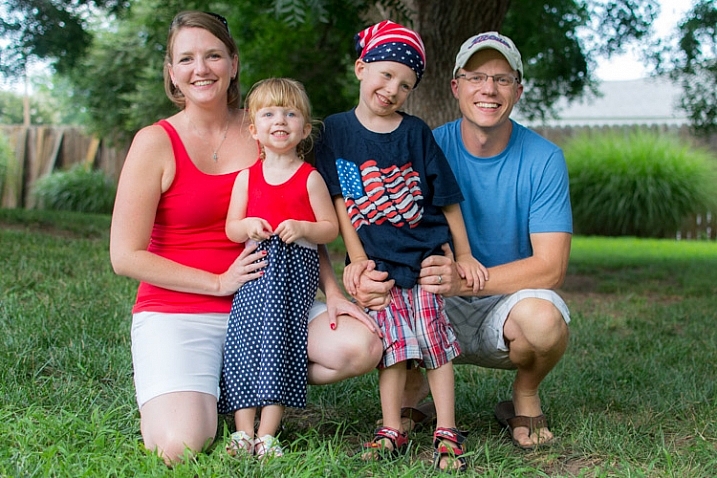
This family picture I took on July 4th is fine, but the boy’s expression is not the greatest.

Fortunately I had another picture that looked great, but in this one the mother was blinking. No worries though – Photoshop was there to save the day!

He has a much better expression in this photo, but his mother was blinking.

The little guy has a much better expression in this photo, but his mother was blinking. Photoshop to the rescue!

When working with edits like this it’s a good idea to use as high-resolution of pictures as possible, so you have the maximum amount of data to work with. Do not export your images from Lightroom as low-res JPG files, and then import them into Photoshop. Instead use full-size originals, though I do like to make sure the exposures are as closely matched in each picture first. Edit your white balance, color adjustments, and other parameters such that both images are as close as possible before going into Photoshop, or your composite will look painfully obvious. (Some photographers take the exact opposite approach and do all the Photoshop work first, and then do color adjustments and cropping in Lightroom. Either way works, but I prefer the former method.)

If you’re unfamiliar with Photoshop, and it seems a bit overwhelming at first, don’t think about all the buttons, menus and options available to you just yet. This face compositing really only requires two sections: the Layers panel in the bottom right corner, and the Brush tool on the left side.

photoshop-face-swap-workspace

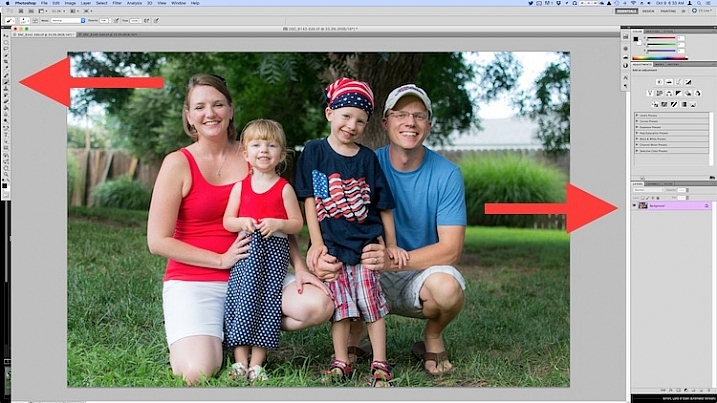
Open both images as layers in Photoshop

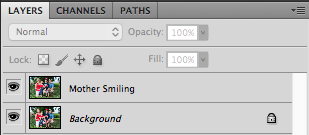
Select both images in Lightroom and right click, then choose: Open as Layers in Photoshop. Once your images are open in Photoshop, rename one or both so you can tell which is the one to use most people, and which is to copy the new head from.

photoshop-face-swap-edit-as-layers


You now have two layers in one image: the background (in this case, the one where everyone but the mother is smiling) and the layer you just copied over (in this case, the one where only the mother is smiling).

photoshop-face-swap-multiple-layers

Make a layer with just the new head to be added

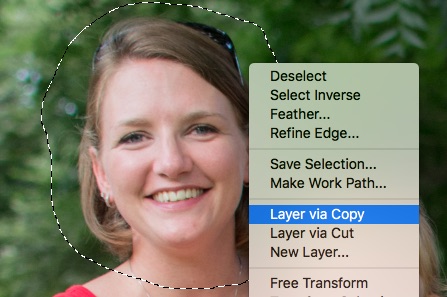
From here there’s a couple different ways to go about combining them, but when doing a simple head swap the method I prefer is to get rid of everything in the second layer except the face I want to put into the first image. To do this, use the Lasso tool to draw an active selection around the face, and create a new layer which consists of just the face itself. I like to use New Layer via Copy just in case I want to go back to the original for something, but it’s up to you. Make sure to leave plenty of padding around the face so you have enough room to blend it in as you make your adjustments.

photoshop-face-swap-new-layer-via-copy

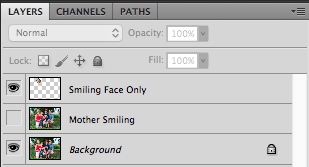
You now have three layers in the side panel: the original background, the new one you copied over, and the face itself. Since you only need the face, you can click the eye icon just to the left of the layer you copied over, which leaves it intact but invisible (hidden layer).

photoshop-face-swap-three-layers-hide-one

Compositing or blending them together

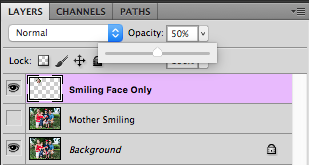
Now comes the fun part – compositing the face! I like this step because I get to be a little creative, and play around with exactly how I want the final image to look. The first thing you’ll notice is the face you are working with is probably going to be out of place, unless your camera was on a tripod, and everyone was perfectly still.

photoshop-face-swap-initial-composite

To get the face into the proper position, select it in the Layers panel and change its opacity to about 50%. That way you can see both faces at the same time, which will help you as you start lining them up. (Note: alternatively you can change the face layer’s blend mode to Difference. That will show it sort of inverted (negative) and it makes it easy to position them or align the layers. Then just change it back to normal when done.)

photoshop-face-swap-opacity

With the face layer still selected, choose “Transform” from the “Edit” menu, or press command-T on a Mac (control-T on Windows). Use your mouse to drag the face into the proper position, and press the arrow keys on your computer to fine-tune your movements on a per-pixel basis. You can also use the Transform command to rotate the face in case the person has turned his or head slightly. To do this, put your mouse cursor just outside the border near one of the corners, where it will change to a rounded arrow which means you can now click and drag to rotate.

photoshop-face-swap-line-up-facial-features

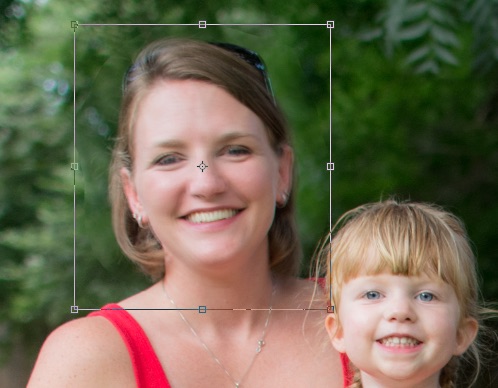
Once you that have the second face lined up properly over the first one, press the [Enter] key to lock it in place, then bring the layer opacity of the face back up to 100%. Don’t worry if you didn’t get things just right: you can always made additional Transformations later by selecting the layer and choosing “Transform” just like before.

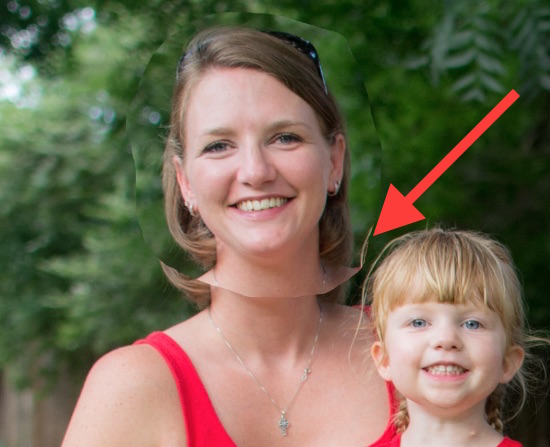
At this point things are looking pretty good, but right away you will notice a harsh border around the face where your selection box was. This needs to be eliminated so you only have the facial features you want, and not the person’s hair or any background elements that might have changed between the shots.

photoshop-face-swap-harsh-border

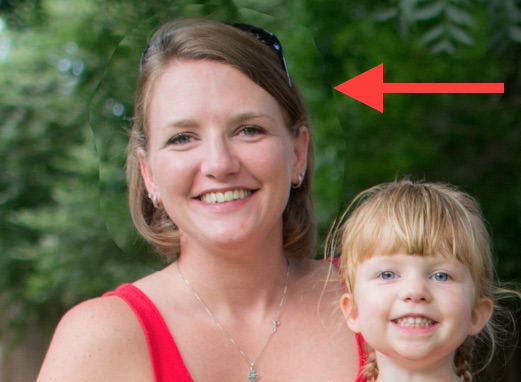
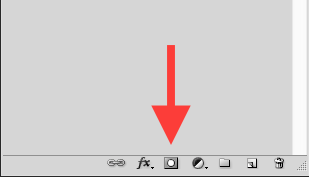
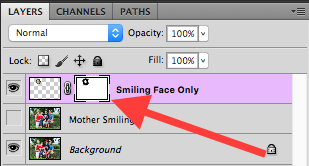
At this point you might be thinking “No problem! I’ll just use the eraser tool to get rid of the parts I don’t need,” but that’s a rookie mistake you will soon regret. The eraser tool is permanent, so instead we’ll use what’s called a layer mask to get rid of any parts we don’t want. It works similar to the eraser tool, but is fully adjustable and even altogether reversible (it’s called non-destructive editing) so that any edits you make can easily be undone at any point. With the face layer selected, click the “Add Layer Mask” button at the bottom of the Layers panel.

photoshop-face-swap-new-layer-mask

Now you can use the brush tool to paint out (using black) any areas of the face layer you do not want, or paint them back (paint with white) in if you do decide to keep them. This layer mask method is far more flexible than using the eraser tool, and it allows you to use varying levels of opacity as well. You can partially erase something, while retaining just enough to allow for a smooth transition, instead of a harsh line. Select the brush tool and choose a brush with soft edges. Play around with your flow rate and opacity settings too. I don’t like to go all the way to 100% opacity right away, so I usually start with 50%-70% to leave some wiggle room. Remember, you can always change your adjustments later.

photoshop-face-swap-brush-selection

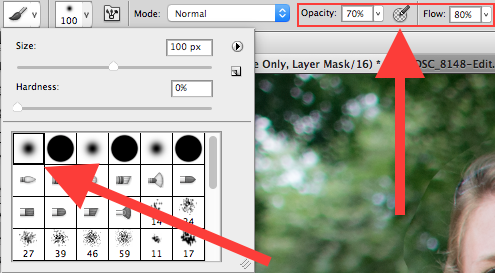
Now you can start blurring the line between the background photo and the face you are compositing onto it. Use the brush tool to gradually erase around the edges of the face, and if you find yourself wanting to brush anything back in just press the X key to reverse the process (X switches your foreground and background colors, in this case black and white) as you apply the brush. Notice that you’re not actually painting on the image of the face, but on a mask that has been applied to the layer. You are basically telling Photoshop which parts of the face layer you want to see, and which parts you want to erase (hide) or mask out. In the Layers panel you will see this mask show up to the right of the original layer as a mostly white box with some dark spots that indicate where you have painted with the brush.

photoshop-face-swap-edit-layer-mask

Using brushes on the layer mask is the most part of this whole process as I get to see my edits in realtime, and get as detailed as I want with brushing in the smiling face.
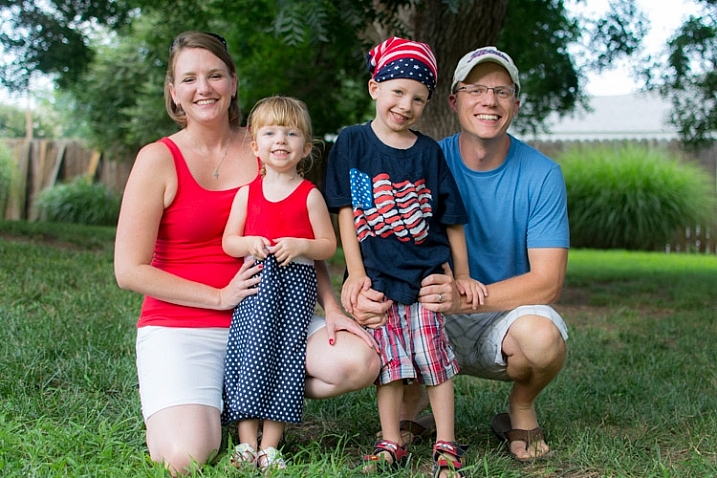
photoshop-face-swap-final-image

The final image

You can use this technique to composite as much as you want, including background elements, multiple faces, or even individual features such as eyes or teeth. Learning this simple head swapping technique is not only handy for creating the perfect group portrait, but can also be your gateway into a much broader world of Photoshop editing in general.

What are your favorite tips for doing simple edits in Photoshop? Do you have any other techniques that have worked for you over the years? Leave your thoughts in the comments below.

googletag.cmd.push(function() {
tablet_slots.push( googletag.defineSlot( “/1005424/_dPSv4_tab-all-article-bottom_(300×250)”, [300, 250], “pb-ad-78623” ).addService( googletag.pubads() ) ); } );

googletag.cmd.push(function() {
mobile_slots.push( googletag.defineSlot( “/1005424/_dPSv4_mob-all-article-bottom_(300×250)”, [300, 250], “pb-ad-78158” ).addService( googletag.pubads() ) ); } );

The post How to do a Head Swap using Photoshop by Simon Ringsmuth appeared first on Digital Photography School.


Digital Photography School

 
Comments Off on How to do a Head Swap using Photoshop

Posted in Photography


Manfrotto launches XPRO Ball Head

26 Jun

Manfrotto has launched the XPRO Ball Head in the UK, joining existing fluid and geared heads in the XPRO lineup. It is offered with Arca-Swiss compatible Top Lock and 200PL camera plates and features a spherical locking mechanism alongside a Triple Locking System, the latter of which stabilizes the camera’s position and keeps it from drifting via a trio of wedges. Read more

Articles: Digital Photography Review (dpreview.com)

 
Comments Off on Manfrotto launches XPRO Ball Head

Posted in Uncategorized


Tips for Choosing a Tripod Head

04 Apr

NO PARKING

One of the first accessories many people buy after getting a camera is a tripod, and most of those are the all-in-one kind with three legs on the bottom, and a top part called a head, onto which you mount your camera. Typically these heads feature a handle that juts out from one side that can be tightened or loosened to allow you to change the angle at which your camera is situated. These tripods usually cost about $ 25 to $ 50 which makes them quite attractive to photographers looking to invest in some gear to help them take better photos. However, one of their main limitations involves the head: it is usually non-removable, which means you are bound by its constraints, and you may soon discover that your creative sensibilities outstrip the capabilities of the tripods.

two-tripods

All-in-one tripods like this are inexpensive and great for beginners.

I remember the first time I walked into a camera store to look at a some tripod heads and was shocked to find that the sticker price was well beyond what I thought was reasonable. I thought to myself, “Why would anyone spend $ 150 on a tripod head alone, when a basic tripod could be had for less than half that amount?” Then I looked at the price of tripod legs and just about hit the floor. Over the years I came to realize that the reason these components are so expensive was because they are made of much higher-grade materials and built to specifications that demanding photographers need.

When you’re ready to take the step of buying a tripod head and set of legs separately, there are so many options from which to choose it can leave you in a state of confusion with no clear answers. When you’re thinking about spending hundreds of dollars you don’t want to make a bad choice. So, I’m going to take a look at four of the most common types of tripod heads and discuss how they would suit different types of photography. Hopefully it will give you a better idea of what to look for the next time you walk down to your local camera shop, or browse through some of your favorite online photo stores.

Ball Heads

manfrotto-496rc2

Manfrotto 496CR2 ball head

This is my favorite type of tripod head, and one that I think suits most casual or enthusiast photographers quite well–much moreso than the standard pan/tilt head that comes with all-in-one tripods. Ball heads are designed around a 360-degree swivel (basically a large ball bearing, hence the name, ball head) which you can tighten or loosen with a lever or dial on the side. You can turn your camera from side to side, rotate it in a circle, or change its orientation from portrait to landscape in an instant, all with virtually no effort on your part.

Some are specifically designed to let you change just one direction of motion at a time, which is useful if you are into special types of shots like panning. The first time you use one it can be a bit disorienting until you get used to the sheer amount of freedom they offer. But be careful to keep one hand on your camera while you adjust the locking mechanism on the ball head. If you don’t, your camera may suddenly flop to the side which can be a bit scary the first time it happens. This degree of freedom can actually be a bad thing if you only want to adjust one parameter at a time, and it can be tricky to operate ball heads when you want micro-level adjustments. But, as an overall step up from an entry level tripod, it’s hard to go wrong with a ball head.

Pan/Tilt Tripod Heads

manfrotto-804rc2

Manfrotto pan/tilt tripod head 804CR2

If this model looks familiar to you, it’s because you might already have one like it, or have seen them on all-in-one tripods. Basic models have one or two adjustment levers, but if you spend a bit more you can get one with three levers to give you fine-tune control over specific adjustments. They are much more precise than ball heads in this regard, and it is not uncommon to find pan/tilt heads with built-in bubble levels to help you make sure you have your camera positioned exactly how you want. While it takes more steps to reposition your camera compared to a ball head, it can actually be a good thing because you can adjust just one parameter at a time. For example if you have your subject perfectly aligned up but need to rock your camera to one side, you can use one lever to adjust only the tilt. A pan/tile head is not as simple as a ball head, but the added control it offers is nice, once you get the hang of working with multiple levers.

Pistol Grip Tripod Heads

vanguard-gh-200

Vanguard GH200 pistol grip tripod head

Pistol grips are designed to give you the same degree of control as a ball head but some photographers find them much easier to adjust, due to their full-handed grip mechanism. Whereas a ball head requires you to turn a relatively small knob in order to alter the position of your camera, which can leave your camera flopping around like a wet noodle unless you keep one hand on it too – the pistol grip head, which is also available as a joystick style, gives you precise one-handed control over the exact position of your camera. To use it, just squeeze the grip and the head will unlock so you can reposition it. Most of these have tension dials to adjust how easily you can change things when you squeeze the grip, and more advanced ones allow you to rotate the camera along one axis which makes panning shots much easier. As you can see in the photo they are much larger than ball heads which makes them slightly less portable, but the tradeoff can be well worth it if you need precise control over the position of your camera, while maintaining a high degree of freedom, as well as quick access to a full range of motion with a squeeze of your hand.

Pan/Tilt Tripod Heads for Video

manfrotto-700rc2

Manfrotto 700CR2 tripod head

Similar to the pan/tilt head shown earlier, these specialty heads are designed with video shooters in mind, and while they can be used for still photography, they are less than ideal due to some important limitations. As is common with most video heads, these often feature a long extension arm which allows for greater control and smooth movements for panning shots, but is not very practical when shooting still photography. Contrary to what you might think, the extension arm does not twist in your hand to let you adjust your camera: it is merely a lever that lets you swing your camera from side to side, and does not actually do anything itself. You lock your camera in place by turning knobs on the side of the head, and loosen them to gain access to movement. This particular head is designed for two types of movement: rocking back and forth and twisting from side to side. This means if you want to tilt your camera to the left or right (to shoot a vertical image) you simply can’t do it–at least not without spending much more money on a high-end version.

Recommendations

vanguard-sbh-100

Vanguard SBH-100 ball head

If you’re looking to step up from a basic tripod my recommendation is almost always to get a ball head, partially because it allows such a fantastic amount of control, but also due to the more intimate relationship it creates between you and the camera. Using a ball head with your eye to the viewfinder (as opposed to the LCD screen) while positioning your camera is an incredibly freeing experience if you have only used an all-in-one tripod, and might even help you find new types of shots that you had not considered before. While ball heads do not offer the same type of precision control as dedicated pan/tilt heads, some like the  model shown here, do allow you to at least adjust the rotation of your camera separately from the other movements which can assist with motion or panning shots. If you like to shoot video with your DSLR perhaps a video head would suit your needs a bit more, and virtually all dedicated tripod heads feature solid construction and well-lubricated parts which make operating them much smoother overall.

Using a ball head made positioning my camera for this shot much easier than if I was working with a standard all-in-one tripod head.

Using a ball head made positioning my camera for this shot much easier than if I was working with a standard all-in-one tripod head.

What about you? What is your favorite type of tripod head, or do you have any other tripod tips to share? Leave your thoughts in the comments below!

googletag.cmd.push(function() {
tablet_slots.push( googletag.defineSlot( “/1005424/_dPSv4_tab-all-article-bottom_(300×250)”, [300, 250], “pb-ad-78623” ).addService( googletag.pubads() ) ); } );

googletag.cmd.push(function() {
mobile_slots.push( googletag.defineSlot( “/1005424/_dPSv4_mob-all-article-bottom_(300×250)”, [300, 250], “pb-ad-78158” ).addService( googletag.pubads() ) ); } );

The post Tips for Choosing a Tripod Head by Simon Ringsmuth appeared first on Digital Photography School.


Digital Photography School

 
Comments Off on Tips for Choosing a Tripod Head

Posted in Photography


Fresh Images to Put Spring Visions in Your Head

07 Mar

When I think of spring some of these words come to mind:

  • Rebirth
  • Growth
  • Fresh
  • New

It’s my favorite time of year. I love how it smells after the rain comes. I love to see the grass turn green and flowers pop up. So here are some fresh images to get you thinking about spring.

Photograph Chlorophylle by Gaétan Zilli on 500px

Chlorophylle by Gaétan Zilli on 500px

Photograph Feel the Green! by Shaz Mazhare on 500px

Feel the Green! by Shaz Mazhare on 500px

Photograph Fern Rhapsody by Jensen  Chua on 500px

Fern Rhapsody by Jensen Chua on 500px

Photograph Abstract flowers card by Sergii Syzonenko on 500px

Abstract flowers card by Sergii Syzonenko on 500px

Photograph Vintage apricot flower by Roksana Bashyrova on 500px

Vintage apricot flower by Roksana Bashyrova on 500px

Photograph June green grass flowering by Elena Elisseeva on 500px

June green grass flowering by Elena Elisseeva on 500px

Photograph grass flower with water drops by meesri apichart on 500px

grass flower with water drops by meesri apichart on 500px

Photograph Closeup view of wet, pink coneflower by Frank Hoekzema on 500px

Closeup view of wet, pink coneflower by Frank Hoekzema on 500px

Photograph SKC 2899 Damsel of Nature by Sunil Kapadia on 500px

SKC 2899 Damsel of Nature by Sunil Kapadia on 500px

Photograph Fresh pink tulip flowers. by Iryna Soltyska on 500px

Fresh pink tulip flowers. by Iryna Soltyska on 500px

Photograph Tulips by Teerasak Tiamdao on 500px

Tulips by Teerasak Tiamdao on 500px

Photograph Violet by Thomas Zsebok on 500px

Violet by Thomas Zsebok on 500px

Photograph green by Margo B. on 500px

green by Margo B. on 500px

Photograph Foggy meadow at sunset by Roman Tsubin on 500px

Foggy meadow at sunset by Roman Tsubin on 500px

Photograph Young butterfly by YOline SAntosa on 500px

Young butterfly by YOline SAntosa on 500px

Photograph Birth of a Beauty by S. Tabrizi on 500px

Birth of a Beauty by S. Tabrizi on 500px

Photograph Poppy "cocoon" by Florin  Negruti on 500px

Poppy "cocoon" by Florin Negruti on 500px

Photograph Cocoon by Asma Adnan on 500px

Cocoon by Asma Adnan on 500px

Photograph Brotherly love by Daan de Vos on 500px

Brotherly love by Daan de Vos on 500px

Photograph Press the Copy Button - 5 times by Vincent Cheng on 500px

Press the Copy Button – 5 times by Vincent Cheng on 500px

Photograph Hello, Little One by Ben Robson on 500px

Hello, Little One by Ben Robson on 500px

Photograph Origin of life by Hugo Alberto on 500px

Origin of life by Hugo Alberto on 500px

Photograph PIU!!! cock by rui mendes on 500px

PIU!!! cock by rui mendes on 500px

Photograph Kitten by Artur Polachowski on 500px

Kitten by Artur Polachowski on 500px

Photograph ???????? by Nozomi Itabashi on 500px

???????? by Nozomi Itabashi on 500px

Photograph Violet by Magda  Bognar on 500px

Violet by Magda Bognar on 500px

Photograph Enjoy the Shower by Michael Kothes on 500px

Enjoy the Shower by Michael Kothes on 500px

Photograph Taste the rain by Steve Pomeroy on 500px

Taste the rain by Steve Pomeroy on 500px

Photograph drops by sydzey on 500px

drops by sydzey on 500px

Photograph Splish splash Im taking a bath by Leanne M Williams on 500px

Splish splash Im taking a bath by Leanne M Williams on 500px

Photograph Life Change by Shawn Malekifar on 500px

Life Change by Shawn Malekifar on 500px

googletag.cmd.push(function() {
tablet_slots.push( googletag.defineSlot( “/1005424/_dPSv4_tab-all-article-bottom_(300×250)”, [300, 250], “pb-ad-78623” ).addService( googletag.pubads() ) ); } );

googletag.cmd.push(function() {
mobile_slots.push( googletag.defineSlot( “/1005424/_dPSv4_mob-all-article-bottom_(300×250)”, [300, 250], “pb-ad-78158” ).addService( googletag.pubads() ) ); } );

The post Fresh Images to Put Spring Visions in Your Head by Darlene Hildebrandt appeared first on Digital Photography School.


Digital Photography School

 
Comments Off on Fresh Images to Put Spring Visions in Your Head

Posted in Photography


Manfrotto releases XPRO Geared tripod head for precision adjustments with heavy kit

05 Mar

Italian tripod and accessory manufacturer Manfrotto has announced it is introducing a new heavy-weight head to its XPRO range. The XPRO Geared Head is designed for photographers who use weighty equipment and who like to be able to make precise adjustments to their composition. Read more

Articles: Digital Photography Review (dpreview.com)

 
Comments Off on Manfrotto releases XPRO Geared tripod head for precision adjustments with heavy kit

Posted in Uncategorized


Review: Zenelli Carbon Fiber Gimbal Tripod Head

27 Jan

One of the more impressive pieces of gear that I’ve been using as of late is the Zenelli CARBONZX Carbon Fiber Gimbal Head. I can’t say I’d have ever thought of myself being excited over a tripod head, but Zenelli has made one of the sexiest pieces of equipment I’ve seen and used. As you’d imagine any product that is Carbon Fiber is going to come with a hefty price tag and this gimbal head is no exception, but for those in need of cutting the weight of their gear for remote trips this could be worth the spend. It’s important to note that the fact this gimbal head is carbon fiber is not the only reason to consider it. The engineers at Zenelli have come up with very innovative features to protect high value super telephoto lenses with the Save Lens Lever®, Pin Save Tablet® and SaveLook® lever.  The Save Lens Lever ensures the lens remains balanced and does not fall when changing gear or leaving your gear unattended. The Pin Save Tablet is a mechanism that ensures the arm of the gimbal head cannot uncouple accidentally.  The Save Look lever ensures that the gimbals quick release can’t be accidentally released allowing your camera and/or lens to fall plus it allows for preset tightening of your Arca-type lens plates. I was also impressed the manufacturer thought to support panoramic photography by engineering the head so the lens plate mount is perfectly centered atop the rotational axis of the tripod head base. I demonstrate all of these features in my review video and with out a doubt the Zenelli CARBONZX Carbon Fiber Gimbal Head  gets my highest rating.

Order your Zenelli CARBONZX Carbon Fiber Gimbal Head at B&H

Key Specifications

Height: 9.25″ (23.5 cm)

Width: 3.58″ (9.1cm)

Depth: 9.33″ (23.7 cm)

Weight: 2.6 lb

Distance from Center of Lens to Vertical Arm: 3″ (7.6 cm)

Arca-Type Compatible

360° Pan & Tilt Ranges

Quick-Release Lever

Save Lenses Lever (Home Bar)

Bubble Level

(optional) Camouflage Cover

Copyright Jim M. Goldstein, All Rights Reserved

Review: Zenelli Carbon Fiber Gimbal Tripod Head

The post Review: Zenelli Carbon Fiber Gimbal Tripod Head appeared first on JMG-Galleries – Landscape, Nature & Travel Photography.


Related Stories

  • Review: Zenelli Carbon Fiber Gimbal Tripod Head – Enclosure
  • Review: Landscapes in Lightroom 5 eBook
  • Review: Landscapes in Lightroom 5 eBook – Enclosure
Feed Ads by FeedBlitz
powered by ad choices


JMG-Galleries

 
Comments Off on Review: Zenelli Carbon Fiber Gimbal Tripod Head

Posted in Equipment