RSS
 

Posts Tagged ‘Guide’

A small project: iFixit Samsung NX Mini disassembly guide

17 Apr

iFixit Samsung NX Mini disassembly guide

As far as small cameras go, the Samsung NX Mini is one of the most impressively small we’ve come across. The Mini manages to fit a 20.9MP 1″-type sensor into a super-slim body that’s just 22.5mm thick. It’s been discontinued, but when we saw iFixit post a disassembly guide for the littlest NX we just had to see what was inside. See some of the highlights from a safe distance here, and if you’re feeling adventurous head over to iFixit and find a step-by-step guide to taking the NX Mini apart.

iFixit Samsung NX Mini disassembly guide

After removing the battery and various screws from the battery compartment and external flash port, you’ll be ready to unscrew the lens mount. That teeny, tiny lens mount.

Image courtesy of iFixit

iFixit Samsung NX Mini disassembly guide

Removing a few more screws from the bottom of the camera frees the front housing, revealing the sensor and NFC chip. Relative to the camera body, the 1″-type sensor looks pretty big.

Image courtesy of iFixit

iFixit Samsung NX Mini disassembly guide

The NFC target lives on top of the battery compartment, which can be removed as seen here to reveal the motherboard underneath. The sensor cover has also been removed at this stage, giving a better view of the 20MP chip underneath. And that’s the next bit to go…

Image courtesy of iFixit

iFixit Samsung NX Mini disassembly guide

A little spudger action frees the sensor module from the motherboard so it’s ready to be carefully removed.

Image courtesy of iFixit

iFixit Samsung NX Mini disassembly guide

There’s one more screw to remove to disconnect the motherboard, and just above it is the Wi-Fi antenna. Of course, you’ll want to carefully disconnect the ribbon cables connected to the motherboard before it goes anywhere.

Image courtesy of iFixit

iFixit Samsung NX Mini disassembly guide

This step requires some careful spudger work to release the ribbon cables…

Image courtesy of iFixit

iFixit Samsung NX Mini disassembly guide

…and once those have all been removed the motherboard is free.

Image courtesy of iFixit

iFixit Samsung NX Mini disassembly guide

The flash assembly is the last piece to come out of the chassis, and takes with it the Wi-Fi antenna as it’s removed.

Image courtesy of iFixit

iFixit Samsung NX Mini disassembly guide

The tilting LCD twists free of the housing and there you have it – one tiny camera in lots of tiny pieces. Check out the whole guide on iFixit for the play-by-play disassembly instructions.

Image courtesy of iFixit

Articles: Digital Photography Review (dpreview.com)

 
Comments Off on A small project: iFixit Samsung NX Mini disassembly guide

Posted in Uncategorized


Beginner’s Guide to Buying Filters

14 Apr
Use of neutral density and graduated neutral density filters

Neutral density filters help you achieve extreme long exposures, while graduated neutral density filters help balance exposure between a bright sky and a dark foreground. Both were used in this image. The exposure time was three minutes.

For most photographers, their first experience with a filter is when it is suggested they purchase a UV or Skylight filter to protect their lens. It’s usually much later that beginning photographers find out about the other filters available to them, and what they can be used for.

Once you’ve decided to add a filter or filters to your camera bag, however, you’ll be faced with a myriad of choices regarding the various brands, materials, and types of filters that are available to you. Many times, the gut instinct is to purchase the cheapest filter that will do the job. The reality is, however, that there are many factors to consider when purchasing a filter, and buying the cheapest one on the rack that does what you want, it to is not usually a good idea. There is often a difference in the quality of the materials used, even when both filters appear to be made of the same things.

In An Introduction to Filters for DSLRs, you’ll find a breakdown of the different kinds of filters, and their uses. Here, I’d like to try and demystify the differences between filters, and why similar looking filters might have drastically different price points.

Screw-in versus drop-in filters

Drop-in and screw-in filters

First of all, there are two basic types of filters: screw-in and drop-in. The former mount directly onto the lens via the threads on the front, whereas the latter drop-in type are square or rectangular in shape, and require a filter holder and mounting ring that attaches to the front of the lens. Certain types of filters are available as both a screw-in and drop-in filter.

Screw-in filters are constructed of glass with a metal ring. The quality of the glass can vary, even within the same brand, depending on whether you’re going with a high end filter or a value priced one. The metal of the ring can vary as well, as they can be made of brass or aluminum. Cheaper filters usually have an aluminum ring. It’s a soft metal that is more easily dented if dropped, or bent if put under pressure. This could cause the filter to jam when mounting it to your lens. The most popular screw-in filters tend to be polarizers, UV, and neutral density filters.

The other type is what’s known as a drop-in filter. These are square or rectangular pieces of glass that are typically inserted in a holder that is mounted onto the lens. Often, the holder, or mounting ring, can also accommodate a screw-in polarizing filter, as well as two or three drop-in filters in front of that, allowing you to combine the effects of a polarizer, a neutral density filter, and/or a graduated neutral density filter.

While graduated neutral density filters are available as both a screw-in or a drop-in, the drop-in style allows for more precise placement of the gradation, and thus allows for more creativity. Drop-in filters are generally part of system, or have compatibility with one. Some examples include: the Lee filter system, Vü Sion Q system, Formatt-HItech, and Cokin P and Cokin Z filter systems. You’ll want to ensure that the system you invest in has the filters you need available, and that it’s compatible with your size camera.

Materials used

You may notice when shopping for filters, that there is a wide range of prices, for the same types of filters. The primary difference in cost is related to the material used in the filter. Other materials used to make filters include optical resin, which is more of a plastic material, and polyester. Polyester filters are generally used for color correction or soft focus effects, while optical resin is used as a more cost effective option compared to glass, especially in the case of drop-in filters such as graduated neutral density filters.

The more expensive filters often use a top quality glass, such German Schott Glass, which is generally color neutral and distortion free. Some filters by their nature need to be made from glass, such as polarizers. The differences in the material are related to the chemical makeup of the glass, thickness, and coatings used.  Where thickness is concerned, the thinner the filter the better, as thinner glass reduces any possible distortion.

Use of a polarizing filters

A polarizing filter not only helps make the sky bluer, but also controls reflections on shiny surfaces, such as buildings.

In the case of polarizers: in cheaper filters, the polarizing material is sandwiched between glass; while the polarizing material is bonded directly to the glass in more expensive ones. This reduces the chance for air pockets, and other irregularities that could affect the image quality in a negative way. Again, the quality of glass can vary widely between a budget-priced filter, and top quality one.

I have used both high quality glass filters, and optical resin ones. While the glass is more fragile if dropped, it tends to resist scratching more effectively than resin. However, optical resin can be considerably less costly than glass, for the same type of filter. For instance, a Formatt Hitech 3-stop soft edge graduated neutral density filter lists for about $ 80, while Vü Filters 3-stop Soft Edged Graduated Neutral Density Filter,  which is made of Ultra White German Schott glass, retails for $ 224. There are different grades to optical resin filters as well. This Lee 0.9 (3-stop) Soft ND Grad Filter, made from optical resin, lists at $ 146.

While any of these filter will provide good results, with higher end lenses, you may notice a distinct difference between a higher quality and thus higher priced filter, and one that cost less.

Coatings

In the days of film, filters did not need to be coated in the way they do for the digital age. Film was a more forgiving medium, which didn’t pick up flare or reflections the way a digital sensor does. For this reason, multi-coatings have become incredibly important in filter manufacturing. Higher quality filters will use these coatings to reduce flare, and increase light transmission. An uncoated filter will suffer from a loss of light. Some filters have a single coating, which is better than nonr, but not as good as a multi-coated filter. For digital if you were to take the same shot three different times, with an uncoated, a single coated, and a multi-coated filter, the difference should easily be visible in the image. In addition to minimizing flare and increasing light transmission, coatings also help maintain good contrast and color reproduction. Filter manufacturers will also use coatings that help make the filter easier to clean, and more scratch resistant.

Many photographers will debate whether or not filters are necessary, with those who say no doing so out of fear that the filter will degrade image quality. I use filters often, especially in my landscape work. There is no true digital substitute for a polarizing filter, and neutral density and graduated neutral density filters provide for effects not easily duplicated in post-processing. The key is to ensure you are using a quality filter, that is free from color shifts and distortion, and properly coated for digital. I’m not saying you have to spend top dollar on a filter, just understand what the differences are, so you can make an educated decision.

Drop-in filter system

A drop-in filter system allows use of square or rectangular filters. This is advantageous when using graduated ND filters, so you can adjust the placement of the gradation.

So do you own and use filters? What buying tips do you have for newbies? Which are your go-to and favorite filters? Please share in the comments below.

googletag.cmd.push(function() {
tablet_slots.push( googletag.defineSlot( “/1005424/_dPSv4_tab-all-article-bottom_(300×250)”, [300, 250], “pb-ad-78623” ).addService( googletag.pubads() ) ); } );

googletag.cmd.push(function() {
mobile_slots.push( googletag.defineSlot( “/1005424/_dPSv4_mob-all-article-bottom_(300×250)”, [300, 250], “pb-ad-78158” ).addService( googletag.pubads() ) ); } );

The post Beginner’s Guide to Buying Filters by Rick Berk appeared first on Digital Photography School.


Digital Photography School

 
Comments Off on Beginner’s Guide to Buying Filters

Posted in Photography


Get Booked: ‘A Burglar’s Guide to the City’ by Geoff Manaugh

03 Apr

[ By WebUrbanist in Travel & Urban Exploration. ]

burglars guide

Take a break and enter the world of urban villains, who see and seek out hidden opportunities in built environments, forever on the lookout for architectural workarounds and infrastructural escape routes.

In his latest book, A Burglar’s Guide to the City, architecture expert Geoff Manaugh of BLDGBLOG explores everyday spaces through the lens of criminals and criminologists, unearthing uncanny stories at the intersection of buildings and crime.

His research led the author down elevator shafts, into panic rooms and through buried vaults; the resulting tales are a combination of true-crime pieces and architectural philosophy, equal parts entertaining and educational.

abandoned roofman hideout

From the perspective of perpetrators, consider the strange case of Jeffrey Manchester, AKA Roofman, a burglar responsible for dozens of break-ins and hold-ups, primarily at fast-food joints. His signature strategy was to drop down into establishments from above, catching workers and managers unawares. This approach worked precisely because of an architectural flaw in the system: nearly identical structures used by chains make each theft quite like the last, so each incursion doubled as a practice round for the next.

In another architectural twist, when he was finally captured, Roofman’s secret lair turned out to be a customized void between a Toys”R”Us store and an adjacent abandoned Circuit City. He outfitted his abode with working plumbing and electricity, using baby monitors from the Toys”R”Us to monitor employee activity.

capture house thief

From the other side of the law, enforcement officials and criminal investigators have likewise fascinating tales to tell, including the UK police practice of creating “capture rooms.” The cops reverse-engineer ideal targets for breaking and entering, then fill a selected vacant house with tempting electronics and other expensive merchandise, then use it to capture thieves breaking an entering on tape.

Points of entry (doors and windows) as well as the goods strewn throughout the fake homes (such as TVs and video cameras). These are sprayed with a special tracer chemical, helping police confirm with clear physical evidence that suspects were on the premises. Once caught, the would-be burglars are shown videos of their exploits, much like stars on some twisted reality television show.

bldgblog book

And these are just two teaser examples; the book is filled with many more, with subjects ranging from urban guerrilla warfare strategies to the work of theory-minded architects like Bernard Tschumi.

The real magic of Manaugh’s work is in the subtle way it reshapes the reader’s understanding of the built world, causing you to look at architecture with a criminal mindset. Suddenly, trap doors, abandoned shafts, sewer systems, escape ladders, and other oft-overlooked features take on new meaning. The true stories that serve as foils for this exploration are also fully engaging in their own right, real tales genuinely stranger than (and often the basis for) fictional crime dramas.

Readers who enjoy this book will also want to pick up a copy of BLDGBLOG: The Book, a collection of fascinating “architectural conjecture, urban speculation and landscape futures,” a great compilation of stories that expand on Manaugh’s past articles

Share on Facebook


[ By WebUrbanist in Travel & Urban Exploration. ]

[ WebUrbanist | Archives | Galleries | Privacy | TOS ]


WebUrbanist

 
Comments Off on Get Booked: ‘A Burglar’s Guide to the City’ by Geoff Manaugh

Posted in Creativity


A Beginner’s Guide to Focus Stacking

23 Mar

Other than for special effect, photographers generally do not want out-of-focus images. But sometimes, regardless of which camera settings are used, not every detail of an image can be captured tack sharp. Depth of field (DOF) can be so shallow, that interesting aspects of the photos are without sharpness. Setting to a smaller aperture may be used to increase DOF, but moving the aperture farther from a lens’s sweet spot introduces lens diffraction into the image, again resulting in some fuzziness. Also, if stopping down the camera’s aperture, shutter speed will need to be increased and blurry images may result. Increasing ISO to help with the exposure will introduce digital noise to the image.

So, how do you shoot with the best aperture and shutter speed combination, and get sharp images from front to back of an image? A technique that can help resolve this problem is called focus stacking. Here’s some helpful info about this technique.

13 image Focus Stack

13 image focus stack

What You Need

  • A tripod.
  • A DSLR camera, capable of shooting in manual mode. It is possible to use a point and shoot camera, but it must have manual mode and manual focus capabilities.
  • Depth of Field iPhone app (helpful but not required).
  • Photoshop or another focus stacking software.

How to Shoot for Focus Stacking

Focus stacking is similar in principle to HDR. However, with focus stacking, images are captured with different focus points, and later combined in Photoshop, to create an image with more DOF than would be possible with a single exposure. Landscape and macro photography are two genres of photography that benefit most from using this procedure. Be warned – calm winds and reasonably stationary objects are a must!

Before beginning to shoot, it is always helpful to know a lens’s sweet spot, defined as the aperture that the lens produces its sharpest image. (It is usually found about two to three stops from wide open.) Experiment until this important setting is determined.

6 image Focus Stack

Landscape

There are two basic scenarios when shooting landscapes, that may benefit from focus stacking. The first is when the subject is a close foreground object, with an interesting background, both desirable aspects to be in sharp focus. The second, is when using a telephoto lens (which typically has a shallow depth of field) and the subject covers multiple distances, that may be brought into sharper focus. (FYI: If shooting a landscape with a wide angle lens, the DOF may be adequate enough to capture a sharp image that has no benefit in being processed by focus stacking.)

Tip: Here is a little trick to find out if focus stacking will benefit an image when photographing a scene or subject. After composing the image, set the focus point about one third into the image. Then, using Live View, enlarge the image and check to see if the foreground and background are sharp or blurry. If either or neither are in focus as sharply as desired, the image could benefit from focus stacking.

Steps for Shooting Landscapes for Focus Stacking

  1. Place the camera on a sturdy tripod – a must!
  2. Frame the subject and compose the shot.
  3. Determine exposure for the scene, and set the camera to manual mode, to ensure that the exposure is constant for every image.
  4. Set the camera to Live View and aim the focus point on the nearest object desired to be in focus. Use the camera’s zoom (+ button, not zoom on the lens) to preview the focus through Live View. Then switch to manual focus and use the focus ring to fine tune for sharpness if necessary.
  5. Take the first exposure.
  6. Without moving the camera or adjusting any settings, move the focus point to an object mid-way in the image and refocus.
  7. Take the second exposure.
  8. Again, without changing anything, refocus on an object at the farthest point of the intended image.
  9. Take the third exposure.
    To capture landscapes, three images are generally all that is necessary to create sharp focus stacking images, but it’s completely fine to take extra images to make sure that the entire scenee is covered. A rule of thumb would be to add more images for longer focal lengths. Be aware that extra images will take longer to process in post-production. If available, check the DOF with a Smartphone app, in order to figure out how many images will be necessary, to get every aspect of the photo in focus.
Using three images focus stacking. The first image was focused on the fence, the second was focused mid-way into the image, and the third was focused on the front of the house.

The first image was focused on the fence, the second was focused mid-way into the image, and the third was focused on the front of the house.

Macro Photography

Macro photography can benefit from focus stacking more than any other type of photography, because a macro lens has an extremely shallow depth of field.

  1. Place the camera on a sturdy tripod – a must!
  2. Frame the subject and compose the shot.
  3. Determine the exposure for the subject, and set the camera to manual mode to ensure that the exposure remains constant for each and every image.
  4. Set the camera to Live View and aim the focus point on the nearest object desired to be in focus. Use the camera’s zoom (+ button, not zoom on the lens) to preview the focus through Live View. Then switch to manual focus and use the focus ring to fine tune for sharpness if necessary.
  5. Take the first exposure.
  6. Without moving the camera or adjusting any settings, move the focus point to a distance slightly farther away from the lens. Remember that DOF in macro will be measured in fractions of an inch, instead of feet, as in landscape photography.
  7. Repeat step 6 as many times as needed to cover every aspect of the subject’s DOF. This could range from as few as six images to 30+ images. Make sure the entire subject is covered or the results may be unusable. If available, check the DOF with the iPhone app (www.setmycamera.com), in order to figure out how many images will be necessary to get every aspect of the photo in focus.
By focus stacking the flowers only and leaving the background out of focus makes the flowers stand out in the final image.

Focus stacking the flowers only makes the flowers stand out from the background.

Image on right is a single image capture at 85mm focal length. Image on right is a 12 image focus stacked image. Each image had a DOF of less than one inch.

The image on right is a single image capture at 85mm focal length. The image on right is a 12 image focus stack. Each image had a DOF of less than one inch. Note the additional detail in the image on the right, compared to the single image.

Tip: As often used when capturing HDR images, take a shot with your hand in front of the camera before and after each series of images. When working with the images later, this will make it easier to tell where each series starts and ends.

Use you hand to mark the beginning of each series of images, this will make processing you images much easier.

Use your hand to mark the beginning of each series of images. This will make processing your images easier.

Processing the Final Images

Processing the files to accomplish the final image may seem like the most difficult part of creating a focus stacked image, but it’s really very simple to do in Photoshop. Here’s how:

  1. Open Photoshop
  2. Get each image on a separate layer: Under File, choose Scripts and Load files into stack. Click Browse and select all the images.
  3. Check the box for Attempts to Automatically Align Source Images.
  4. Click OK and each of the images will open into a new layer in Photoshop.
  5. Open the Layer palette and select All Layers.
  6. Under Edit, select Auto-Blend Layers.
  7. Check the box for Stack Images and Seamless Tones and Colors. Optionally, select Content Aware Fill Transparent Areas, which will fill any transparent areas generated by aligning images in step 3. (Be aware this will increase processing time. Generally, I do not choose this option; rather, I just crop the image slightly later, if necessary.)
  8. Click OK
  9. Flatten the image by selecting Layer/Flatten image and save.

Focus-stacking-1

Note: If you are using a Lightroom and Photoshop workflow, after importing your images into Lightroom, instead of following steps 2 through 5, you can simply add all your images into Photoshop layers by selecting all your images, then go to Photo/Edit in/Open as Layer In Photoshop. This will open all the selected images as layers. You will then have to Align your images by selecting all the layers in the layer palette, then go to Edit/Auto Align Layers. Then continue at step 6 above.

Summary

It is nearly every photographer’s intention to capture the sharpest images possible, and focus stacking can be another tool to help you achieve this goal. The trick to this whole process is to take enough focused images, to create a final photo that is in focus from foreground to background. The results can be amazing once you get the hang of it! Give it a try and post your results and any questions you have here.

googletag.cmd.push(function() {
tablet_slots.push( googletag.defineSlot( “/1005424/_dPSv4_tab-all-article-bottom_(300×250)”, [300, 250], “pb-ad-78623” ).addService( googletag.pubads() ) ); } );

googletag.cmd.push(function() {
mobile_slots.push( googletag.defineSlot( “/1005424/_dPSv4_mob-all-article-bottom_(300×250)”, [300, 250], “pb-ad-78158” ).addService( googletag.pubads() ) ); } );

The post A Beginner’s Guide to Focus Stacking by Bruce Wunderlich appeared first on Digital Photography School.


Digital Photography School

 
Comments Off on A Beginner’s Guide to Focus Stacking

Posted in Photography


Beginner’s Guide to Water Droplet Photography

22 Mar

Have you ever looked at those great water droplet or splash images and found yourself scratching your head wondering how did they do that?

10

Well, those great images are usually done in studios, with electronically programmable eyedroppers, and motion triggers that fire the camera at an exact split second, allowing the photographer to freeze motion on that exact perfect moment. All that specialized gear makes all this process controllable, but if you own a camera and an external flash, you can also give this type of photography a try.

Water drops are an interesting subject to photograph, as it gives you the opportunity to explore techniques you wouldn’t normally do, and will probably give you some great images to add to your portfolio.

In this article, I will give you some interesting tips on how to get started with water droplet photography, with just some basic equipment.

Gear

Besides your camera and lenses of choice, you will need an off-camera flash, and a wireless trigger or dedicated extension cable.

01

Even though you can get great images without it, flashes with the high-speed sync (HSS) function will allow you to use shutter speeds above 1/250th, and freeze the motion much better.

02

A shutter cable release is also a good accessory to use, as it will allows you to fire your camera without touching it.

03

Finally you will need an eyedropper, or a wet sponge, with a system to hold it in place above a container with water. Usually I prefer to use a sponge, as it can produce bigger drop. I use a nano clamp and a gooseneck, attached to a tripod, to hold things in place.

Here is the complete setup:

04

Safety

Electronics and water don’t get along very well, so will need to be extra careful when doing this type of photography. Safety first, so a good piece of advice, is to protect your equipment with cellophane wrap, so any accidental water spillage won’t damage it.

05

Lighting

The first step is to keep in mind, that water is a specular surface, so you should not light the water but rather what the water reflects. Here I’m using white cardboard to bounce the light that reflects on the water surface.

06

Exposure: ISO 2000, 1/8000, f/11

The f/11 aperture allows me to have some depth of field, and the 1/8000 shutter speed, together with the flash at full power on HSS mode, allows me to freeze the action.

You can get a lot of different effects with slower shutter speeds and different apertures. This is a plain simple image, but you can get creative in a lot of ways here. One thing I use a lot is colored gels in front of the flash, to create some dynamics in the image.

07

Here I am mixing yellow and blue gels to create this colorful image.

08

Timing

The perfect timing to press the shutter release is something really hard to accomplish, as it’s humanly impossible to be that accurate. But, with some practice, and a little bit of luck, you will end up some great shots. To be honest, the random nature of the results is something that I really enjoy.

Here is a sequence of images that didn’t work as good as the last one.

09

Once you get the hang of it, you can experiment with food colorants and different liquids. Milk is a good choice, as it gives you drops with more consistency, and therefore best splashes.

10

You are only limited by your imagination here. With some basic Photoshop skills, you can take your images to the next level with some photo composites, like this image I created for a strawberry yogurt advertisement campaign.

11

So, there are some basic techniques to produce great water droplet images, without specialized equipment or motion triggers. Give it a try, I’m sure you’ll get great results!

This week on dPS we are featuring articles on special effects. Check out the others that have already been published here:

  • How to Photograph the Full Band of the Milky Way
  • Fire Spinning with Steel Wool – A Special Effects Tutorial
  • Special Effect – How to Create Multiple Flash Exposures in a Single Frame
  • Stacking Light Trails for Night Photography Special Effects
  • 26 Unique Special Effects Photos to Spark Your Creativity
  • Weekly Photography Challenge – Special Effects
  • Tips for Shooting Through Objects to Create a Special Effect
  • How to Add Vintage Frame Overlays Using Alien Skin Exposure X
  • 8 Steps to Great Long Exposure Landscape Photography
  • How to Create In-Camera Double Exposures

googletag.cmd.push(function() {
tablet_slots.push( googletag.defineSlot( “/1005424/_dPSv4_tab-all-article-bottom_(300×250)”, [300, 250], “pb-ad-78623” ).addService( googletag.pubads() ) ); } );

googletag.cmd.push(function() {
mobile_slots.push( googletag.defineSlot( “/1005424/_dPSv4_mob-all-article-bottom_(300×250)”, [300, 250], “pb-ad-78158” ).addService( googletag.pubads() ) ); } );

The post Beginner’s Guide to Water Droplet Photography by Ivo Guimaraes appeared first on Digital Photography School.


Digital Photography School

 
Comments Off on Beginner’s Guide to Water Droplet Photography

Posted in Photography


11 Steps for Basic Portrait Editing in Lightroom – A Beginner’s Guide

16 Mar

I love Lightroom, and use it for the vast majority of my portrait editing. You can achieve a wide variety of portrait effects in Lightroom, from harsh and grungy, to soft and dreamy. My technique varies depending on the kind of portrait I’m editing, although the workflow remains consistent.

The photo I’ve selected for this exercise, is one you can easily replicate at home. It was shot indoors, with a large window as the only light source, and is one of a series shot in the same location.

Before and after

One of the great features of Lightroom is the ability to sync settings. It’s a huge time-saver when you have a series of images, all shot in similar conditions. Once you are happy with the general settings (white balance, shadow-highlight ratio, etc.) of one image, you can sync the rest of the images in the series, with the same settings. After that, you’ll only need to fine-tune the others.

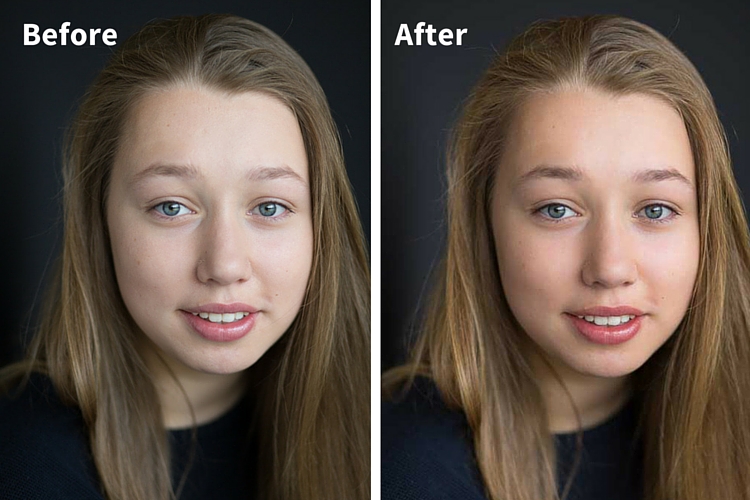
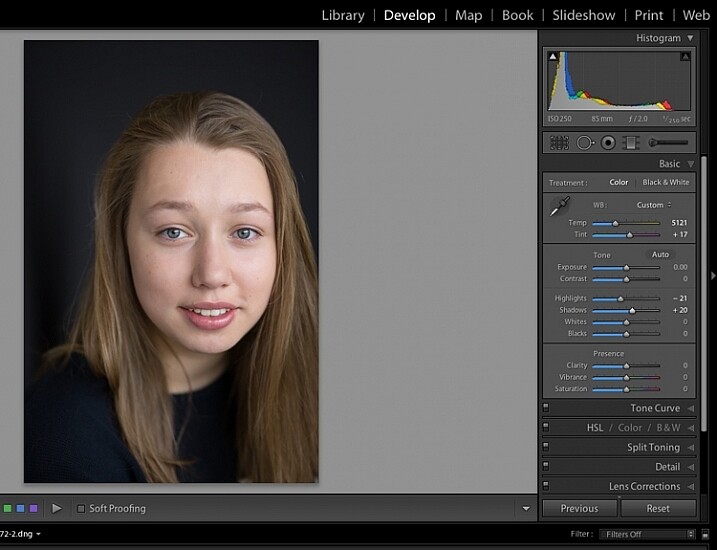
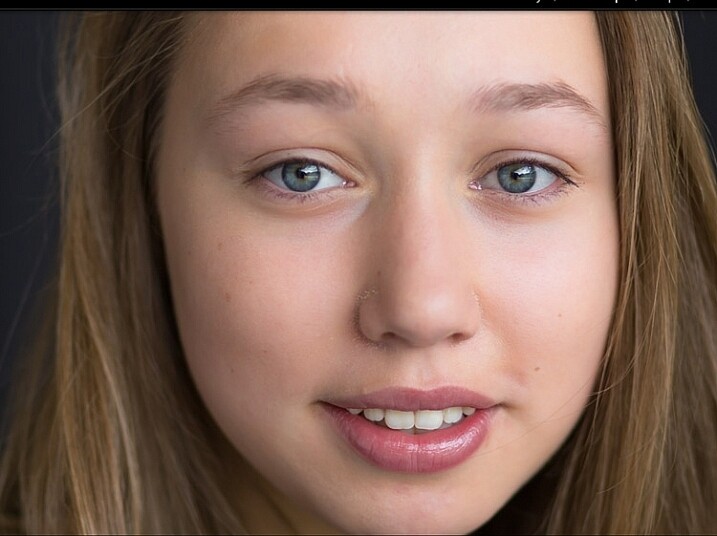
This before image is too cool for my liking, and there is not enough separation between the model’s hair and the background. I am also going to smooth out her skin tone, and bring a bit more sparkle to her eyes.

As you work through each step on your own image, play around with the sliders to see what effect each one of them has.

Step #1: Import your file
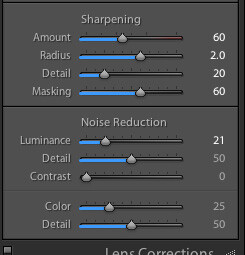
Image showing basic portrait editing in Lightroom

Sharpening preset

In the LIBRARY module, import your image into Lightroom. I have created a custom sharpening preset (shown here), which I find works with the majority of my portraits. I apply this preset upon import – a handy shortcut, especially when you’re importing a large number of images at once. It’s easy to create your own presets in Lightroom, read this tutorial How to Create Your Own Lightroom Presets on dPS, that shows you how.

To apply a preset on import, go to the righthand panel in LR, to the tab labelled “Apply during import”. Go to Develop settings > user presets, then click on the preset you wish to apply.

Once you have imported your file, go to the DEVELOP module.

Image for basic portrait editing in Lightroom

Import your file.

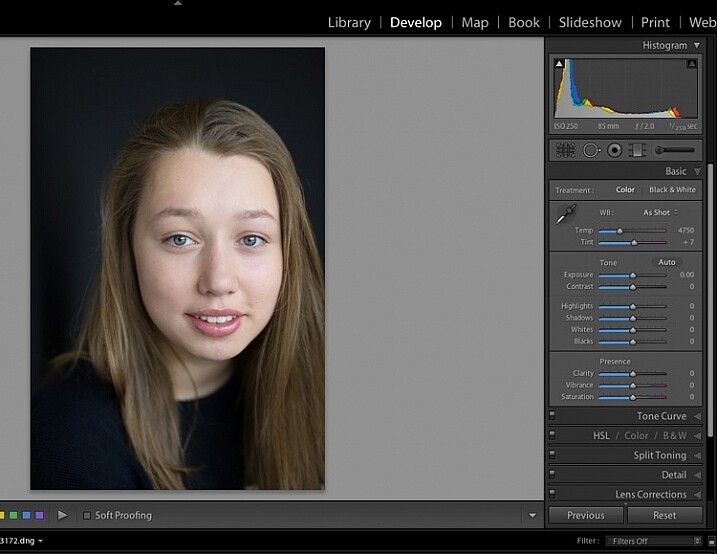
Step #2: Adjust  the white balance

The colour tint in this photo is a bit cold. There are a number of ways to adjust the white balance. If there was a neutral wall or surface in this photo, you could use the eyedropper tool. In this case, there isn’t a neutral reference, so I have moved the sliders under the white balance section to give the image more warmth.

Image for basic portrait editing in Lightroom

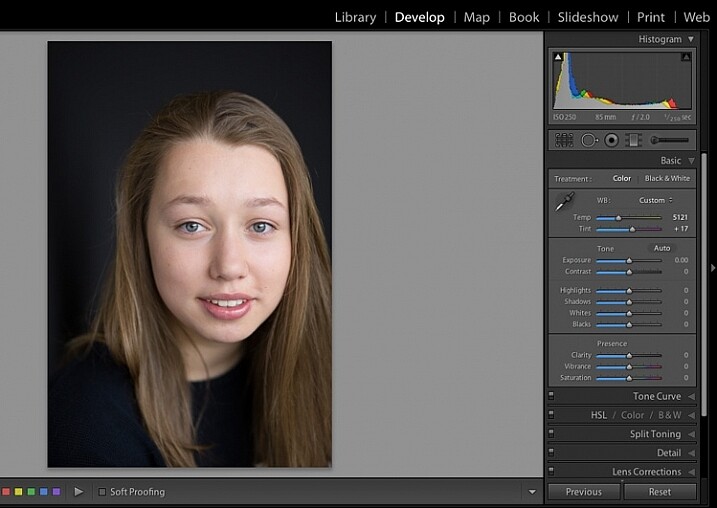
Correct the white balance.

Step #3: Adjust highlights and shadows

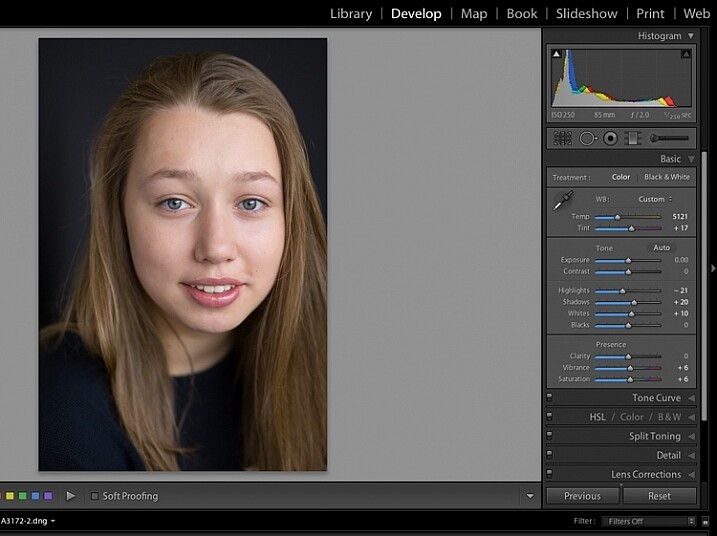
The model’s skin tone is a little too light, and her hair and the background are too dark. To redress the imbalance, pull back the highlights and lighten the shadows. You can fine-tune this later if necessary.

Image showing basic portrait editing in Lightroom

Adjust highlights and shadows.

Step #4: Increase vibrance and saturation

The image still looks a little dull. Use the sliders under the presence tab to increase the vibrance and saturation, and move the whites slider up to give your portrait a nice clean look. Now it’s starting to look like my model’s real-life skin tone.

Image showing basic portrait editing in Lightroom

Increase vibrance and saturation.

tep #5: Crop your image

You can crop at any stage. I’ve cropped this image for a tighter, better-balanced headshot.

Image showing basic portrait editing in Lightroom

Crop your image.

Step #6: Soften the skin

Zoom in to take a closer look at the skin. This model is very young with almost flawless skin. Usually I wouldn’t do much, if any, softening with such great skin. However, for the purpose of this exercise, I will.

Select the brush tool. You can load your brush with any adjustments you want to apply. Although there are brush presets you can use for skin softening, teeth whitening, etc., I find them too heavy-handed.

Set the clarity slider down to around -35 to -40, and the (contrast to +35, and the Highlights to +15 or so – this will help maintain contrast and keep the face from looking flat) sharpness up to +20. This will vary according to your subject’s skin, and the kind of effect you want to achieve. In this example it will just even out the skin tone and give it a soft, glowing appearance. A mature person photographed in stronger light, will require a different treatment. The lower the clarity slider, the softer the skin will appear. For a grungy look, increase the clarity slider.

Reducing the clarity tends to flatten out the image, so you can increase the contrast, deepen the shadows and increase the highlights to balance this out. Keep the feather and flow at 100%, and brush all over the face with a large brush.

Image showing basic portrait editing in Lightroom

Zoom in close to look at the skin.

Image showing basic portrait editing in Lightroom

Brush all over the area with your adjustment brush.

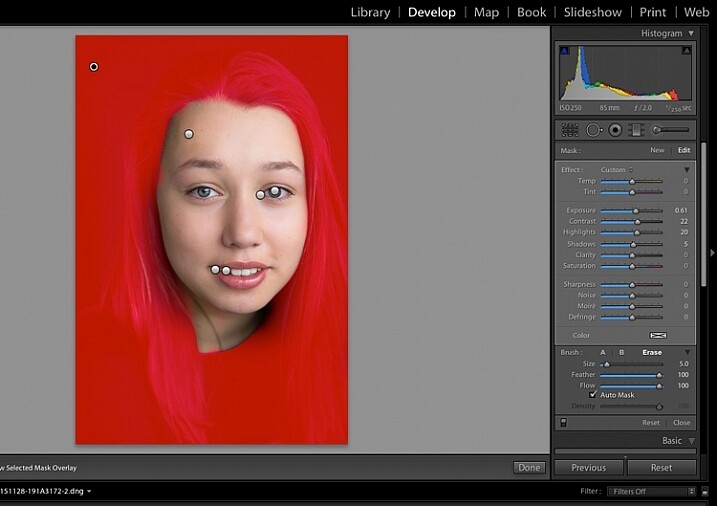
Step #7: Fine-tune your adjustments

Underneath the image, check the box “Show selected mask overlay”  (or use the keyboard shortcut, O) to see exactly what parts of the image your brush adjustments have touched. Often you’ll find it has covered the eyes and mouth, which is not desirable. Still using the adjustment brush, click on the erase brush tool, and remove the brushed-on effect from around the eyes, mouth, and hair.

Image showing basic portrait editing in Lightroom

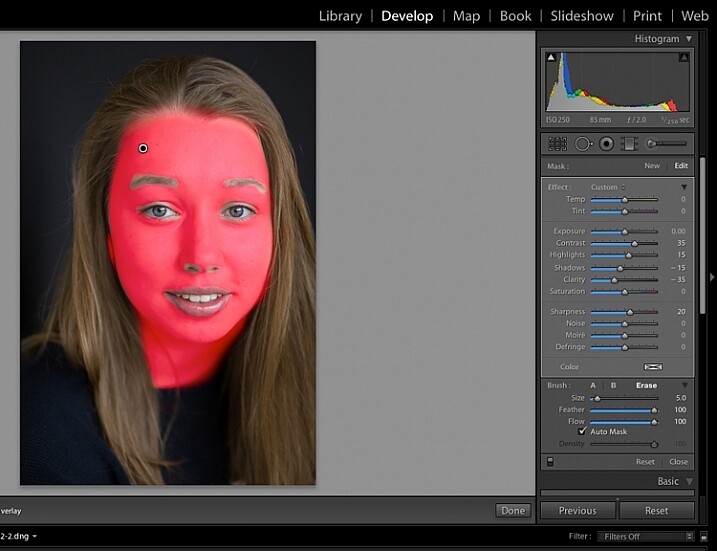
Brush off the adjustments from unwanted areas.

Image showing basic portrait editing in Lightroom

Here are the adjustments so far. Looking good.

Step #8: Brighten the eyes

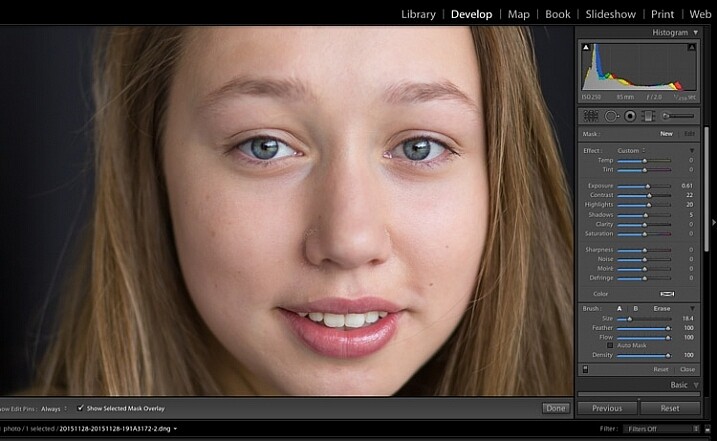
Zooming in even closer, then use the Adjustment Brush to add clarity and sparkle to the eyes. Note that by increasing the clarity, you also make the affected part of the image darker. Compensate with your exposure slider.

In this photo, I also increased the saturation of the iris a little to enhance the blue of the model’s eyes. Be sparing with this technique to avoid an unnatural look.

Image showing basic portrait editing in Lightroom

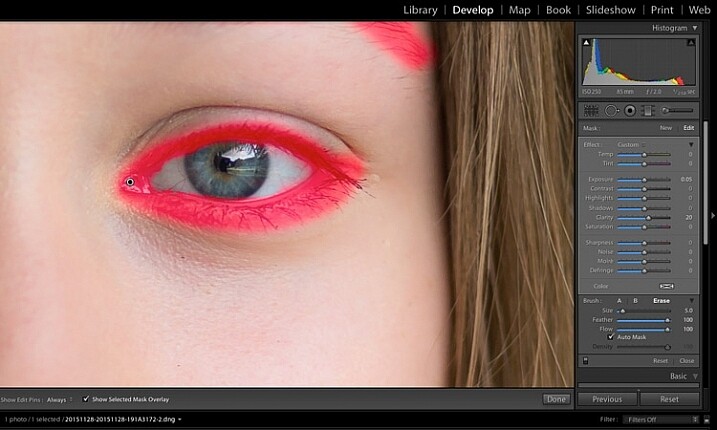
Use the brush tool to sharpen the outline of the eyes.

Image showing basic portrait editing in Lightroom

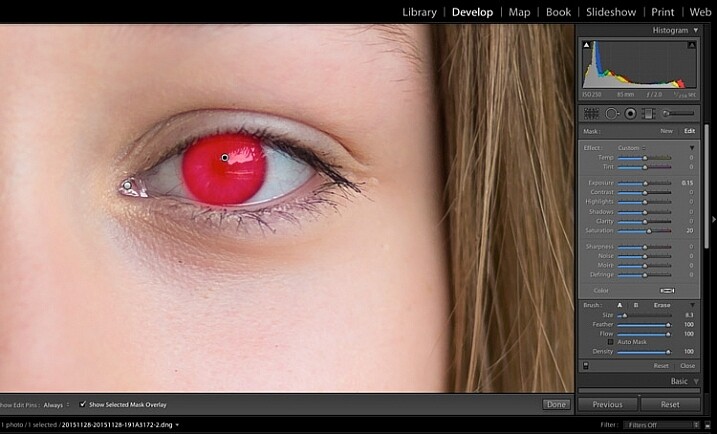
Treat the iris separately.

Step #9: Add colour to the mouth

Moving on to the mouth area now. Again, this model doesn’t need any work on her lips or teeth; this is for the purpose of demonstration. Using the same technique as with the eyes, brush on clarity and increase saturation. I have also moved the temp and tint sliders up to alter the hue of her lips.

Image showing basic portrait editing in Lightroom

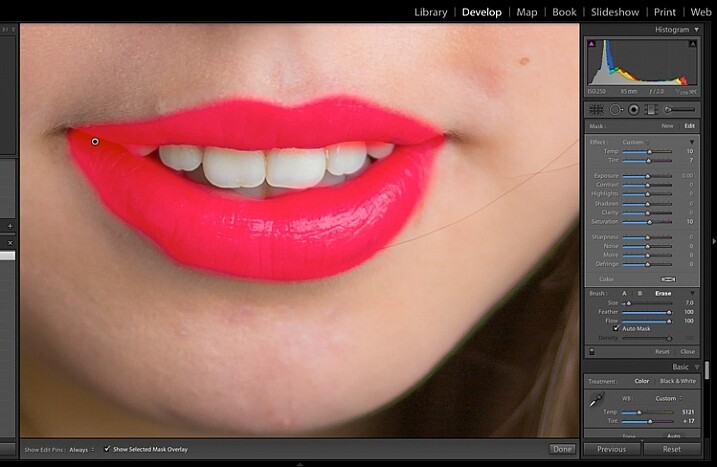
Brush over the lips to add colour and clarity.

Step #10: Whiten the teeth

To lighten teeth, use the brush tool with the saturation slider decreased, and the exposure slider increased just a little. As with the eyes, be sparing with this step.

Image showing basic portrait editing in Lightroom

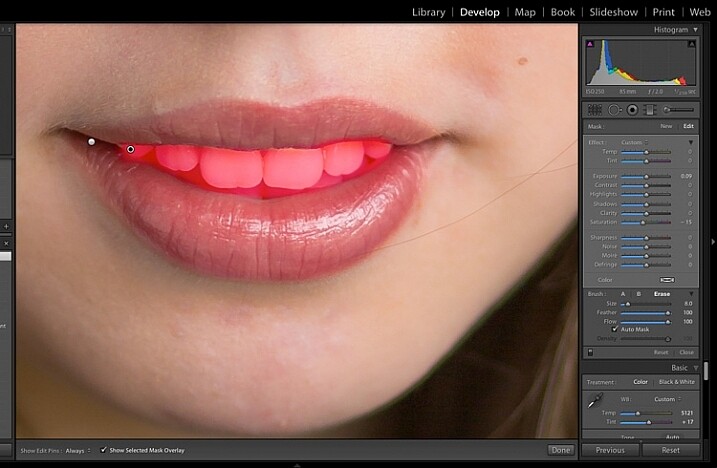
Lighten or whiten the teeth.

Step #11: Lighten the hair and background

Finally for this image I have lightened the hair and background to reduce contrast between her face and the background, and to give separation between hair and background.

Image showing basic portrait editing in Lightroom

Finally, lighten the hair and background to give separation.

The final image is a vast improvement on the SOOC (straight out of camera) image.

Image showing basic portrait editing in Lightroom

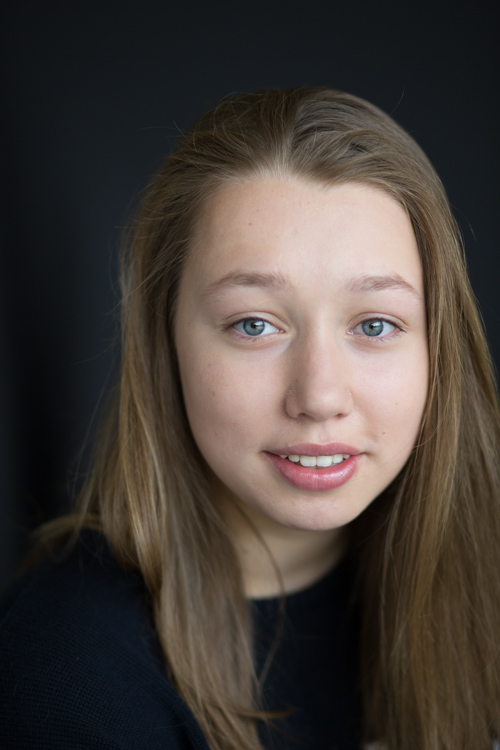
Before Lightroom adjustments.

Image showing basic portrait editing in Lightroom

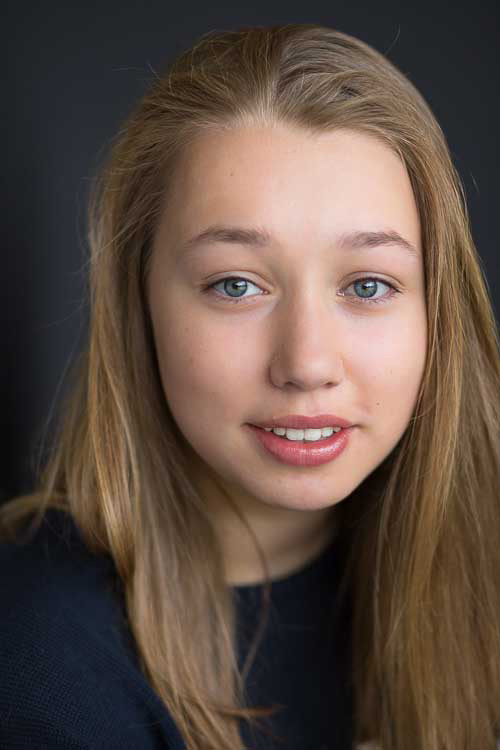
After all Lightroom adjustments.

Over to you!

Lightroom editing is as much about personal preference as your shooting style, and my workflow and style represents just one approach of many. Share your tips and tricks (and, of course, questions) in the comments section below.

googletag.cmd.push(function() {
tablet_slots.push( googletag.defineSlot( “/1005424/_dPSv4_tab-all-article-bottom_(300×250)”, [300, 250], “pb-ad-78623” ).addService( googletag.pubads() ) ); } );

googletag.cmd.push(function() {
mobile_slots.push( googletag.defineSlot( “/1005424/_dPSv4_mob-all-article-bottom_(300×250)”, [300, 250], “pb-ad-78158” ).addService( googletag.pubads() ) ); } );

The post 11 Steps for Basic Portrait Editing in Lightroom – A Beginner’s Guide by Karen Quist appeared first on Digital Photography School.


Digital Photography School

 
Comments Off on 11 Steps for Basic Portrait Editing in Lightroom – A Beginner’s Guide

Posted in Photography


13 Snow Photography Tips: A Beginner’s Guide

09 Mar

Does your heart jump a little on a beautiful winter day?

snow photography tips a beginners guide

Are you ready to run outside and start shooting? I know how you feel, I love snow photography too. Here are a few things to keep in mind:

13 snow photography tips: a beginners guide

The tips in this article will help you get some great photos in the snow, and keep your camera safe.

beginners tips for photographing show

1. Focus on contrast

Autofocus can have a hard time locking on, when everything is white. It helps to focus on something dark, like the bark that’s just below a lump of snow on a tree branch. Your camera’s autofocus system needs contrast to focus on, so a plain white mound of snow may cause issues.

photographing snow beginners tips

Press your shutter half way. If the focus won’t lock on, move your focusing point to a darker area of the subject, and try again. This usually does the trick.

2. Camera settings

Set your camera to shoot in RAW. When you take photos in RAW, you will have more to work with in editing. JEPG files are already condensed, and don’t allow for much editing. Learn about 5 reasons to shoot in RAW.

Choose Evaluative (Matrix for Nikon) metering. Evaluative metering will do a good job. That’s what I used for all the photos in this post. If it’s really sunny, you may also want to try Spot or Partial metering to see if it handles the light better.

Exposure Compensation – Your camera will try to make snow look gray, so set your exposure compensation to +1 or +2. That will keep the snow looking white. You can also adjust exposure compensation while editing.

3. Shoot in Aperture Priority Mode

Aperture Priority (AV on Canon, A on Nikon) will allow you to quickly change your depth of field. When shooting in Aperture Priority the camera will choose the ISO, (if the camera is set to auto ISO) and the shutter speed, so all you have to do is switch between aperture settings. This is great in cold weather, and allows for a lot of creativity.

4. Capture it fresh

There’s noting like a fresh snowfall.

snow photography tips

If you want footprint free snow, you might want to plan which photos you’re going to take, and what order you’ll take them in. This might also mean going out early, before the kids get up.

5. Keep your batteries warm

In cold weather your batteries won’t last long. Charge two, and keep one in an inside pocket. When the one in your camera runs low, replace it with the warm one. Then put the drained one in your pocket, you may be able to use it again once it warms up.

6. Bag your camera

Condensation can form on the outside, and inside of your camera, when you bring it in from the cold. That’s scary, but it’s easy to avoid.

When you are heading out, just bring along a large zip-lock bag. I usually keep one in my camera bag or jacket pocket. When you are ready to go inside, put your camera in the bag, and make sure it’s sealed tight. Then, once you’re in the house put your camera somewhere it can warm up slowly. Once it reaches room temperature, you can take it out of the bag and use it normally.

I leave my camera bag in the car while I’m taking photos. Before getting back into the car, I put my camera in the zip-lock bag, then in the camera bag. This way the camera comes up to temperature slowl,y and condensation doesn’t form.

7. Don’t let the weather stop you

Snowy landscapes look good, in both sunny and cloudy weather.

On cloudy days, when everything is white, include elements that will break up the white, and add interest to your photo. If it’s snowing, use an umbrella to protect your camera. Or if it’s too cold to go out, roll down your car window, grab your shot, and roll it back up.

snow photography tips for beginners

While I don’t take my camera out in super cold weather, some people do. Read more about protecting your camera and yourself in cold weather (by David Shaw who’s in Alaska and knows about cold weather!)

8. Act fast

Snow can change quickly. It can start, or stop falling in an instant. When the sun comes out, snow can start melting really fast too. Those beautiful trees can go from dazzling to drab in no time.

snow photography tips for beginners 2

Don’t wait. Get out there and photograph it.

9. Be patient

Light can also change really fast. The sun can go behind a large cloud and totally change how the snow looks. You may need wait for the sun to come out again. This can be hard when it’s cold, but it’s worth it!

photographing snow beginners guide

Sunshine and shadows, add beauty and drama to a snowy scene.

10. Keep all your images

Don’t delete any photos from your camera, wait until you’re warm and comfy, sitting in front of your computer. You’ll be able to see your photos more clearly, and your fingers won’t freeze.

11. Play with perspective

Shoot from different perspectives. Try to show the way snow blankets the ground, weighs things down, and clings to everything.

tips for photographing snow

Watch out for falling snow. It’s not so nice to have a clump land on your camera.

12. Play with shutter speed

Shutter Priority allows you to choose your shutter speed, while the camera takes care of the rest. With a fast shutter speed, you can freeze falling snow in mid air. With a slow shutter speed, you can turn those flakes into long white streaks.

13. Capture some Bokeh

A sunny winter day, is a great time to create bokeh. With all that sparkling snow and ice, it shouldn’t be too hard.

To create bokeh in your photos, look for a subject that has something bright or shiny in the background. This could be the light reflected off of ice, melting snow or some sunspots. Use a wide open aperture (a small number like f/3 or f/5), and make sure there is some distance between your subject, and the shiny background objects.

13 tips for photographing snow

With a shallow depth of field (from the wide aperture), your subject will be in focus, but the objects in the background won’t. This will create bokeh. See 28 wintery white snowy images.

Let it snow

Will you be out experimenting on the next snow day? I’m planning on it. Have fun with your snow photography. Experiment with different settings on your camera. Just remember to dress for the weather, and bag your camera.

If you have some snowy photos to share, I would love to see them. I hope you’ll share your tips too. Please add to this article by commenting below.

googletag.cmd.push(function() {
tablet_slots.push( googletag.defineSlot( “/1005424/_dPSv4_tab-all-article-bottom_(300×250)”, [300, 250], “pb-ad-78623” ).addService( googletag.pubads() ) ); } );

googletag.cmd.push(function() {
mobile_slots.push( googletag.defineSlot( “/1005424/_dPSv4_mob-all-article-bottom_(300×250)”, [300, 250], “pb-ad-78158” ).addService( googletag.pubads() ) ); } );

The post 13 Snow Photography Tips: A Beginner’s Guide by Dena Haines appeared first on Digital Photography School.


Digital Photography School

 
Comments Off on 13 Snow Photography Tips: A Beginner’s Guide

Posted in Photography


ISO, Aperture, Shutter Speed Guide for Product Photography

24 Feb

Who said you have to be a professional photographer to take a good picture—but wait, a great product image requires more than just lights, aim and shoot! When you are shooting products to sell on your ecommerce store, you want to achieve the best results possible. A remarkable product image can give your online store a professional look that tells Continue Reading

The post ISO, Aperture, Shutter Speed Guide for Product Photography appeared first on Photodoto.


Photodoto

 
Comments Off on ISO, Aperture, Shutter Speed Guide for Product Photography

Posted in Photography


Nissin releases i60A flash unit with a guide number of 60m

24 Feb

Flash manufacturer Nissin has announced a hotshoe flash unit that features a guide number of 60m and the company’s NAS 2.4GHz radio wireless control system. The Nissin i60A can control three groups of flashes in its role as a commander, or it can be controlled via another Nissin flash unit (only the Di700A at the moment) equipped with the NAS system or by the company’s Air 1 commander unit. Although each unit will have a TTL system dedicated to the mount it is designed for, the i60A also comes with multiple control systems built-in. This means that every flash can be used off-camera in an optically connected network of Canon, Nikon and Sony TTL flashes, no matter the mount. The i60A is equipped with 8 channels.

The zoom head covers focal lengths of 24-200mm, and it is at the 200mm that the quoted GN60m@100 ISO has been measured. The unit has been designed to be small so that it will be attractive to owners of compact system cameras – it measures 98x73x112mm and weighs 300g without batteries. Manual control allows 1/3-stop increments from full power to 1/256th, and auto exposure compensation is available up to +/-2EV.

The head rotates 180° and tilts directly upwards, and the unit is powered by 4AA cells, that Nissin says will provide 220 full power bursts, or via an external battery pack.

The Nissin i60A will be available for Nikon, Canon cameras in May 2016, and Micro Four Thirds, Sony and Fujifilm cameras in the future. No pricing information has been released yet. Nissin doesn’t have any English information posted yet, but there is a Japanese press release PDF on the website.

Articles: Digital Photography Review (dpreview.com)

 
Comments Off on Nissin releases i60A flash unit with a guide number of 60m

Posted in Uncategorized


How To Find Your Lens’ Sweet Spot: A Beginner’s Guide to Sharper Images

03 Feb

Are you tired of blurry images?

It’s time to learn how to capture sharper images by finding your lens’ sweet spot. This will give you more confidence, save time, and help you take better photos.

In this article you’ll learn:

  • How to find your lens’ sweet spot (for sharper images)
  • Why you should shoot in Aperture Priority mode (and how to use it)
  • How to perform a test to get your sharpest image every time
  • How important is your lens’ sweet spot? Notice the difference

Mid range aperture sharper than wide open

In the above images of the clock, the one on the right is sharper. Look closely at the words and at the leaves behind the clock. The f/9 image is sharper throughout because it was shot in my lens’ sweet spot. The f/3.5 one was not.

First, take a look at your lens

In this beginner’s guide, we’ll use an entry level zoom lens as our example. Most kit lenses (the basic lens that comes with a DSLR) generally shoot their sharpest at the mid-range aperture settings. To determine the mid-range of your lens, you’ll need to know its widest (or maximum) aperture setting. It is located on the side, or end, of the lens and will look something like this 1:3.5-5.6.

For example, here it is on my Canon 18-55mm zoom lens.

Lens aperture range

This means that when my lens is zoomed all the way out, its widest aperture is f/3.5. When zoomed all the way in, its widest aperture is f/5.6.

The rule to finding that mid-range sweet spot, is to count up two full f-stops (aperture settings are called f-stops) from the widest aperture. On my lens, the widest aperture is f/3.5. Two full stops from there would bring me to a sweet spot of around f/7.

Use this chart to count your f-stops

Robin Parmar

By Robin Parmar

There is some wiggle room in the mid-range, so anything from f/7 to f/10 will capture a sharp image. Once you know the mid-range of your lens, you can do an easy test to get your sharpest image. To perform the test you’ll need to shoot in Aperture Priority mode.

Take control with Aperture Priority Mode

Shooting in Aperture Priority allows you to choose the aperture setting you want, which gives you more creative control than Automatic mode. By controlling the aperture setting, it’s much easier to get a sharp image, and because your camera still chooses the ISO (if you are set to Auto ISO) and shutter speed automatically, it’s very easy to use.

You’ve probably heard that apertures like f/16 and f/22 are best for keeping everything in focus. While that can be true, focus does not always equal overall sharpness. Choosing a mid-range aperture will give you sharper images throughout. You can improve them even further by reducing camera shake with a tripod and a remote shutter release (or your camera’s self-timer).

Here’s an example of how shooting in your lens’ sweet spot will give you sharper images.

Sharp images shot in lens sweet spot

Mid range f stop sharper than small f stop

In the above split-image, the f/9 image is sharper than the f/22 one. The needles and shadows are not as soft or blurry as in the f/22 shot (look at the crispness and sparkles in the snow too).

Switching from Automatic to Aperture Priority Mode

To take your camera out of Automatic and put it in Aperture Priority, just turn the large Mode Dial to Aperture Priority. This is what that looks like on my Canon (on Nikon and other brans look for the A).

Aperture priority on canon mode dial

Automatic mode is the green rectangle; Aperture Priority mode is the Av (or A on a Nikon). Once your camera is in Aperture Priority mode, turn the smaller Main Dial (shown here on the top of my Canon) to choose your f-stop.

Main dial canon

As you turn that dial, you’ll see the f-number changing on your screen. In the next picture, it’s set to f/9.5.

Aperture setting on canon LCD screen

Perform a Lens Sweet Spot Test

Once you have your camera set up on a tripod, performing a sweet spot test only takes a couple of minutes. To begin, put your camera in Aperture Priority mode, then compose your shot and take a photo at varying apertures. Start out with the widest, then click that main dial a couple of times (to the right) and take another. Keep doing that until you’ve taken seven or eight photos.

Upload your photos to your computer and zoom in on them. You’ll quickly see which aperture settings gave you the sharpest overall image.

This next photo of my daughter was shot using natural light. Shooting in my lens’ sweet spot gave me a pretty sharp image, even in this low light setting.

Mid range aperture sharp image low light

Find your lens sweet spot for sharper images

The close up of the mugs shows the advantage of shooting in the lens’ sweet spot. Whenever you want to make sure you get the sharpest capture possible, take a shot at each mid-range setting f/7, f/8, f/9, and f/10.

Getting Your Sharpest Images

Now that you know your lens’ sweet spot, it’s time to practice. I hope you’re as pleased with the results as I’ve been!

Mid range aperture for sharper images

I love shooting in natural light, and learning how to capture sharper images in low light has made me so much happier with my photos.

Tips for capturing your sharpest images:

  • Shoot in Aperture Priority mode
  • Choose a mid-range aperture (usually f/7 to f/10)
  • Use a tripod and a remote shutter release (or your camera’s self-timer) to reduce camera shake
  • Take a series of shots at f/7 through f/10 when a sharp capture is especially important

But don’t stop here. Keep playing with settings in Aperture priority mode. It’s awesome to get images that are sharp throughout, but there’s a lot more to aperture than that.

Learn more about aperture and depth of field here.

Do you have any lens sweet spot tips to share? Please do so by commenting below.

googletag.cmd.push(function() {
tablet_slots.push( googletag.defineSlot( “/1005424/_dPSv4_tab-all-article-bottom_(300×250)”, [300, 250], “pb-ad-78623” ).addService( googletag.pubads() ) ); } );

googletag.cmd.push(function() {
mobile_slots.push( googletag.defineSlot( “/1005424/_dPSv4_mob-all-article-bottom_(300×250)”, [300, 250], “pb-ad-78158” ).addService( googletag.pubads() ) ); } );

The post How To Find Your Lens’ Sweet Spot: A Beginner’s Guide to Sharper Images by Dena Haines appeared first on Digital Photography School.


Digital Photography School

 
Comments Off on How To Find Your Lens’ Sweet Spot: A Beginner’s Guide to Sharper Images

Posted in Photography