RSS
 

Posts Tagged ‘Great’

How to Take Your Portrait Photos From Good to Great with a Single Click

12 Oct

Do you enjoy portrait photography? Are you a Lightroom user? You’re going to love what we’ve just released today!

It’s our all new Adobe Lightroom® presets bundle: 101 Lightroom Portrait Presets.

NewImage
With our new presets pack, transforming your portrait shots is a breeze.

And for a limited time, the pack can be yours for the special introductory price of just USD $ 20 (that’s 60% off).

Check it out here.

In this comprehensive Portrait Presets pack you’ll get the following collections:

  • Art Series (7 presets): Get the look from the early 1900’s through to the 90’s.
  • Black and White (10 presets): A variety of black and white presets to give you that b&w portrait look.
  • Film Series (8 presets): Nothing beats the authenticity of film. These presets will re-create that professional film feeling.
  • Fix (20 presets): Fix a range of of issues including contrast, grain, highlights and sharpness.
  • Tone (14 presets): Change an array of tonal qualities.
  • Traditional Series (8 presets): Tweaks to give your portraits that classic look. Including Beach,
  • Outdoors, and Worn, amongst others.
  • Touch Up Kit: 37 brushes to help you touch up eyes, hair, lips and skin.

Created by professional photographer and author Rachel Devine, she’s done all the hard work for you so you can get the perfect edit for every portrait, without the fuss.

Here’s a short video of Rachel showing how easy it is to use these presets:

Simply apply the effect and adjust as desired… it’s fast and easy!

You’ll save a whole heap of processing time, while giving your portraits an instant “pop”. See Rachel demonstrate in the video on our product page.

Transform your photos in just one click. Pick up our 101 Lightroom Portrait Presets today – while we’re still offering it at the introductory price.

Please note: a copy of Adobe Lightroom is required to use these presets.

Also: Haven’t used presets before? No worries. Full instructions are included in the pack.

Lastly: like all our products this one has a 60 day satisfaction guarantee. If you buy it and find for whatever reason that it doesn’t suit your needs simply contact our support team and we’ll arrange a refund – no questions asked.

googletag.cmd.push(function() {
tablet_slots.push( googletag.defineSlot( “/1005424/_dPSv4_tab-all-article-bottom_(300×250)”, [300, 250], “pb-ad-78623” ).addService( googletag.pubads() ) ); } );

googletag.cmd.push(function() {
mobile_slots.push( googletag.defineSlot( “/1005424/_dPSv4_mob-all-article-bottom_(300×250)”, [300, 250], “pb-ad-78158” ).addService( googletag.pubads() ) ); } );

The post How to Take Your Portrait Photos From Good to Great with a Single Click by Darren Rowse appeared first on Digital Photography School.


Digital Photography School

 
Comments Off on How to Take Your Portrait Photos From Good to Great with a Single Click

Posted in Photography


9 Tips for Creating Great Street Portraits

02 Oct

I love taking street portraits. Whether the people you are photographing are posing or just going about their day-to-day life, humans are the most captivating, strange and interesting of subjects.

9-tips-for-creating-great-street-portraits-01

Most of my portraits taken out on the street are shot with the permission of the subject. That’s my style. I love looking for people who intrigue me. I often signal them with a smile and gesture of my camera, then watch for their reaction. But I also shoot unposed portraits and life on the street, whatever catches my eye.

I know from my workshops that a lot of people find photographing strangers difficult and even, sometimes, terrifying. What is important to remember though, is that most people like to be noticed. It’s a compliment to be seen and thought of as interesting. But if they don’t like it, then the worst that can happen is that you have to delete the photo. Simple. Plus the more you do this, the easier it gets.

9-tips-for-creating-great-street-portraits-02

Here are some tips for creating interesting and evocative street portraits:

#1 – Simplicity

“The one guiding idea was to strip away the visual noise of the street so that the people emerge in a different and hopefully more surprising way.” Eamonn Doyle

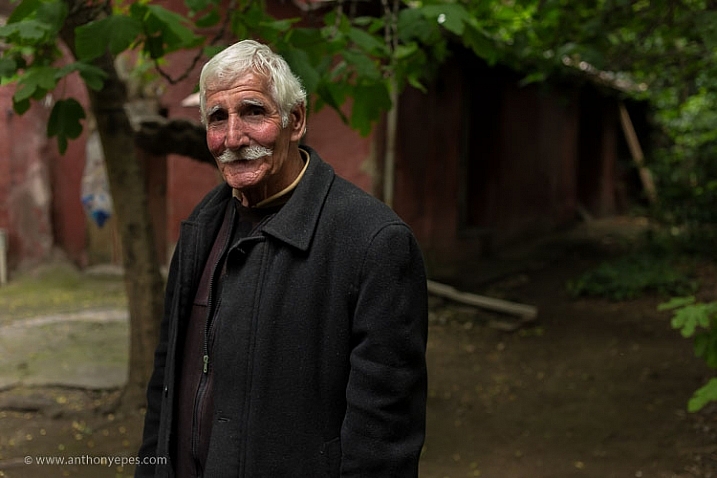
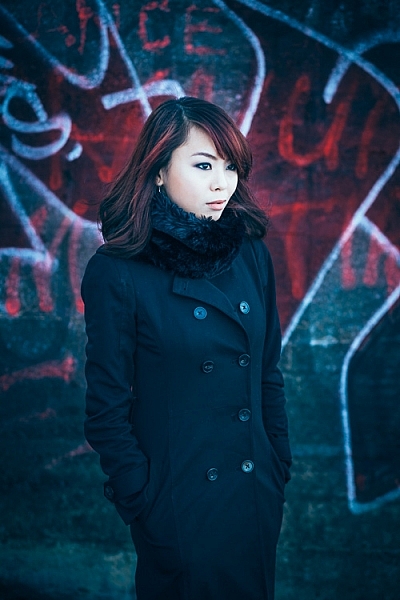
I am a lover of simplicity in my composition and when it comes to street portraits, simplicity really is your friend. One thing that ruins so many portraits is a busy, complicated background. A background that’s too busy will make your image look flat because your camera can’t capture the depth that your eye can. You have to create depth yourself with your composition. A busy background will swallow up your subject and distract your eye.

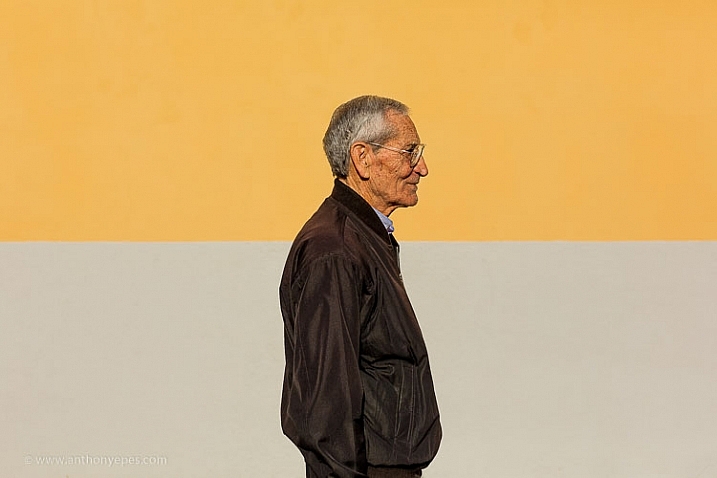
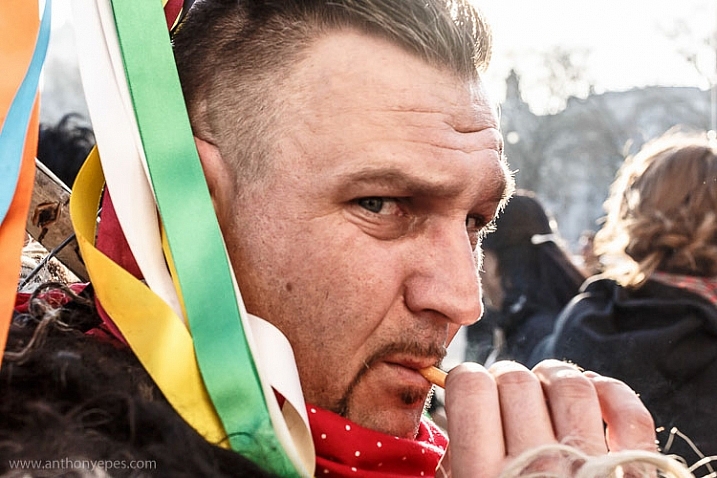
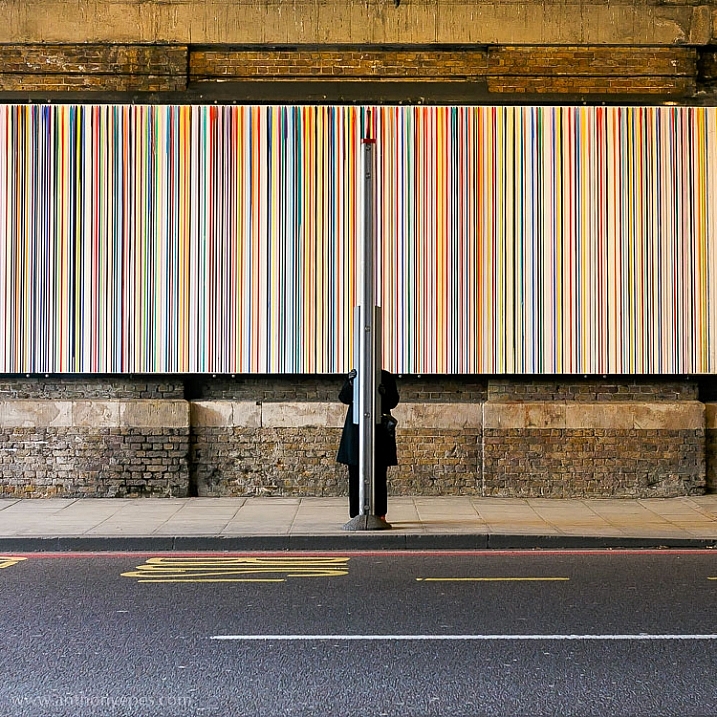
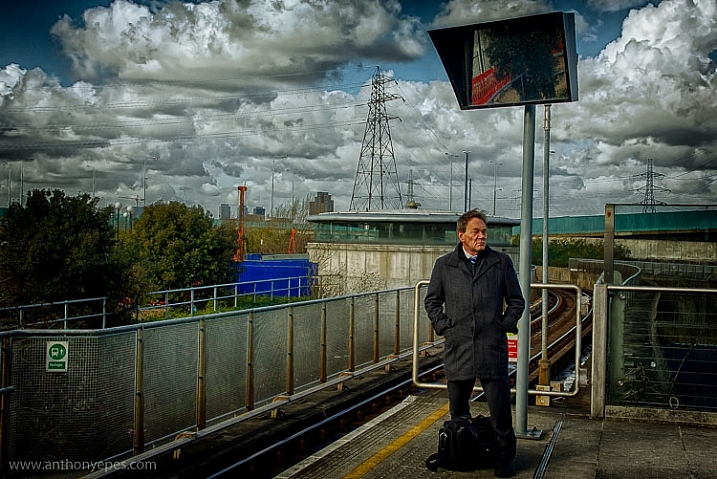
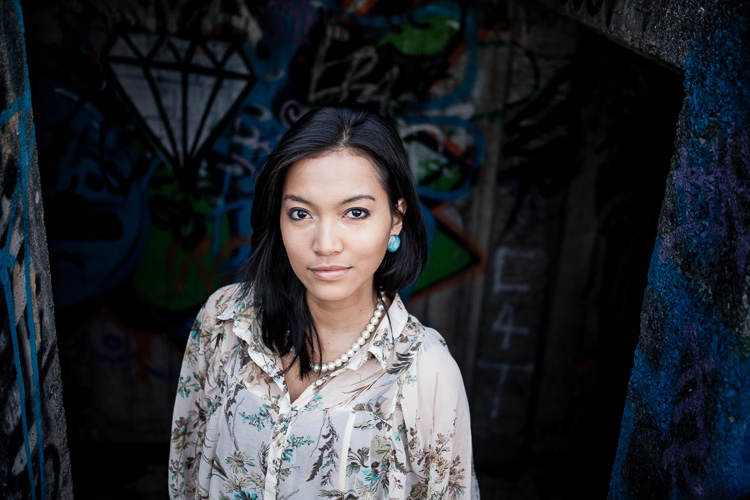
One of my favourite types of backgrounds for street portraits is something clean, colourful, and strong, like the image below. The line in the middle creates a really strong balancing element for the subject. The strength of the colours and line contrast nicely with this older man, who with that slight smile looks like he knows a thing or two about life.

7-tips-for-creating-great-street-portraits-03

#2 – Break the world down into elements

You can simplify the purpose of composition into the idea that you are simply breaking down the world into elements and organizing them in an interesting way.

I find it really helpful to look at composition with this in mind – that all you are doing is organizing the world’s elements. It helps because our eyes make things very complicated for us photographically as we see everything in 3D. Not only do we see and sense hundreds of thousands of pieces of visual information every minute from all around us, but our senses can pick up on things happening behind us as well.

street-portrait-tips-6

To break this visual overload created by your eyes when you are bringing the world into your frame, start by breaking down what you see around you into elements – an interesting mural, strong lines on the road, beautiful shadows, etc. Then build your composition up from there. You only need one or two interesting elements to make a photo. Ones that work together and say something through their balance, shape, or placement.

An example

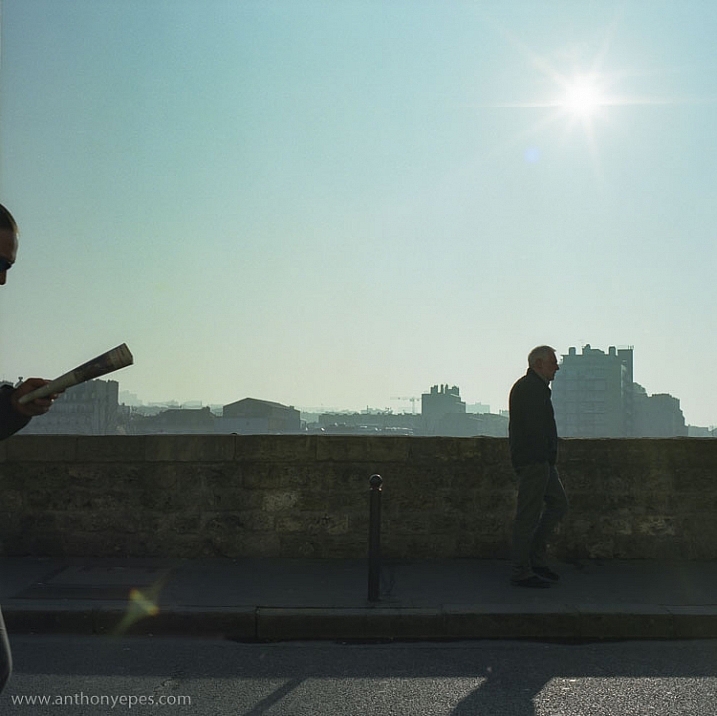
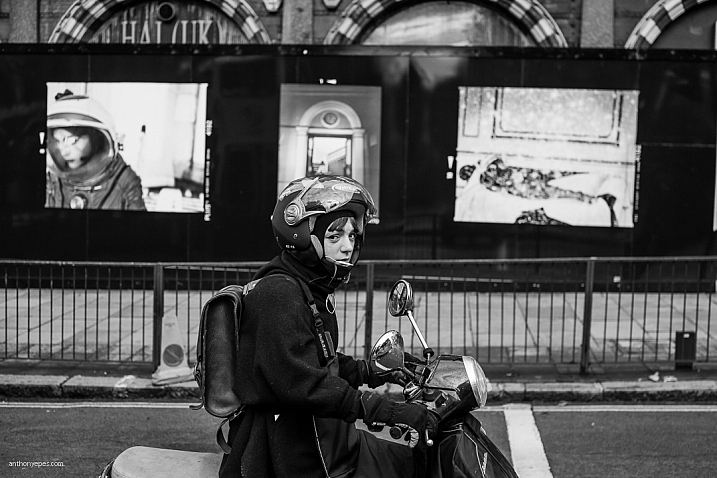
This photo below is super simple. Very little going on, but I like it. What do you think makes it work? There are a couple of strong elements here that make it an interesting photo. Firstly it’s the hand holding the newspaper with a glimpse of the face reading. Then the man farther ahead walking.

Now these two men, combined with that strong line of the wall, makes it look to me like a conveyor belt. You know that it’s morning, partly because of the sun, and then the newspaper, that’s the kind of thing you do on the way to work right? So now you have a little story, perhaps about the repetitiveness and the monotony of the human experience?

street-portrait-tips-2

I don’t always see a story in an image when I am shooting; often that comes after when I’m looking at my photos and sharing them. But what I do concentrate on is looking for interesting elements and figuring out how to place them together to make an interesting composition.

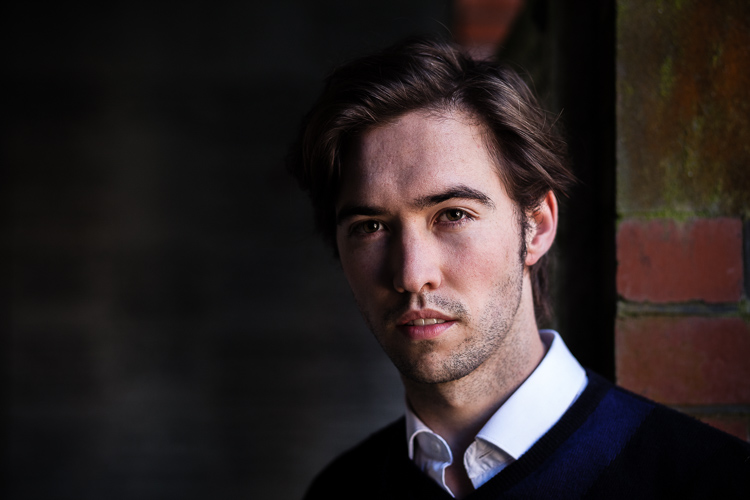
#3 – It’s all in the eyes

“The face is a picture of the mind as the eyes are its interpreter.” Marcus Tullius Cicero

When you are starting out taking photos of people it can be a scary experience. So much so that you often rush too much – perhaps in an effort to get it done as quickly as possible and to not offend or upset anyone. But the more you shoot street portraits, and the more effort you make to relax into the experience, the more you can work on revealing the deeper emotions of your subject.

When you take a more relaxed and patient approach you give people the space to unfold and reveal their thoughts and feelings through their bodies, faces and, most powerfully, their eyes. Eyes tell you how the subject is feeling, and often thinking.

7-tips-for-creating-great-street-portraits-07

This is where having a camera is an advantage. As humans we don’t usually look into someone’s eyes for long periods of time. It’s too powerful! It takes the interaction with that human to another level. If you have a camera between you and your subject though, it acts as a sort of safe barrier. So you can then spend time observing them, seeing what their face is doing, looking into their eyes, and seeing how they really feel.

7-tips-for-creating-great-street-portraits-13

#4 – Be patient humans do funny things

“You don’t have to enhance reality. There is nothing stranger than truth.” Annie Leibovitz

9-tips-for-creating-great-street-portraits-09

street-portrait-tips-23

For me taking photos of people on the street is all about opening yourself up to, and noticing the comedy of being human, as Elliot Erwitt calls it.

“You can find pictures anywhere. It’s simply a matter of noticing things and organizing them. You just have to care about what’s around you and have a concern with humanity and the human comedy.” Elliott Erwitt

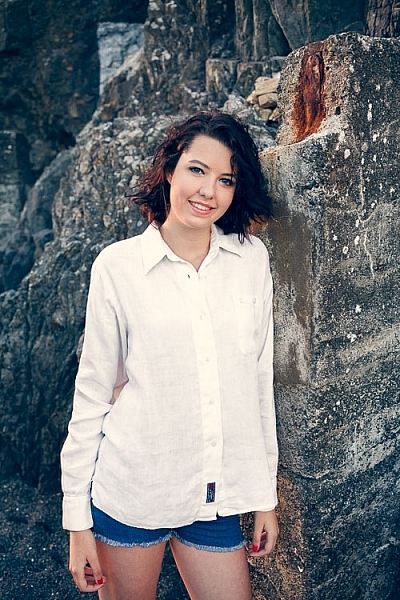
#5 – Find a great background and wait

There is a tradition in street photography that you find an interesting location; a background, a road, or sign, and then you wait for someone or something to happen in front of it. It requires patience, which is a very good thing to develop. I’ve noticed that patience is something that beginners often lack. Possibly because we live in a world that is so used to immediate gratification that we expect good shots to come in abundance.

It rarely works like that. I therefore like this idea of finding something interesting out on the street – some elements, or a place that fascinates you, then waiting for something to happen. It’s a great way to train your eye, and perfect your timing. Plus, when you continually gaze at one place you become very familiar, very intimate with it. You’ll notice things that initially you didn’t see.
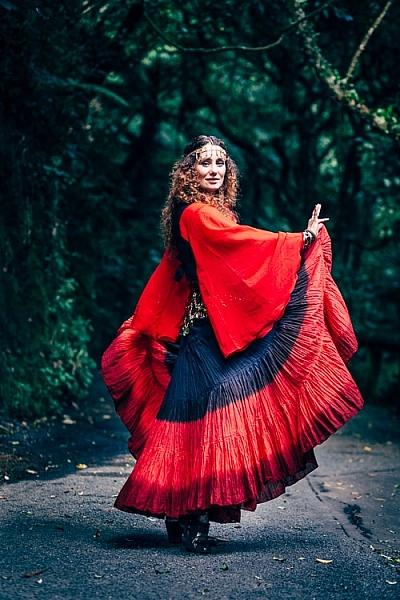
street-portrait-tips-8

#6 – Use colour

“I paint because colour is a significant language to me.” Georgia O’Keeffe.

Colour is also a significant language for me and I have always preferred shooting colour over black and white. I love the feeling you can communicate with colour and I think it moves me as much as light. So for me it’s an integral part of my style.

Street photography is often dominated by black and white photography. Although what I am doing is often not strict street photography (however, Bruce Gilden, controversial street photographer extraordinaire, did say “If you can smell the street by looking at the photo, it’s a street photograph.”).

street-portrait-tips-26

Whether you use colour or black and white, do what excites you the most. The more excited you are by your subject and what you are creating, the more you’ll imbue your photos will feeling and depth.

Colours communicate different feelings and ideas (e.g., yellow is warm and happy, green is peaceful, red signals confidence and aliveness). I love to use them to contribute to the story that I am telling with my images.

street-portrait-tips-14

#7 – Your camera is your licence to be curious

“I love that having a camera basically gives you a license to go up to anyone and ask them what they’re doing and why.” Andrew Hinderaker

Most people are perfectly happy to be photographed. That’s the key when you’re going out and about. My mantra when taking photos of strangers is – be confident (this comes with practice), friendly, curious, and ethical. In other words, I prefer to photograph people who are okay with the experience. I don’t generally photograph kids and the obviously vulnerable, etc. That’s my ethical line. For me photography is an exchange and I respect everyone whom I photograph.

7-tips-for-creating-great-street-portraits-10

Humans are built to want to connect with other humans, and photography is a powerful form of connection when you use it as such. When you are taking someone’s photo you are basically saying – I see you, you interest me. And for most people that’s a wonderful compliment.

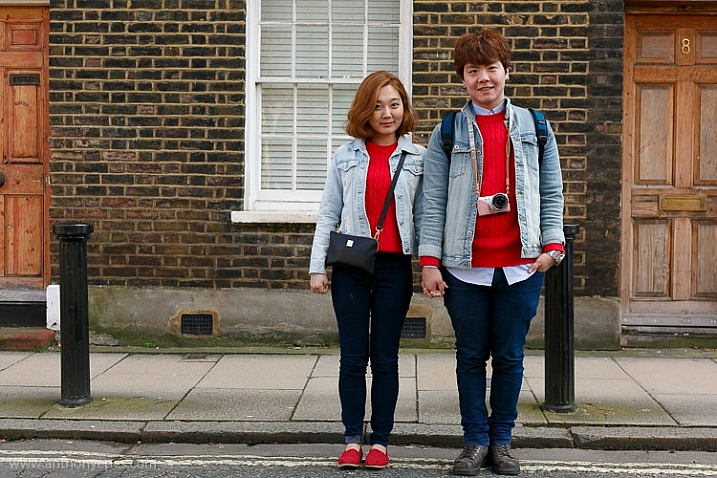
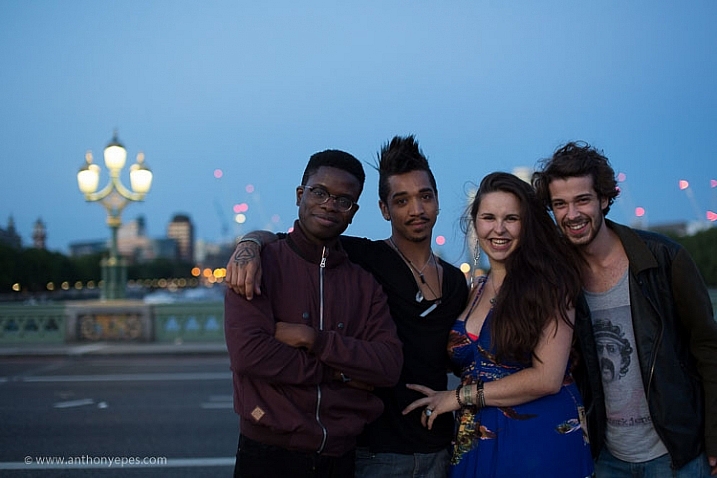
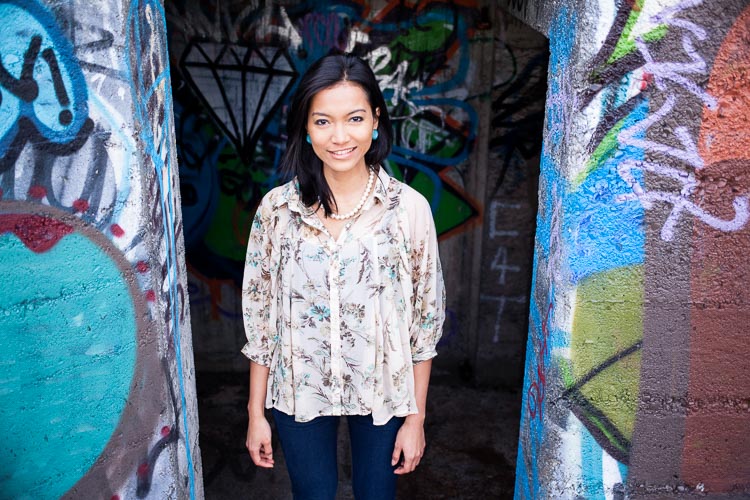
For me the portrait above is about two things, the light and the couple smiling. The warmth of their smiles match the warmth of the light, as well as the lush, summery background of grass and trees. I took this photo by just smiling at the couple and gesturing with my camera. Of course the fact that it was a beautiful summer’s evening and we were in the park helped. People who are relaxing and enjoying themselves are, of course, easier subjects to approach.

#8 – The power of the gesture

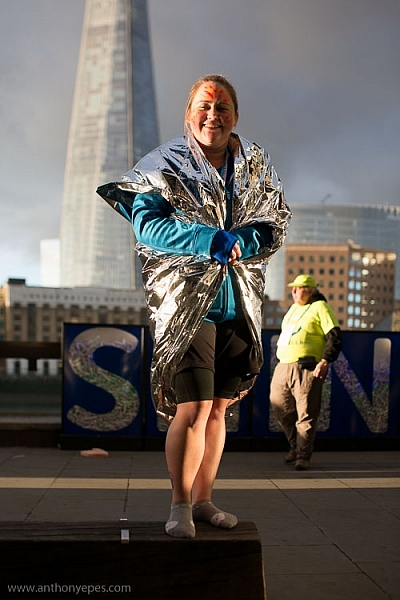
The more closely you watch humans the more you see how they reveal themselves in so many ways. This was a photo I took for a project I was doing on people’s bellies. Each photo was totally different because the way that people presented their bellies and the gestures they made, showed so much about their personalities, what they felt about themselves, and their bodies.

street-portrait-tips-18

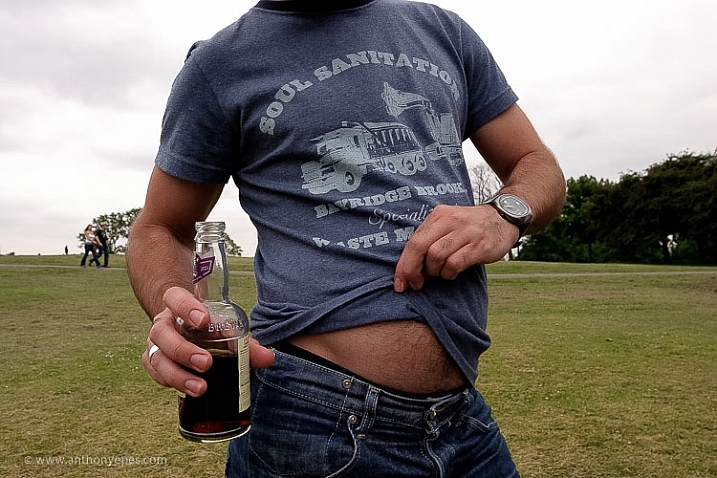
Keep watch of people’s gestures. Along with the eyes, hands are very revealing of people’s feelings and thoughts (and apparently hands are easier to read than eyes if you want to tell if someone is lying).

#9 – The key to original, interesting photos is to be yourself

“I’m photographing myself out there. Not myself physically, but mentally. It’s my take on the world.” Bruce Gilden

A lot of people in workshops worry about how over-photographed the world seems now and will they ever have anything interesting or original to contribute? Hasn’t it all been done before? Well, this is the wrong way to think about it. Of course the world is very photographed now. Especially places that I visit, London, Paris, Venice, Istanbul, etc.

But the world isn’t a staid thing – it’s an ever-changing, ever moving, organism. Nothing stays the same. Having humans moving around the world makes the possibilities for original and interesting photos infinite.

street-portrait-tips-4

More importantly though, photography is an expression of who you are. When you start out perhaps you’ll take photos like everyone else. But the more you do it, the more you’ll create something unique and original that’s a total expression of who you are – your passions, experience, style, and way of seeing the world. This creates the unique and interesting photographs that you are aiming for. It’s just like famous jazz musician Miles Davis says:

“Sometimes you have to play a long time to be able to play like yourself.”

Conclusion

I’d love to know what you think. What do you do to create interesting street portraits? Comment below, I’d love to hear your ideas!


Taking street portraits and exploring the street life of cities with your camera is an exhilarating experience. Learn how to conquer your fears of street photography and to create compelling compositions with Anthony’s popular street photography workshops in some of the most vibrant cities Europe.

googletag.cmd.push(function() {
tablet_slots.push( googletag.defineSlot( “/1005424/_dPSv4_tab-all-article-bottom_(300×250)”, [300, 250], “pb-ad-78623” ).addService( googletag.pubads() ) ); } );

googletag.cmd.push(function() {
mobile_slots.push( googletag.defineSlot( “/1005424/_dPSv4_mob-all-article-bottom_(300×250)”, [300, 250], “pb-ad-78158” ).addService( googletag.pubads() ) ); } );

The post 9 Tips for Creating Great Street Portraits by Anthony Epes appeared first on Digital Photography School.


Digital Photography School

 
Comments Off on 9 Tips for Creating Great Street Portraits

Posted in Photography


Getting the Right Timing for Great Outdoor Photographs by Planning Ahead

09 Sep

There is more to taking great outdoor photographs than a pleasing composition and the correct exposure. There is another important aspect. One that is too often overlooked when trying to capture a beautiful scenic subject or vista. The right timing is required to get great photographs.

Often on social media sites, images are posted that show ideal composition and exposure. But they are not photographed at the best time of day to capture the most attractive and interesting image. Some say that taking the most eye-catching photos is only about luck; being in the right place at the right time. But with the proper preparation, the odds of creating an exceptional photo can be increased. Certainly, without any pre-planning, you may be able to create “okay” images on a regular basis, but let’s examine the role timing takes in capturing more stunning images.

Here shooting toward the east in the evening produced some nice light on this image.

Shooting toward the east in the evening produced some detail-revealing light on this image.

Research

Much preparation for an outdoor photo shoot can be done from your computer, before even leaving the house. Listed here are three very effective tools that can help you find great shots. They can show you where you want to be, and when you want to be there:

  • Google Earth: The Google Earth software provides street views of any location on earth. This is very useful, as you can literally see and plan a shot from your computer before leaving to shoot. Google Earth gives you the ability to determine the best location, and its ideal angle to capture before even arriving!
  • GPS: Use GPS devices to help navigate to the exact location where you plan to shoot.
  • The Photographer’s Ephemeris: TPE is a very useful on-line tool to help plan outdoor photography. Its maps show how natural light falls on the earth both day and night for any location on earth, and for any time or day in the future!

    Screen capture from TPE showing the direction of the sun at the time the image of the statue and church was captured.

    A screen capture from TPE shows the direction of the sun when the above image of the statue and church was captured.

Time of day

Photographing at the right time of day is a big factor to getting the right light for a special image. It is a well-known fact among serious art-driven photographers, that some of the best light for making great outdoor images, happens early in the morning and late in the afternoon. These are called the “golden hours”.

But in addition to shooting during those times, notice should be taken as to where the sun is casting its light. Shooting into the light will mean that your subject will be in the shadows, or even silhouetted. Yes, the exposure can be compensated in this situation, but watch what happens to the sky in the image. It will be blown out and colorless. There are times when this shot may work, but the point here is to always be aware of the direction of light.


Same location as above, but this time it was shot in the morning. Notice how the sky is completely blown out when getting the exposure on the statue. Even tho this is nearly the same image as above, it doesn't have near the impact.

Same location as above, but taken facing into the morning sun. Notice how the sky is completely blown out when the exposure is set for the statue. Even though this is almost the same image as above, it doesn’t make near the same visual impact.

Don’t leave this factor to luck. When planning a trip, try to schedule the day around good light. Shoot westward in the morning, and toward the east in the late afternoon and early evening. Midday light in most cases is very harsh, and produces very contrasty images and deep shadows. Again, producing arresting images in this light is possible, but is also definitely more challenging.

So what does one with a camera do in the middle of the day? Rest or travel! The bottom line is, that if you are on vacation, with an open agenda, and are looking to take great photos of the sights, plan around the light to get the best results.

Using TPE I was able to determine the exact day that the sunrise would aline with the bridge to capture a one of a kind image.

Using TPE I was able to determine the exact day that the sunrise would aline with the bridge to capture a one of a kind image.

Season

Considering the season of the year can make a great difference in your photos. The angle of the sun changes from season to season. For instance, photographing a deep canyon in the winter will produce a much different image than one taken in the summer. Because of the lower angle of winter sun, light won’t reach the canyon floor as it would in summer.

Besides the change in light, there is the obvious a variation of foliage colors (or the absence thereof) from one season to the next, that can completely change the image captured at a given location. Sometimes it is fun to capture a four-season image of the same subject and location.

Weather

Weather conditions are a great factor when it comes to capturing the perfect scene. They should always be considered, even though they can’t be planned.

Overcast days, while not great for sky images, often produce very nice even lighting. This is ideal for shooting things like waterfalls. Bright sunlight can make it almost impossible to capture the scene without blowing out the water, and making it necessary to use a Neutral Density filter. Don’t look at dreary weather as always being a negative; rather, turn those negative conditions into a positive result. For instance, a foggy morning may mess with a pre-visualized image in one location, but an alternative location nearby may be perfect for foggy conditions.

This waterfalls was captured while the sun was shining. Notice the hot spots created by the sun on the water.

These waterfalls were captured while the sun was shining. Notice the hot spots created by the sun on the water.

Same waterfalls as above by this time captured in cloudy conditions allowed for a long exposure with out the hot spots or a ND filter.

Cloudy, overcast conditions allowed for a long exposure of the same waterfalls, removing the hot spots or need for an ND filter.

Rainy conditions may also produce pleasing effects on the subjects being photographed, darkening bright rocks and saturating foliage. However, it may be necessary to use a polarizing filter to reduce glare.  Also, when faced with unexpected weather conditions, be patient! Some rather fantastic shooting conditions occur following storms. Watching and waiting for just the right weather-related effects can provide an opportunity to capture a unique image, of even the most commonly photographed locations.

Special Occurrences

You could be out all night. Your tripod and camera all set up to watch the skies to photograph a meteor shower, and not see a single streak of light!  But with a little research you can ascertain when the next large meteor shower will occur. Thus the chance to capture the desired photos will be increased. To take the meteor shower experience one step farther, look for a night without a moon. This will help the stars to appear more vividly in the photographs. Use The Photographer’s Ephemeris to find special occurrences of the moon or sun, or look for times when the sun or moon rise or set may be in line with a special location. This a fun and creative way to produce a fascinating image, instead of an ordinary one.

Using TPE to reseach is image I knew the exact time an location of the full moon rising. What really made this image was the sunset at my back that was casting some fantastic light on the city. Knowing this facts allowed me to create a one of a kind image of Marietta Ohio. One that I have sold many times.

Knowing when and where the moon would rise allowed me to plan and be ready to capture a unique image of Marietta, Ohio. Using TPE to research this image, I knew the exact time and location of the full moon rising. The sunset light behind me cast fantastic light on the city, that absolutely defined the shot, prints of which I have successfully marketed.

Day of the week

Every photo event timing factor considered so far has had something to do with light and lighting. But timing also includes the aspect of planning a less stressful, more convenient, and possibly more productive photo shoot. The day of the week is one such factor.

Time off from day-to-day activities often happen for many individuals and families on the weekends. Many are out visiting popular locales en force on those days. High traffic photo sites are best visited mid-week. There will be a better chance of having more room to work, free of other photographers attempting to get the same shot.

Conclusion

To wrap up this article on timing and preparation, remember the five P’s of capturing that great image:

Proper Planning Prevents Poor Photographs

Whether just taking a day trip or a long vacation, planning your photographs around the best available light will increase your chances of capturing a memorable image.

Do you have any tips for planning for the best light? Please leave them in the comments below.

googletag.cmd.push(function() {
tablet_slots.push( googletag.defineSlot( “/1005424/_dPSv4_tab-all-article-bottom_(300×250)”, [300, 250], “pb-ad-78623” ).addService( googletag.pubads() ) ); } );

googletag.cmd.push(function() {
mobile_slots.push( googletag.defineSlot( “/1005424/_dPSv4_mob-all-article-bottom_(300×250)”, [300, 250], “pb-ad-78158” ).addService( googletag.pubads() ) ); } );

The post Getting the Right Timing for Great Outdoor Photographs by Planning Ahead by Bruce Wunderlich appeared first on Digital Photography School.


Digital Photography School

 
Comments Off on Getting the Right Timing for Great Outdoor Photographs by Planning Ahead

Posted in Photography


How to Find Great Backgrounds for Outdoor Portraits

11 Aug

Outdoor portrait photography involves going outside, and utilizing the beauty (or the ugliness) of your surroundings. You probably already know some local beauty spots, and can think of some good places to take portraits right away. But once you start observing your local area with the aim of making portraits in mind, you will begin to see the potential, even in mundane locations. But how do you find great backgrounds for outdoor portraits?

Portrait taken outdoors

Here are some ideas to get you started.

1. What lens are you going to use?

This is important because, broadly speaking, there are two different ways to take portraits. Both involve the use of different types of lenses.

The first is to to use a wide-angle lens to take an environmental portrait. This may be documentary in approach, or it may be more fashion or beauty orientated. Either way, the idea is that you use a wide-angle lens to take a portrait, and that the setting is as important as the model.

The second is to use a longer focal length, and shoot with a wide aperture to throw the background out of focus. In this situation the requirements for the background are different, because you are looking for something that looks good out of focus. Also, because longer lenses have a narrower angle of view, you are using less of the setting in your portrait.

Of course, it is more than likely that you can find opportunities to take both types of portraits, in the same setting. You may also make up your mind, once you have scouted a location and assessed its potential. But it helps immensely if you know what your approach to the shoot will be, while searching for a spot to shoot.

These two portraits show the differences in the two approaches. The first was taken with a 40mm lens (on a full-frame camera), and shows the setting as well as the model. The second was taken with an 85mm lens (also on a full-frame camera) and shows much less of the setting.

Portraits taken outdoors

2. Where does the light fall?

Some photographers tend to shoot portraits entirely in natural light; others use flash to supplement it. Whichever approach you take, it is still important to assess the quality of the light in your given location.

Take into account the time of day you plan to do the shoot. To take full advantage of natural light you should aim to shoot in late afternoon or evening, during the golden hour, when the sun is close to the horizon. For this reason it helps if you do your scouting at the same time of day, so you can see how the location looks in this beautiful light.

Another option is to take photos on a bright sunny day, but in the shade. The light bounces off nearby surfaces, which acts as a giant reflector. This is another type of natural light with beautiful qualities.

Alternatively, you might like to shoot on a cloudy day. This means that time of day is not so important, but it does mean that the light is most likely to come from above, and may create shadows under your model’s eyes and chin. In this situation you can use a reflector or fill-flash to minimize shadows. So think about whether there is room to set up a light-stand (if using flash) or for somebody to stand and hold a reflector (if using natural light).

This photo was taken in Wellington Botanical Gardens, and the model is illuminated by light coming from above, through the tree tops. As she is in costume, I thought the direction of the light was reminiscent of a spotlight on a stage, and appropriate to the style of portrait. I used a short telephoto lens (85mm, full-frame camera) to separate the model from the background.

Portrait taken outdoors

3. Use a smartphone to take photos

You can use a smartphone to take photos of locations to help you remember what they look like. Of course, you can do this with any camera, but the advantage of a smartphone is that most of them have GPS, and this helps you remember, and find, the exact location again later. This could be important if you are out in the countryside somewhere. There is nothing more frustrating than finding a great place to take some portraits, then not being able to remember where it is.

You could also import the photos into a specific Collection in Lightroom, and go to the Maps module to see the locations displayed on a map.

Here are some types of location you can search for. Remember, it’s important to think about what type of lens you are going to use for your portraits, as well as to assess the quality of light.

Backgrounds by the coast

Any location by the sea is full of potential. The same place can look very different every day, thanks to changing tides, weather patterns, and light. If the coastline is rugged, look for locations where you can use the rocks and cliffs as a background. Each bay or beach has its own character, so get out and explore. You are likely to find a good variety of beautiful locations, even in a relatively small area.

This photo was taken on a local beach, which has become one of my favorite locations for taking portraits, using a 40mm lens on a full-frame camera. This lens has a slightly wider angle of view than a 50mm standard lens, and allowed me to include a little of the beautiful location, but still make the model the focal point of the photo.

Portrait taken outdoors

Graffiti backgrounds

It may be bit of a cliche, but there’s no doubt that graffiti or street art, can make an interesting and colorful background.

This photo was taken on a local beach with a graffiti covered, concrete bunker in the background. I used an 85mm lens (on a full-frame camera) to include just a little of the artwork in the frame.

Portrait taken outdoors

Field and forest backgrounds

Fields and woodlands often make good locations for taking portraits, especially in the spring and summer. Fields of flowers are gorgeous locations. Try using a telephoto lens, and shooting through the flowers so they are out of focus.

The light in a forest is usually most suitable for portraits on a cloudy day. The light is soft, and unlike on a sunny day, your camera can easily cope with the brightness range. The one thing to watch out for is the direction of light. It comes from above, through the trees, and is highly directional. You will have to search for the places where gaps in the trees let light through. You may have to use a reflector to fill in the shadows created by the top light, or ask your model to tilt her face toward the light.

On sunny days, try shooting at the end of the day, when the light is softer, and use backlighting.

This portrait was taken on a cloudy day, in a thick forest where not much light penetrated through the trees. We found a clearing next to a large tree that we were able to use as a background. I used an 85mm lens (full-frame camera) to pull the tree in close to the model, and exclude most of the forest from the frame.

Portrait taken outdoors

Local buildings for backgrounds

Keep an eye out for local buildings with public access that you can use for photos. I’m not talking about busy locations, as they are difficult places to work, unless both you and your model are very experienced. Let me give you some examples.

Here’s an abandoned boat shed on a lonely beach. 

outdoor-portrait-locations-12

Test shot

outdoor-portrait-locations-13

This is the portrait we made at that location.

The second example is a graffiti covered concrete bunker left over from WWII.

Test shot.

Test shot.

Here’s a portrait we made there.

Here’s a portrait we made there.

In both examples I used a small part of the building as a background. You can see the same technique in the other photos in this article. The idea is to make sure the background complements the model in your portraits, and doesn’t overwhelm her.

Summary

The outdoors is a bit like a giant stage set, just waiting for you and your model to use. Wherever you live, I am sure that there are plenty of great locations for portrait photography nearby. It’s just a matter of learning to spot their potential, and thinking about which lens (or lenses) you will use for your portraits. 

Share some of your images from your favorite spots in the comments below.


Mastering Lenses

If you want to know more about buying and using lenses then please check out my ebook Mastering Lenses: A Photographer’s Guide to Creating Beautiful Photos With Any Lens.

googletag.cmd.push(function() {
tablet_slots.push( googletag.defineSlot( “/1005424/_dPSv4_tab-all-article-bottom_(300×250)”, [300, 250], “pb-ad-78623” ).addService( googletag.pubads() ) ); } );

googletag.cmd.push(function() {
mobile_slots.push( googletag.defineSlot( “/1005424/_dPSv4_mob-all-article-bottom_(300×250)”, [300, 250], “pb-ad-78158” ).addService( googletag.pubads() ) ); } );

The post How to Find Great Backgrounds for Outdoor Portraits by Andrew S. Gibson appeared first on Digital Photography School.


Digital Photography School

 
Comments Off on How to Find Great Backgrounds for Outdoor Portraits

Posted in Photography


Top tips for composing great landscapes

23 Jul

In this article I’ll try to outline a handful of the key elements that I look for when composing a photo in the field. The process of composing a photo can be daunting at times, but I hope that some of these tips will help you to lay the groundwork for developing an eye for composition in landscape photography.

Compositional Visualization: See the ball, be the ball

Developing an eye for composition in landscape photography is something that takes a great deal of time and practice in the field. Practice, persistence and due diligence do pay off and over time you will find yourself becoming more comfortable behind the lens.

The Mossy Grotto in the Columbia River Gorge in Oregon is incredibly difficult to shoot due to the limited compositional choices. I hiked around for almost 30 minutes before I settled on this composition which had a lot of layering and some nice diagonal leading lines to help to lead the eye to the focal point.

Mossy Grotto, Columbia River Gorge, OR

Sony a7R, Canon 16-35mm F2.8, 16mm- multiple exposures used for focus stacking and water movement. 

One thing that I’ve learned over time is that you absolutely have to pre-visualize your shot. This process starts with four key elements – the direction of the light, the focal point, the foreground and the leading line(s).

The focal point is often the first thing that your eye gravitates toward. It could be a waterfall, a mountain or even a stand of trees. If your eye gravitates toward it chances are it may serve as a good focal point to build your composition around. The next step in the process is to look for a leading line that guides your eye through the scene to your focal point.

I decided to use the river you see in this image as the leading line in this composition because it was able to the lead the viewer to the main focal point without detracting interest from it. I also enjoyed how the light in the composition added layers and depth to the image as well.

Glacier National Park, MT

Sony a7R, Canon 16-35mm F2.8, 16mm, F11, 1/15sec, ISO 160, single exposure

The ‘line’ is figurative of course. It can be a rock formation, a river, a series of interesting trees, vegetation or foliage, flowers, or even a trail. Choosing the correct leading line can have a large impact on your image. It is important to note though that the leading line may not work depending upon the direction of the light in the scene.

Let the light guide your eye to the focal point in the image

All of the elements need to work together to form a pleasing composition. Let the light guide your eye to the focal point in the image. Shadows and light play a huge role in guiding your eye through the scene and, when used correctly, can add a great deal of depth and interest to your photo.

I chose the Lupine you see here as my foreground because I felt the colors complimented the sky well (blue/purple and yellows tend to work well together) and the light play in the flowers also helped to guide your eye through the scene to the focal point at the back of the image.

Sony a7R, Canon 16-35mm F2.8L II, 16mm, F10, 1/50sec, ISO 100, multiple exposures for focus stacking and sunstar.

Choosing the correct foreground can have a large impact on the success of your image. I always try to choose a foreground that offers a complementary color palette to the other elements in the scene such as the sky or mountains. I also tend to look for elements that add depth and interest to the overall image without overwhelming the viewer- it’s a bit of a balancing act in regard to keeping the image dynamic yet visually pleasing. I also try to choose a foreground that offers a color palette that helps to ‘connect’ the overall image. When colors work well together they can really help to solidify an already aesthetically pleasing image.

Ted Gore recently published an excellent article on color theory that complements this article nicely. Using groups of colors that work in harmony and flow nicely can help to solidify an already robust composition and can add a whole new ‘layer’ of interest to the photo.

Articles: Digital Photography Review (dpreview.com)

 
Comments Off on Top tips for composing great landscapes

Posted in Uncategorized


15 Photographs from Ed Ruscha and the Great American West

16 Jul

I had a wonderful opportunity to attend the press preview on Thursday for the new exhibition “Ed Ruscha and the Great American West,” which opens today and runs through October 9th at the de Young Museum in San Francisco.

Ed Ruscha has long been a hero of mine. With my own photography focusing on the American Road and my background growing up in Los Angeles, so much of Ruscha’s work has always rung true to me personally and I’ve felt a certain sort of affinity with it. Gas stations, neon signs, old swimming pools, and the images of a uniquely American experience, fill the current Ruscha exhibition. Mixed in with these beautiful, nostalgic and iconic images are the words that further explain this modern life: “Honey . . . . I Twisted Through More Damned Traffic to Get Here,” “God Knows Where,” “Slobberin Drunk at the Palomino” I remember back in high school or was it college once watching X, or maybe the Blasters or the Knitters perform back at North Hollywood’s Palomino, my memory is hazy and alcohol likely was involved.

“In 1956, at the age of 18, Ed Ruscha left his home in Oklahoma and drove a 1950 Ford sedan to Los Angeles, where he hoped to attend art school. His trip roughly followed the fabled Route 66 through the Southwest, which featured many of the sights—auto repair shops, billboards, and long stretches of roadway punctuated by telephone poles—that would provide him with artistic subjects for decades to come.” This may be all the inducement you need to read to get you to this show.

Here are 15 photographs that I took on Thursday at the new exhibit representing my own interpretation.

Standard

Every Building on the Sunset Strip

A Particular Kind of Heaven

Slobberin Drunk at the Palomino

Honey . . . . I Twisted Through More Damn Traffic to Get Here

Hollywood

Poolside, Series of Nine Photographs

God Knows Where

Burning Gas Station

Hollywood, 19698

La Brea, Sunset, Orange, De Longpre

Texas

Ed Ruscha

15 Photos from Ed Ruscha and the Great American West-9

Ed Ruscha and the Great American West Exhibition Store

Complete 15 photo set here, but everything usually looks better on Ello. ?

More Ruscha here.

More de Young Museum here.


Thomas Hawk Digital Connection

 
Comments Off on 15 Photographs from Ed Ruscha and the Great American West

Posted in Photography


Paradise Found: Spend a Night Floating Above the Great Barrier Reef

05 Jul

[ By SA Rogers in Destinations & Sights & Travel. ]

Screen Shot 2016-06-30 at 6.55.49 PM

Better hope your kids remain firmly tucked into their Finding Dory-themed beds all night long lest they get a little too enthusiastic about leaning over the edge of this wall-free AirBNB floating over Australia’s Great Barrier Reef. The vacation rental company is offering one lucky family of four two free nights aboard their 2-bedroom, 1-bath open platform, with a beautiful white-curtained master suite on one end and the kids’ room tucked behind it.

Screen Shot 2016-06-30 at 6.56.07 PM

Screen Shot 2016-06-30 at 6.56.31 PM

The platform itself is pretty cool, taking advantage of the beautiful weather and pleasant temperatures of the area, not to mention the world-class snorkeling and scuba diving. If you want to win, you’ll have to submit an essay on why your family deserves to stay at the temporary rental, and your answer better “surprise and delight” the folks at AirBNB. The winner will be selected on July 4th.

Screen Shot 2016-06-30 at 6.56.39 PM


Screen Shot 2016-06-30 at 6.56.46 PM

“Imagine living atop a coral garden beside a sand cay in a billowing reef home on the Great Barrier Reef,” says AirBNB on the promo page for the contest. “You feel the pull of the unknown when you peek over the edge of the coral shelf and take in your neighborhood – home to 600 types of soft and hard corals, 100 species of jellyfish, 3,000 varieties of molluscs, 500 species of worms, 1,625 types of fish, 133 varieties of sharks and rays, and more than 30 species of whales and dolphins. And somewhere, beneath you, is the most famous Blue Tang in the world.” [The latter refers to the type of fish featured in ‘Finding Dory.]

Screen Shot 2016-06-30 at 6.56.13 PM

Screen Shot 2016-06-30 at 6.56.23 PM

Unsurprisingly, the contest is a collaboration between AirBNB and Disney Pixar’s Finding Dory, the animated film that’s likely set to wipe out the species of fish it highlights just as it did with clownfish back in 2003. In the years since ‘Finding Nemo’ came out, more than 10 million clownfish were removed from reefs for home aquariums, causing them to go locally extinct in places like Thailand. At least viewing tropical fish in their natural habitat at the Great Barrier Reef leaves them where they belong. Just don’t go throwing any trash overboard, please, kids.

Share on Facebook


[ By SA Rogers in Destinations & Sights & Travel. ]

[ WebUrbanist | Archives | Galleries | Privacy | TOS ]


WebUrbanist

 
Comments Off on Paradise Found: Spend a Night Floating Above the Great Barrier Reef

Posted in Creativity


Great Gear that’s Back in Stock

20 Jun

What did the camera gear say when it found itself in a pot of soup, again?

We’re back in stock!

A few of our favorite goodies are back in action in the Photojojo Shop. Grab ‘em while we’ve got ‘em!

(…)
Read the rest of Great Gear that’s Back in Stock (0 words)


© laurel for Photojojo, 2016. |
Permalink |
No comment |
Add to
del.icio.us

Post tags:


Photojojo

 
Comments Off on Great Gear that’s Back in Stock

Posted in Equipment


10 Tips for Great Butterfly Photos

20 Jun

Butterflies are wonderful subjects for photographs, but not always the easiest subject to shoot. You don’t have to wing it anymore, and let good shots be a product of chance. Follow these tips and you’ll come home with some great butterfly photos.

how-to-photograph-butterflies

1. Consider shooting with a telephoto macro lens

To shoot close-ups of butterflies, you’ll want to use a telephoto macros lens. To get great shots, you need to get close to the butterfly, and having a 100mm or longer macro will help. If you don’t have a macro, don’t be discouraged, you can still make great shots with your zoom lens, you’ll just need to shoot more of the environment, but you can make beautiful images that way too.

2. Find a location with flowering plants that attract butterflies

how-to-photograph-butterflies2

Specific plants, such as the butterfly bush, are known to attract butterflies. See if you can find a location in a park, zoo, or arboretum that has a flower garden with plants chosen specifically to attract butterflies. The more subjects you have to photograph, the better your chances are at nailing the perfect butterfly shot.

3. Pick a spot and wait for the butterflies to come to you

how-to-photograph-butterflies4

Once you’ve found your garden, find an area that seems to have a lot of butterflies around. While photographing butterflies in flight seems like a great idea, it’s pretty difficult, and it will likely leave you frustrated.

Take a minute or two and just observe. Butterflies seem to come back to the same flower over and over again. Just watch, then pick a flower and wait for the butterfly to come to you. I usually choose a flower that is in the shade. Harsh shadows take away from the beauty of the photograph. I also watch the background to make sure that it compliments the butterfly.

4. Use a monopod or a tripodHow-to-shoot-butterflies1

If you use a tripod, don’t lock it in. Leave the head loose, to give you some flexibility. I like using a tripod over a monopod for shooting butterflies. It helps me keep the camera in place and ready, and I can take my eye from the viewfinder as I watch and wait for them to come to my flower. Using a tripod also helps me to frame my photo ahead of time to keep the background very clean.

5. Shoot in manual exposure mode

In a situation like this, I prefer to shoot in manual mode. When I am focused on one particular area, the lighting, and therefore my exposure, isn’t going to change, or at least not very much. I like to shoot at least 1/500th of a second. I prefer to use a wide aperture for a narrow depth of field. But, if you are just starting out, give yourself a break by using an aperture that will give you more depth of field – f/8 would be a great starting point and you can adjust from there.

how-to-photograph-butterflies5

6. Focus on the butterfly’s eyes

Some photographers like to focus on the wings, I choose to make sure the eye is as sharp as can be, and if the wings fall off focus a little bit, that’s okay. It’s easier to use a bigger depth of field, like f/8 or f/11, so I encourage you to try that first.

I like to use a smaller f/stop in order to throw the background out of focus. It is much more challenging to shoot that way, but I like the effect it gives. It makes the butterfly really stand out from the background instead of blending in to its surroundings.

7. Shoot the butterfly in profile

how-to-photograph-butterflies6

If you are using a larger aperture, and shallow depth of field – shoot the butterfly in profile. That way, you have more of the butterfly in focus. I also love to see how the antennae stands out from the background, and love the details of their legs. Yes, there is beauty in the wings, but there is also an awe in those tiny legs that support the butterfly, as well as its tendril. Look beyond the obvious, to details for outstanding photographs.

8. Shoot tight as well as loose to capture the environment

how-to-photograph-butterflies3

Notice the differences between the photographs above and below. It’s the same species of butterfly, in the same field of flowers – but one shot is cropped tighter and one is framed looser, with more space around the butterfly. Both are successful. Take note in the top photograph, how the antennae are framed with the orange flower to make them stand out. If my angle had been such to have the darker green in the background, it may not have been as successful.

Also note that the orange in the wings mimics the orange flowers. Shooting great butterfly shots goes beyond just taking sharp photographs of wings!

how-to-photograph-butterflies7

9. Break the profile rule (above)

I love this photograph because it feels like this butterfly is moving forward, into a new place. The head is sharp and the lower wings fall out of focus due to the narrow depth of field, but in this case, it really works because it pulls out attention to the butterfly’s eyes, and into the photograph. It gives the viewer the feel of looking over the shoulder of the butterfly into some new place.

how-to-photograph-butterflies8

This photo is successful because it moves beyond recording what the wings look like and creates a mood and sense of movement and anticipation.

10. Have patience and have fun!

Beautiful butterfly photos take time and patience, but they are worth it. If you don’t get it your first time out, keep trying. It’s a great chance to hone your skills and you might get an amazing shot.

Please share your questions and butterfly images below and also remember to post them on the weekly challenge: Butterflies and Bugs happening here.

googletag.cmd.push(function() {
tablet_slots.push( googletag.defineSlot( “/1005424/_dPSv4_tab-all-article-bottom_(300×250)”, [300, 250], “pb-ad-78623” ).addService( googletag.pubads() ) ); } );

googletag.cmd.push(function() {
mobile_slots.push( googletag.defineSlot( “/1005424/_dPSv4_mob-all-article-bottom_(300×250)”, [300, 250], “pb-ad-78158” ).addService( googletag.pubads() ) ); } );

The post 10 Tips for Great Butterfly Photos by Vickie Lewis appeared first on Digital Photography School.


Digital Photography School

 
Comments Off on 10 Tips for Great Butterfly Photos

Posted in Photography


Six Essential Steps to Taking Great Photographs

05 May

Whether you have been creating photographs for years, or only for few weeks, your goals and dreams are to create great photographs that everyone will admire. You may notice this is not an easy task, and I’m sure that most of the time you experience more disappointments than successes. But don’t worry, I have for you six essential steps that will help you speed up the process, and give you confidence on your journey to these elusive great photographs.

Step 5 - Organise by eva polak

Step 1 – See

Seldom does a photograph succeed because of unusual technique or exotic equipment. Most of the time it succeeds for one simple reason – the photograph was well seen. So, to create great photographs we just need to learn to see better.

Unfortunately this isn’t as easy as it sounds. There’s more to seeing than just looking. It requires time and patience. Begin by concentrating on the objects before you; see how light strikes those objects; see colour, see quality and direction of light, see contrast, see texture, lines,forms and shapes, see details.

The strength of a photograph is directly related to how well, and how carefully you see things around you.

Step 1 - See by eva polak 2 Step 1 - See by eva polak

Step 2 – Feel

Feeling has to do with the emotions generated by a place or subject. Sometimes you need to just sit and absorb your surroundings. Listen to the wind and the birds. Smell the flowers. Feel the rough texture of the trunk you sit on. If you are photographing an animal, watch its movement and behaviour. If you are photographing people, listen to their words, and try to understand their feelings expressed by body language. You can’t photograph the smell of flowers, the sound of birds, or the feelings of a person, but the emotions generated by them can guide you in finding the essence of the scene or subject.

Step 2 - Feel by eva polak 2 Step 2 - Feel by eva polak

Step 3 – Think

This is the most important step in the process. Strong images begin in the mind, not in the camera. Before you begin photographing ask yourself, “Why am I about to take this photo?”

Think about how you will use that sensual input and combine it with your camera, the lighting, and the mood. Is the lighting the best? Would soft, overcast light work better? What about angle of view? High angle? Low angle? Which lens will give the effect you are after? What about shutter speed and aperture?

Answering all these questions is very easy when you have a clear idea of why you want to take an image. Your choices will be completely different when you want to just record your holiday, as opposed to capturing the warm glow cast over the scene by the evening light.

Step 3 - Think by eva polak 2 Step 3 - Think by eva polak

Step 4 – Isolate

Many good shots have been spoiled through poor composition. We tend to concentrate our attention on the subject of a photo, remaining oblivious to what is going on beyond. Make a habit of spending just a second or two before pressing the shutter, checking the viewfinder for any unwanted elements. Get rid of those chaotic objects in the picture. Simplify. Isolate only those elements that convey the message you are trying to express. Emphasize the strong lines, shapes, patterns, textures or colours – but not all of them at once. Be bold and decisive. Ask yourself why. What does it contribute to the overall image? Can you make it stronger by isolating even more? Would you hang that picture on your wall? If not, why not?

Step 4 - Isolate by eva polak Step 4 - Isolate by eva polak_2

Step 5 – Organize

Having isolated carefully, you now need to organize or arrange the elements in the strongest possible way. Where should you place the subject in the frame? In the centre? If so, why? The arrangement may be too boring or static, or on the other hand, it may convey a sense of peacefulness. Or should you put the subject near the edge of the frame? What about the picture orientation itself? You have a choice of creating a vertical or a horizontal image. Which is best for the subject? Vertical orientation tends to emphasize vertical lines or the height of things. Horizontal orientation can give emphasis to sweeping panoramas or the movement of subjects. When you make these choices, always by guided by the message that you are trying to express.

Step 6 - Experiment by eva polak Step 6 - Experiment by eva polak_2

Step 6 – Experiment

Digital photography makes it easy to experiment because you have instant feedback on the LCD screen. Look for new ways to portray familiar subjects. Don’t always photograph the same kinds of scenes in the same ways. Be creative, try different lenses or compositions or angles of view. Play with light. Investigate, explore, observe, evaluate. Don’t be afraid to make mistakes, and above all, have fun!

googletag.cmd.push(function() {
tablet_slots.push( googletag.defineSlot( “/1005424/_dPSv4_tab-all-article-bottom_(300×250)”, [300, 250], “pb-ad-78623” ).addService( googletag.pubads() ) ); } );

googletag.cmd.push(function() {
mobile_slots.push( googletag.defineSlot( “/1005424/_dPSv4_mob-all-article-bottom_(300×250)”, [300, 250], “pb-ad-78158” ).addService( googletag.pubads() ) ); } );

The post Six Essential Steps to Taking Great Photographs by Eva Polak appeared first on Digital Photography School.


Digital Photography School

 
Comments Off on Six Essential Steps to Taking Great Photographs

Posted in Photography